The funny thing about Photoshop is that just when you get the hang of using a tool a certain way, you learn that there are about a hundred other ways to use the same tool. I’ll admit, it can be overwhelming at times. The trick is to flip through the various methods of using something and then to apply the methods that are either the most comfortable or the most efficient for you.
The zoom tool and the hand tool go hand-in-hand (no pun intended) with each other. If you’ve ever worked in Photoshop, you’ll most likely agree that one of the very first things you do after opening a document is to size it to your liking. If it’s a large image, you may want to zoom in on it to check out its detail. If you do this, you’re likely to navigate around it a bit to view different areas. This is where the zoom tool and the hand tool come into play.
In this post, I’m going to do my best to cover the oodles of methods of changing the viewing size of your documents inside of Photoshop. I’ll also discuss the almost as many methods of navigating your document. And just to let you in on a secret – you can accomplish both of these tasks with keyboard shortcuts and panels, which is much faster than using the tools.
Zooming In On & Out Of An Image
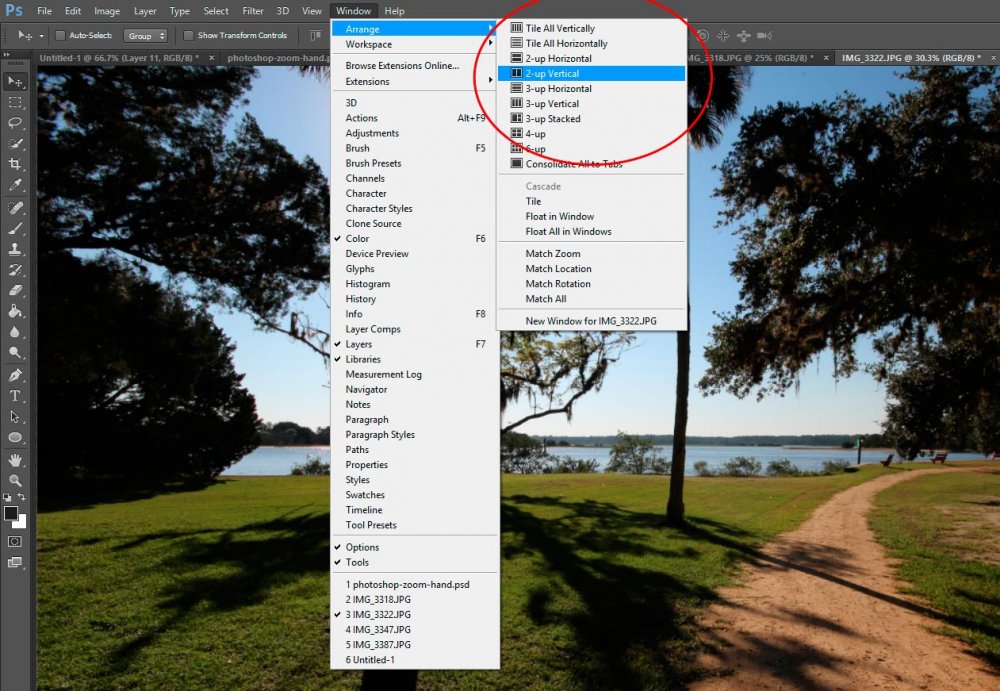
Before I begin, I’d like to point out which tools I’ll be covering in this post as well as where the options for each of these tools reside in our Photoshop workspace. Please take a look at the screenshot below.

In the screenshot above, I circled two areas in red. The lower area contains the two tools we’ll be discussing. The hand tools (shaped like a hand) is the one on top and the zoom tool (shaped like a magnifying glass) is the one on the bottom. Towards the top of the screen is another red circle that contains what’s called the “Options Bar.” When you click on a tool in Photoshop, chances are that a menu specific to that tool will appear in this area. You need to keep an eye on it because it’s constantly changing and much of your power in this application will be derived from your tool’s available options.
Now that we’ve got that out of the way…
I’ve already opened a photo in my workspace. As usual, I want to see a larger view of it. In general, my first inclination is to see how clear I captured my shot. If you take a look up at the tab for this photo, you’ll see that it’s opened to only a 25% sized view. To check out its clarity, I need at least a 100% view.
To zoom in on an image, I can head down to the “Zoom” tool and click on it. After that, I head up to the zoom tool’s options bar and be sure the left magnifying glass is chosen – the one with the “+” in the middle of it. Lastly, I can click on my image to enlarge it.

If I continue to click on the image, I can zoom all the way into a 3200% view, which shows my image pixel by pixel. This is a pretty neat view, if you ask me.

To get back down to a reasonable size, I can simply click on the other magnifying glass – the one with the “–” in it and then click on my image once again. This will shrink my photo.
Now, clicking on my image continuously with the zoom tool isn’t the only method of acquiring a larger view of it. I can also click once and hold down on a particular area. If I do this, Photoshop will assume that I want to take a closer look at that one area and will keep it in the field of view while simultaneously making the entire image larger.
Moving on – if I head up to the zoom tool’s options bar and click on the “Scrubby Zoom” check box, I can drag my zoom tool to the right on my image to enlarge its view.

And to zoom out of the image, simply drag the zoom tool to the left.
Another method (of the many) of zooming in on an image is to (after the Scrubby Zoom option is unchecked) click and drag on a particular area of the image. If I do this, I’ll see that something that looks like the crop tool appears and when I let go of the mouse key, my image will zoom in right on that area. Take a look at what I’m talking about in the red circle below.

Here is the result after I let go of my mouse.

I’m going to be honest with your here when I tell you that I very rarely use the zoom tool to zoom in and out of an image. Since the very beginning of my Photoshop days, I always used the keyboard shortcuts, which are “Ctrl +” and “Ctrl –” (I’m sure you can figure out which does what). It’s super fast to make images appear larger and smaller by taking advantage of these shortcuts.
If you’ve been exploring the options bar, you’ve probably seen the three buttons that are located on the right side of it. Those buttons are “100%,” “Fit Screen” and “Fill Screen.”

These buttons are especially helpful if you’re really zoomed in on an image and would like to get out fast. If this is the case, all you need to do is to click on the button of your choice and the image will shrink down to something manageable. Now, a corner case here would be if you’re looking at a zoomed out view of an image and you click the 100% button. If you’ve got a large photo, you may zoom in on it. I suggest you toy around with these buttons for a while to see how advantageous they can be.
Navigating an Image
Once your image is nice and zoomed in, you’ll most likely need to explore it a bit. To do this exploring, there are many options and as you may be aware, we’ve covered some of them in the previous section. By clicking and holding the zoom tool as well as by clicking a dragging it, we navigated to a particular area. Those are sometimes clumsy though and oftentimes, we need a more elegant solution.
One of my favorite methods of navigating a zoomed in photograph is by using the scroll bars found on the bottom and right sides of the image window. I can click and move the bars around until my image is set where I want it. (In the screenshot below, you’ll notice that I’m using a new photo. I was getting tired of the last one.)
By the way, the photos I’m using in this post were taken in “Washington Oaks Gardens State Park” in Palm Coast, Florida. I lived in Palm Coast for about six months, and this park was definitely a highlight.

While the scroll bars are helpful for moving up, down and side to side, I confess that I use the roller on my mouse for most of my up and down movement.
If you head up to the “Window > Navigator” menu and give it a click, you’ll see a new panel open. When it comes to navigating around an image, this panel brings some magic to your workflow.

Upon opening the navigator panel, you may notice it’s a bit small. For many scenarios, this is fine. For me though, I like the navigator panel large, so I can see what I’m doing. In order to make the panel bigger, I click and drag either the left or bottom edges or the lower left corner. Check this out.

You may have seen this panel small, but I’m not sure you’ve seen it large like this. How cool is that? And to navigate your image, all you need to do is to click inside the image somewhere. If you click outside the red box, the image will jump to that area. If you click inside the red box and hold your mouse pointer down, you can drag your image where you’d like to see it.
Getting to the second half of the title of this post, I’m going to introduce the “Hand” tool. As I mentioned earlier, the hand tool is located directly above the zoom tool over on the toolbar and by clicking it, another options bar is exposed.

While this options bar doesn’t offer all too much, the hand tool is fun to play with and to use to navigate an image. If you click and drag with this tool, you can incrementally re-position your document to where you see fit. If you’ve got a huge document or have it zoomed in really far, you can click, drag and let go fast. In the Photoshop world, this is called “Flicking.” Go ahead and give it a shot. Remember, click down, drag in any direction fast and as you’re dragging, let go. I’m sure you’ll get the hang of it and when you do, you’ll see that by flicking an image with the hand tool, you can navigate it quite quickly.
Working With Multiple Images
Many times, while working in Photoshop, you’ll find it necessary to zoom in and out and navigate multiple images at once. This is particularly true if you’ve taken similar photos and would like to analyze them simultaneously. Luckily, we can easily zoom, navigate and compare images, all at the same time, by taking advantage of a few tools at our disposal.
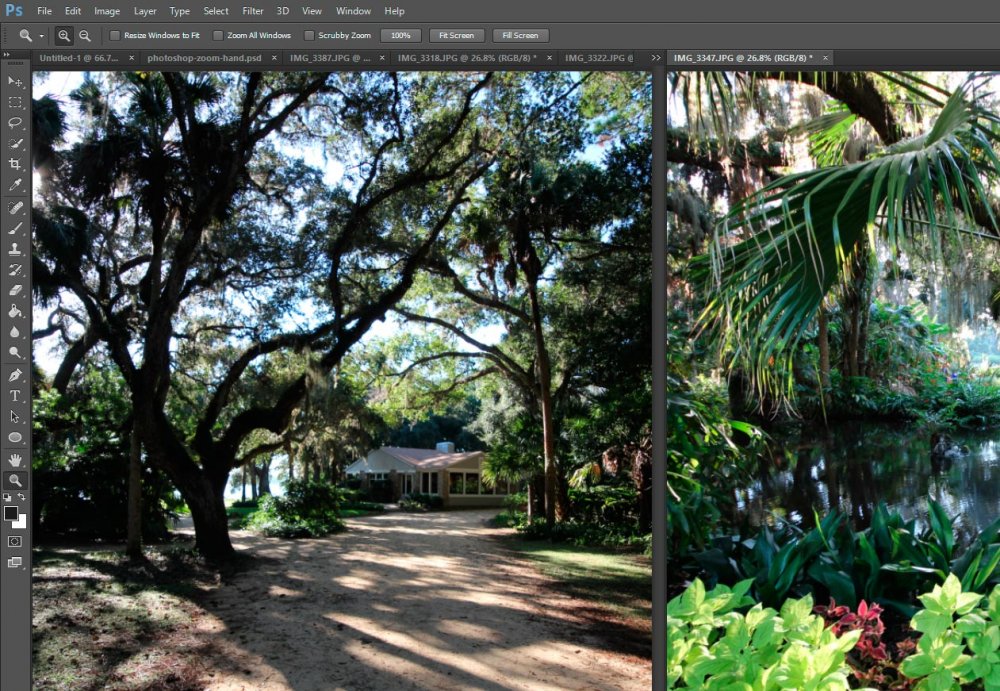
For this example, I’m going to use the “Window > Arrange” menu to fit two of my sample images side-by-side. FYI – you can arrange your images any way you want and use the same methods as I do below. Things will work the same.
Now, if you click either the zoom tool or the hand tool and look up to their respective options bars, you’ll see some check boxes. For the zoom tool, you should see a check box labeled “Zoom All Windows” and for the hand tool, you should see a check box labeled “Scroll All Windows.” If you check these boxes, you’ll find that you can perform many of the earlier mentioned tasks and have those tasks locked across your multiple images. What I mean is that, if you want to zoom multiple images simultaneously, you can do so by zooming only one image in your arrangement. The same is true for navigating with the hand tool. All you would need to do in this scenario is to drag around one image and any in your arrangement will mimic the actions of that first one.
If you ever get lost with your zooming and navigating of multiple images, you can use a few menu selections to get you back on track. If you go up to the “Window > Arrange” menu again, you’ll see some more options. The ones I’m referring to here are “Match Zoom” and “Match Location.” If you click either of these, your images will sync up to match either size percentage or location in the window with no more necessary action from you.

Using the Rotate View Tool
If you’re an illustrator, you’ll find this last tool in today’s cluster of tools very handy. It’s called the “Rotate View Tool” and it can be found right behind the hand tool. What I mean by “behind” is if you click and drag the hand tool out to the right, you’ll see a small drop-down appear. From there, while still dragging, if you move down and highlight the rotate tool, you’ll have selected it.

Now, all the rotate view tool does is rotate the canvas of your document, which allows you to sketch or draw at the angle you’re used to drawing or sketching. Once you use this tool, I’m sure you’ll see its many benefits.

With every tool comes an options bar. If we take a look at this one, we’ll see that we can, not only rotate our canvas by dragging it with our mouse, but also type in the angle we’d like. We can set the angle we’d like by using the small circle as well. If we want to straighten our image back to its original orientation, all we need to do is click the “Reset View” button and if we’d like to apply our rotation to all arranged windows, simply check off the “Rotate All Windows” check box. It’s that easy. If you’ve enjoyed today’s post and found it helpful, please share it with a friend. Thanks!
Leave a Reply