Adobe Lightroom is the go-to program for photographers. Between Lightroom and Photoshop, it’s possible to create world class images for display on the web or in print. So, if you’re a photographer and if you’ve ever been interested in learning about Lightroom, this is your chance.
In this post, I’m going to discuss one of the very first tasks you’ll complete when launching Lightroom. That task is importing a photo collection. Now, while you’ll initially do this just once, you’ll also continue to perform this function over and over and over again, so it’s important to read this post carefully and save it for later use.
Locating Your Photos
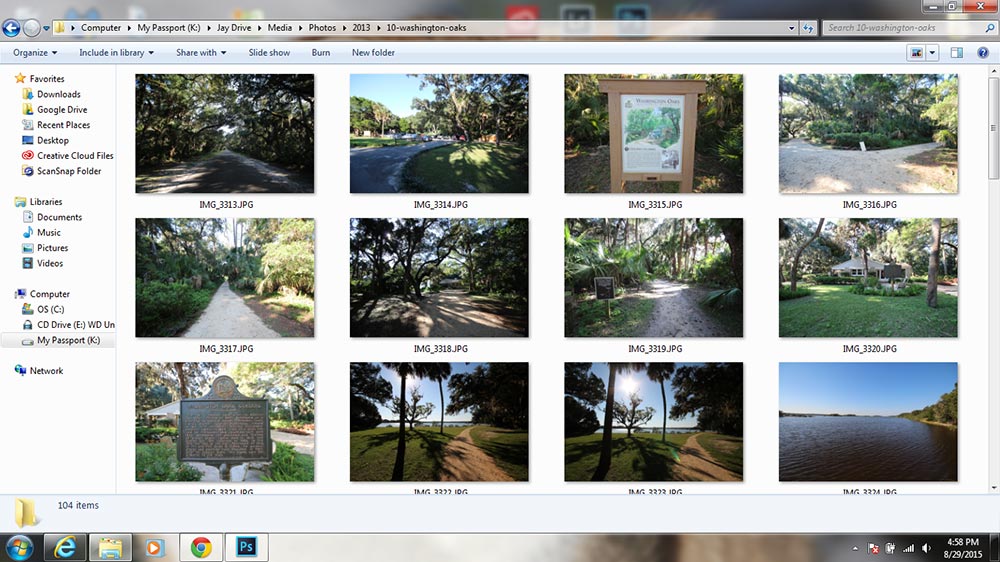
If you read the post regarding where photographers store their photos, you know exactly where yours live. In my case, I’ve got the photo collection that I’d like to import already pulled off my camera. Actually, this particular collection is a few years old. It’s located on my external drive, in “Jay Drive > Media > Photos > 2013 > 10-Washington-Oaks.” If you have your photos still on your camera, go ahead and copy them over to your computer or external hard drive. They should reside in their permanent home. In this tutorial, we’ll be working from there. In later posts, I’ll discuss exactly how to go about importing pictures to Lightroom directly from either your camera or card reader.
Launching Lightroom & Clicking Import
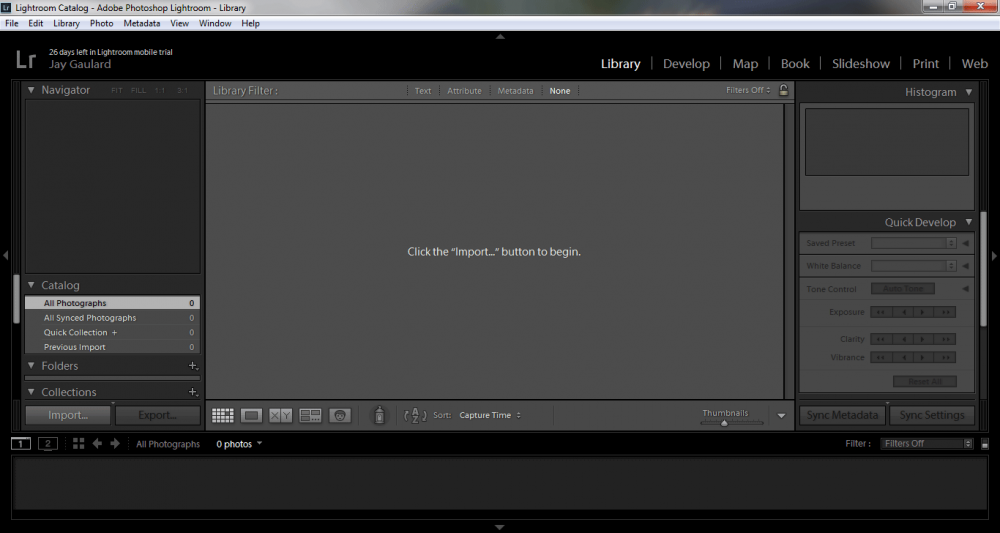
Now is when you should launch Lightroom, if it’s not already open. If you’re running the latest version (2015 CC), the interface should look like this:
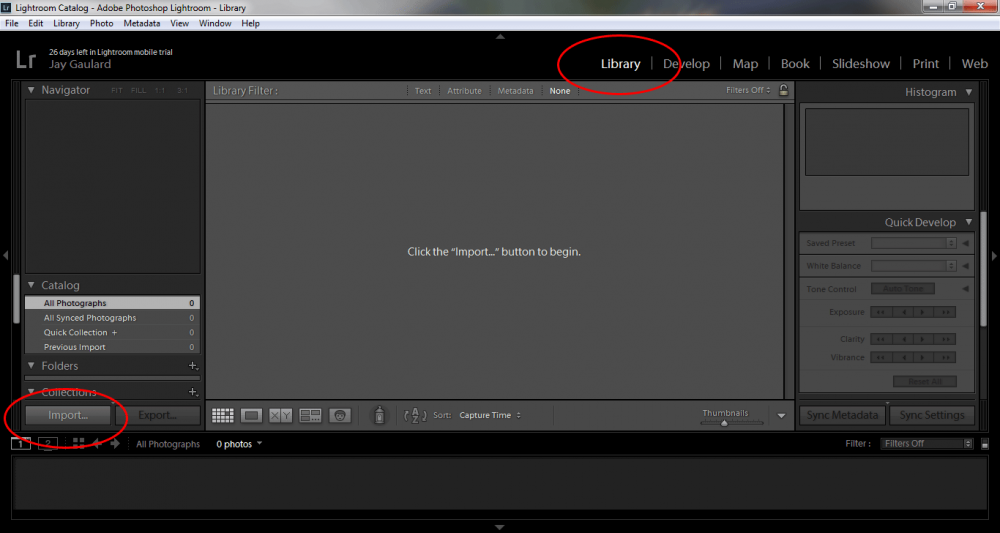
I want you to take a look at a few things in the next two images. I have what I’m about to discuss highlighted.
After you open Lightroom, be sure to click the word “Library” in the upper right area. After you click Library, then click the “Import” button that’s found in the lower left area.
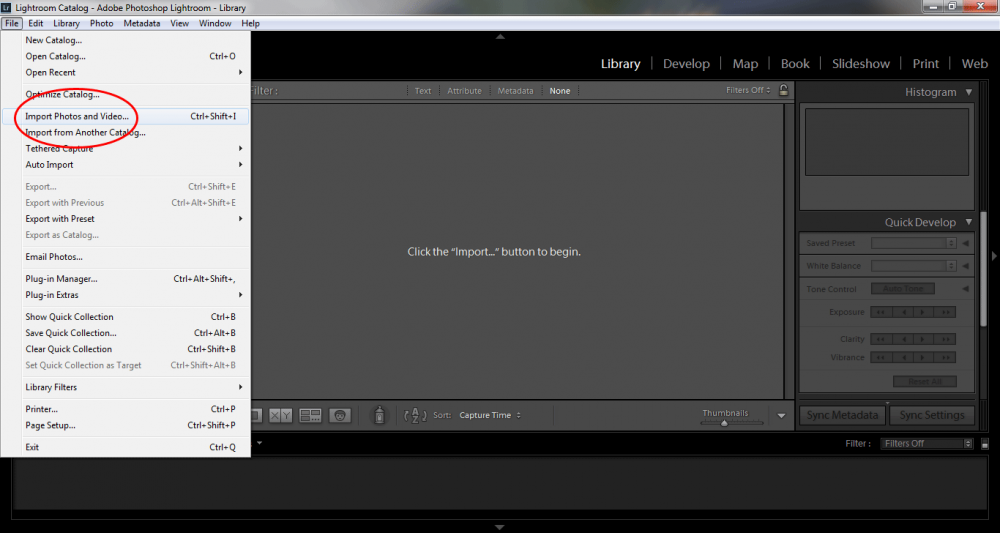
If you’d prefer, instead of clicking the “Import” button, you can alternatively click the “Import Photos and Video” from the “File” menu at the top left corner of the application.
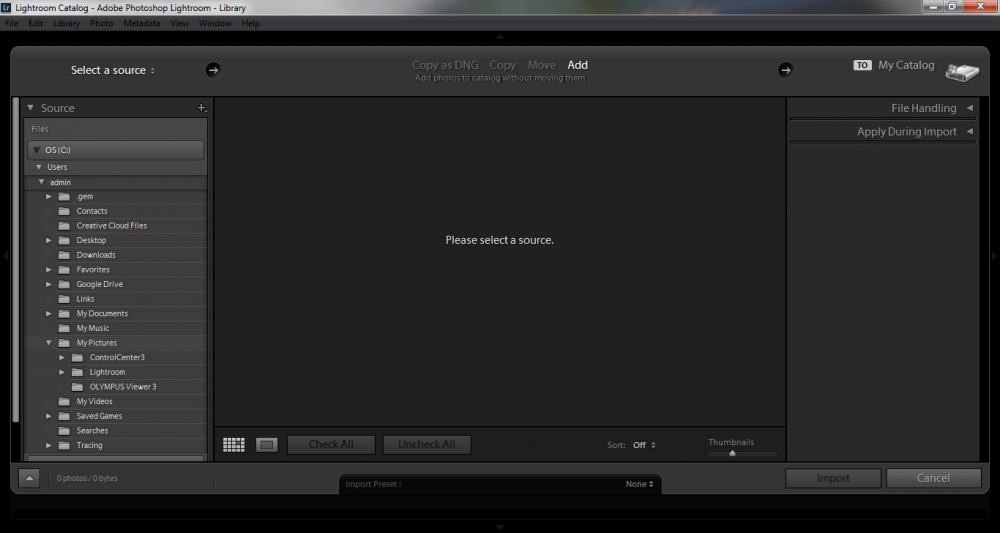
After you click Import, you should see the import dialog that looks like this:
Choose Your Photos
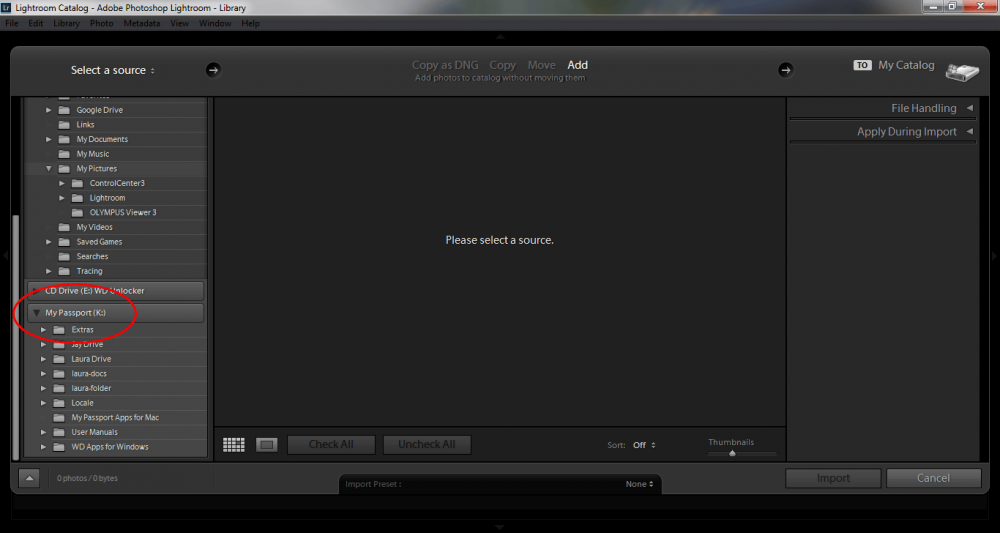
This next part is really easy. Working from left to right in the import dialog, we want to find our image collection and see what we’ve got in there. So, in order to locate our photographs, we need to do a bit of navigating. If you’ve got your files stored on your local drive, then go ahead and browse through that location. It’ll most likely be the first drive listed in the “Source” panel. Since the photos I’ll be working on are located on my external hard drive, I need to navigate a bit further down to the “My Passport (K drive)”.
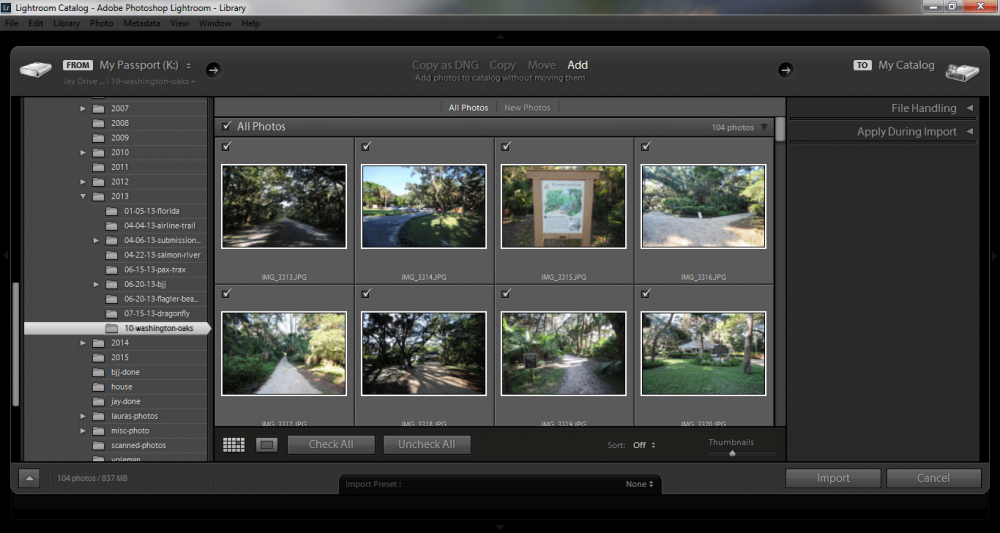
After I do some navigating through the folders I outlined in the “Locating Your Photos” section of this post, I find my images. I click the folder they’re stored in and they appear in the center panel.
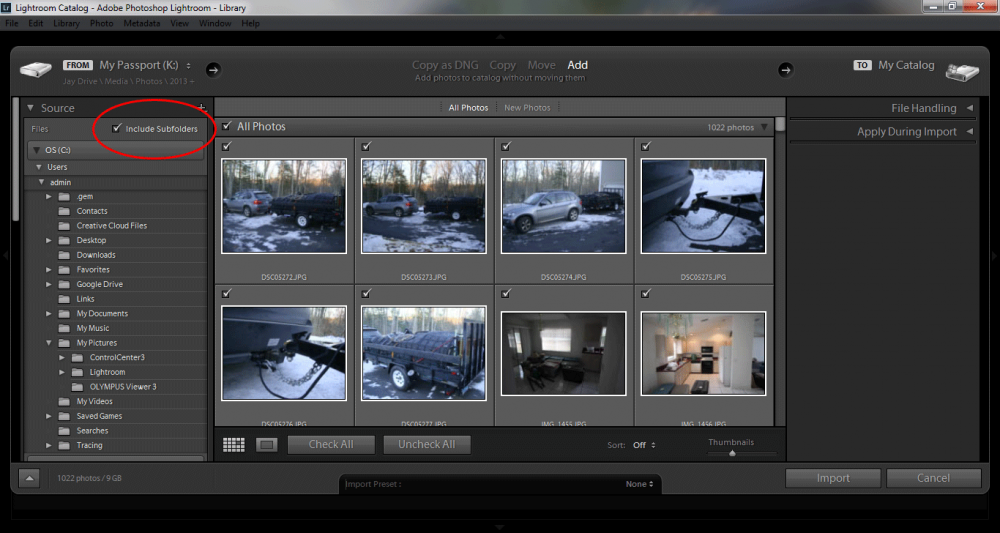
Now, there’s a small caveat when clicking around in the Source panel. If you have a good number of folders that all contain images and would like click the top folder to view all images in the sub-folders, you need to be sure to check off the “Include Subfolders” check box located at the top of the Source panel. If you don’t check this box, you’ll still have the ability to view your photos, but you’ll have to click each folder to do so. You won’t have an overview of all images in all folders at the same time.
Adjusting Thumbnail Size
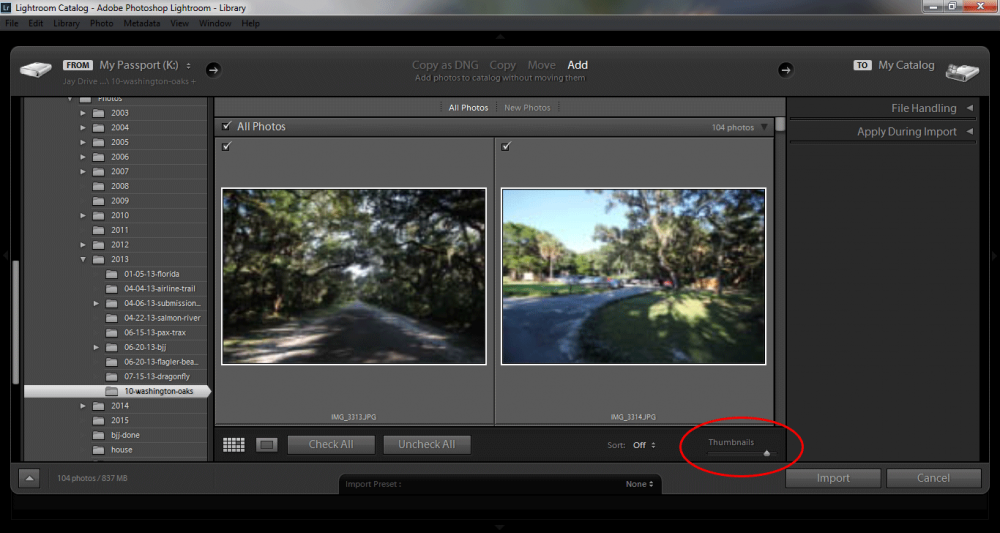
Once you have your folder chosen and see your images, you might decide that you either want to view more images or fewer images at the same time. By moving the “Thumbnails” slider from left you right, you can shrink or grow each thumbnail in your collection.
Selecting Thumbnails
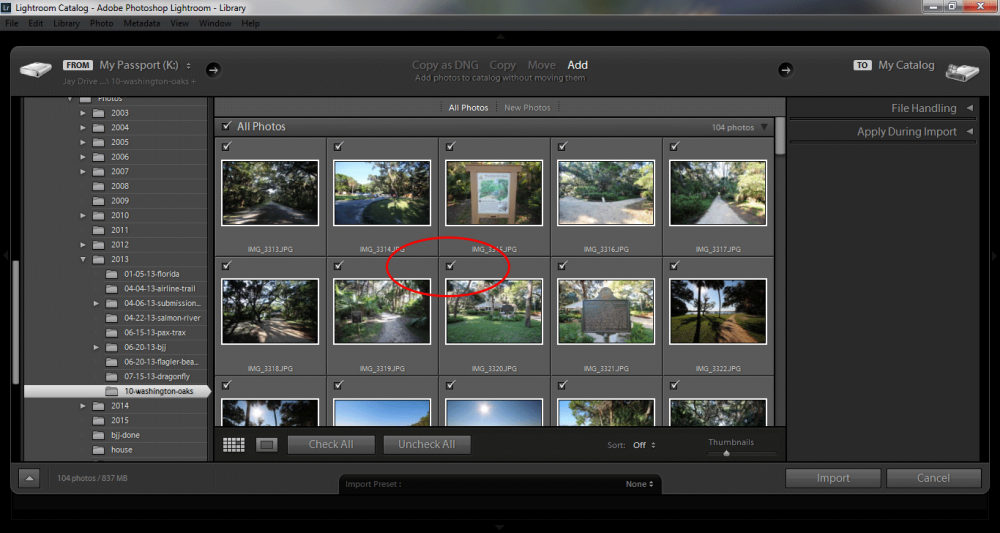
Also, while looking through your photos, you might decide that you don’t need each and every one of them imported to Lightroom. If you take a look at your image thumbnails, you’ll see that there’s a small check located at the top left of each image. By default, all images are checked. If you would like to import all files, simply keep them checked. If you would like to exclude some photos, uncheck the ones you’d like Lightroom to ignore. If you’d like to perform a mass unchecking or a mass checking of your images, simply use the “Check All” or “Uncheck All” buttons below the thumbnails. From there, you can check and uncheck as you desire.
The Larger Preview
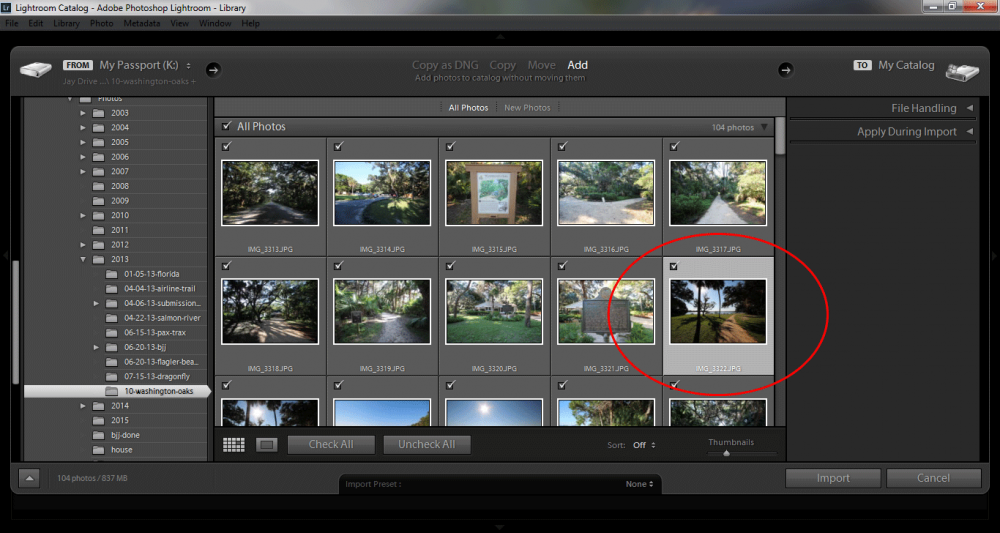
Here’s something fun. Say you don’t really have a great view of your thumbnails and would like to take a closer look at the images you’re considering for import. Instead of heading back to the original folder where the images are stored, all you need to do is click the thumbnail you’re interested in. In my case, I would like to take a closer look at an image I think has some nice shadows in it. Notice how the grey box around the thumbnail lightens after I click on it.
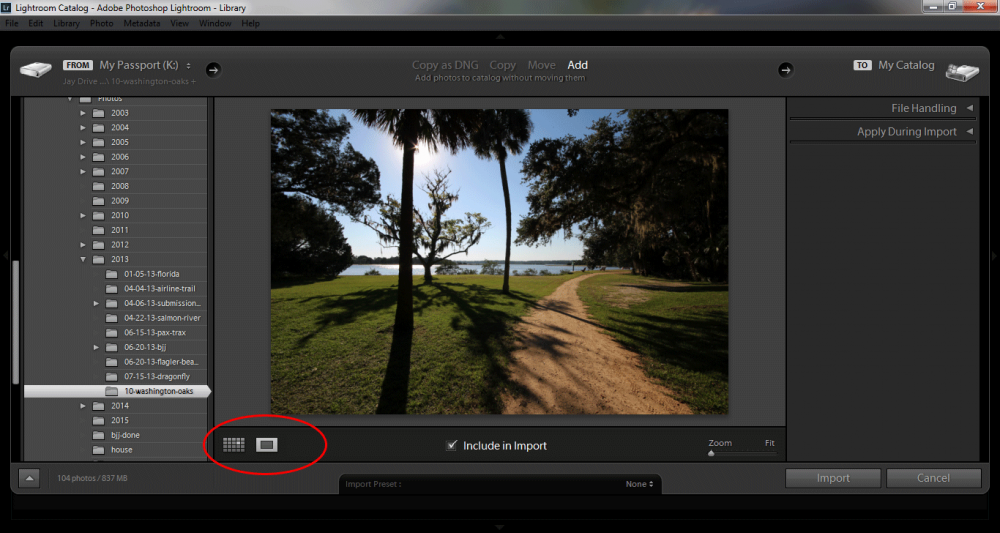
After I select the thumbnail I would like to see a close up of, I need to click on the “Loupe View” button located under the thumbnails. By doing this, my thumbnail will grow in size, which will allow me a closer view (and a higher quality one than simply sliding the thumbnail slider).
File Handling
Once we finish up with the center column, we need to head over to the right column to tell Lightroom exactly what we’d like it to do with the files we’ve chosen for import. If you haven’t already, click the small triangle next to the words “File Handling” in the right column to expand that box.
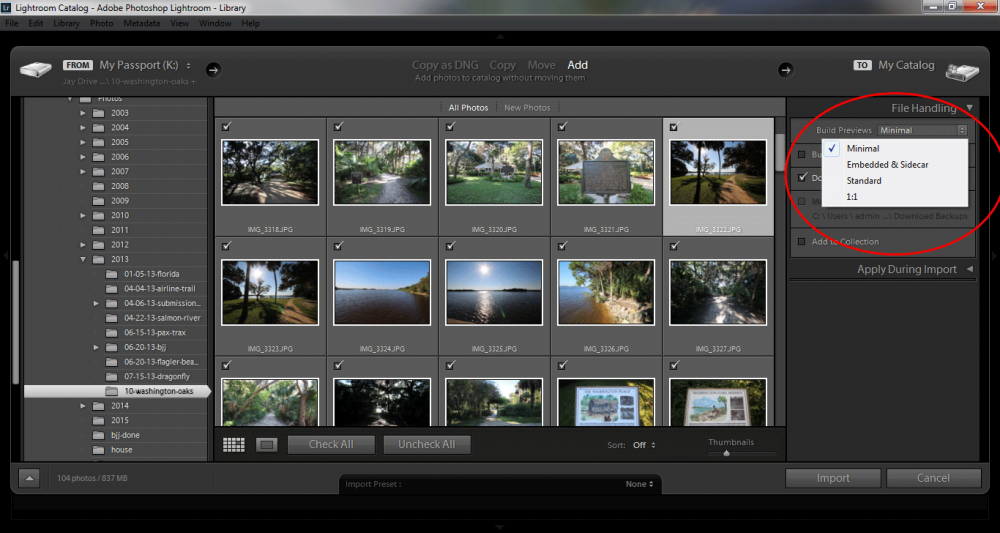
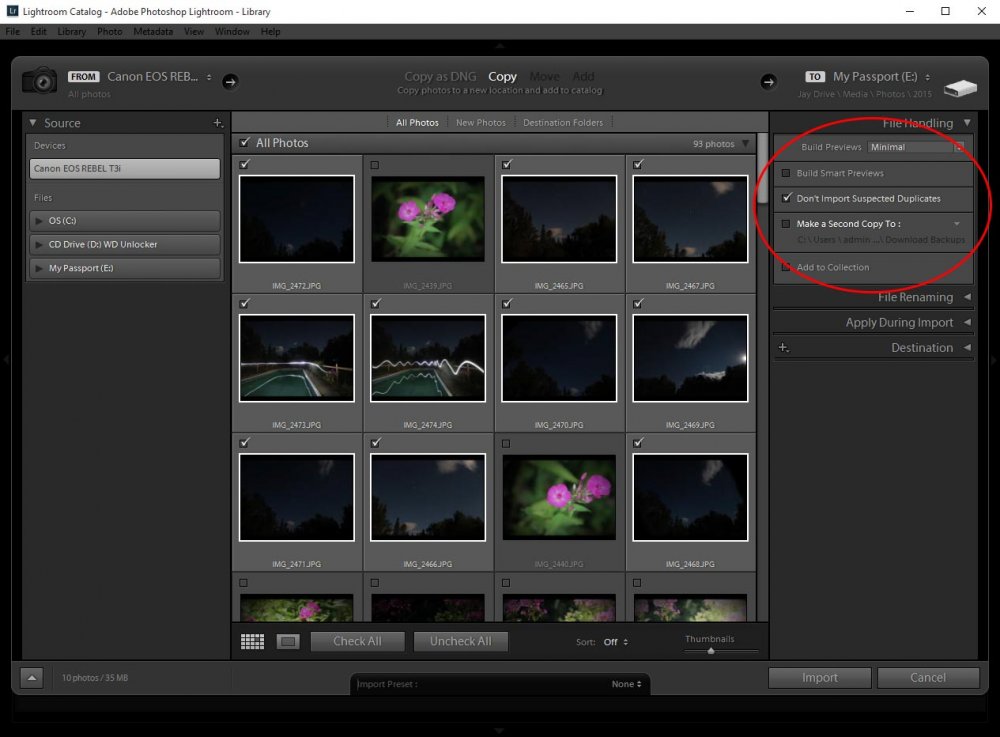
After you expand that box, you’ll see you’ve got a few choices to make. The first one is what quality you’d like Lightroom to import your images as. From the “Build Preview” dropdown box, there are a few alternatives.
Minimal: This choice just imports light version thumbnails to Lightroom after you click the “Import” button. If you’d like to work on each thumbnail individually at a higher quality later on, all you need to do is double click the image in question, wait a few seconds for Lightroom to pull in the higher quality version of that file and you can then do what you’d like to it.
Embedded & Sidecar: This choice uses low-resolution JPEG thumbnails from your high-quality full size photos to import. After loading them, Lightroom will begin loading higher quality thumbnails, which are still lower quality than the full sized photos.
Standard: If you’ve got time, you can use this option, which imports higher quality previews from the get-go. Once they’ve imported, you can begin clicking around to see your images at a higher resolution without waiting.
1:1: After importing the smaller preview thumbnails, this option begins bringing in the highest quality previews as to limit your waiting time after clicking a thumbnail. This option is extremely slow to initially load and uses a lot of space in the Lightroom database, so I suggest you use special care when choosing this option.
Smart Preview & Duplicates
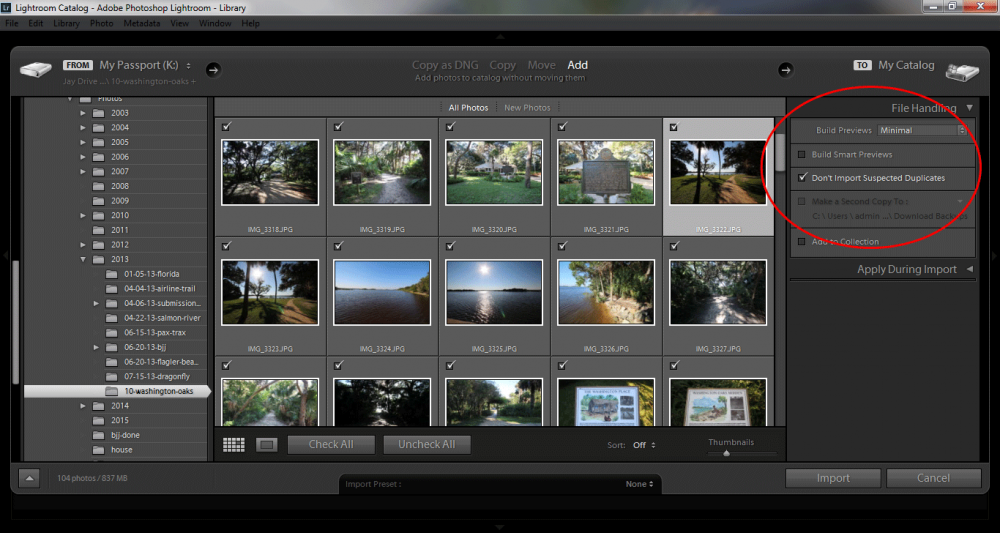
If you use an external hard drive and work on a laptop, you may want to take advantage of the “Build Smart Previews” option. What this option does is import preview images to your Lightroom database, so you can work when your external hard drive is disconnected. Since this option takes up additional space, only use it if you’re working under these conditions. If you’ve always got access to your local drive or external hard drive, keep this option unchecked.
Directly under that option is another one called “Don’t Import Suspected Duplicates.” Folks usually keep this box checked because it prohibits importing duplicates of the same images. If you do end up importing duplicates, the thumbnails of those duplicates will display as grey.
Importing Your Photos
For now, I’m going to ignore a few of the remaining options because I plan to discuss them at greater detail in later posts. At this point, I’m going to click the “Import” button at the bottom of the right column and wait for my collection to be imported to Lightroom. Once it’s finished (which it is now), it’ll look like the graphic below.
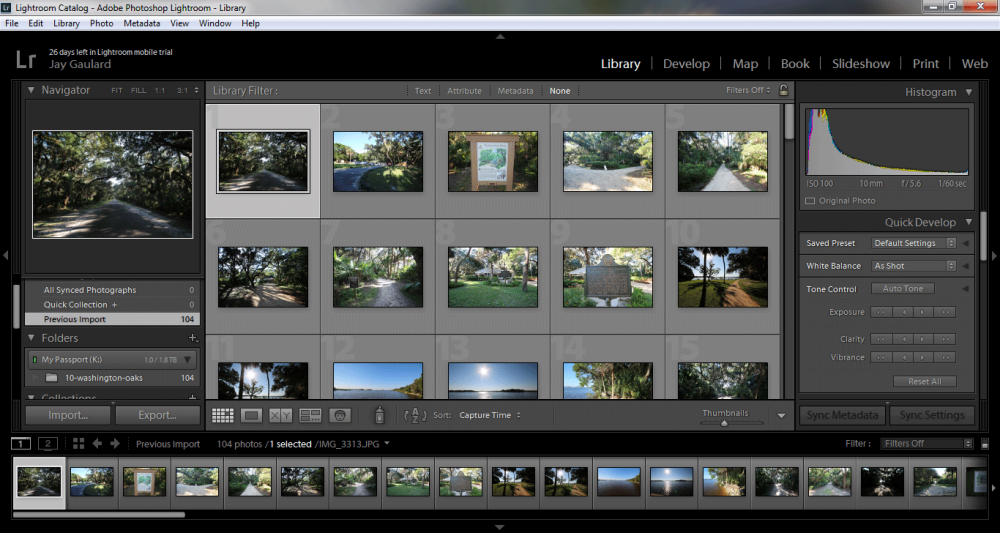
And there you have it, photographs that are imported to Lightroom.
A Few Notes
I do want to mention a few things about this post. First, for the example collection, I imported JPEG files. The true power of Lightroom comes from editing RAW files. I simply used JPEG files because they are smaller and easier to deal with. If I were to actually take the time to use Lightroom to enhance my photography, I would definitely shoot my photos initially in RAW format.
Second, to keep the screenshots as clear as possible, I used my laptop screen, which is a 15.6″ format. When editing in Lightroom, you’d most likely want to use a larger monitor. Things won’t be so compact on a larger monitor and you’ll have much more fun. When I do my editing, I use a 27″ monitor.
Importing Photos from Camera into Adobe Lightroom
I know I just wrote a post above that talks about how to import photographs into Lightroom. The thing is, in that section, I kept things simple. I pretended that you had already taken all your photos off your camera and had them situated neatly on either your local hard drive or your external drive. Nowhere in that post did I discuss how to import your photos directly from your camera into Lightroom and then save those same photos on the hard drive of your choosing. I’m here today to correct that and let you in on all the details of how to accomplish this task. And the good part is, it’s really not all too difficult.
There’s a benefit to working directly from your camera. For starters, it’s efficient. At its core, Lightroom is about organization and optimization. If you’re removing all your recent photo shoot’s photos from your camera, storing them in a folder on your hard drive, looking through them to filter out the bad ones and then importing what’s left into Lightroom, you’re sort of bypassing a lot of Lightroom’s functionality. That’s what Lightroom is for – to organize and filter and all that. So why not use it for how it’s meant to be used?
In this section, I’m going to talk about how to find the photos you’d like to import from your camera, how to import them as working copies into Lightroom and then how to store them in a folder on your hard drive that you created right from the inside of Lightroom. For the sake of brevity, I’ll skip some of what I already covered in my previous post, so it may be beneficial to read both.
Locating Photos
If you’ve got Lightroom open on your computer and if you’ve got your camera plugged in or your memory card in the reader, after you hit the “Import” button in Lightroom, you should notice something like this image below.
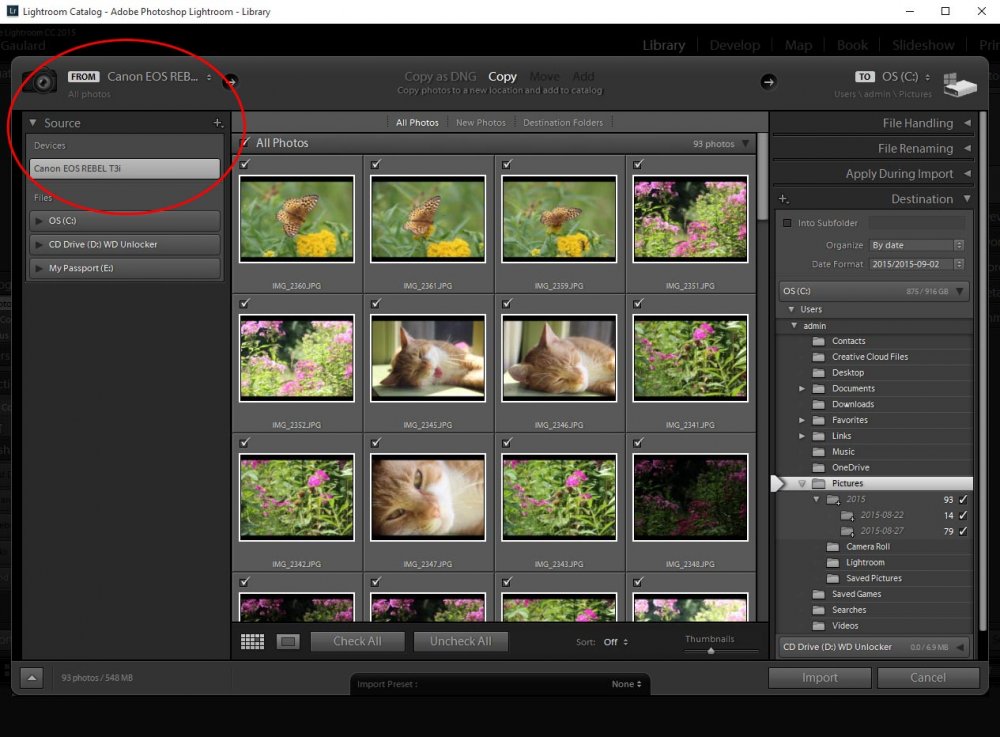
Inside the red circle, my camera drive is automatically displayed as the drive to import from. Lightroom figures that if you’ve got the camera plugged in, it’s the drive you want to work from. As you can see, if you’re not interested in pulling the files from your camera, you can easily choose from alternate hard drives below. In my case, my drive options are my local C: drive as well as my external E: drive.
Copying Files
Now that we’ve got our source defined, we need to turn our attention to the center box, right above the thumbnails. If you take a look up there, you should notice a few options. They are “Copy As DNG” or “Copy.” Whether you choose to copy over your images and change them to Adobe’s DNG format or simply copy them as they are is up to you. I’ll be writing posts later on that cover exactly what DNG files are and how they can be advantageous to your workflow. For the purposes of this post, I’ll be copying my files over as they are (which happen to be JPEGs).
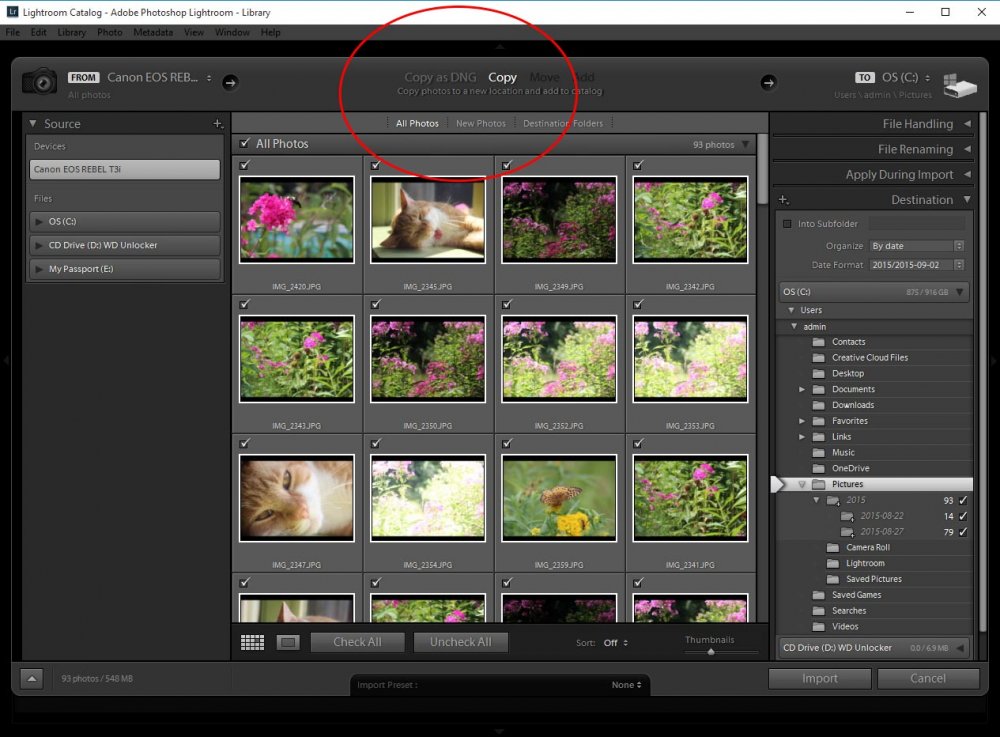
As a side note – when you choose either Copy As DNG or Copy, all Lightroom is doing is making copies of the images you would like to use and placing them on the hard drive of your choosing. Lightroom doesn’t alter or remove the images that you’ve got stored inside your camera.
Sorting Images
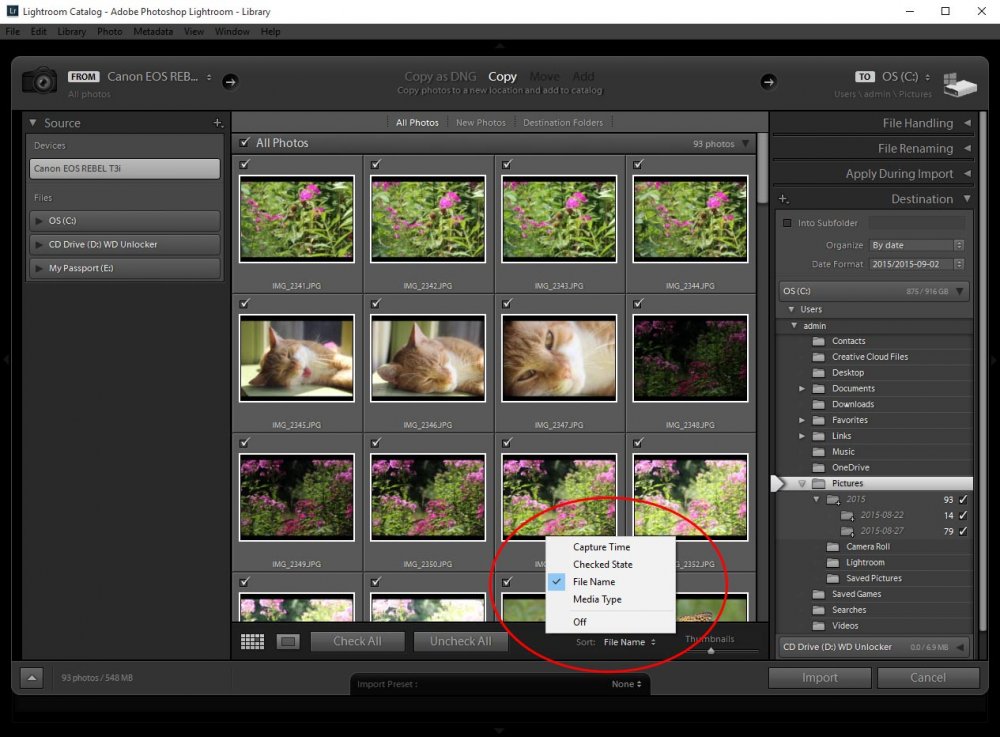
If you’ve been shooting all day, you’ve probably got tons of images stored on your camera. If you attempted to view all those images in Lightroom without some sort of sorting option, you’d most likely have a tough time. Luckily, we do have a sort option available to us and it can be found right below the thumbnails. If we click on the “Sort” arrows, we can see a few choices. They are “Captured Time,” “Checked State,” “File Name,” “Media Type” and “Off.” The default value is off, but when I view my images, I like to sort them by File Name. This is simply because as I take photographs, my camera names each file in succession, meaning 1, 2, 3 and so on. So, when viewing my images, I can see then in the order I took them.
Filtering Files
Let’s say that you take a few shoots in one day and that, throughout the day, you run inside to your computer to check out what you’ve taken. Each time you come inside to see what you’ve done, you import your most recent photos. By the time the end of the day rolls around, you’ve got hundreds and hundreds of photos on your card. Obviously, this can be overwhelming to look at on a computer screen.
The nice thing is, Lightroom’s got a really neat feature that will allow us to filter through the photos on our card. If we’ve already imported a batch, or a few batches of photos, Lightroom can pick up on that.
Take a look at the three options that are located directly above the thumbnails.
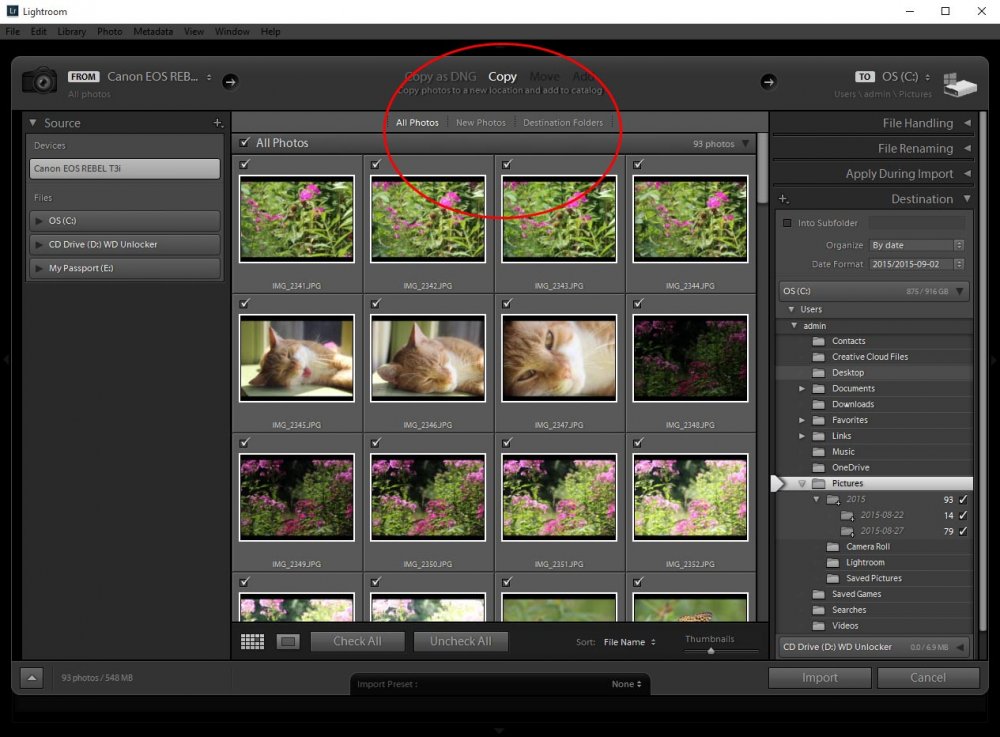
These options include “All Photos,” “New Photos” and “Destination Folders.” So, as I mentioned above, if you’ve already imported some photos, you can move from the default “All Photos” and click on “New Photos” and have all those previous images filtered out. Like I said, this is a really neat feature. If you choose “Destination Folders,” you’re telling Lightroom to hide all images that you’ve already stored in the folder that you plan to import to.
Selecting Images
Remember when I told you I had already written a post on how to import photos to Lightroom? Well, this is one of those sections where I’m going to ask that you refer to that post. Since I already covered how to go about working with the thumbnails and how to select the images you’d like to use, please check out the “Selecting Thumbnails” section over there. Actually, while you’re at it, you might want to spend some time reading through the rest of the post. I’ve got some good information in it that I’m just dying to share with you.
Defining Destination
Moving over to the third column (are you sensing a flow to this yet?), we’ve got the area where we need to tell Lightroom what to do with the images we’ve chosen to import. The first thing we need to communicate is the destination we’d like to import to. And to do this, we look at the upper right area of Lightroom, next to the word, “To,” which is near the little picture of a hard drive.
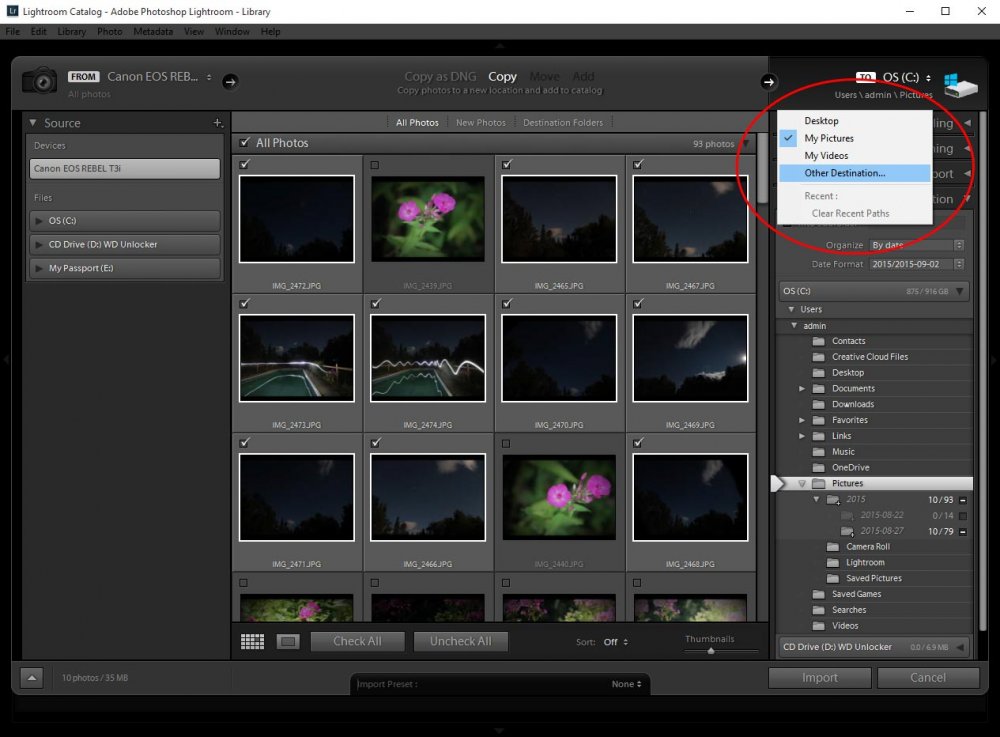
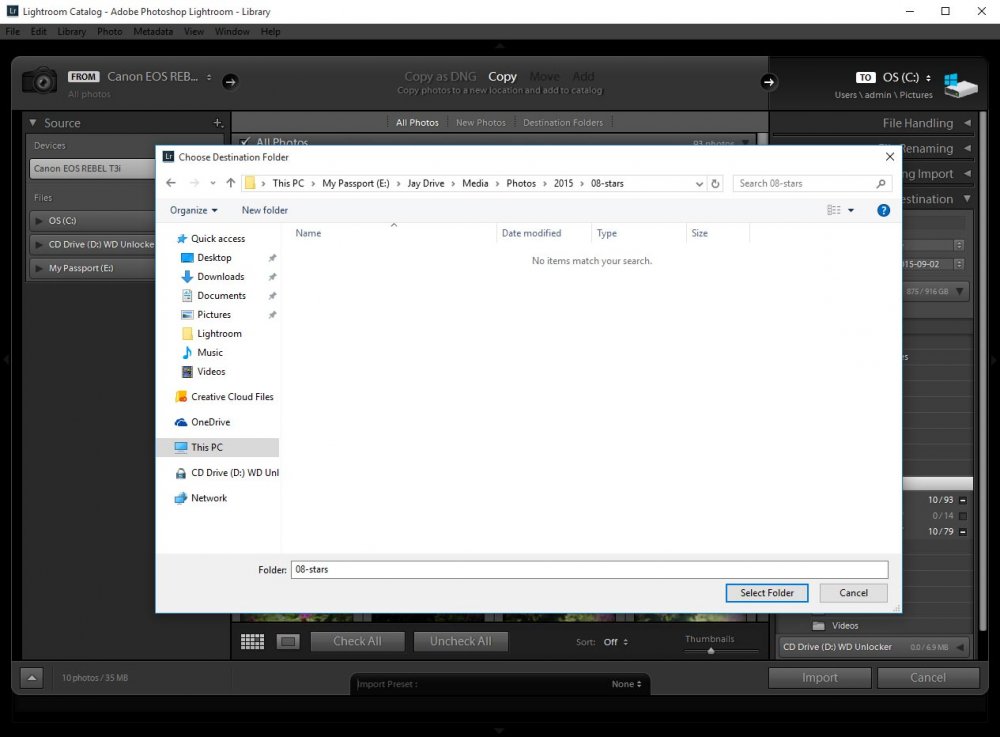
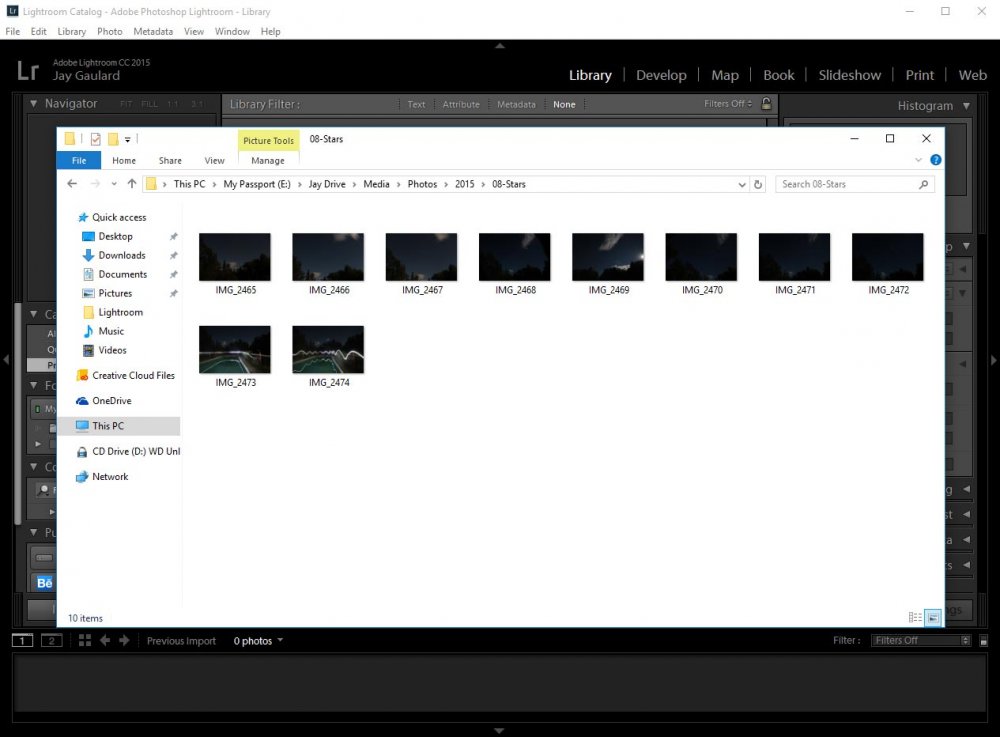
In my case, I chose “Other Destination” because I already created a folder on my external hard drive for my “Star” pictures to live. Notice in the previous image that I’ve only got those specific pictures checked off. Only those images will be imported into this folder. The path to this folder is “My Passport (E Drive > Jay Drive > Media > Photos > 2015 > 08-Stars.”
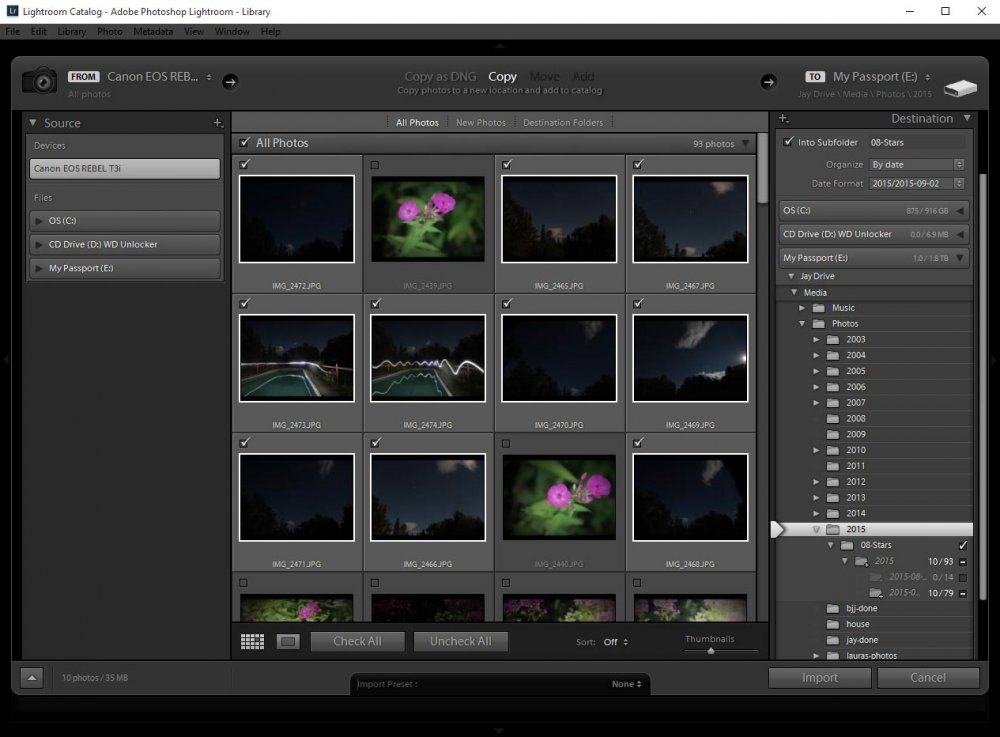
You have another alternative to select your destination folder. If you move down to the “Destination” dropdown in the third column and click the little arrow, you’ll see some options. You can use the first one called “Into Subfolder” if you haven’t created a folder for your photos yet. Simply check the box and create a name for the folder you’d like to import to. Beneath that, you’ll need to choose the drive where you’d like to store your pictures and then navigate all the way down to the folder you’d like Lightroom to create the sub folder you previously defined. Here’s what that dropdown panel looks like.
File Handling
I usually choose “Minimal” when importing photos. Also, one option that’s available to us now that we’re importing directly from a camera that we didn’t have before is called “Make a Second Copy To.” This is fairly self-explanatory. If you’d like to copy your images over to a second drive or folder, this is where you would define its location.
Clicking Import
For now, I’m going to leave off explaining what the “File Renaming” and “Apply During Import” panels do. I plan on writing a more in-depth post that covers just those two panels in the future. For our purposes today and for the purposes of a good majority of folks, what I’ve already discussed should be enough to import photos into Lightroom and copy them to the destination of their choice. All that’s left to do is click the “Import” button at the bottom right of the screen.
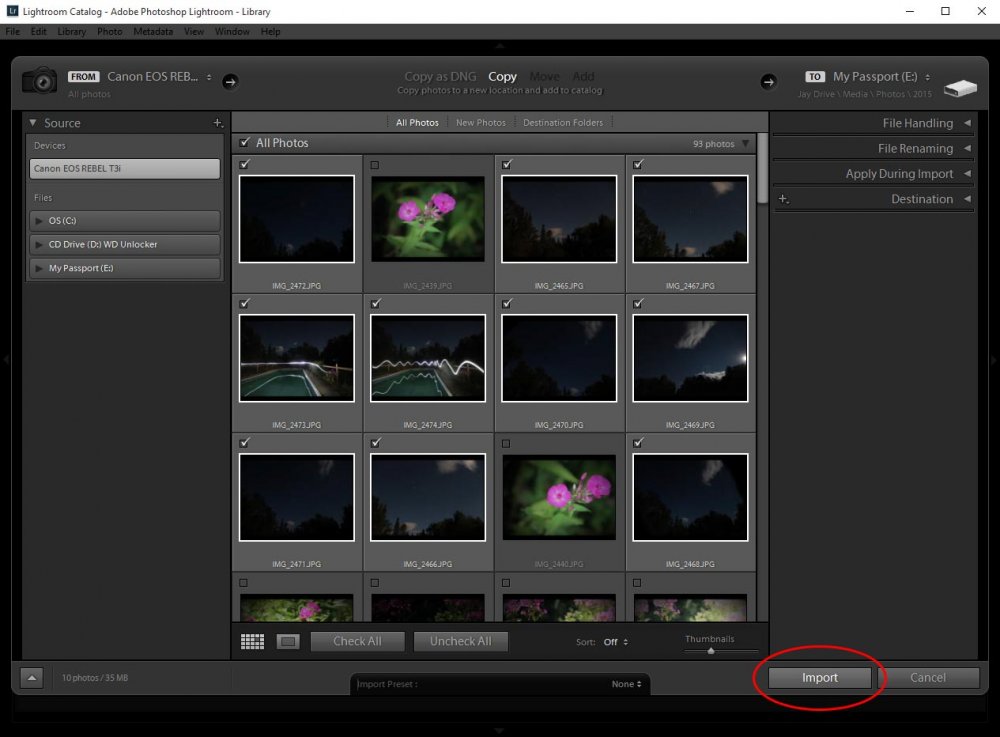
If you’ve done everything correctly, you should see Lightroom actively import the photos you’ve chosen. When that’s completed, go ahead and open the folder you’ve copied to and you should see your photographs waiting for you.
Leave a Reply