Brightening an image in Adobe Photoshop is super easy. This process has changed through the years, but the goal is just as simple to accomplish as it’s always been. Today though, there’s a layer protection built in that I’ll explain down below. Basically, because photographers and graphic designers were tired of having their original images altered, Adobe came up with a way to apply an adjustment “layer” above the real layer, as to avoid any type of destruction with some types of edits. It’s a great feature.
To start off with today’s demo, I’ll open an image into Photoshop. Then, I’ll go to the Layers panel and click on the layer that I’d like to brighten. Since the file I opened is the only layer, it’s already selected, but if there were many layers, it would be important to select that layer in question.
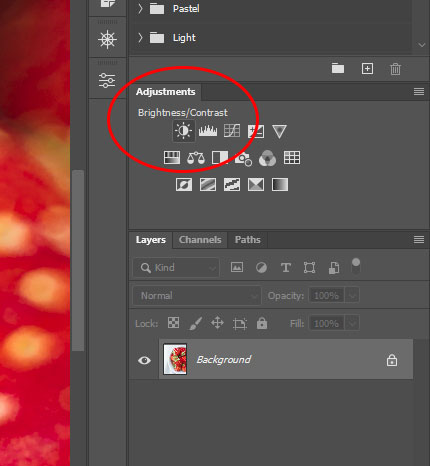
After that, I’ll go to the Adjustments panel that’s directly above the Layers panel. Inside the Adjustments panel, I’ll click Brighten/Contrast.

To see which icon in the Adjustments panel does what, simply roll over each one with your mouse. A tool tip will appear that offers an explanation. The name of the icon will also appear above all the icons. The name is fairly descriptive.
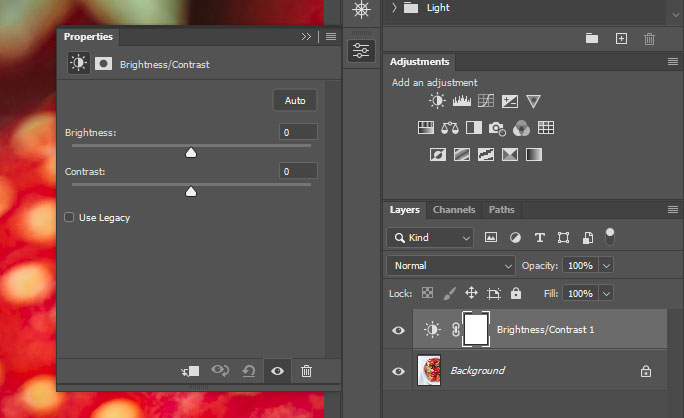
When the icon is clicked upon, the Properties panel will open and two sliders will appear inside of it.

The sliders are Brightness and Contrast. Also, you’ll notice that a layer with a white box appears inside the Layers panel, right above the layer that’s being brightened. This new layer is called an adjustment layer. Any changes that are made will be applied to this adjustment layer, as to not permanently alter the original layer. To see the changes you make before and after, click the eye icon in the adjustment layer. To remove any changes you make, click and drag the adjustment layer down to the trash can at the bottom of the Layers panel or just click delete on your keyboard.
To brighten an image, push the Brighten slider to the right. To darken it, push the slider to the left. If you decide to add contrast to your image by pushing the Contrast slider to the right, be aware that adding contrast generally darkens an image overall. You’ll need to compensate by pushing the Brightness slider even farther to the right.
Finally, know that you can edit your adjustment layer at any time by simply click on the layer. The Properties panel will open when you do so. Brightening and adding contrast to an image is a great way to make it vibrant and colorful. Give this a try and let me know how you did. I’d love to hear your feedback.
Leave a Reply