Search

Aperture Tutorials for Photography

  • Thread starter Phoenix1
  • Start date
Phoenix1

Phoenix1

Member
Joined
May 7, 2021
Messages
135
Reaction Score
0
Points
23
  • #1

What Does Aperture Mean? How Does it Affect my Photos?​

Simply put, the aperture in a camera lens is the adjustable hole that allows light through the lens and into the camera. Some lenses have fixed aperture sizes, but most have variable ones. When you see an Aperture Priority mode available on a camera, it means that as the photographer, you're able to change the size of the hole that's letting the light through to your camera's sensor.

When you shrink your aperture (higher F number), you're closing down the hole. There are two effects of doing this. First is that you'll let less light through to the sensor and second, you'll increase the depth of the depth of field in the photo. Conversely, if you enlarge the aperture in your camera's lens (lower F number), you're opening up the hole. The results from this will be more light being allowed to come through the lens as well as a shallowing of the depth of field.

Understanding aperture in a lens is actually quite simple. Things get more complicated when you begin considering how aperture can effect a photograph. Depending on the distance you keep your camera from your subject can have an effect on the resulting depth of field in a photo. Your aperture size plays a part in this. Also, aperture plays a huge part in the exposure of your photograph. A small aperture allows less light through and a large one allows lots of light. On dark days, you want more light, but on bright ones, you want less. When adjusting your lens's aperture setting, you'll need to weigh the benefit of increasing or removing light with how you want the depth of field to look in your photos.

If you'd like to read up more on aperture, please scroll through to the following posts. They're very informative, so enjoy.
 
Phoenix1

Phoenix1

Member
Joined
May 7, 2021
Messages
135
Reaction Score
0
Points
23
  • #2

How Do I Get the Background Blur in My Pictures?​

The big question for new photographers is, "How do I get the pretty blur in the backgrounds of my photos?" I can remember wanting to know the same thing when I started out. It actually wasn't very tough to do. All I used to do was zoom in as much as I could with my kit lens and somehow the blur would just magically show up. Which is weird, because the more I zoomed in, the smaller the aperture would get inside of the lens. Typically, the smaller the aperture, the deeper the depth of field, not the other way around. Ah! But proximity to the subject plays a role as well. The closer you are to your subject, the more shallow the depth of field. But I'm getting ahead of myself here.

Okay, there are two things that control the pretty blur (bokeh) you see in the backgrounds of so many pictures on the internet. The first is aperture size inside of your lens and the second is how close you are to whatever it is you're taking a picture of. Let's get the distance thing out of the way first. If you set your camera to f/5.6 aperture while in aperture priority mode and stand two feet away from something (all the way zoomed out or with a prime lens) and take a photo of it, you'll definitely see some blur in your background. If you keep the same aperture size and stand 15 feet away from that same thing and take a photo of it, you'll see a heck of a lot less blur. So basically, the rule is that the closer you hold your camera to something and take a picture of it, the more blur will appear in the background of your photos. That's just the way it works, which can sometimes be confusing because of what I'm about to tell you next.

When people talk about isolating their subjects, they're primarily talking about blurring out anything that's not important in the image. Let's face it, if everything in a portrait was absolutely sharp, the person would get so lost in it, no one would know what you wanted to take a photo of. By blurring out all of the non-essential objects in a scene, you're prioritizing, or highlighting, the most important thing - the person. The best way to control how much blur is in an image is to set your camera to aperture priority mode (A or Av on the top dial) and then adjust the aperture size by rolling the dial that's on the top of your camera or on the back of your camera back and forth. If you're using a tripod, you can play around and take the same exact photos over and over again while changing the aperture size. You'll immediately see the effect of each f-stop on the appearance of your photos. If you take a picture of a scene with your aperture set to f/22, almost everything in the image will be sharp (depending on how close you are to things) and if you set your camera to 2.8, you'll see lots and lots of blur. Generally speaking. If you're taking landscape shots and everything is ten miles away, you most likely won't see much of a difference.

I just want to let you know that I have my camera set to aperture priority mode 90% of the time I'm out there photographing. Sometimes that's because I want the bokeh I just wrote about, but other times it's because I'm trying to control the light that comes into my camera. I also like to dictate the shutter speed by adjusting the lens's aperture size, but that's a topic for another day.

So there you have it. Both distance and your aperture setting will control how much blur you'll get in your images. What is required is lots of experimentation to see what the effects of different circumstances will be. Don't worry, it's a lot of fun.

close-up-bokeh.jpg
 
Phoenix1

Phoenix1

Member
Joined
May 7, 2021
Messages
135
Reaction Score
0
Points
23
  • #3

How Does Aperture Priority Work on My Canon Rebel T6i?​

I use Aperture Priority for most of my shooting. I have my camera set to this pretty much all the time. I prefer this setting because it gives me a very simple method for controlling the light that comes through my lens, without having to concern myself too much with shutter speed or ISO. Of course, I need to take those other two factors into consideration when I'm photographing (shutter speed first and then ISO), but in general, I like to play around my aperture the most.

If you aren't aware, a lens's aperture primarily controls two things. First, as I said above, it controls how much light passes through the lens to your camera's sensor. It also controls how much depth-of-field a photograph will display. Before I go any further with this post, I think it would be wise to explain more of what I just mentioned.

The aperture size inside of a camera lens is controlled by very thin plastic or metal fins that move. When you set a larger aperture, the fins move out of the way, allowing more light to pass through into the camera. When you set a smaller aperture, those same fins move into the way of the light, obstructing it, so a smaller amount of light passes through to the camera. It's a fairly easy concept to understand. What's confusing about it is the numbers that are assigned to aperture values. Get this: the lower the number, the larger the aperture setting that allows more light to pass through. The higher the number, the smaller the aperture setting that allows less light to pass through. So, an aperture value of f/1.2 would let a heck of a lot more light through the lens than a value of f/16. The f/1.2 hole is much bigger.

There are a few different ways to think about aperture to make the whole idea more clear. I'll explain one right here and then another below. I don't want to go crazy far into anything, but I will need to explain how aperture impacts shutter speed.

If you are using a small aperture setting for your lens, you're not letting a lot of light through to your camera. Because of this, your shutter speed needs to slow down to compensate. No matter what you do, your camera needs a certain amount of light in order to properly expose a photo. So if you limit the light through the lens, the shutter will need to stay open longer to capture the light it's looking for. If you open up your aperture as far as it can go, the camera will recognize that and hasten the shutter speed.

If you pretend that you're standing next to a swimming pool that needs to be filled, you'd most likely need to make a decision as to what you're going to use to fill it. If your options are a garden hose or a fire hose, you can probably imagine how different each would be. No matter which filling method you choose, the pool will need to be filled. Consider the full pool the same as a properly exposed photograph. Both need to be completed. They're the ultimate goal. A full pool and a nice image.

Consider the filling method the aperture. A garden hose is a small aperture and a fire hose is a large aperture. If you use the garden hose, it's going to take a very long time to fill the pool. If you use the fire hose, it's going to take a shorter time. While the hose sizes are comparable to the aperture, the time it takes to fill the pool is comparable to the shutter speed. So, you can see how each has an effect on how the pool gets filled.

Of course, there's a lot more than goes into all of this, but what I just explained is the basics.

Another aspect of photography that is impacted by aperture size is depth-of-field. All this is is how much of the final photo is in focus. I'm sure you've seen photos where the object in focus is sharp, while everything behind that object is soft (or blurry). This is directly related to aperture size in the lens. A large aperture size will offer a more shallow depth-of-field (more blur behind the point of focus) and and small aperture size will offer a more deep depth-of-field (less blur behind the point of focus). You can remember this by thinking about the bigger numbered aperture setting (smaller hole) as giving you a bigger area of focus. The smaller numbered aperture (larger hole) will give you a smaller area of focus.

Okay, let's get to the meat of this post. I simply want to show you how to set your Canon Rebel T6i, or any Rebel for that matter (T2i, T3i, T4i, T5i and T7i) to Aperture Priority. It's so easy.

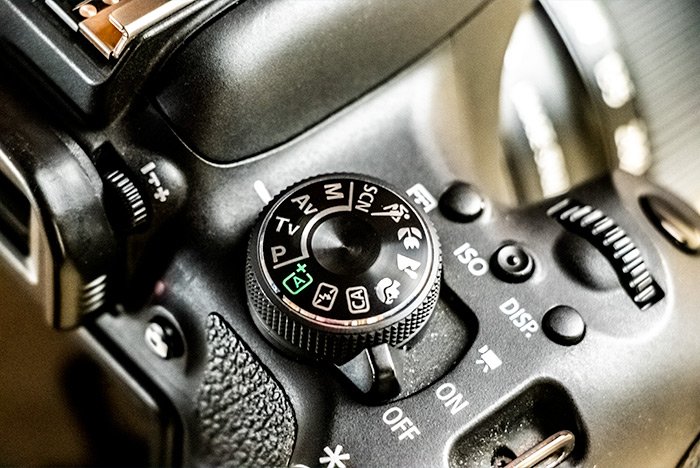
Take a look at the dial on the top of your camera. You should see a bunch of different settings. The ones I'm primarily concerned with here are the P (Program), Tv (time Valuation (Shutter Speed)), Av (Aperture Valuation) and M (Manual). All you need to do to set your T6i to Aperture Priority mode is to turn the dial so the Av setting is aligned with the small white tick mark on the camera itself. After that, you'll need to use the dial on the top of your camera to choose the actual setting you'd like to shoot with. Learn more about Aperture Priority here. There's tons of good information in that post.

canon-rebel-t6i-top-dial.jpg

Please let me know if you have any questions about what I shared today. I know the aperture settings are different for all makes and models of camera, but this ought to help some folks who use the very popular Canon Rebel series.
 
Phoenix1

Phoenix1

Member
Joined
May 7, 2021
Messages
135
Reaction Score
0
Points
23
  • #4

The Real Reason to Use Aperture Priority Mode​

Let's face it. Most people who own DSLR cameras out in this world are amateurs. And within that group of amateur photographers are a whole bunch of people who really don't know that much about photography itself or how their cameras work. I used to be one of these people, so I speak from experience. When I purchased my first DSLR camera way back in 2010, I had no idea what I just bought. For years, I kept it set to Auto mode, thinking that just by using the camera itself, I was getting better shots. Little did I know that the true power of of my DSLR had yet to be unleashed (or discovered).

I'm writing this post to offer those of you who are still like how I used to be a tip. It's a tip that can boost your knowledge of your camera settings as well as make your current photography a heck of lot better than it currently is. And the best part is that this tip won't require any additional work for you. You'll actually be tricking yourself into learning, which, in my opinion, is the best way to learn.

Before I begin, let me tell you what the true barrier to learning as much as possible about photography is. It's the fact that we think there's too much to absorb, so we don't learn much of anything. I can remember when I first heard the phrase exposure triangle. I was like, "What?" Thinking about full Manual mode bewildered me. I had no idea what exposure was and I really had no idea what aperture was. In my mind, everything was upside down and backwards. Nothing made sense, so it was just easier to keep the camera set to Auto. I mean heck, my shots were coming out pretty good. Why change?

Well, I'll tell you why I should have changed. Because I had no control. Photography is about controlling one's environment so it is portrayed the way the photographer intends. He or she can't do that when they're letting the camera make every single decision.

So, the goal is to slowly and methodically, in the easiest and least painful way to understand, take the control away from the camera and keep it for ourselves. How can we do that? That's what I'll tell you down below.

What I'll tell you here is that using your exposure compensation feature is an extremely simple method for making your photos brighter or darker, as you're taking them. That's it. It's that simple. Most DSLR cameras have a button and a dial or something similar that controls the feature. All you need to do is roll the dial or push the button to your desired setting and take your shot. Right there, you're stealing back some of the creative control from your camera. Use that feature liberally, get used to it and learn to love it. This is the very first and easiest thing you can do to improve your images.

Next, switch your camera into Aperture Priority mode. For the next six months, keep your camera set to this mode and combine it with your exposure compensation feature. By the time the six months is through, you'll have gained an immeasurable amount of knowledge about how depth of field, focus and light works, all from this one priority mode. Aperture priority is so simple to deal with and it can truly improve your photos immensely. Professional photographers use this mode all the time and it's a great way to take back creative control, while allowing your camera to use its built in functions, such as light metering. Of course, when you combine aperture priority with a change in exposure compensation, you're going to be kicking some serious butt. You'll be taking photos you want to show your friends.

The reason I'm suggesting that you use Aperture Priority mode along with the exposure compensation feature is because both of these features are easy to learn and can make huge differences. They also naturally lead to bigger and better things down the road. They'll teach you things you didn't know you wanted to learn and you'll feel good about yourself when you're finished with a day's worth of shooting. I can tell you that it's a great feeling when you review photos after messing with the camera settings. Taking shots in Auto mode outside - yeah, that's fine. Taking shots in a creative mode while adjusting the exposure yourself - wicked cool. You'll love it.

Please give me your opinion on what I just wrote. I'd love to hear your perspective on how you prefer to learn or how you have learned about photography. What tricks did you use? How did you end up succeeding? Thanks!
 
Phoenix1

Phoenix1

Member
Joined
May 7, 2021
Messages
135
Reaction Score
0
Points
23
  • #5

Examples of Different Lens Aperture Settings For Photography​

Aperture Priority mode is one of the most fun camera settings available. There are only a few settings, but this is definitely one of the most fun ones. It offers the photographer an enormous amount of flexibility and creativity when shooting by giving the option of either blurring certain areas of a scene or keeping them sharp and in focus. The entire thing revolves around what's called "depth of field," so if you aren't familiar with that phrase, you'll definitely want to read the recent post about the basics of camera depth of field. It's pretty good.

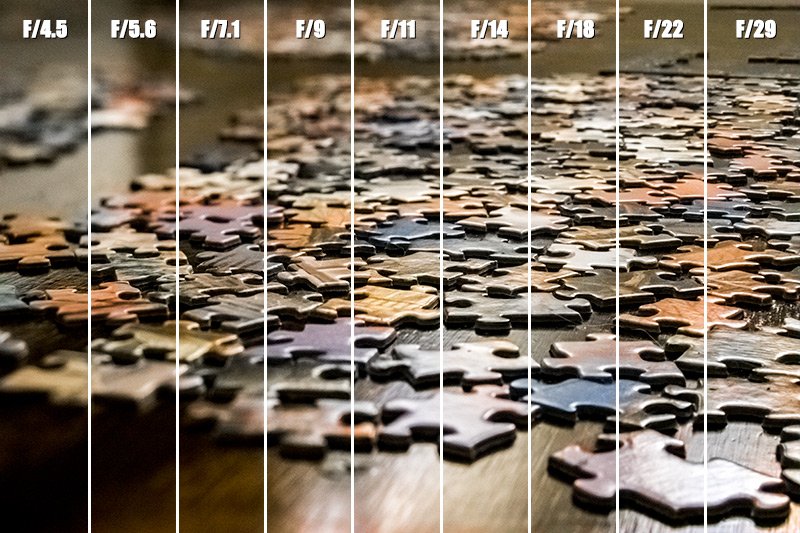
In this short post, I wanted to offer you a few examples of different aperture settings. I placed my camera on a tripod a few evenings ago and pointed it at a puzzle I'm working on. I thought the pieces would be perfect to exemplify how lens aperture size can affect the in-focus area of a resulting photograph. For my demonstration, I took nine consecutive photographs using Aperture Priority mode, starting at F/4.5 and ending all the way at F/29. I then processed the photos in Adobe Photoshop and sliced them up so each aperture setting output was visible in it's own section. As you'll see in the image below, the slices toward the left have more blur in the foreground and background and as the slices progress towards the right, that blur begins to disappear. What's the moral of the story? Larger aperture settings (lower "F" numbers) offer more blur and smaller aperture settings (higher "F" numbers) offer sharper images.

apertures.jpg
 
Phoenix1

Phoenix1

Member
Joined
May 7, 2021
Messages
135
Reaction Score
0
Points
23
  • #6

Can I Preview My Aperture Setting On My DSLR Camera?​

This is actually a very good question and it's one I hear a lot. Budding photographers want to know if, after setting a specific aperture size, they can preview the depth of field that will appear in the photograph they take. Even if a specific aperture setting isn't made and the camera is in another priority mode, auto mode or full manual mode, it's nice to know what you're in store for regarding the depth of field. As it stands, when you meter the camera and view the scene through the viewfinder or rear Live View screen, the camera is giving a preview with the aperture wide open, regardless of what the actual setting is. As you can imagine, this isn't ideal and having a way to preview where the blur will be and where the sharp areas will be is helpful.

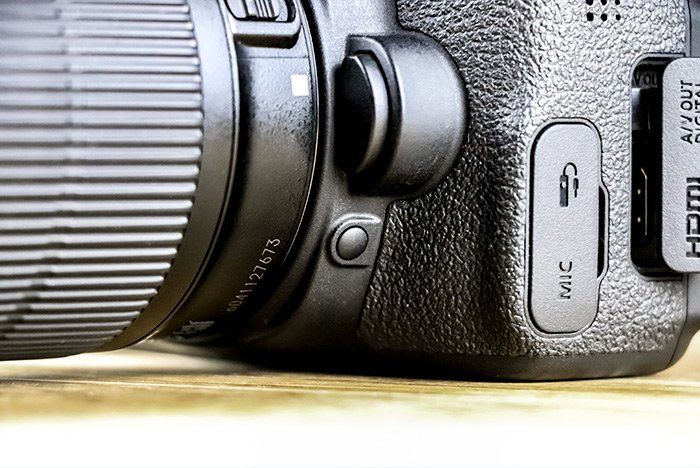
The answer is, yes, you can preview depth of field and it's actually a very simple process. If you take a look at the side of my Canon Rebel T6i DSLR camera, you'll see a button that sits directly below the lens removal button. Take a look.

depth-of-field-preview-button.jpg

If you press this one button at any time and view the scene through either the viewfinder or the Live View screen, you'll see exactly what the depth of field will look like. Let me warn you though, things may get dark when using that preview button. Since we can't preview shutter speed, the camera can't take a longer exposure into account when showing the depth of field preview. So, the result is a darker view. Just a warning. This is a great feature to have available though, especially when using a larger aperture size that let's lots of light through. You'll get a glimpse of all that wonderful and creative blur you're after.
 
Phoenix1

Phoenix1

Member
Joined
May 7, 2021
Messages
135
Reaction Score
0
Points
23
  • #7

What's the Best Aperture Setting to Use For Landscape Photography?​

I get asked which aperture setting is the best for landscape photographs a lot and the answer is simple. It's probably around f/8, f/11 or f/16, depending on how close the closest object you'd like to keep in focus is. There's actually a table that can help you calculate the distance of how far you need to be from that closest object so you can know for sure. For instance, if you've got your aperture set to f/11 and your lens set to 12mm, you need to keep your camera at least 2.3 feet away from that closest, in-focus, object (with a cropped sensor camera). If you were to go any closer, that object may become soft (blurry) or the objects in the distance may become blurry, depending on how you've got things set up. I really don't think this is an issue though because who stands closer than 2.3 feet to something when they're taking landscape shots? That's some serious framing.

You most likely already know that as you go down in f-stops, your depth of field shrinks down. It becomes more shallow. So, because shutter speed isn't necessarily an issue with landscape photography and because you'll likely be using a tripod, go ahead and reduce your aperture size as much as you want (but not too small because of diffraction). All that's going to happen is the shutter speed will slow down (or/and the ISO value will rise). It'll also ensure that anything in the foreground (within reason) will stay sharp, along with everything in the background. Now, if you're shooting landscape at night, that's a whole different ball of wax. I'll have to write a separate post on that because it's much more involved. You'll be dealing with longer shutter speeds and something like that would likely fall under the category of long exposure photography.

Let me know what you use for your landscape photography. Do you use just aperture priority or do you go full manual? What's your favorite aperture setting for something like this?
 
Phoenix1

Phoenix1

Member
Joined
May 7, 2021
Messages
135
Reaction Score
0
Points
23
  • #8

Aperture Confused? Use Creative Auto Mode on Your Canon Rebel T7i​

I recently purchased a brand new Canon T7i DSLR camera for my photography endeavors. My last camera was the T3i, which has served me well. On this blog, I've written about various aspects of functionality between the T2i, T3i, T4i, T5i, T6i and now the T7i. As you may have guessed, I truly enjoy this line of cameras.

On a side note, I must compliment Canon for their touch screen feature. I mean, where in the world have I been? That is totally awesome.

Anyway, in an effort to write tutorials and posts about (and take photos of) this camera before it gets dust all over it, today I offer you an introduction to an area that isn't discussed very often. This area has to do with the Creative Auto mode that's been around for as long as I can remember. Basically, this Creative Auto mode is indicated on the mode dial on the top of the camera by the letters CA. This mode is sort of a combination of a few others. It combines the Auto mode and the Aperture Priority modes into one. And the best part is, it includes a scale where you can choose how blurry or sharp you want the background of a photo to be. Really, this mode is the perfect balance between taking somewhat advanced photographs in a certain priority mode and taking those same advanced photographs with a really easy to read and understand interface. Don't worry, I'll explain everything below.

Here's the Problem​

Let's say you aren't really up to speed when it comes to how the aperture works inside of a lens. You don't know what steps and stops are and quite honestly, you don't care. You may not be a professional photographer and you really just want to take certain types of photos that you've seen others take. You know the ones - those pictures that have the blurry backgrounds in them.

While I encourage you to learn all about photography, or if you're interested in just the area of aperture, learn about only that, I completely understand the mindsets of those who don't want to get too involved. Many of us are the same when it comes to this stuff. We just want a good looking output without having to struggle through all types of lessons and the sort.

So let me ask you a question. Does a larger aperture opening give you a sharper or more blurry background? What about a smaller aperture? Don't know? Don't care? Don't worry. I've got something that can help you out and it's called Creative Auto mode and it's built right into the Canon Rebel line of cameras.

Accessing Creative Auto Mode​

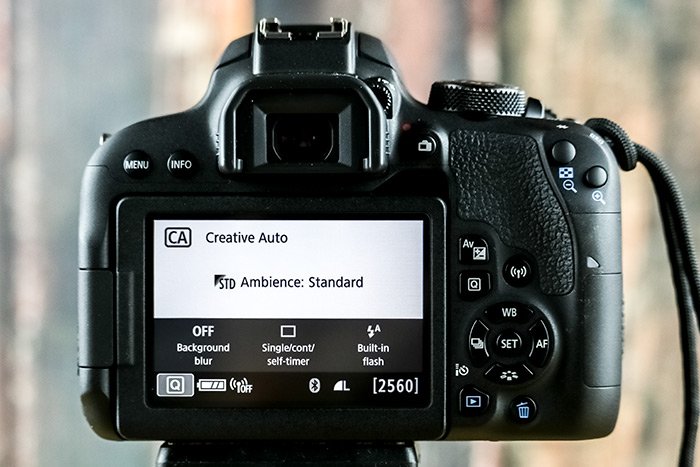
If you look at the top of your camera, you'll see a CA option on the dial. Turn the dial so that CA is lined up with the tick mark. When it's there, you should see this screen on the back of your camera.
creative-auto-screen.jpg

As you can see, there are four primary functions in this mode. They include some creative filters, the blur or sharpness settings, single or multiple shot, plus timer and the flash settings. On the T6i and T7i, these options are easily accessed by touching the rear view screen with your fingertip. But before you touch the screen, you'll need to press the Q button that sits just to the right of the screen. That Q button activates things and makes them come alive. If you forget to press this button, don't fear, the camera will remind you to. I'll be honest with you here when I say that having to press this button is sort of annoying, but so be it.

Ambience Based Shots​

If you press the Q button and then press the Ambience: Standard option in the middle of the screen, you'll see some further options.
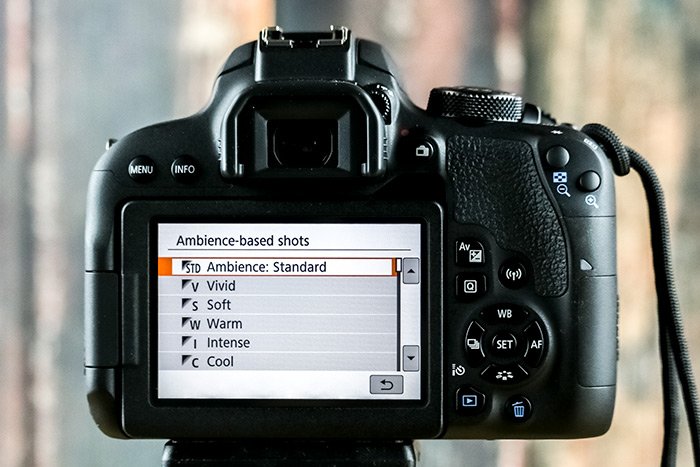
ambience-based-shots.jpg

Currently, the available options are Standard, Vivid, Soft, Warm, Intense, Cool, Brighter, Darker and Monochrome. I even went ahead and took some sample shots for you to browse through. They are in this order; Vivid, Soft, Intense and Brighter. Take a look.
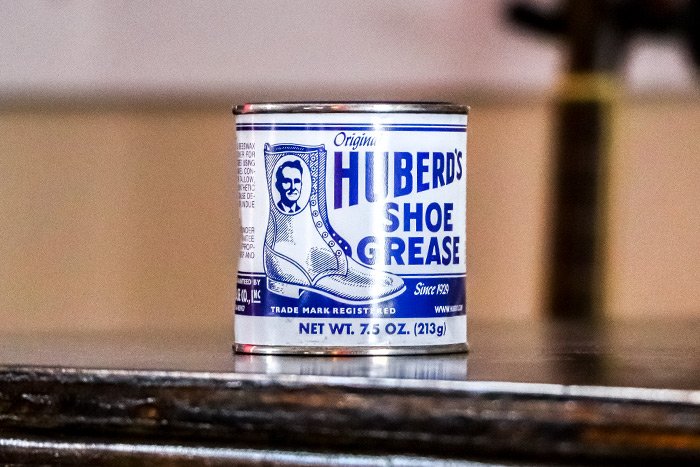
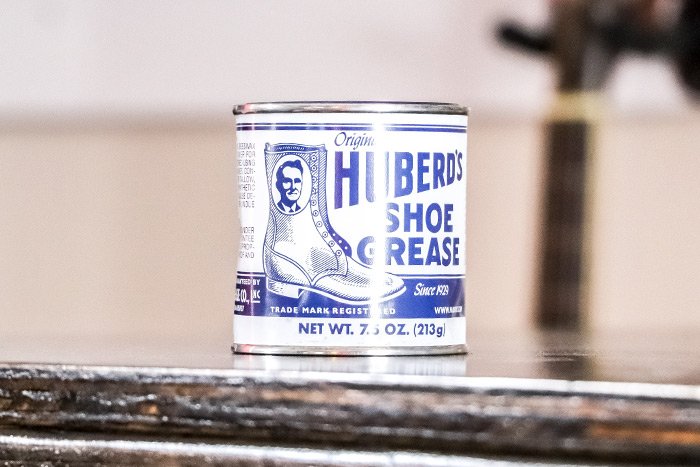
vivid.jpg

softer.jpg

intense.jpg

brighter.jpg

Once you find which type of ambience you'd like the photo taken with, you can go ahead and touch that option with your finger. After you do that, you'll have the ability to set the strength of the ambience on the next screen. Once you do that, you'll be ready to take your photos.

Use these options at your leisure.

Setting Background Blur​

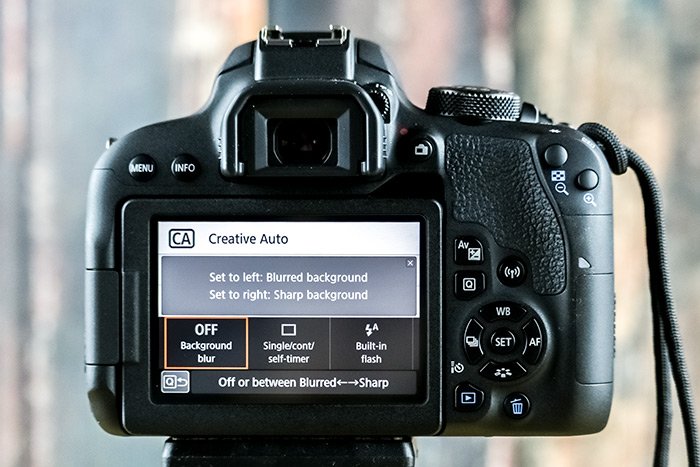
This option is the real gem among the others. This is the one that lets you get around memorizing what the aperture settings mean. To use this one, all you need to know is what degree of sharpness or blur you'd like to apply to the background of your photos. The camera will automatically make all the other settings for you. That's why Canon calls this mode the Creative Auto mode. It's mostly auto.

To access the Background Blur setting, simply click the appropriate box on the view screen. It's highlighted in orange in the photo below.
background-blur.jpg

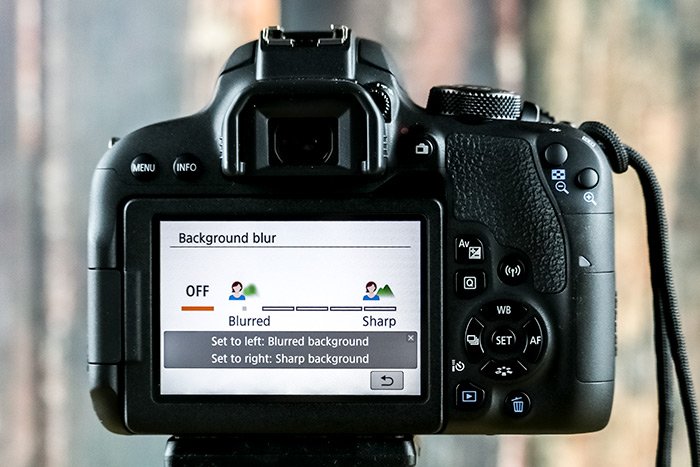
If you press the option twice, you'll be brought to the next screen where you can set the blur intensity. In this next photo, the blur setting is still off, as indicated by the orange bar underneath the word Off.
blur-settings.jpg

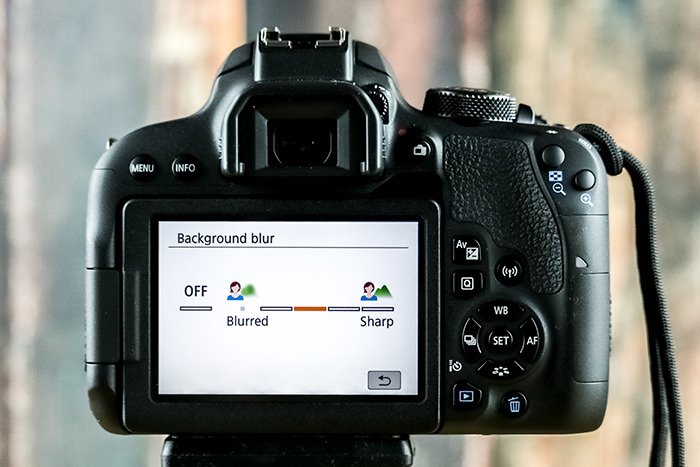
If you touch your finger to one of the bars that sit between the words Blurred and Sharp, you'll turn this feature on and it'll be set to whatever you choose.
blur-set.jpg

Once you make this choice, things are set, you can go ahead and take your photos.

Shooting & Timers Options​

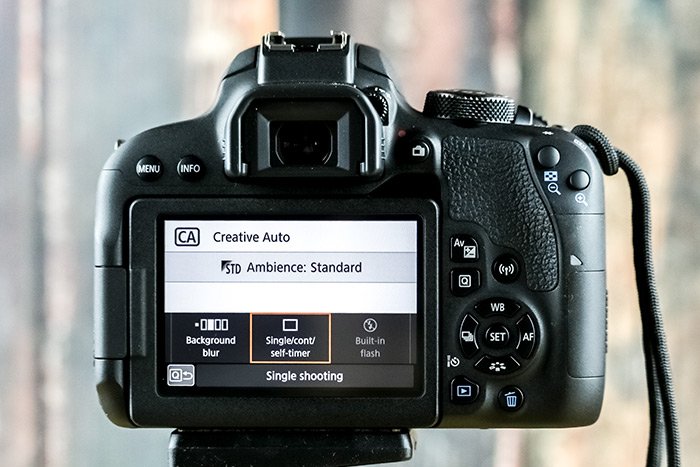
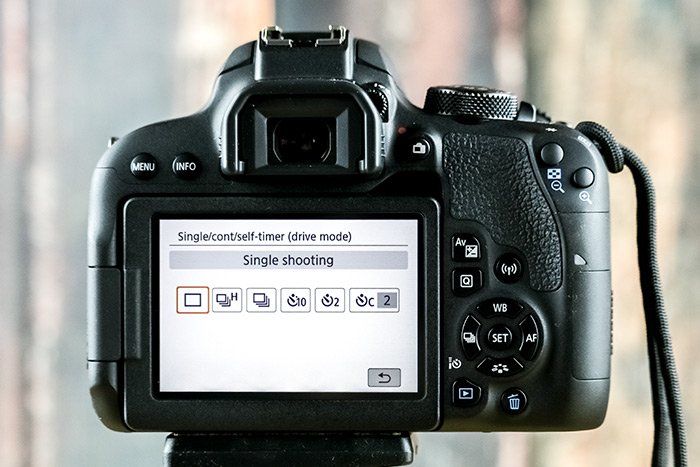
If you go back to the home screen for this mode and press your finger to the center option, you'll see that you can change how the camera takes it's shots. You can take single or continuous photos. You can even set the camera's timer with this option.
shooting-timer-option.jpg

shooting-mode.jpg

To apply any of these settings, simply press your fingertip to the option you're interested in.

Auto, On & Off Flash Settings​

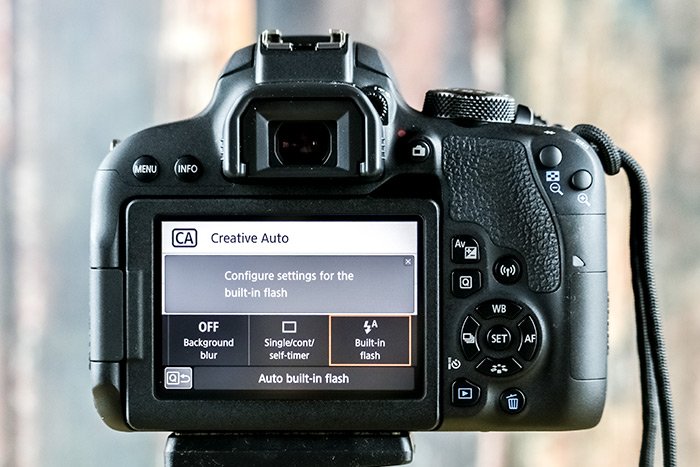
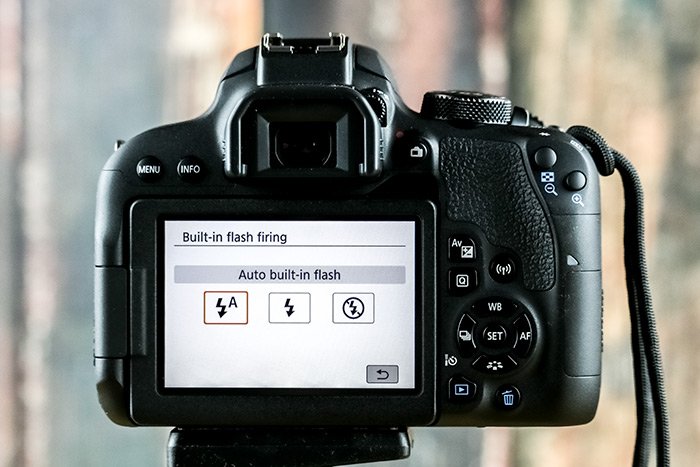
Finally, if you head back to the home screen for this shooting mode, you can set which type of flash you'd like to camera to operate with. If you touch the bottom right box, you'll activate the flash setting options screen.
flash-option.jpg

flash-settings.jpg

If you touch your finger to any of the three options, you'll set the built-in flash to do what you want. The first option is to have the camera automatically decide whether or not the flash is needed. The second option is to turn the flash always on and the third option is to turn the flash off. This is handy to have in here because, personally, I don't ever use the built in flash. I'd like to keep it set to off, which I can do in this mode.

I hope I clearly introduced you to the Creative Auto mode that's available on Canon's Rebel line of DSLR cameras. This is a very handy mode to have because you can get around some of the more challenging aspects of photography while still having fun with different ambience offerings. If you have any questions regarding this post, please leave them below. Thanks for reading!
 
Phoenix1

Phoenix1

Member
Joined
May 7, 2021
Messages
135
Reaction Score
0
Points
23
  • #9

How Do Camera Lens Aperture Sizes Compare to One Another?​

It’s always a great shock when you see the actual size of a lens aperture. The stops between aperture sizes can be dramatic in actuality, but at times, they don’t look very dramatic at all. If you remember what a “stop” is, you’ll know that for every stop, you either halve or double your exposure. Exposure is controlled by three settings in your camera; shutter speed, aperture and ISO. So if someone says to you, “Increase your exposure by one stop for this photo,” you can either halve your shutter speed from 1/250th of a second to 1/125th of a second, enlarge your aperture size from F/11 to F/8 or increase your ISO setting from 100 to 200. Each of these three options would increase your exposure by one stop. Just remember, while you’re increasing your exposure equally with these settings, there may be side effects, such as changes that include motion blur or alterations to depth of field. Just keep that in mind.

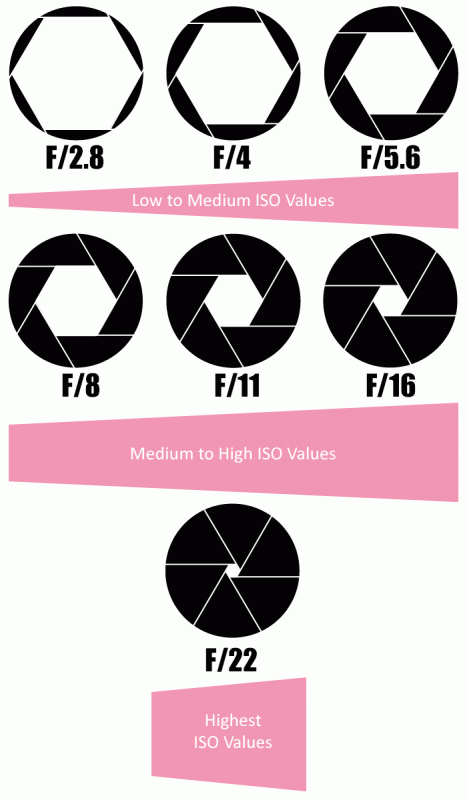
I made a very cool graphic this morning that exemplifies the size of aperture settings in a lens. Check it out.

aperture-sizes.gif

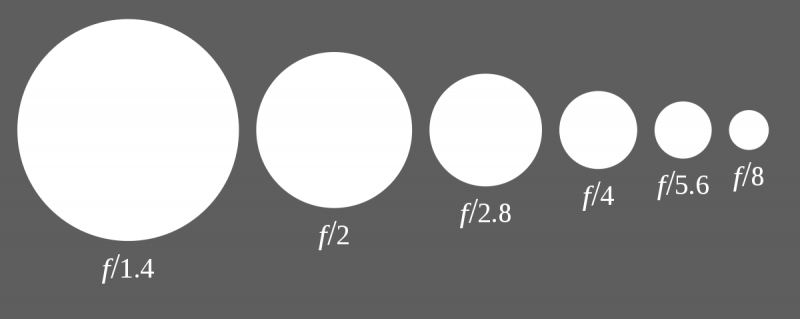
This graphic should give you an idea of what each aperture size is compared to others. I made the above graphic, but this one down below I found on Wikipedia. In it, the scale of aperture sizes goes all the way down to F/1.4, which is very huge.

1200px-Aperture_diagram.svg_.png

So F/1.4 allows twice the amount of light in through the lens than F/2 does. Incredible.

I also wrote a post that discusses how aperture size can affect ISO settings when the camera is set to Auto ISO. Please give that a read. It’s a good post.
 
Phoenix1

Phoenix1

Member
Joined
May 7, 2021
Messages
135
Reaction Score
0
Points
23
  • #10

F/8 is the Sweet Spot Aperture in Photography​

Here’s a question for you. What mode should you put your camera in if you’re taking photos of groups of people? The goal is to keep everyone in focus because, well, that’s the whole point of taking the photo in the first place; to capture the people. We so often prioritize the bokeh in our photographs with all the pretty blur that comes with it, but what about when we want to keep everything in the image sharp? Well, the answer is easy. If a low f/stop gives us the blur, a higher f/stop gives us clarity, especially when what we’re shooting is far away.

The next question becomes; what’s a good aperture setting to use for everyday sharp photography? If you asked a whole bunch of photographers that question, I think you’d here that f/8 is the one to use under most circumstances. The f/8 aperture size is right in the middle of soft blurry backgrounds and tack sharp everything. The best part about f/8 is that it will allow enough light in to avoid an extremely slow shutter speed but not so much light that you lose important elements of your photo to blur.

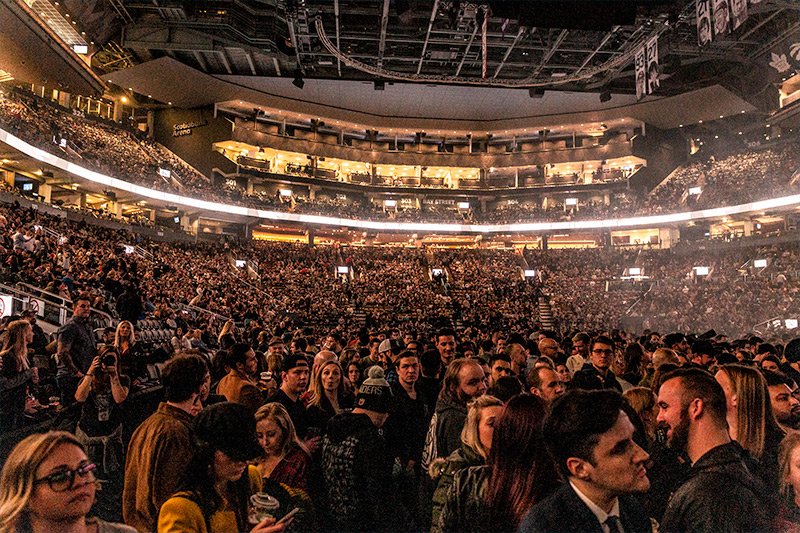
Go ahead and try it. Take your camera out to a place where there are lots of people; a city street, the inside of a mall, a festival, and then take some photos of the crowds. Make sure you’re far enough away from them so that you’re able to take advantage of hyperfocus and then begin snapping away. I think you’ll find that the f/8 aperture size combined with an ISO value that’s allowed to rise up will give you very high quality photos of those crowds. Of course, you’ll need to be in aperture priory mode to do this. If you find that your shutter speed is too slow and the movement in the images is blurred, you can either manually increase your ISO setting to force the shutter speed to increase or you can go straight to full manual mode and increase your shutter speed from there. Think about using anything over 1/100 of a second or higher. Let me know what happens.

crowd-people-stadium.jpg
 
Top