Search

How to Undo in Photoshop

  • Thread starter EmeraldHike
  • Start date
EmeraldHike

EmeraldHike

Member
Joined
May 10, 2021
Messages
133
Reaction Score
0
Points
21
  • #1
I'll write this post for all the people out there who make mistakes in Photoshop and need to undo them. Of course, I don't, so I don't need to know any of this, but from what I hear, others do. Kidding. Of course I make mistakes in this program. Lots of 'em too. So yeah, we all need this, I guess.

I'll just put this out there - there are multiple methods for undoing what you've done in Photoshop, so don't feel as though you should inhibit yourself in any way when working. Go nuts and have fun. Know that you're not going to break anything because you can backtrack as much as you want. Nothing is set in stone.

In today's post, I'll show you a few of the methods you can use to undo in this wonderful application. I'll jump right in below.

To start this example off, I'll create a new document and I'll use the Horizontal Type Tool to type out the word, "Mistake."

photoshop-text.jpg

Next, I'll add an "S" to the end of the word, so it says, "MISTAKES." Now I'll pretend that typing the S was a bad move. I want to undo that. To accomplish this, I'll head up to the Edit > Undo Edit Type Layer and click. That will remove the S from the word.

edit-undo-type-layer-tool.jpg

Now let's pretend that I actually wanted that S at the end. Removing it was a mistake in itself. I can always add it back if I visit the Edit > Redo Edit Type Layer menu item. Check it out.

edit-redo-edit-type-layer.jpg

If you look to the right of each of those menu items, you'll see some available keyboard shortcuts that will allow us to accomplish the same things. The shortcuts are Ctrl+Z to undo and Shift+Ctrl+Z to redo. And if I wanted to jump back and forth between the undo stage and the redo stage, I can choose the Edit > Toggle Last State menu item, which offers a keyboard shortcut of Alt+Ctrl+Z.

And just to let you know, undoing steps in Photoshop isn't a one-off command. You can undo multiple steps by repeating the steps I described above. Use either the menu items or the keyboard shortcuts.

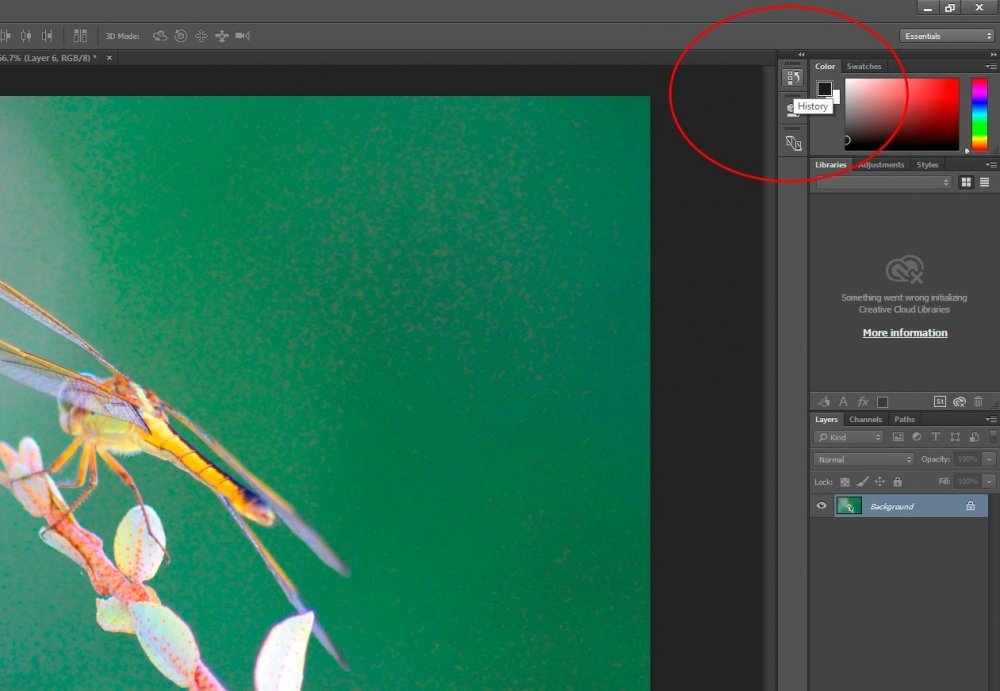
Another great way to undo steps you've taken is to use the History panel. By default, this panel is docked over to the right, just left of the opened panels.
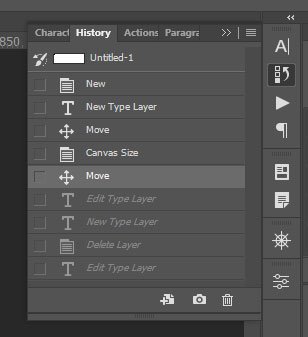
history-panel.jpg

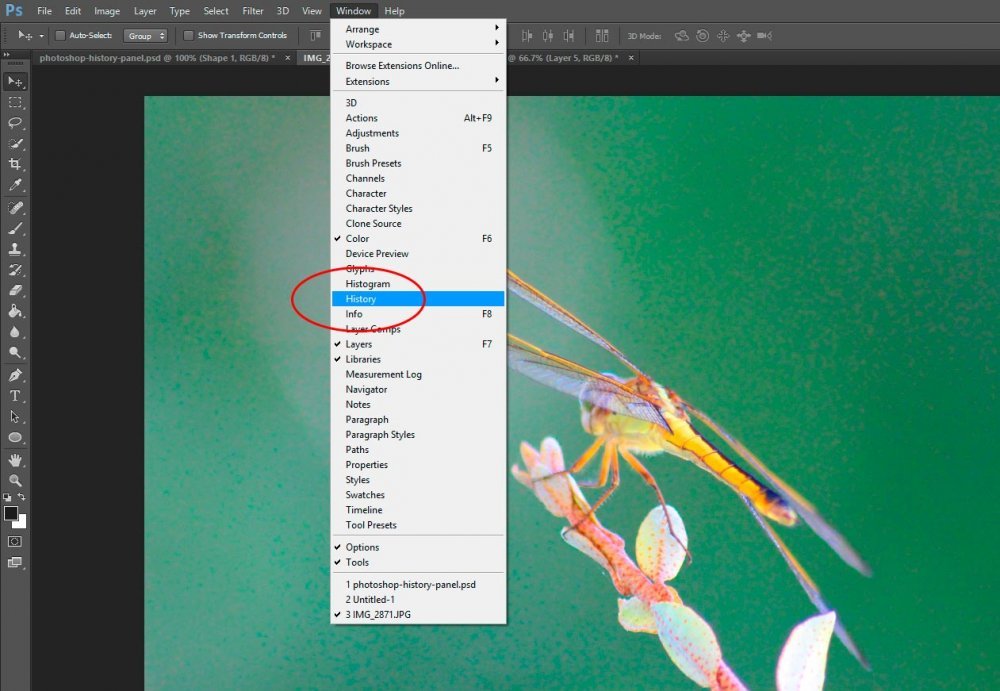
If you don't see it there, you can always go to the Window > History menu item and click. The panel will open that way as well.
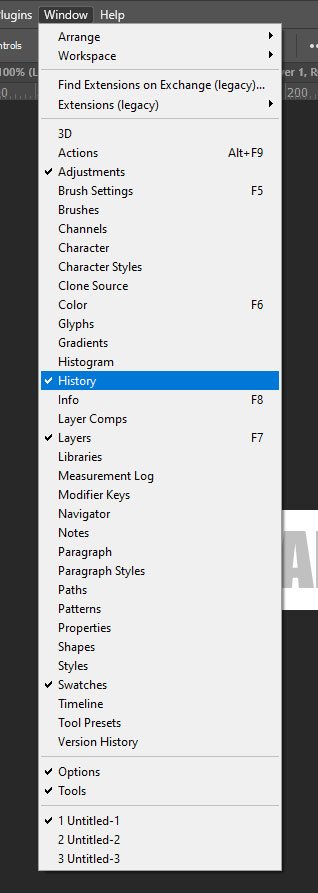
window-history.jpg

Once the panel is opened, all you need to do is click on the step you'd like to go back to. You can click on past steps and then click on more recent steps to return to the present. The History panel is very robust, so I encourage you to explore it.

Well, I'd say those are some pretty good ways to undo mistakes in Photoshop. If you've got any more ideas, please share them down below.
 
CaptainDan

CaptainDan

Member
Joined
May 9, 2021
Messages
113
Reaction Score
0
Points
16
  • #2
history-panel-photoshop-undo.jpg

Need to Undo? Use the History Panel in Photoshop​

Right behind creating something awesome in Photoshop is the ability to undo those aspects of things that aren’t so awesome. While good and proper Photoshop workflow minimizes the risk of having to go back and correct mistakes, mistakes do happen. That’s why it’s critical to understand the options available to you while working on photographs and graphics in Photoshop.

For many of you, this post may seem like a beginner topic. And while it is somewhat straightforward, there actually is a lot to know about the undoing king of all kings, the History panel. Believe it or not, the History panel has got a history all of its own. I’ll be covering the details of specific panels in later posts, bur for now, please be aware that panels in Photoshop that seem like they’re somewhat average, once were, and still are, a very big deal.

In this post, I’m going to talk about two areas. The first one will cover how to simply undo the very last action you’ve taken. The second area will dive into the beginnings of using the History panel. How to view it, how to manage it and more.

How To Undo the Last Thing You Did​

In this post, I’m going to use an example photo of a dragonfly to illustrate the undo methods I’ll cover. This dragonfly picture was taken some time in 2014 and, while clear, it lacks saturation and depth. It’s the perfect subject to practice on.

Take a look at what we’re dealing with.

adobe-photoshop-initial-photo.jpg

Now, the first thing a beginning user of Photoshop does in situations like this is to jump right to the “Image > Adjustments” menu and start fiddling around with the saturation, color, exposure, vibrance and all the other editable values available to them. While I’m not going to go over the proper methods for editing photos in this post, I will change a value and simply undo it using the “Edit” menu for demonstration purposes.

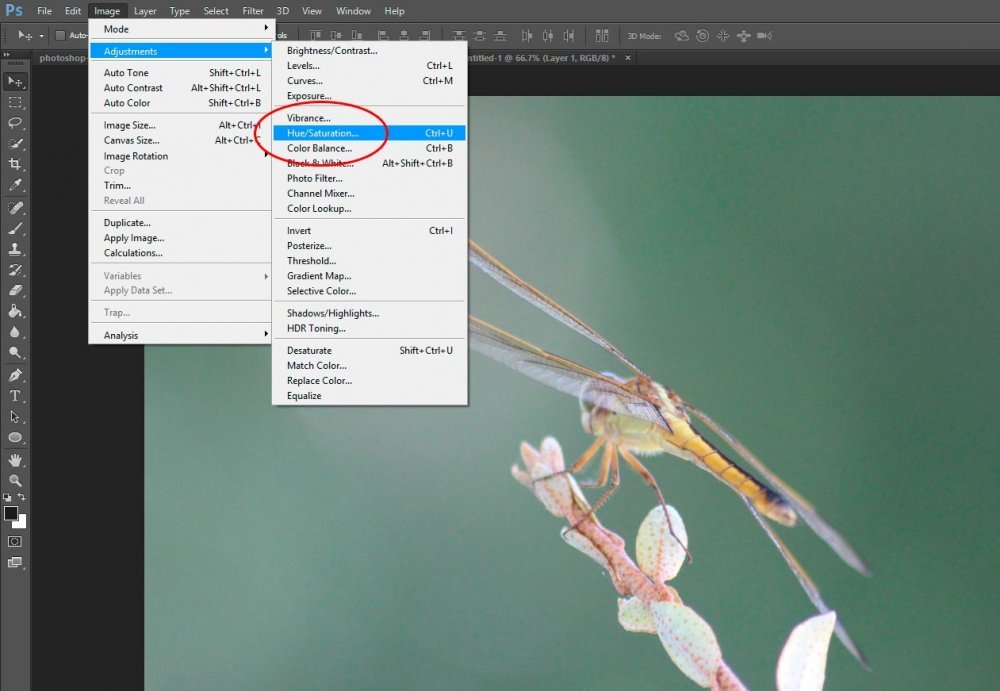
Let’s say I want to add some saturation to this photo. To do this, I’ll head up to the “Image > Adjustments > Hue/Saturation” tool.

adobe-photoshop-hue-saturation-tool.jpg

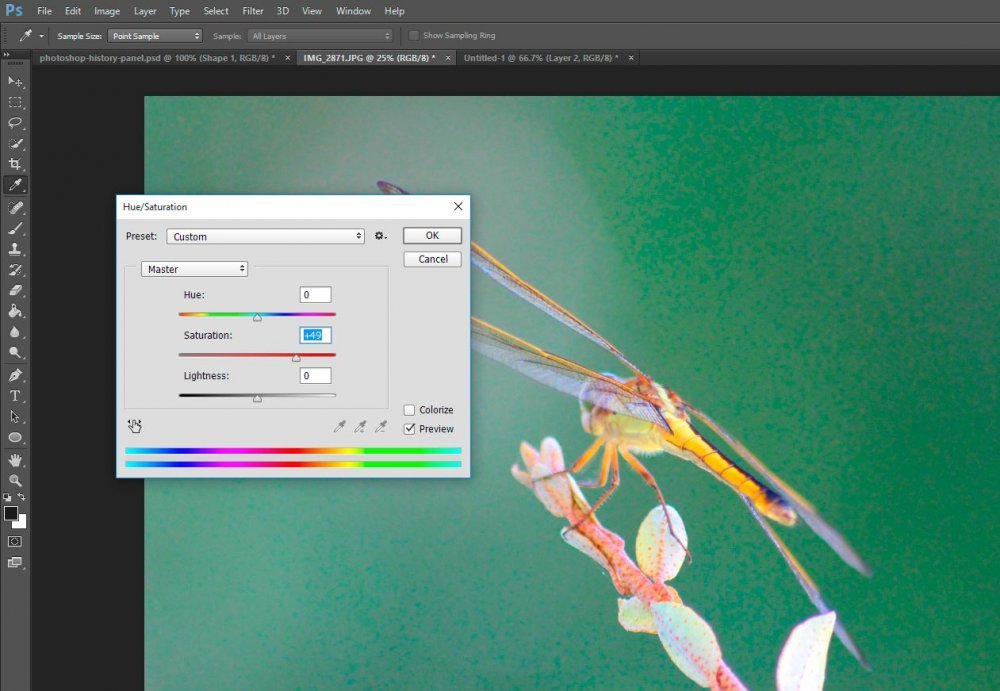
Once the tool appears, I go ahead and move the saturation slider to the right to add some color.

adobe-photoshop-over-saturated-photo.jpg

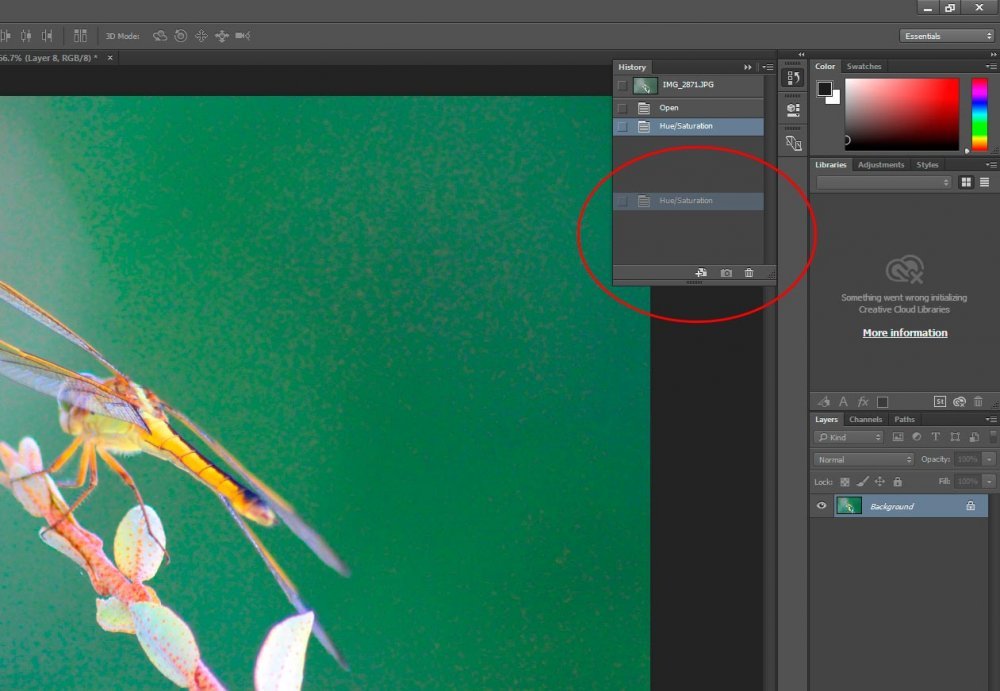
I fiddle with the slider for a while and then decide that I don’t want to adjust the saturation after all. When I go to click on “Cancel,” I click “OK” by accident. Whoops! I definitely don’t want to keep this photo in its over-saturated state. I want to undo my last action.

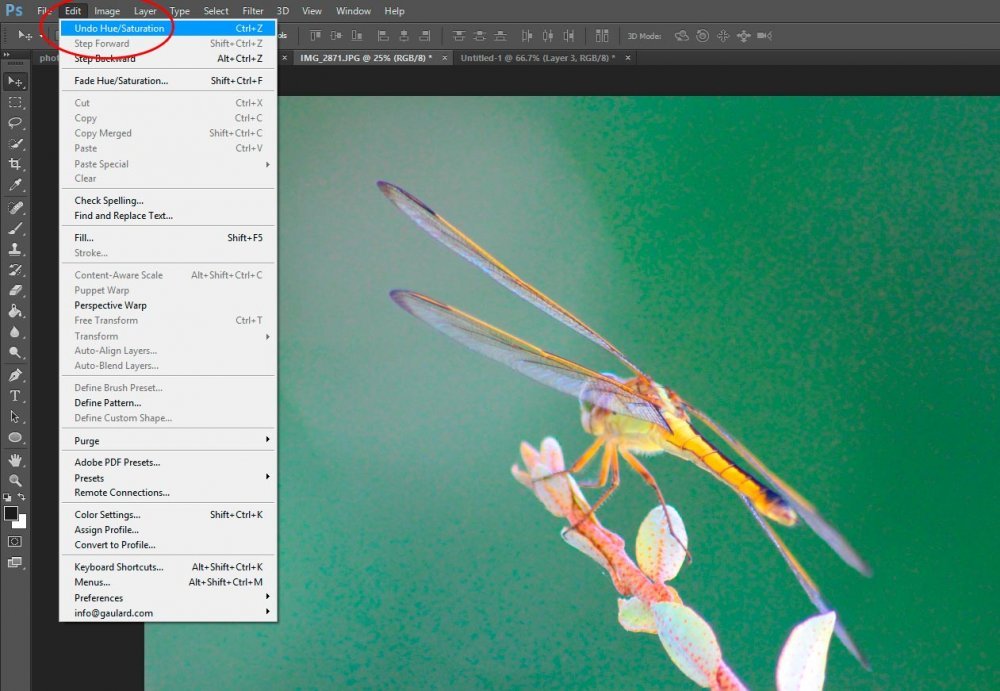
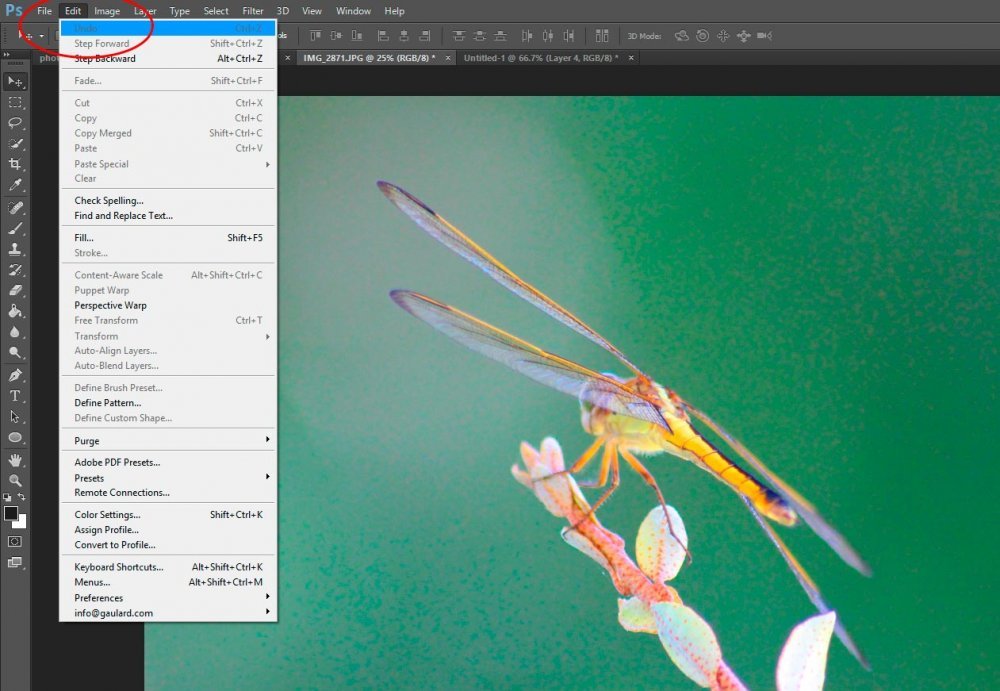
In order to undo my most recent action in Photoshop, I need to head up to the “Edit > Undo” menu and click on the first selection. In this case, it says “Undo Hue/Saturation.” Since this was the only change I made to this photo, undoing the last thing I did will bring me back to the photograph’s original state.

adobe-photoshop-edit-undo.jpg

The History Panel​

A funny thing happened while taking the screenshots for this post. While I was jumping back and forth between files, Photoshop assumed I wanted to keep my latest changes to the dragonfly photo. And by assuming that, it took away my ability to use the “Edit” menu to undo my last action. In other words, I can’t undo anything using this method.

adobe-photoshop-unable-to-undo.jpg

Now what do I do?

I’m sure you guessed it by now. We’re going to head over to the History panel to see if our last change is captured there. First though, we need to check to make sure the History panel is open in our workspace. To do this, I can head up to the “Window” menu and make sure the “History” selection is checked.

adobe-photoshop-window-history-menu.jpg

I can do that, or I can go browse through the panels that are located in my Photoshop workspace. In this case, I see the History panel hiding as an icon in my vertical icon panel.

adobe-photoshop-history-panel-icon.jpg

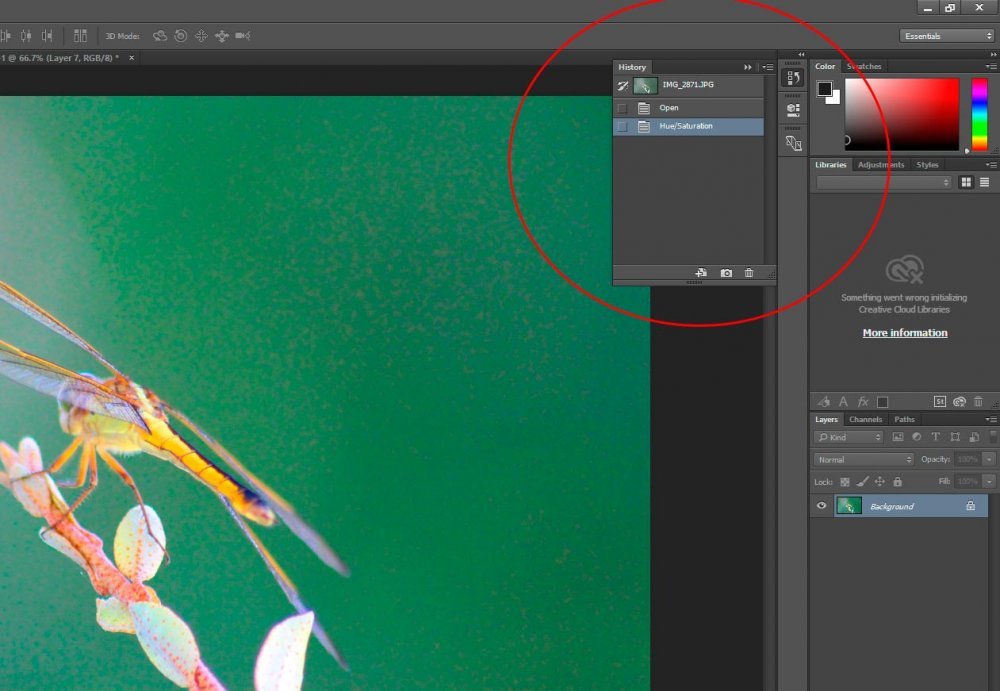
Once I click the icon, the panel opens up and we can begin looking around inside it.

adobe-photoshop-history-panel.jpg

Before we go any further, I want to fill you in on a small tip. When I first clicked the History panel icon, the panel opened in a very short state. Since I wanted more room, I clicked and dragged the very bottom bar of the panel. I rolled my mouse over the bar and waited to see that it had turned from a pointer into a double arrow and then I clicked and dragged it downward.

Okay, now that we’ve got the panel where we want it, we can take a look inside. If you check out the previous screenshot, you can see that there is, indeed, our hue/saturation action that we previously performed. That’s a good thing.

To undo something we previously did by using the History panel, we can do a few things. The first, and easiest action to take is to click our most recent change and drag it down to the small trash can.

adobe-photoshop-deleting-history.jpg

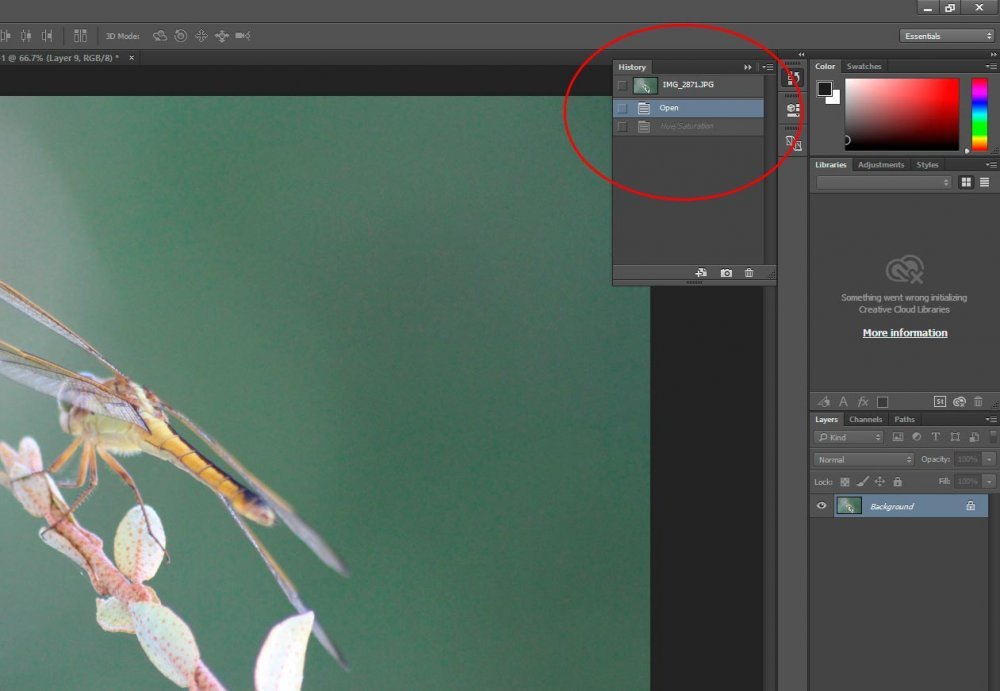
With that completed, our image goes back to its original state.

Another method of undoing one change is to simply click the history item right above your most recent one. In this case, if we do this, our photo goes back to its original state and the most recent piece of history remains in the History panel, but is darkened. If we perform another adjustment to the photo, that history state will be removed from the panel and will be overwritten by our next change.

adobe-photoshop-history-panel-clicking-previous-change.jpg

Undoing Multiple Changes​

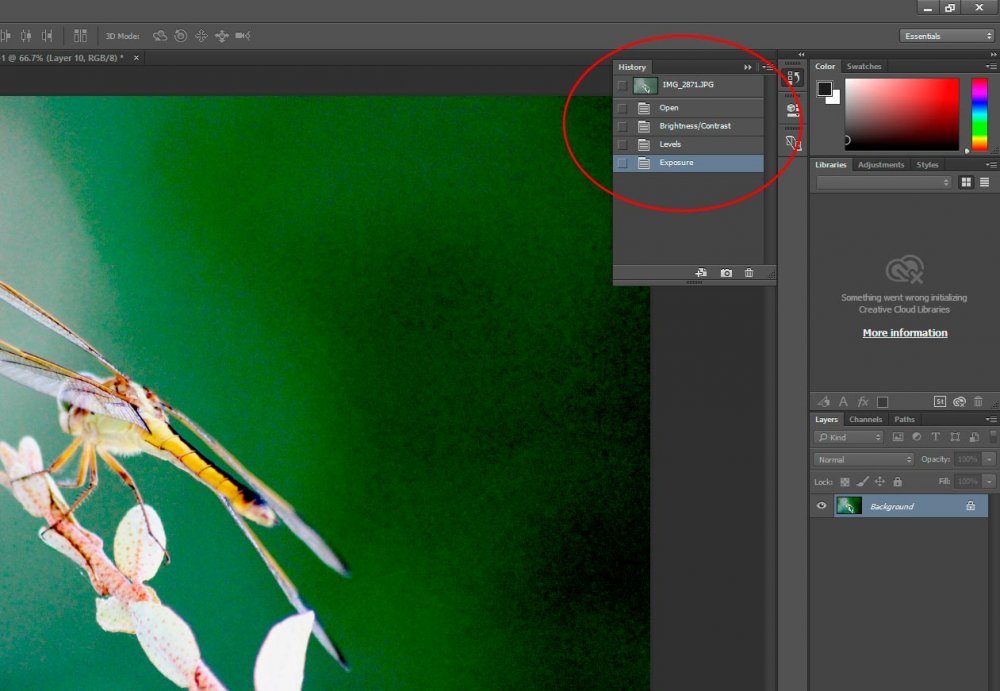
Let’s say that I make three changes to this photograph. I adjust the “Brightness/Contrast,” the “Levels” and the “Exposure.” If I do this, my History panel and photo will look

adobe-photoshop-history-panel-change-states.jpg

You can see my individual changes fairly clearly.

If you have Photoshop open, go ahead and make similar changed to an example photo like I did. If you do and start clicking those changes in the History panel, you should see something interesting take place. For each change state you click on, all changes after that one darken and your file should revert back to that period of time. It’s pretty neat.

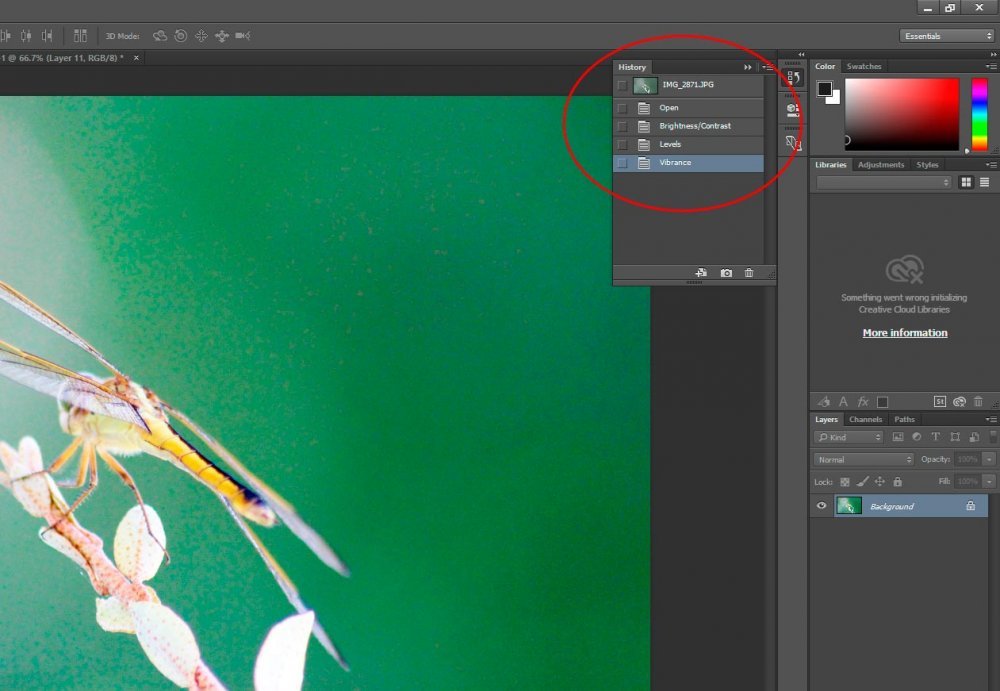
So, just like in the previous section of this post, if I wanted to undo a particular change I made to my photo and every change after that, all I need to do is click that change state. If I drag that state to the small trash can located at the bottom of the History panel, those changes will be deleted.

And just like above as well, if I simply click on a change and go ahead and make another change, every change that was after that one I clicked on will disappear, only to be replaced with what I just did. Check it out.

adobe-photoshop-altering-change-states.jpg

I’d like to take a moment to fill you in on something. When working in Adobe Photoshop, each change you make is recorded as a “State” in the History panel. While this can be a blessing, it can also become quite confusing if you are making all sorts of adjustments to your images and graphics. If you think you’ll need to go back and make changes to your file later on, you’ll want to make those changes using something called “Layers.” I’ll be writing many, many posts that include the use of Layers in Photoshop, but until then, keep your eye on how much you manipulate your images. Some changes you make you won’t be able to undo.

——

If you’ve enjoyed today’s post and found it helpful, please share it with a friend. Thanks!
 
EmeraldHike

EmeraldHike

Member
Joined
May 10, 2021
Messages
133
Reaction Score
0
Points
21
  • #3

How to Increase the Number of Available History States in Adobe Photoshop​

If you’ve ever found yourself in the middle of a big project in Photoshop, you most likely know how important it is to have as many history states available to you as possible. I sure do. I go back and forth through these things all the time.

If you’re not familiar with the phrase “history state,” I’ll tell you what it is. A history state is a place in time, in Adobe Photoshop, before you did something new. Let’s say you open a file in Photoshop and then add an adjustment layer to that file via the Adjustments panel. The action of creating that adjustment layer is one history state. Now, let’s say you add some text to the image. There’s another history state, giving you two in total. Next, let’s say you move the text and change its color. There are two more history states.

The reason I say these things are so important is because they give you the ability to essentially travel back and forth in time, right inside Photoshop. If you feel like you need to go back for some reason, you can do that by simply clicking on the corresponding history state inside of the History panel. If you need to go back all the way to the beginning because you realized you were working on the original image and you wanted to work on a duplicate for safety, you can do that too. It’s all very simple.

To learn more about the history panel in Photoshop, click through this link below.

Need to Undo? Use the History Panel in Photoshop

In today’s post, I’m going to show you two quick tricks that will help you out if you ever find yourself in a jam, similar to the one I just outlined above (saving the original file). I’ll also demonstrate, in Adobe Photoshop, how you can edit your preferences to add more visible history states in the History panel. If you’re a power user, this second tip may be crucial to your editing efficiency.

Making Changes to a File​

I already have a demo photograph opened up in Photoshop. It’s just waiting for me to make some changes to it. Let’s take a look at this image before I go any further.

cortina-car.jpg

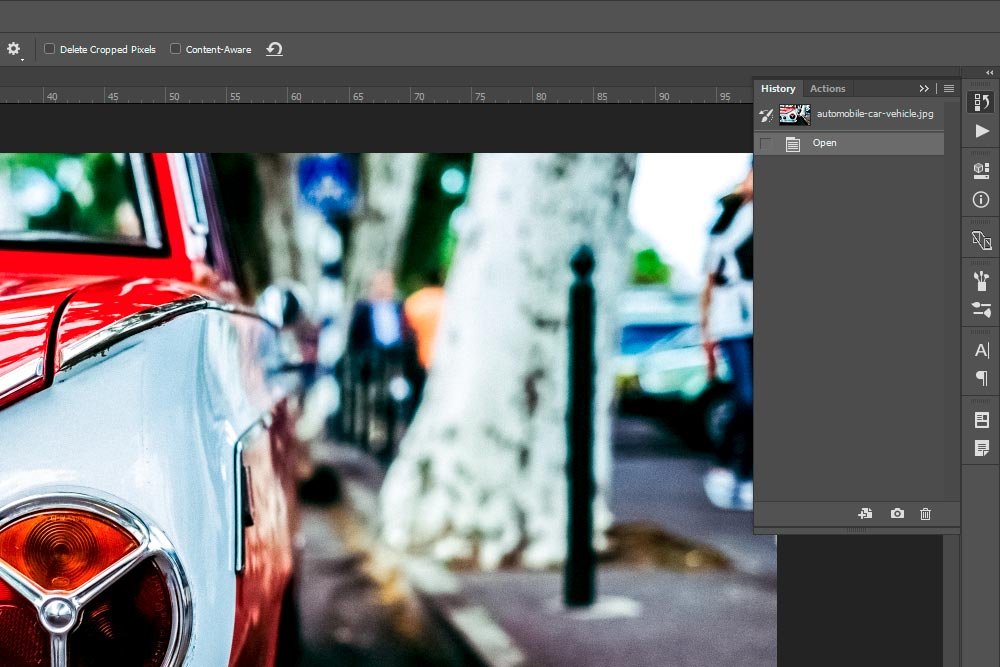
Now, let’s take a look at the current states that are available in the History panel.

beginning-history-panel.jpg

Basically, all we have so far is the name of the file and the very first action that occurred. Photoshop calls this action Open. That’s all I’ve done so far. I only opened the file.

At this point, to continue on with this demonstration, I’m going to make a few random changes to the file. The reason I’m going to do this is because I want to add some history states.

Okay, I made some changes. Let’s take a look at the image now.

finished-photo.jpg

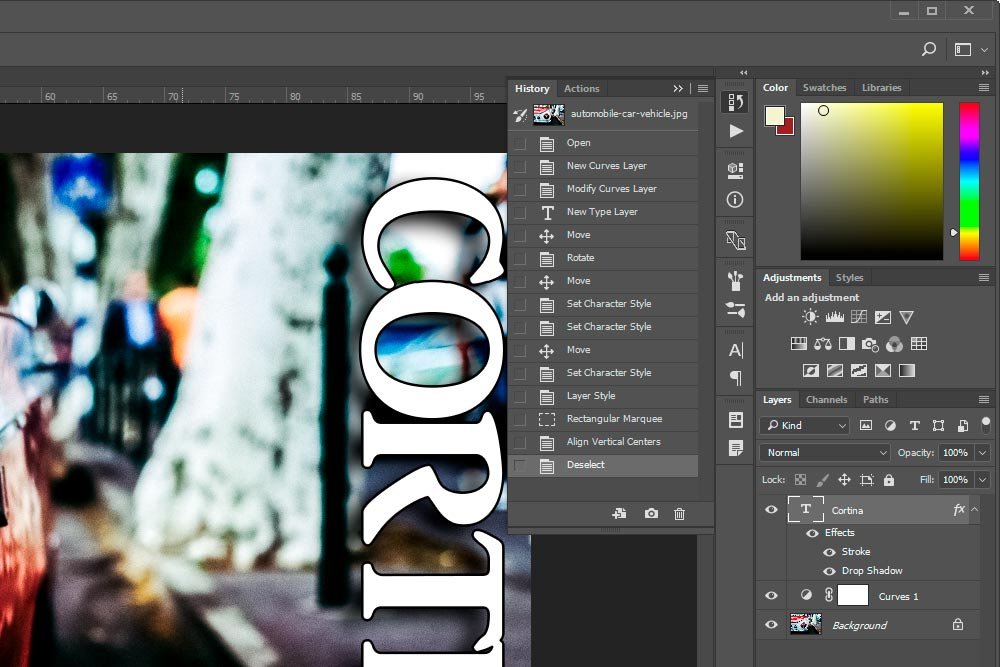
Basically, I added a Curves adjustment layer and then modified that layer to show more of a medium contrast look on the photo. Then, I added some text, moved, rotated and then moved the text again. I set some character styles related to the text, moved it again and then aligned it with the Rectangular Marquee Tool. I’d say there’s now enough data in the History panel to work with. Check out both the History and the Layers panels.

history-layers-panels.jpg

If you look at just the History panel, you’ll quickly realize there are 15 states inside of it. This is an important number that I’ll use later on, so be sure to remember it.

Going Back to the Beginning​

Something that happens all the time, let me repeat that, all the time, is when you’re working on a project while forgetting that you are, in fact, editing the original photo file that should be set off to the side somewhere and not touched. A common practice to get around this type of thing is to first make a duplicate of the file and then edit the duplicate, while keeping the original file safe somewhere. But, as I stated, accidentally working on the original happens all the time. In this section, I’ll give you a quick tip to get around this error and that will allow you to save the original from Photoshop again.

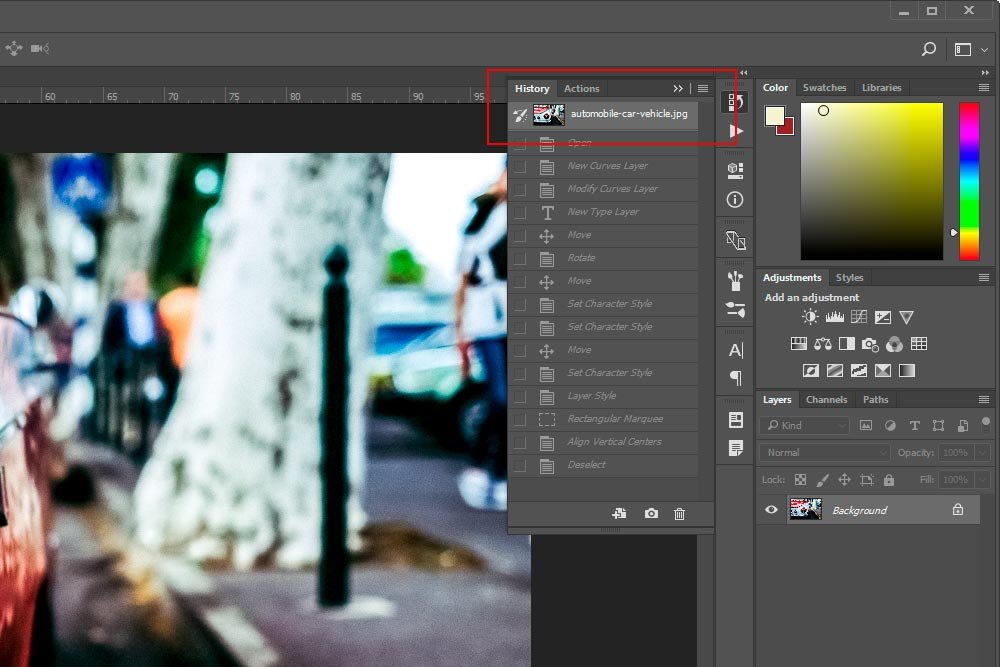
Let’s pretend the picture of the car I’m currently editing in Photoshop is the golden file. It’s the original high resolution file that, if lost, will cost a lot of money in photography services. I already began working on it and as it stands, I have 15 history states. While this isn’t too many, if I had many more, the issue would be even worse. The bottom line is that I neither want to close the file out without saving it because I’ll lose all my work nor save the file the way it is because all the work I already did will pollute the image. And I certainly don’t want to “Save As” the file over the original. That would be the worst. While there are many avenues to take at this moment to remedy the issue, the most straightforward one is to simply click the top-most state in the History panel. This isn’t actually a state at all. It’s more of the actual, untouched, file. Here, take a look.

first-history.jpg

If you look at the screenshot above, you’ll see that after clicking the top most state, which is the file name, all the other history states turned gray. Also, if you’ll notice the Layers panel, all the additional layers I created disappeared. It’s as if the file was never touched at all. It’s at this time when I can head over to the File > Save As menu item and save the file out any way I wish, to preserve the original JPEG. It’s that simple. I know, there are many methods for dealing with a situation like this, but I felt this one was appropriate because it uses the History panel and that’s what I’m discussing in this post.

Increasing & Decreasing the Number of Visible History States​

In an earlier section of this post, I mentioned that you should remember that I currently had 15 change states recorded in the History panel. I also mentioned that I had hardly made any actual changes. My point with this was to emphasize how quickly history states can accumulate. Basically, the History panel records almost everything you do in Photoshop. Just by adding some text and some effects to that text, I added about ten states. Can you imagine how fast you could surpass 100 states? 200? Or more? I’ll tell you one thing, it doesn’t take long at all when you’re working on a large project and when you’re making many small changes.

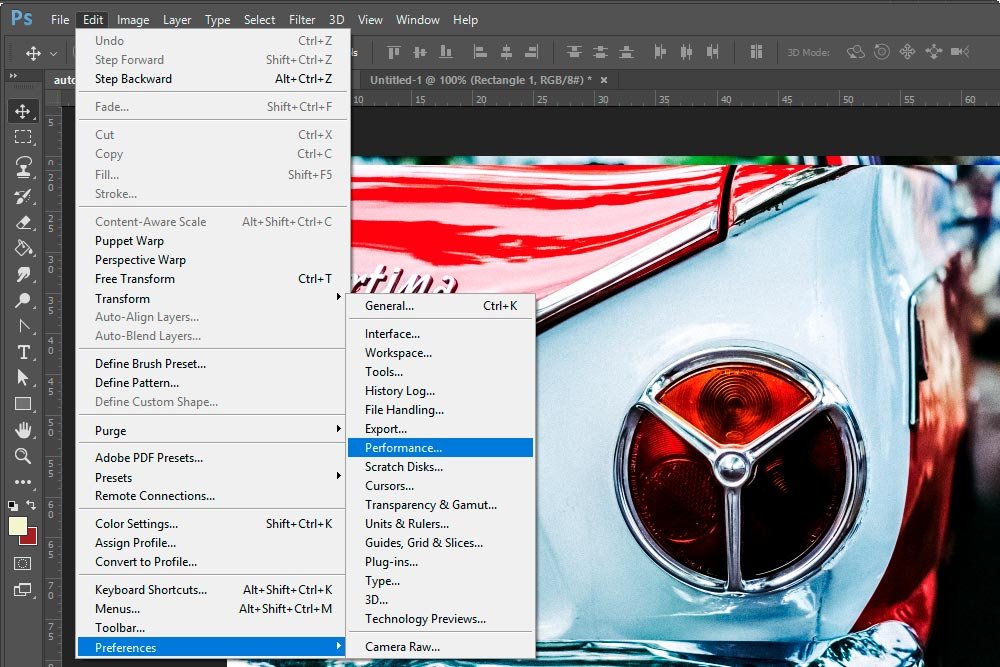
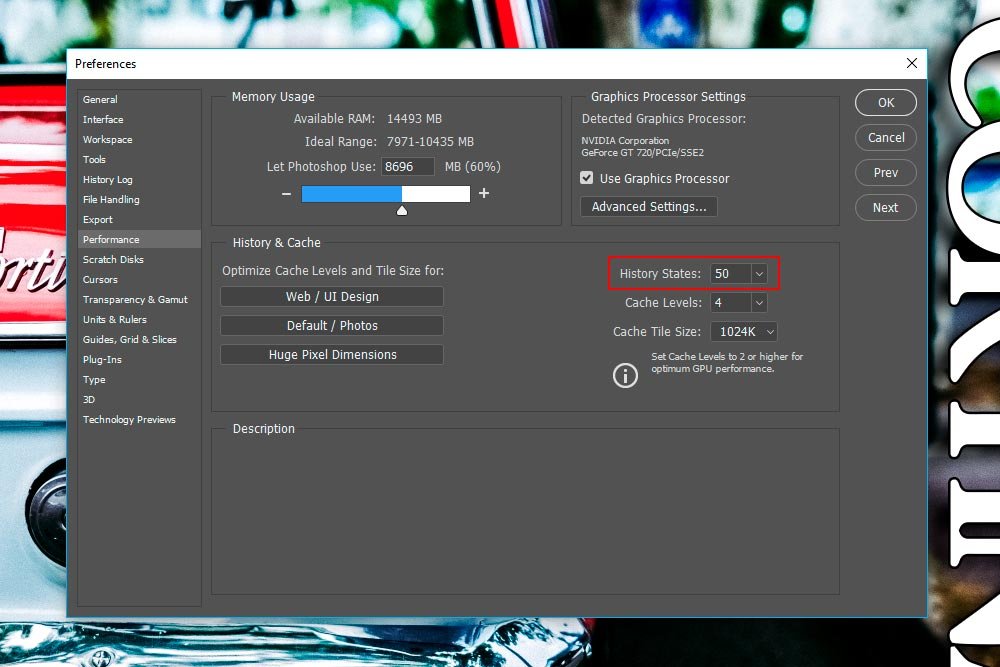
If I head up to the Edit > Preferences > Performance menu item, I’ll see that the current default recorded History States is 50.

edit-preferences-performance.jpg preferences-dialog-box.jpg

This setting is in the Preferences dialog box, in the Performance area. Since I just explained how 50 recorded states is rather low, it would be in most editor’s best interest to raise that number to something around 250. The most you can go is currently 1000, but if you set your installation to that, it may use too many resources and that might slow your computer down. A good compromise between not having enough and not slowing your computer down is anywhere between 250 and 400. Since I have a lot of RAM in my computer, I clicked the drop-down box for this setting and moved the slider to 400. That will offer me tons of recourse if I ever need to go back and clean up a lot of mistakes I made while editing a file. Again, if you need to learn the fundamentals surrounding the History panel and learn what it’s good for and how it can help you, I encourage you to read through my previous post on the subject.

——

I hope these two quick tips help you out in the future. There are tons and tons of these types of helpful tidbits floating around and I hope to bring many of them to you via this very blog. If you have any questions or concerns regarding this post, please leave them in the comment section below. Thanks for reading!
 
Top