15Katey
Member
- Joined
- May 10, 2021
- Messages
- 130
- Reaction Score
- 0
- Points
- 23
- #1

A few days ago, a friend and I were talking about this website. I told him that I write a lot about Photoshop and photography and much of the digital world. After discussing the site a bit, he asked about Camera Raw. I told him that Camera Raw is a valuable piece of the photography workflow puzzle. That you can edit much of your content right inside the interface and then move on to Photoshop. He wondered, out loud, why anyone would need to click through to Photoshop if Camera Raw offered so much. I told him that you need to save the file somehow and when he asked if you could save it straight from Camera Raw, I scratched my head. I’m ashamed to say that I’ve never use Camera Raw’s “Save” feature.
I took it upon myself to do some digging and in this post, I’m going to share my findings. Of course you can save a file directly from Camera Raw and what’s really neat is that this particular plugin offers some pretty cool options.
Opening & Editing a File
For this example, we’ll use a raw image I captured yesterday of some chard I’m attempting to grow on my windowsill. The file is in .CR2 format and has already been edited. Since I used this photo on my personal blog inside a post, I took advantage of Photoshop’s cropping and saving featured to output it as a .JPEG. But what if I didn’t want to use Photoshop’s interface at all? Could I have accomplished the same tasks inside Camera Raw? I’m not going to crop or anything like that, but I will save out the image.First, let’s take a look at my photo. As you can see, I’ve edited the colors and such.
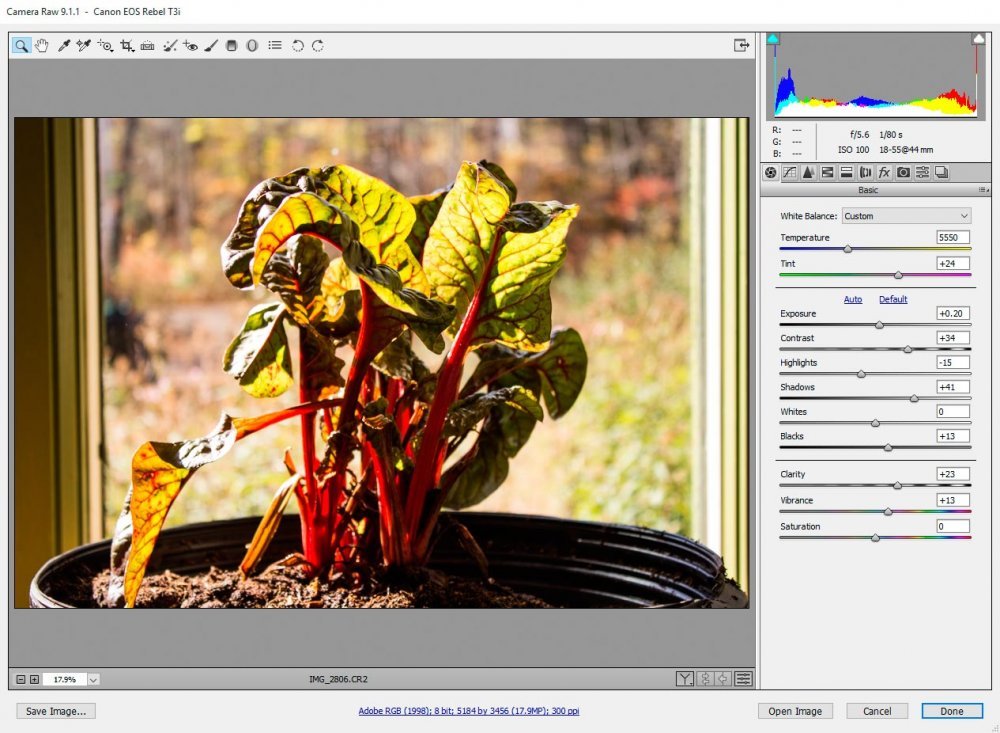
Since the editing is finished, I want to save my photo as a .JPEG because I’d like to use the photo to post online. If we take a look down at the bottom left corner, we’ll get a glimpse of the “Save Image” button. Let’s click that and see what happens.
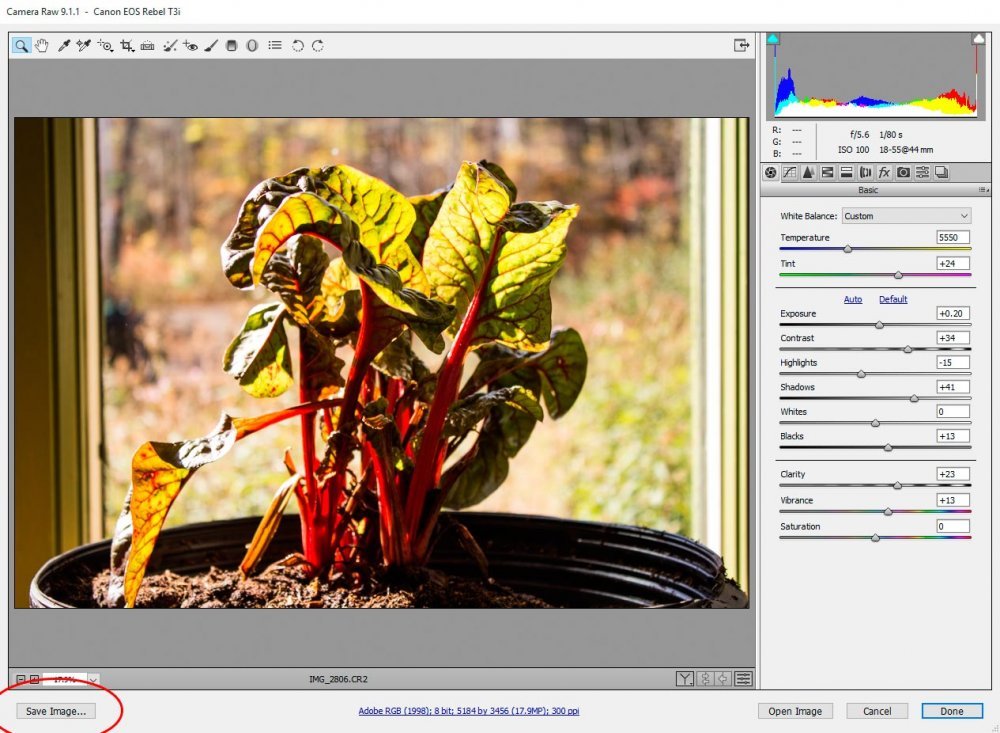
Saving a File
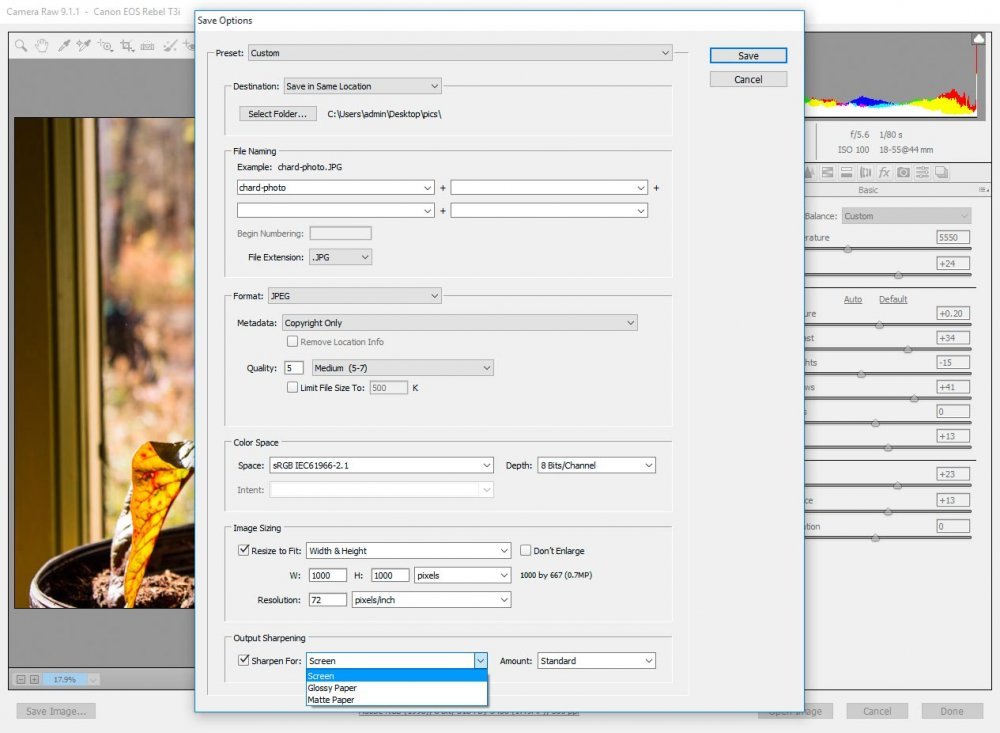
As you can see in the next screenshot, after clicking “Save Image,” we’re presented with a rather in-depth “Save Options” dialog box. Inside this dialog box, we should find everything we need to output the type of file we’d like.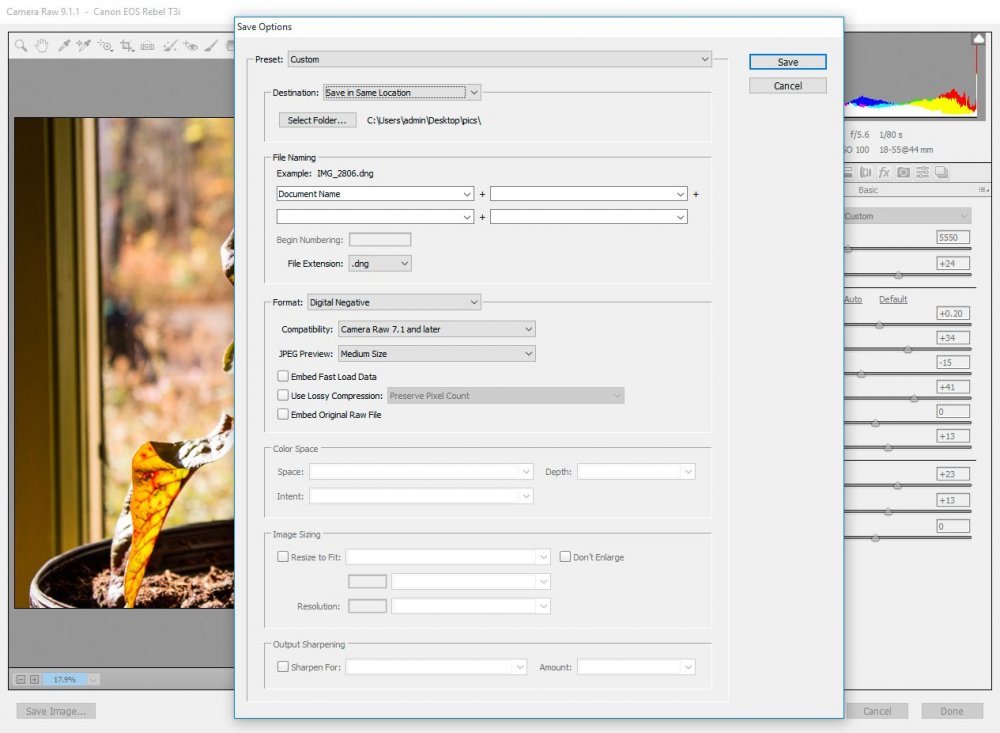
If you’ve ever saved a file from a digital image editing application, much of this should look rather familiar. Even if you have, I’ll cover a few of the sections found inside the box.
For now, let’s skip past the “Preset” section. I’ll cover that in a separate section later in this post. What I’ll do here is walk through the remaining sections.
First, we’ve got the “Destination” section. If you’d like to save your image to the same location you opened it from, you don’t need to do anything. But, if you’d like to save your image to a new location, you can either click the drop-down box and choose “Save in New Location” or simply click the “Select Folder” button. Both will open another box where you can choose your new folder to save your file to.
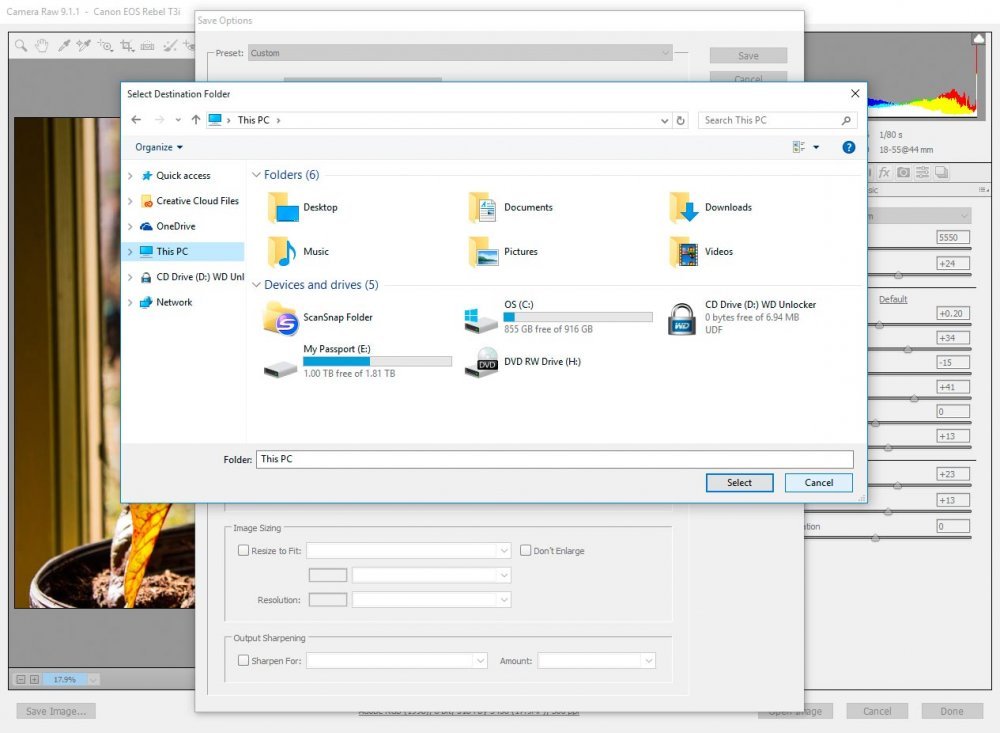
From here, we can go ahead and choose our new folder. If I’m going to quickly post an image to the web, I usually choose my desktop.
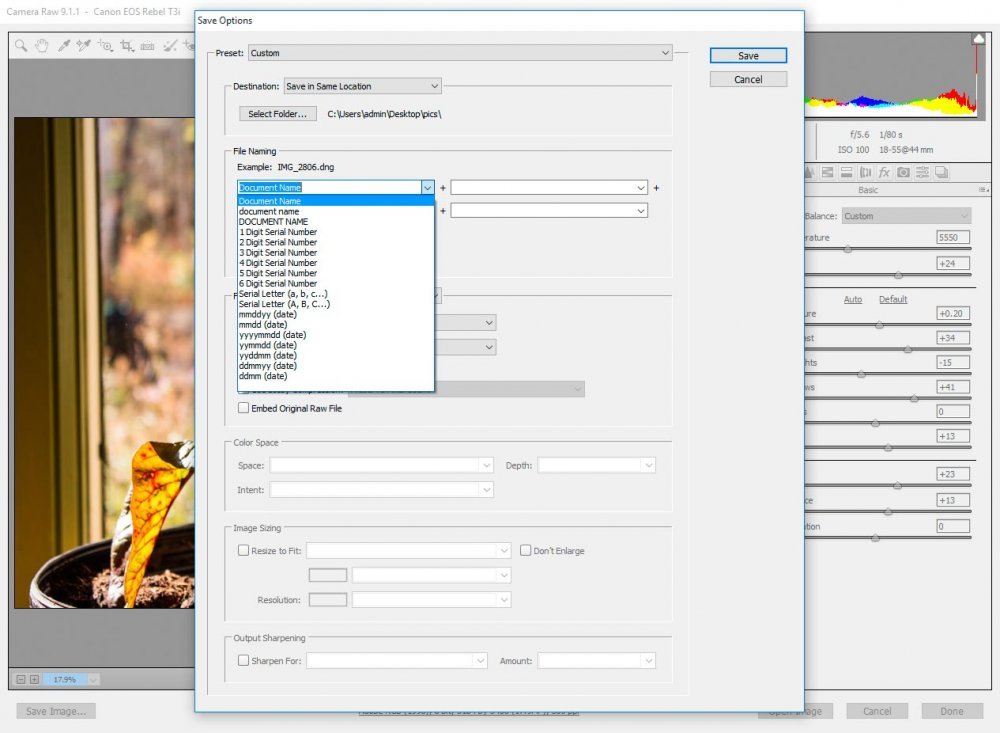
Inside the “File Naming” section, we’ve got a few more decisions to make. We can name our file and apply a numbering sequence to it. We can even apply our preferred extension. I’ve actually already discussed file naming conventions in a few of my previous posts. If you’re interested in reading through any of them, I suggest you begin with one I wrote on Adobe Bridge. I talk about how you can rename files in that application, but much of the naming convention section can be applied to this section in Camera Raw.
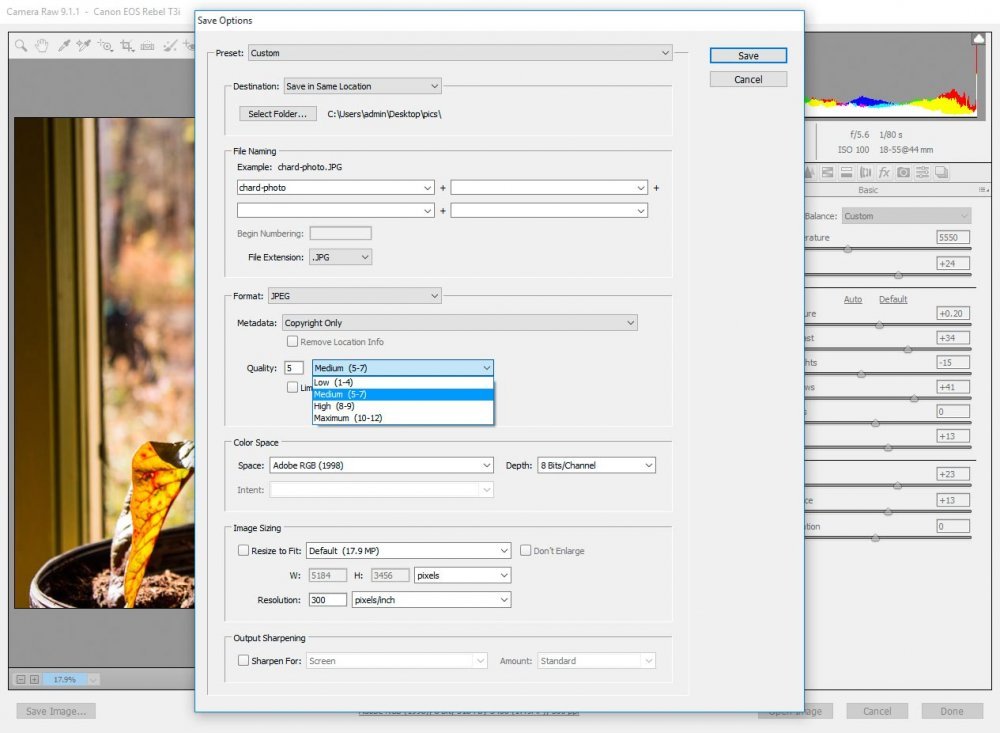
In the next section called “Format,” we make decisions based on, yes, you guessed it, file formats. As you can see in the screenshot below, things in this section changed a bit because I chose to save as a .JPEG in the previous section. If I chose another extension, the options in this section would be different.
This section is kind of nice because I can choose to limit my metadata. If I would like to keep my file size to a minimum, I can select “Copyright Only” in the metadata drop-down box. If I wanted to include all possible metadata, I can choose “All.”
When saving an image for the web, one of the most important decisions to make is what quality you’d like your image to maintain. In a perfect world, we can keep our quality as high as possible, but in a world of slow internet connections and smart phones, we’ll definitely want to lessen the image quality somewhat. I usually stay somewhere in the “Medium” area, which offers a quality of “5.” If I wanted to get more exact than that, I could always type my desired quality in.
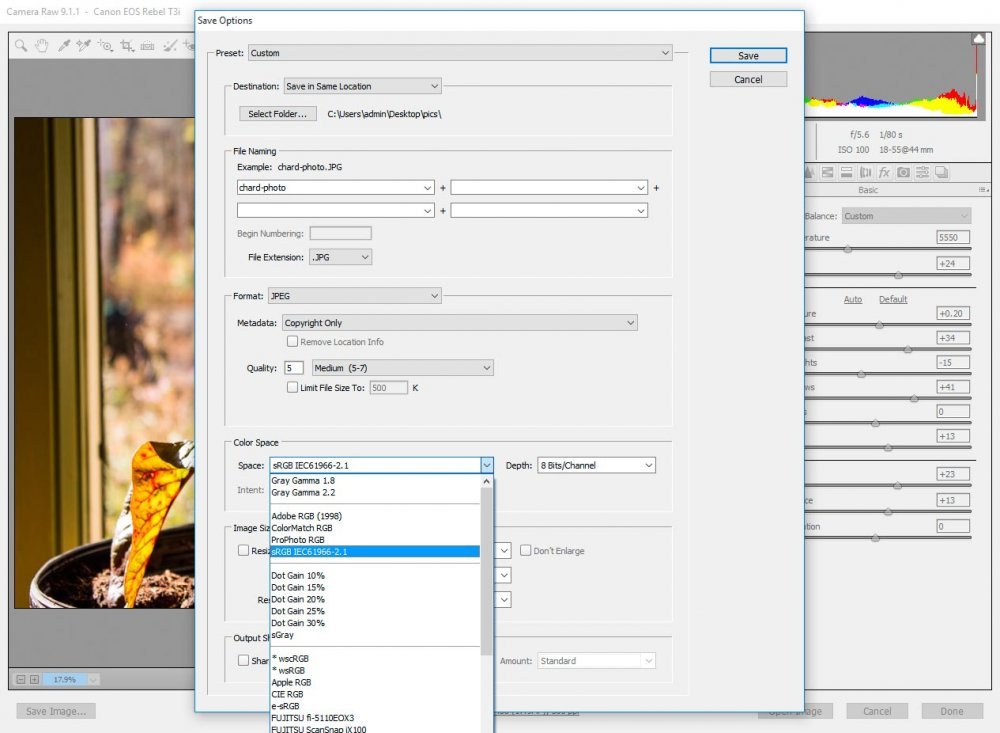
I’m not going to get into the “Color Space” section all too much. What I will do is refer you to my post that I wrote on color space when it comes to Adobe Photoshop. I’ll also tell you that when saving a file for the web, you’ll want to choose a smaller color space, such as “sRBG” because, simply put, you just don’t need a huge color space like “ProPhoto” when viewing images online. So, in this case, we’ll select “sRGB” and move on.
As I did my research on saving files directly from Camera Raw, I was surprised to find the next section in the “Save Options” dialog box. This one is really cool. The section is called “Image Sizing” and it gives us the ability to choose between a few options for how we’d like to see the physical output of our images. Take a look at the screenshot below.
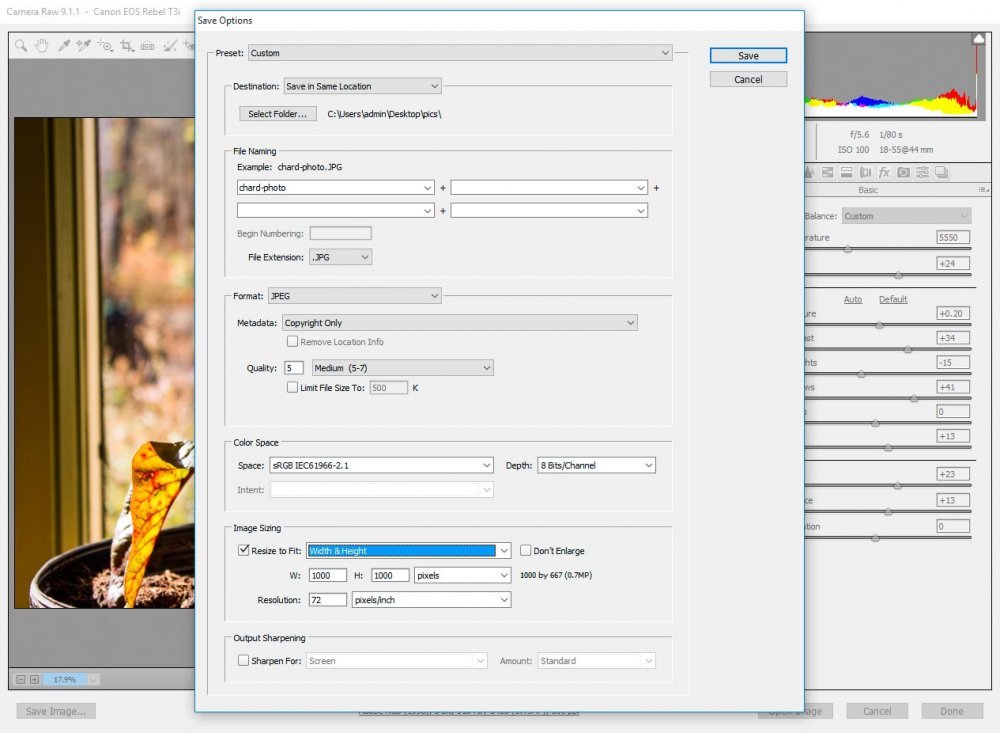
If we click on the drop-down box, you’ll see that we’ve got a few choices when it comes to how we’d like to size our final image. Those selections are “Width & Height,” “Dimensions,” “Long Side,” “Short Side,” “Megapixels” and “Percentage.” As we click through each one, the following related options change to fit our selection.
In my case, I chose “Width & Height” because I want to limit either of the sides to 1000 pixels. I generally keep the images I post to my personal blog no larger than 1000 pixels for both the height and width. And as you can see, I typed my desired dimensions into the corresponding boxes below the drop-down and also reduced the resolution to 72dpi, which is also good for the web.
Now, if we wanted to print our image or photo directly after saving from Camera Raw, there is the ability to sharpen your file in the next section. This one is called “Output Sharpening” and allows us to sharpen for either the screen (what we’ve been talking about above), for glossy paper or for matte paper. We can also choose between low, medium or high for how sharp we’d like our image to look. Since I use the sharpening functions inside the Camera Raw itself while I edit images, I don’t think this feature would be useful for me.
Creating a Preset
If you think about it, this is a lot of work just to save a file. That’s why the fine folks over at Adobe gave us the ability to create what’s called a “Preset.” Presets take the information we typed in during this long “save options” process and saves it so we can recall it easily later on.If we choose the “Preset” drop-down box at the top of the dialog box, we’ll find that we can select the option that gives us the power to name the collection of data we just typed into the fields below.
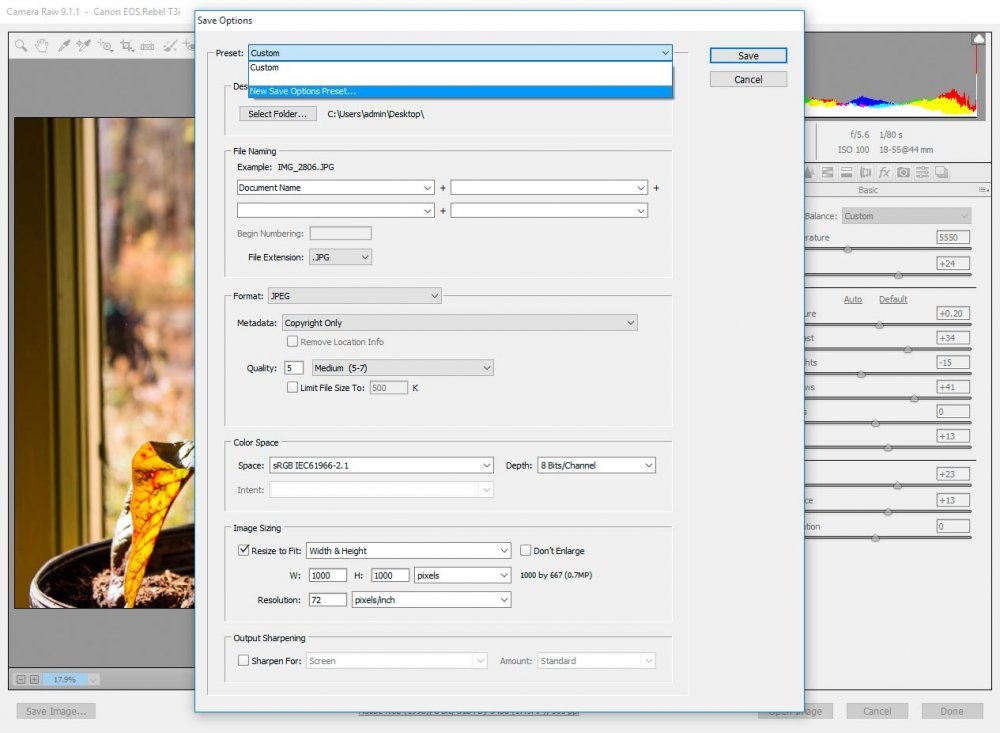
If we click on “New Save Options Preset,” we’ll see a box appear where we can name our preset. I named mine “Personal Blog Image.”
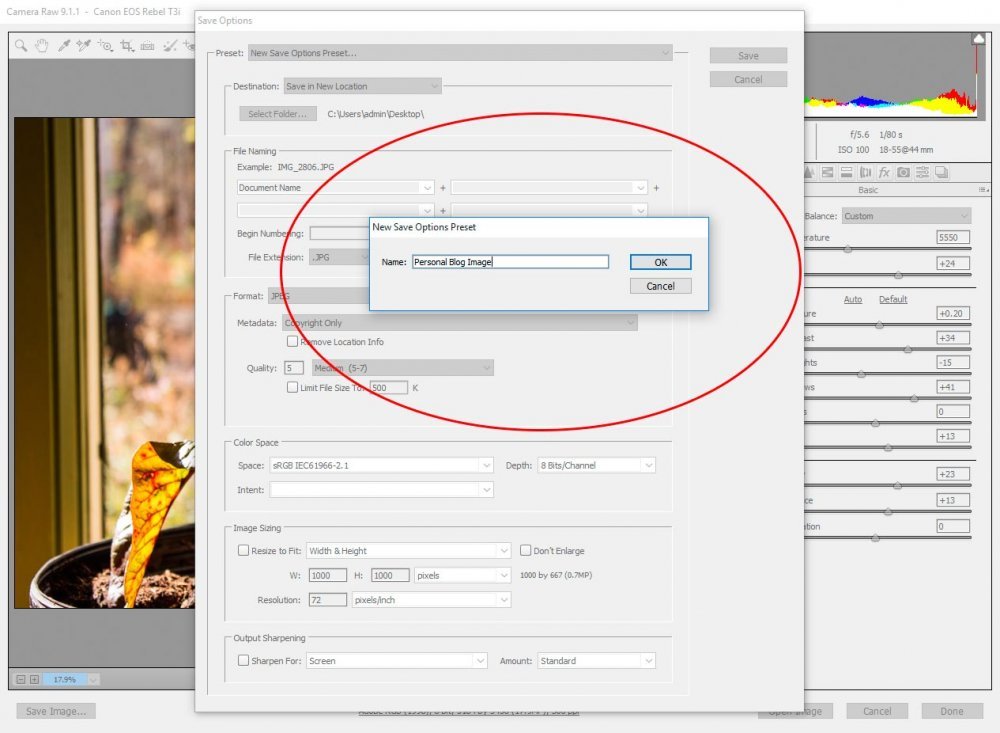
After the naming is finished, I clicked “OK” and my new preset is saved inside Camera Raw for later use. Because of this, I don’t have to go about refilling all those fields. I can simply give my file a file name and click “Save” in the upper right corner. Whether you create a preset or not, you’ll still need to click “Save” to save out your file.
——
If you’ve enjoyed today’s post and found it helpful, please share it with a friend. Thanks!
