EmeraldHike
Member
- Joined
- May 10, 2021
- Messages
- 133
- Reaction Score
- 0
- Points
- 21
- #1
Imagine for just a moment that every time you launched Photoshop and opened a picture, only three colors appeared. The colors are red, green and blue. That’s it. So, no matter how wonderful your camera is and no matter how vibrant and deep your colors show in real life and on your camera’s viewfinder, the minute you open and look at that picture in Photoshop, all you see are those three colors. That would be pretty horrible, wouldn’t it?
Now, I know that example was somewhat extreme, but something similar to it actually exists. While the “space” for those three colors in my example was limited to only three, there are other color combinations and scenarios that have limits as well. For example, the RGB color space is a combination of those red, green and blue colors. If you mash those three up in all possible combinations, you can have a maximum value of 16,777,216 possible colors. Is that enough? Well, while the number I just typed does sound kind of large, many folks would argue it isn’t.
In this post, I’m going to discuss a bit about color. I’m going to let you in on a little secret that can help out with setting Adobe Photoshop to give you a nice, large color space to work with and I’m going to explain exactly how to go about adjusting a simple setting that will make your photos come alive.
Photoshop’s Default Color Setting
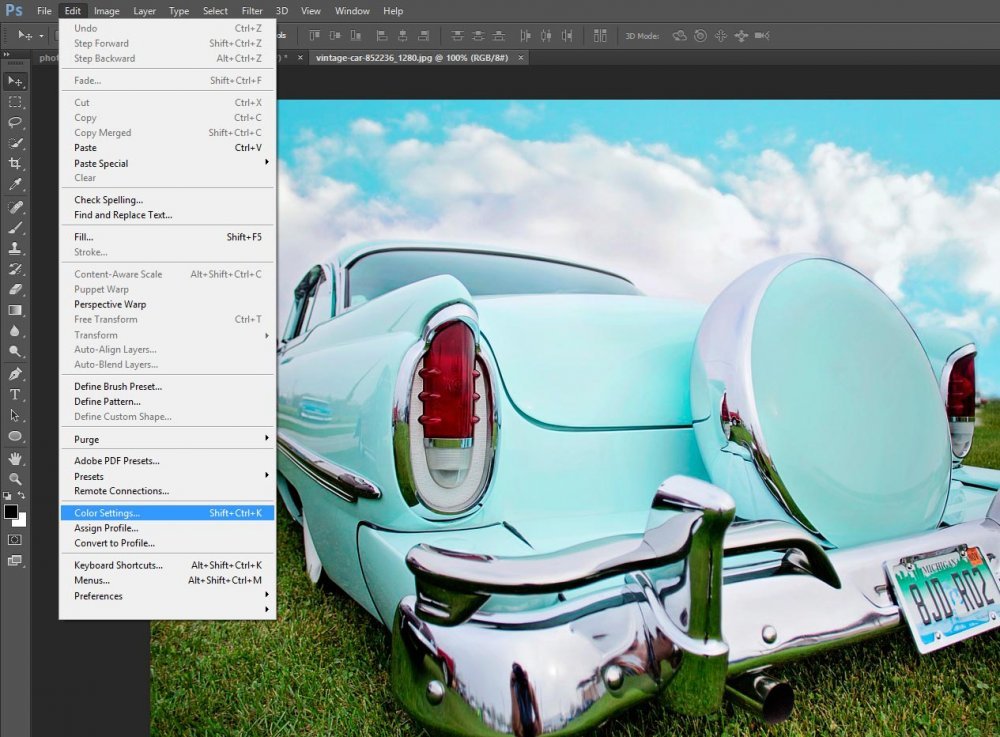
When you install Photoshop, everything looks normal and as it should. Because of this, many people go ahead and begin opening, editing and exporting their photos without a care in the world. I did this type of thing for years before I discovered that I was working in a limited color space. Let me explain what I’m referring to.If you haven’t already, go ahead and open your version of Photoshop. Head up to the main menu at the top of the program and click on “Edit.” From there, roll on down to the “Color Settings…” selection. It should look like this:
Once you click that selection, a dialog box should open up that looks like this:
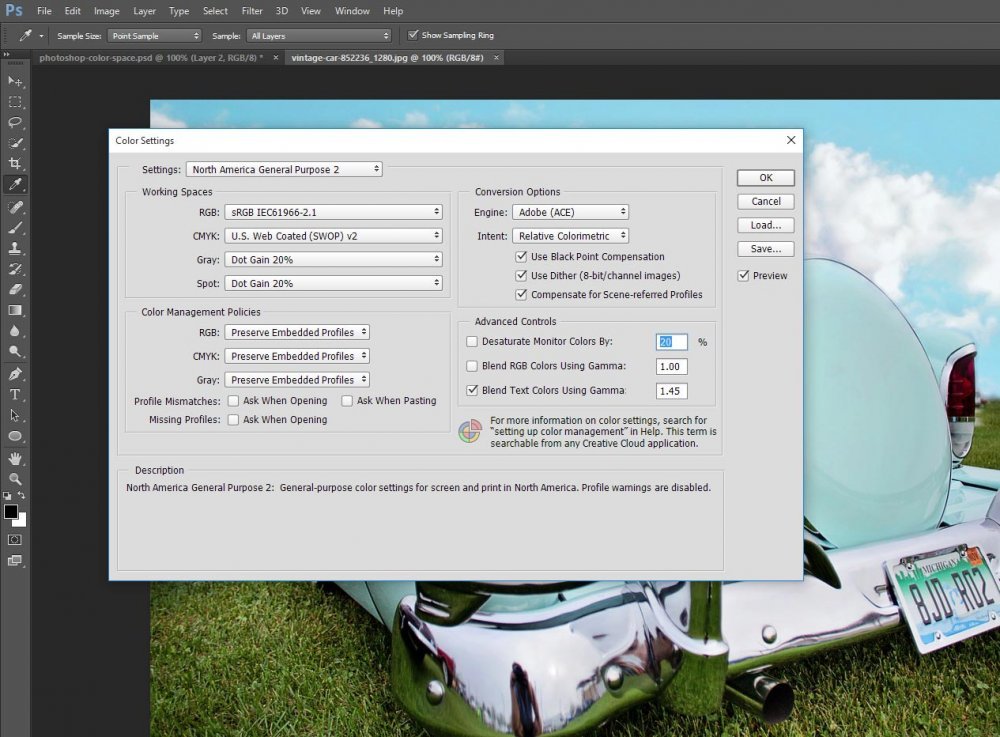
Now, if you’ll take a look at the very first drop-down box to the right of the word “Settings,” you’ll notice that it’s set to “North American General Purpose 2.” And right below that, inside the “Working Spaces” area, to the right of the word “RGB,” you’ll see the current RGB color space set to “sRGB IEC61966-2.1.”
Okay, here’s the thing. When you take a photo with your digital camera, that camera captures a huge array of colors. It’s really big. If you took the photograph you just captured and printed it with a really good printer, directly from your camera, you’d have one heck of a vibrant print-out.
The thing is, the minute you remove your photograph from your vibrantly color spaced camera and open it with Photoshop inside this sRGB IEC61966-2.1 (sRGB for short) color space, you’re essentially squeezing what was once vibrant and dynamic into a limited color range. The result of this probably won’t be all that noticeable on your computer screen, but certainly will be once you print the photo out with a quality printer. The problem is, when you edit a photo that has a large color space inside a smaller color space, you’re clipping some of the colors out of your photo. You may have seen this in practice – photos or graphics with “bands” of colors instead of smooth gradients. That’s the clipping in action. I think you’ll agree, this isn’t ideal.
So, the question is, what can we do about this? How can we enlarge our color’s working space so the photo we output from Photoshop has a wider range of colors? Oh, that’s easy.
Expanding Your Color Space to Adobe RGB
There’s a debate going on out there that I’m sure will be over in just a few short years (because technology is advancing). The debate is over which color space to set Photoshop to use. In this section, I’m going to advise you to set Photoshop to use the Adobe RGB (1998) color space and in the next section, I’ll talk about an even larger one.Our goal here is to change Photoshop’s default color space to a larger one, without going overboard. Since we already know sRGB is relatively small, the logical step is to upgrade to Adobe RGB. This next color space offers us the ability to view and reproduce a far larger percentage of colors than what the default sRGB color space gives us. In return, we get deeper and more saturated photographs. And since many quality ink-jet printers are compatible with this Adobe color space, it’s highly popular with the majority of professional photographers. It’s currently the safest and best option.
I bet you’re wondering how to go about setting your installation of Photoshop to this new color space. I’ll go over that now.
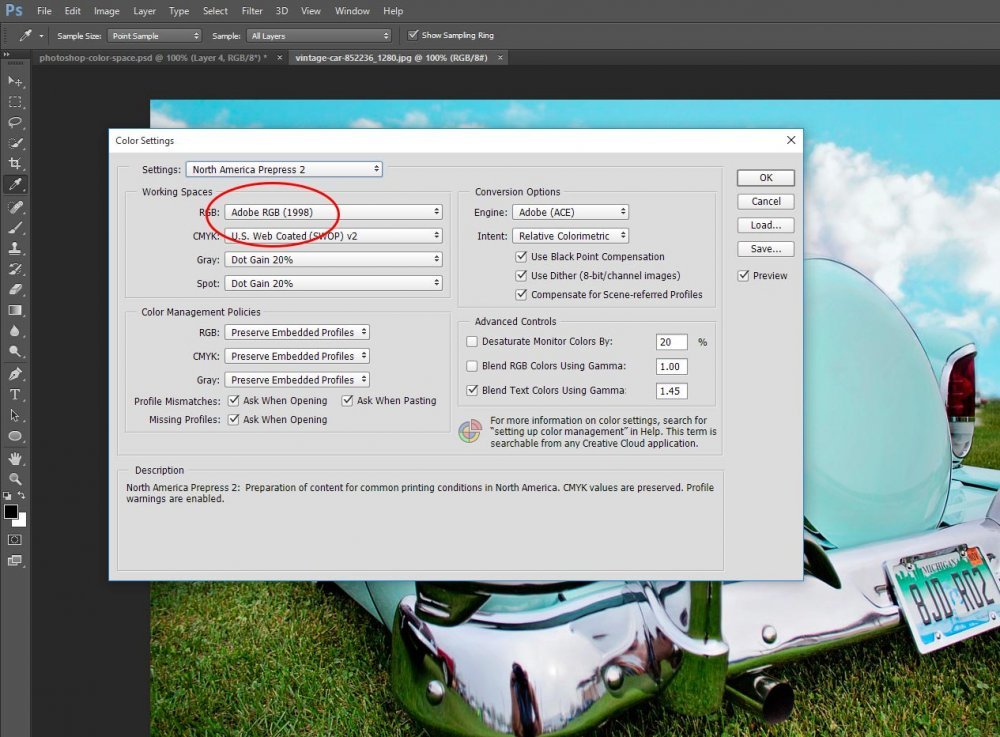
Go ahead and get back into Photoshop. Inside the dialog box I referred to above, click on the “Settings” drop-down box and select “North American Prepress 2.”
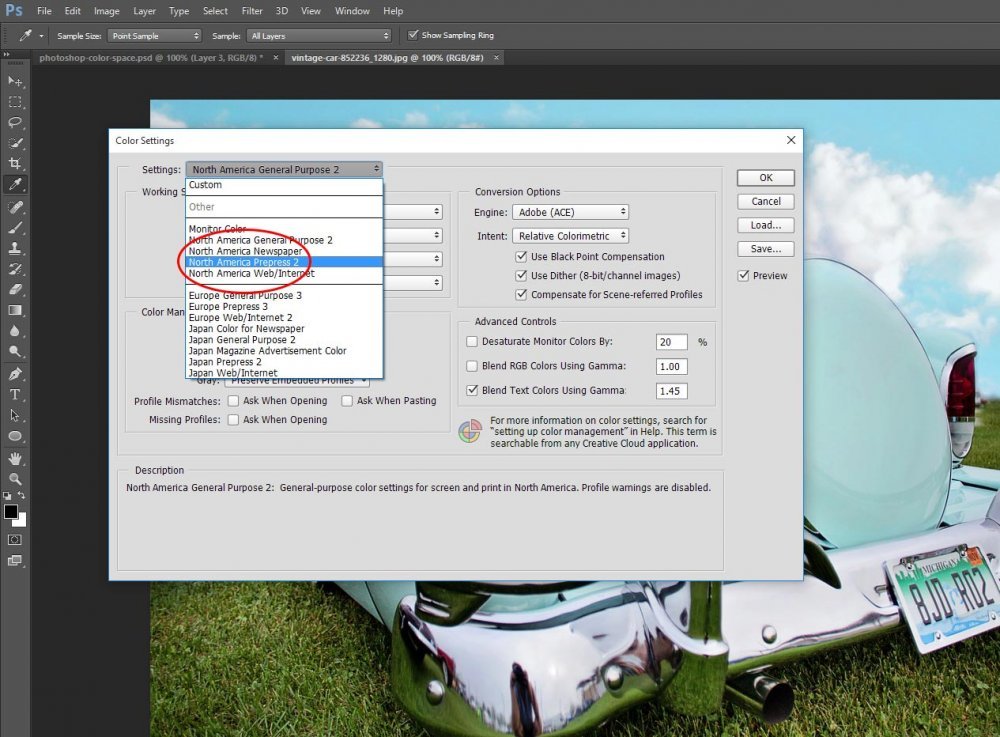
Once you do that, you should see the value in the lower “RGB” drop-down box change from “sRGB” to “Adobe RGB (1998). This is where you want to be.
Further Options For a Larger Color Space
If you’re an advanced photographer and have top notch equipment, you may want to enlarge your color space even further. The next step in this arena is called “ProPhoto RGB.” This one is really huge, but for most people, it isn’t practical because of its size. It can possibly lead to posterization due to the large gaps between one level’s data point and another. It can work, however, if you change a few other settings in Photoshop. Those are beyond the scope of this post though.If you’re interested in further reading on color and color space settings in Photoshop, I can suggest you visit “Photoshop Essentials,” where they give a nice description on a wide variety of topics in this regard.
——
If you’ve enjoyed today’s post and found it helpful, please share it with a friend. Thanks!
