Search

Adjusting Canvas Size & Color in Adobe Photoshop

  • Thread starter Newman
  • Start date
Newman

Newman

Member
Joined
May 11, 2021
Messages
106
Reaction Score
0
Points
23
  • #1
adjusting-canvas-size-color-adobe-photoshop.png

There are many reasons why someone might want to adjust the canvas size of a workspace in Photoshop. I can tell you that, in the past, I’ve resized the canvas areas of photographs I used on websites . These are the days before things like this were handled by CSS. While it wasn’t a perfect solution, it was a workaround that buffered the page copy away from sitting right up against the image. It worked well and many designers still use this technique today.

Resizing the canvas area isn’t tricky at all, but there are a few methods to go about accomplishing the task. And in this post, I’ll cover some of those methods.

Opening Our Image​

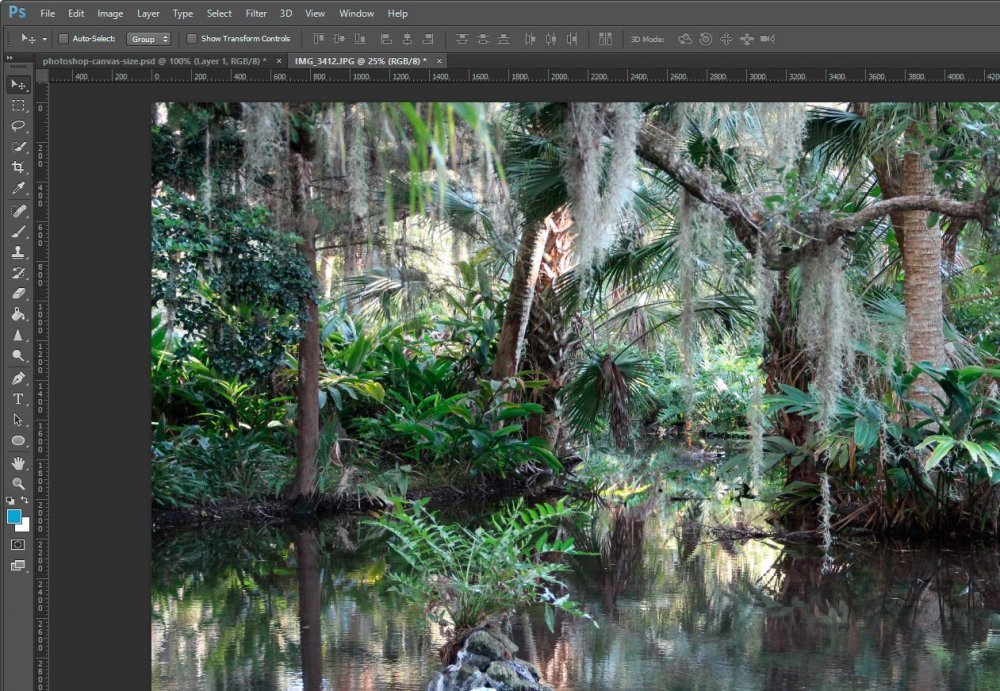
The very first thing we need to do is to open our image in Photoshop. In my case, I’ll open up one of my trusted sample photographs that I took in 2013 while visiting a park in Florida.
opening-photograph-adobe-photoshop.jpg

The first method of adjusting the canvas size will be the most precise. This is the method you should use if you have specifications to follow and need to produce an exact document.

Adding a Layer​

I’ll be writing a few posts in the future that will cover layers in Photoshop ad nauseam, but for now, if you’re interested in what I’m talking about in this post, my instructions will be simple enough to follow.

Now that we’ve got our image opened up in our workspace, we need to separate it from everything else. We need it to “float,” for lack of a better term. The way we separate something from something else in Photoshop (in this case, the image from the workspace or canvas), we turn it into a layer.

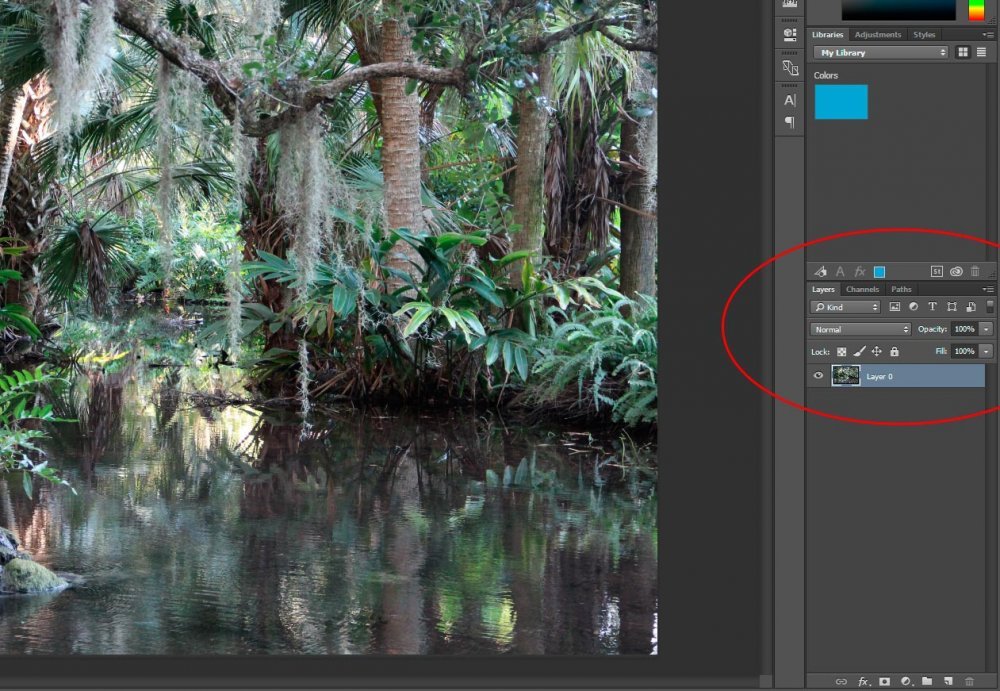
If you take a look down in the “Layers” panel, you’ll notice that what we currently have is something that looks like it’s locked. To unlock the image layer, all we need to do is click on the lock icon that’s inside the layer itself. This will give us flexibility when it comes time to adjust our canvas.
unlocking-layer-adobe-photoshop.jpg

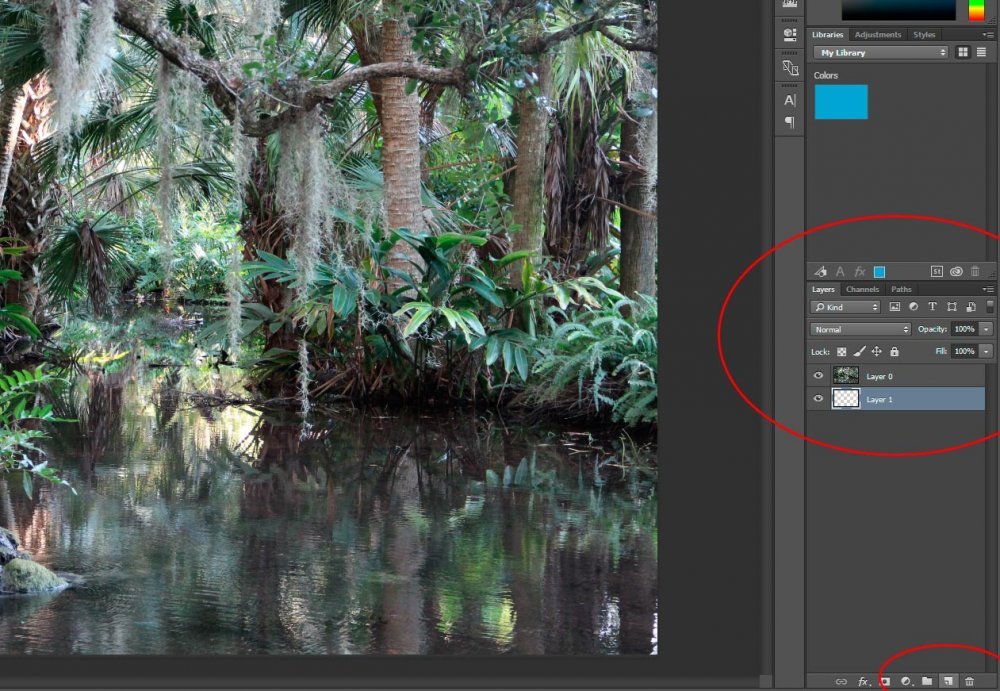
Now that we’ve got the image separated from everything else, we can resize the canvas right now or add another layer to make things easier later on. I prefer to add another layer first. To accomplish this, I head down to the bottom of the Layers panel and click the small “Create New Layer” button.
create-new-layer-adobe-photoshop.jpg

In the screenshot above, the bottom red circle surrounds the Add New Layer button and the top red circle surrounds the new layer I added. I also clicked and dragged the layer to position it below the image. Now, the image layer floats on top of the transparent layer.

Adjusting the Canvas Size​

As I mentioned above, we could have gone ahead with this next step without adding another layer. If we did, we would have only been able to save and export the image with a transparent margin. Now that we have an additional layer though, we can export our image with either a transparent margin or one that’s filled with the color of our choosing.

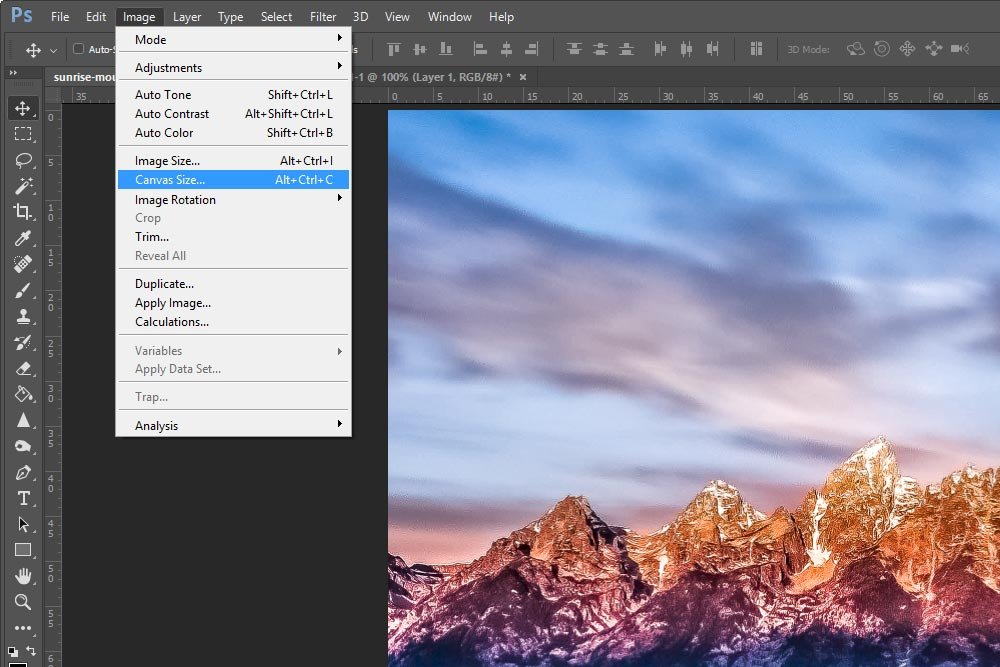
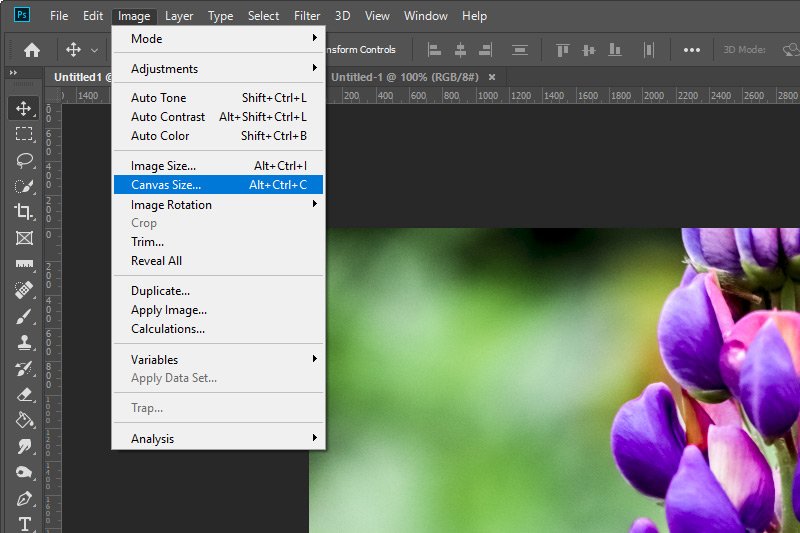
To resize the canvas, we need to head up to the “Image > Canvas Size” menu.
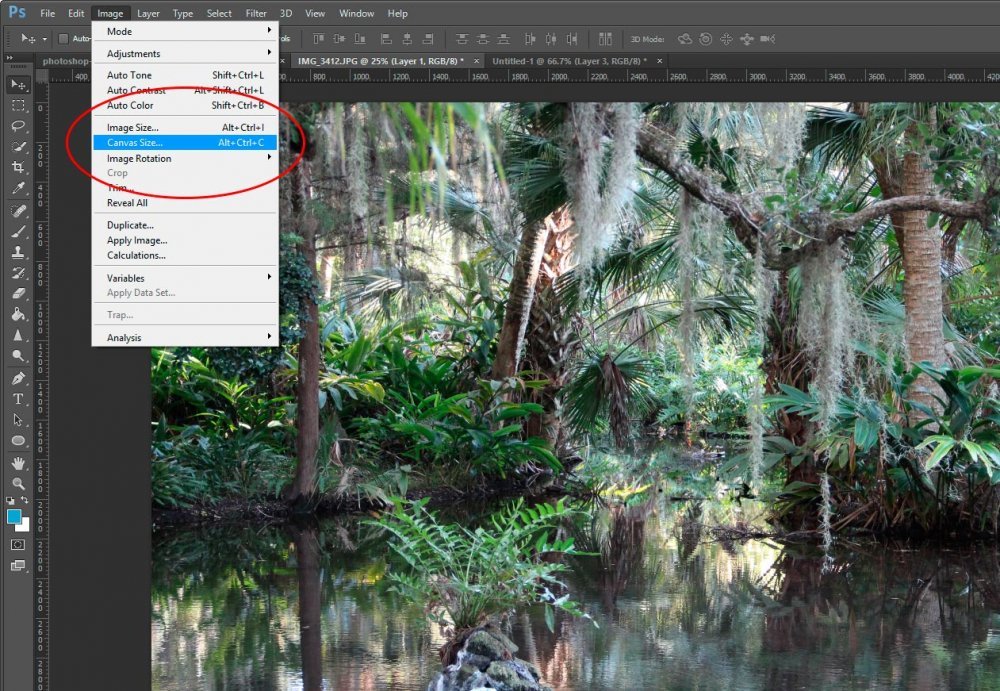
image-canvas-size-menu-adobe-photoshop.jpg

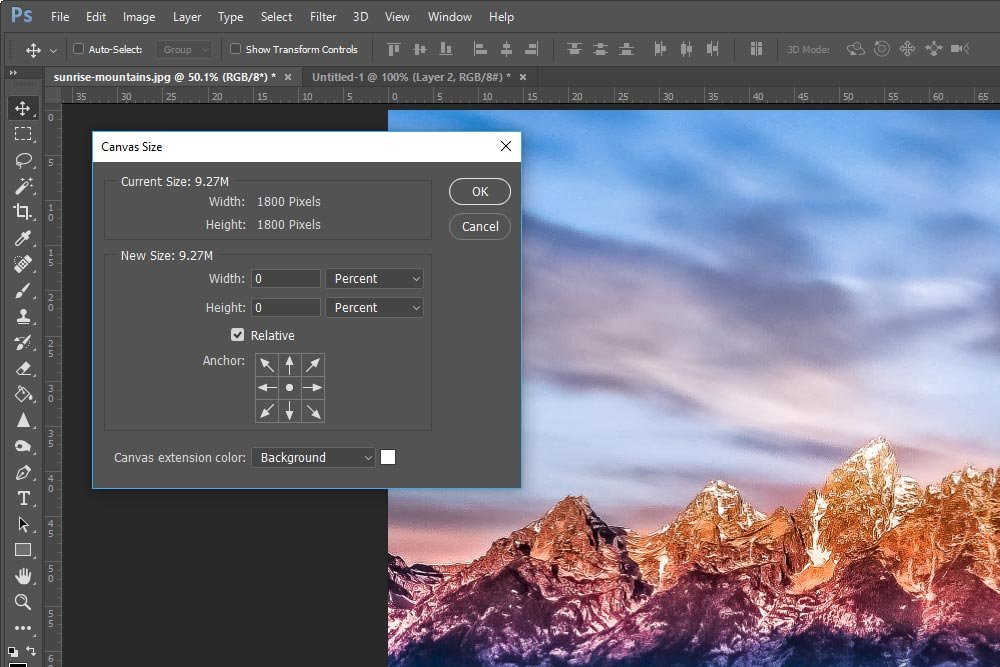
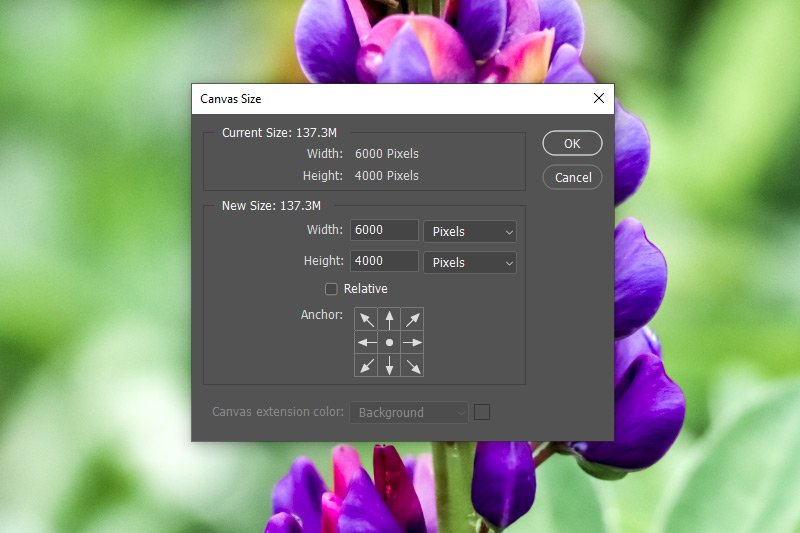
Once we do this, we’ll see a nice “Canvas Size” dialog box appear. This is where we get things done.
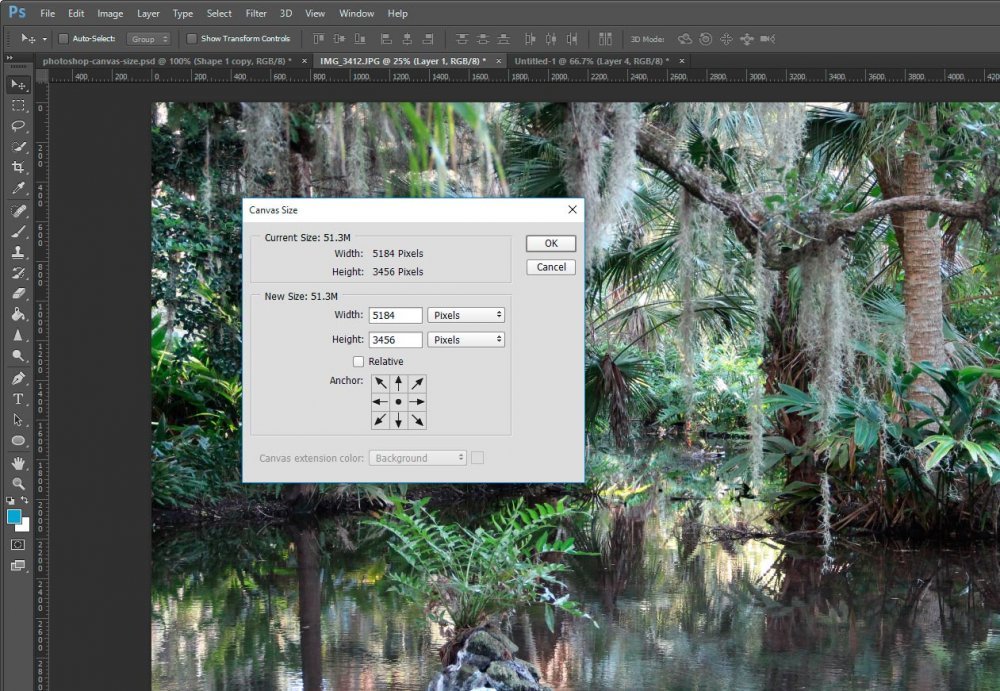
canvas-size-dialog-box-adobe-photoshop.jpg

As you can see in this dialog box, we’ve got some options to choose from. Since I already have this image displayed in pixels, we’ll keep it this way for simplicity.

Let’s say that you have a photograph that’s 5000px wide and 3000px tall. If you wanted to add a 50px margin all the way around the photo, all you would need to do is change the 5000px value to 5100px and the 3000px value to 3100px. That’s fairly simple. The thing is, it’s rare that a photo is so perfectly sized in pixels. More often, you’ll find something like my example, where the photo is 5184px wide and 3456px tall. In this case, to add the same 50px margin all the way around, I have to do some math, which is prone to error.

A more simple method of adding a margin like this is to use the “Relative” tool. The relative tool is activated by clicking the check box that’s situated below the file dimensions.
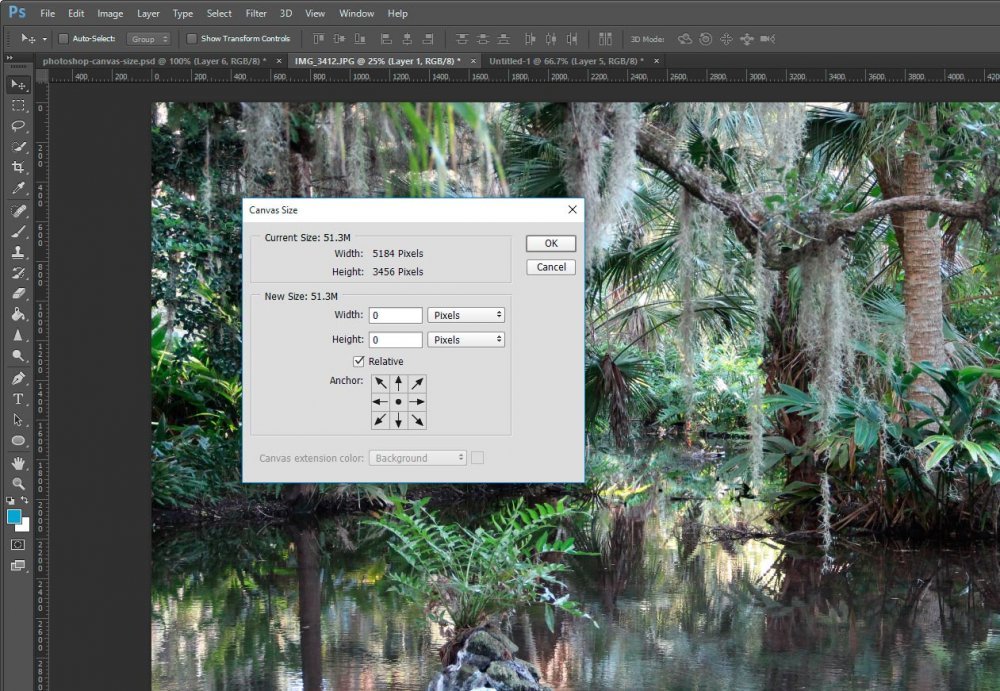
canvas-size-relative-adjustment-adobe-photoshop.jpg

If you look closely at the screenshot above, you’ll see that once the check box is checked off, the values inside the boxes above turn to zero. This allows us to place our relative size configuration inside.

So, if we wanted a 50px margin around our image, we would simply add the value of 100px to both boxes. This would add 100 pixels relative to the original size of our photograph.
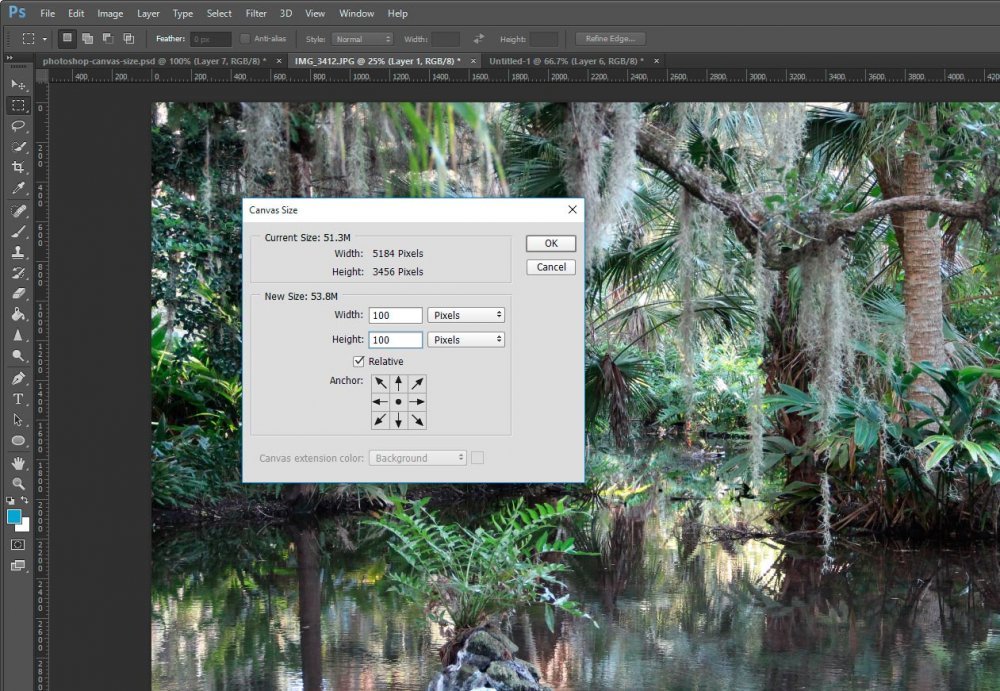
adding-canvas-size-margin-adobe-photoshop.jpg

Our result would look like the screenshot below.
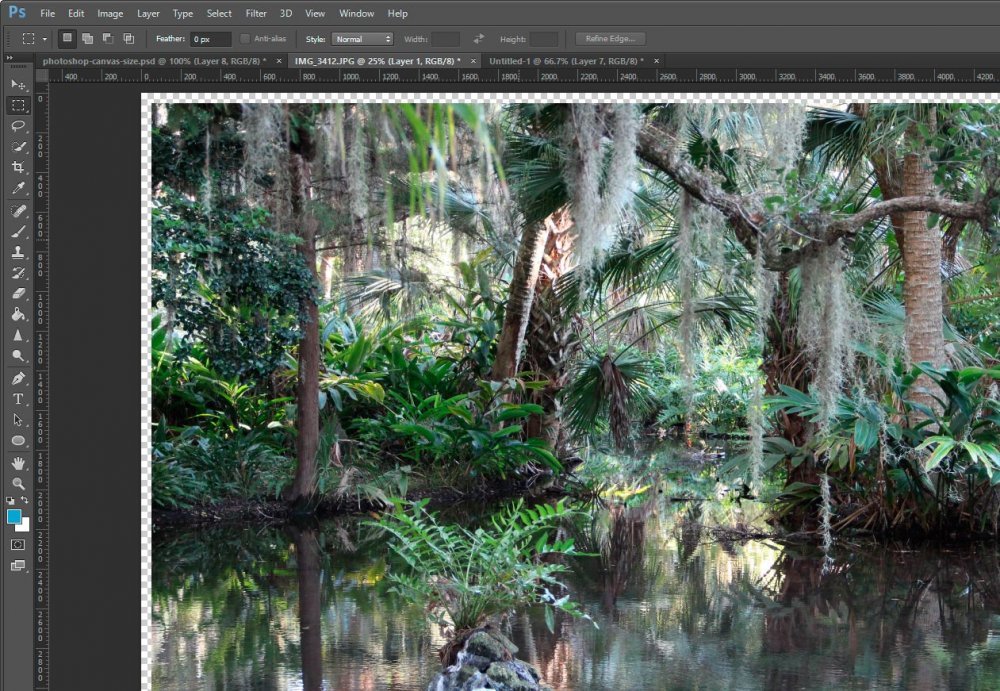
margin-added-to-photo-adobe-photoshop.jpg

Adding Color To Our Margin​

What we have right now is a photo that can be exported with a transparent margin. That’s fine and will work well in many cases. But what if we wanted a margin that’s of a specific color? How can we add one? Well, that’s simple.

To add a color to our margin, we first need to click on our empty layer to select it. Once that’s complete, we can head up to the “Edit > Fill” menu and click it.
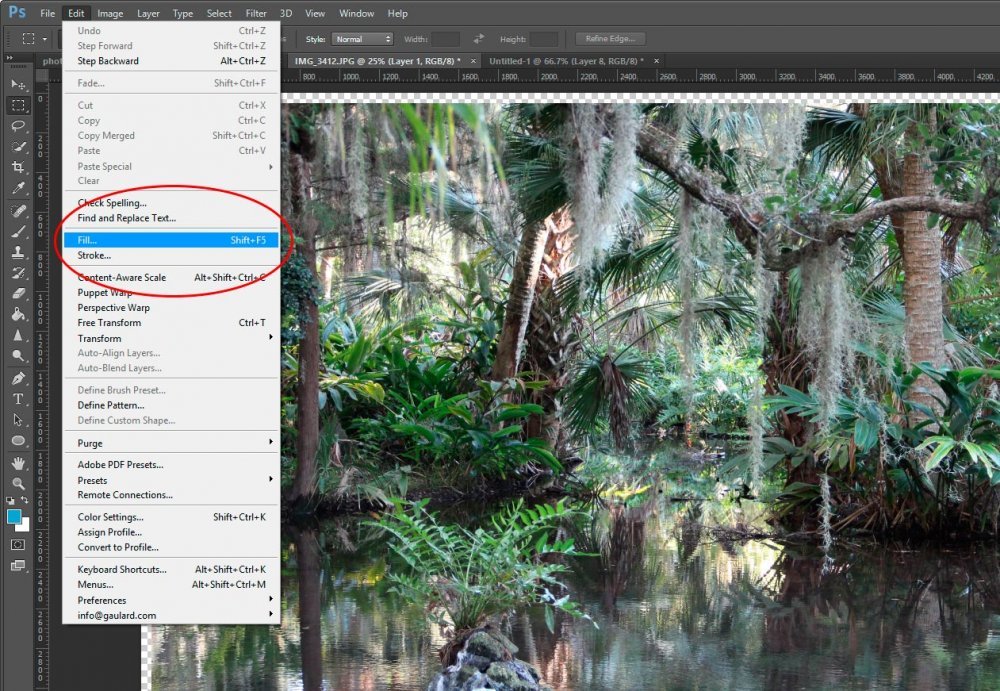
edit-fill-menu-adobe-photoshop.jpg

After we click, we’ll be presented with another dialog box. This time, it’s just called “Fill.”
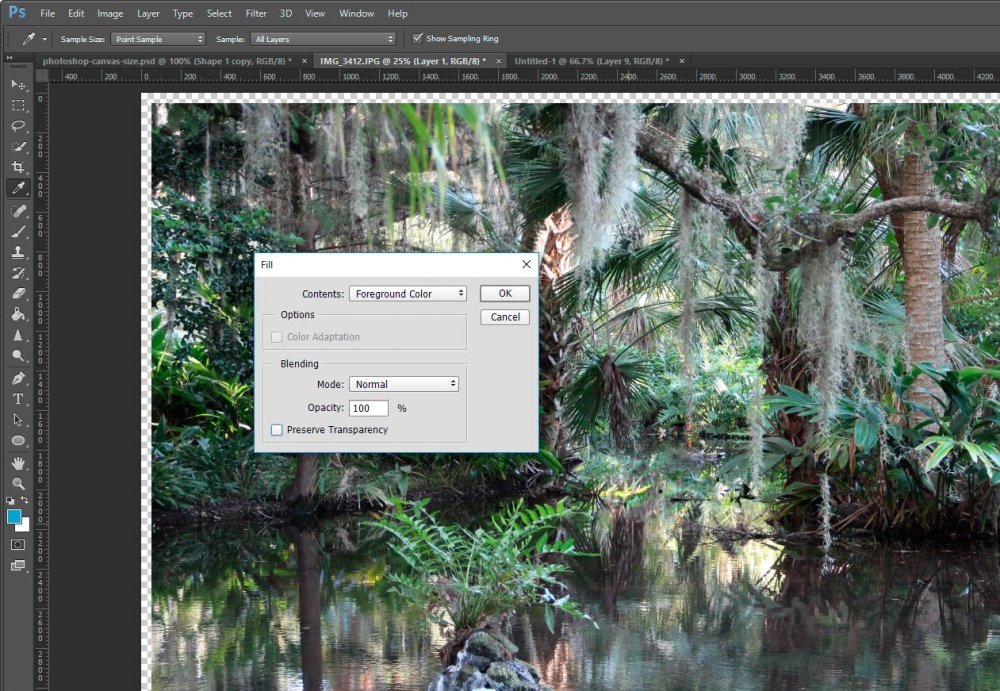
fill-dialog-box-adobe-photoshop.jpg

If you look around inside this dialog box, you’ll notice a few different options available. I’m not going to go over everything now, but what I do what to cover is how you would go about “filling” our transparent layer with color. And to do that, we’ll need our color picker.

If we click on the “Contents” drop-down box, we’ll see a few options. The one we want to select is called “Color.” If we click that, we’ll see our color picker appear.
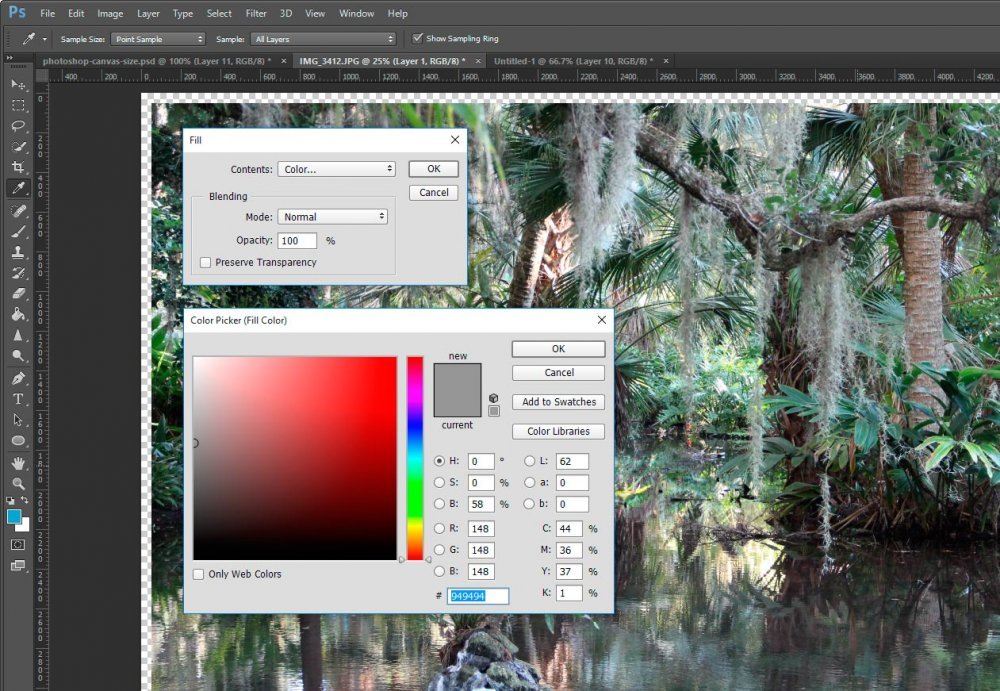
fill-color-picker-adobe-photoshop.jpg

The wonderful aspect of this method is that we can either choose a color by simply clicking around inside the color picker or we can stray outside it to our image and select a color from that. If we roll our mouse tool outside of the color picker, it’ll turn into an eyedropper. All we need to do is roll over any area in our photo and click. That will record the color of our choosing and select it inside the color picker. I’m going to go ahead and do that now.
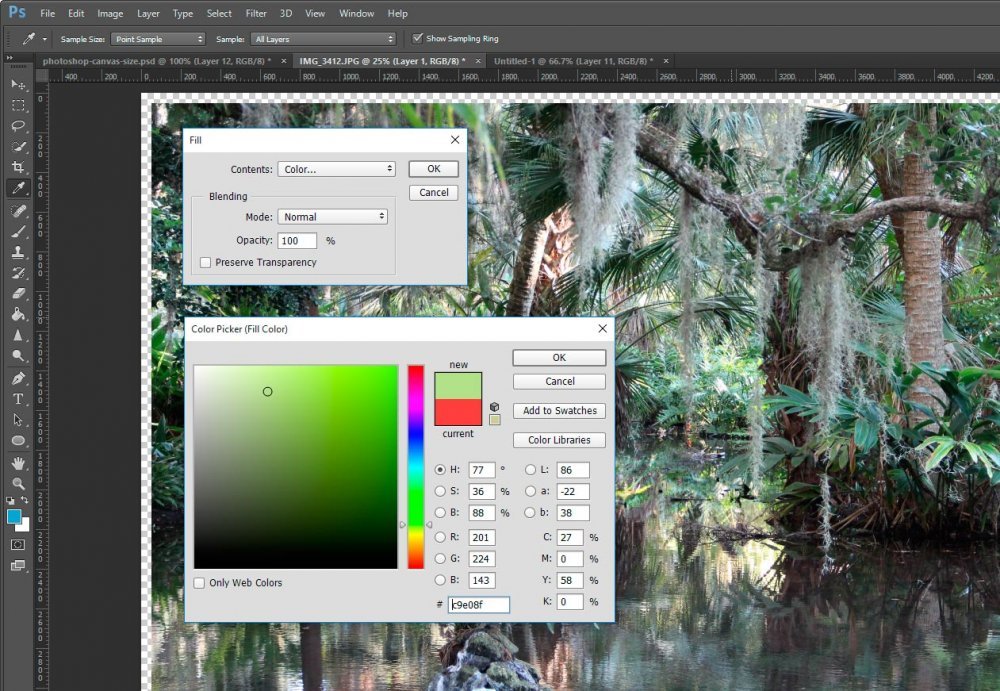
color-selected-color-picker-adobe-photoshop.jpg

Once I choose my color and am happy with it, I can click the “OK” in the color picker and then the “OK” in the Fill dialog box and will be rewarded with a layer filled with the color of my liking.
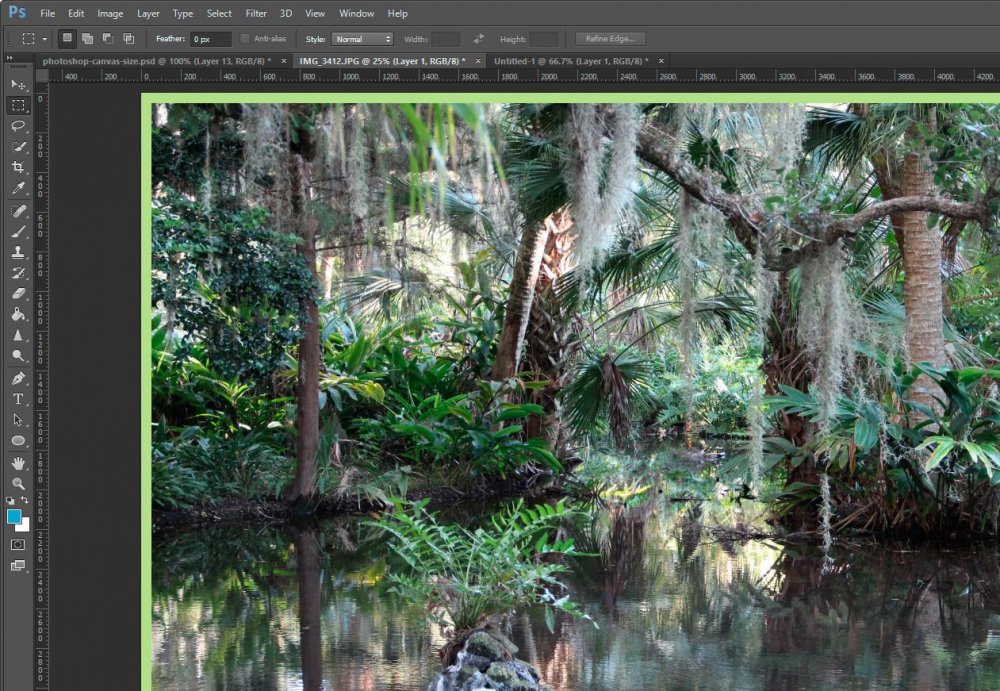
colored-margin-adobe-photoshop.jpg

From here, I can click on my image layer again to move it around the canvas any way I see fit. The larger canvas layer will act as a margin and will set the bounds of the image size.

Using the Crop Tool to Adjust Canvas Size​

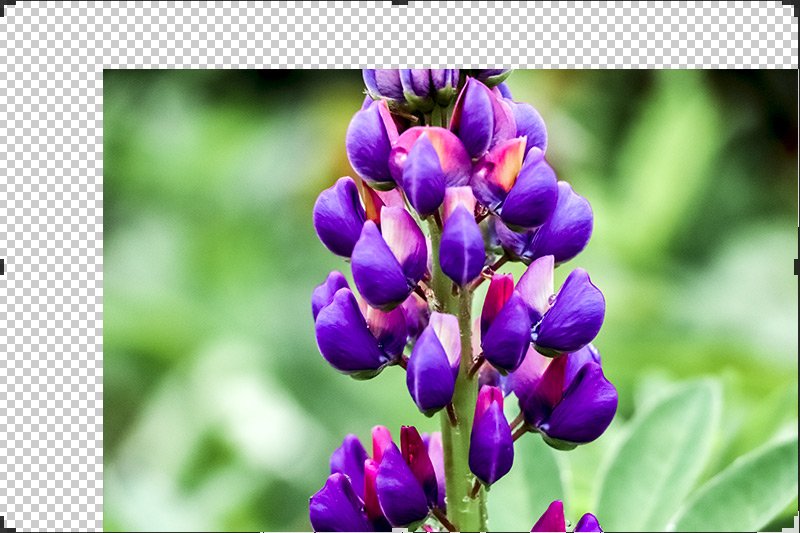
When I use the crop tool, I usually think about reducing the size of whatever I’m working on. I think that’s fairly common because, as photographers and designers, we tend to associate the word “Crop” with cutting content away from something. Well, in Photoshop, we can use the crop to enlarge our canvas as well. I’ll cover this neat trick below.

This is really easy and it’s really fast. It can be rather lacking in precision if you aren’t familiar with limiting your crop by constraints though. I covered these constraints in my post about how to use the crop tool, so if you aren’t familiar with them, I suggest you read that post. It’ll teach you how to keep things neat and orderly when cropping an image.

The first thing I want to do, after opening my image into Photoshop, is to select my crop tool. I want to be sure that no ratios or sizes are set up in the options bar, so I’m working fresh. To clear everything that may be set already, I can click the “Reset” icon up top. It’s the one on the left with the circular arrow.
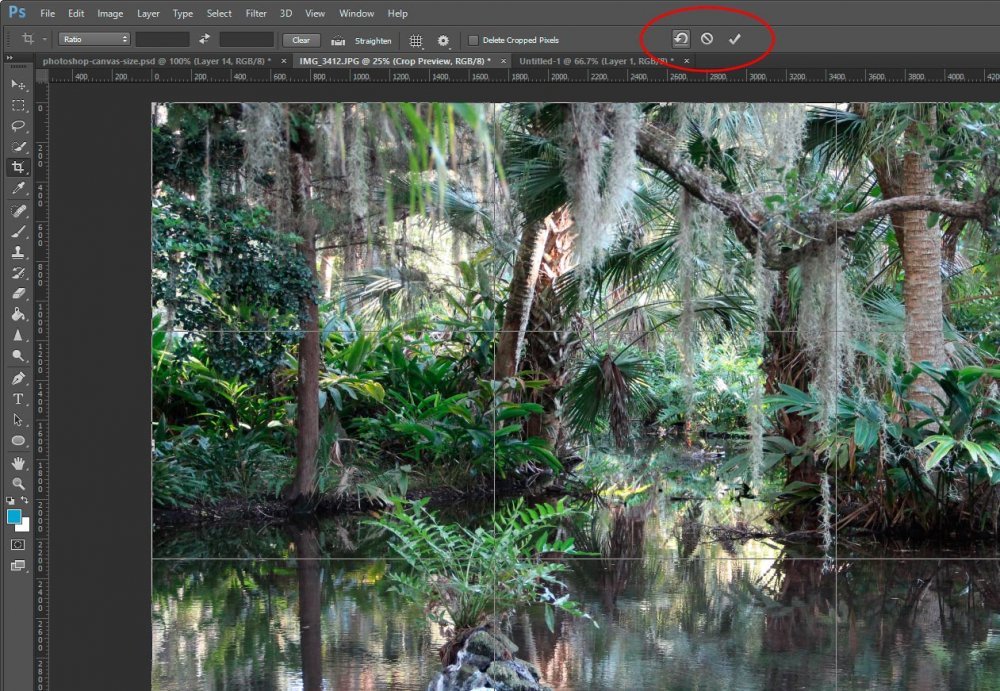
crop-reset-icon-adobe-photoshop.jpg

Once that’s finished, our crop area should take up the entire image.

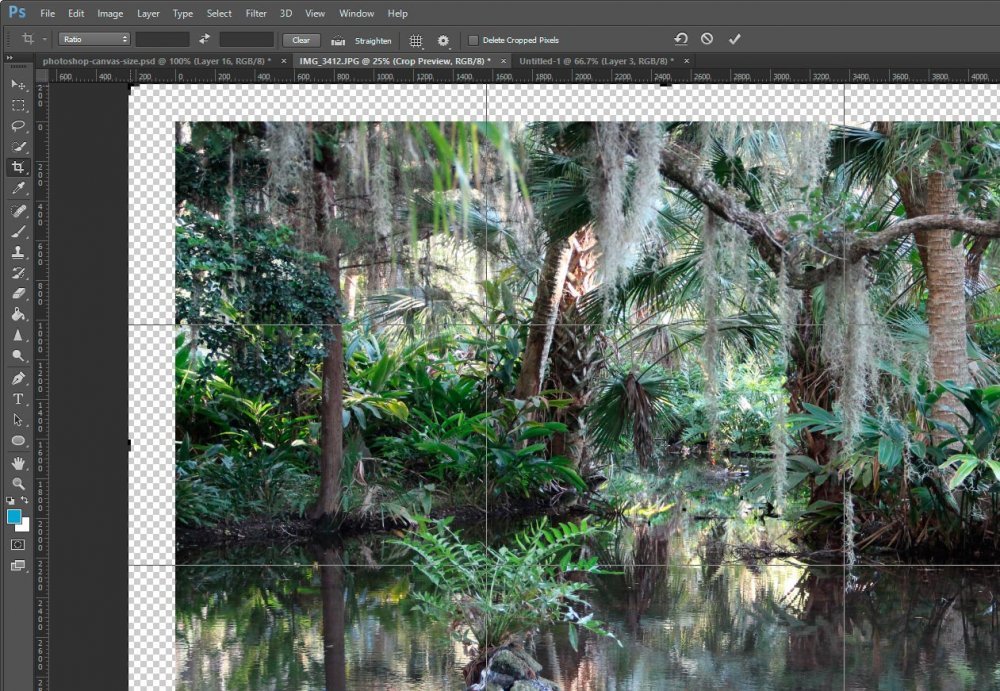
Since I’m not going to go over how to add canvas area with precision, like I mentioned above (which you can learn in my previous post), I’ll merely mention here that all you need to do to enlarge the canvas area by using the crop tool is to drag it outward, as opposed to inward. If we do this, it’ll look something like the screenshot below.
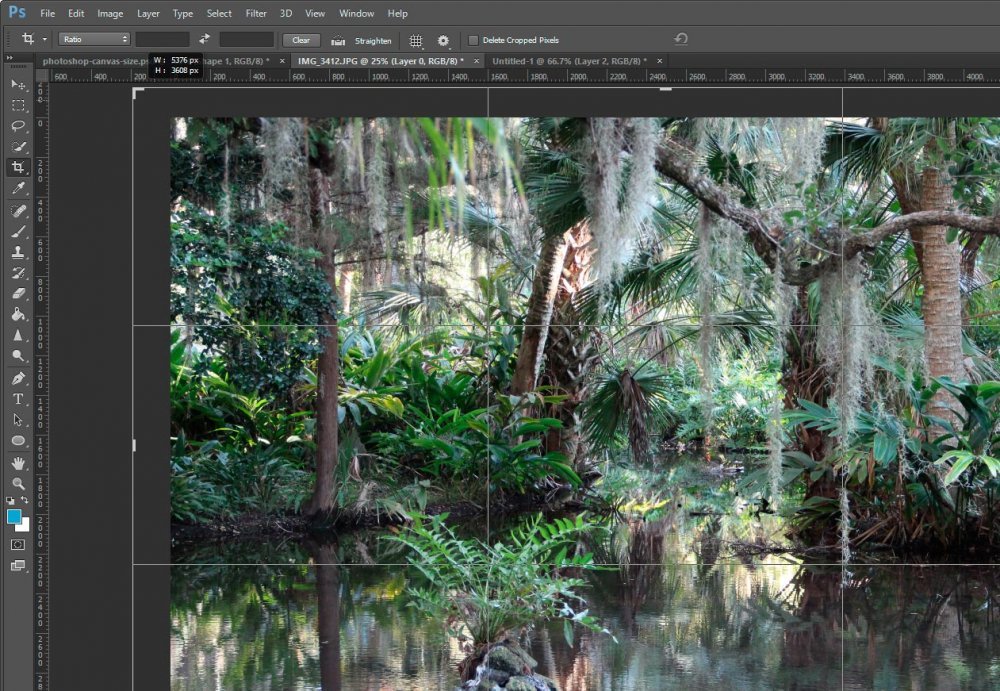
enlarging-canvas-with-crop-tool-adobe-photoshop.jpg

And once we let go of the crop tool, our canvas should look like the screenshot below.
outward-crop-adobe-photoshop.jpg

To apply this new canvas size, simply double-click inside the crop tool area and there you’ll have it. Now, if you want to keep transparency in your new margin, you’ll need to be sure the “Delete Cropped Pixels” check box is unchecked up in the options bar. Also, if you want to add color to your margin, you can add another layer and use the Fill tool, just as we did above. It will have the same exact effect as before. Pretty cool, huh?

——

If you’ve enjoyed today’s post and found it helpful, please share it with a friend. Thanks!
 
Newman

Newman

Member
Joined
May 11, 2021
Messages
106
Reaction Score
0
Points
23
  • #2

3 Awesome Canvas Size Tricks For Adobe Photoshop​

For some weird reason, I’ve been screwing up canvas size adjustments for ages. I really don’t know why this is. It’s probably got something to do with impatience. When working with canvas size in Adobe Photoshop, you need to know what you’re doing and you need to take the time to do it correctly. That’s why I feel a post like this is important. It lays the ground rules for properly using some of the tools available that will enable us to size and resize the canvas in Photoshop.

In today’s post, I’m going to work through three different scenarios that will give you a handle on how to effectively adjust the size of the canvas in Adobe Photoshop. Once you’re finished reading through this post, I hope you’ll agree that this type of thing really isn’t challenging at all. It merely takes an understanding of what a very small number of things mean. Once there’s a grasp on them, the rest is as easy as pie.

What is Canvas Size?​

Before I begin, I figured that I’d try to explain what canvas size actually is. Let’s say that you open a photograph into Photoshop that measures 6 inches by 6 inches. The moment you open that image, Photoshop sets both the image size and the canvas size to 6 inches square. If you change the image size to 5 inches, the canvas size also changes to 5 inches. If you now want to create a border around the image of, say, 1/2 inch, you’d set the canvas size to 7 inches square. In this case, the photo size would stay the same, but a border would appear around the image that measured 1/2 inch thick.

So, think of it this way. You are standing in a room holding an actual paper photograph in your hand. That photo is 6 inches square. In front of you there is an actual physical painter’s canvas. It measures 7 inches square. Using scotch tape, you stick the photograph onto the canvas. There you have it. A 6 inch photo on a 7 inch canvas. Understanding the difference between the two is the most challenging part. Once you do, the rest is smooth sailing.

I do want to mention one nuance before I go any further. If I were to set up an image and canvas like this inside Photoshop and then export the file, the output would be a 7 inch square image. Canvas size is only a term used inside of Photoshop. If I were to open the saved file back into Photoshop, the new image size would be the 7 inches. From there, I could reset the canvas size again and play around as much as I want to.

Adjusting Canvas Size, the Long Way​

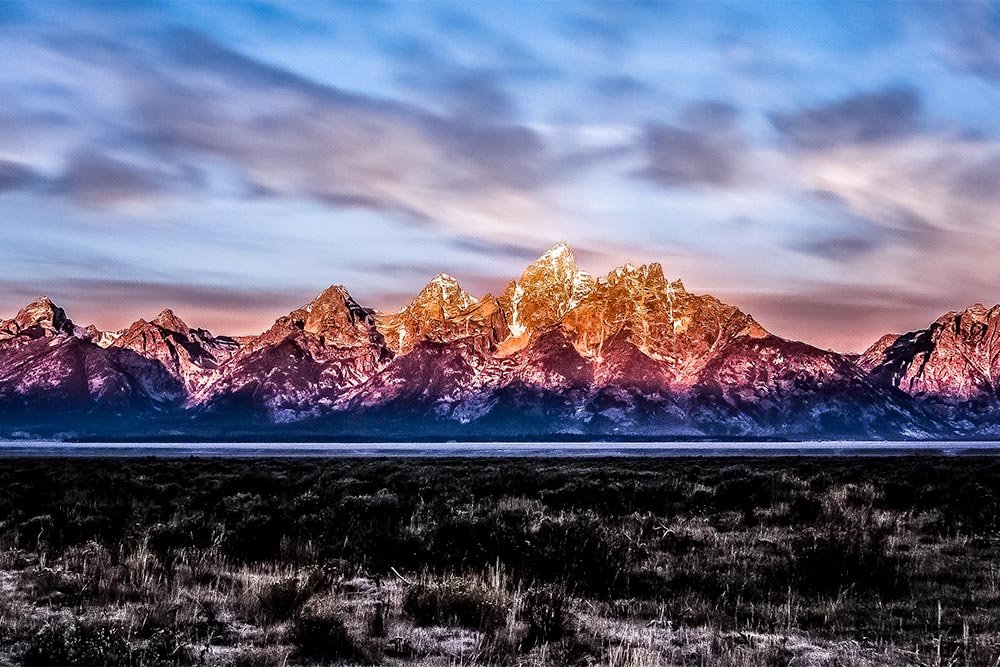
For this post, I’ll be using a cropped version of this photo:

mountains-sunrise.jpg

I cropped it square, so the demonstrations in this post are as straightforward as possible. The last thing we need at this point are varied dimensions.

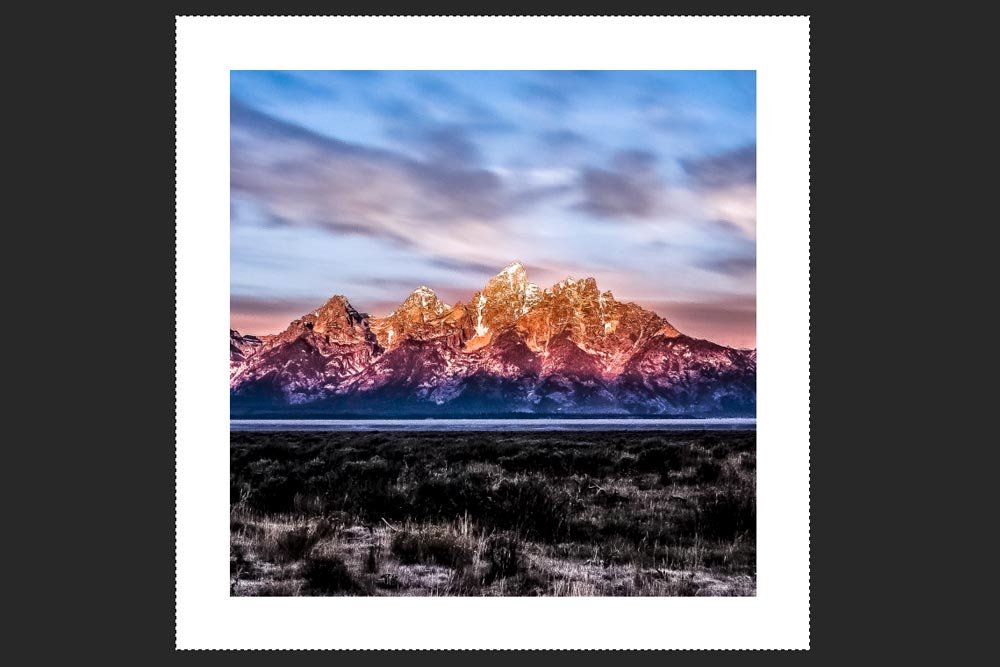
Now, as it stands, the image I’ll be working with measures a perfect 6 inches by 6 inches. Let’s say I would like to add that border I spoke of earlier in this post. I want to see a white, 1/2 inch border all the way around the photograph. How would I achieve this goal?

To kick thing off, I’ll head up to the Image > Canvas Size menu item and click on it.

image-canvas-size.jpg

After I click that, I’ll see the Canvas Size dialog box appear.

canvas-size-dialog-box.jpg

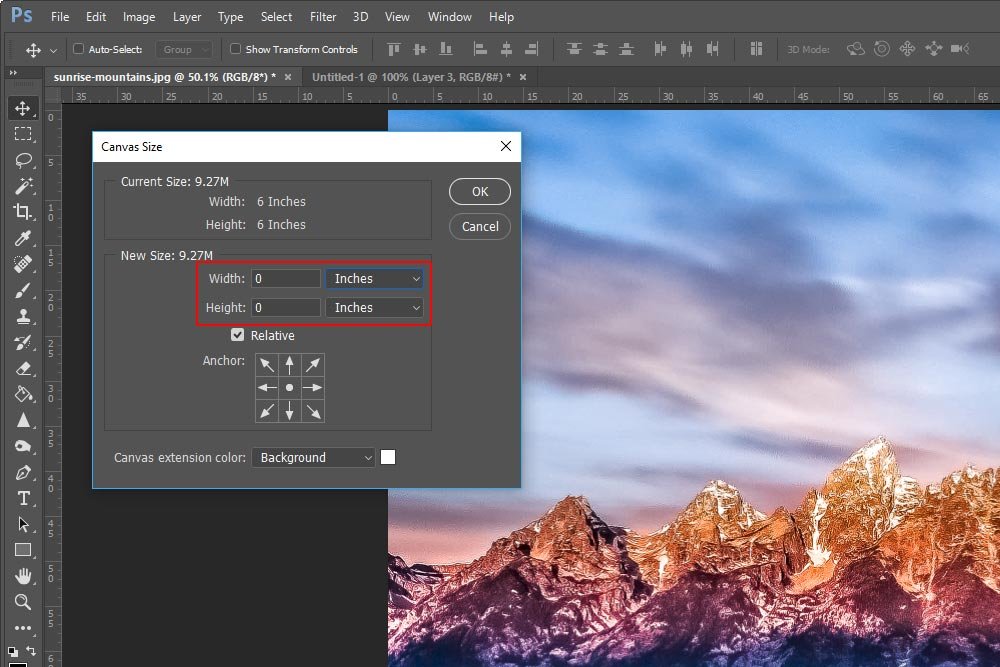
Inside this dialog box is where it all happens. If you take a close look at it, you’ll see three sections. The first section deals with the image’s current dimensions. The second one deals with the dimensions you’d like to change the canvas size to and the third section deals with the color of the canvas. For now, I’ll talk only about the second and third sections.

Since I’m already dealing with inches, I’ll change the first drop-down box in the second section to Inches, as opposed to Percentage. I only need to change one because once I do that, the other will change to Inches automatically.

canvas-size-unit.jpg

After that, I’ll keep the Relative box checked, because I want the units I place in the Width and Height fields to be relative to the existing dimension.

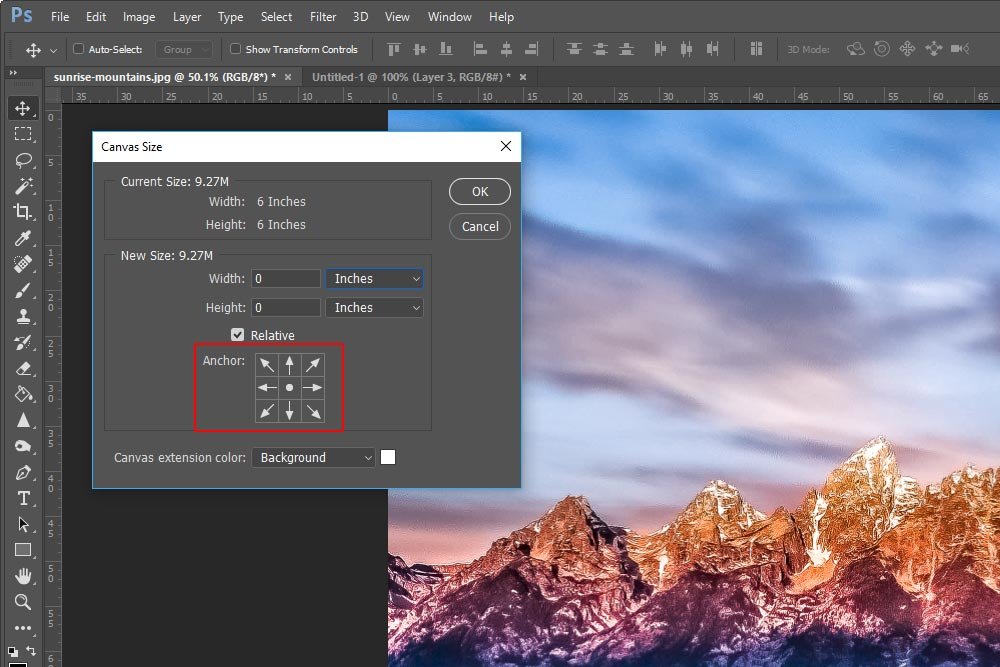
The next area I’d like to talk about is extremely important. The settings in this area instruct Photoshop to place the exposed canvas where the user wants it to be seen. If you look closely at the Anchor area, you’ll see it sort of looks like a tic-tac-toe board.

canvas-size-anchor.jpg

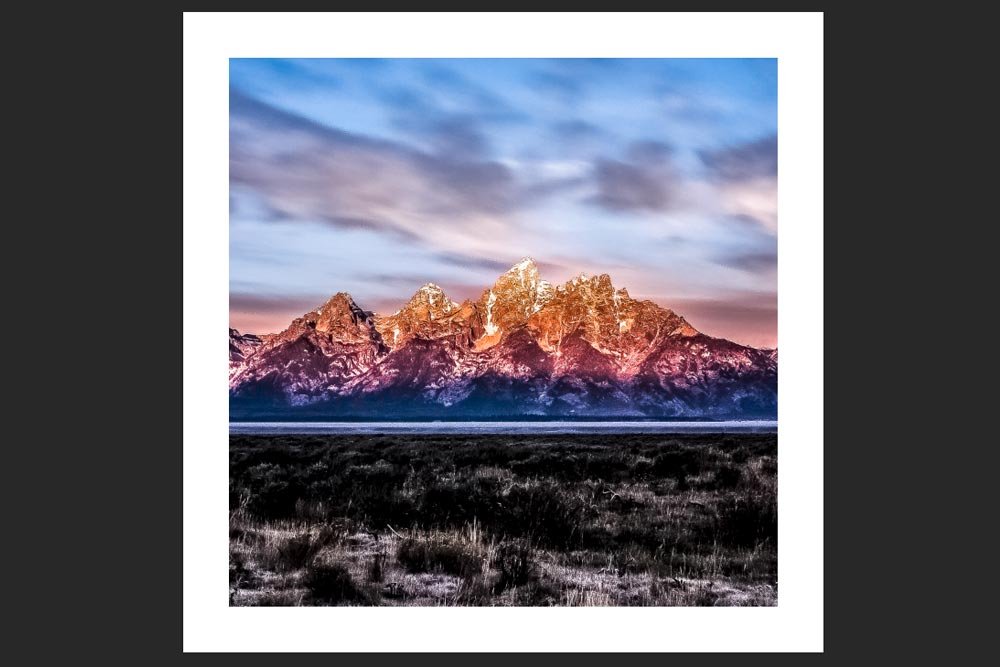
Currently, the anchor sits directly in the center square. This means that any change I make to the canvas width or height will be applied from that center position. Let’s see what the outcome would look like if I added 1 inch to both of these fields with the anchor point remaining at the center.

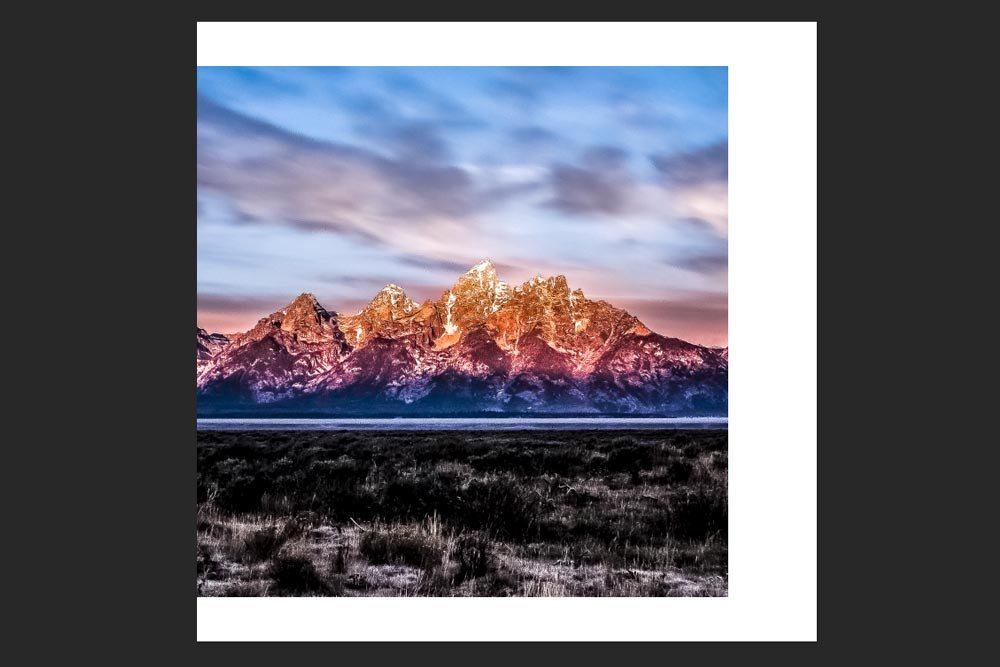
equal-margin.jpg

As you can see, the photo size has remained at 6 inches square while the canvas size has changed to 7 inches square. Since I added 1 inch to each of the width and height variables, 1/2 inch was added all the way around the photo in a uniform fashion. That’s fairly straightforward.

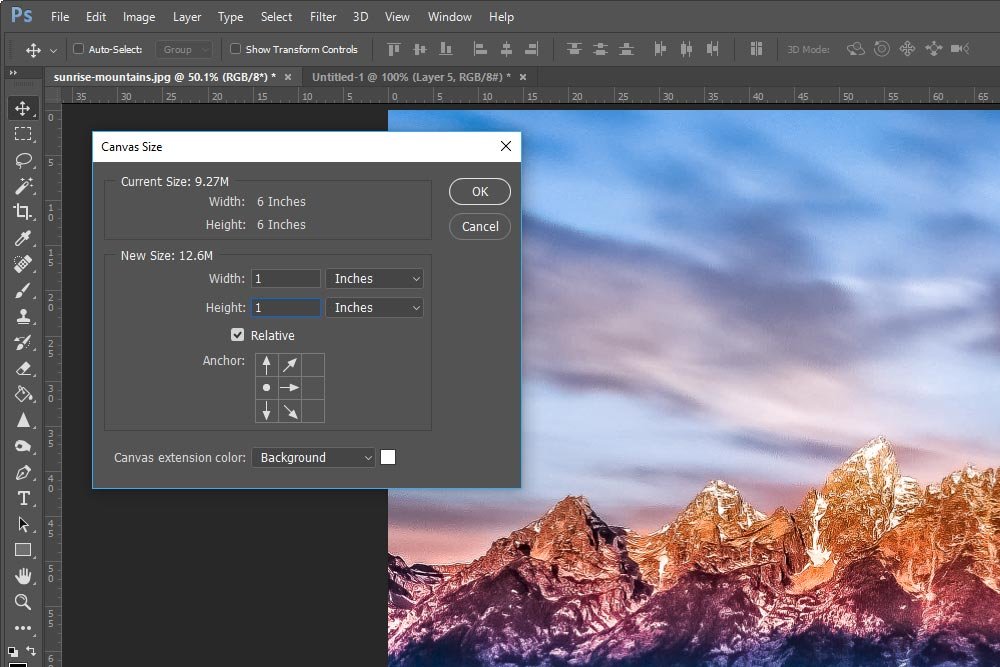
I’ll try this same experiment again. This time, I’ll move the anchor point to the left by one square, while keeping the width and height the same as the previous example.

moving-anchor-point.jpg

Let’s check out the result.

top-bottom-right-margin.jpg

This is interesting. In this case, the entire inch was added to the right side while a 1/2 inch was added to the top and bottom. The result is the same though in that the canvas is 7 inches square.

I encourage you to open up a sample photo and experiment with this tool inside of Photoshop. There are tons of variations and the only way you’ll truly get a handle on them is to experience them for yourself.

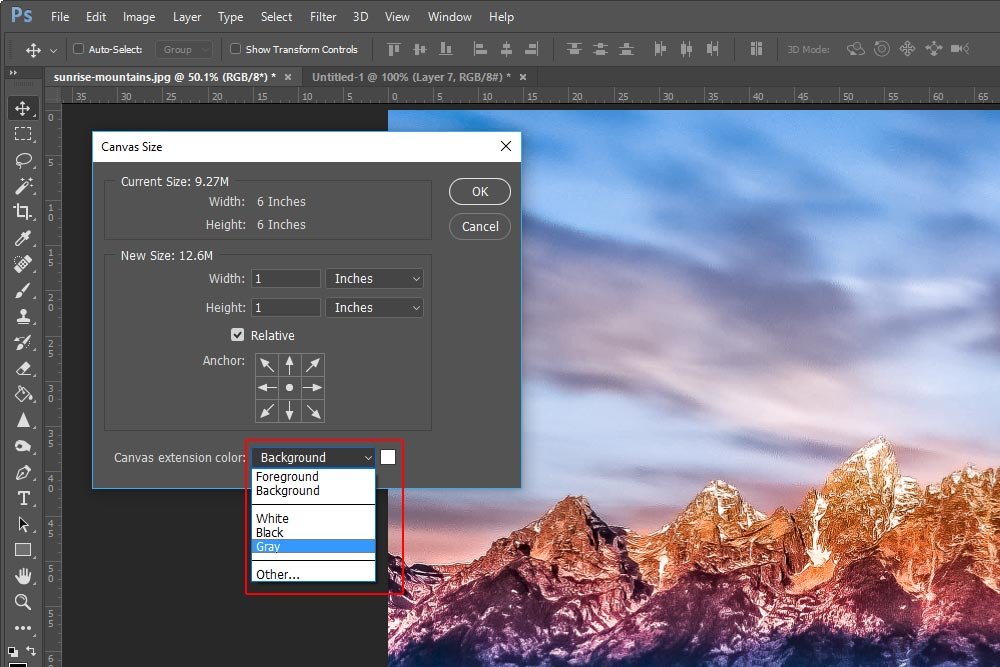
The last thing I’d like to talk about in this section has to do with canvas color. If you look at some of the previous screenshots, you’ll notice a bottom section inside of the Canvas Size dialog box. This section is called Canvas Extension Color and it’s probably the most simple of all the areas to learn and understand.

In the examples I gave above, you saw a white border. The only reason that happened to be was that, by chance, I had the background color in the color picker set to white. If I wanted a different exposed canvas color to appear around the photo, I could have set that color in this bottom section.

canvas-extension-color.jpg

If you look at the above screenshot closely, you’ll see that there are a few different preset choices for you to choose from. In the drop-down box, there are Foreground, Background, White, Black, Gray and Other. If you click one of those selections, you can alter the color of the canvas. Also, if you look directly to the right of the drop-down box, you’ll see a small white square. If you click that, the color picker will appear, giving you the opportunity to select a custom color of your liking.

Changing Canvas Size Using the Crop Tool​

What I gave you above was the longer version of how you can change the canvas size of a document inside of Photoshop. Hopefully, this section will be more brief.

Below, I think I’ll quickly run through a short project that will help you visualize how I might want to use the Crop Tool to resize the canvas around our demo photo. Pay attention because I’m going to move fast. If you have any questions after I’m finished, please ask them in the comment section below.

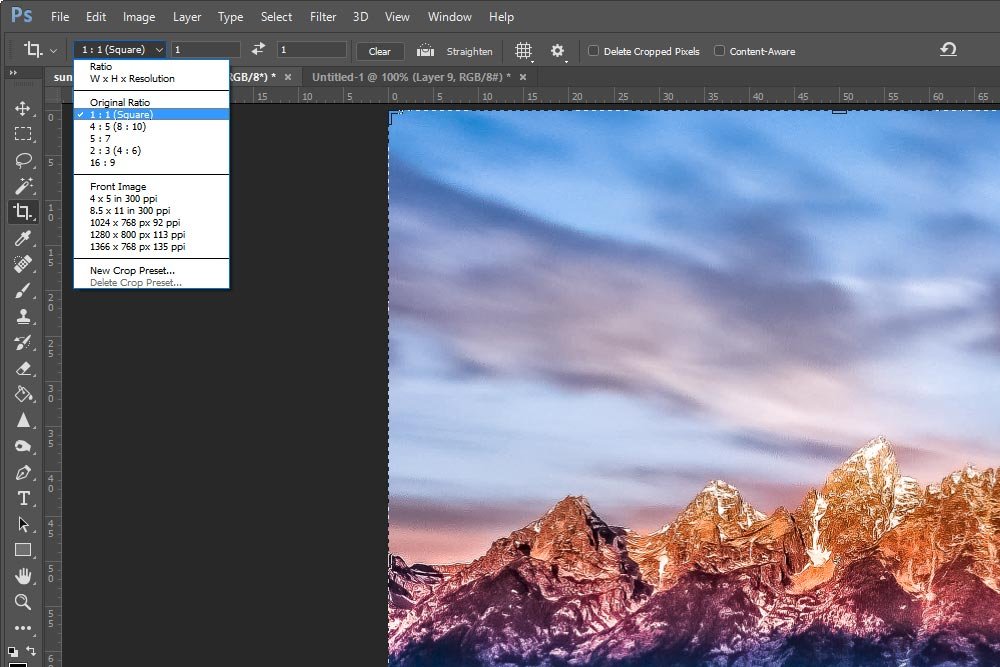
First, I’ll select the Crop Tool from the left vertical toolbar. This will highlight the image with the dashed markings of the tool. After that, I’ll click on the drop-down box that’s located in the options bar above the photo. I’ll select the 1 to 1 ratio, just so the new canvas size remains a perfect square.

crop-tool-square-ratio.jpg

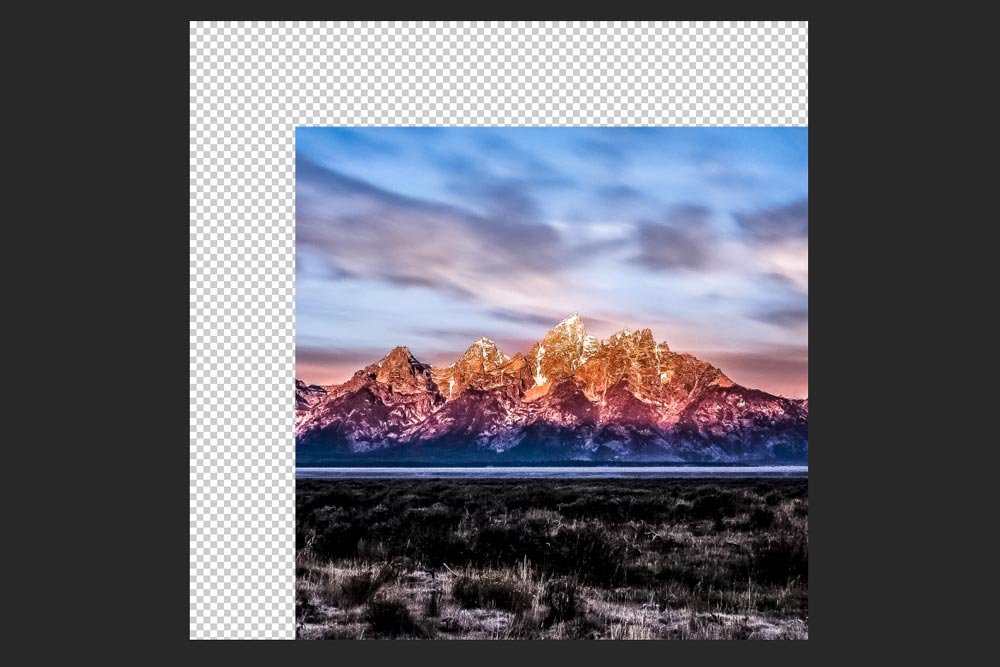
Next, I’ll use the keyboard Ctrl+- to shrink the view of the image a bit, which will help me as I drag the Crop Tool handles. From there, I’ll drag the corner of the tool outward and I’ll press Enter on my keyboard to apply the crop.

crop-tool-canvas-change.jpg

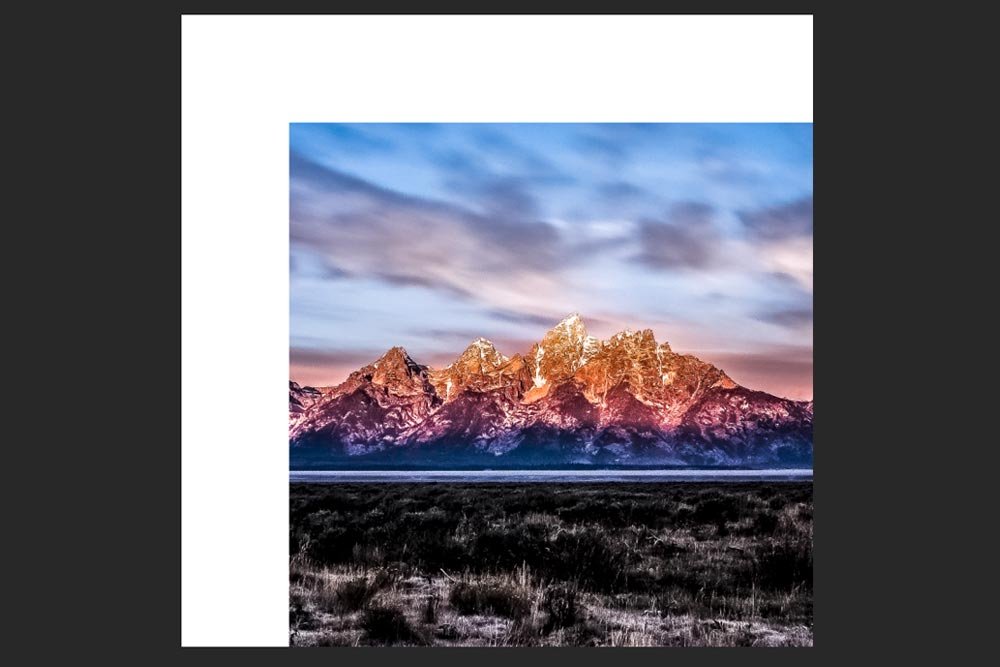
As you can see, the canvas is transparent. The good news is that the canvas size was changed. I don’t know its exact size, but that’s not a concern for me right now. If it was, I would have used the previous method where I can be as exact as I want. This is more of the freehand approach.

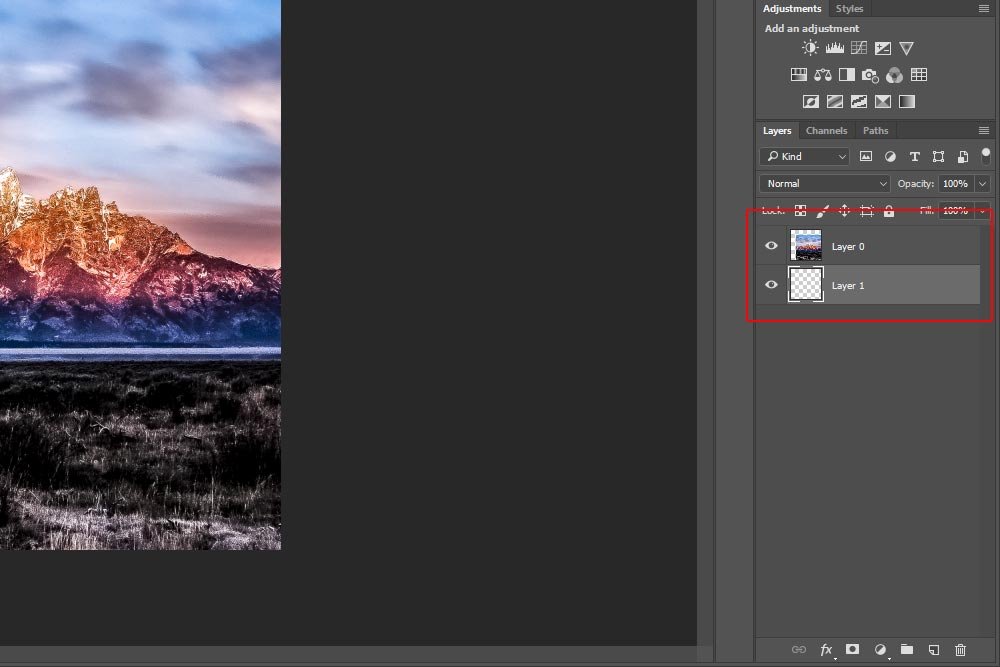
Since I would like a colored canvas, I’ll create a new bottom layer over in the Layers panel.

new-layer.jpg

Next, with the new layer selected, I’ll select the Paint Bucket Tool from the left vertical toolbar and then select a color from the Color Picker. Finally, I’ll click inside the transparent canvas area, which will fill that area with whatever color I chose inside of the color picker. In this case, I chose white.

filling-canvas-color.jpg

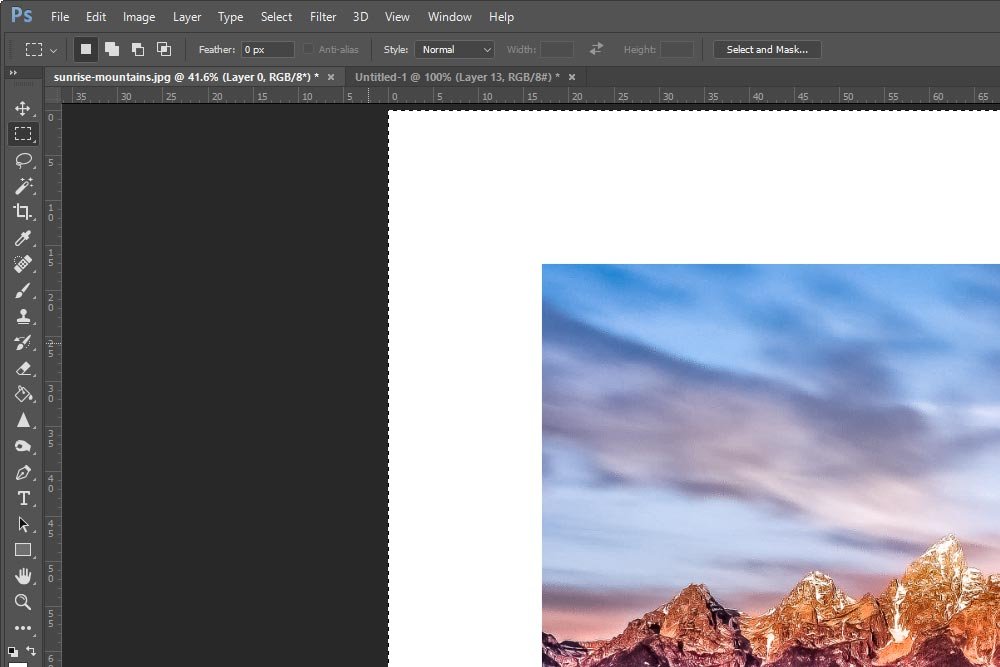
Okay, I’ve gotten this far. There’s only one thing left to do and that’s to center the image. To accomplish this, I’ll go back over to the Layers panel and select the image layer. Then, I’ll select the Rectangular Marquee Tool in the left vertical toolbar. Next, I’ll use the keyboard shortcut of Ctrl+A to select all, which will outline the entire canvas area with some marching ants. Those ants indicate the selected area.

rectangular-marquee-tool.jpg

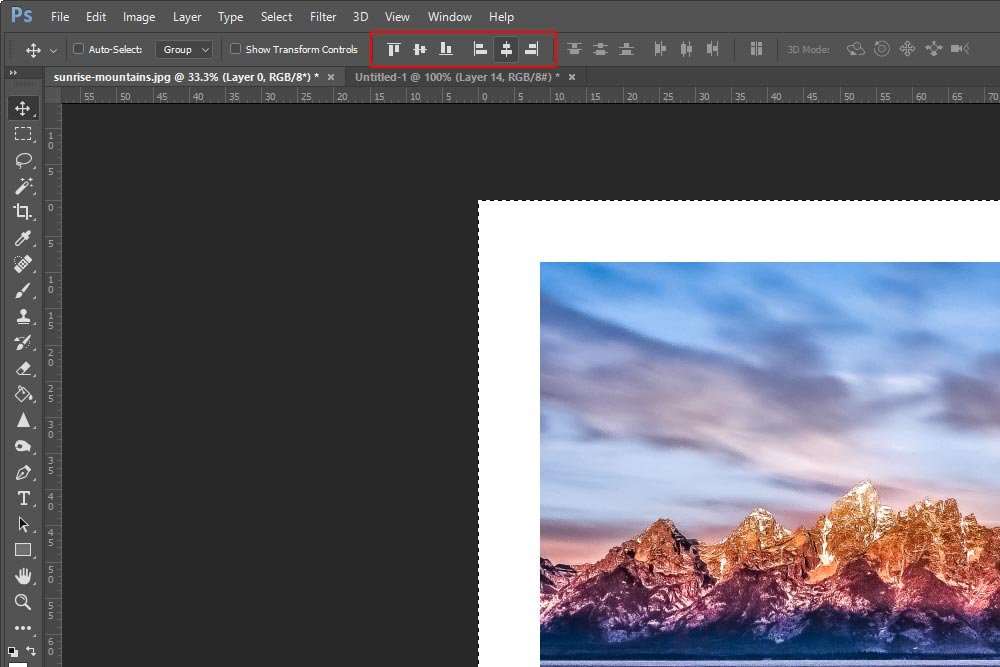
To center the image, I’ll now select the Move Tool from the left vertical toolbar, which will expose an options bar. Inside the options bar, I’ll click on the Align Vertical Centers and Align Horizontal Centers. This will align the selected layer inside the canvas area.

alignment-tools.jpg

And here’s the selected result.

centered-image-canvas.jpg

I have to say, that’s pretty cool. If I don’t need to know the exact dimensions, this may be the way to go. To un-select the canvas area, simply choose the Rectangular Marquee Tool again and click inside the workspace.

Trimming the Canvas​

While I thought the previous section was going to be shorter, it sort of wasn’t. My goal for this section is to really stay brief. Let’s see if I can do it.

Let’s say I’d like to remove the outer border from this image. You know, the one I just created by expanding the canvas size. Well, instead of undoing what I just did, I can simply trim it away by using an extraordinarily easy tool to use.

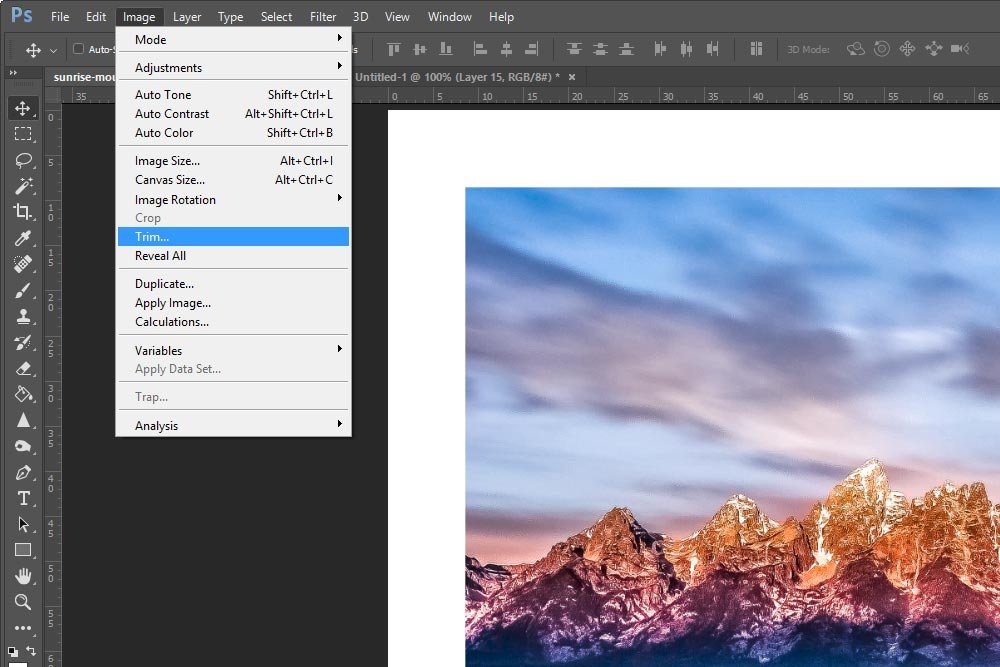
To trim away a canvas, I’ll head up to the Image > Trim menu item and select it.

image-trim-menu-item.jpg

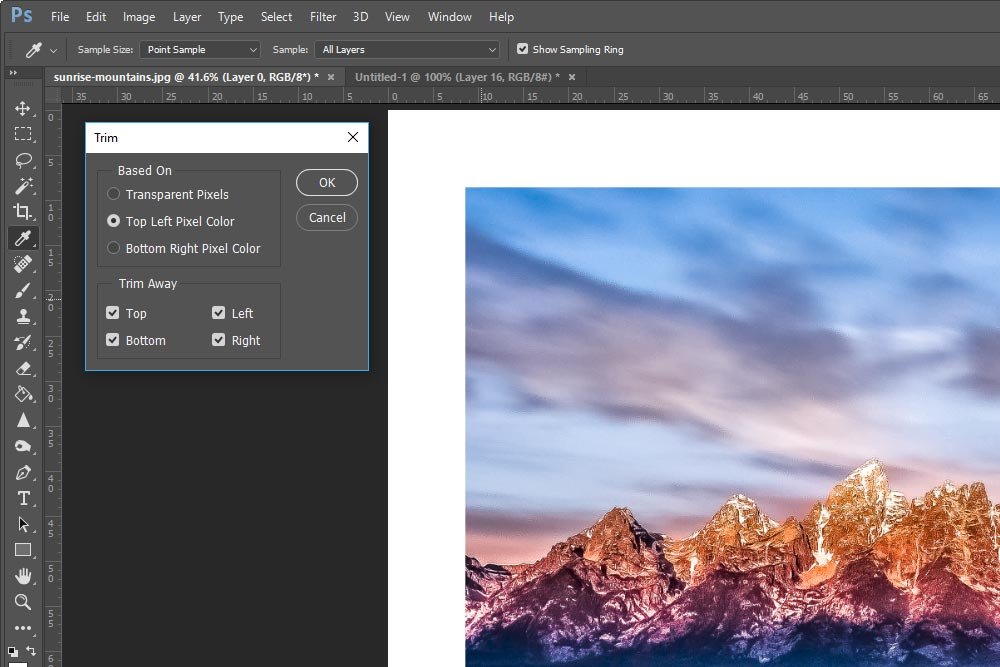
After I do that, the Trim dialog box will appear.

trim-dialog-box.jpg

Since I’d like to remove all the canvas from all around the photo, I’ll choose Top Left Pixel Color from the top section and Top, Bottom, Left and Right from the bottom section.

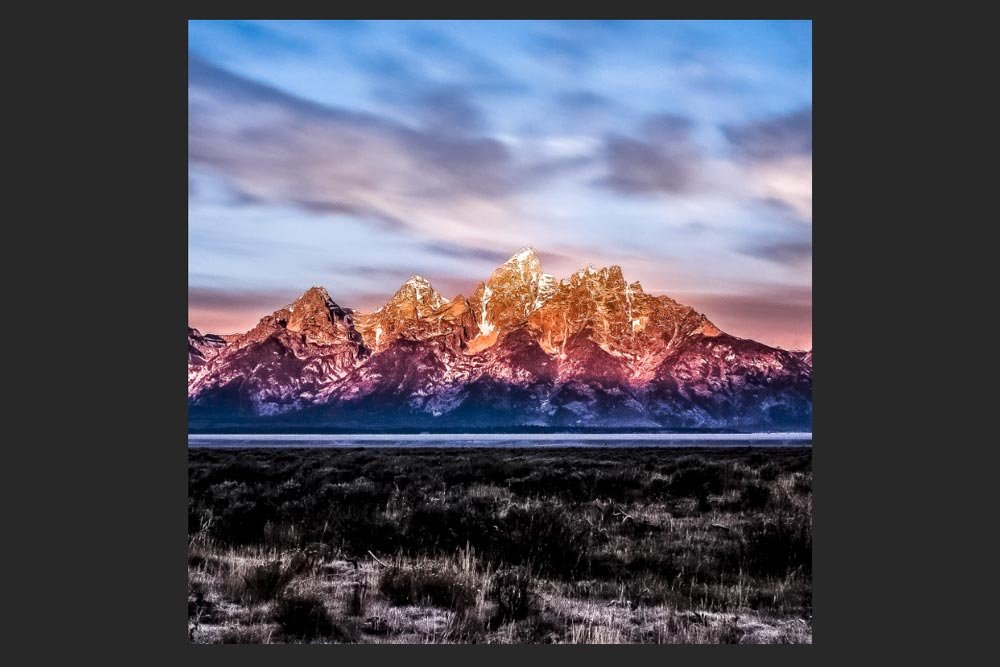
When finished, I’ll click the OK button and watch in amazement as the canvas disappears.

trimmed-photo.jpg

And that, my friends, is how you trim the canvas area away from a photo.

In closing, I must tell you that I was going to add one more section. As I wrote this post though, I decided that three great tips were fine. The fourth is kind of complex, so I think I’m going to keep that one for a separate post all to itself.

Anyway, I hope you got something from this post and learned a bit more about Photoshop. If you have any questions or concerns, please leave them in the comment section below. As always, thanks for reading!
 
Newman

Newman

Member
Joined
May 11, 2021
Messages
106
Reaction Score
0
Points
23
  • #3

How to Reduce the Canvas Size in Adobe Photoshop​

I’ve got two really cool and very simple Photoshop tricks for you today. Both are super helpful, so you’ll want to bookmark this page for later use. If you’re a Photoshop power user and find yourself inside of Photoshop more than any other application, you either already know about these two tips or you need to know about them.

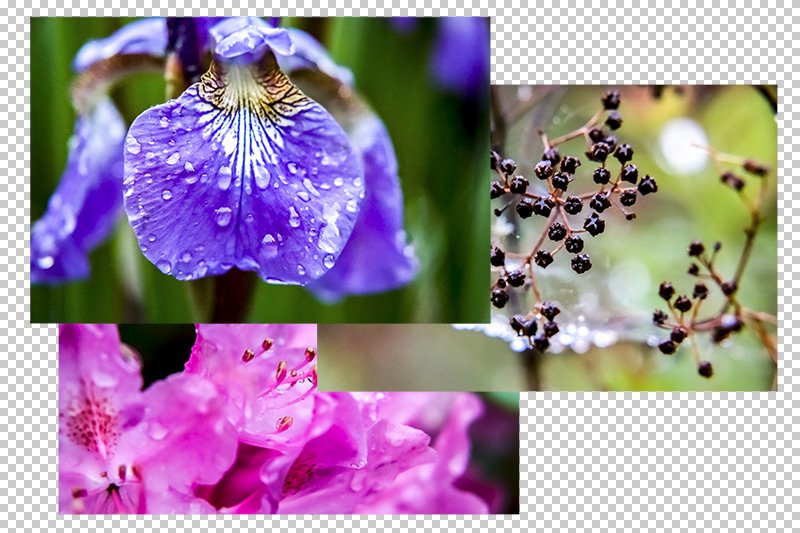
Okay, let’s say I’ve got Photoshop opened up and I’ve already imported three photographs as layers from Adobe Bridge. My goal is to make a sort of arrangement of these images for a magazine layout, so I’d like to situate the images in a scattered fashion. Kind of overlapping. I’ll need to reduce the size of each image and then arrange them the way I want. Here, take a look.

overlapping-photo-layout.jpg

As you can see, I’ve got three different image layers inside of the canvas as well as inside of the Layers panel. To arrange these photos, you can imagine that I might have to do a lot of nudging. And to do that, I’d have to repeatedly click each layer inside of the Layers panel to first select it and then nudge it with either my mouse or the arrow keys on my keyboard. If you’ve ever done anything like this, you know how tedious it can be to first find which layer you’d like to move and then click to select it inside the panel. Here’s a better way. It’s tip number one. To directly select a layer with your mouse, all you need to do is hold down the Ctrl (Mac: Command) key on your keyboard and then simply click on the layer in the canvas (work area). Then you can move it from there. This removes the difficulty of having to closely examine each layer thumbnail or name inside of the Layers panel and then continuously click. Easy, right?

Onto the second tip. As you can imagine, when creating a layout such as the one I displayed above, you’ll likely have some leftover margin around the images you arranged. If you take a peek at the screenshot above once more, you can see the transparent area around the entire canvas. This area should probably be removed, which can be a pain to do with the Crop Tool. With that tool, you may precisely trim the excess canvas from the work area or you may not. That’s up to how steady your hand is and how good your eye is.

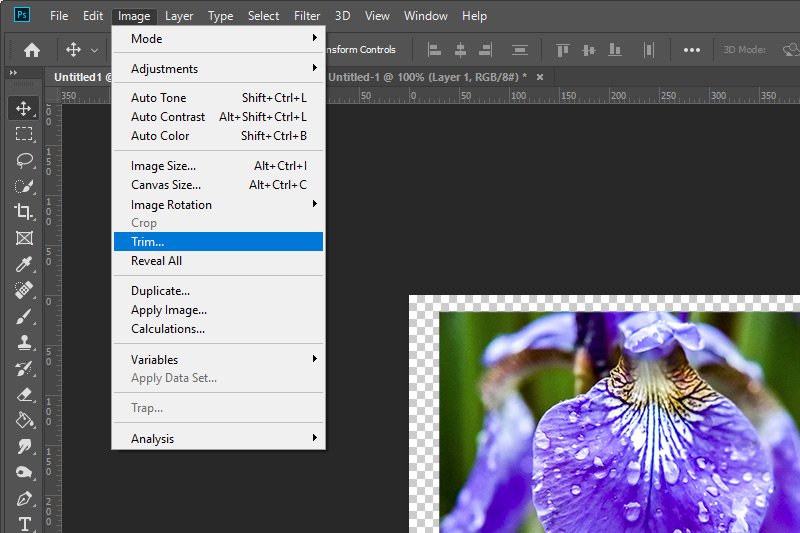
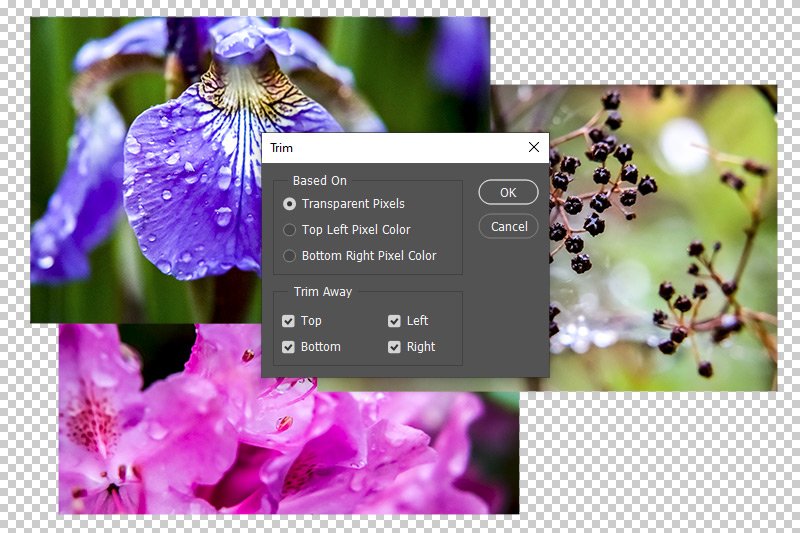
A better way to trim the transparent area from around a canvas is to head up to the Image > Trim menu item and then click. When you do that, the Trim dialog box will appear, where you can select the Transparent Pixels option and click OK.

image-trim.jpg trim-dialog.jpg

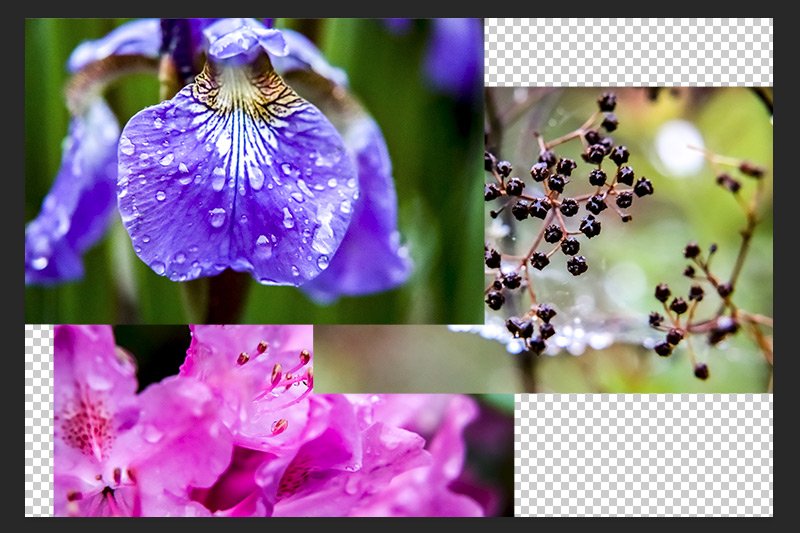
Doing this should shrink down the canvas so it hugs the outer edges of the layers inside of it. Again, that’s super easy.

trimmed-canvas.jpg

Any questions, please ask down below. Thanks!
 
Newman

Newman

Member
Joined
May 11, 2021
Messages
106
Reaction Score
0
Points
23
  • #4

How to Extend the Canvas Size in Adobe Photoshop​

Have you ever wondered if there’s an easy method for enlarging or extending the size of your canvas in Adobe Photoshop? If I had to guess, most people would probably head straight for the Image > Canvas Size menu item and then adjust the settings in the dialog box that appears. If you’ve never seen this dialog, take a look at these screenshots.

image-canvas-size.jpg canvas-size-dialog-box-photoshop.jpg

It’s pretty simple to make your canvas size either larger or smaller. All you have to do is adjust the variables in this box. The problem with this method is that the user doesn’t always know what numbers to fill the fields with. Sometimes, they’re eyeballing their project and they simply need to stretch the canvas to fit an element. It’s not worth it to take the time to take out the calculator to figure out how large to make the working area.

In today’s post, I’d like to show you two methods for extending the canvas size in Adobe Photoshop. You’re going to love both of these tricks because they’re just so easy to pull off. I’ll begin with using a menu item first.

I’ve gone ahead and launched three separate files into one Photoshop file as layers. The three layers are equal in size (6000px x 4000px) and instead of keeping the canvas the same dimensions as it opened as, I’d like to extend it to show all three layers as if they were stacked on top of one another. Sort of like a three image layout for a magazine or something.

Here’s what I’m going to do. I’ll click on one layer to activate it. Then, I’ll drag that layer’s image above the existing canvas, so it’s just out of view, being hidden by the dark gray work area. Then, I’ll do the same thing to another layer, but this time, I’ll drag it down underneath the existing canvas, so it’s just out of view.

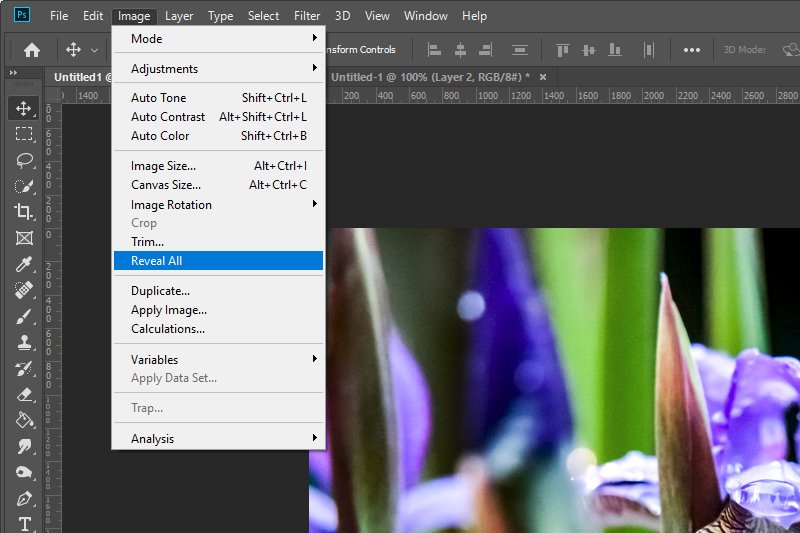
Next, I’ll go to the Image > Reveal All menu item and click. Miraculously, anything that’s outside of the current canvas will appear. And the canvas size will automatically extend to fit those items.

image-reveal-all.jpg

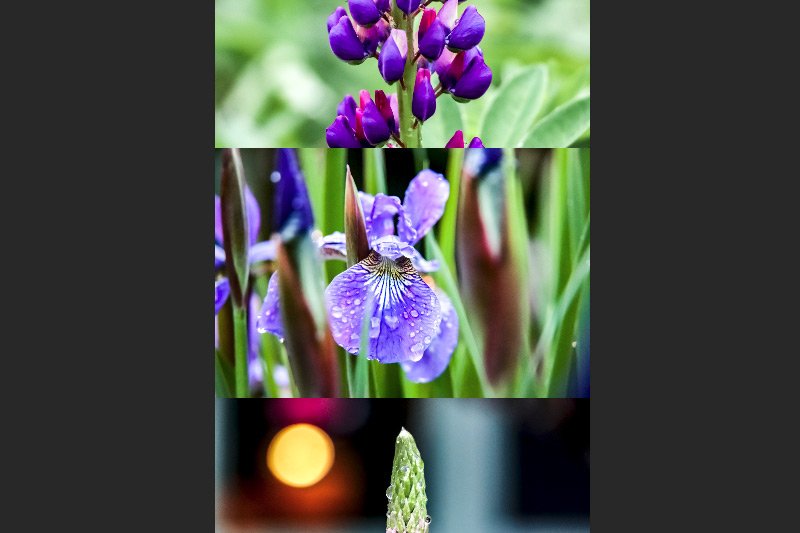
Take a look at the result. Well, the top and bottom are cut off, but you get the idea of the layout I was going for.

three-photo-layout.jpg

The next trick has to do with using the Crop Tool to extend the canvas size inside of Photoshop. This one is a snap. I’ll click on the Crop Tool in the left toolbar and then make sure to uncheck the Delete Cropped Pixels box from the options bar up top. Then, I’ll just click and drag one of the handles that exists on the edges of the tool and drag outward. When I let go, the canvas will have been extended. Take a look at the result.

extended-canvas-crop-tool.jpg

And it’s that easy! Let me know what you think of these quick methods. Do you have any others up your sleeve? Thanks for reading!
 
Top