Search

WordPress Coding & Development

  • Thread starter CaptainDan
  • Start date
CaptainDan

CaptainDan

Member
Joined
May 9, 2021
Messages
113
Reaction Score
0
Points
16
  • #1
Through the years, I've written a lot about WordPress development and the coding that goes into it. I've generally kept my posts separate from one another in an effort to maintain simplicity. I like the way forum threads work though, so I decided to combine all of my posts into one of them. Please continue below to review all I've shared on the topic and let me know if you have any questions.
 
CaptainDan

CaptainDan

Member
Joined
May 9, 2021
Messages
113
Reaction Score
0
Points
16
  • #2

Working With WordPress Templates​

I'm going to start talking about WordPress a lot on this site and I thought the best place to begin is on the template end of things. I know the whole download and install saga sounds more logical, but I'm not sure if I can coerce myself into writing those instructions. Honestly, you can already find them written out very well on WordPress.com and just about any other site in the universe that covers anything WordPress. We don't need another copy.

Templates, on the other hand, surely need to be discussed. I understand that there are various versions of template coverage floating around, but that doesn't make a new and fresh look at things any less valuable. The more the merrier, I say.

What are WordPress Templates?​

Basically, WordPress templates are the same as any other type of template for any other website or CMS. The template of a website is what gives it its front-end look. You can apply one specific template file to cover any amount of pages. In the WordPress sphere, if you have a blog section, you can create one template file to define the look, layout and structure for every single page of that blog. Again, in WordPress (which is what I'm going to be discussing for the remainder of this post), you can apply HTML, PHP or WordPress PHP functions to these template.

In this post, I'm going to discuss the template hierarchy for WordPress. I'm also going to touch on a small sampling of code. I'm going to go through the file types of those involved as well as how they relate to each other. As far as the code goes, I'm going to talk about what the most popular code you'll find in a WordPress template is and offer a few examples.

About those templates...

WordPress template files must follow a very specific naming convention. If you refer to the "WordPress Template Hierarchy" website or the template hierarchy page on the WordPress codex itself, you can see up close what these names need to be.

The benefit of having a naming convention such as the one used by WordPress is that it creates continuity across all themes. If you're a site owner who needs to make changes, things will be more clear once you understand the convention. If you're a template designer or WordPress developer, you'll have a tremendously simpler experience working of projects because of this as well. Any way you look at it, a clear foundation for working in a structure like this is key.

WordPress Template Hierarchy​

I think we should dive into the template hierarchy to get a better look at what's going on. Again, I'll give you those two links:

- WordPress Template Hierarchy

- Template Hierarchy at WordPress Codex

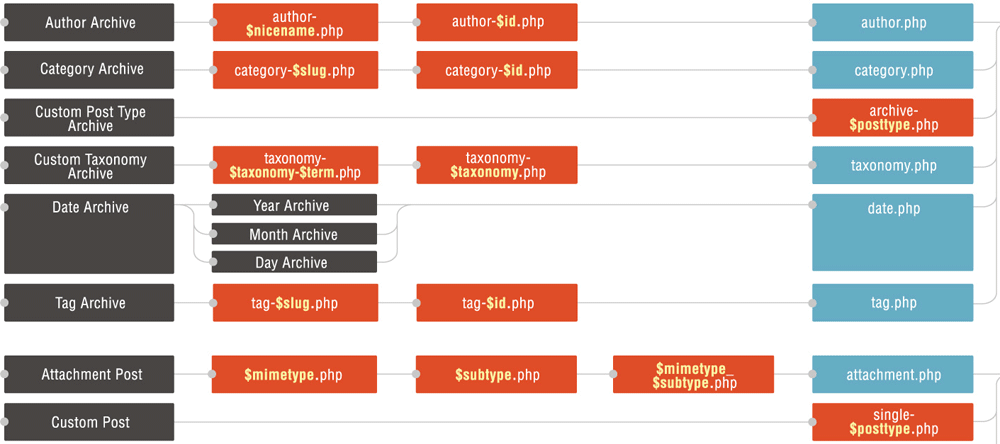
These two sites are very important because they give an overview of all files that can be used in your WordPress theme. The way the template file system works is this: on the left, you decide what type of page you need and then travel to the right. During your trip, you'll find a wealth of possibilities to find the actual template file that you need to get things done.

Here is a sample from the WordPress Codex. You may also view the entire image.

wordpress-template-hierarchy.png

The nice thing about the first link I gave you above (wphierarchy.com) is that if you're interested in a specific page type, you can click that page and land on the related WordPress Codex page. As a developer, this is quite handy.

I want to go through a scenario here, just to hammer home the idea of how page templates work. Say, for example, that you have an archive page on your website. What you would do, is visit wphierarchy.com and look for the archive page choice on the left hand side of the page. WordPress would figure out if your archive page is an Author Archive, Category Archive, Custom Post Type Archive, Custom Taxonomy Archive Date Archive or Tag Archive. Once it does that (let's say you have an Author Archive), you can continue on to the right. You'll need to determine what type of control you would like over your Author Archive page. If you want granular control, you'd create either a specific author page based on name (author-{nicename}.php) or one based on a specific author id (author-{id}.php). If you don't want to create either of those, WordPress will cascade further to the next available choice. In this case, it would be author.php. If that wasn't available, WordPress would fall back to archive.php and so on. You can read more about this specific case here, or just read it below. I'll paste it from the codex.

-----

In the case of authors, the hierarchy is fairly simple. The Template Hierarchy specifies that WordPress uses the first Template file it finds in your current Theme's directory from the following list:

author-{nicename}.php - If the author's nice name were rami, WordPress would look for author-rami.php.
author-{id}.php - If the author's ID were 6, WordPress would look for author-6.php.
author.php
archive.php
index.php

That is, if you do not have an author.php file, WordPress will check for archive.php, and so on.

-----

Examples of Code You'll Find in a WordPress Template​


In this section, I'm going to go over some of the more prevalent code you'll find in a WordPress template. Some you'll find more than others, but I'll go over the most popular.


WordPress Loop


If you've ever dabbled in WordPress behind the scenes, you've undoubtedly heard of the WordPress Loop. The loop is what WordPress uses to display the post content of a page. As WordPress states:


"Using The Loop, WordPress processes each post to be displayed on the current page, and formats it according to how it matches specified criteria within The Loop tags. Any HTML or PHP code in the Loop will be processed on each post."


In general, the WordPress loop begins with an "if" and "while" statement. It says, "If this exists, I should display it." WordPress also uses an "else" statement frequently in the loop. It says, "If that doesn't exist, I should do this instead."


I took some sample code from the "WordPress Loop in Action" page for you to see what a simple loop looks like:

Code:
<?php
get_header();
if (have_posts()) :
   while (have_posts()) :
      the_post();
         the_content();
   endwhile;
endif;
get_sidebar();
get_footer();
?>

WP Query

Another part of the WordPress loop is WP_Query. Using this class, you are able to refine the loop as you see fit. If you take a look at the "Parameters" section of the WP_Query page, you can see what parameters you can refine by. For example, if you wanted to display posts by specific authors, you would include this WP_Query code into your loop:

Code:
$query = new WP_Query( 'author=2,6,17,38' );

Or, if you wanted to show posts written by all authors except one, you'd include this into your loop:

Code:
$query = new WP_Query( 'author=-12' );

Take a look through the other parameters to get a better feel of what you can filter, or refine by.

Get Template Part

The last of the most popular pieces of code you'll find in a WordPress template that I'm going to discuss is the get_template_part function. Get template part basically includes a part of code into your template.

In order to use the get template part function, you will need to pass it a parameter. Here's an example:

Code:
<?php get_template_part( $slug ); ?>
 
<?php get_template_part( $slug, $name ); ?>

The $slug in the examples is required and is the name of your file, such as loop.php. If you wanted to include that into your template, your code would look like this:

Code:
<?php get_template_part( $loop ); ?>

The $name parameter is reserved for a specialized template and is optional. If you used index for your $name parameter, WordPress would look for loop-index.php for the second example above.

In the most simple terms, I believe the WordPress "get_template_part" function is a modified version of the PHP include (or require) statement.

-----

I'm going to stop here for today. For future posts regarding to WordPress templates, be sure to check out the WordPress forum.
 
CaptainDan

CaptainDan

Member
Joined
May 9, 2021
Messages
113
Reaction Score
0
Points
16
  • #3

The Anatomy of Your WordPress Theme​

Every WordPress theme has a common set of files to ensure a functioning website. While some of these files, which are considered “core,” are not required, others are absolutely necessary. In this post, I’m going to discuss a few of both types of files, while offering commentary regarding each.

STYLE.CSS​

We all know what stylesheets do. They control the presentation – the visual design and layout of a website. While this may be true, WordPress also uses the primary stylesheet (style.css) to identify the meta details pertaining to your theme via a comment block located at the top of the file.

While I won’t discuss styling CSS here, because it’s really beyond the scope of this post, I will offer an example of the header comment I referred to above. And since it’s probably the first task you’re going to complete when putting your custom theme together, it’s important to understand.

Parent Theme Meta Data

Code:
/*
Theme Name: Twenty Thirteen
Theme URI: http://wordpress.org/themes/twentythirteen
Author: The WordPress Team
Author URI: http://wordpress.org/
Description: The 2013 theme for WordPress takes us back to the blog, featuring a full range of post formats, each displayed beautifully in their own unique way. Design details abound, starting with a vibrant color scheme and matching header images, beautiful typography and icons, and a flexible layout that looks great on any device, big or small.
Version: 1.0
License: GNU General Public License v2 or later
License URI: http://www.gnu.org/licenses/gpl-2.0.html
Tags: black, brown, orange, tan, white, yellow, light, one-column, two-columns, right-sidebar, flexible-width, custom-header, custom-menu, editor-style, featured-images, microformats, post-formats, rtl-language-support, sticky-post, translation-ready
Text Domain: twentythirteen
 
This theme, like WordPress, is licensed under the GPL.
Use it to make something cool, have fun, and share what you've learned with others.
*/

I took this example from the WordPress Codex page (slightly modified). If you’re interested, you can see that page here.

Now, there are two different versions – or actually one version and another modified version of this meta data area at the top of your CSS file. If you have a parent theme, or just one theme version on your site, you’d use something similar to what I just posted. If you have a child theme that’s built off of a parent theme, you would need another style.css file in that child theme directory, along with another comment meta data area at the top of that file. Your child theme meta data area would look something like this:

Child Theme Meta Data

Code:
/*
 Theme Name:   Twenty Thirteen Child
 Theme URI:    http://wordpress.org/themes/twentythirteenchild
 Description:  Twenty Thirteen Child Theme
 Author:       http://wordpress.org/
 Author URI:   http://wordpress.org/
 Template:     twentythirteen
 Version:      1.0.0
 License:      GNU General Public License v2 or later
 License URI:  http://www.gnu.org/licenses/gpl-2.0.html
 Tags:         light, dark, two-columns, right-sidebar, responsive-layout, accessibility-ready
 Text Domain:  twentythirteenchild
*/

The above code came from the WordPress Codex Child Theme page (slightly modified).

Below, I’m going to go over each part of the parent and child theme meta data areas.

Breaking Down the Meta Data​

Theme Name: This is the name of your theme. It should be descriptive and easily recognizable.

Theme URI: Where is your theme located? This area should identify that.

Author: This area is where you name the author of your theme. You can name a specific person or a group, such as a company.


Author URI: Building off the last field, you would offer the web address of the theme creator(s).

Description: How would you describe your theme to someone else? If a parent theme, be descriptive of its features. If a child theme, be sure to inform users of what parent this is a child of.

Version: Are you distributing this theme? Are to modifying it in house? If so, it may be a good idea to keep the theme’s version on file.

License: If you are selling this theme, if would be a good idea to describe its license here. Both parent themes and child themes should have the same license.

License URI: Display the URI of your theme license. Similar to above, both parent and child themes should display the same license URI.

Tags: If you plan on making this theme searchable in a theme index, good descriptive tags are important.

Template: If you are creating a child theme, you would include the name of the parent theme’s folder here. The child theme would inherit much of the parent theme.

Text Domain: My understanding is that this field is for various languages. If you are familiar with this field and its use, please explain in the comment section below.

Using Your Parent Theme’s CSS​

The old word for this was “import.” The new one is “enqueue.” Instead of using the outdated process of importing the parent stylesheet into the child’s:

Code:
@import url("../twentythirteen/style.css");

You would now enqueue it in your child theme’s functions.php. In order to do this, you would need to create a functions.php in your child theme directory and place the following code in it:

Code:
add_action( 'wp_enqueue_scripts', 'theme_enqueue_styles' );
function theme_enqueue_styles() {
    wp_enqueue_style( 'parent-style', get_template_directory_uri() . '/style.css' );
}

INDEX.PHP​

The index.php file is a good one to have because it provides as a backup for all other templates. You can learn more about this by checking out my “Working With WordPress Templates” post.

If you decide that you aren’t going to do much customizing or engage in a lot of granular control of many other WordPress template pages on your site, you’ll likely want to keep the coding of your index.php file fairly high level, so it’ll capture all the necessary functions of every available page you plan to have on your website. Remember, if you only have your index.php file, it’s going to be responsible for the functionality of all pages. Although this isn’t the most ideal setup, it certainly is possible to have your website operate this way.

Here is an example of some code you might have in your index.php file:

Code:
<?php get_header(); ?>
    <div class="page">
      <?php if ( have_posts() ) : while ( have_posts() ) : the_post(); ?>
          <div class="title">
            <h1><?php the_title(); ?></h1>
          </div> 
        <?php the_content(); ?>
      <?php endwhile; else: ?>
        <div class="title">
            <h1>No Data Found</h1>
          </div>
          <p>Unfortunately, there is no content on this page.</p>
      <?php endif; ?>
      </div>
      <?php get_sidebar(); ?>
<?php get_footer(); ?>

The above code will check to see if you have any content, and if you do, it’ll display it on your page. If not, visitors will receive the message of “Unfortunately, there is no content on this page.

HEADER.PHP​

If you take a look at the top portion of the code above, you’ll see a snippet that looks like this:

Code:
<?php get_header(); ?>

This function calls the header.php file and includes it into the index.php page. To learn more about WordPress functions, you can visit this page in the codex.

Since the index.php page will include the header.php, I thought it would be a good idea to show you an ultra stripped down version of a header.php file.

Code:
<!DOCTYPE html>
<html>
  <head>
    <meta charset="utf-8">
    <meta name="viewport" content="width=device-width, initial-scale=1">
    <title><?php wp_title(); ?></title>
 
    <?php wp_head(); ?>
 
  </head>
 
  <body <?php body_class(); ?>>
 
    <div class="navigation">
      <!-- navigation goes here -->  
    </div>

In the section above, you can see the very first function is wp_title() up in the title area. This pulls in the title you input in the back end admin area. The next function is the wp_head() function, which pulls the data you enqueued in your functions.php file. Such data might be your css and js files. The body_class() function adds CSS class names for the HMTL body tag and is dynamic, depending on which page you’re on. Of course, you can have many more functions in this file, but like I said above, I stripped things down for simplicity’s sake. Just know, the header.php file gets pulled into most files by using the get_header() function. WordPress automatically knows which file to pull in because it’s part of their naming convention.

FOOTER.PHP​

Similar to the header.php file, the footer.php file gets pulled into index.php using the get_footer() function. You can see this above as well.

There potentially isn’t much to this file. There are a few reasons for it to exist though. The first reason is to simply close any markup that was opened, or initiated, in header.php. If you take a look above, you’ll see that we opened up the <html> and <body> tags and then in the example below, we closed them.

Code:
    <footer>
       
      <!-- footer information goes here -->
       
    </footer>
 
    <?php wp_footer(); ?>
   
  </body>
</html>

Another common item found in footer files is the wp_footer() function. This function doesn’t output anything by itself, but is often used by developers as a hook to reference JavaScript files. If you don’t have this code in your footer.php file and someone attempts to load a plugin or the equivalent, it won’t work, if it relies on those referenced JavaScript files. Lastly, this function should be coded in right before the closing body tag.

SIDEBAR.PHP​

Sidebars on WordPress installs are generally active areas. They hold all sorts of navigation, sign up forms and advertising. Primarily, when coding the sidebar.php file, you’d want to make it widget friendly because those widgets are the things that folks use to include the items I just mentioned. I’ve written some sample sidebar code below:

Code:
<div class="sidebar">
  <?php if ( ! dynamic_sidebar( 'primary' ) ): ?>
  <!-- sidebar information goes here -->
  <?php endif; ?>
</div>

As you can see, that’s pretty straightforward. Basically, all we’re doing is calling in the primary sidebar, if it exists, using the dynamic_sidebar() function. If it doesn’t exist, you could certainly add a bit of text there that says something to that effect. It would be up to you whether it’s hard coded or dynamic.

—–

Well, that’s it for today. My fingers are tired and now I’ve got to go through this post to edit it and add some links to all the WordPress functions and other items I talked about. Until next time!
 
CaptainDan

CaptainDan

Member
Joined
May 9, 2021
Messages
113
Reaction Score
0
Points
16
  • #4

WordPress Homepage Templates​

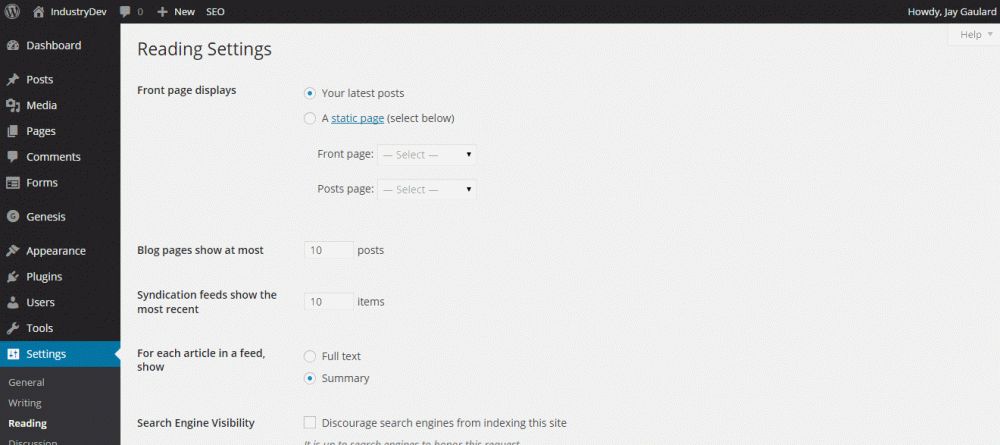
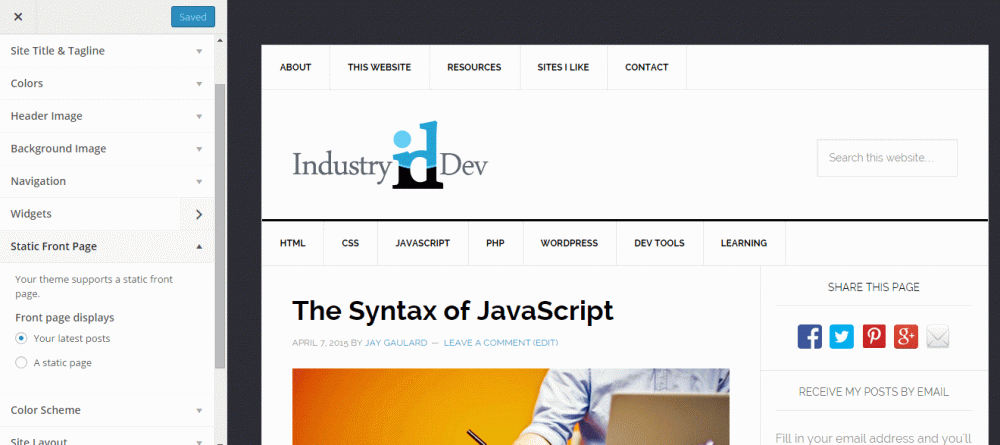
In WordPress, you have a few options when it comes to displaying your homepage. You can either display a static one or you can display a dynamic one, such as a page that displays your latest posts. To make the settings according to which one you would like to see, you can either use “Settings > Reading” from the stock WordPress admin area or you can use the “Appearance > Customize” menu, if available to you.

Here is a screen shot of the WordPress admin settings page:

homepage-settings.gif

And this is what the “Customize” settings page looks like:

custom-appearance.gif

Which Page to Use​

When using the static home page setting, you’ll be using the front-page.php file in “wp-content > themes > your-theme >.” Under this setting, your blog listings page will use the home.php file in same directory.

If you decide that you would like to have your homepage to show your latest blog posts, then the home.php file I mentioned above will be used for that and the front-page.php file will be ignored.

Which Files to Create​

When creating a theme, you need to remember the cascading nature of how WordPress theme files operate. If you are in the midst of putting together your file structure and neglect to construct a front-page.php file and you decide that you would like to set your homepage to use a static page, WordPress will fall back to the page.php file. Whether this is ideal, is up to you, but if you want specialized functionality for your homepage, using the front-page.php file would be better suited.

The same is true if you would like to display your latest blog posts as your homepage and neglect to create a home.php file. In this case, under this setting, WordPress will cascade down to utilize the index.php file for your homepage. Again, if this is not ideal, it would be advisable to create a home.php file.

You can learn all about static front page options in the WordPress Codex.
 
CaptainDan

CaptainDan

Member
Joined
May 9, 2021
Messages
113
Reaction Score
0
Points
16
  • #5

WordPress Page & Post Templates​

In this post, I’m going to cover a few aspects of static page templates, blog post templates, comment templates along with post formats. Setting these types of templates up is actually a lot of fun. There is a fair amount of flexibility when it comes to how far you can drill down with specificity inside WordPress and the WordPress naming convention is as straightforward as it comes.

Static Page Templates​

If you remember back to the WordPress template hierarchy, you’ll recall that there’s a certain flow to how static page templates work. In this section, we’re going to go over some scenarios. But first, let’s look at the applicable area in the hierarchy.
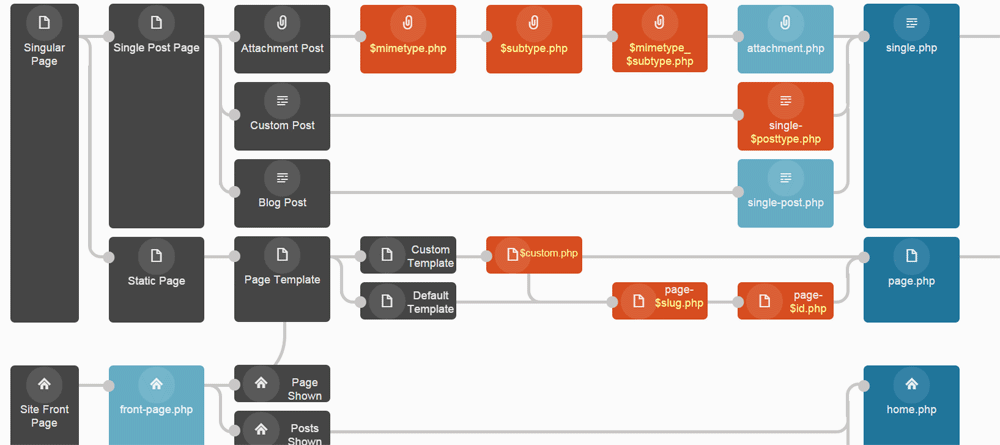
wordpress-page-template-hierarchy.png

In the default setup, the page.php template is what WordPress uses to display static pages. If you take a look at the above image (click to enlarge), you’ll see that template all the way over to the right. That page has the following code in it:

Code:
<?php
/**
 * The template for displaying all pages
 *
 * This is the template that displays all pages by default.
 * Please note that this is the WordPress construct of pages and that
 * other 'pages' on your WordPress site will use a different template.
 *
 * @package WordPress
 * @subpackage Twenty_Fourteen
 * @since Twenty Fourteen 1.0
 */
 
get_header(); ?>
 
<div id="main-content" class="main-content">
 
<?php
    if ( is_front_page() && twentyfourteen_has_featured_posts() ) {
        // Include the featured content template.
        get_template_part( 'featured-content' );
    }
?>
    <div id="primary" class="content-area">
        <div id="content" class="site-content" role="main">
 
            <?php
                // Start the Loop.
                while ( have_posts() ) : the_post();
 
                    // Include the page content template.
                    get_template_part( 'content', 'page' );
 
                    // If comments are open or we have at least one comment, load up the comment template.
                    if ( comments_open() || get_comments_number() ) {
                        comments_template();
                    }
                endwhile;
            ?>
 
        </div><!-- #content -->
    </div><!-- #primary -->
    <?php get_sidebar( 'content' ); ?>
</div><!-- #main-content -->
 
<?php
get_sidebar();
get_footer();

If you read the comment at the top of the code, you’ll see that this page.php code comes from the Twenty Fourteen theme. If you’d like to see source code like this and from other WordPress files and themes, you can check out this site.

In the broadest sense, when you set up a basic WordPress install and have a broad based theme, the page.php template is what you’ll see for all your static pages. If you want to narrow down and display more specific layouts for various pages on your site, you could do that by creating new pages that are named differently. Of course, you must follow WordPress’ naming convention, but like I said above, that’s easy.

I’m going to use this very website as an example for this post. As of this writing, I have five static pages up in the top navigation bar. They’re called, About, This Website, Resources, Sites I Like and Contact. Right now, I’m using the standard page template that came with the theme I’m using and haven’t altered anything. It works fine for my purposes, but what if I wanted to add some special functioning or layout to the About page that I couldn’t achieve with the standard page.php template? Well, I could solve my problem a few ways.

Creating Static Page Template Files

Page ID Method – The first way I could create a stand alone template for my About page is to go in the admin area and click to edit that page. Once I’m in the editor area, I can look to the URL bar to see what “post” the page has been assigned to. In this case, my About page is under post 591. So, with that knowledge, I can make a copy of my page.php file and name the new file, page-591.php. After I do this, WordPress will begin using the page-591.php template – only for my About page. All other static pages will still use the page.php template. If you refer to the hierarchy image above, you’ll see that the page-591.php template follows the naming convention of the red box directly to the left of the blue page.php box. In the image, it says page-$id.php. Now, if I wanted to, I could change the code in page-591.php any way I wanted to.

Page Slug Method – The second way I could create a stand alone template for my About page is to go back to the edit page area and take a look what the slug of the page is. Since the name of my page is “About”, I kept the slug the same, but lowercase. By the way, if you don’t know what a slug is, read below:


A slug is a few words that describe a post or a page. Slugs are usually a URL friendly version of the post title (which has been automatically generated by WordPress), but a slug can be anything you like. Slugs are meant to be used with permalinks as they help describe what the content at the URL is.

Example post permalink: http://wordpress.org/development/2006/06/wordpress-203/

The slug for that post is “wordpress-203”.


Reference


Now, if you refer back to the hierarchy image above, you’ll see a red box to the left of the first red box I just talked about. This new red box has page-$slug.php written in it. Everything that I just wrote above applies to this new file that you can create – just the naming of the file is different. If I wanted to go this route instead of the page-591.php route, I would name my file page-about.php. This would create a special template specifically for the About page. Remember, these naming conventions are valid for any static pages, not just my About page.

Custom Template Method – Let’s say that the reason I wanted to create a different About page template was because I wanted to display that particular page at full width. If I was sure that only the About page would ever show at full width, it would be reasonable to make custom About page templates the way I just described above. But, what if I thought I’d be adding more full width pages in the future? Since that’s a fairly generic change, I could simply create a custom full width template and apply any page I wanted to that template. Then, as I make full width pages in the future, I could use that template for all of them. The way to create a custom template in WordPress is to create a new file named pretty much anything you want. In this case, I’ll call this file, page-full-width.php. That will keep things clear as I’m browsing the files during development.

If you’ll notice in the code below, I copied the standard page code over to this new template to be edited later. The important addition to take notice of is the comment at the top. The “Template Name: Full Width” comment will tell WordPress that there’s a new custom template available. As I’m editing or creating a page, I could click the drop-down box to the right of the page editor (Page Attributes) and choose the “Full Width” template. This way, any page that I applied this template to would be using the same code.

Code:
<?php
 
/*
    Template Name: Full Width
*/
 
get_header(); ?>
 
<div id="main-content" class="main-content">
 
<?php
    if ( is_front_page() && twentyfourteen_has_featured_posts() ) {
        // Include the featured content template.
        get_template_part( 'featured-content' );
    }
?>
    <div id="primary" class="content-area">
        <div id="content" class="site-content" role="main">
 
            <?php
                // Start the Loop.
                while ( have_posts() ) : the_post();
 
                    // Include the page content template.
                    get_template_part( 'content', 'page' );
 
                    // If comments are open or we have at least one comment, load up the comment template.
                    if ( comments_open() || get_comments_number() ) {
                        comments_template();
                    }
                endwhile;
            ?>
 
        </div><!-- #content -->
    </div><!-- #primary -->
    <?php get_sidebar( 'content' ); ?>
</div><!-- #main-content -->
 
<?php
get_sidebar();
get_footer();

What if I had a custom About page template and a custom Full Width template available? What if I chose to use the Full Width template for my About page? Well, the Full Width page template would override the About template because it’s more specific. The rule is, the most specific template is the one that gets used.

If you’re looking for more information on WordPress page templates, here’s a really great tutorial put out by Elegant Themes.

Single Post Templates​

If you look back up to the top hierarchy image, you’ll notice that the template used for single blog posts is single.php. I’ll give you an example of the Twenty Fourteen single.php code here:

Code:
<?php
/**
 * The Template for displaying all single posts
 *
 * @package WordPress
 * @subpackage Twenty_Fourteen
 * @since Twenty Fourteen 1.0
 */
 
get_header(); ?>
 
    <div id="primary" class="content-area">
        <div id="content" class="site-content" role="main">
            <?php
                // Start the Loop.
                while ( have_posts() ) : the_post();
 
                    /*
                     * Include the post format-specific template for the content. If you want to
                     * use this in a child theme, then include a file called called content-___.php
                     * (where ___ is the post format) and that will be used instead.
                     */
                    get_template_part( 'content', get_post_format() );
 
                    // Previous/next post navigation.
                    twentyfourteen_post_nav();
 
                    // If comments are open or we have at least one comment, load up the comment template.
                    if ( comments_open() || get_comments_number() ) {
                        comments_template();
                    }
                endwhile;
            ?>
        </div><!-- #content -->
    </div><!-- #primary -->
 
<?php
get_sidebar( 'content' );
get_sidebar();
get_footer();

Unfortunately here, we don’t have some of the naming and customization flexibility that we had when dealing with custom page templates in WordPress. We do, however, have more broad customization options. We could, for instance, create custom single post types for specific categories or specific authors. In a later post, I’ll go over how to set these templates up, but for now, just remember that the single.php template controls general single blog posts.

Comment Templates​

The layout of the comment section for posts and pages can be found in the comments.php template file. I’ll show you some example Twenty Fourteen code below:

Code:
<?php
/**
 * The template for displaying Comments
 *
 * The area of the page that contains comments and the comment form.
 *
 * @package WordPress
 * @subpackage Twenty_Fourteen
 * @since Twenty Fourteen 1.0
 */
 
/*
 * If the current post is protected by a password and the visitor has not yet
 * entered the password we will return early without loading the comments.
 */
if ( post_password_required() ) {
    return;
}
?>
 
<div id="comments" class="comments-area">
 
    <?php if ( have_comments() ) : ?>
 
    <h2 class="comments-title">
        <?php
            printf( _n( 'One thought on &ldquo;%2$s&rdquo;', '%1$s thoughts on &ldquo;%2$s&rdquo;', get_comments_number(), 'twentyfourteen' ),
                number_format_i18n( get_comments_number() ), get_the_title() );
        ?>
    </h2>
 
    <?php if ( get_comment_pages_count() > 1 && get_option( 'page_comments' ) ) : ?>
    <nav id="comment-nav-above" class="navigation comment-navigation" role="navigation">
        <h1 class="screen-reader-text"><?php _e( 'Comment navigation', 'twentyfourteen' ); ?></h1>
        <div class="nav-previous"><?php previous_comments_link( __( '&larr; Older Comments', 'twentyfourteen' ) ); ?></div>
        <div class="nav-next"><?php next_comments_link( __( 'Newer Comments &rarr;', 'twentyfourteen' ) ); ?></div>
    </nav><!-- #comment-nav-above -->
    <?php endif; // Check for comment navigation. ?>
 
    <ol class="comment-list">
        <?php
            wp_list_comments( array(
                'style'       => 'ol',
                'short_ping'  => true,
                'avatar_size' => 34,
            ) );
        ?>
    </ol><!-- .comment-list -->
 
    <?php if ( get_comment_pages_count() > 1 && get_option( 'page_comments' ) ) : ?>
    <nav id="comment-nav-below" class="navigation comment-navigation" role="navigation">
        <h1 class="screen-reader-text"><?php _e( 'Comment navigation', 'twentyfourteen' ); ?></h1>
        <div class="nav-previous"><?php previous_comments_link( __( '&larr; Older Comments', 'twentyfourteen' ) ); ?></div>
        <div class="nav-next"><?php next_comments_link( __( 'Newer Comments &rarr;', 'twentyfourteen' ) ); ?></div>
    </nav><!-- #comment-nav-below -->
    <?php endif; // Check for comment navigation. ?>
 
    <?php if ( ! comments_open() ) : ?>
    <p class="no-comments"><?php _e( 'Comments are closed.', 'twentyfourteen' ); ?></p>
    <?php endif; ?>
 
    <?php endif; // have_comments() ?>
 
    <?php comment_form(); ?>
 
</div><!-- #comments -->

Just so you are aware, this particular code displays one comment form for for when someone is logged in, another comment form for when someone ins’t logged in and the comments themselves. If you’d like to customize any portions of these areas, you would do so in this file. In general, the comment area isn’t something people mess too much with, but if you do decide to, you can start off with one of WordPress’ generic templates and customize that code. As I mentioned earlier in this post, you can find code for multiple WordPress themes here.

Post Formats​

Ill admit, it took me a while to figure out what WordPress post formats were. For years, I’d see the radio buttons to the right of my post editor that say, “Aside” and “Gallery” and “Link.” I’d ask myself, “Who wants to post a link?” Really, who wants to post a link? As a post?

But after some research today, I think I’ve got the whole idea squared away. Post formats give you an opportunity to display your site differently than a traditional WordPress site would display.

Say you’d like to setup your homepage to look like a Twitter page. If you choose the “Aside” post format, you could write some short text and then that message would display on your homepage. The thing is, what you just posted won’t have a link to the full post. There is no full post – it’s just that short message that displays. That’s what I think I was having trouble with. Grasping the fact that WordPress is actually responding to the Twitter and Tumblr competition out there.

The same goes for the “Gallery” format and the “Link” format and the “Status” format. These types of posts don’t actually link through to anything (well, the gallery links to pictures). They simply display kind of on-the-fly type messages. Much like many social networks do out there.

So, what is the list of available post formats? Here they are:

Aside – No title. Sort of like a Facebook update.

Gallery – Image gallery. Shortcode with image attachments.

Link – Outside link. There are a few different ways to set this up in the post editor.

Image – A single image.

Quote – A quotation.

Status – Looks like a Twitter status update.

Video – Single video or playlist.

Audio – Audio file or playlist.

Chat – Chat transcript.

Unlike the template files in the hierarchy I talked about above, post formats have their own set of files. If you look in a standard WordPress theme, such as Twenty Fourteen, you’ll see files named, content-aside.php, content-audio.php, content-link.php, etc… Each of these files is named after each post format. If you click into each of these files, you’ll see the code it uses to run that particular format.

If you take a look inside the Twenty Fourteen single.php template, you’ll see a line of code that looks like this:

Code:
get_template_part( 'content', get_post_format() );

This is the code that calls whichever post format you chose to run. The way WordPress chooses the correct template to run is built into this line of code. The ‘content’ part of the above code tells WordPress that the file it’s looking for is partially named, content. The get_post_format() part of the above code tells WordPress which post format you’ve chosen. So if it’s the aside format you want, the file name WordPress would use is content-aside.php. Again, this isn’t in the WordPress hierarchy, but it’s a WordPress naming convention nonetheless.

WordPress doesn’t always make all post formats automatically available. The post formats that you’d like to see in your editor will depend on which ones are coded into the functions.php file. In the Twenty Fourteen theme, here is the line that defines which formats would be available:

Code:
add_theme_support( 'post-formats', array(
    'aside', 'image', 'video', 'audio', 'quote', 'link', 'gallery',
) );

A few aren’t in this list, but if you were building your own theme or wanted to include the missing ones, you’d have to code those into this line.

Once you take a few minutes to go over what exactly post formats are and how they can be used, things become much more clear. In the case it doesn’t, I’ve listed a few resources that will help out tremendously. These are actually the references that taught me what’s going on with post formats.
 
CaptainDan

CaptainDan

Member
Joined
May 9, 2021
Messages
113
Reaction Score
0
Points
16
  • #6

WordPress Archive Templates​

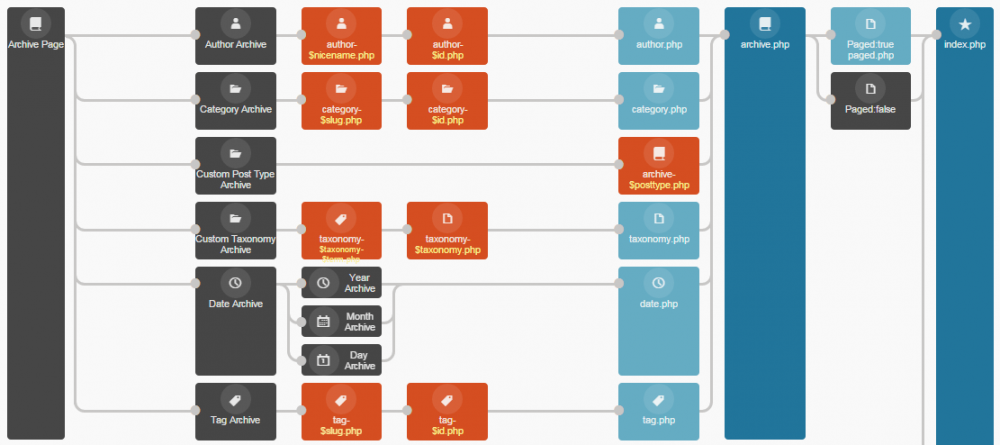
In this post, I’m going to talk about archive templates in WordPress. Archive templates have quite a lot of versatility and if you wanted to, you could really drill down and customize large portions of your site. Before we begin though, let’s take a look at the WordPress hierarchy one more time.

archive-templates.png

As you can see, we can break down archives quite a bit and have a range of options at our disposal. Those options available are: author, category, custom post type, custom taxonomy, date and tag. Each one of those areas has it’s own template available. If you don’t want or don’t need to get that specific, you can create a catch-all archive.php template for all archive pages.

Date Archives​

A lot of the time, WordPress developers choose to consolidate their archive pages into one archive.php file. They do have the option, though, to create a more specific date.php file that would offer more granular control over their chronologically ordered content. If a developer did choose to go ahead with a date.php file, that file would override the archive.php file.

When you look at a url for date archives, you probably see something that looks like this: http://www.example.com/2013/09/. Basically, this is the base URL, the year and then the month. This URL would narrow all date based archives to the specific month in question. If you wanted to, you could delete the month and have your URL look like this: http://www.example.com/2013/09/, which would display all posts written over the entire year in question.

Within your date.php file, it’s possible to write some conditional statements that would give clarity to which type of date based archives someone is looking at. And since it’s one file that’s controlling all three date archive types (year, month, day), it’s important to distinguish which is being viewed.

I’m going to give some code for an example date.php file and then discuss certain sections of it.

Code:
<?php get_header(); ?>
    <div class="container" role="main">
        <div class="row">
            <div class="col-md-8">
                <div class="page-header">
                    <h1><?php wp_title( '' ); ?></h1>
                </div>
                <ul>
                <?php if ( have_posts() ) : while ( have_posts() ) : the_post(); ?>                   
                    <?php if( is_year() ): ?>
                        <h3><?php the_date( 'F' ); ?></h3>                       
                    <?php endif; ?>                   
                    <li><?php the_time( 'jS' ); ?> - <a href="<?php the_permalink(); ?>"><?php the_title(); ?></a></li>
                <?php endwhile; endif; ?>
                </ul>
            </div>
            <?php get_sidebar( 'blog' ); ?>
        </div>
    </div>
<?php get_footer(); ?>

As you can see from the above code, we have somewhat of a typical template file. Inside the file though, we also have one of those conditional chunks of code I referred to above. Let me strip out some of the code to get to the meat.

Code:
<?php if( is_year() ): ?>
    <h3><?php the_date( 'F' ); ?></h3>                       
<?php endif; ?>

At the heart of our file, we have this conditional statement. Basically, it says, if someone is viewing a year based archive, display the year as the page heading and then display the months below. If they are viewing something other than a year based archive, then simply display the month or day as the page heading. This type of conditional statement is typical in WordPress and I’m sure you can see the power behind these statements if you get the gist of how to write the PHP code that will display it.

Category Archives​

Category archives are much like page templates in that they offer some flexibility with their individual display.

If you take a look at the WordPress Hierarchy, you can see the options available. Again, if no custom page is being used, you can have all your category archive pages fall back and use the archive.php template. If you would like to somewhat customize your category templates, you can create a category.php page and WordPress will use this page when someone is viewing your site categories. If you would like granular control over what specific category archive pages look like, you have the option to create either category-$slug.php or category-$id.php. I would recommend going with category-$id.php because your page slugs may change over time (by manually editing or altering your structure), while page IDs are much less likely to change.

I’ll give you some example category page code below and then we’ll talk about a more unique category page.

Code:
<?php get_header(); ?>
    <div class="container" role="main">
        <div class="row">
            <div class="col-md-8">
                <div class="page-header">                     
                    <h1><?php wp_title( '' ); ?></h1>
                    <p>This is a category archive</p>
                </div>
                <?php if ( have_posts() ) : while ( have_posts() ) : the_post(); ?>
                <article class="post">                   
                    <h2><a href="<?php the_permalink(); ?>"><?php the_title(); ?></a></h2>
                    <p class="meta">
                        By <?php the_author_posts_link(); ?>
                        on <?php echo the_time('l, F jS, Y'); ?>
                        <a href="<?php comments_link(); ?>"><?php comments_number(); ?></a>
                    </p>
                </article>
                <?php endwhile; endif; ?>
            </div>
            <?php get_sidebar( 'blog' ); ?>
        </div>
    </div>
<?php get_footer(); ?>

As you can see, we’ve got our page headings, our loop and all the rest. Now let’s say we wanted to create a unique page for one of our categories. The first thing we’d have to do is to decide which naming convention we’d like to use – slug based or ID based. In this case, we’re going to use an ID based naming convention. Therefore, we can name our file, category-3.php or something equivalent. This naming convention will tell WordPress that we’re creating a unique category template for a specific category and that it should use this template and override the category.php file. Here is some example code for this page:

Code:
<?php get_header(); ?>
    <div class="container" role="main">
        <div class="row">
            <div class="col-md-8">
                <div class="page-header">
                    <h1><?php wp_title( '' ); ?></h1>
                </div>
                <?php if ( have_posts() ) : while ( have_posts() ) : the_post(); ?>
                <article class="post">                   
                    <h2><a href="<?php the_permalink(); ?>"><?php the_title(); ?></a></h2>
                    <?php the_content(); ?>               
                </article>
                <?php endwhile; endif; ?>
            </div>
            <?php get_sidebar( 'blog' ); ?>
        </div>
    </div>
<?php get_footer(); ?>

The above code displays more of a “post” style page, rather than a category page. When compared to the previous example code, you can see some of the “category” specific content is missing, such as the paragraph indicating “This is a category archive.” You can also see that the meta data is missing inside the loop.

Now, just as a reminder, we could just as easily have named this page using the category slug. So, instead of naming the page category-3.php, we could have named it category-dancing.php or whatever the specific category slug is.

One last thing – if you’d like to customize the CSS of your page for a different look, you’ll need to use the WordPress body class function, which you can add to the body tag in the header.php file. Here is what that function looks like inside the body tag:

Code:
<body <?php body_class(); ?>>

Author Archives​

Much like category archives, author archives can display more customized pages than what the standard archive.php or author.php templates offer. The options for custom author naming conventions are author-$nicename.php and author-$id.php. We already covered these naming conventions in the previous section, so you should know what’s going on. For the author-$nicename.php file, the “nicename” portion is simply the URL slug for that author.

I’m going to give you an example of what the code would look like for an archive.php page here:

Code:
<?php get_header(); ?>
    <div class="container" role="main">
        <div class="row">
            <div class="col-md-8">
                <?php
                    $curauth = (get_query_var('author_name')) ? get_user_by('slug', get_query_var('author_name')) : get_userdata(get_query_var('author')); ?>
                <div class="page-header">
                    <?php echo get_avatar( $curauth->ID ); ?>
                    <h1><?php echo $curauth->display_name; ?></h1>
                    <p><?php echo $curauth->user_description; ?></p>                   
                </div>   
                <h2>Recent Posts</h2>   
                <ul>
                <?php if ( have_posts() ) : while ( have_posts() ) : the_post(); ?>                   
                    <?php if( is_year() ): ?>
                        <h3><?php the_date( 'F' ); ?></h3>                       
                    <?php endif; ?>                   
                    <li><?php the_time( 'jS' ); ?> - <a href="<?php the_permalink(); ?>"><?php the_title(); ?></a></li>
                <?php endwhile; ?>
                </ul>
                <?php else: ?>
                    <p>No posts :(</p>
                <?php endif; ?>
            </div>
            <?php get_sidebar(); ?>
        </div>
    </div>
<?php get_footer(); ?>

As you can see, if you look at the code, this page would display the author name, the author avatar, user description and recent posts. If you wanted to, you could create a custom author archive file and display different or altered content. Here’s some example code for that:

Code:
<?php get_header(); ?>
    <div class="container" role="main">
        <div class="row">
            <div class="col-md-8">
                <?php
                    $curauth = (get_query_var('author_name')) ? get_user_by('slug', get_query_var('author_name')) : get_userdata(get_query_var('author'));  ?>
                <h1><?php echo $curauth->display_name; ?></h1>
                <p><?php echo $curauth->user_description; ?></p>
            </div>
            <?php get_sidebar(); ?>
        </div>
    </div>
<?php get_footer(); ?>

As you can see from this code, we’ve stripped some of the display data away. Now, all we’re showing for this particular author is the author name and that author’s description. While this is a simple example, you have total control of how to display any author page you wish.

I’m going to end this post here. If you have any questions, comments or concerns, please leave them below. Also, if you’re looking for more information on WordPress setup or templates, please check out the WordPress tutorials forum at the top of this page.
 
CaptainDan

CaptainDan

Member
Joined
May 9, 2021
Messages
113
Reaction Score
0
Points
16
  • #7

WordPress Custom Post Type Templates​

In this post, I’m going to talk about custom post types in WordPress – a very handy bit of knowledge to become familiar with. If you’ve ever wanted to add a custom section of your WordPress website, this post will benefit you. And the thing is, while setting up custom posts and custom archive pages is kind of confusing to begin with, it’s really easy to get the hang of. Once you understand the parts, the challenging areas of this section of your site will be a thing of the past.

Custom Post Type UI​

Let’s start off with the primary plugin you’ll need to connect the dots of your custom posts and archive pages. The plugin is called, “Custom Post Type UI” and you can download it here from the WordPress plugin directory and install it manually or you can simply search for it from your plugin area of your WordPress install. Either way, once it’s installed, there are only a few settings you need to be aware of (to get the ball rolling).

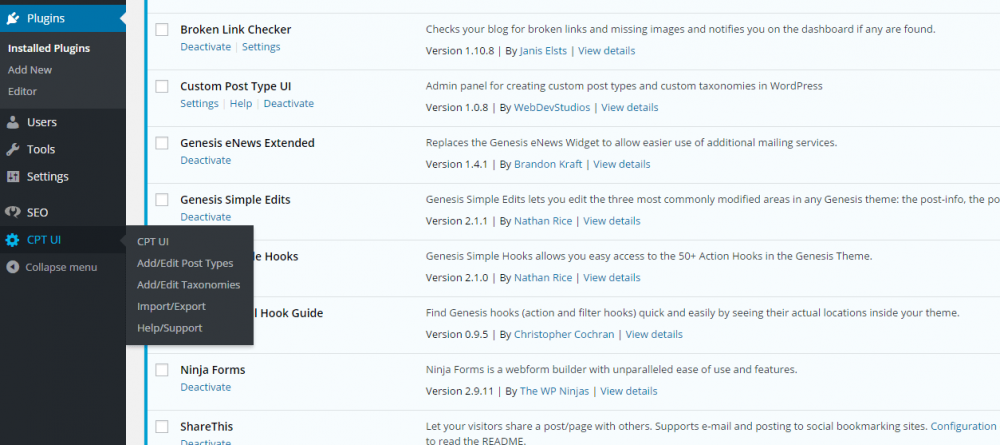
After you get the plugin installed, you should see a menu over to the left that looks like this (click for larger image):

cpt-ui-menu.png

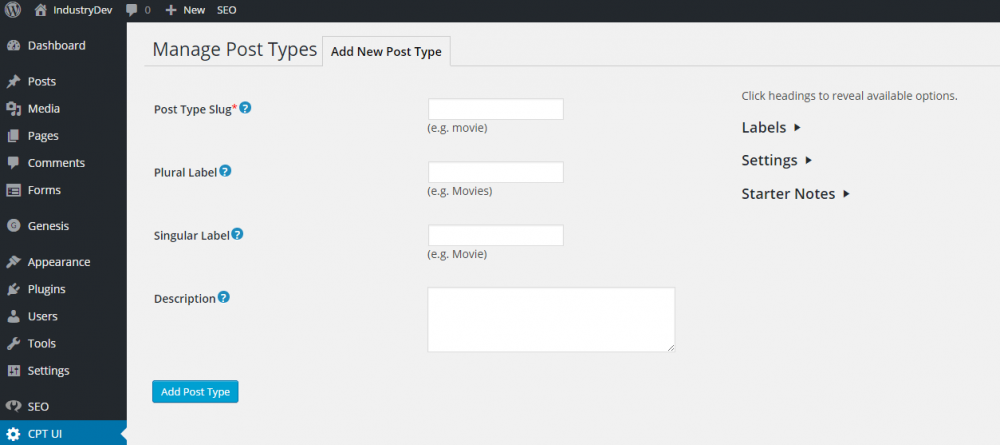
There are a few areas of the setup that need attention. If you click the “Add/Edit Post Types” link in the menu I just described above, you’ll see some fields that need to be filled in.

First, fill in the post type slug. This has the capability of being part of the URL that holds the posts and archive page, so be short, but descriptive. Also, be sure to follow the directions while creating the slug. There are a few rules to follow (example: gallery).

Second, fill in the plural label. This is going to be used as a menu item in the WordPress admin area, so again, keep it short, but descriptive (example: Galleries).

Third, fill in the singular label, which will be used as a heading while you are creating and editing your custom posts. (example: Gallery Section).

add-new-post-type.png

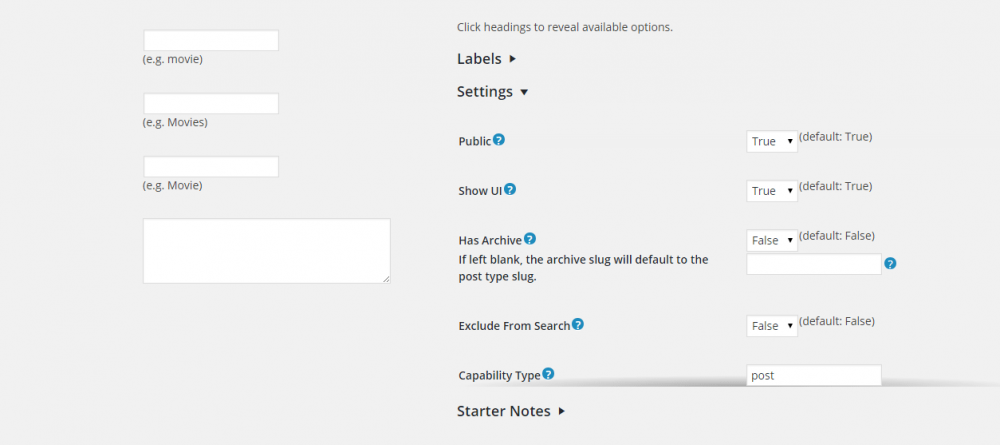
Next, there are some more advanced areas that need to be set over to the right. In previous versions of this plugin, these were held below the initial settings and were accessed via a link. In the most recent version, all you have to do is click the arrow to the right of the word, “Settings.”

The first attribute you need to set is the “Has Archive” setting. If you set this to true, WordPress will create a custom archive page, specifically for your custom posts. So, if you are creating some sort of a gallery or portfolio with many custom posts, the custom posts can show on a custom archive page. This is probably the most commonly desired option. Also, you have the option of creating a custom slug for the archive page. If you leave this blank, the post type slug will be used.

It’s important to remember that if you do request that an archive be used, either the archive.php or the archives-$posttype.php template file will be used.

The other attribute that needs attention is called, “Rewrite.” This is coupled with “Custom Rewrite Slug.” If you set Rewrite to true, WordPress will “rewrite” your URL path to work with your custom posts. With the Custom Rewrite Slug, you can set this URL to look like whatever you want.

settings.png

After all of these areas are set, you should be able to create a new custom post by using the menu to the left in the WordPress admin. So, let’s say you created a label called, “Gallery,” you could mouse over the Gallery link on the left and click the “Add Gallery Section” link. This will bring you to the add post page. Once you add a custom post, you should see the automatically generated slug.

Let’s say, for example, you create a custom post called, “My First Work of Art” and saved it. You should see the slug as “http://www.example.com/gallery/my-first-work-of-art/. If you copy just the beginning part of the slug, for example, http://www.example.com/gallery/, and paste it into a browser, you will see the archive page that holds the custom posts.

In order to add a link to the custom archive page, you’ll need to visit the “Appearance > Menus” section, where you can set up a new “Custom Link.” Once you create the link, add it to the menu you’d like to see it in on your site.

Again, if you don’t have a custom archive page set up specifically for this area of your site, WordPress will use the standard archive.php template for it. If you wanted to create a custom archive page for the, for example, Gallery section, you’d have to create a template file named, archive-gallery.php.

In order for you to have your custom posts listed on a page, such as the archive page, you don’t necessarily need to follow the latter instructions above. You can just as easily not turn on the “Has Archive” setting and go ahead and create a custom page, like I described in an earlier post. If you have a custom page template set up, while creating your custom page in the admin, you would choose the specific page from the “Template” drop down in the “Page Attributes” box. Also, inside the code of the custom page template, you’d add some code to the loop that looks like this:

Code:
<?php
    $args = array(
        'post_type' => 'gallery'
    );
    $the_query = new WP_Query( $args );         
?>

Finally, we’re going to talk about how to set up an actual custom post template to use with your custom post types. After all, you most likely want these posts to be unique from other posts on your site.

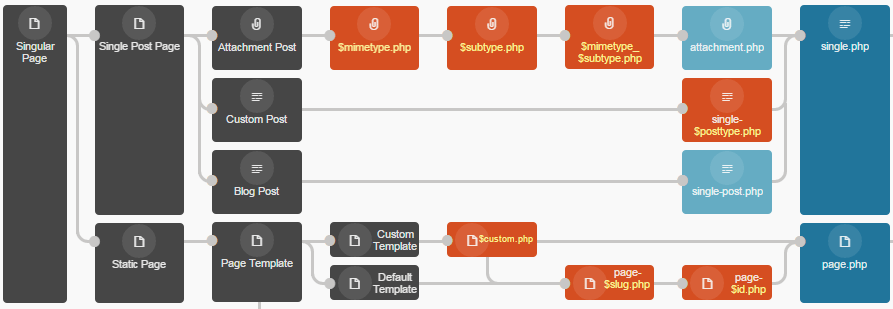
If you look at the WP Hierarchy, under Singular Page > Single Post Page > Custom Post, you’ll see that you have the ability to create a custom post template for these pages. The naming convention for these custom post templates looks like this: single-$posttype.php. If you don’t create this file, the generic fallback single.php will be used. In your custom post template, you can add whatever code you’d like.

I hope I helped you create your custom post types on your website. If you have any questions or comments, please leave them below.
 
CaptainDan

CaptainDan

Member
Joined
May 9, 2021
Messages
113
Reaction Score
0
Points
16
  • #8

WordPress Templates – Media, Search & 404 Pages​

I’m coming towards the close of my WordPress template journey with Zac Gordon over at Treehouse. I’ve written about many types of WordPress templates over the last few posts and today, I’m going to go over the ones that are left. The media, search and 404 page templates.

Media Page Templates​

I have to admit, I don’t use media pages on any of my websites. What seemed like a good idea years ago has proven to be, well, not so much of a good idea. The reason goes like this – For every post or page you write in WordPress, the search engines count that page as one. For every image you place on a page and link that image to its own page, the search engines count those as individual pages as well. If you have one page with twenty images on it and link to every image using a media page template, you just created twenty one pages. If you don’t know how this can harm you, I encourage you to do a quick Google search for “Google Panda.” If that doesn’t steer you away from using media pages, I don’t know what will.

Be that as it may, and also considering that there are other uses for media pages in WordPress, I’ll cover how to go about setting up custom pages for either mime types or as a catch-all media page for all types of media.

Before we do anything else, let’s first take a look at the WordPress Hierarchy:

wordpress-attachment-templates.png

As you can see from the above image, the catch-all template for media pages is the attachment.php, This is, of course, excluding the obvious index.php and single.php. If you choose to create a more customized template for your media pages, you can do so by modifying the file names to $mimetype_subtype.php, $subtype.php and $mimetype.php. If you’re wondering what mime types WordPress recognizes, you can check out this page for the allowed default mime types.

I’m going to give you a short example on what your template files might look like if you wanted to have custom pages for images and then custom pages for PNG images. Yes, you can filter down to sub-mime types. Again, you might have a very good reason for doing this, but I’m guessing these types of pages are rarely found.

If you’d like to have an attachment page that will be used for all images, then you would create a template file named image.php. Inside that image.php file, you might find some code that looks like this:

Code:
<html>
<head>
    <title>Image Template</title>
    <?php wp_head(); ?>
</head>
<body>   
    <p><a href="javascript:history.back()">&#8592; Back</a></p>
    <div>
    <h1>Image Template</h1>
    <?php if ( have_posts() ) : while ( have_posts() ) : the_post(); ?>       
        <p>MIME Type: <?php echo get_post_mime_type(); ?></p>
        <p>File Name: image.php</p>
        <p><?php echo wp_get_attachment_image( $post->id, 'large' ); ?></p>
    
    <?php endwhile; endif; ?>
    </div>
</body>
</html>

For testing purposes, you can include the “get_post_mime_type()” function, that would display the specific mime type of the page you’re working on and to verify that it’s working correctly.

If you are including PNG files into your posts or pages and are linking to them, and aren’t using the image.php template, you can have WordPress fall back to use a more specific imagepng.php template file. Code inside that file might look like this:

Code:
<html>
<head>
    <title>PNG Template</title>
    <?php wp_head(); ?>
</head>
<body>       
    <p><a href="javascript:history.back()">&#8592; Back</a></p>
    <div>
    <h1>PNG Template</h1>
    <?php if ( have_posts() ) : while ( have_posts() ) : the_post(); ?>       
        <p>MIME Type: <?php echo get_post_mime_type(); ?></p>
        <p>File Name: png.php</p>
        <p><?php echo wp_get_attachment_image( $post->id, 'large' ); ?></p>
    
    <?php endwhile; endif; ?>
    </div>
</body>
</html>

Which, as you can see, is very similar.

Now remember, you can set up a specific template for any of the allowed mime types or sub types. Most developers probably create either the attachment.php template or simple use the single.php template if they’re interested in having their media files link to their own pages.

Search Page Templates​

I’m going to give you a big heads up on some good knowledge here in regards to search results pages in WordPress. Go ahead and block “/?s” path in your robots.txt file. You DO NOT want any search results pages crawled by search engines. Don’t fall for the, “Just use noindex on those pages…” nonsense that’s floating around on the internet these days. There is no reason why search engines should be crawling these pages and they should be stopped in their tracks. Don’t say I didn’t warn you. There are many a WordPress site out there right now not ranking as well as they should be due to this one area. Don’t become one of them.

Anyway, barring that, you still need to have a nice search results page for your site visitors. Let’s take a look at the WordPress hierarchy to see which template gets used in this case.

wordpress-search-template.png

As you can see, it’s the search.php template that gets used for website search results. If you set one of those up, the code inside might look like this:

Code:
<?php get_header(); ?>
    <div class="container" role="main">
        <div class="row">
            <div class="col-md-12">
                <div class="page-header">
                    <h1><?php wp_title( '' ); ?></h1>
                </div>
                <?php if ( have_posts() ) : while ( have_posts() ) : the_post(); ?>                   
                    <h2><a href="<?php the_permalink(); ?>"><?php the_title(); ?></a></h2>                 
                    <?php the_content(); ?>
                <?php endwhile; else: ?>
                    <p>No results :(</p>
                    <p><?php get_search_form(); ?></p>
                <?php endif; ?>
            </div>
        </div>
    </div>
<?php get_footer(); ?>

Now, please be aware, if your website is on the smaller end, you probably don’t need to include a search field or search results page. But if you have a larger website, you would certainly benefit from one.

Also, if you aren’t aware how to include a search box on your WordPress site, you can either use the drag and drop search field widget or hard code the search function into your templates. The code to get the search form is this:

Code:
<?php get_search_form( $echo ); ?>

Also, if you are planning on creating a custom search form, please do some reading on the topic in the codex. You can find the appropriate page here.

404 Page Templates​

wordpress-404-template.png

If you’d like to include a custom 404 page for your site visitors to see when they land on a non-existent page, you would set one up using the 404.php template. This template can be as simple or complex as you would like. Some very basic code would look like this:

Code:
<?php get_header(); ?>
    <div class="container" role="main">
        <div class="row">
            <div class="col-md-8">
                <div class="page-header">
                    <h1><?php wp_title( '' ); ?></h1>
                </div>
                <article>
                <p>This is where your clever content would go.</p>
                </article>
            </div>
        </div>
    </div>
<?php get_footer(); ?>

Please be aware though, you should, at the very least, have a search field that really stands out on your 404 page. If your site is small, at least have some sort or listings for your most popular pages. You want to offer the visitor something to click on if they don’t land on the page they expected to see.

Here we are, at the end of another WordPress template post. I hope you enjoyed what you read and if you have any questions or comments, please leave them below. If you’d like to browse some other WordPress related posts, please check out the WordPress forum above.
 
CaptainDan

CaptainDan

Member
Joined
May 9, 2021
Messages
113
Reaction Score
0
Points
16
  • #9

Setting Up a WordPress Theme​

In this post, I’m going to talk about setting up a WordPress theme. I’ll go over where exactly to put your theme files, what order to put them in, what to name them and how to turn your theme on. This isn’t a difficult process, but there are some rules to follow.

Where Are My WordPress Themes?​

I guess we should start with where WordPress themes can be found. There are two perspectives here. The first perspective is from a WordPress user’s point of view. If you have a WordPress install and simply want to know where to upload a theme folder and where you can browse through existing themes on your site, you can do this:

– Log into your WordPress install admin.
– Roll over the “Appearance” link in the left navigation.
– Click the “Themes” link in the next menu.

From there, you’ll notice a few things. First, you’ll most likely see some big squares with thumbnail images inside them. Those are your themes. If you roll over a particular square, you’ll see an option to view a live preview of the theme you’re rolling over and an option to activate the same theme. You also have the choice to view the theme details.

At the top of the page, you’ll see a button that says “Add New” that can be pressed. The following page can be used to search through themes that are located inside the WordPress Theme Repository. If you find something you like, you can install it directly from the repository. Also, on that same page, you’ll see a button that says “Upload Theme” that you can use to upload and install your own theme.

Which brings us to our second perspective. This one is from a WordPress developer’s point of view. Let’s say that you want to get into developing WordPress themes and you would like to know where to store the theme files in you WordPress site’s directory structure. Well, to answer this question is very simple. WordPress theme files are kept in the following directory:

/wp-content/themes/

Inside this directory, you can create a folder with a unique name, such as /my-theme/. You’d store all the files I’ll talk about in later sections of this post as well as in later posts.

Our Theme Template Hierarchy​

Since I’ve already covered the WordPress template hierarchy on this site quite a bit, I’m going to keep this section as more of a resource, rather than descriptive or informative. I’ll link to what I think will help in the way of understanding the hierarchy and where you can find information on it. After browsing through the landing pages from the links I’ll give below, you should have an understanding of what the WordPress template hierarchy is and how to go about developing with it in mind.

Template Hierarchy in the WordPress Codex

WordPress Template Hierarchy – A Mini Resource

Putting Your WordPress Theme Folder Together​

In order to begin constructing a theme for our WordPress website, we need to create a directory where all our theme files will reside. We’ll call this the theme folder.

When naming the theme folder (that lives where I described in the first section of this post), we need to be cognizant of similarly named directories in the same directory as our theme. Here’s a hint: don’t name your theme folder with one word. Always prepend something unique before a generic name. So if you would like to create a theme for a cat site, you wouldn’t simply name it /theme/. You would name your theme directory something like, /cat-theme/ or /orange-cat-theme/. By prepending a generically named theme with something more unique, you lessen the risk of conflict with another theme.

In order to get our theme initially off the ground, we’re going to have to create three files inside our folder. These three files are:

style.css
index.php
functions.php

The first two files are necessary for viewing our theme inside the WordPress admin area I spoke of earlier. There is specific text that’s held inside these files that tell WordPress exactly what they are. They give the instructions that tell WordPress what to do with them.

Do you remember when I talked about rolling over the thumbnail box that you’ll most likely find on the themes page inside the WordPress admin? When you roll over that box, a link appears that says, “Theme Details.” If you click that link, you’ll travel to a page that offers all the details for that particular theme. Well, those detail are stored someplace and the top of the “style.css” is that place. Folks in the WordPress community call this area the theme meta information. I’ll give an example of it here:

Code:
/*
Theme Name: MySite Theme
Author: My Name
Author URI: https://mysite.com/
Description: Very basic theme that showcases the simplicity of what life on the internet can be.
Version: 1.0
License: GNU General Public License v2 or later
License URI: http://www.gnu.org/licenses/gpl-2.0.html
Tags: responsive-layout, light, silver, two-columns, right-sidebar
*/

To take a closer look at the top of the stylesheet, check out this page in the WordPress Codex.

Just by filling in the meta information for our theme in the style.css file, we’re now able to see our theme available in the themes area of our WordPress admin. All the information we placed in that area is nicely formatted.

What’s missing is the screenshot of what the theme is going to look like. In order to add that to view inside the admin, we’ll need to create a .png file with the dimensions of 880×660. Also, it needs to be named “screenshot.png” and stored inside the theme folder. To learn more about the WordPress theme screenshot requirements, follow this link.

Turning It On – Let’s Activate Our Theme​

In order to activate our theme, all we need to do is to head back into the theme page in the WordPress admin, roll over our theme thumbnail and click the “Activate” button. From there, the active theme will move into the first position and be live on the site. If you visit the theme area and don’t see the theme you’re interested in, but see something down below under the heading, “Broken Themes,” it most likely means that a file is mis-named. Check the files over again to be sure they are named precisely as I named them above.

I’m going to be writing posts on how to continue setting up a WordPress theme below, so if you’re interested, stay tuned to this thread. Also, if you have any comments or questions, please leave them below. Thanks!
 
CaptainDan

CaptainDan

Member
Joined
May 9, 2021
Messages
113
Reaction Score
0
Points
16
  • #10

Adding CSS and JavaScript to Your WordPress Theme​

One of the very first areas that needs attention when creating a theme inside WordPress is to add, or include, your style sheets and JavaScript files inside of your template files. Without those, your theme development is going to be quite difficult. In this post, I’ll cover exactly how to go about attaching those types of files to the proper templates.

Importing Code To Your style.css File​

It’s really up to you how you want to go about developing your WordPress theme. Some people (myself included) prefer to work live, meaning, code CSS directly inside the style.css file that lives in the WordPress theme folder from the beginning. I prefer to see exactly what each and every change looks like inside WordPress.

Other folks prefer to create an entire template in static files first and then move their code over to include inside the WordPress theme files. If you’re working on a team, this is most likely the preferred approach. Also, if you need approval from a client or are using a framework, such as Bootstrap or Foundation, you might want to take this approach as well.

In this post (and the following posts), we’re going to take the route of creating a static template first and then move the code over to the dynamic WordPress template system.

The first thing we need to do is to include the CSS code into our style.css file. This is a simple copy/paste task. Simply copy what you already coded inside your static template CSS file and paste it inside your WordPress template file. The only tricky part is linking to additional CSS files via the functions.php file.

Linking To CSS Files​

If you have additional stylesheet files that you’d like to include in your theme, you would need to create a new folder inside of the theme folder and place those stylesheets inside of it. So your structure would look something like this:

/wp-content/my-theme/css/normalize.css
/wp-content/my-theme/css/foundation.css

Once you have those files inside of your CSS folder, you can insert some code into the functions.php file that will tell WordPress that they exist and that it should use them.

This section involves some code, so I’ll try to explain things as clearly as I can and give additional details as to where you can find supporting documentation for each function used.

First, I’ll show you what the finished CSS include code looks like inside the functions.php file:

Code:
<?php
function myt_theme_styles() {
 
  wp_enqueue_style( 'foundation_css', get_template_directory_uri() . '/css/foundation.css' );
  wp_enqueue_style( 'normalize_css', get_template_directory_uri() . '/css/normalize.css' );
  wp_enqueue_style( 'googlefont_css', 'http://fonts.googleapis.com/css?family=Asap:400,700,400italic,700italic' );
  wp_enqueue_style( 'main_css', get_template_directory_uri() . '/style.css' );
 
}
add_action( 'wp_enqueue_scripts', 'myt_theme_styles' );
?>

Okay, the first line in the PHP code block is a function with a unique name. You can name this whatever you want, but you should be sure it represents what it’s about. In this case, the “myt” represents the theme name and the “theme_styles” represents what the function is about. The reason you want the name of the function to be unique is to differentiate it from all other functions in your WordPress install. If you’d like to learn more about the functions file, please view this page in the WordPress Codex.

In the next few lines, we use the WordPress “wp_enqueue_style” function. This function is a safe way to add/enqueue a stylesheet file to the WordPress generated page. For documentation on this function, please visit this page or this page.

Now, inside this function, we need to use a few parameters that indicate exactly what the function is going to do. For the first parameter, we use the handle ($handle), “foundation_css” to give a name to the stylesheet we’re interested in attaching. The next parameter is the source ($src) of the stylesheet. To gather the path of where the CSS file is located, we use another function (get_template_directory_uri()) and concatenate the beginning part of the path to the location of the actual CSS file (/css/foundation.css).


The “get_template_directory_uri” function is use to retrieve the template directory URI for the current theme. For more information on this function, please visit this page in the WordPress Codex.

Now, just by simply writing the myt_theme_styles() function, it doesn’t necessarily mean anything is going to happen. It’s similar to creating any function in programming – it sits idly until it’s called. With that in mind, let’s go over the “add_action” function that’s written below the function.

First, what is the add_action function? Basically, the add_action function triggers an event when the hook inside the function is acted upon. So, in this case, we have included the hook, “myt_theme_styles” so when that hook is called, the myt_theme_styles function will execute. Now, I realize we haven’t included the hook in any pages yet, but we will later. It’s important to lay the groundwork by creating functions before calling any hooks.

Linking To JavaScript Files​

Linking to JavaScript files via the functions.php file is much like linking to CSS files. We need to first create a /js/ directory to hold our files. In this case, we’ll have three files and the directory structure will look like this:

/wp-content/my-theme/js/modernizr.js
/wp-content/my-theme/js/foundation.min.js
/wp-content/my-theme/js/app.js

Below, I’m going to show you a function that’s similar to the one we used for the stylesheets, but this one’s for use with JavaScript files. Like I did above, I’ll go over what everything means below.

Code:
<?php
function myt_theme_js() {
 
  wp_enqueue_script( 'modernizr_js', get_template_directory_uri() . '/js/modernizr.js', '', '', false );
  wp_enqueue_script( 'foundation_js', get_template_directory_uri() . '/js/foundation.min.js', array('jquery'), '', true );
  wp_enqueue_script( 'main_js', get_template_directory_uri() . '/js/app.js', array('jquery', 'foundation_js'), '', true );  
 
}
add_action( 'wp_enqueue_scripts', 'myt_theme_js' );
?>

I’m sure you can see the similarities. The “myt_theme_js” is the name of the function that will hold the specifics of our JavaScript files. The handles, the paths, etc… The first difference that we can see though is the use of the function, “wp_enqueue_script.” While this function links the script file to the proper page, it can also link to it at the proper time, according to its dependencies.

And like the wp_enqueue_style function, the wp_enqueue_style function needs to use parameters as well. Again, I’ll use the first line of the function as an example.

In this case, the handle is called, “modernizr_js” and the path uses the get_template_directory_uri() along with the location of the specific file. While the two enqueue functions do look alike in many ways, the JavaScript enqueue function (in this case) needs a few additional parameters. If you check out the wp_enqueue_style page over at the WordPress Codex, you can see that the additional parameters are the $deps for dependencies, $ver for version and $in_footer for whether or not this script is included at the footer of the page, right before the closing body tag. Here’s what the function can look like:

Code:
<?php wp_enqueue_script( $handle, $src, $deps, $ver, $in_footer ); ?>

In the first wp_enqueue_style function, we use the $handle, $src and the $in_footer parameters and leave the others blank. If you look at further functions a few lines down, you can see that we take advantage of those additional parameters.

Before we finish up this section, let’s take a quick look at how the $deps (dependencies) parameter works. If you’ll notice in the last function:

Code:
wp_enqueue_script( 'main_js', get_template_directory_uri() . '/js/app.js', array('jquery', 'foundation_js'), '', true );

We use the $deps parameter. The way to take advantage of this parameter is to create an array of files that the file we’re currently calling is dependent upon. In the case above, the “app.js” is dependent upon the jquery (included in WordPress) and the foundation.min.js files, we’ll include those two handles in the parameter. This is important because by doing this, you’re ensuring the dependencies get loaded on the page before the file in question.

Below this, we again use the “add_action” function that I went over above.
 
CaptainDan

CaptainDan

Member
Joined
May 9, 2021
Messages
113
Reaction Score
0
Points
16
  • #11

Creating & Including WordPress Header & Footer Files​

In most WordPress installs (and websites in general) headers and footers are consistent across many pages. Unless there are special sections that are unique to the majority, visitors will see the same layout, with perhaps some dynamic content, at the top of the page and at the bottom of the page. These layouts are pulled into to the page that’s being viewed by two files – header.php and the footer.php.

Now that we have our index.php page set up, we can go ahead and add some code to pull in, or include, the header and footer files to that page. The code to do this would look like:

Code:
// INCLUDE HEADER FILE
<?php get_header(); ?>
 
    // MAIN CONTENT
 
// INCLUDE FOOTER FILE
<?php get_footer(); ?>

This is the very beginnings of a template page. As you can see, we have both the header and footer files being included by using two WordPress functions. The first one is the “get_header()” function and the next one is the “get_footer()” function. Remember though, it’s important that the header file be named header.php and the footer file be named footer.php. There are more advanced file names than that available, but we’ll talk about them in a later post. For now, focus on these file names.

header.php​

This is where the fun starts. We get to begin building the header.php file out. Below, I’ve displayed some very basic code, including some WordPress functions – just to offer an idea of what might be included in the header file. Of course, there is much more that can go inside this file. I merely wanted to show the bare bones. I’ll go over the WordPress functions below.

Code:
<!doctype html>
<html class="no-js" lang="en">
    <head>
        <meta charset="utf-8" />
        <meta name="viewport" content="width=device-width, initial-scale=1.0" />
        <title><?php wp_title( '|', true, 'right' ); bloginfo( 'name' ); ?></title>
            <?php wp_head(); ?>
    </head>
 
<body>
    <header>
        <h1><a href="<?php bloginfo('url'); ?>"><?php bloginfo('name'); ?></a></h1>
    </header>

Now, if you’re looking at building WordPress templates, it’s assumed that you have an understanding of HTML, CSS and JavaScript. And since you have an understanding of those things, let’s take a look at what’s above.

At first glance, everything looks like what is normally inside a header file. But since we’re dealing with WordPress and its dynamic nature, we need to use WordPress functions. I suppose you could hard code everything into these files, but if you did that, you’d be missing out on much of the functionality that WordPress offers.

The first function you see above is the wp_title function, along with some parameters. This function displays the titles for all posts and pages on your WordPress site. It looks like this:

Code:
<?php wp_title( $sep, $display, $seplocation ); ?>

As you may be able to guess, as the function sits above, WordPress calls the title of the page, uses a pipe as a separator, displays it and displays it to the right of the title. Which makes sense because to the right of this function is the bloginfo function. This function can look like this:

Code:
<?php bloginfo( $show ); ?>

Now, I’m not going to go over all the available parameters for this function in this post because there are so many of them. If you’re interested in taking a look at what they are, feel free to check out its WordPress Codex page. I will tell you, though, that the bloginfo function parameter that’s showing above will display the site title as is stored in the WordPress admin settings.

The next function – and one that’s quite important – is the wp_head function. This goes right before the closing head tag in the header.php file and fires the wp_head action. Basically, this function calls the functions that we placed in the functions.php file. Due to its very dynamic nature, it’s somewhat confusing to wrap your head around. Just rest assured that the functions you coded into your functions.php file will act as you want them to. Functions such as the wp_enqueue_style and the wp_enqueue_script. In this case, the CSS that you coded earlier will appear in the head section of your header.

Finally, we have two more cases of the bloginfo function. In these cases, we’re simply pulling in the site URL and the name, as we did earlier.

footer.php​

Below, we have some code that might be found in the footer.php file. As you can tell, this code is a bit lighter than the header code, but in many cases, you’ll find much more than this.

Code:
    <footer>           
        <p>Copyright <?php echo date('Y'); ?></p>
    </footer>
        <?php wp_footer(); ?>
</body>
</html>

Above, we have some simple HTML, along with a few more functions. The first one we see isn’t unique to WordPress. It’s actually the PHP date function. If you want to see how to code this, check out this page.

The last function we have is the wp_footer function. This is found right before the closing body tag. Much like the wp_head function, this one is very dynamic. It generally calls in JavaScript files and if you fail to include it, your JavaScript will not work as intended. A good example of how this might work is through the use of the wp_enqueue_script function (I talked about this in my previous post). If you take a look at the “$in_footer” parameter of the wp_enqueue_script function, you’ll see that it relies on wp_footer. Things in WordPress go round and round like this, so it’s important to really learn how this type of code works and how many areas need one another to give you what you’re looking for.
 
CaptainDan

CaptainDan

Member
Joined
May 9, 2021
Messages
113
Reaction Score
0
Points
16
  • #12

Understanding the WordPress Loop​

If you’ve either looked into developing with WordPress or have developed with WordPress for any length of time, I’m sure you’ve heard of the “WordPress Loop.” The loop is one area of WordPress that you don’t want to skimp on. In order to be proficient in development, it’s important to understand exactly what’s going on. With this post, it’s my intention to help out with that. The good news is, it’s fairly straightforward.

To get the most out of learning how to loop works, it’s a good idea to visit the related page in the Codex. It’s here where much of what you’ll need to know is explained.

I think we’ll get started by looking at a small piece of code that’s shown in the Codex:

Code:
<?php if ( have_posts() ) : while ( have_posts() ) : the_post(); ?>
    // YOUR CONTENT GOES HERE
<?php endwhile; else : ?>
    <p><?php _e( 'Sorry, no posts matched your criteria.' ); ?></p>
<?php endif; ?>

What you’re looking at above is the bare bones basics of what the WordPress loop can look like. If you’ll notice, there are a few areas and functions in use. I’ll go through things line by line.

In the first line, we have a lot to look at. In this one line, we actually have an if statement, a while statement and the content itself. There are three areas that require consideration.

The first area is an if statement that holds the “have_posts” function and basically asks if there are any posts in existence. If so, then go ahead and continue on to the next area. If not, then jump to the statement that says, “Sorry, no posts matched your criteria.” The have_posts function returns only a yes or no answer and no parameters are allowed.

The second area is a while loop and also uses the have_posts function. This area says that as long as posts continue to exist, then continue on to the next function. If no more posts exist, stop looping.

The last area is used for the content itself and uses the “the_post” function. In the Codex, WordPress says that this function, “Iterates the post index in The Loop. Retrieves the next post, sets up the post, sets the ‘in the loop’ property to true.”

The following lines end the loop and end the if statement.

The above code is one way to write the loop. If you want to see another way, check out this code:

Code:
<?php
if ( have_posts() ) {
  while ( have_posts() ) {
    the_post(); ?>
    <h2><?php the_title(); ?></h2>
    <?php the_content(); ?>
  <?php }
}
?>

This might be a bit easier to understand because of the use of the curly braces. You can see more clearly that everything is contained inside the if statement and that the content is contained inside the while loop. But, as you get used to creating and working with the loop, the shorthand that was in the first example is much cleaner to use in your code.

Also, if you’ll notice above, there are a few more functions in use. We already looked at the have_posts and the the_post functions, but we haven’t gone over the “the_title” or “the_content” functions yet.

The the_title function returns the title of the current post. There are a few parameters that you can use inside this function, so if you’re interested in using them, I suggest you read the page in the Codex.

The the_content function displays the contents of the current post and must be used inside the loop. Again, there are a few parameters that you can use here, so if you’re interested, check them out.

To go one step futher, I’m going to build upon my last post and show you some code for how your index page can look. This code should assist in clarifying where you can place your HTML in reference to these PHP functions.

Code:
<?php get_header(); ?>
<section class="row">
  <div class="small-12 columns text-center">
    <div class="leader">   
    <?php if ( have_posts() ) : while ( have_posts() ) : the_post(); ?>   
      <h1><?php the_title(); ?></h1>
      <p><?php the_content(); ?></p>   
  <?php endwhile; else : ?> 
    <p><?php _e( 'Sorry, no posts matched your criteria.' ); ?></p> 
  <?php endif; ?>   
    </div>
  </div>
</section>
<?php get_footer(); ?>

As you can see above, we’ve included the header and footer files. Also in this code is the wrapper code for the loop. So, outside the loop is some HTML for semantics and styling and inside the loop is a heading tag and a paragraph tag to be used for every iteration of content.

I’d like to finish up this post by giving a few references that’ll help make building your template pages and working with the loop much easier. The first one is “The Loop In Action” page in the Codex. By browsing this page, you can find many great code samples that should give you enough ideas to get started.

Also, if you want to work with the loop, you’ll surely want to know some functions that you can use with it. Guess what? There’s a resource for that. It’s the “Function Reference” page in the Codex. Check this one out, but take a few days with it. There’s a lot to go through. Better yet, just put it in your favorites to look back on when you need it.
 
CaptainDan

CaptainDan

Member
Joined
May 9, 2021
Messages
113
Reaction Score
0
Points
16
  • #13

Creating WordPress Page Templates​

Once you begin creating templates in WordPress, you’ll quickly realize that the basis of each template is quite similar among them all. If you take a look at my previous post, where I described how one might go about formatting the WordPress loop, you’ll see that the code for the index.php file looks strikingly like the code I’m about to place below:

Code:
<?php get_header(); ?>
<section class="row">
  <div class="small-12 columns text-center">
    <div class="leader">   
    <?php if ( have_posts() ) : while ( have_posts() ) : the_post(); ?>   
      <h1><?php the_title(); ?></h1>     
      <p><?php the_content(); ?></p>     
    <?php endwhile; else : ?>   
      <p><?php _e( 'Sorry, page found.' ); ?></p>   
    <?php endif; ?>   
    </div>
  </div>
</section>
<?php get_footer(); ?>

The reason the code inside the page.php file is almost identical to the code inside the index.php file is because the loop works the same way for pulling posts as it does for pulling page content.

So, why does this code go inside the page.php template? Well, to answer that question, I suggest you review my “WordPress Page & Post Templates” post, where I go over exactly how the WordPress hierarchy functions and why the name, “page.php” is important.

Speaking of the WordPress hierarchy brings me to my next point. What if you want to create a custom page type in WordPress? What does that look like? Well, I went over that in one of my previous posts as well, but I’ll cover it here.

In the example below, I’m going to be placing code inside a template named “page-sidebar-left.php.” If you look at the WordPress hierarchy, you’ll notice that we aren’t bound to any naming conventions when creating custom page types. The naming convention for this is simply “$custom.php.” What differentiates the page among other templates and makes the template available inside the WordPress admin is the comment code at the top of the page. Here, take a look:

Code:
<?php
/*
  Template Name: Left Sidebar
*/
?>
<?php get_header(); ?>
<section class="two-column row no-max pad">
  <div class="small-12 columns">
    <div class="row">
      <!-- Primary Column -->
      <div class="small-12 medium-7 medium-offset-1 medium-push-4 columns">
        <div class="primary">   
        <?php if ( have_posts() ) : while ( have_posts() ) : the_post(); ?>       
          <h1><?php the_title(); ?></h1>     
          <p><?php the_content(); ?></p>     
      <?php endwhile; else : ?>     
        <p><?php _e( 'Sorry, no pages found.' ); ?></p>     
      <?php endif; ?>   
    </div>
    </div>
    <!-- Secondary Column -->
    <div class="small-12 medium-4 medium-pull-8 columns">
      <div class="secondary">
        <h2 class="module-heading">Sidebar</h2>
      </div>
    </div>
  </div>
</section>
<?php get_footer(); ?>

Take a look at the: Template Name: Left Sidebar comment code at the top. This code alone indicates to WordPress that there’s a custom page type available and that it should be included in the “Template” drop-down box inside the page edit admin. Also, if you’ll notice, we don’t really have any dynamic code being pulled into the secondary column yet – we’ll get to that in later posts. For now, focus merely on what a custom page type looks like and how to set one up properly so it’s recognized by the CMS.
 
CaptainDan

CaptainDan

Member
Joined
May 9, 2021
Messages
113
Reaction Score
0
Points
16
  • #14

Setting Up Navigation In WordPress​

I think you’ll agree when I say that website navigation in WordPress is one of the more important areas of creating a template. After all, without navigation, our visitors are going to have a mightily challenged experience while attempting to traverse our sites. With this in mind, in this post, I’m going to cover some of the more critical areas of setting up site navigation in template files.

If you’re creating your own theme in WordPress, you may ask yourself a question. “Hey, how do I add a menu to my WordPress theme?” Well, there are a few steps to complete this task and I’m going to go over them in this post.

add_theme_support​

The very first thing you need to do is to get WordPress to recognize that you would like to include a menu in your theme. Without doing this, you’ll notice that there’s no link to “Menus” in your WordPress admin area. In order to have the Menus link appear, we need to add some code to the functions.php file.

Code:
add_theme_support( 'menus' );

By adding the above line of code into your PHP block inside the functions.php file, you’ll signal to WordPress that it should give you the ability to create menus for your theme. Once it’s done, you’ll notice that you can now roll over the “Appearance” link in the admin and the link, “Menus” will appear. You can now begin creating custom menus. Before you do that though, you should probably educate yourself on the add_theme_support function and its parameters. The parameter, “menus” is just one of them.

register_nav_menus​

Once you’ve got a menu or two created inside the WordPress admin, you need to go back to the functions.php file and tell WordPress that it should actually use the menus you created. There’s a fairly simple way to do this – it again involves a bit of code.

Code:
function register_theme_menus() {
  register_nav_menus(
    array(
      'primary-menu'  => __( 'Primary Menu' )     
    )
  );
}
add_action( 'init', 'register_theme_menus' );

There are a few new functions in use here. First, the “register_theme_menus” functions is one we created to hold another function we’ll discus below. This function will encapsulate all menus in our theme.

The second function is called, “register_nav_menus.” This function registers multiple custom navigation menus in the custom menu editor and allows for the creation of custom menus in the dashboard for use in your theme. If you are were interested in only using one menu in your theme, you may want to go ahead and take advantage of the “register_nav_menu” for that. The reason we’re using the function that contains an array is because if we decide to add menus in the future, this function will simplify their addition.

The register_nav_menus function requires the use of a $locations parameter and, again, is used via an array. You can see this in the above code. I’ll show you another example of an array used with multiple menus here:

Code:
register_nav_menus(
  array(
    'pluginbuddy_mobile' => 'PluginBuddy Mobile Navigation Menu',
    'footer_menu' => 'My Custom Footer Menu',
  )
);

The $locations parameter uses the menu location slugs and their descriptions.

If you go back to the example above this last one, you’ll see that we have one last function that’s called “add_action.” If I’m not mistaken, I believe I discussed this function in previous posts, but if not, I’ll go over it here.

In this case, the add_action function calls the register_theme_menus as WordPress is initializing. You can see this via the two parameters used inside the function. If you take a look at the add_action function here:

Code:
<?php add_action( $hook, $function_to_add, $priority, $accepted_args ); ?>

You can see that we’re taking advantage of the $hook and $function_to_add parameters. The $hook parameter is name of the action to which $function_to_add is hooked. So like I said above, when WordPress initializes, the function gets called. If you’re familiar with PHP or coding in general, you’ll recognize that functions just sit there in sort of a reserve until they are called later on.

So, just to recap what went on above:

1. WordPress had no idea that we wanted to use menus inside our theme. We used the “add_theme_support” function to solve that problem. By doing that, the “Menus” link inside the admin area was enabled.

2. Once we created a menu in the admin area, it sat there in limbo. WordPress didn’t know what to do with it or what “menu area” to attach it to. In order to rectify this issue, we registered a new menu location inside of the functions.php file by using the “register nav menus” function. We told WordPress that we’d like to create an area in which to attach our menu to.

3. Lastly, since our new location was sitting idly inside a function, we need to make it come alive. In order to do this, we used the “add_action” function inside the functions.php file. This called the previous function.

Now, you’ll notice that I’m not covering the other side of creating a menu – the side inside the admin area. Since that’s more of a user interface post and not a development post, I’m going to go over that in another article. For now, I’m simply covering the programming aspect of creating menu locations inside WordPress template files.

wp_nav_menu​

Now that we’ve got everything written inside our functions.php file, along with having a menu set up in the admin of our site, we can go ahead and place some code in the header.php file that will tell WordPress exactly where our menu should be located in our template. The function we’re going to use to tell WordPress this is the “wp_nav_menu” function. This function will display the menu that we specify from the “Appearance -> Menus” page.

Before we use the function though, we have to establish a few parameters. We need to create an array that will answer some questions. If you take a look at the functions page in the WordPress Codex, you’ll see all the parameters for this function. While we’re not going to take advantage of them all here, it’s a good idea to scan over what each parameter is capable of for an idea of how you might use them in the future. Check out this code:

Code:
$defaults = array(
  'container' => false,
  'theme_location'  => 'primary-menu',
  'menu_class'  => 'no-bullet'
);
wp_nav_menu( $defaults );

In the above code, you can see the array and the parameters we’ve chosen to use. Again, you can visit the Codex page to see what each of these does. Like any variable and just like the functions we wrote in our functions.php page, the “$defaults” variable with its array isn’t going to do much unless we call it. That’s where the wp_nav_menu function comes in. It’ll call the $defaults variable and show our “primary-menu” in the header of our template.
 
CaptainDan

CaptainDan

Member
Joined
May 9, 2021
Messages
113
Reaction Score
0
Points
16
  • #15

Creating WordPress Custom Post Type Templates​

There seems to be a bit of debate out there about whether or not to use a group of plugins to assist in creating custom post type template for your WordPress site. Zac Gordon, from Treehouse, advocates the use of the plugins. He says that by utilizing these plugins, a website owner is protected from custom post type loss if they decide to change themes. His favorite plugins to accomplish the creation of these templates are:

Advanced Custom Fields – (Owner’s Website)

Custom Post Type UI – (Owner’s Website)

Over at WPBeginner, it’s said that there’s danger in using plugins to create your custom post types. If a user deactivates one of the plugins involved, they run the risk of losing the posts, since those types aren’t registered in WordPress. They also won’t be available in the admin section.

When I began writing this post, I leaned towards the view of hard coding the custom post type code into the necessary templates. I’m still leaning that way. I’m not one to believe that users should flip through themes in their WordPress back-end and expect various features to continue working as they did before. To say that someone is only going to lose their custom post types by changing themes is only partially true. They’ll lose much more than that. Basically, anything that was coded into their template files will be gone. So why limit your concern to custom post types?

By the way, I’m really not going to go into crazy details on this topic in this post. I’ll cover the essentials, but if you’re looking for more, please feel free to take a look at these posts:

How to Create Custom Post Types in WordPress by WPBeginner

Creating Custom Post Types In WordPress by Elegant Themes

In this post, I’m going to focus on setting up custom post types by using code. If you read my previous post on setting up navigation, this shouldn’t look too foreign to you.

To keep things as simple as possible, I’m going to tell you that in order to get everything set up, we’ll need to complete three steps.

1. Give WordPress all the information it’ll need to recognize our custom post types (register our custom post type).
2. Create a special archive template that will hold all our custom posts (like an archive or category page).
3. Create a custom post template.

See, that’s not so terrible.

Step 1​

I’m going to review some code from the WordPress codex and use parts of it in the code examples below. And just to make you aware, I’m getting this from the “register_post_type” page, among other sources.

Code:
// Custom Post Type Function
function book_reviews_posttype() {
    // Custom Post Type Options
    $args = array(
      'label' => 'Book Reviews',
        'public' => true,
        'show_ui' => true,
        'capability_type' => 'post',
        'hierarchical' => false,
        'rewrite' => array('slug' => 'book-reviews'),
        'query_var' => true,
        'supports' => array(
            'title',
            'editor',
            'excerpt',
            'trackbacks',
            'custom-fields',
            'comments',
            'revisions',
            'thumbnail',
            'author',
            'page-attributes',)
        );
    register_post_type( 'book-reviews', $args );
}
// Hooking Our Function Into the Theme (calling the function)
add_action( 'init', 'book_reviews_posttype' );

The above block of code goes inside your functions.php file. Now, if you’re familiar with PHP, you might be aware that you can write this code another way. Instead of creating and using a local $args variable to store our options, we can include the array right inside the register_post_type function.

Code:
// Custom Post Type Function
function book_reviews_posttype() {
  register_post_type( 'book-reviews',
  // Custom Post Type Options
    array(
      'label' => 'Book Reviews',
        'public' => true,
        'show_ui' => true,
        'capability_type' => 'post',
        'hierarchical' => false,
        'rewrite' => array('slug' => 'book-reviews'),
        'query_var' => true,
        'supports' => array(
            'title',
            'editor',
            'excerpt',
            'trackbacks',
            'custom-fields',
            'comments',
            'revisions',
            'thumbnail',
            'author',
            'page-attributes',)
    )
  );
}
// Hooking Our Function Into the Theme (calling the function)
add_action( 'init', 'book_reviews_posttype' );

It’s up to you which way you want to go. Also, to get a handle on what all these arguments mean, check out the WordPress Codex page.

If everything went smoothly during the setup of your functions.php code, you should now have an new menu link in the admin. If you don’t, check over your code. If it’s all okay, click around a bit to see what posting something new would feel like.

——

Just a quick note: now that we have the ability to create new custom posts in our admin, we still have no way of seeing those posts on our website. The area that holds our primary custom page and posts isn’t automatically linked to. In order to link to it, we’ll need to modify an existing, or create a new, menu with our static link. In this case, the link to our custom area would be http://www.example.com/book-reviews/.

——

Step 2​

If we leave things the way they are, WordPress will use our fallback archive.php template to display the list of our book review custom posts, as can be seen in the hierarchy. If we don’t like this template or want to modify it, we can do so by creating a file called, “archive-book-reviews.php” and populating it with our template code. We’ll need to include the correct text commented out at the top of the page.

Code:
/**
 * Template Name: Book Reviews
 **/

The comment above tells WordPress that it’s not only a custom template, but the template we’re using for our book reviews.

Inside the template, we’re going to need to include a loop that will correctly call the data we’d like to be called. So, within your formatted HTML code, you’d use something like this:

Code:
<?php
 $query = new WP_Query( array('post_type' => 'book-reviews', 'posts_per_page' => -1 ) );
 while ( $query->have_posts() ) : $query->the_post(); ?>
<?php the_content(); ?>
<?php endif; wp_reset_postdata(); ?>
<?php endwhile; ?>

Step 3​

In this last step, we’re going to create a new custom post template for each of our custom posts. As it stands now, WordPress will use the “single.php” template for this. Since we’re creating something unique, we most likely want to change that. To follow the WordPress naming convention, we’ll call our new file, “single-book-reviews.php.” Take a look at the code below:

Code:
<?php if ( have_posts() ) : while ( have_posts() ) : the_post(); ?>    
  <h1><?php the_title(); ?></h1>
    <p><?php the_field('description'); ?></p>
    <p><?php previous_post_link(); ?> -  <a href="<?php bloginfo('url'); ?>/book-reviews">Back to Reviews</a> -   <?php next_post_link(); ?></p>  
<?php endwhile; endif; ?>

In the most basic sense, the stripped down code above should get each post showing on its own page. Of course, you’ll want to add your own formatting, but as far as creating the PHP code goes, this is good.

I’m actually going to revisit this post in the future to clean up a few parts. I believe the steps are the correct approach to take when attempting to explain this, sort of confusing, task, but as far as the actual PHP goes, I would like to verify its accuracy. What I’m learning is that there are multiple ways to accomplish the same task and many resources online conflict with one another. The only way I’ll be able to rectify this is to gain a better understanding of the functions in question.

Treehouse just released a new course on PHP for WordPress that I’d like to take. It’s obvious that any WordPress developer needs to have a solid understanding of PHP to truly delve into development of this sort. I’ll be taking this course shortly.
 
CaptainDan

CaptainDan

Member
Joined
May 9, 2021
Messages
113
Reaction Score
0
Points
16
  • #16

Creating Blog Templates in WordPress​

In this post, we’re going to set up the template files necessary to make a fully functional blog section on a WordPress site. We’ll also configure the admin area to allow for what we’d like to happen. This isn’t complicated, but there are a few areas that need to be covered. Our goal here is to create templates for the blog homepage, the blog posts themselves as well as a blog archive page.

Setting Up Our Blog Home Page Template​

If you take a look at the WordPress hierarchy, you’ll see that, in order for us to create a template for our blog index page, we’ll need to name it “home.php.” This is what’s required for consistency with the WordPress naming convention. By naming our file home.php, we’re telling WordPress what template we’d like to use for our purposes.

Once we’ve got our file named and saved in our theme directory (it can be blank at this point), we can go ahead and adjust a few settings in the admin area of our install. The first thing we need to do is to actually create a page named “Blog” in the “Pages” section of the admin. By doing this, it’ll give us something to choose from next.

In this next step, we’re going to tell WordPress which page it should use for our blog homepage. Basically, this is sort of a phantom page that we need to point to that will use our home.php template file we just created. To do this, we can either go into the “Settings > Reading” area in the admin and choose our page under the “Front Page Displays” area or we can use the WordPress Customizer. If you decide to use the customizer, navigate to the “Appearance > Customize > Static Front Page” section and click around a bit. You’ll see exactly what to do. Personally, I’d get used to using the customizer if I were you, because that seems to be where WordPress is heading for many of these types of settings.

Lastly, we need to add our newly created “Blog” page to our menu. To do this, navigate to “Appearance > Menus” and add the page to the appropriate menu.

Basically, what we did here, if we go backwards, was to create a new link in our menu that will bring us to our blog section. In order for something to be in that section, we needed to create a page called “Blog.” In order for the “Blog” page to be considered as the home page for our section, we had to tell WordPress about it in the customizer. Lastly, in order for us to see the page as we’d like to see it, we created a template file called, “home.php.” Next up, we’ll code the home.php file.

Adding Code To Our Blog Home Page Template​

Coding our blog home page is much like coding other WordPress template pages. There may be a few more areas you’d like to customize, but by and large, it’ll look familiar if you’ve read some of my other posts.

I’m going to show you some code below that you may want to include on a home page. I’ve stripped out all HTML (that’ll be up to you), so what we’re left with is only PHP. Below the code, I’ll explain what’s going on any what each piece of code does. I’ll also take advantage of commenting some of the code.

Code:
// INCLUDE HEADER FILE
<?php get_header(); ?>
 
  // BEGIN WHILE LOOP AND IF STATEMENT
  <?php if ( have_posts() ) : while ( have_posts() ) : the_post(); ?>
 
    // ADD CLASS FOR CSS
    <?php post_class('post'); ?>
 
    // DISPLAY POST TITLE WITH LINK TO POST
    <a href="<?php the_permalink(); ?>"><?php the_title(); ?></a>
 
    // DISPLAY EXCERPT OF POST TEXT AND STRIP ALL HTML FROM IT
    <?php echo strip_tags( get_the_excerpt() ); ?>
 
    // DISPLAY AVATAR OF AUTHOR
    <?php echo get_avatar( get_the_author_meta( 'ID' ), 24 ); ?>
 
    // LINK TO AUTHOR POST PAGE
    <?php the_author_posts_link(); ?>
 
    // LINK TO CATEGORY PAGE
    <?php the_category( ', ' ); ?>
 
    // DISPLAY DATE POST WAS WRITTEN
    <?php the_time('F j, Y'); ?>
 
    // IF POST THUMBNAIL, DISPLAY IT AS LARGE
    <?php if( get_the_post_thumbnail() ) : ?>
      <?php the_post_thumbnail('large'); ?>
    <?php endif; ?>
 
    // LINK TO NEXT POSTS
    <?php next_posts_link( 'Older posts' ); ?>
 
    // LINK TO PREVIOUS POSTS
    <?php previous_posts_link( 'Newer posts' ); ?>
 
  // END WHILE LOOP
  <?php endwhile; else : ?>
 
    // IN ENGLISH, NO POSTS
    <?php _e( 'Sorry, no pages found.' ); ?>
 
  // END IF STATEMENT
  <?php endif; ?>
 
// INCLUDE SIDEBAR
<?php get_sidebar(); ?>
 
// INCLUDE FOOTER FILE
<?php get_footer(); ?>

If you look at the top and the bottom of the code example above, you’ll see where I’ve “included” the header and footer files. To do this, I used the “get_header” and “get_footer” functions. Similar to these functions is the “get_sidebar” function. Since I already covered this in a previous post, if you’re interested in how these functions work, please read that post.

After we include these template file, we’ll begin our if statement and while loop. Basically, we’re telling WordPress, “if” we have posts, do this. “If” we don’t, do something else. We’re also telling it, “while” we have posts, keep looping through them until we don’t have anymore. You can see where I commented the relevant areas of the code for this. I wrote about the WordPress loop in a previous post as well, so if you’re interested, you know what to do.

Moving along, you can see the “post_class” function. This is simply to add more granular control over our classes for CSS. This is a styling issue. You can read more about this function here.

On the next line, we’ve got the “the_permalink” and “the_title” functions. The the_title function displays the title of the post and the way we’ve got it set up, the the_permalink function links the title to the post page itself.

After that, we’re using the “the_excerpt” function to display an excerpt of our post content. There’s a bit of drama that comes with this function, so we’ve employed the use of the “get_the_excerpt” as well as the PHP “strip_tags” function, which strips HTML and PHP tags from a string. The reason we had to use these additional functions was because by default, WordPress sends out the excerpt formatted in paragraph tags. This can alter the text appearance, so it was necessary to clean it up and then re-format it inside our own HTML (not shown).

In the next line, the “get_avatar” function displays the avatar associated with the author’s email address.

If you’ve been on the internet within the past twenty years, you’ve certainly seen posts written by various authors on the same website. Many of these websites have links to author pages that filter all posts down to a specific author. In WordPress, the “the_author_posts_link” displays that link to the author page.

Similar to the previous function, the “the_category” function links to the specific category that the post belongs to.

If you were to write multiple posts on the same day and were to utilize the “the_date” function, the date would only display for the first post iteration inside the loop. To work around this, you can utilize the “the_time” function and format it to show the date.

The “the_post_thumbnail” displays the featured image for a specific post. As you can see, we use the “get_the_post_thumbnail” function in our “if” statement. Basically, we’re checking to see if a featured image exists and if it does, pull it out and display it. If an image doesn’t exist (no string is returned), move right on by.

The next few lines use the “previous_posts_link” and the “next_posts_link” to link to pages that hold previous posts and next posts.

Adding Code To Our Single Post Page Template​

To work with a generic single blog post template file, we’re going to need to create it and name it “single.php.” This will tell WordPress that we want this particular template to be use to display our single post posts.

In the code example below, I’m going to do the same thing as I did above. Luckily, there won’t be nearly as much writing as before because, as you might have noticed, much of the template code is identical or similar to what we used above. Only a few things have been changed and I’ll go over those areas below.

Code:
<?php get_header(); ?>
  <?php if ( have_posts() ) : while ( have_posts() ) : the_post(); ?>
    <?php the_title(); ?>
    <?php echo get_avatar( get_the_author_meta( 'ID' ), 24 ); ?>
    <?php the_author_posts_link(); ?>
    <?php the_category( ', ' ); ?>
    <?php the_time('F j, Y'); ?>
    <?php if( get_the_post_thumbnail() ) : ?>
      <?php the_post_thumbnail('large'); ?>
    <?php endif; ?>
 
    // DISPLAY FULL POST CONTENT
    <?php the_content(); ?>
 
    // DISPLAY COMMENT SECTION
    <?php comments_template(); ?>
    
    <?php endwhile; else : ?>
      <?php _e( 'Sorry, no posts found.' ); ?>
  <?php endif; ?>
<?php get_sidebar(); ?>
<?php get_footer(); ?>

As you can see, we’ve removed the_excerpt and instead, included a function called, “the_content” below the featured image (if there is one). Most simply put, this function will display the content of a blog post.

After the post content, you can see that we’ve added a new function, called, “comments_template.” This functions loads the comments template inside either a single post or a single page. It’s the comment sections that we’ll cover next.

Reviewing the Comment Template​

As you can see in the previous section, we’ve already added the code to include our comment section. For the average person, this is all you would need to do. Since comment templates are sort of complex, we’re not going to get into their actual code. I can tell you though, if you did want to add your own comment template, you can do so by creating a file called “comments.php” and WordPress will pull that template in, instead of its default template. You would do this if you were creating a plugin or a custom comment section or something like that.

Adding Code To Our Archive Template​

If you take a look at the WordPress hierarchy, you’ll see that the “archive.php” template is used for a wide variety of pages, including the author, category, date and tag archives. It’s a nice catch-all file for handling very similar pages.

The archive template is actually very similar to the “home.php” file that we created earlier. So similar, in fact, all we need to so is add one function to it and call it a day.

The way we’ll do this is to create a file named “archive.php” and copy the contents of “home.php” into it. Directly above the loop, we’ll add this code:

Code:
<?php wp_title(''); ?>

Again, you’ll need to format the “wp_title” function the way you see fit. What this code will give you is the title of the page you’re on. So if you’re looking at an author page for “Jay Gaulard,” you’ll see “Jay Gaulard” written above the posts. This is true for dates, categories and tags as well.

Now, just to let you know, if you were to amend this code with adjacent text like this:

Code:
<?php wp_title(''); ?> Blog Posts

You may have a more descriptive title.
 
CaptainDan

CaptainDan

Member
Joined
May 9, 2021
Messages
113
Reaction Score
0
Points
16
  • #17

Working With PHP in WordPress​

It’s the strangest thing – since I’ve begun delving into the world of coding, I’ve heard very little in terms of PHP. It seems that the majority of folks who are attempting to get into this field are more concerned with JavaScript, Python and the plethora of tools that emerge daily. That strikes me as odd, considering how prevalent PHP is on the web. I’ve been working online since the beginning of the century and right behind HTML and CSS, PHP has been where it’s at. To each their own, I suppose.

Treehouse has finally released their latest WordPress course by Zac Gordon, called, “PHP for WordPress.” I’ve been looking forward to this course because, while I’m taking courses in straight up PHP as well, learning PHP specifically as it relates to WordPress is going to be a huge time saver. Since WordPress will be my primary focus moving forward in life and since there are only so many hours in the day, learning advanced PHP probably isn’t in the cards. Getting a grip on what levels of PHP are used by WordPress developers will help immensely.

With that in mind, let’s get started with my notes for Zac’s new course.

PHP Files​

If you’ve looked into working with PHP at all, you most likely understand that the files used with PHP, end in .php. Within these files, you can write both HTML and PHP. Some applications use only files that end in .php for every single file they use.

Inside WordPress, there are three primary areas that contain PHP files. They are:

Core Files: If you have no idea what these files are, don’t touch them. These are files that run your installation of WordPress. If you go ahead and edit any of these files and you aren’t a WordPress core developer, you’ll most likely break your install. Much like with any CMS, these types of files run behind the scenes and aren’t meant to be edited by theme developers and the such.

Theme Files: These files are the ones you’ll most likely concern yourself with when developing for WordPress. Theme files control the look and function of the front-end of your WordPress install. They contain HTML and PHP code. In this and later posts, we’ll be talking a lot about theme files in WordPress. If you’d like to see some articles where I’ve already gone into some pretty good detail on this, check out my posts on WordPress.

Plugin Files: Unless you’re a plugin developer, don’t touch these files either. These types of files contain HTML, PHP, CSS and JavaScript. You may want to mess around with these types of files if you’re trying your hand at creating a WordPress plugin or are editing something in someone else’s plugin.

Now that we’ve got that out of the way, the question is, “I want to work on those template files. Where the heck are they?” If you look at an install of WordPress, you’ll see a bunch of files and folders. You can safely ignore mostly everything you see, except for the “wp-content > themes” directory.

If you look inside the “themes” directory, and you’re running a basic install of WordPress, you’ll most likely notice a few default WordPress themes. It’s common for folks to want to modify these themes to make them more suited to their own website, but there are a few words of caution that come with modifying default themes – at times, these themes are updated by the WordPress core developers. If you edit any of these “parent” default themes and the theme is automatically updated, those updates will be written over, meaning all your hard work will be lost. It’s better, and wiser, to create a “child” theme that’s not written over during a theme update.

For example, if you have a theme called, “twentyfifteen,” you shouldn’t edit any files directly in that theme. Instead, you should create a new directory called, “twentyfifteen-child-theme” and copy the file that you’d like to edit, from the original directory, to your new directory. Once it’s there, edit away. WordPress will automatically detect a new file and use it when displaying your website.

Editing Theme PHP Files​

When it comes to editing WordPress files, we have a few choices. We can either set up a local server environment on our computer and work from that, work directly from a live server or work on our WordPress files locally and upload them to a live server piece by piece. Let’s go over each option.

If you wanted to go ahead and set up a local environment, you’ve got some choices. They are:

MAMP & MAMP PRO

XAMPP

DesktopServer

WampServer

Instant WordPress

There are more solutions than this, but what I’ve listed here is a good start. Basically, you’d set up a server environment to do your editing and creating from and once everything looks and functions as you’d like, you would upload the entire project to your live server. This is, obviously, the safest way to go about working on a website because of the division between a production environment and a live environment.

The next option you have for editing WordPress PHP files is to work directly from a live server. Once you’ve got WordPress installed, you could either head to the “Appearance > Editor” area in the WordPress admin and have at it. You could, alternatively, use an FTP client to edit the PHP files directly. This would be considered the least safe option there is for editing files because of the lack of the “undo” feature. If you write some code that doesn’t work or code that is way off, you’re going to have a tough time tracking down or reversing your errors.

The last option we have to editing our project is to have a WordPress install live on a server and a backup copy stored locally. This is a mix between the two previous options because you can edit files locally, with all the safety that comes with that, and upload them to a live environment when the files are ready.

Writing Actual PHP​

Whichever choice you make, there’s going to come a time when you need to write actual PHP code. I already discussed that PHP files are regular text files that use the .php extension, but I haven’t talked about the other requirement that’s necessary to make your file truly functional PHP. This other requirement is called the “PHP block,” which is essentially a sort of “container” you would write your PHP in.

There are a few rules we need to follow when coding PHP files. The first is that if we’re coding exclusively in PHP (meaning the entire file is PHP code), we can open the PHP block at the beginning of the file and close it at the end. I’ll give an example of what PHP opening and closing tags look like here:

Code:
<?php
    // CODE GOES HERE
?>

The second rule is that if we’re mixing HTML and PHP code in the same file, we’re going to need to open and close PHP blocks multiple times. Here’s an example of that:

Code:
<div class="footer-clear"></div>
<footer class="row no-max pad">           
    <p>Copyright <?php echo date('Y'); ?></p>
</footer>
    <?php wp_footer(); ?>
    </body>
</html>

This is some sample code from a footer file in a WordPress theme. What’s important to recognize is the separation of HTML code and PHP code. You can see that it’s PHP code from the opening and closing PHP tags. These are called, “PHP blocks” and may be numerous in number as files get longer.

Remember, if you want to include PHP code in a file, the file has to end in .php. If it ends in anything else, it won’t work. Also, any PHP code needs to be encapsulated inside a PHP block. If it’s not, you’re dynamic PHP code will display as regular text.

Some Basic PHP Syntax​

In order to get your PHP functioning correctly, there is some basic syntax that needs to be adhered to. I’ve discussed this in one of my posts on PHP, so if you’d like to read about that, please do so here. Towards the bottom of that post, I get into syntax. If you’d like to read about general PHP development, please take a look at the Coding forum.
 
CaptainDan

CaptainDan

Member
Joined
May 9, 2021
Messages
113
Reaction Score
0
Points
16
  • #18

PHP Code Used in WordPress​

Most of the PHP code you’ll need for your WordPress install can be found in the codex. The codex is simply a huge repository of instructions, code and support. It’s a wonderful place for WordPress developers to hang out because, not only does it contain much of what you’ll need to answers questions and solve problems, it’s also a really nice learning opportunity. The more you browse, the more you begin to understand the inner workings of how much of WordPress is assembled.

While the codex is a large area with tons of code, in this post, we’re only going to concern ourselves with theme development. So, if you scroll down towards the middle of the main codex page, you’ll see a heading called, “Working With Themes.” We’ll be in there.

Template Tags​

If you’ve ever used jQuery, you may be familiar with the idea behind how WordPress template tags work. Basically, instead of forcing a website developer to write out long blocks of JavaScript code or a WordPress developer to write out long blocks of PHP code, the developers behind both jQuery and WordPress have done that already. They’ve written the code behind the scenes and condensed it into nice, pretty keywords. When we call these simple keywords in our code, we’re telling the behind the scenes code to wake up and do what’s it’s made to do.

Inside the WordPress codex, there’s an area that lists all template tags by category. If we visit the page, we can locate the category we’re interested in and browse through each template tag that category contains. If something looks helpful, we’re able to click that tag and visit the actual tag page that contains all the information related to it.

By default, template tags do something. They either return something short and simple or return something much more complex. To take advantage of the short and simple tags is easy. You simply place the tag in your PHP code inside your template file. You may end up with a URL or a title or something as straightforward as that. Taking advantage of the more complex tags requires a bit more thought. In some cases, you’ll have to tell WordPress exactly what you’re interested in accomplishing by using what are called, “parameters.”

For instance, if we look at the “the_title” template tag, we can see that it accepts three parameters – $before, $after and $echo.

Code:
<?php the_title( $before, $after, $echo ); ?>

Each of these parameters plays a different role. For many template tags, parameters are optional. For others, they’re required. Fortunately, all optional and required parameters are listed and described on its related template tag page. In this post, I’ll go over some examples of what I’m talking about.

Conditional Statements & Loops​

This is the part where you wish you had programming experience. Not that it’s immensely difficult or anything like that, but I think things would progress rather smoothly with the understanding of a few coding concepts, such as the ones you acquire when studying either PHP or JavaScript. Fortunately for us, these concepts are found in the “101” level for both of these languages, so once you become comfortable with the basic ideas behind conditional statements and loops, the rest just has to do with syntax. Before we begin though, let me give a few definitions:

Conditional Statements: In computer science, conditional statements, conditional expressions and conditional constructs are features of a programming language which perform different computations or actions depending on whether a programmer-specified boolean condition evaluates to true or false. (source)

Loops: In computer programming, a loop is a sequence of instructions that is continually repeated until a certain condition is reached. (source)

The foundation of conditional statements (or conditionals) and loops throughout much of programming is common. And as I stated above, the concepts aren’t all too challenging to grasp. In the most basic sense, in WordPress, a conditional and loop is constructed something like this:

Code:
IF posts exist and WHILE they exist
// DISPLAY CONTENT
ELSE
// DISPLAY NO CONTENT MESSAGE

All the information on WordPress loops can be found in the codex. And lucky for us, I’ve already written a fairly in-depth post that covers some of the ins and outs of the loop.

Understanding the WordPress Loop

WP_Query​

A while back, I wrote a post that covered a bit of working with WordPress templates. In that post, I talked about something called, “WP_Query.” WP_Query is the ultimate when it comes to making your WordPress loop output a certain way. It can filter which posts display on a certain page, sort them a specific way, display posts written by one or many authors and more. It really is a tool that needs to be worked through. The codex page I linked to above is a long one and gives great examples of how WP_Query can be used.

Instead of writing any code examples, I’ve decided that linking to external blog posts might be more helpful when it comes to talking about this topic. Truthfully, a conversation on WP_Query is a post unto itself and I think it’s beyond the scope of what I’m talking about here. So, if you’re interested in delving deeper into WP_Query, please take a look at the resources below:

Using WP_Query in WordPress – Smashing Magazine

Custom WordPress Loop With Pagination – Call Me Nick

An Introduction To WP_Query | Elegant Themes Blog
 
Top