Search

Working With Layers in Adobe Photoshop

  • Thread starter 15Katey
  • Start date
15Katey

15Katey

Member
Joined
May 10, 2021
Messages
130
Reaction Score
0
Points
23
  • #1
working-layers-adobe-photoshop.jpg

This is a very exciting post because we’re finally going to dive deep into the meat of Photoshop. Until now, I’d say we’ve been dabbling. Today, we’re going to explore what layers are and how powerful they can be.

I’m going to attempt to explain layers as simply as possible and as they were explained to me years ago. If you don’t quite “get it” right away, no sweat. As we work though some projects on this site, everything will become clear.

What are layers? Most simply put, layers are a feature in Photoshop that allows us to work non-destructively. Think about it this way – you took a photo, printed it and placed it so it lay flat on a table. We can consider this your base layer. Next, you printed another copy, altered the colors somewhat and placed it directly on top of the first photo. This next photo would be considered another layer. If you did this again and again, you’d have multiple layers. You see, you can alter layers however you wish and by saving the original way down at the bottom, you won’t lose the original.

Of course, working with and altering your additional layers is really the motivation for creating them in the first place. You can create effects, change opacity, merge, flatten and so much more. As I said above, it’s exciting to move into this area of Adobe Photoshop!

In this post, I’m going to begin to touch on how to work with layers. I’ll explain how to complete a few simple tasks and I’ll lay the groundwork for future posts.

Viewing the Background Layer​

Today, we’ll be working with a beautiful butterfly photo. I’ve already adjusted it a bit in Camera Raw and have opened it into Photoshop. The moment I opened it into Photoshop, the photo was set as the background layer. I can see this by taking a look at the “Layers” panel.
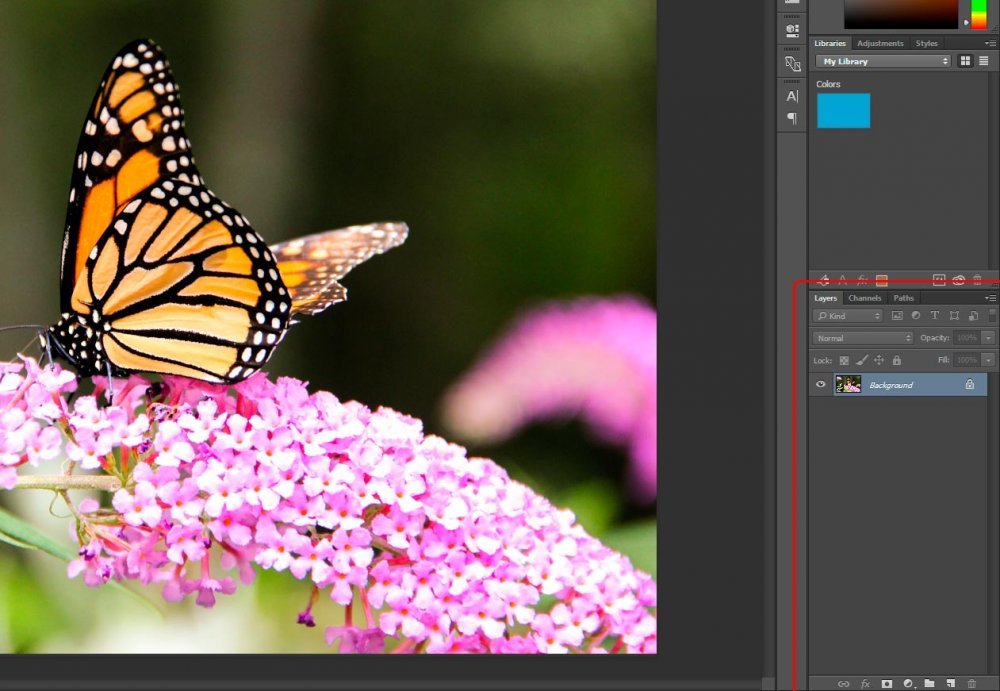
layers-panel-adobe-photoshop.jpg

I have to tell you, in my old age, I’m having a bit of trouble seeing what’s inside the layer thumbnail. I’d actually it a bit larger. To make it so, I’m going to right-click in the Layers panel and choose “Large Thumbnails.”
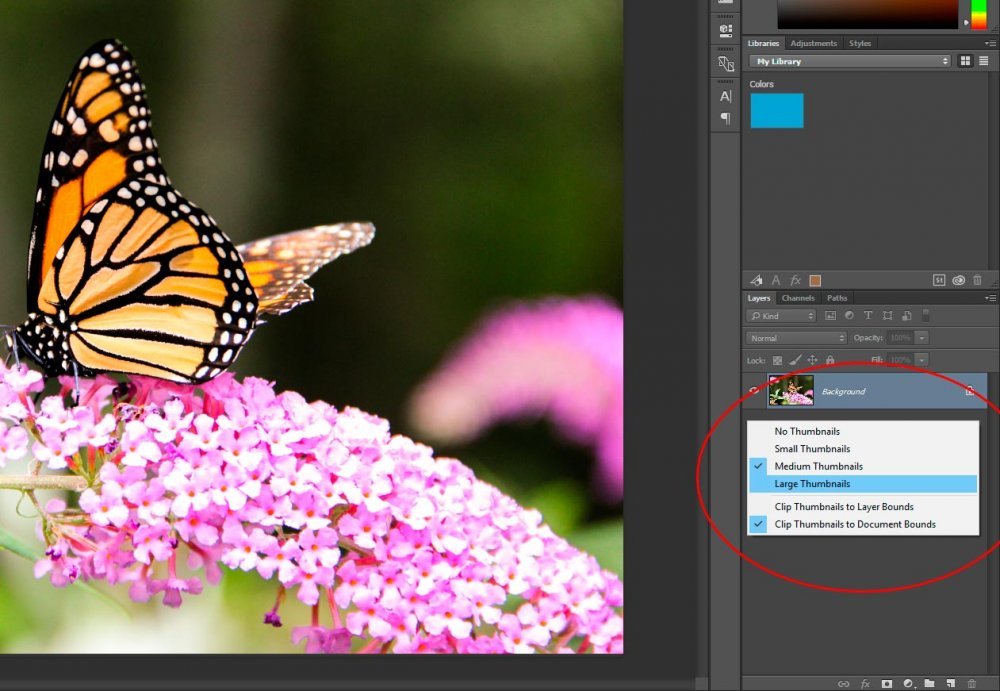
change-thumbnail-size-layers-adobe-photoshop.jpg

Well, after looking at that, I think I’ll switch it back to medium. Large is just too large.

How To Create a New Layer​

In this post, I’m going to be doing some things simply as examples. I understand that we don’t exactly need to accomplish these things, but it’s important to go over them.

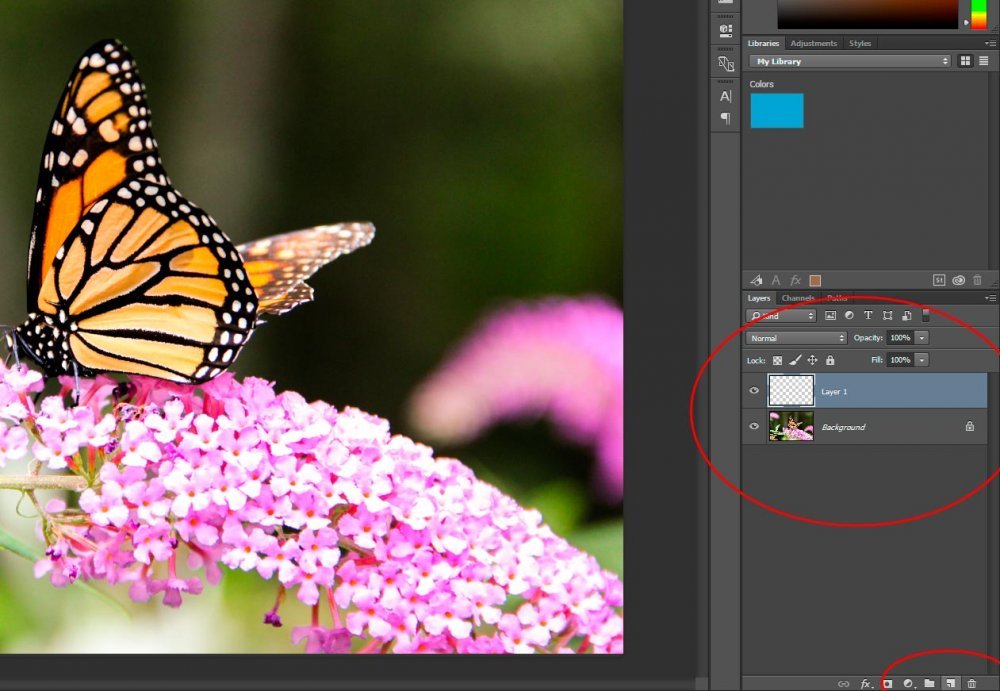
The first task I’d like to complete is to create a new layer. To do this, I’m going to head down to the bottom of the Layers panel and click the new layer icon. This is the one that’s directly to the left of the trash can (second from the right).
create-new-layer-adobe-photoshop.jpg

As you can see, I circled the new layer in red as well as the new layer button.

How To Rename a Layer​

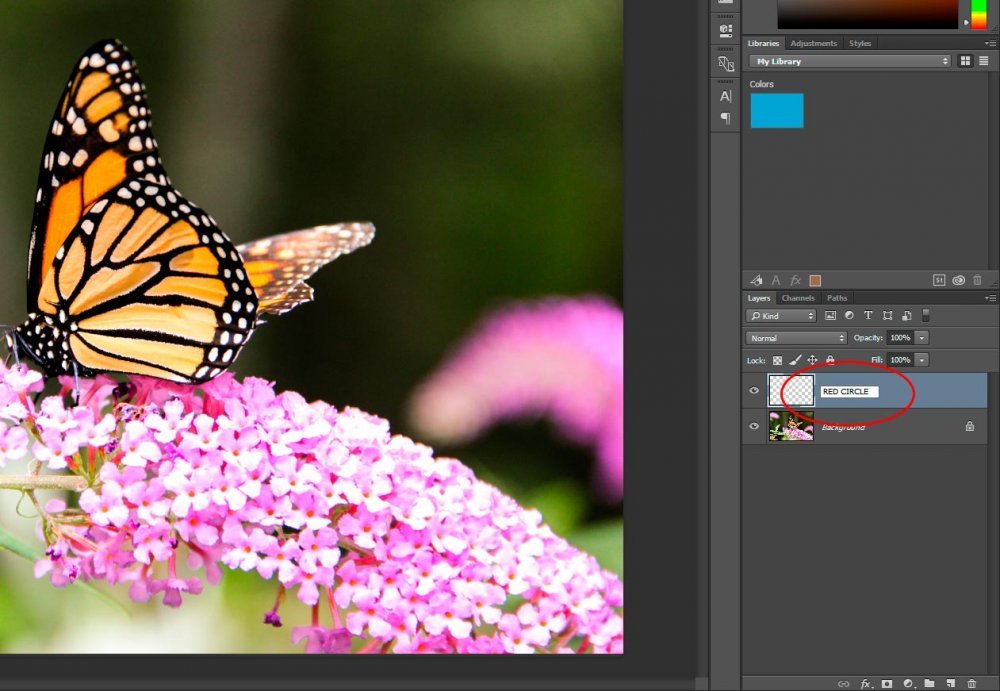
If I wanted to rename the layer I just created, or any layer for that matter, I would simply double-click on the existing name to make it editable and would type in my new name. Once that’s finished, I would hit “Enter” on my keyboard.
renaming-layer-adobe-photoshop.jpg

Editing the New Layer​

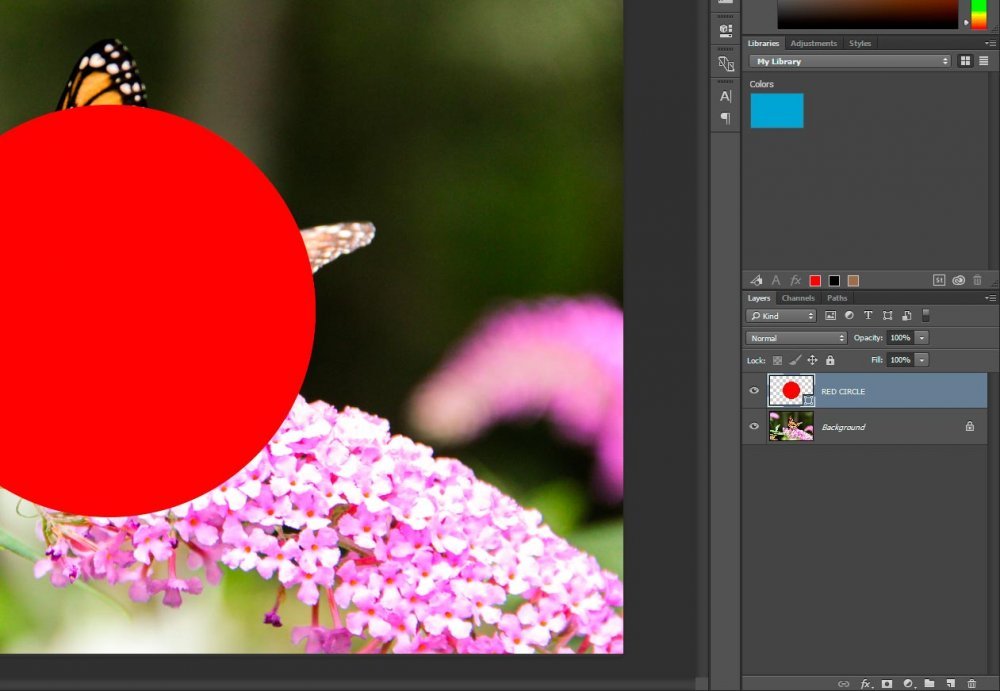
If you take a closer look at the name I gave the new layer, you’ll see that I decided to call it “RED CIRCLE.” I did this because I plan on creating a circle in this layer to demonstrate how layers work a bit.
edit-layer-adobe-photoshop.jpg

As you can see, the red circle is inside the new layer and it sits directly on top of my photograph. Now, it’s important to remember how this works. I have a photo that’s laying on my table. I created an image with a red circle and placed it directly on top of my photo. I have two layers now. In no way does this red circle layer interfere with my photo layer. They are separate and independent. I can use my “Move” tool to slide the red circle around if I wanted to and I can move my photo as well. All I’d have to do is select which layer I’d like to move around from the Layers panel.

How To Hide a Layer​

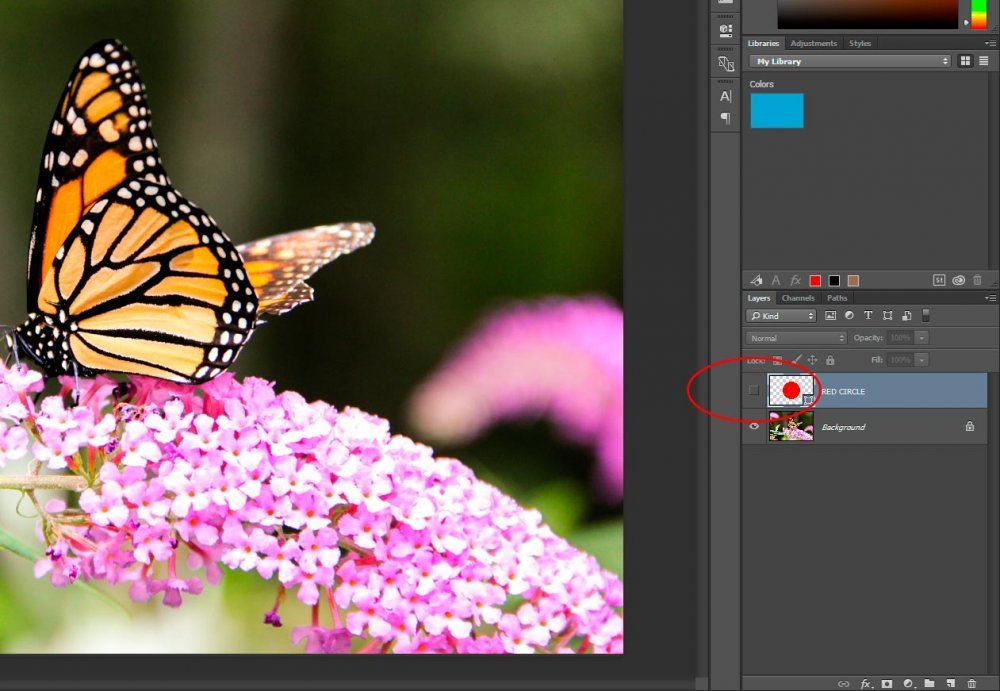
I’ve decided that having a big red circle on top of my photo is really ugly, so I’d like to hide it. I don’t want to delete it right now because I’m going to use it in later examples. I just want to hide it. To do this, I simply click the small eye icon to the left of the layer thumbnail in the Layers panel.
hide-layer-adobe-photoshop.jpg

By clicking the eye icon, I’ve hidden the layer. It’s still there, so if I want it to appear again, all I need to do is to click the small box the eye used to be in. Once that’s complete, all will be revealed.

How To Duplicate (or Copy) a Layer​

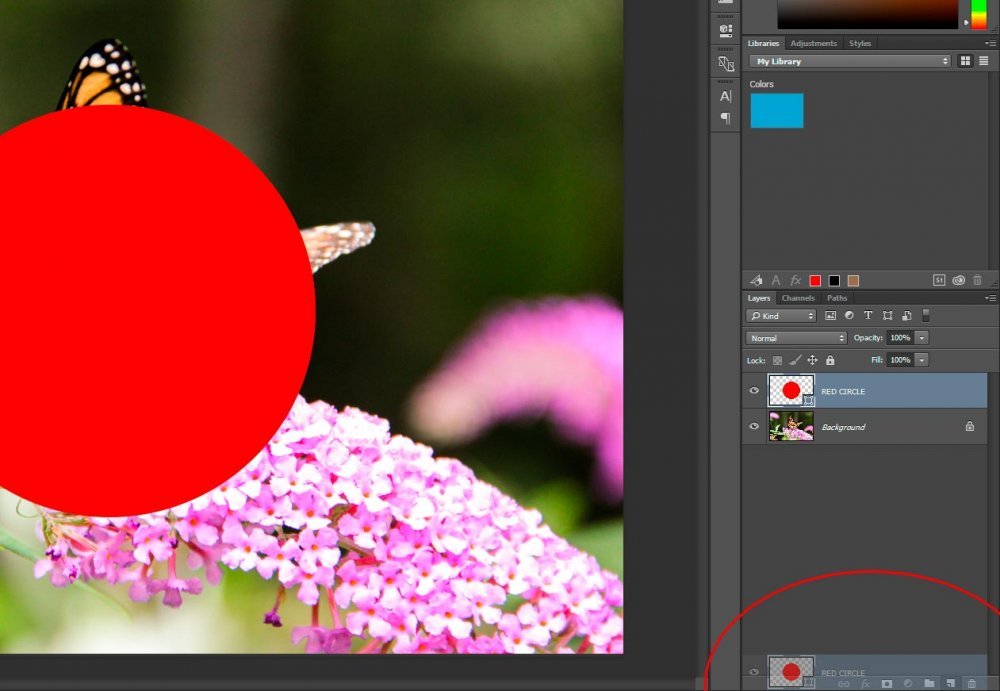
If you remember back a few sections, I explained how to create a new layer. All you needed to do was to click the new layer icon at the bottom of the Layers panel. Duplicating a layer is pretty much just as easy. In order to copy a layer, all you need to do is to drag the layer you want to copy down to the new layer icon and let go of your mouse. Once this is done, you’ll have two identical layers. I’ll do this with my red circle layer.
duplicate-layer-adobe-photoshop.jpg

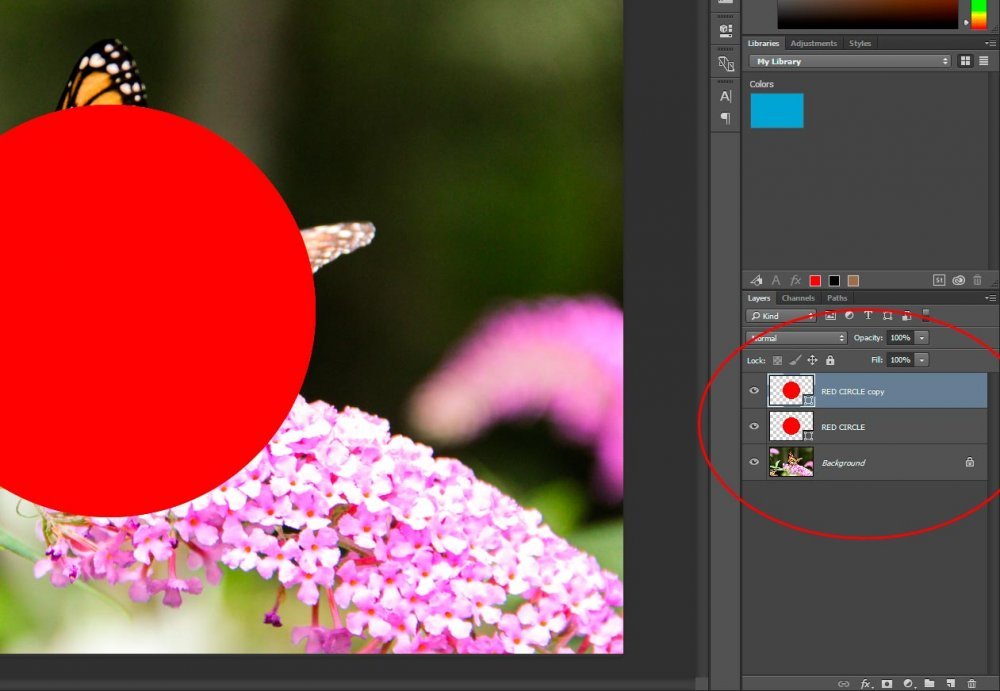
The screenshot above shows me dragging the layer I want to copy down to the new layer icon and this next screenshot shows the new layer in the Layers panel. Photoshop automatically kept the name of the layer, but added “copy” to the end of it.
copy-layer-adobe-photoshop.jpg

How To Delete a Layer​

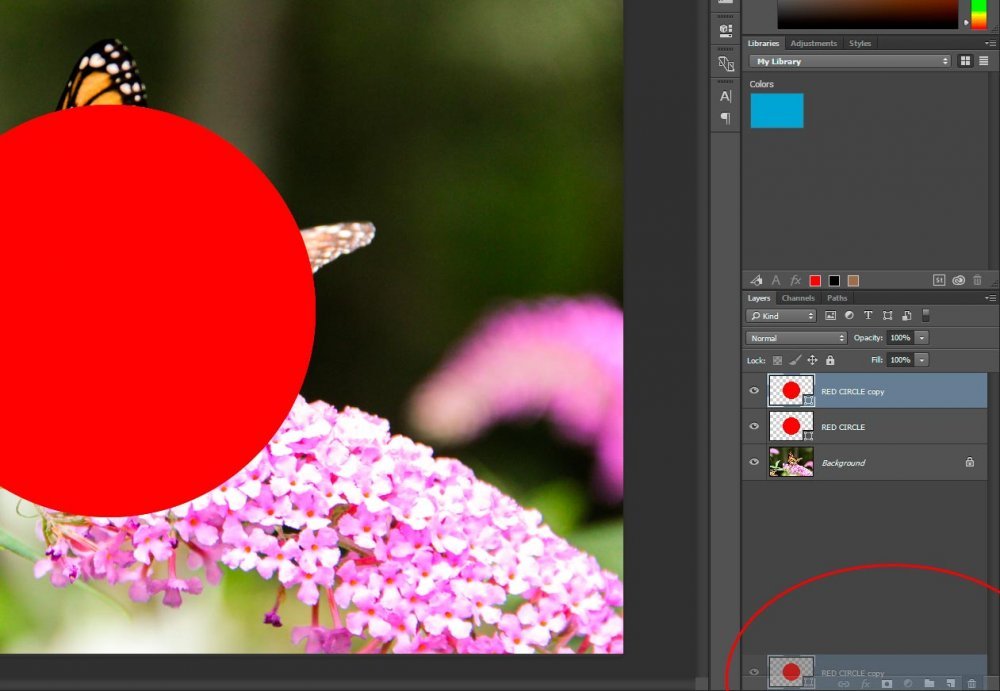
Since I only created that second red circle layer as an example, I think I should delete it. I don’t want my Layer panel all cluttered up with useless layers. To delete a layer, all I need to do is to click and drag the layer I want to delete down to the trash can icon at the bottom of the Layers panel. That will get rid of it.
delete-layer-adobe-photoshop.jpg

How To Change the Opacity of a Layer​

I use this tool all the time when I’m editing images. Changing the opacity has so many uses – I can’t even type them all right now. Just be assured that this is one section you want to pay attention to because later posts are going to build off it.

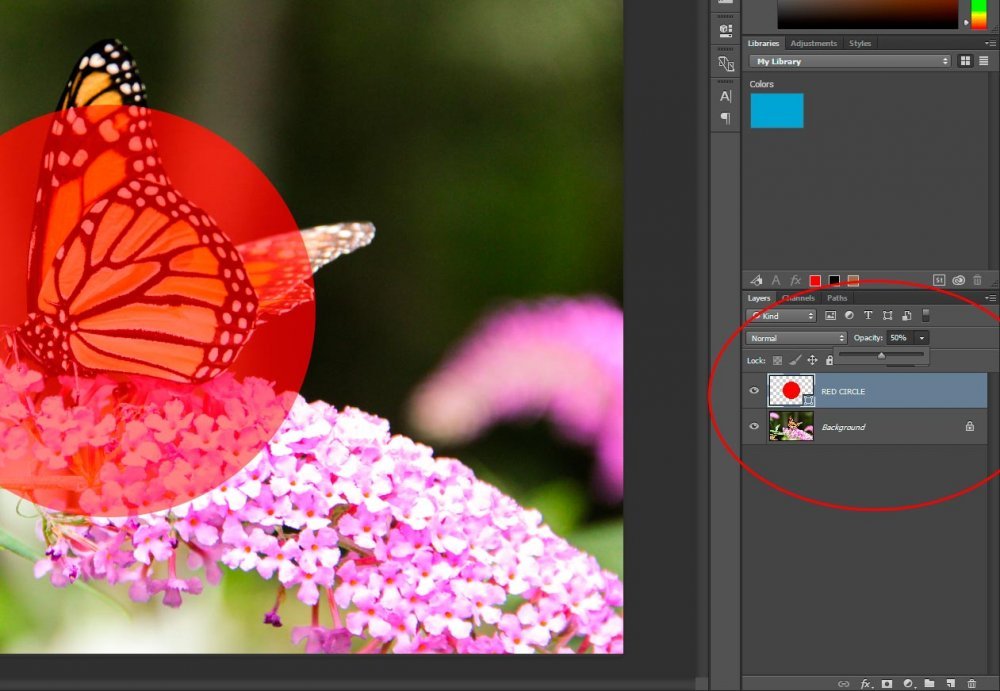
To change opacity of a layer, you’ll need to select the layer in question and then click on the “Opacity” slider that’s located right above the layers in the Layer panel. In the case of my example, I chose to reduce the opacity of my red circle layer from 100% to 50%. As you can see in the screenshot below, the big red circle is sort of see-through now.
change-layer-opacity-adobe-photoshop.jpg

I think I’m going to stop here. As I mentioned above, this is the first of many posts that will cover layers in Photoshop. Since this is such a huge topic, I’m going to devote a lot of time to it.
 
15Katey

15Katey

Member
Joined
May 10, 2021
Messages
130
Reaction Score
0
Points
23
  • #2

Cool Keyboard Shortcuts for Working with Layers in Adobe Photoshop​

I’ve got lots of great tips for you today. Most of them have to do with working with layers and various functions in the Layers panel. I’m not sure if these tips would fall under the “advanced” category because they’re so simple to execute. They’re powerful though and trust me when I say this; If you’re an Adobe Photoshop power user, you definitely want to know what I’m about to share down below. Your workflow will be altered for the better and quite a few of those more annoying aspects of the Layers panel will disappear.

In today’s post, I’d like to discuss a few keyboard shortcuts that can assist when changing the order of layers in the Layers panel of your projects, changing which layer is active and how to select and work with layers in a much more efficient manner than you have ever before. I’ll also throw in some good information that has to do with layer opacity and fill. All of this will occur in Adobe Photoshop and it’s really too good to miss.

Today’s Demo Photo​

I decided to go with a summer theme for today and sunflowers are on my mind. We have about five of these things that, I swear, are at least ten feet tall, right outside our front door. They’re enormous and beautiful.

sunflowers.jpg

What I plan on doing is adding three text layers, a custom shape and a few layer styles to this image. I’ll also unlock the background image layer so it’ll work better with the examples I share below.

Adding the Text, Shape & Styles​

Since I’ve already covered how to add the items I’ve added to this image on this website, I’ll just tell you what they are. I typed out three text layers with one word per layer. I also applied a white Outer Glow to those layers and applied the Linear Burn blending mode to them as well. Then, I drew a custom shape that reminded me of a sunflower. I didn’t apply any blending mode to this layer, but I did apply a white stroke. Take a look at the finished product.

the-sunflower-store.jpg

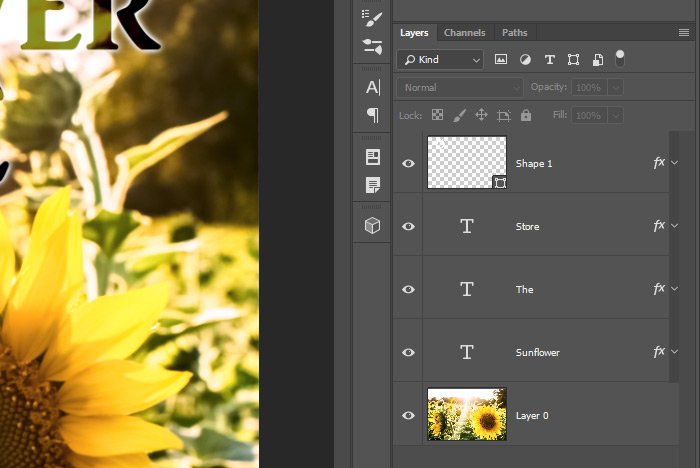
Here are the layers in the Layers panel. Notice how four of them have down facing arrows to the right of the Fx symbol. Those arrows indicate the presence of layer styles. If I clicked on those arrows, I would be able to see which effects I applied. I’ll keep them hidden for now.

project-layers.jpg

Changing Layer Order​

While my project for this post is very small and relatively simply to deal with, projects in Photoshop often become absolutely huge as they’re being worked on. Layers get created and moved around and the Layers panel can actually become quite confusing. It’s for this reason that clicking and dragging layers around with a mouse sometimes ins’t the best route to take. Even with a few layers, moving them with a mouse is cumbersome.

If you select a layer with your mouse and then use the Ctrl+[ or Ctrl+] keyboard shortcuts, you can move that layer without touching it with your mouse at all. That’s Ctrl (or Command for Mac) and the left and right bracket keys. The left bracket key moves the layer down while the right bracket key moves it up in relation to other layers in the project. This type of shortcut becomes extremely helpful when dealing with text layers, as they’re often overlapping and need a certain “look.”

To move a layer all the way to the top of the stack, skipping all the layers in between it and the top position, add Shift to the mix. So if you had a layer that’s located down near the bottom and it would be a pain to click and drag up multiple positions, you could use your mouse to select it in the Layers panel (or select it using the next tip I’ll share below) and then use the keyboard shortcut of Shift+Ctrl+]. That’s Shift plus Ctrl plus the right bracket key. Mind you, you can do the same thing if you want to move a layer all the way down to the bottom of the stack. Just use the left bracket key instead of the right one.

Automatically Selecting a Layer With Your Mouse​

Out of all the tips I’m going to share today, this one is the coolest. I love it because it helps so much when there are many layers to deal with. Instead of bringing your mouse pointer over to the Layers panel to select a layer and then move it around in your workspace, all you need to do is (using the Move Tool) press and hold down the Ctrl key on your keyboard and then hover your mouse over the layer in question in your work area. When you hover the mouse over the layer, it will become outlined in pink, indicating that it’s the layer that will be selected.

outlined-layer.jpg

Once the layer is outlined in pink, you can click on it to select it. You’ll notice that the layer in the Layers panel will become highlighted as well.

An Alternative For Selecting Layers​

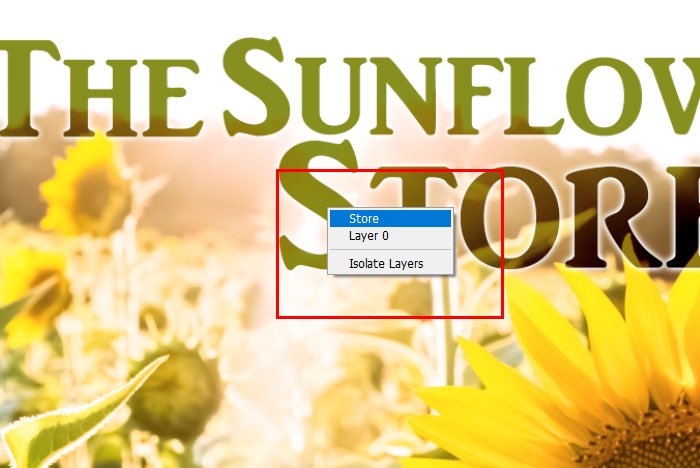
If you’re not great at remembering keyboard shortcuts, I’ll show you something that’s really easy to remember. If you want to select a particular layer in your workspace, all you have to do is right-click on the layer and Photoshop will show you a small menu that names each layer that’s below that position. Let me show you what I’m talking about.

layer-menu.jpg

I right-clicked on top of the “Store” layer. When the menu appeared, it showed me that the Store layer as well as the “Layer 0” layer (the image itself) was below. If I rolled over and clicked on the Store option, that layer would be selected in the Layers panel.

Changing Layer Opacity With Your Keyboard​

This trick is so simple. As you may already know, there’s an Opacity slider located at the top of the Layers panel that can change the opacity of a layer. To do this, all you need to do is click on that slider and drag it to the left or to the right. Did you know that you don’t have to drag that slider at all to change opacity? If you simply click a number between zero and 100 on your keyboard, the layer opacity will change just the same. You may have experienced this by mistake, as I have many times through the years.

Changing Fill Opacity With Your Keyboard​

You may already know this, but I’ll repeat it here. While the Opacity slider alters the opacity of the entire layer, styles included, the Fill slider alters the opacity of just the original object in the layer and not the styles at all. So, as I mentioned above, I have a few effects that I added early on in this post. For the text, I added a white outer glow. If I went ahead and dragged the Fill slider that’s located at the top of the Layers panel to the left, I’d reduce the opacity of the text, but not the glow. Take a look.

zero-fill.jpg

Do you see that white glow outline?

So the question now is, how can we alter the fill of a layer with a keyboard shortcut? Well, all we need to do is hold down the Shift key and then press a number, just as we did above. Doing this will accomplish the same thing as pushing the slider would.

I was actually going to cover a few more neat shortcuts in this post, but I think I’ll leave them for the next one. They’re sort of on a different topic, so I think it would be better that way.

——

I hope I clearly explained how to go about using various keyboard shortcuts that help make working with the Layers panel in Adobe Photoshop a bit easier. If you have any questions regarding this post, please let me know in the comment section below. Thanks for reading!
 
15Katey

15Katey

Member
Joined
May 10, 2021
Messages
130
Reaction Score
0
Points
23
  • #3

How to Rename & Reorder Layers in Adobe Photoshop​

I wanted to write a quick post to answer a question I received a few days ago regarding the management of layers in the Layers panel of Adobe Photoshop. Many folks who are new to this application have some difficulty understanding the basics of how layers work. I always tell them to think about Photoshop as a table and layers as pieces of paper on top of that table. You can move the pieces of paper around, just as you can with layers. You can reorder the paper, just as you can with layers. You can also stack the pieces of paper on top of one another, just as you can with layers. Layers are quite literally “layers.” They’re layered on top of one another in a certain sequence.

While this post is about layers, it’s mostly about something more specific than that. The question I received had to do with how to name layers as well as how to change the order of them in the panel. Since this is quick and easy to explain, I thought I’d do it here. I would never want to respond to a question like this to an individual if others can be helped as well.

In today’s post, I’ll open a few images in Adobe Photoshop. I’ll use those images as examples when it comes time to name their layers. I’ll also demonstrate how to change the order of the layers in the Layers panel as well. This is all easy stuff, so it shouldn’t take long at all.

Demo Photos​

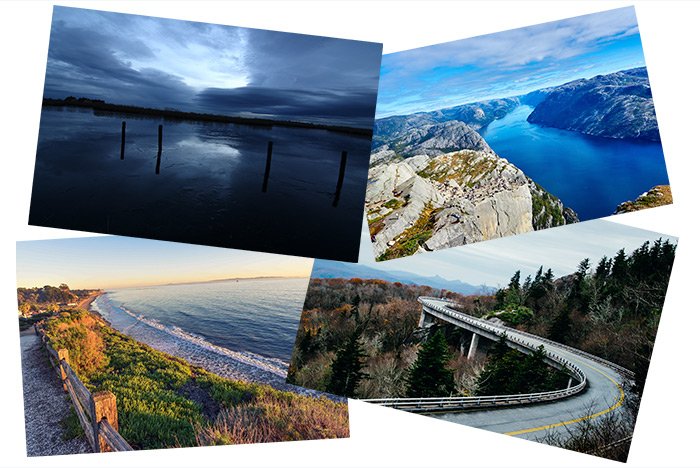
Okay, I’ve gone ahead and opened four different images into the same file in Photoshop. The way I did this was to select the files in Adobe Bridge and then go to the Tools > Photoshop > Load Files into Photoshop Layers menu item and click. That opens all the selected images into one file as layers. It’s a very handy feature to have around. It saved me some clicking and dragging.

Anyway, here’s the fancy “natural looking” arrangement I made. I hope the fact that the images are on top of one another is noticed.

callage.jpg

Naming the Individual Layers​

I guess the question is, why in the world would anyone want to name the individual layers in the Layers panel? I mean, most of the time, there are only one or two layers. Maybe three at most, so why not just keep them as the way Photoshop named them by default? To be honest, when I’m working with just a handful of layers, this is what I do. The answer is, you want to name them because you’re not always going to be working with just a handful. There may be a point where you work with dozens or hundreds. You’ll certainly want to not only name them, but group them as well, but that’s something for another day. Another good reason to name the individual layers is because you may be working on variations of the same image (or similar looking images). Perhaps they just have different brightness levels. Since this can get confusing fast, naming them to describe them makes a lot of sense.

Let’s take a look at the current Layers panel.

layers-panel-1.jpg

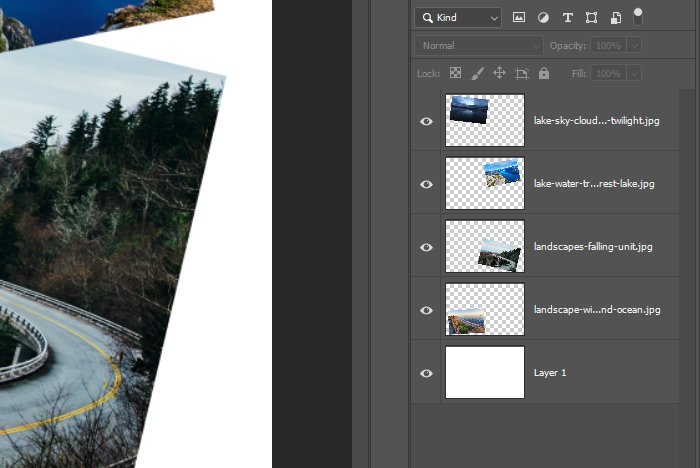
As you can see, each of the four photographs has its own layer. The thumbnails are showing which is which. You can also see that I added a bottom layer that I filled with white. That’s helping my demonstration out.

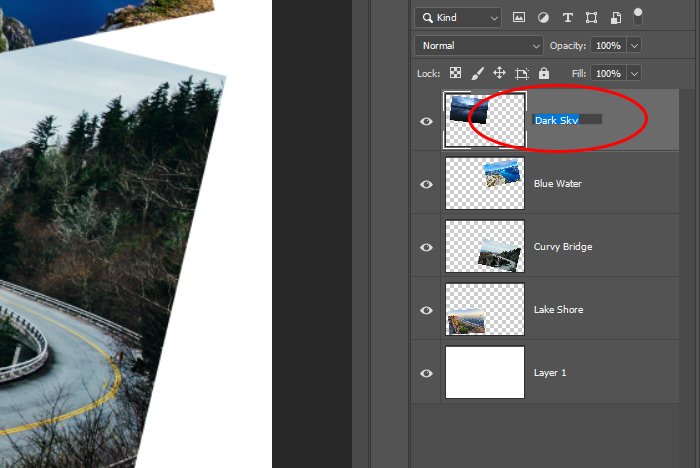
Since the current names of the photo layers are the image file names, I’d like to change them to be more descriptive. To rename a layer, I’ll simply double-click the current name with my mouse. The name area will become editable and I’ll type the new desired name and then when I’m finished with that, I’ll press the Enter key on my keyboard.

renaming-layers.jpg

In the above screenshot, I completed the renaming, but I left the top one in the editable state, so you can see what that looked like.

Reordering the Layers​

You may have noticed that I have sort of a collage of photos going on in my example. The order is random, so I may want to change that. In order to change the way the photos are stacked on top of one another in the workspace, I’ll need to change the layer order in the Layers panel. This is easy enough to do.

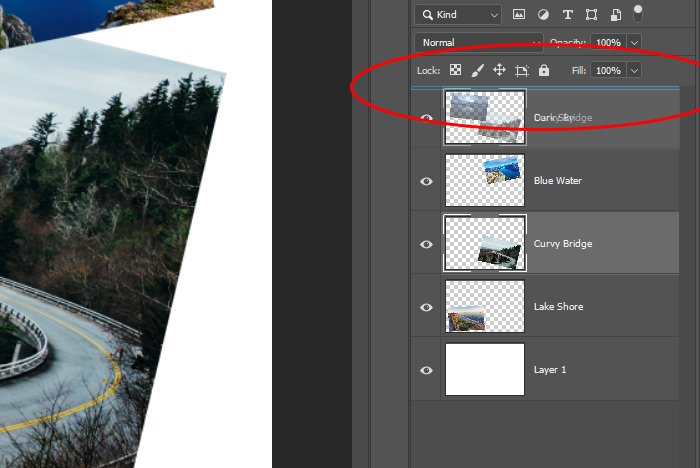
Currently, the “Curvy Bridge” photo layer is third from the top. I’d actually like that to be the top layer. To make it the top layer, I’ll click and drag the layer in the Layers panel to the top position. In the next screenshot, I have clicked and dragged the Curvy Bridge layer to the top position. As I dragged it, I noticed that light blue lines were appearing between the other layers. Those are the areas I can drop this one so it can reside in its new position. Once it’s where I want it to be, I can simply drop it and that’s it.

dragging-layer.jpg

Another easy way to reorder layers is to use two keyboard shortcuts. To move a layer down in relation to the other layers, use Ctrl+[ and to raise it up, use Ctrl+]. I thought about it and I came to the conclusion that I didn’t like the bridge photo all the way on top, so I pressed Ctrl+[ to move it down one space. Now it’s perfect. If I wanted to move a layer all the way to the top or all the way to the bottom in one fell swoop, I would add the Shift key to the shortcuts.

I know that these were simple concepts, but they’re necessary and not everyone knows how to manage these parts of the Layers panel in Adobe Photoshop. I do hope I clearly explained everything though. If you have any questions regarding this post, please feel free to ask in the comments section down below or in the photoshop discussion forum. I’m always hanging out in both areas. Thanks for reading!
 
15Katey

15Katey

Member
Joined
May 10, 2021
Messages
130
Reaction Score
0
Points
23
  • #4

How to Rename Layers in Adobe Photoshop​

I just wrote a post on this topic, so I thought I’d add it to this area as well. Basically, the question is how to rename a layer that exists in the Layers panel of Adobe Photoshop. The process of doing so is simple enough. All you need to do is double-click on the layer name (in the Layers panel) and type a new name over the existing one. Then, when you’re finished, press the Enter key on your keyboard to apply it and you’re good to go.

As you know, if you create a new layer out of the blue, Photoshop will give that layer a name that looks something like “Layer 1.” While this is fine if you’re only working on just one or two layers, it’s not very practical if you’re working on lots of layers. If the latter is the case, you’ll need some organization and that’s where a good naming structure can come into play.
 
15Katey

15Katey

Member
Joined
May 10, 2021
Messages
130
Reaction Score
0
Points
23
  • #5

How to Reorder Layers in Adobe Photoshop​

I talked about this topic in the second half of the post I wrote yesterday. Check it out if you wish. I discussed both renaming and reordering layers in Adobe Photoshop. This post here will be about reordering layers only. I’ll tell you how to do it below. If you would like to know why you might want to reorder layers, then you should read the post I linked to above.

If you’d like to change the position (order) of a layer in the Layers panel inside of Adobe Photoshop, the easiest way to do so is to click and drag the layer you want to move either up or down. As you drag and move the layer, you’ll see a light blue bar appear in between the other layers in the panel. If you drop the layer while one of those bars is showing, that’s where the layer will appear. Right where that blue bar was.

Another way to reorder a layer is to use a keyboard shortcut. To move a layer up by one position, use the shortcut of Ctrl+] (that’s the right bracket) and if you’d like to move a layer down by one position, use Ctrl+[. If you’d like to move a layer all the way to the top of the panel, all at once, you can use Shift+Ctrl+] and if you want to move it all the way to the bottom, you can use Shift+Ctrl+[. It’s that easy.
 
Top