Phoenix1
Member
- Joined
- May 7, 2021
- Messages
- 135
- Reaction Score
- 0
- Points
- 23
- #1
I’d like to use this post to talk about two very basic topics that many beginning photographers concern themselves with. The first has to do with batteries and the second has to do with media, or memory, cards for the Canon Rebel line of DSLR cameras.
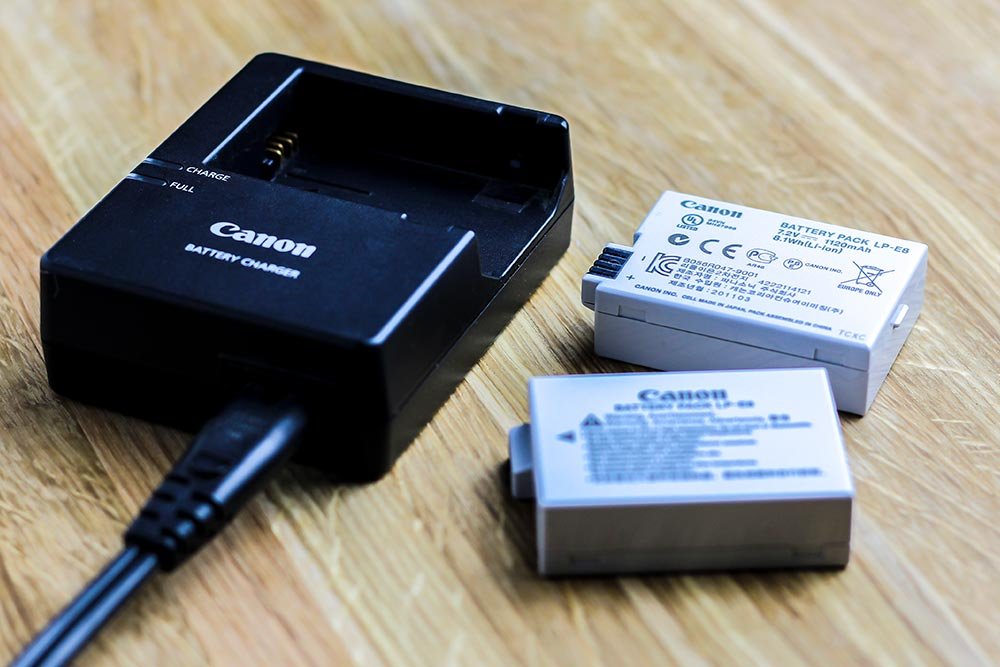
Let’s first talk about the batteries the Rebel line of cameras accept. From what it says on the face of one of mine, the specifications are lithium ion at a 7.2 volt and with a 1120mAh flow. These are the specs that came with one of the batteries I received with the camera over 3 years ago. I still use it because it still holds a charge.
I did purchase some additional “Powerextra” generic brand batteries as extras. Their specs are slightly different, but still compatible with a wide range of cameras. The specifications are 7.4V at 1800mAh. A bit more powerful, but they seem to work well in the camera and haven’t caused any issues.
I do want to mention that replacement batteries for Canon Rebel cameras are extremely inexpensive. Even though two of them are currently going for $13.99 on Amazon, I only paid $9.99 a few months back. Again, that’s for a two-pack, so I encourage you to buy some extra batteries when you buy any camera. There’s nothing worse than having to wait for your one battery to charge in the middle of a shoot.
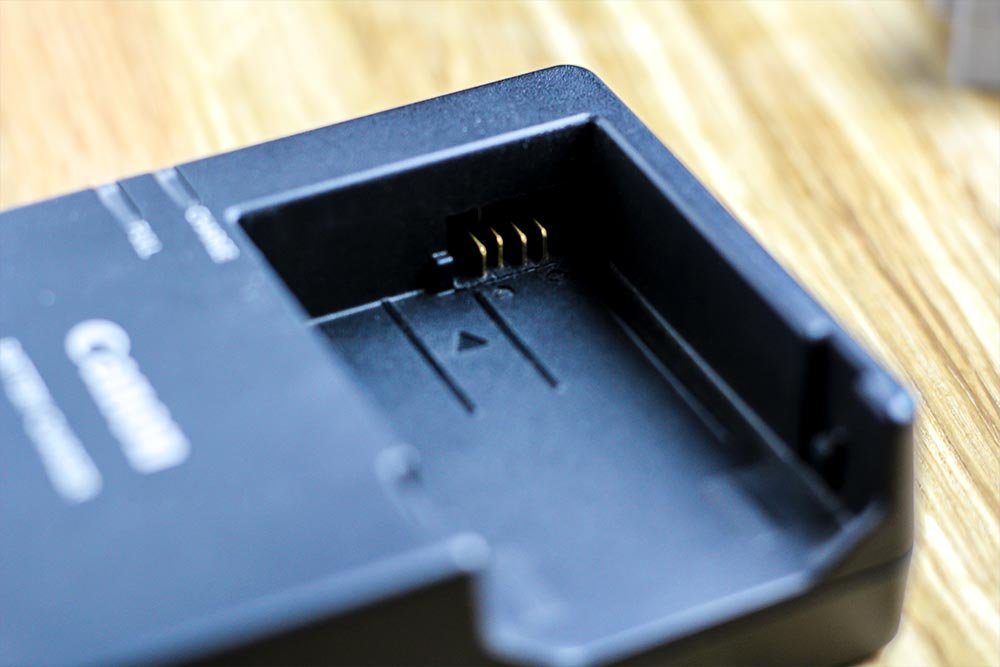
If you take a look at a battery, you’ll see 4 pins in a housing on one side of it. Simply line that housing up with the pins on the charger and push gently. When the battery is charging, the Charge light on the charger will be illuminated in yellow. When the battery is fully charged, the Full light on the charger will be illuminated in green.
If you’re interested in how long it takes one of these batteries to charge, here’s some information. It takes two hours to fully charge a totally dead battery at around 70 degrees. If the battery isn’t completely dead, it’ll take less time. Also, the recharge time will vary depending on the temperature of the environment. Just to be safe, I’d count on it taking 2 hours to charge a battery to its maximum level, no matter what kind of energy it has stored in it.
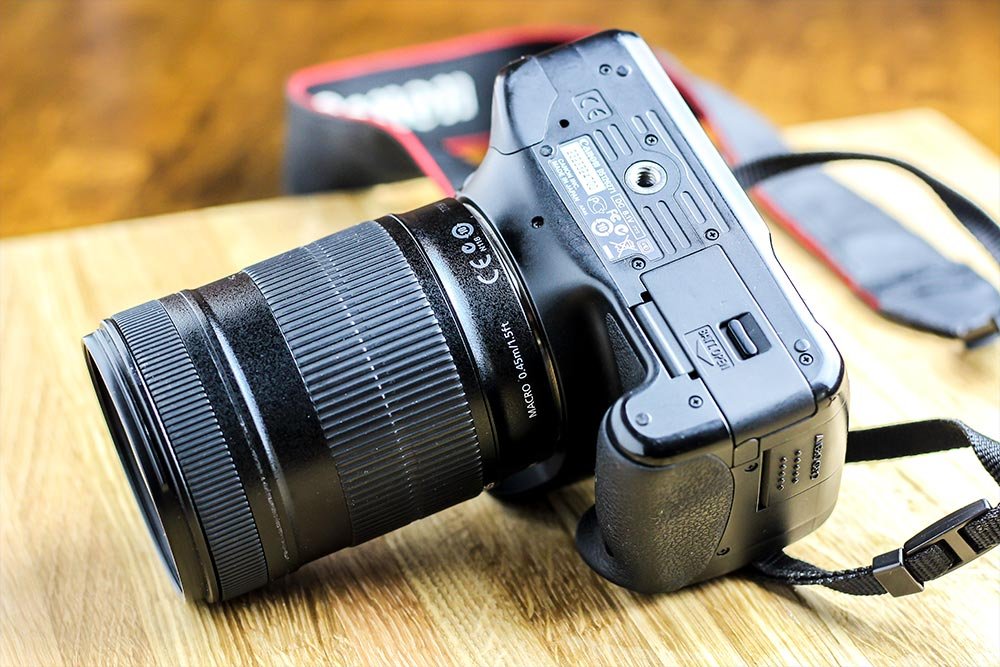
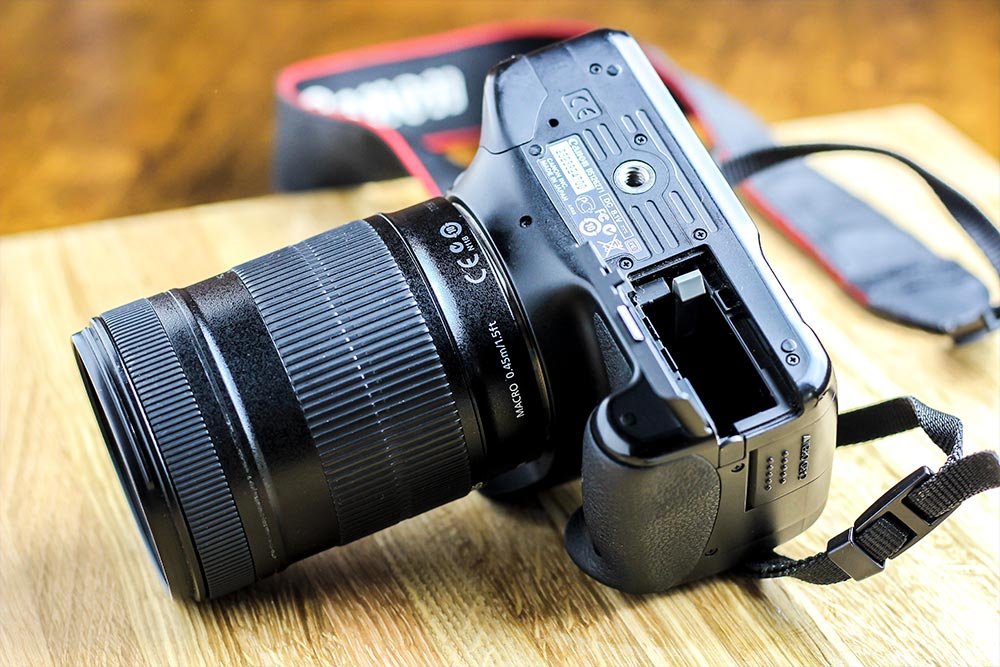
If you look closely, you can see the flap that covers the battery compartment. To open it, you simply need to push the latch to towards the front of the camera. Once you do that, you should see this:
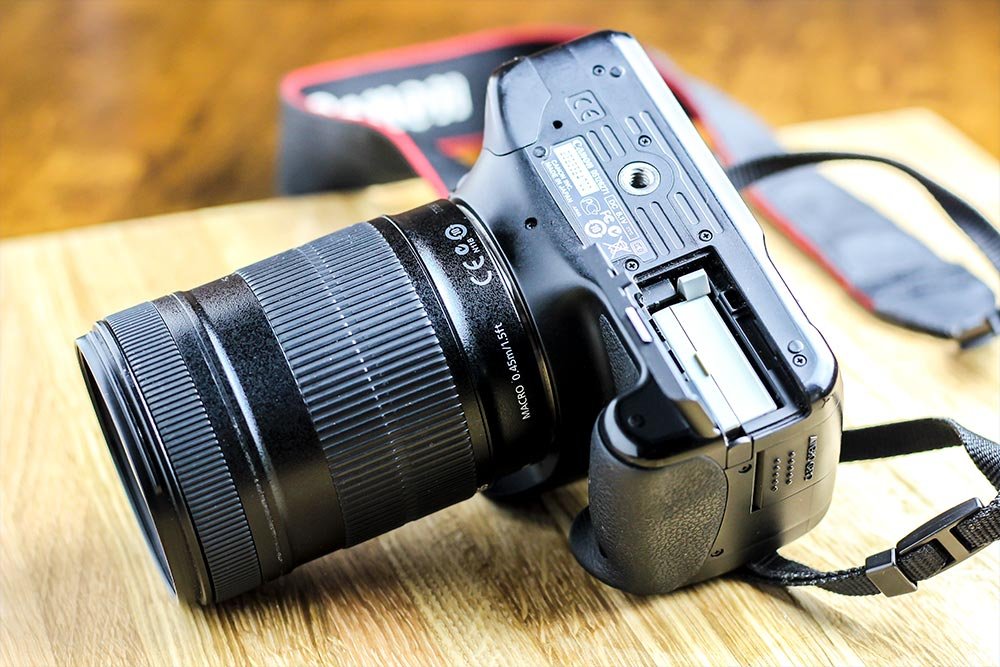
This is a photo of the battery currently loaded into the camera. To remove the battery, you’ll need to push the gray catch away from the battery. Once that’s done, the battery will pop out a few millimeters. From there, just grab it and gently pull out.
Now the battery compartment is empty.
To load the battery into the camera, just reverse steps. Remember though, this is very similar to loading the charger. The pins need to be lined up across both pieces of equipment. Also remember, never push anything too hard. If it’s not fitting smoothly, you’re most likely doing something wrong. Reevaluate and try again.
Before I begin talking about these variables, though, let me show you where the media card is stored in the camera.
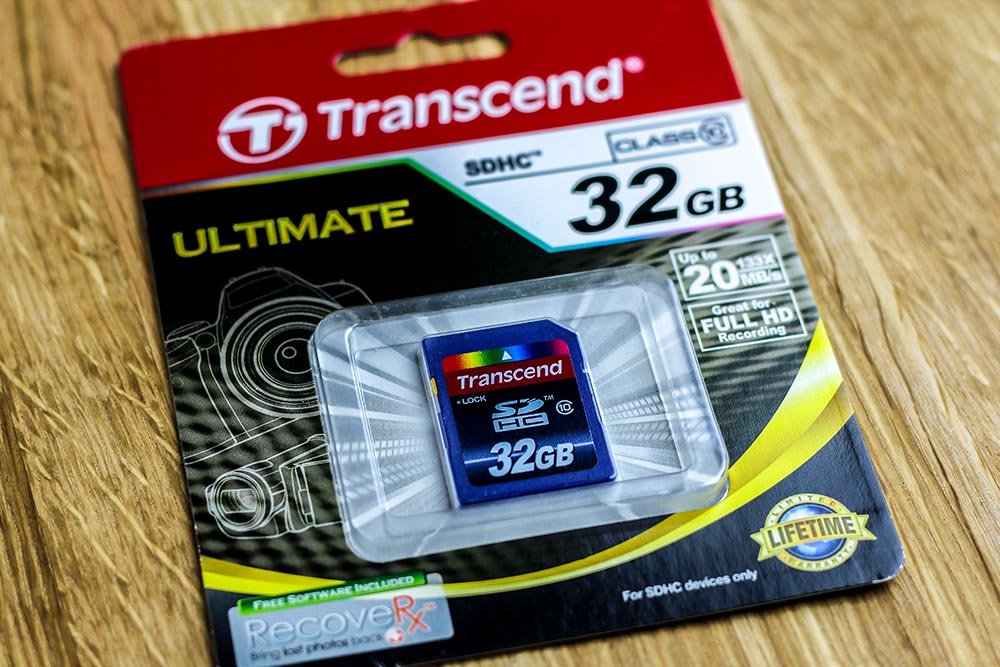
This is a photo of a media card that fits in the Canon Rebel series.
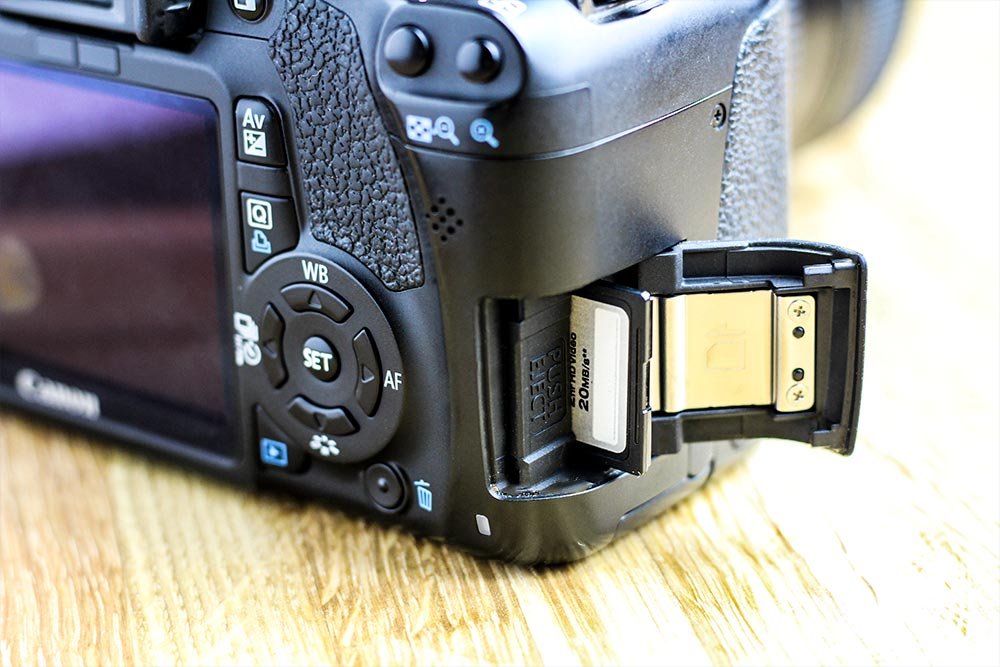
To open the door that houses the media card on this Canon Rebel T2i, all you need to do is press on the door and push it towards the back of the camera. Once it’s open, you can gently push your finger on the card itself and then let go. While pushing, you should hear a light “click.” That’s the card disengaging from the camera. In the photo above, the card was ready to be pulled out.
To insert the card, again, reverse the steps. Line up the card based on the diagram that’s included on the inside of the card door on the camera and push it until it goes all the way in. Again, you’ll hear a click when it’s properly installed. Let go and close the door. That’s it.
Regarding the media cards themselves, I want to let you in on one secret. Whichever media card you choose, that card has no effect on the quality of photo you take. It may have an effect on other things, but not the photo itself. Below, I’ll discuss different aspects of these cards.
Capacity
When it comes to the Canon Rebel, you’ll likely choose between three types of memory cards. They are:
SD (Secure Digital) Memory Cards
SDHC (Secure Digital High Capacity) Memory Cards
SDXC (Secure Digital Xtra Capacity) Memory Cards
In the photo I shared above, you can see that the card belongs to the SDHC family. The primary difference between these three types of cards is capacity. Beyond their shape, which will fit into a Canon Rebel, they offer different amounts of data that can be stored inside of them.
The oldest card above is the SD card, which allows anywhere between 1MB up to 2GB of data to be stored. There were even a few made that hold up to 4GB. Next came the SDHD which allows between 2GB up to 32GB of data and finally the SDXC which allows between 32GB up to 2TB. For a tiny card, that’s a virtual endless amount of storage.
When shopping for one of these cards, remember to look at price and capacity, beyond reviews for the card being quality and reputable or not. For beginners or amateurs, you really only need up to about 8GB, especially if you’re shooting in JPEG mode. In that mode, you can hold a heck of a lot of photos on an 8GB card.
Speed
I began looking at card speed much more closely in recent years. There was one primary reason for this – HD video. Another good reason for someone to look closely at card read and write speed is if they take bursts of photos for sporting events and things like that.
When it comes to speed, there are two types that need to be considered. First is read speed. Imagine for a moment that you took one picture with a camera that has an empty SD card. Then imagine that when you went to download that photo from your camera to your computer, it took 12 hours. That would be an example of using a card with an extremely slow read speed. Now imagine that the transfer only took 1 millisecond. That would be an example of using a card with a very fast read speed.
Basically, when it comes to memory cards, read speed is the speed in which data is transferred off of a card. It’s most important when it comes to transferring data off of a camera or printing directly from the camera.
As with many other things when it comes to technology, a fast read speed is better.
The most critical type of speed, when discussing media cards, is write speed. If a card can’t be written to fast enough, the camera will slow down during repetitive shooting. If you try to shoot in burst mode with a slow card, you’ll likely hear click, click, click, – click, –, click, —, click as the shutter takes action. The first few photos will be written to the card fast enough, but as you continue on, things will slow down tremendously.
When shooting HD video, it’s absolutely important to use a media card that offers a fast write speed. Video transfers tons of data in a stream and if it can’t be written to the card fast enough, it just won’t work. Don’t even try it.
Speed Classes
When purchasing a media card, try to buy the highest speed class you can afford. It’ll keep the door open for various types of photography and videography down the road. Even if you don’t need all the transfer speed your card offers, it’s nice to know it’s there.
When shopping, look at the speed class. Here’s a chart that covers the various speeds:
Class 10: 10MB/s – High Speed – Full HD Video Recording HD Still Image Continuous Shooting
Class6: 6MB/s – Normal Speed – HD and Full HD Video Recording
Class4: 4MB/s – Normal Speed – HD and Full HD Video Recording
Class2: 2MB/s – Normal Speed – Standard Video Recording
So, as you can see, there are some choices to make when purchasing an SD card. As always, keep your shooting style and your wallet in mind while shopping.
I hope I’ve given you a good background into the battery and memory card arenas when it comes to your Canon Rebel camera. If you have any questions or comments, please leave them below. Thanks!
Canon Rebel Camera Batteries
This section isn’t going to be as in-depth as the next because the topic of batteries, when it comes to cameras, is fairly straightforward. I would like to show a few photos of actual batteries and where they go in the camera and then discuss a handy tip or two. First, the battery itself.
Let’s first talk about the batteries the Rebel line of cameras accept. From what it says on the face of one of mine, the specifications are lithium ion at a 7.2 volt and with a 1120mAh flow. These are the specs that came with one of the batteries I received with the camera over 3 years ago. I still use it because it still holds a charge.
I did purchase some additional “Powerextra” generic brand batteries as extras. Their specs are slightly different, but still compatible with a wide range of cameras. The specifications are 7.4V at 1800mAh. A bit more powerful, but they seem to work well in the camera and haven’t caused any issues.
I do want to mention that replacement batteries for Canon Rebel cameras are extremely inexpensive. Even though two of them are currently going for $13.99 on Amazon, I only paid $9.99 a few months back. Again, that’s for a two-pack, so I encourage you to buy some extra batteries when you buy any camera. There’s nothing worse than having to wait for your one battery to charge in the middle of a shoot.
Canon Rebel Camera Battery Charger
Charging these batteries is as simple as it gets. There’s only one way the battery will fit in the charger, so you can’t screw it up. The pins on the battery need to line up with the pins on the charger. Here’s an up-close photo of my charger.
If you take a look at a battery, you’ll see 4 pins in a housing on one side of it. Simply line that housing up with the pins on the charger and push gently. When the battery is charging, the Charge light on the charger will be illuminated in yellow. When the battery is fully charged, the Full light on the charger will be illuminated in green.
If you’re interested in how long it takes one of these batteries to charge, here’s some information. It takes two hours to fully charge a totally dead battery at around 70 degrees. If the battery isn’t completely dead, it’ll take less time. Also, the recharge time will vary depending on the temperature of the environment. Just to be safe, I’d count on it taking 2 hours to charge a battery to its maximum level, no matter what kind of energy it has stored in it.
Loading the Battery into the Camera
To start things off, I’ll give you a view of the bottom of my Rebel T3i. By the way, so much is similar between the other Canon Rebel series cameras, you may be able to apply the concepts below to the T2i, T4i, T5i, T6i, T7i and even the T8i.
If you look closely, you can see the flap that covers the battery compartment. To open it, you simply need to push the latch to towards the front of the camera. Once you do that, you should see this:

This is a photo of the battery currently loaded into the camera. To remove the battery, you’ll need to push the gray catch away from the battery. Once that’s done, the battery will pop out a few millimeters. From there, just grab it and gently pull out.

Now the battery compartment is empty.
To load the battery into the camera, just reverse steps. Remember though, this is very similar to loading the charger. The pins need to be lined up across both pieces of equipment. Also remember, never push anything too hard. If it’s not fitting smoothly, you’re most likely doing something wrong. Reevaluate and try again.
Media Cards for the Canon Rebel
When it comes to cameras, media cards are a much more interesting topic to discuss. This is because while shopping for batteries, all you need to do is browse a few and pick one out based on, most likely, price. When it comes to media cards, there are many more variables to concern yourself with. The more important ones are compatibility, capacity and read and write speed.Before I begin talking about these variables, though, let me show you where the media card is stored in the camera.

This is a photo of a media card that fits in the Canon Rebel series.

To open the door that houses the media card on this Canon Rebel T2i, all you need to do is press on the door and push it towards the back of the camera. Once it’s open, you can gently push your finger on the card itself and then let go. While pushing, you should hear a light “click.” That’s the card disengaging from the camera. In the photo above, the card was ready to be pulled out.
To insert the card, again, reverse the steps. Line up the card based on the diagram that’s included on the inside of the card door on the camera and push it until it goes all the way in. Again, you’ll hear a click when it’s properly installed. Let go and close the door. That’s it.
Regarding the media cards themselves, I want to let you in on one secret. Whichever media card you choose, that card has no effect on the quality of photo you take. It may have an effect on other things, but not the photo itself. Below, I’ll discuss different aspects of these cards.
Capacity
When it comes to the Canon Rebel, you’ll likely choose between three types of memory cards. They are:
SD (Secure Digital) Memory Cards
SDHC (Secure Digital High Capacity) Memory Cards
SDXC (Secure Digital Xtra Capacity) Memory Cards
In the photo I shared above, you can see that the card belongs to the SDHC family. The primary difference between these three types of cards is capacity. Beyond their shape, which will fit into a Canon Rebel, they offer different amounts of data that can be stored inside of them.
The oldest card above is the SD card, which allows anywhere between 1MB up to 2GB of data to be stored. There were even a few made that hold up to 4GB. Next came the SDHD which allows between 2GB up to 32GB of data and finally the SDXC which allows between 32GB up to 2TB. For a tiny card, that’s a virtual endless amount of storage.
When shopping for one of these cards, remember to look at price and capacity, beyond reviews for the card being quality and reputable or not. For beginners or amateurs, you really only need up to about 8GB, especially if you’re shooting in JPEG mode. In that mode, you can hold a heck of a lot of photos on an 8GB card.
Speed
I began looking at card speed much more closely in recent years. There was one primary reason for this – HD video. Another good reason for someone to look closely at card read and write speed is if they take bursts of photos for sporting events and things like that.
When it comes to speed, there are two types that need to be considered. First is read speed. Imagine for a moment that you took one picture with a camera that has an empty SD card. Then imagine that when you went to download that photo from your camera to your computer, it took 12 hours. That would be an example of using a card with an extremely slow read speed. Now imagine that the transfer only took 1 millisecond. That would be an example of using a card with a very fast read speed.
Basically, when it comes to memory cards, read speed is the speed in which data is transferred off of a card. It’s most important when it comes to transferring data off of a camera or printing directly from the camera.
As with many other things when it comes to technology, a fast read speed is better.
The most critical type of speed, when discussing media cards, is write speed. If a card can’t be written to fast enough, the camera will slow down during repetitive shooting. If you try to shoot in burst mode with a slow card, you’ll likely hear click, click, click, – click, –, click, —, click as the shutter takes action. The first few photos will be written to the card fast enough, but as you continue on, things will slow down tremendously.
When shooting HD video, it’s absolutely important to use a media card that offers a fast write speed. Video transfers tons of data in a stream and if it can’t be written to the card fast enough, it just won’t work. Don’t even try it.
Speed Classes
When purchasing a media card, try to buy the highest speed class you can afford. It’ll keep the door open for various types of photography and videography down the road. Even if you don’t need all the transfer speed your card offers, it’s nice to know it’s there.
When shopping, look at the speed class. Here’s a chart that covers the various speeds:
Class 10: 10MB/s – High Speed – Full HD Video Recording HD Still Image Continuous Shooting
Class6: 6MB/s – Normal Speed – HD and Full HD Video Recording
Class4: 4MB/s – Normal Speed – HD and Full HD Video Recording
Class2: 2MB/s – Normal Speed – Standard Video Recording
So, as you can see, there are some choices to make when purchasing an SD card. As always, keep your shooting style and your wallet in mind while shopping.
I hope I’ve given you a good background into the battery and memory card arenas when it comes to your Canon Rebel camera. If you have any questions or comments, please leave them below. Thanks!
