KodyWallice
Member
- Joined
- May 7, 2021
- Messages
- 123
- Reaction Score
- 1
- Points
- 23
- #1

Oftentimes, while reviewing photos we’ve taken, we don’t notice how distorted, or altered, they really are. Lenses are funny things and it’s not until we go through each and every photograph in an image editor that has the capabilities of correcting lens distortion that we discover exactly what’s going on. Adobe Camera Raw offers lens distortion correction, so in today’s post, that’s what we’ll be using to toy with correcting some different views on perspective.
I found a few good example photos last night to use in this post. At first, I didn’t think I had any to work with because I generally enjoy photographing nature and landscape, but as I continued to search through my collections, I stumbled across some photos from Europe. They were perfect. Lots of architecture and historic remains. Exactly what I was looking for. And of the photos I chose, the differences are fairly dramatic while experimenting with the corrective tools.
Lens Corrections Panel
In this post, I’m going to be using the tools in the “Manual” tab inside the “Lens Corrections” panel in Camera Raw. If you open the application and click into the Lens Corrections panel, you’ll see a few other tabs. Those are the “Profile” and “Color” tabs and are used for other purposes. If you’re interested in how to correct lens distortion, you can visit my post on that topic here. I’ve covered it fairly in depth. In that post, I used the tools in the “Profile” tab. To correct chromatic aberration, you should use the tools in the “Color” tab.My Photograph
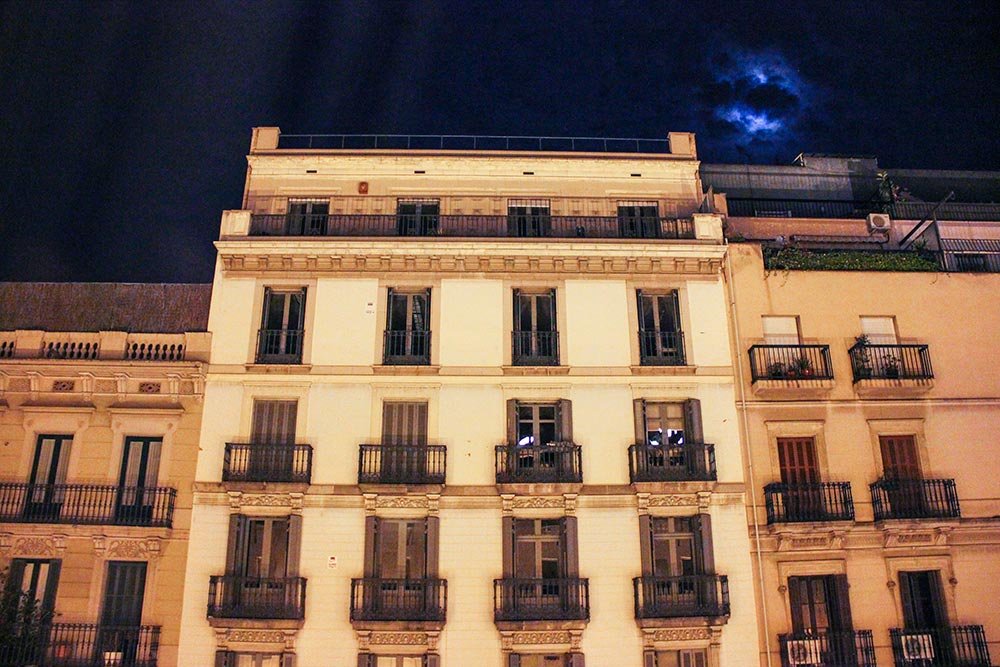
I decided on the photograph below because it has the potential to show any changes we make to it rather drastically. It’s got straight lines that have had their angles altered by a camera lens. It’s the perfect candidate.
Now, at first glance, you may look at this photo and say, “Yeah, that doesn’t look that bad. It looks like someone took a photo of a building from the ground.” You’d be right. This photo was taken from standing on the ground in front of the building. The thing is, from the perspective of this position in real life, the top of the building doesn’t pull away to such a degree as the picture shows. The camera lens exaggerated the walls of the structure.
Show Grid
It’s always easier to see how bad things are when we have something to compare what we’re looking at to. In Adobe Photoshop, we’ve got guides for that. When editing in Camera Raw’s Lens Corrections panel, we’ve got a grid. Take a look.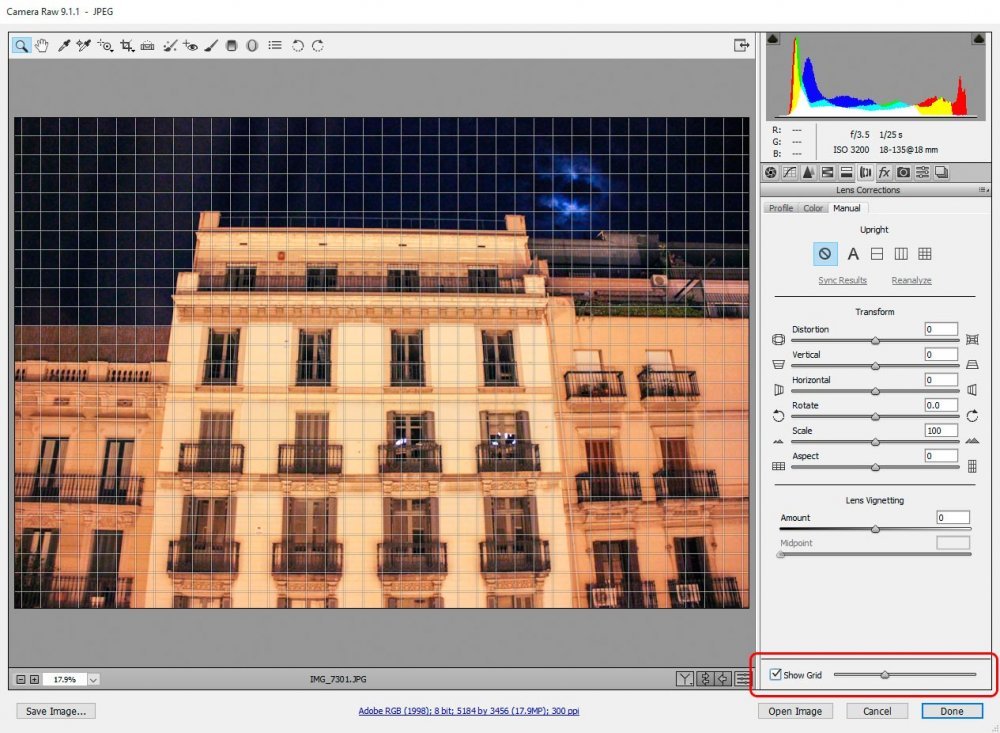
If you look toward the bottom right of the screenshot above, you can see the on/off check box for the grid feature. Check it to turn it on. Also, to the right of the check box, there’s a slider. If you move the slider to the right, the lines in the grid separate and the squares of the grid become larger.
Now, with the grid feature turned on, we can see how distorted the angles in the photo are. Not only do the vertical lines lean inward, but the horizontal lines fall towards the middle as well. That’s the true indicator that perspective needs correcting.
Using Upright Perspective Correction
Inside Camera Raw, we’ve got a tool called “Upright” that really helps in solving perspective distortion. There are four settings that can drastically improve the appearance of a photograph. The four settings are auto, level, vertical and full. I’ve surrounded these setting buttons in the screenshot below.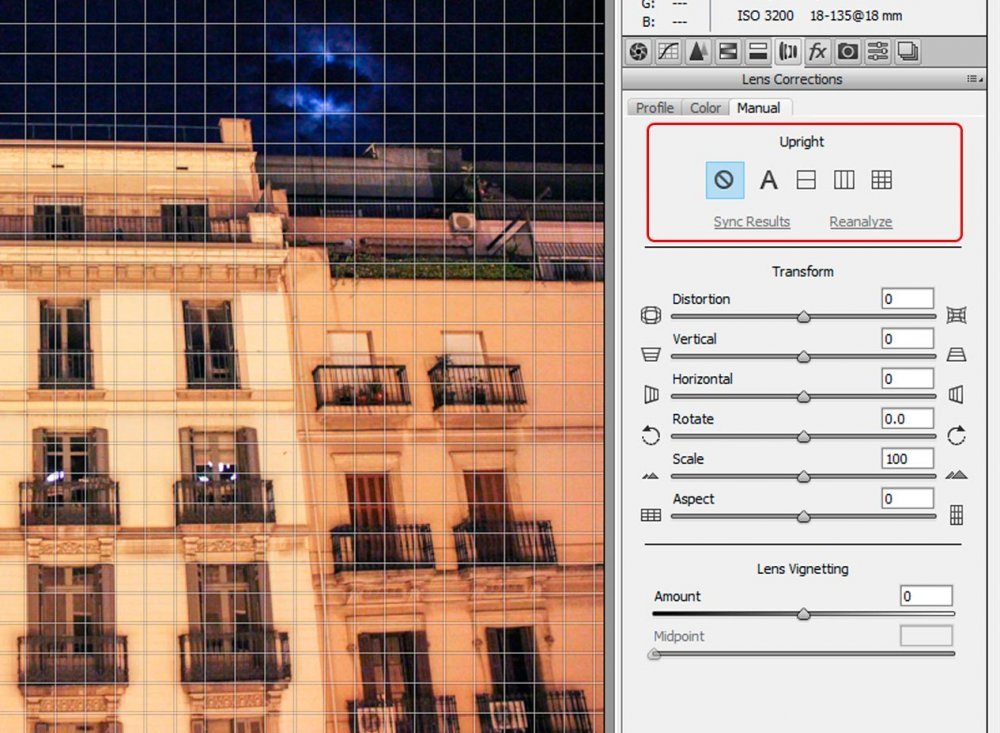
Auto Upright
In the next few sections, I’m going to apply each Upright correction to my photograph. Please keep an eye on the grid lines as they compare to the vertical and horizontal lines in the photo. Also, it may help to refer back to the original image from time to time.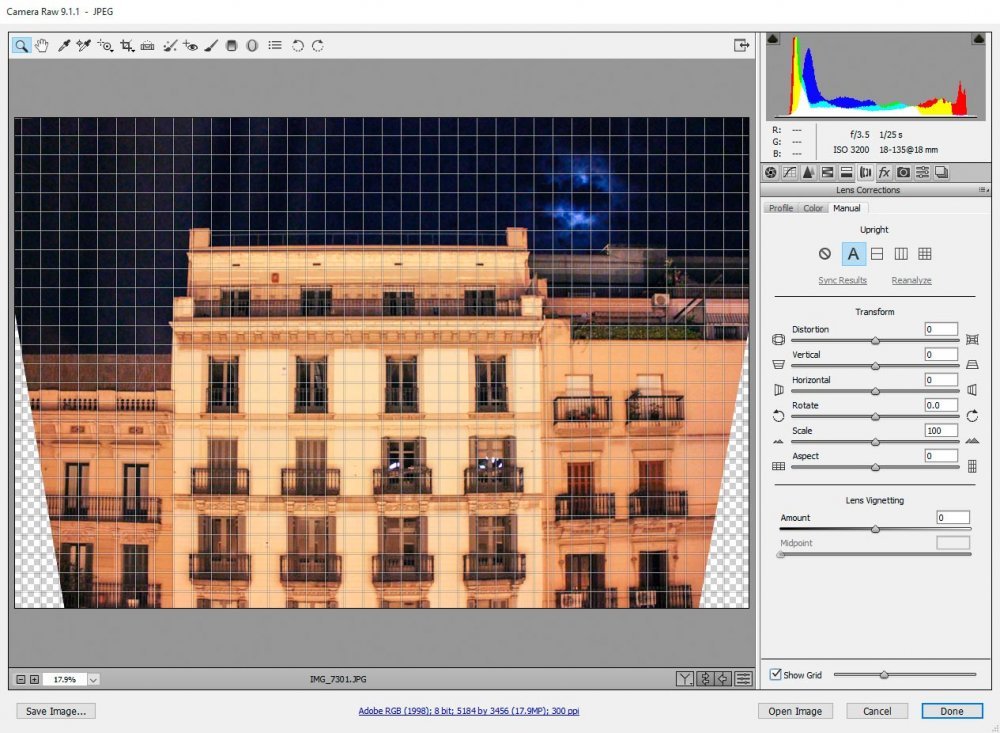
The Auto Upright correction is Camera Raw’s best guess at reality. It doesn’t go as far as locking in any lines or making anything exactly vertical or horizontal, but it does do a good job of making the photo look as though it was intended to look. In general, the auto correction selection is a good one to use.
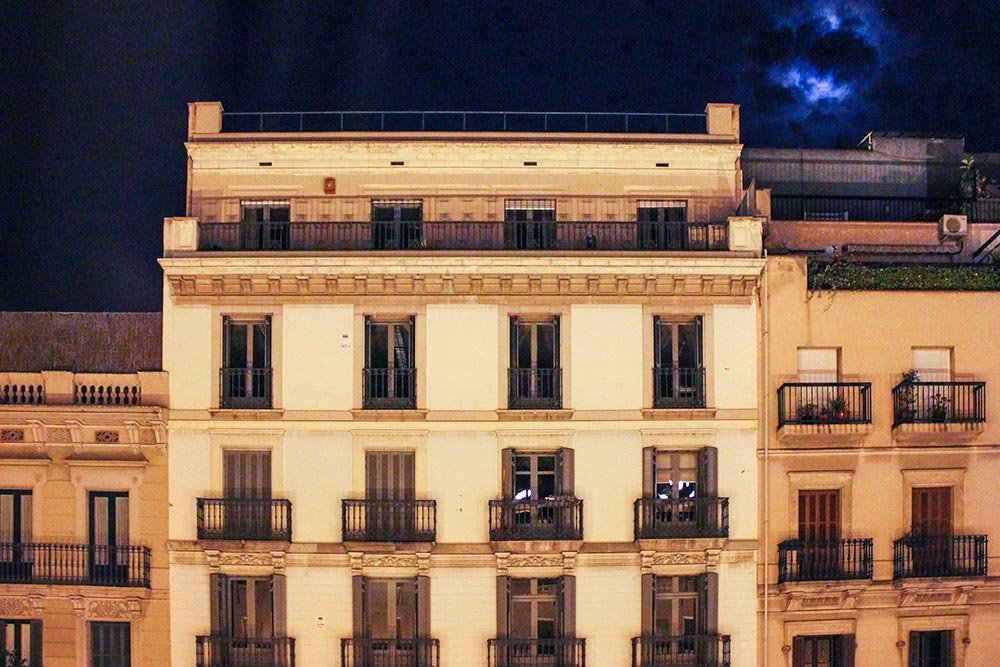
Also, as you can see, in order to adjust the image, Camera Raw found it necessary to pull the bottom pixels in towards the center. To produce a final photo, I would need to crop the edges so only the center remains.
Level Upright
To be honest, it doesn’t look like the Level Upright correction did anything to alter the image. This may be because Camera Raw felt that the horizontal lines were level enough when compared to the other lines in the photo. I can only guess. This adjusted image looks almost exactly like the original.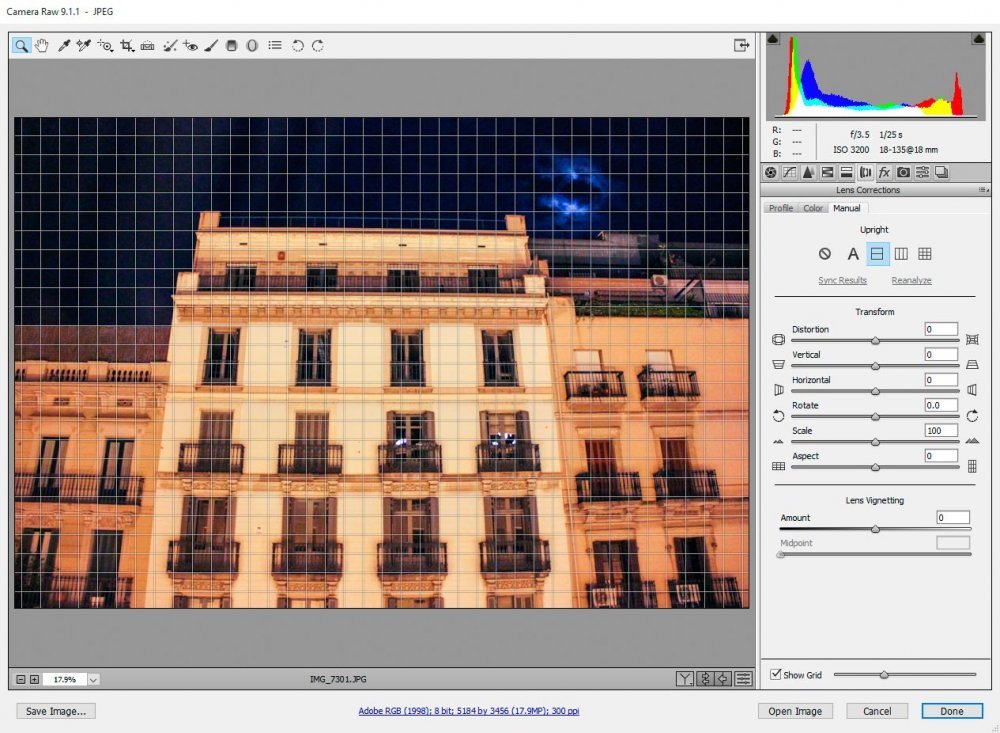
If this photo wasn’t level or if it was tilted in some fashion, we would see something more dramatic. I’ve attempted this type of correction on other images and it does, in fact, level things.
Vertical Upright
This correction applies Level and Vertical perspective corrections. It’s not too far off from the Auto correction, but it does appear to be a bit more drastic. The bottom is pulled in a touch more.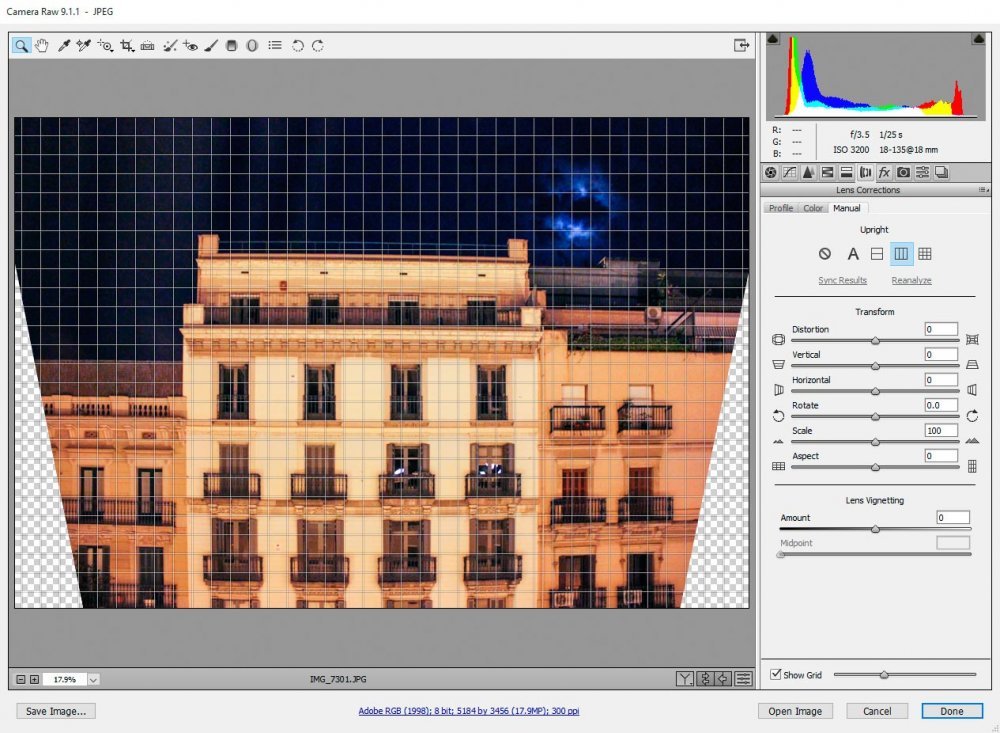
Full Upright
If I wasn’t going to use the Auto correction, I would use this one. The Full Upright correction applies level, horizontal and vertical perspective corrections. If you take a look below, again, this correction doesn’t look terribly different than the Auto or Vertical corrections. The only difference I saw was the right side being lifted slightly to level out the photo.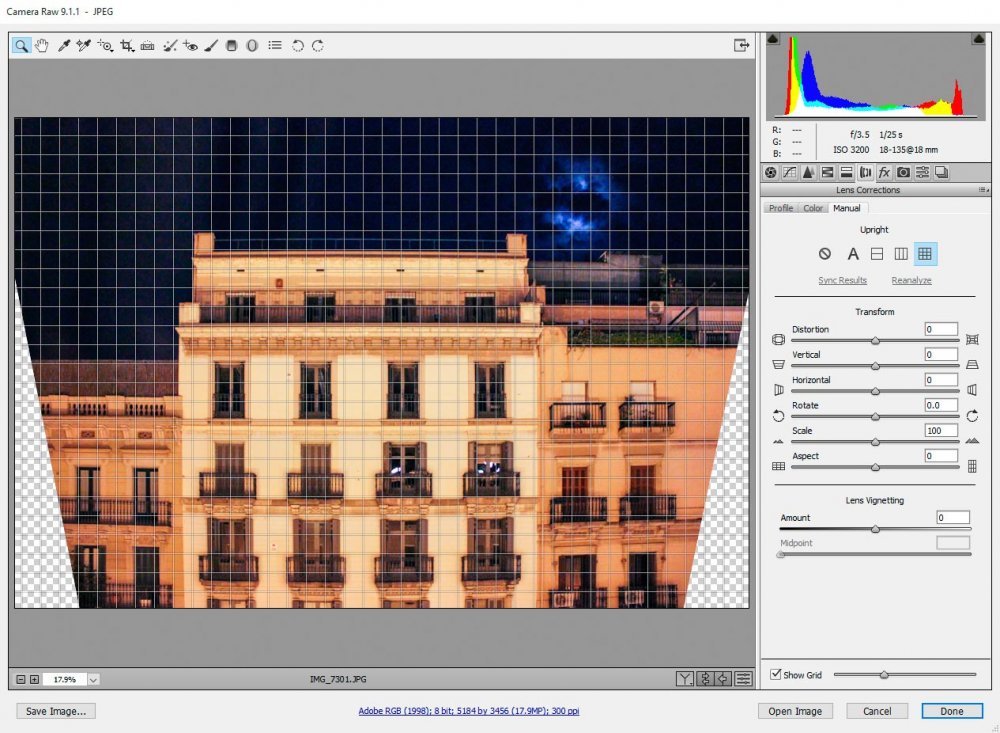
Transform Sliders
Below the Upright buttons, you’ll see the “Transform” section. This is the area you’d use to make more custom changes to your photos. As you use these sliders, you’ll get the hang of what exactly they accomplish. I’m not one for fooling too much with them, but they can assist in some cases.Comparing the Original & Corrected Photos
In this section, I’m going to display both the before and after photos I worked with in this post, to give you an idea of how your photos may look after editing this way. With my photo, I lost a lot around the edges, so continuing on, I’d have to make the decision whether or not it’s worth it to correct this type of distortion. But, I have to say, it looks a heck of a lot less distorted.