CraigHardy
Member
- Joined
- May 11, 2021
- Messages
- 223
- Reaction Score
- 2
- Points
- 18
- #1

Continuing on with the “Importing Photos to Lightroom” series, I’d like to discuss another panel inside the right column of the Import window. This time, the panel is called “Apply During Import.” Inside this panel, we’re faced with three optional sections that, if necessary, can assist altering and setting up our images for later use. And in this post, I’ll discuss exactly what each one of these sections does and how they can help your workflow.
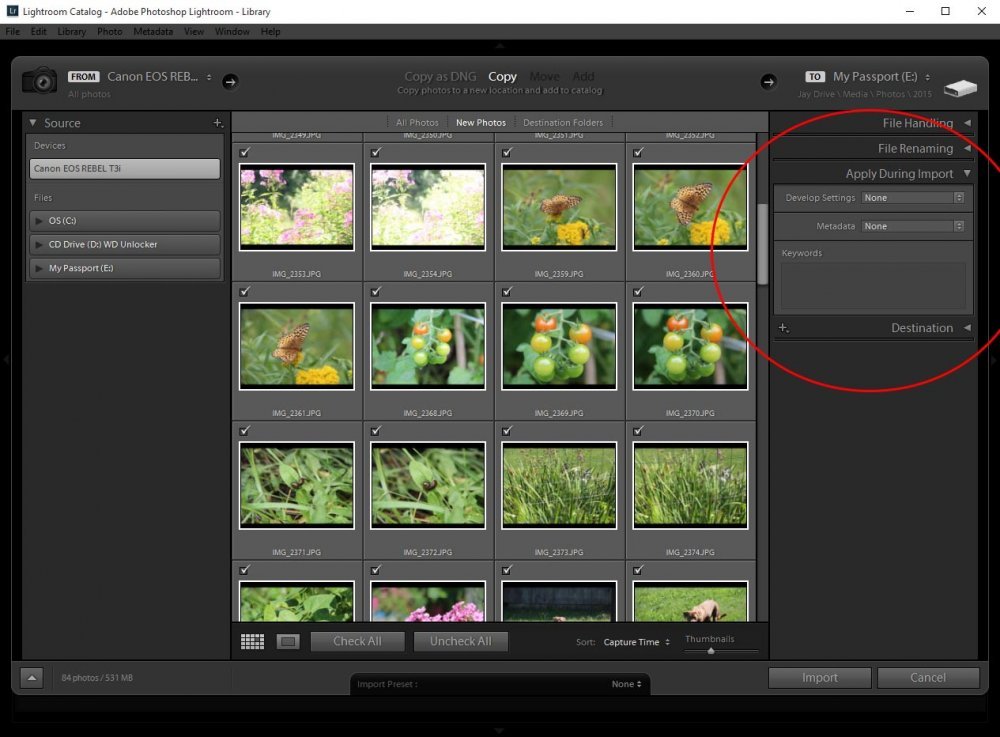
Develop Settings
Before I begin, I’d like to remind you that I’ve already got my camera plugged in and my source images chosen. Those images are loaded in the center column.The “Develop Settings” section of this panel is sort of a controversial one. Well, that’s for the lack of a better word. What I’m trying to say is that some photographers love this feature, while others (myself included) prefer to leave any image editing, especially on a large scale, for later on when we can see and work on our images more clearly. Although, mass editing photos is certainly helpful and if you’ve got something in mind, then go for it.
To explain what I’m talking about, take a look at the image below.
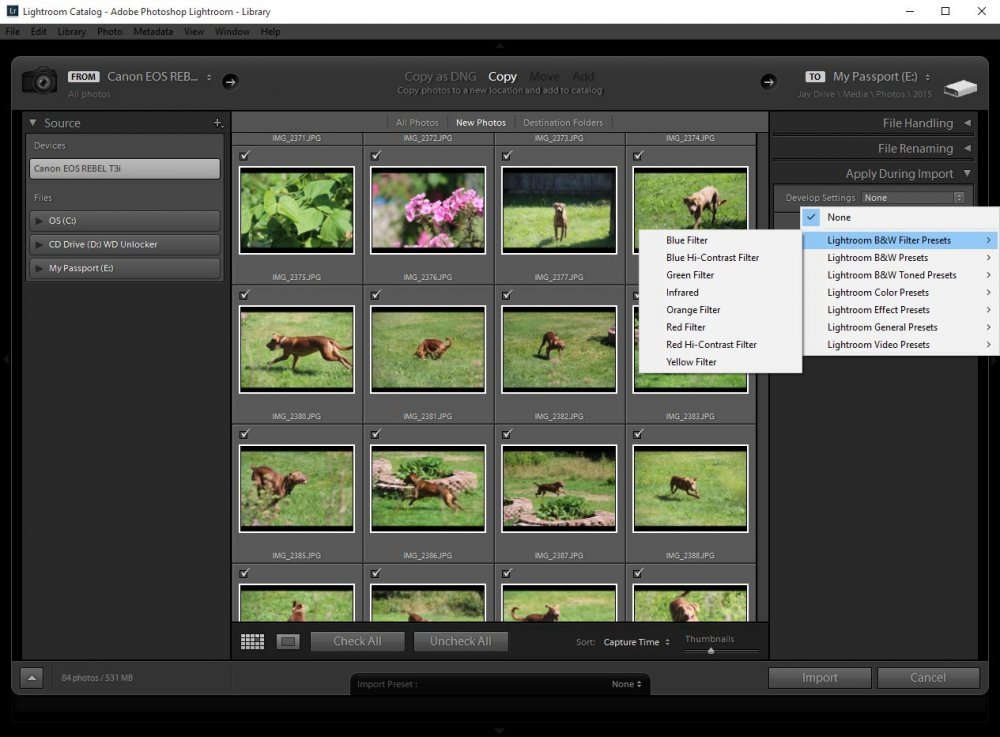
Basically, after clicking the “Develop Settings” dropdown, we’re offered the ability to apply filters and alterations to our images as they’re being imported to Lightroom. If you’re so inclined, you could click on “Lightroom Color Presets > Aged Photo” and add an aged photo filter to each of your images. Like I said above, if you’ve definitely got something in mind, this feature can be handy. If not, perhaps you should leave the editing for later on, once you’ve got the photos imported and situated where they should be.
For the sake of completion, I’ll list all current options for this section below:
Lightroom B&W Filter Presets
– Blue Filter
– Blue Hi-Contrast Filter
– Green Filter
– Infared
– Orange Filter
– Red Filter
– Red Hi-Contrast Filter
– Yellow Filter
Lightroom B&W Presets
– B&W Contrast High
– B&W Contrast Low
– B&W Look 1
– B&W Look 2
– B&W Look 3
– B&W Look 4
– B&W Look 5
Lightroom B&W Toned Presets
– Antique
– Antique Light
– Creamtone
– Cyanotype
– Selenium Tone
– Sepia Tone
– Split Tone 1
– Split Tone 2
– Split Tone 3
– Split Tone 4
Lightroom Color Presets
– Aged Photo
– Bleached Bypass
– Cold Tone
– Cross Process 1
– Cross Process 2
– Cross Process 3
– Direct Positive
– Old Polar
– Yesteryear
Lightroom Effect Presets
– Grain Heavy
– Grain Light
– Grain Medium
– Rounded Corners Black
– Rounded Corners White
– Vignette 1
– Vignette 2
Lightroom General Presets
– Auto Tone
– Medium Contrast Curve
– Punch
– Sharpen Faces
– Sharpen Scenic
– Zeroed
Lightroom Video Presets
– Video B&W Classic
– Video B&W High Contrast
– Video Color Pop
– Video Cool Tone
– Video Cross Process 1
– Video Cross Process 2
Metadata
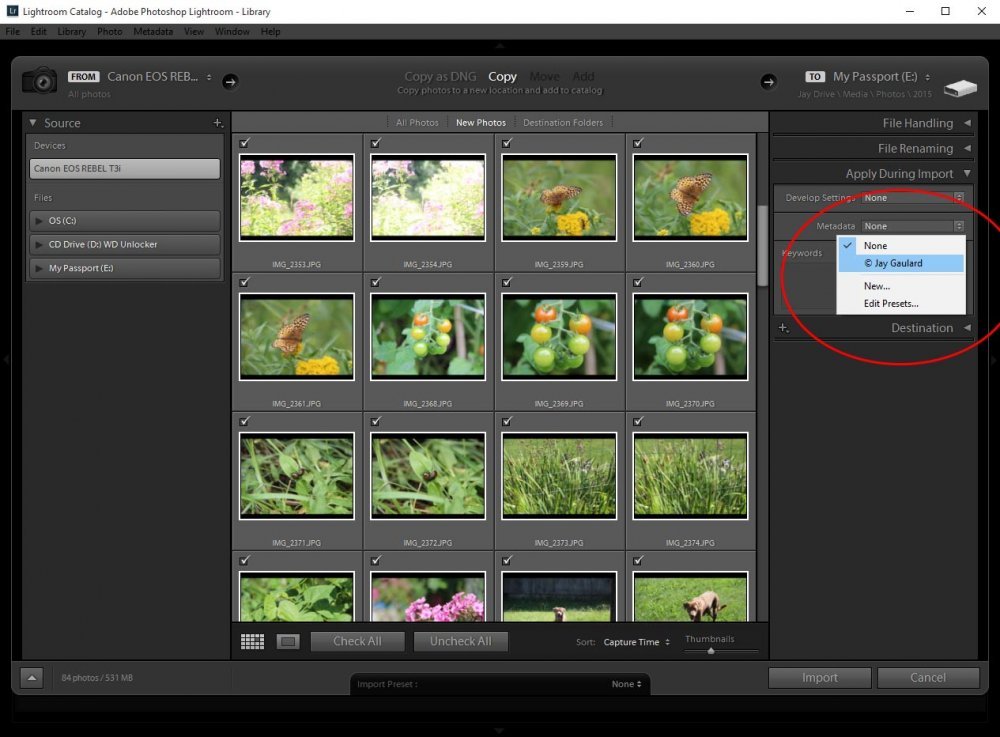
The metadata feature is one photographers love – for good reason. With it, they have the ability to attach a plethora of information to their images through what’s called a “Metadata Template.” Inside the template (shown below), there are tons of fields that can be filled in and once imported, stored inside the meta information of each photograph. Example sections inside the template include “Basic Info,” “Camera Info,” “IPTC Content,” “IPTC Copyright” and more. To see them all, simply click the Metadata dropdown and then “New…”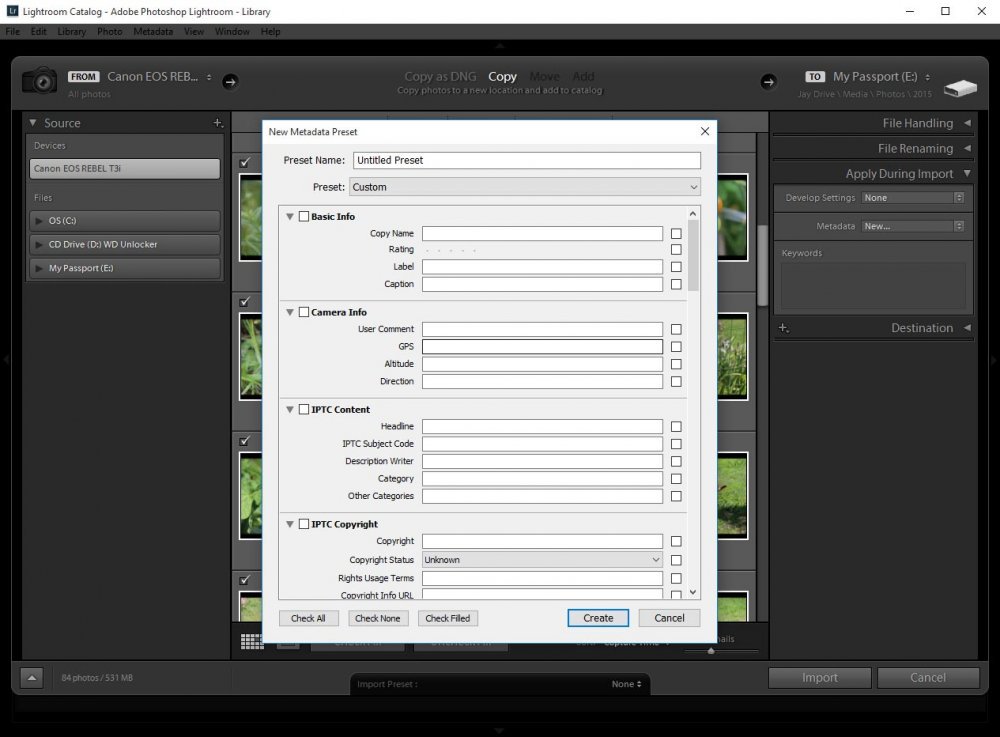
As you can well image, one of the most popular areas of the Metadata template is having the ability to add a copyright to the metadata of your images. To do this, simply name the template what you would like next to “Preset Name” up at the top of the form. In my case, I simply named it “© My Name.” The way I got the little “©” to show up was to hold down the “Alt” key and then type (while holding down the key) 0169 on the number keypad. For some reason, if I tried to type 0169 using the numbers above the letters on my keyboard, nothing would happen. I have to use the numbers on the keypad to the right of the keyboard. If you’re on a Mac, simply hold down the “Opt” key and type c. So that’s Opt + c on a Mac and Alt + 0169 on Windows.
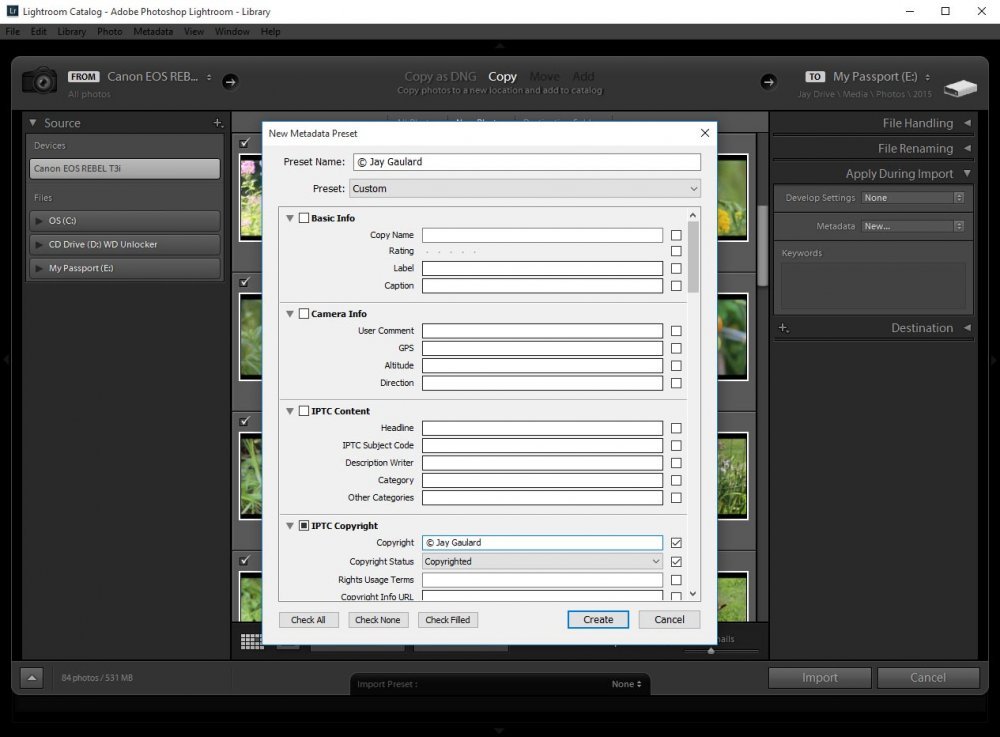
After I name the “Copyright” template, I move down to the “IPTC Copyright” section and again, type in “© My Name” in the copyright field. Right below that, I choose “Copyrighted” from the dropdown box. Once that’s complete, I click the “Create” button down at the bottom of the form and, voila, I’ve got a new template. So, whenever I’m importing images to Lightroom and would like to add copyrights to my images, all I need to do is choose “© My Name” from the Metadata dropdown box. Of course, I could have filled in any amount of information and named the form anything I wanted to, but for this simple example, my name worked fine. You can also create multiple templates and they’ll all appear in the dropdown, so feel free to experiment.
Keywords
The last area I’m going to cover that’s included in the “Apply During Import” panel is the “Keywords” section. This is an extremely valuable, yet overlooked, feature that’s included during the import process. Many folks don’t know that once images are imported to Lightroom, they have the ability to search, or filter, images to locate exactly the ones they’re looking for. In later posts, I’ll cover how to go about filtering, but for now, just recognize that the ability exists, so by including descriptive keywords as metadata, you could be potentially saving yourself loads of time, especially if you’re an avid photographer who has tons of photographs. In a world such as ours, where digital information is growing exponentially, we can’t rely on our memories alone. The time for search is here.Filling in the keyword field is fairly straightforward. All you need to do is type some descriptive terms you may eventually search for. Take a look below:
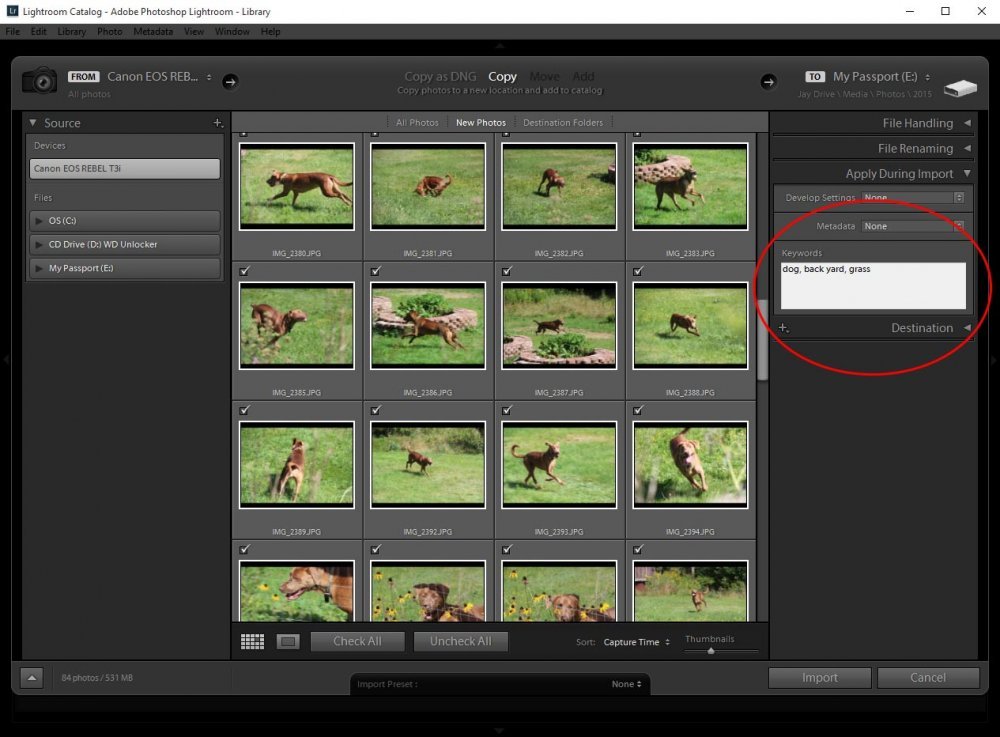
Since I’m importing a bunch of dog pictures simultaneously, I don’t want to go nuts with trying to get very specific with my keywords. During the initial import stage, I like to keep my keywords generalized, meaning that each word I use is applicable to every photo I’m importing. For example, the keywords I chose to use in this example are “Dog, Back Yard and Grass.” In every photo I’m importing, those keywords apply. The thing is, my garden shows in a few of the photos. Even though we can see the garden, I don’t want to include the keyword “Garden” because it doesn’t appear in every photo, but will be applied to each and every one of them. This will cause irrelevant photos to appear in my filter results later on when I’m searching.
Once I’m finished filling in my keywords, I would go about importing my photos as I described in the earlier “Importing Photographs To Lightroom” posts. It’s that simple.
