Cameron
Member
- Joined
- May 10, 2021
- Messages
- 108
- Reaction Score
- 3
- Points
- 23
- #1

While working in Adobe Photoshop, there are some basic premises we all need to keep in mind. One very important premise is that we must assume we’re going to, someday, open the file we’re currently working on, again, and edit it. It may seem that the moment we feel as though we’re finished with a file and send it off to the printer, that’s it. We think we can head off to the beach for a mini-vacation. Well, let me tell you something – that never happens. Sure, we may get lucky here and there, but I can’t count the number of times I received a late night phone call from somebody telling me that they need just one minor change. As a designer, I’ll admit my annoyance with this type of call because it seems that everyone agreed to the final design just a few hours before. But again, someone is bound to call.
So, with this in mind, I have a warning for you – never, ever flatten an original file. Not unless you want to do the entire thing over again.
It’s funny I say this because this post is about merging and flattening layers. Even though I gave you a strong warning directly above, there are still occasion when you may want to utilize either or both of these two operations. But, before we continue on, let me define what merging and flattening, in regards to Photoshop, are.
Merging – To merge layers together, we need to first select the layers and then merge. All the selected layer combine into one, with the new name of the single layer consisting of the topmost merged layer.
Flattening – To flatten layers, we don’t need to select anything. All we need to do is perform the flattening process. Once we do that, all layers in the Photoshop document will combine to form one single background layer.
Risks of Merging & Flattening
The risks associated with merging and flattening layers are few, yet severe. Let’s say you spend hours importing, resizing and positioning various images and graphics into one section of a brochure. After a while, you decide that you’ve got far too many layers, so you merge that one section, which is approximately 15 layers. Everything else in the document stays the same. You continue on working for a few days when your manager walks by and asks you to move a specific area of the section you merged. Well, that can be tough, depending of what your manage wants changed. If it’s an isolated photo, it may not be bad. If it’s the shadowing on some text, you’ll most likely be starting over.Now, let’s go through another example, but this time, we’ll pretend that you spend the same amount of time working on a brochure (days) and you finally get approval to send the file to the printer. The printer tells you that he can accept .psd (Photoshop) files. You rejoice because that’s exactly what you happen to be working in. The thing is, since you have tons of layers, your file is huge. But, if you flatten it, it shrinks down quite a bit. With this in mind, you flatten the entire file, hit save and send it to the printer. Ten minutes later, your manager walks by and tells you he wants something changed. Looks like you’re starting over, again.
Benefits of Merging & Flattening
I alluded to the benefits of merging and flattening in the previous section. For starters, merging layers together simplifies your layers panel and shrinks file size. Furthermore, if you flatten the entire file (all the layers), your file size really shrinks. The question is, when is a good time to use these two techniques?When to Merge Layers
I have an example that may help. I’ll continue on with my brochure scenario. We’ll say that you’re creating a brochure that’s going to have many photos, some graphics and your company logo. The photos and graphics aren’t too plentiful, but the logo has many layers. You decided to drag over the layers folder, straight from the original logo file, into the brochure document. Now, you’ve got quite a few layers. Too many for comfort. Since you dragged over the logo layers from the original logo file, it’s safe to merge them together inside the brochure file. You can do this because you’ll always have the original layers intact inside the logo file. It’s not likely that your logo will change, but if it does, you can simply delete the merged logo layer and re-import the new logo.When to Flatten an Image
For my next example, we’ll say that you’re finished creating your brochure and are ready to send it to the printer. In this case, all you need to do is click File > Save As up in the top menu, save the document with whatever name you’d like, flatten the image and send it on its way. By using this method, you’ll maintain all your layers in the original file and have a flattened one that’s easy to email.How To Merge & Flatten Layers
Okay, now that we’ve gotten all of that background information out of the way, we can start to have some fun. In this section, I’ll go over precisely how to merge layers and flatten an image.Merging Layers
The first thing I’ll cover is how to merge layers. Since I already discussed the whys and why nots of this topic, I’ll leave that alone. From here on out, it’s up to you whether or not you’d like to utilize these methods in your workflow.For starters, let me show you a quick graphic I just made for this demonstration.

Isn’t that pretty? Ask me where I got this idea. I have no clue.
In my Photoshop file, I have five layers. One is for the background, three are photos and the last one is the text. Take a look at the screenshot below.
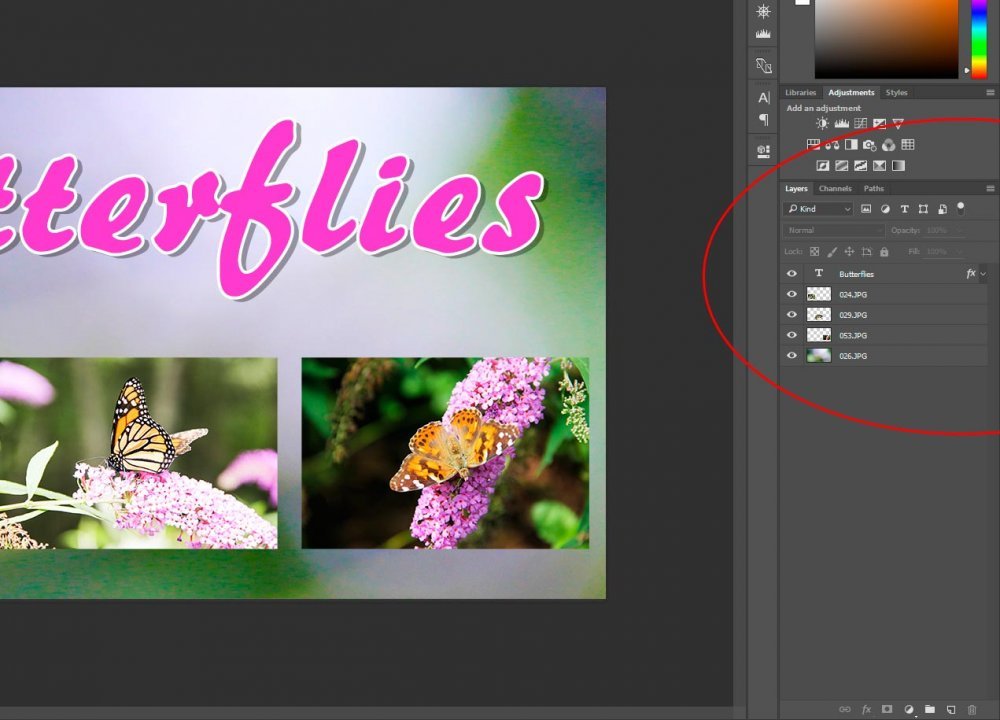
For whatever reason, I’d like to merge the three photo layers. I want them to become one unit so I can move them simultaneously as well as hide them and display them, all at the same time. Now personally, I’d probably just make a new layer group and save layer space that way, but since this is an example, I’ll show you have to actually merge them. There are a few methods.
First, if all the layers you’d like to merge are stacked upon each other in the Layers panel, you can click on the top one and then go up to the top menu and click Layer > Merge Down. By doing this, you’ll be instructing Photoshop to merge the selected top layer with the one directly below it. The two layers will become one and the name of the new layer will be whatever the name was of the layer that was merged into.
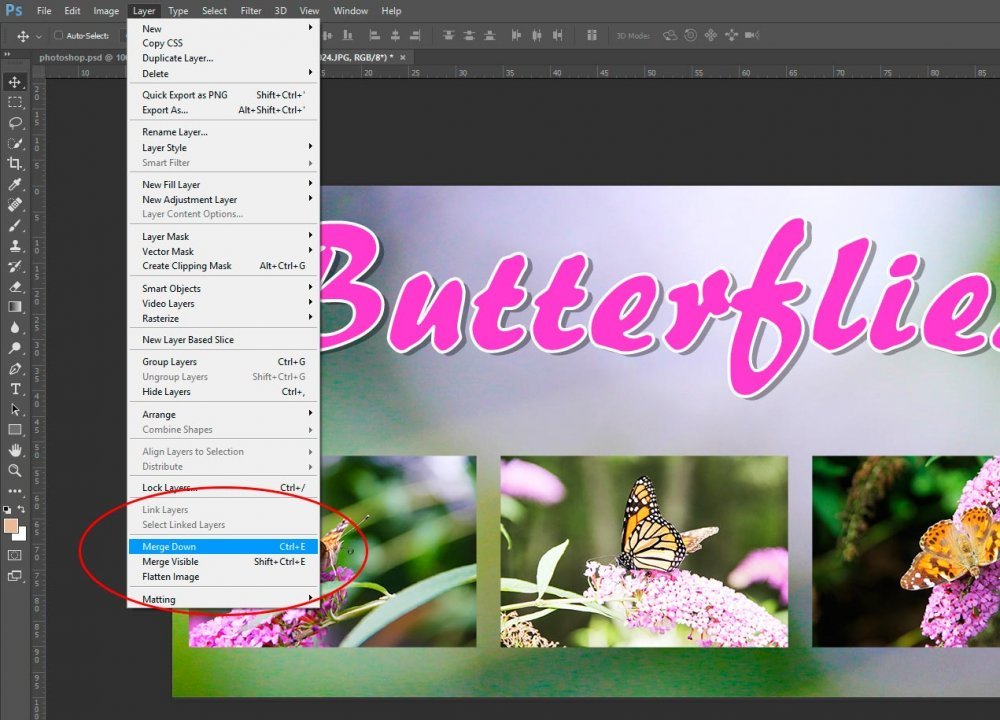
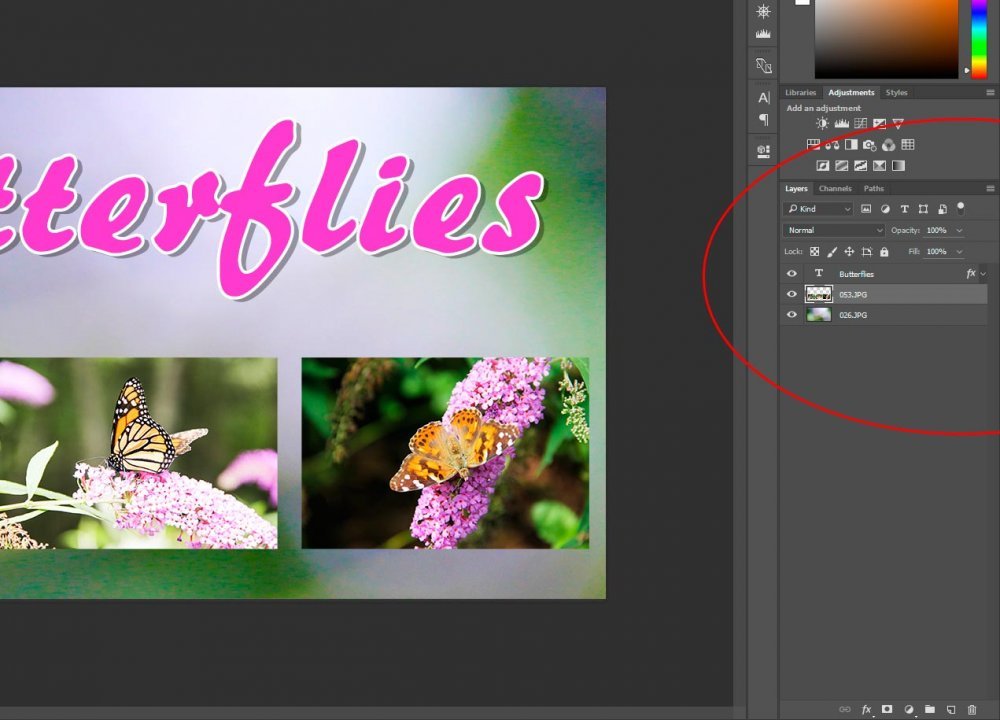
In my case, I performed this action once and then I did it one more time. I accomplished the task of merging my three photo layers into one, as can be seen in the screenshot below.
A second and much faster method is to highlight each of the layers you’d like to merge.
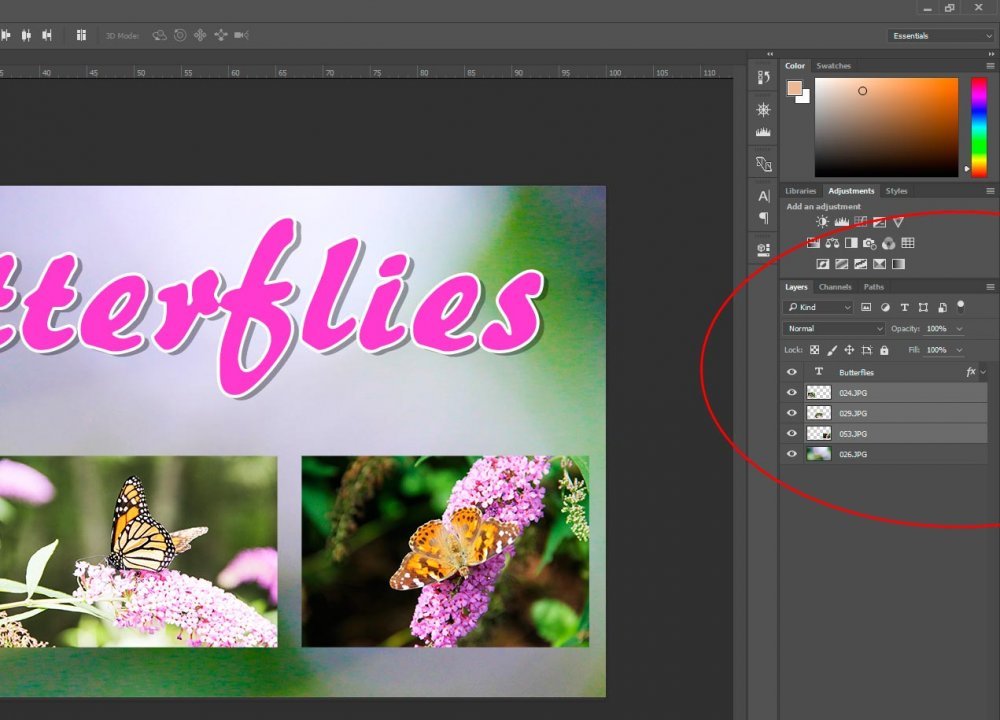
And then head back up to the Layers > Merge Layers menu and click. This will give you the same result. The three selected layers will be merged into one. The only difference between this method and the last one is the name of the final layer. While using the last method will name the layer the name all the way at the bottom of the list, this will name the final layer whatever was given to the very top one.
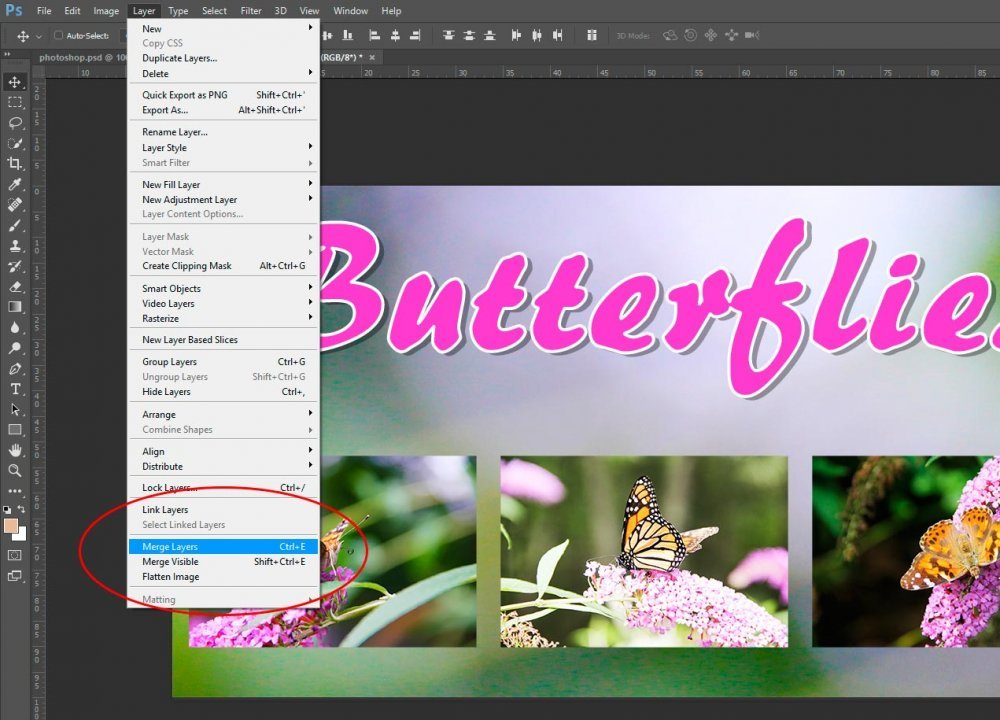
As you can see, this is a much faster way of merging layers, especially if you’ve got a lot of them. It takes just a few steps. Also, if you’ll notice, the menu options changed. For the first method, only one layer was selected and the menu option was Layer > Merge Down. When multiple layers are selected, Photoshop automatically updated the menu option to Layer > Merge Layers. Just make note of that.
Flattening an Image
Flattening an image is really easy. Actually, I’d say it’s too easy. Someone may make a mistake and flatten all their hard work. There should be a warning in there or something.Anyway, to flatten all my layers into one background layer, all I need to do is to head up to the Layers > Flatten Image menu item and select it.
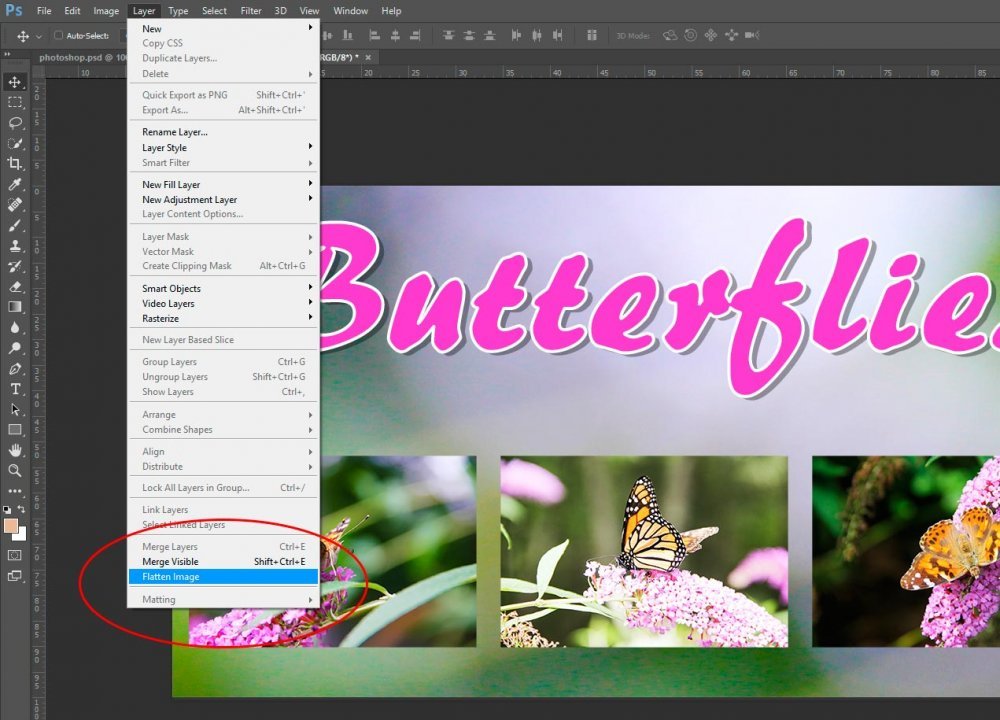
Once I do this, I’ll end up with only one layer as can be seen in the screenshot below.
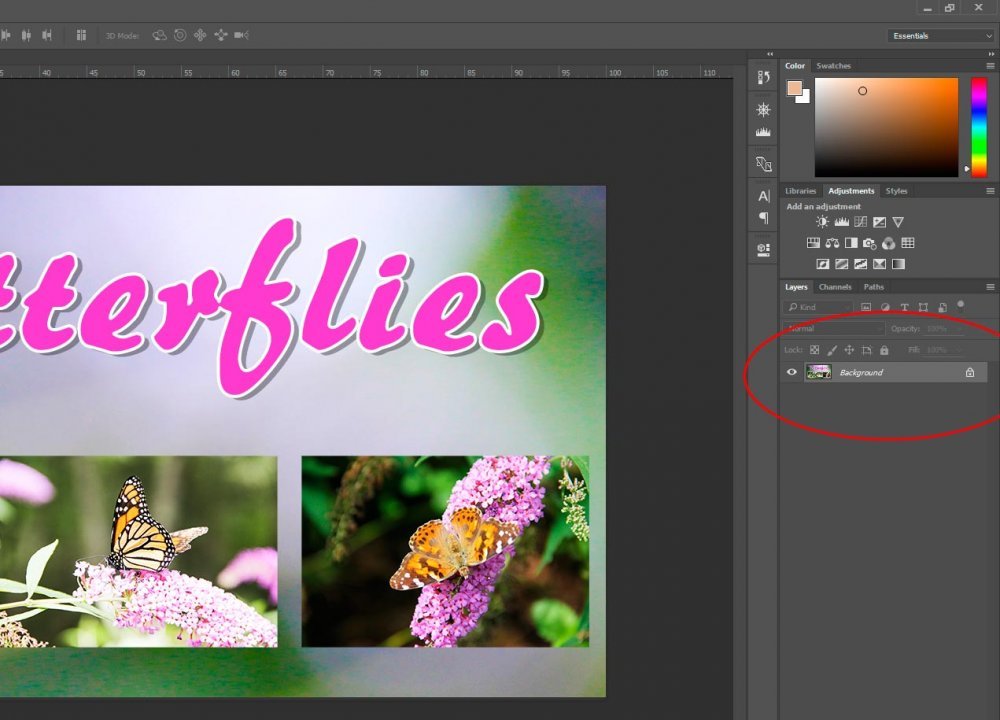
See, it’s even named Background.
