Search

Transform & Free Transform Tools in Photoshop

  • Thread starter CampFireJack
  • Start date
CampFireJack

CampFireJack

Member
Joined
May 9, 2021
Messages
118
Reaction Score
1
Points
16
  • #1
using-free-transform-tool-adobe-photoshop.jpg

Once you get into and work with Adobe Photoshop for a few months, you’ll find yourself using the Transform and Free Transform tools very frequently. Most likely, you’ll become comfortable with one or the other and you’ll effortlessly slide into an effective routine and will probably never look back. These tools are easy to grasp and are extremely useful. With just a few clicks, you can easily resize, twist and skew an image.

In this post, I’ll show you what these tools look like and I’ll give you a taste of what they can accomplish. Of course, their limits are constrained by your imagination, so it’s important to learn what I cover below, but it’s also just as important to stand back and look at the possibilities. Like all tools in Photoshop, they don’t work by themselves. It’s the user that matters most.

Original Image​

For today’s post, I’ll be using a photo of a light bulb on a mirror. Since the bulb is round, it’ll be a good example subject as we move through the different areas of what these these transform tools can do. Here’s the photo.

light-bulb.jpg

Duplicating the Background Layer​

When I work on a photo like this, I always make sure to create a copy of whatever it is I’m working on. In this case, it’s a photograph which is the background layer. Since I’m going to be bending this photo all over the place as an example of what the transform tools can do and since Photoshop is destructive, meaning the changes I make are permanent, I would like to have a backup. To create that backup, I simply click and drag the Background layer that’s in the Layers panel and drop it on the small Create New Layer icon that’s down below. I circled these areas in red. Hint: the Create New Layer text appears when you roll over the icon.
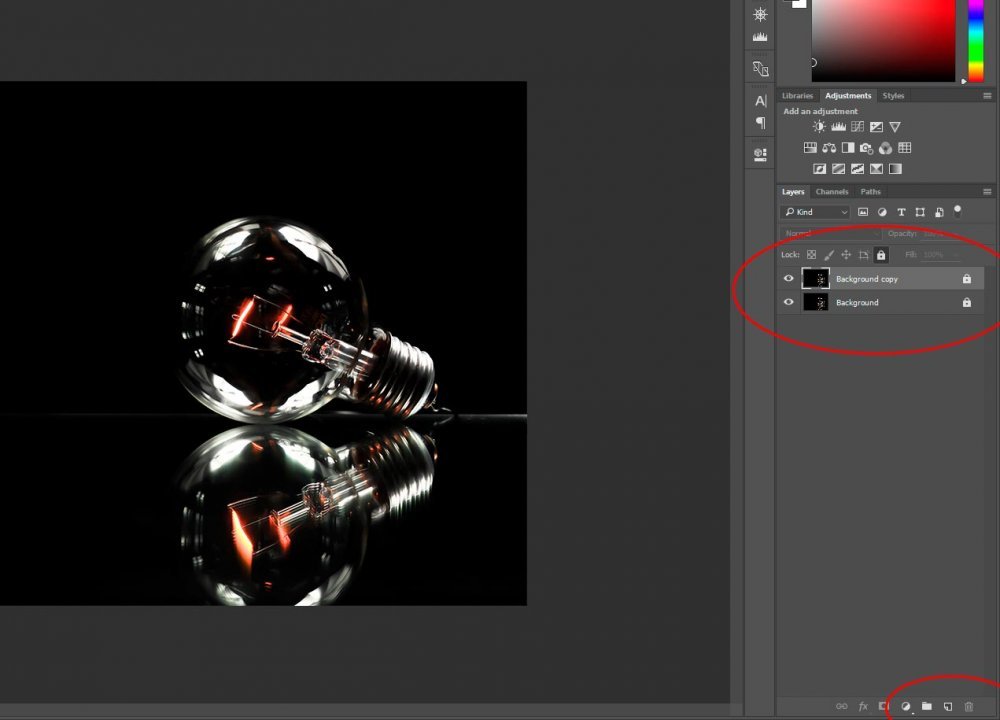
duplicating-background-layer-adobe-photoshop.jpg

Once you drop the layer on that icon, a new layer will appear above the one you just duplicated. Now, if you look at the top layer in the Layers panel, you’ll see that it’s locked. There’s a small lock toward the right of the layer. That lock is going to stop me from doing anything to it. Since I want to work on the layer, I’ll need to click on that lock to remove it. Also, since I want you to view the changes I make to the top working layer, I’m going to reduce the opacity of the bottom layer to 90%. In order to do that, I’ll need to unlock that layer as well. I could just as easily have unlocked the background layer before I copied it, but honestly, both of these methods give the same result (plus, I forgot).

Locating the Transform Tools​

In order to use a transform tool on a layer, that layer must be selected. Since I already did that, I can head up to the Edit > Transform, and in this case, Scale menu item and select it.
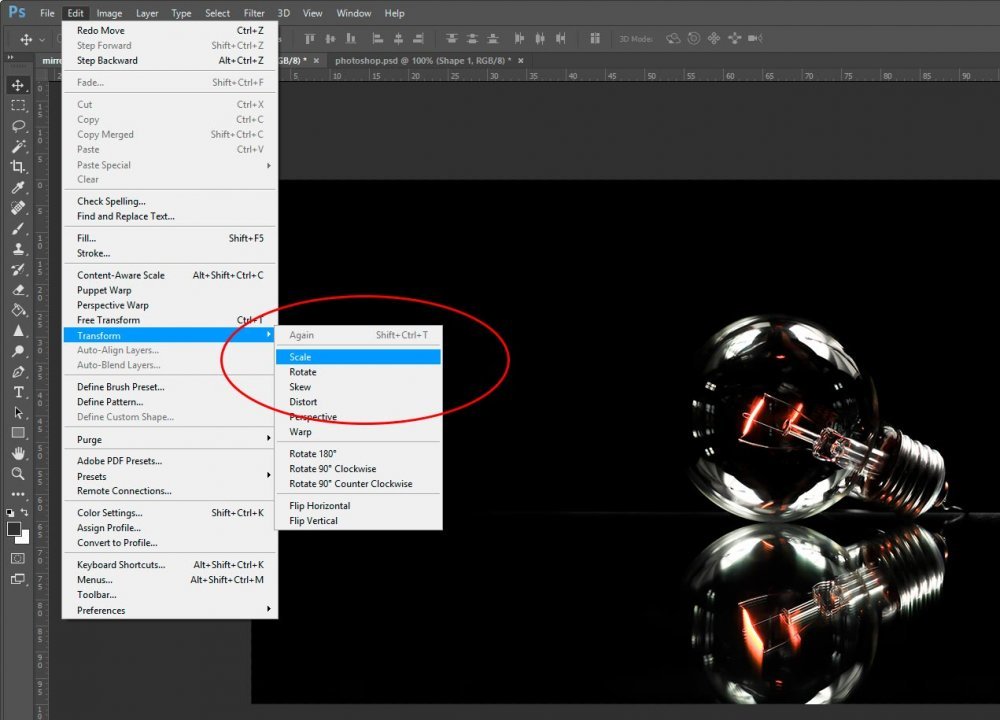
edit-transform-scale-menu-item-adobe-photoshop.jpg

Scaling the Photo​

There are a bunch of ways to scale a photo. After you choose Scale from the Transform menu, you’ll see a box appear around the item in your layer. It looks like this:
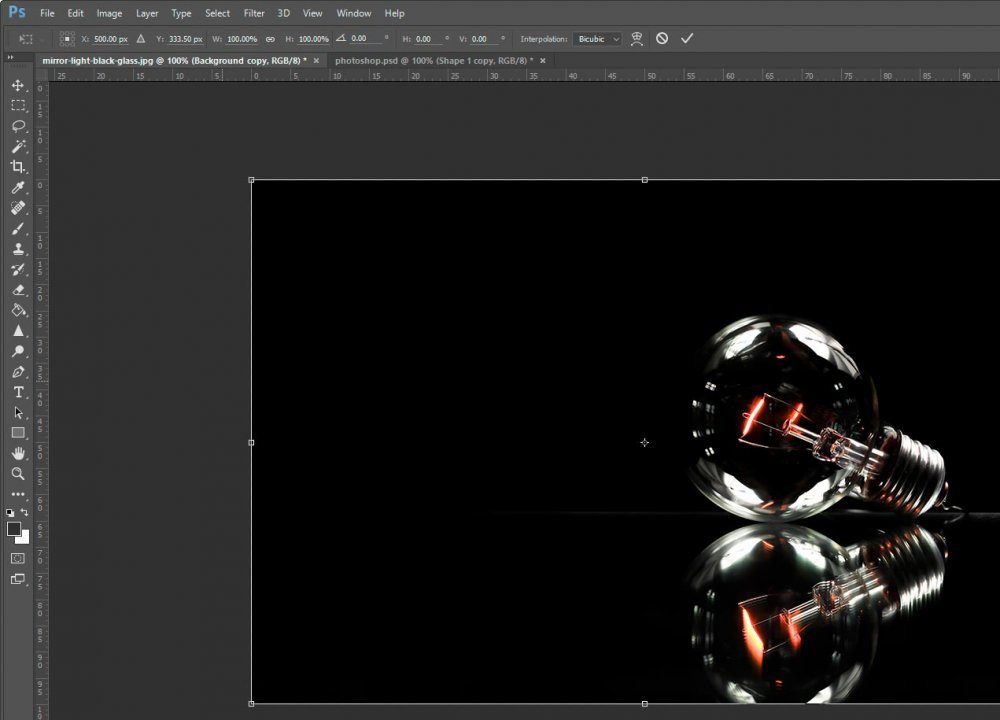
scale-photo-adobe-photoshop.jpg

As you can see, there is now a thin line surrounding the image. Along that line are anchor points. There is one at the center of each side and one at each corner. If I grab (click and drag) a corner anchor point, I can scale the image’s width as well as height. If I grab a side anchor point, I’m limited to either the width or the height.

What’s really neat is that if I grab a corner anchor point and hold down the Shift key, the proportion of the layer will remain intact, as opposed to leaving the door open to distortion. Just as neat is that if I hold down the Alt key, I can scale from the center of the image, meaning the image will shrink equidistant from all four sides. If I hold down both the Shift and Alts keys, I can grab a corner anchor and scale from the center while keeping the proportion intact. Take a look at that below.
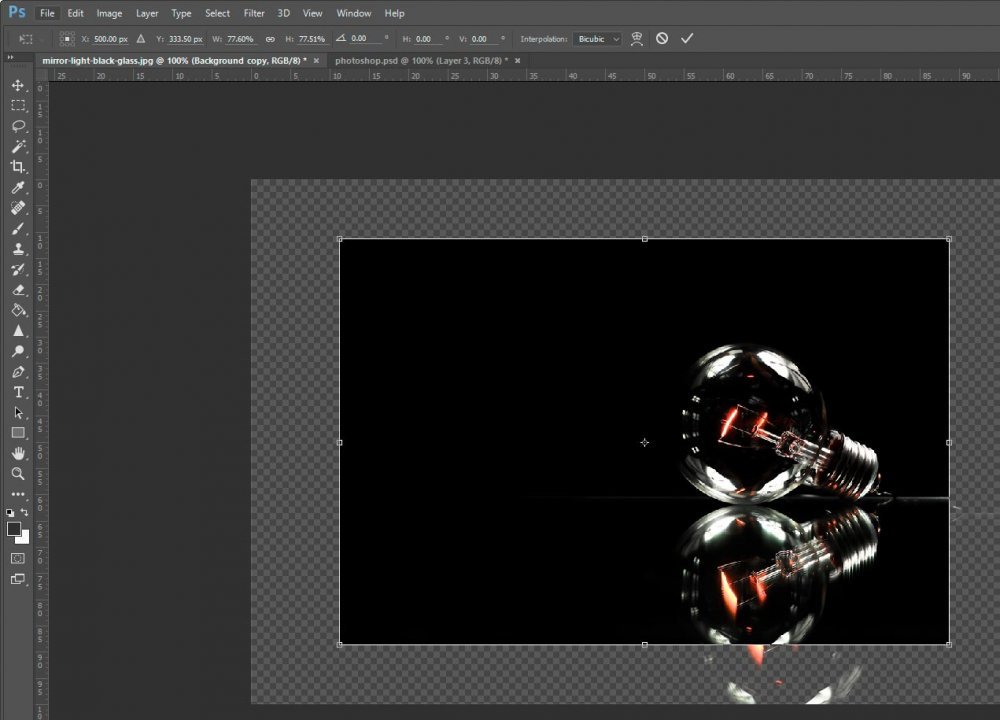
scaling-proportion-adobe-photoshop.jpg

Now you can see why I lowered the opacity of the bottom layer. Since the photo is so black, we wouldn’t have been able to see any scaling.

Rotating the Photo​

Right below Scale up in the menu are a few other choices. We’ll talk about Rotate next. To rotate an image, select that from the top menu. Once that’s done, the same line will appear outside the contents of the chosen layer. If you move your mouse to the outside of the lines, you’ll see that the mouse pointer turns into a curved double arrow. While holding down, if you move your mouse, you can rotate the image around the center anchor point.
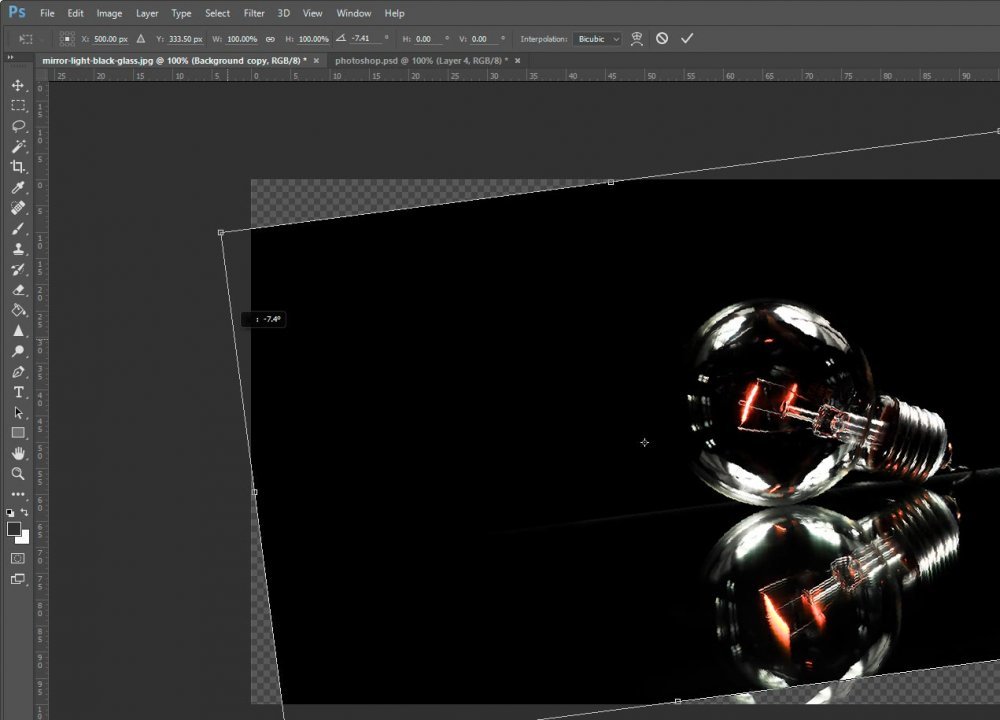
rotate-photo-adobe-photoshop.jpg

If I click and drag the center anchor point somewhere else, I can rotate the photograph around that new center point.
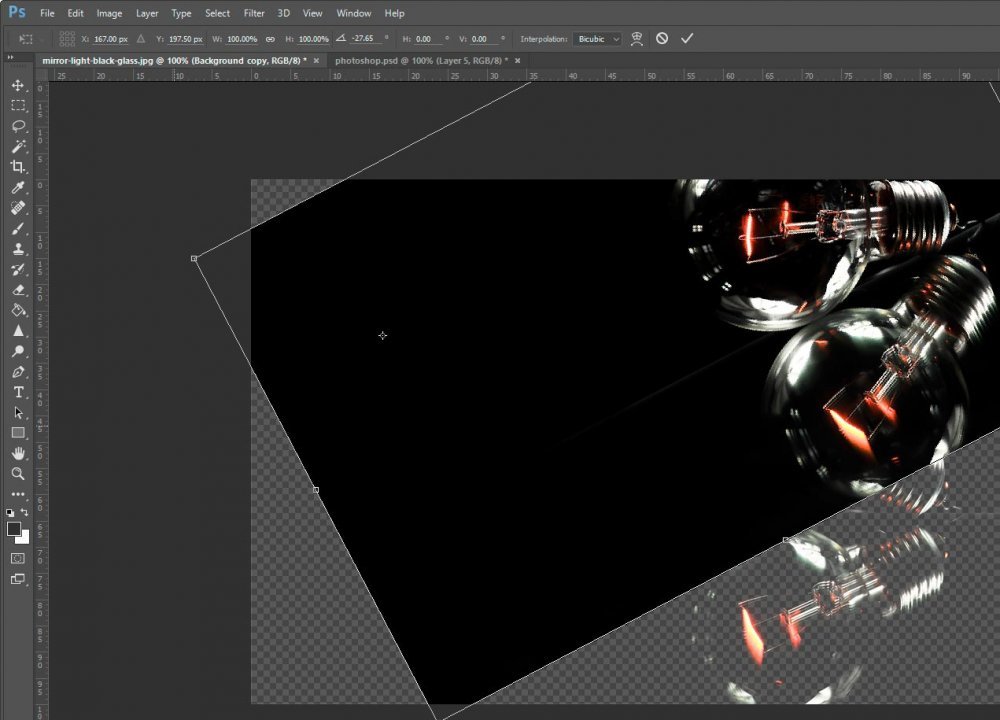
move-center-anchor-rotate-adobe-photoshop.jpg

Positioning the Photo​

Sometimes, while transforming an image, you’ll want to move it to a new location. To do this, all you need to do is to click somewhere inside the box outlines (not on any of the anchors) and drag to your new location. It’s really easy. In the screenshot below, I scaled the photo down while keeping its proportion by holding down Shift. Then, I dragged the layer to the upper left corner.
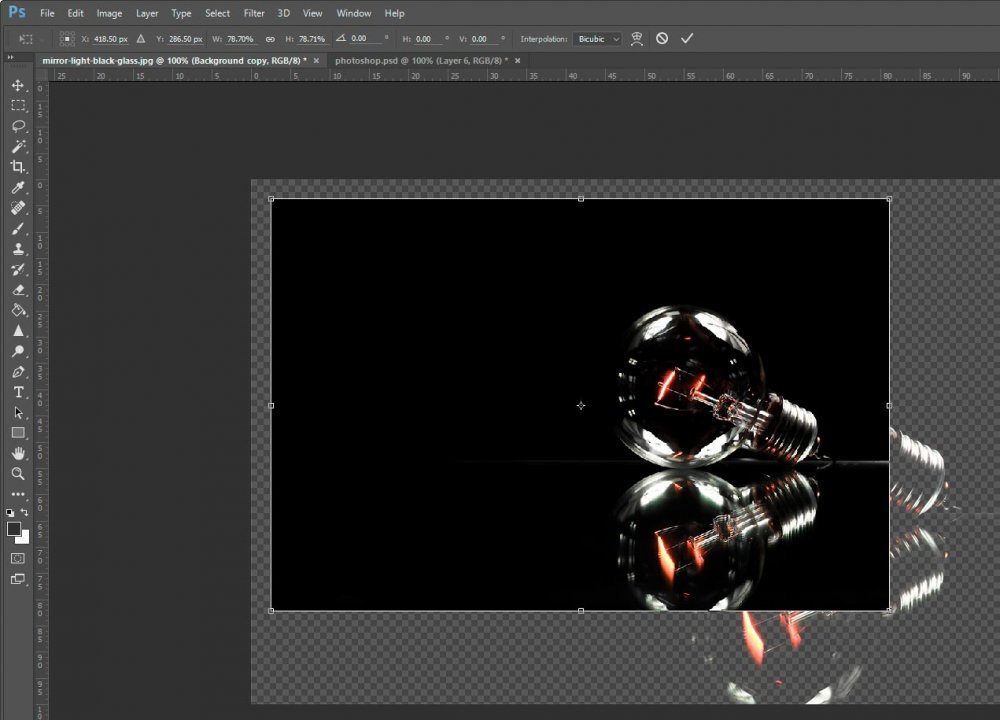
repositioning-photo-adobe-photoshop.jpg

Straightening the Photo​

If you rotate a layer and then hit Enter on your keyboard to apply your changes, for one reason or another, you might want to straighten it back out later on. To do this by hand is a real pain. A better way to straighten a layer that you rotated is to type (zero) into the Set Rotation box in the top options bar.
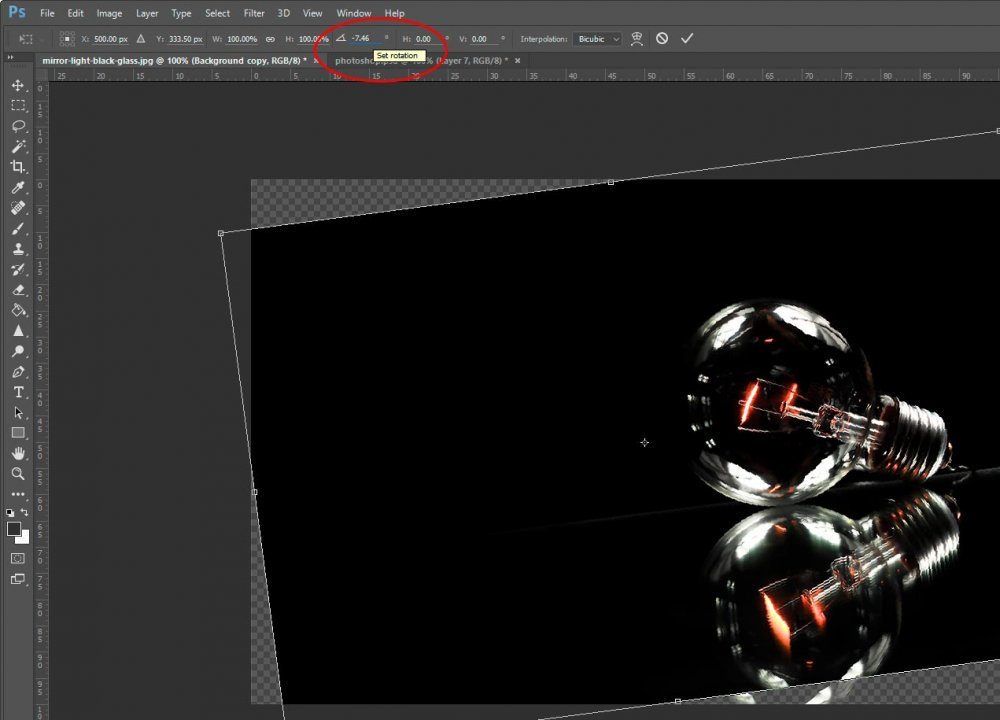
set-rotation-transform-adobe-photoshop.jpg

Once you do that, the rotation will return back to its original setting.

Skewing the Photo​

Our next option is to Skew the photo. If we choose this and grab an anchor on the outer box, we can move the top and bottom left and right and the sides up and down.

skew-photo-adobe-photoshop.jpg

What’s pretty cool is that if you grab a corner anchor, you can skew just the corner by moving the anchor left, right, up or down. Check out this screenshot.
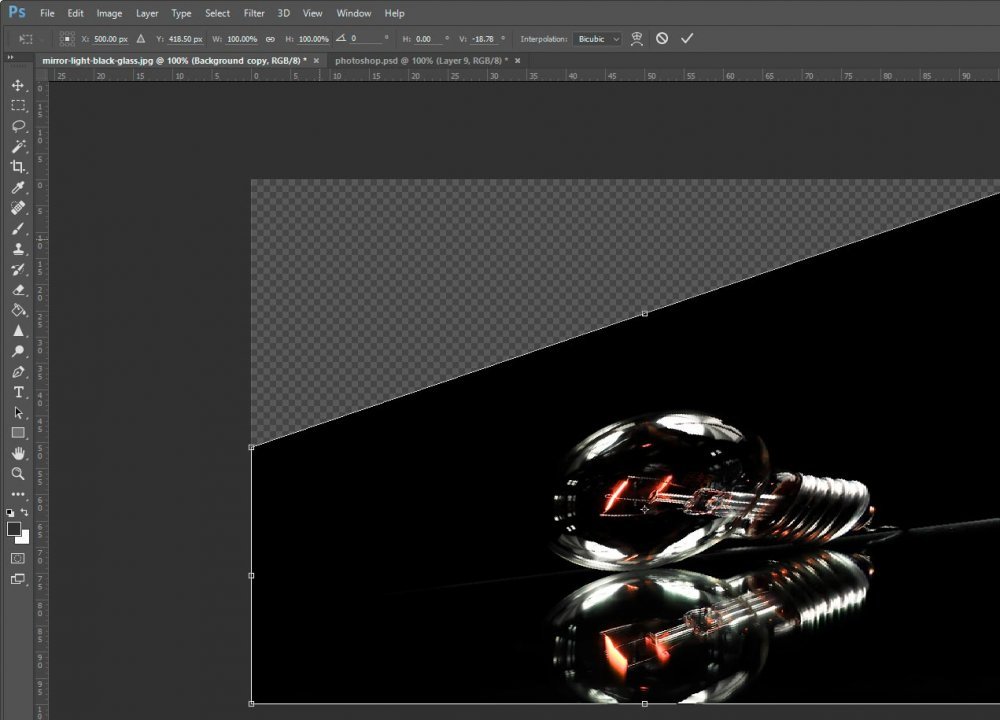
skew-from-corner-adobe-photoshop.jpg

Distorting the Photo​

If we continue on and select Distort from the menu above, we can pretty much do anything we want to the photo. If we click and drag any of the corner anchors, we can move them any which way. If we click either the side, top or bottom anchors, we’re still limited to scaling the image as if we had chosen Scale.
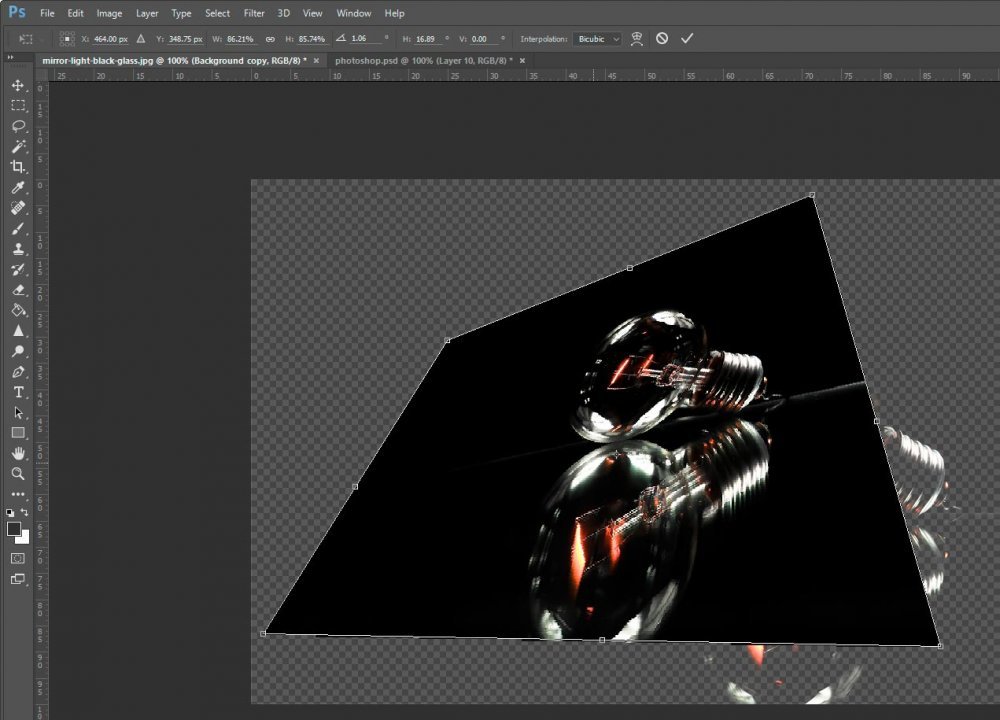
distort-layer-adobe-photoshop.jpg

Perspective Transform​

Almost finished. If we choose Perspective from the above menu, we can make some rather interesting changes. If you click and drag any of the corner anchors, and move your mouse, the anchor that’s opposite will move as well. It’ll move in the opposite direction though. For example, if you click the top left anchor and drag it to the right, the top right anchor will move to the left, creating a trapezoid. It’s pretty neat. But, if you click and drag any of the side anchors, you’re limited to skewing them.
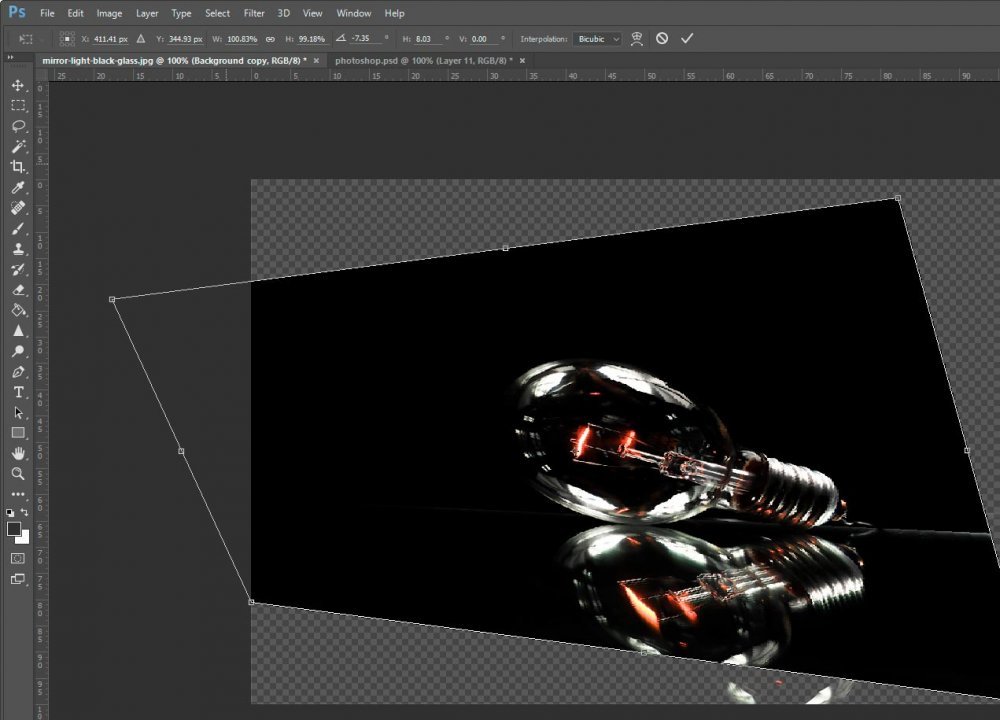
perspective-transform-adobe-photoshop.jpg

Warp Transform​

This last transform is wild. It’s called Warp and can lead you down a dark path. It’ll, somehow, have you sitting for hours trying to create something cool, only to delete what you’ve done to start over. And next time, you probably won’t even use the tool. That is, until you’ve gotten over it and agree to make slight changes to your images as opposed to gigantic ones.
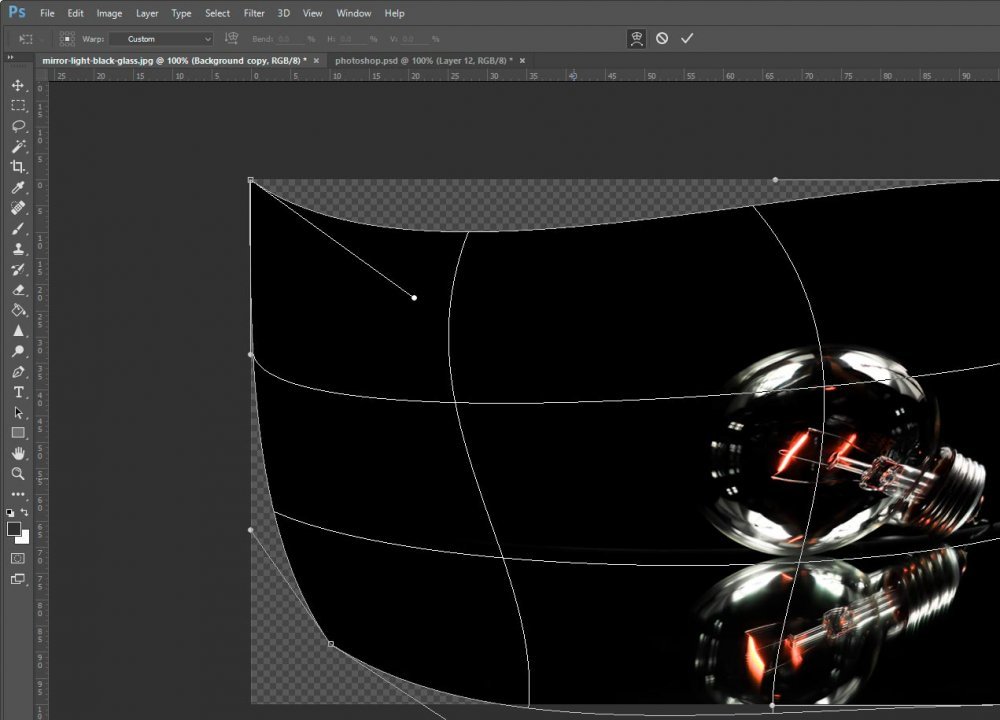
warp-transform-adobe-photoshop.jpg

See what I’m talking about? With Warp transform, you can click anywhere inside the layer and drag to smoothly distort everything around the point you clicked. If you click on a corner, two handles will appear. You can drag those handles around to bend the layer edges. Also, you can drag the corners themselves anywhere you want. I suggest you play with this one for a while to get used to it.

Free Transform​

When working in Photoshop, I usually head straight to Free Transform instead of Transform (Edit > Free Transform in the top menu). It’s really fast and easy to get around.
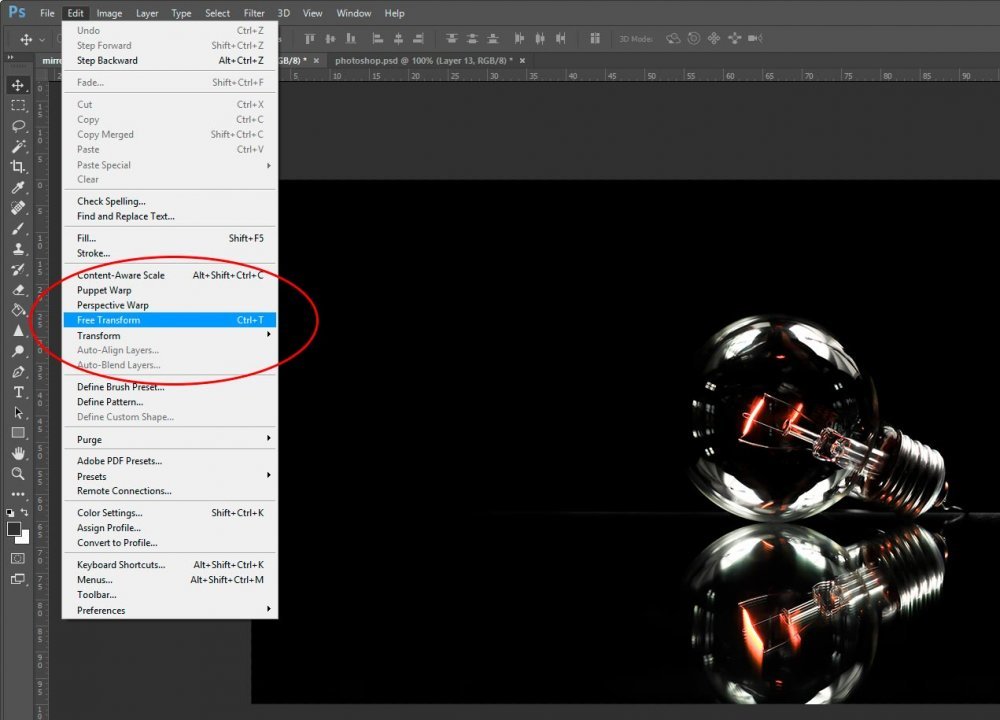
free-transform-adobe-photoshop.jpg

While you can accomplish many everyday tasks using Free Transform, its true power lies in the fact that once you select it from the top menu, you can right-click inside the layer area and choose all the options we just talked about above from a pop-up box.
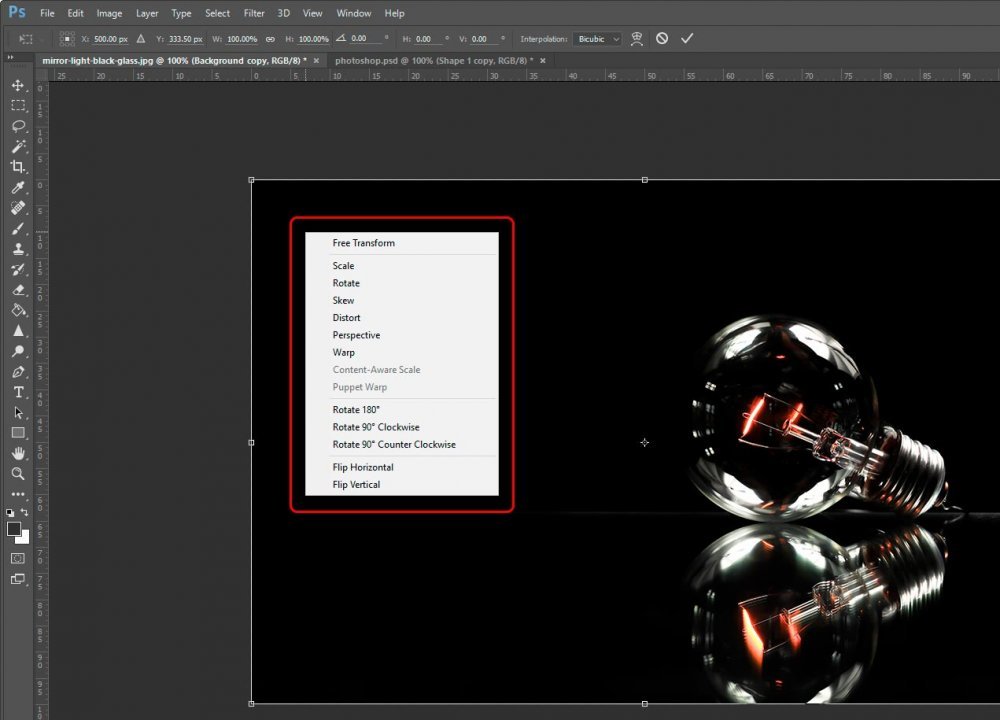
free-transform-right-click-adobe-photoshop.jpg

In addition to the above, you can rotate and flip the layer as well.

Options Bar​

You may not use this area too often, but you might want to make minor exact changes in your transform from time to time. I wanted to quickly mention the Options Bar to accomplish these types of changes.
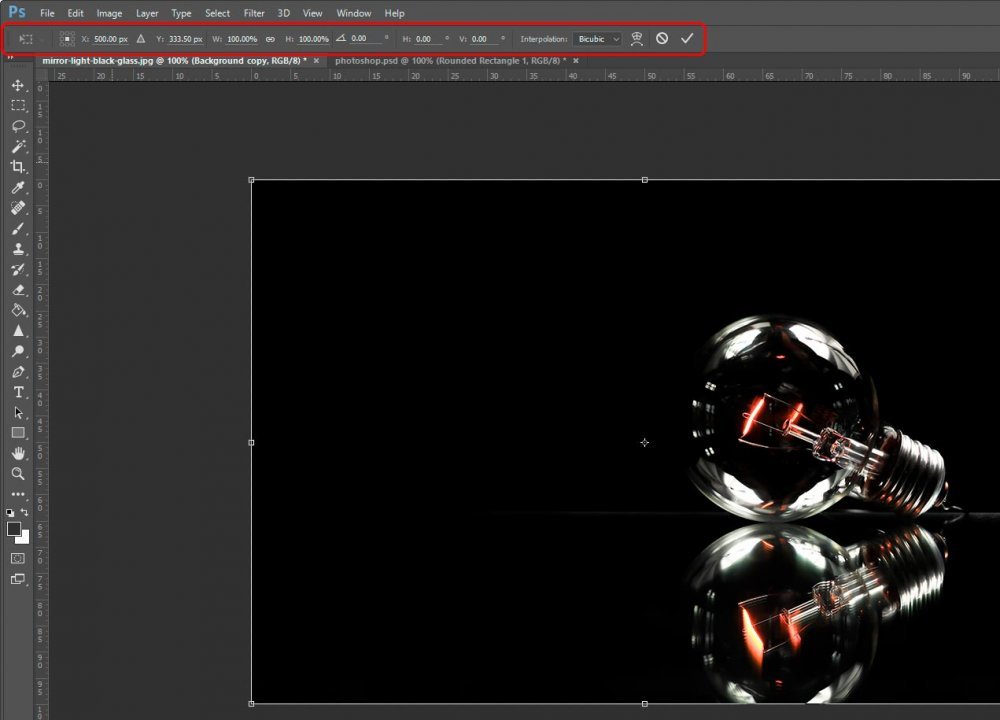
transform-options-bar-adobe-photoshop.jpg

If you look through the fields in the Options Bar, you’ll find that they all apply to some sort of transformation. Like I said though, I mostly use these for minor nudges or large sweeping transforms, such as rotating a layer exactly 45 degrees, but you may find more uses for it than that. Also, you can apply or escape your transform from this bar as well. Those buttons are over to the right. See directly below for more ways to accomplish this.

Applying & Escaping​

There is going to come a time when you want to apply all the transforms you made to your layer. To do this, you only need to push the Enter key on your keyboard. Conversely, there may come a time when you want to get the heck out of transform mode. You may have changed your mind and simply don’t want to do anything you once did. To undo all active transforms and to get out of transform mode, simply click the Esc key on your keyboard.
 
CampFireJack

CampFireJack

Member
Joined
May 9, 2021
Messages
118
Reaction Score
1
Points
16
  • #2

How to Use the Free Transform Tool in Adobe Photoshop​

I can’t even begin to tell you how many times I’ve pressed Ctrl+T on my keyboard through the years. Hundreds, if not thousands of times – for all sorts of reasons. If you aren’t aware, Ctrl+T (or Command+T on the Mac) is used to activate the Free Transform tool in Adobe Photoshop. It’s an all around super versatile tool that’s been around for a long time.

Many editors are used to visiting the Edit menu and then choosing the transform tool of their choice when they want to manipulate an object in some way. For instance, you can select many different options from this menu, such as Scale, Rotate, Skew, Distort, Perspective and Warp. I’ve actually talked about these tools in a previous post. If you’re interested in learning about them, click below.

Using the Transform & Free Transform Tools in Adobe Photoshop

In today’s post, I’d like to focus only on the free transform version of all the transform tools in Adobe Photoshop. As I said above, there’s a lot you can do with this one tool and there’s a way you can access the rest of the transform tools if you need them. Other than getting to them via the Edit menu.

Demo Photo​

For this post, I’ll be using a beautiful demo photo of a man looking towards the mountains.

man-looking-mountains.jpg

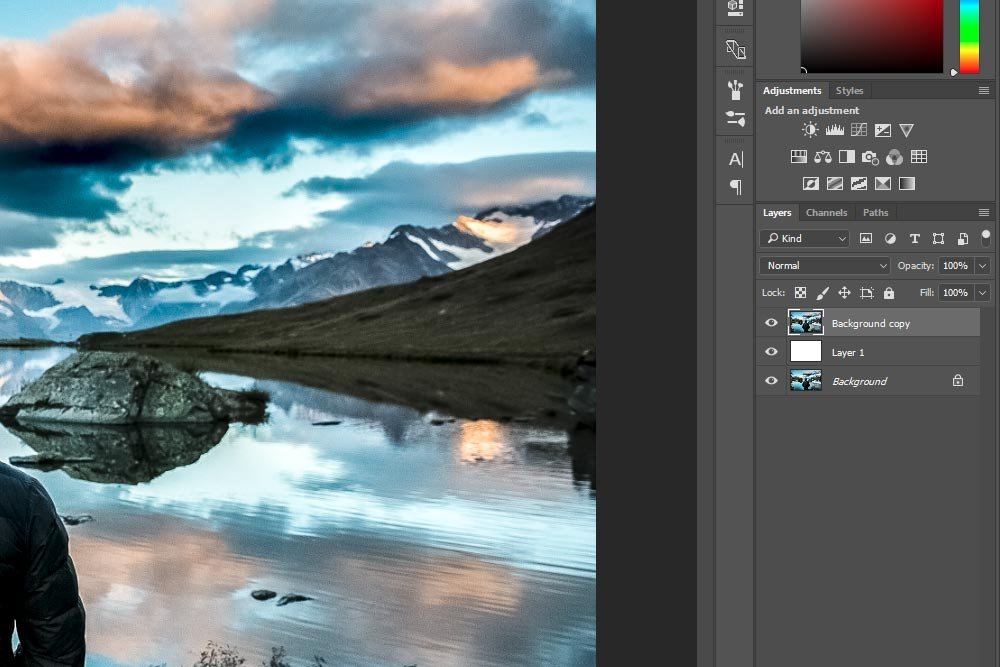
Basically, I’ll just duplicate this image background layer in Photoshop and then create a new layer and fill it with white. I’ll do this so I can work with the image layer and the Free Transform tool. I wouldn’t be able to do that if I kept it as the background layer. Here’s how my Layers panel will look.

layers-panel.jpg

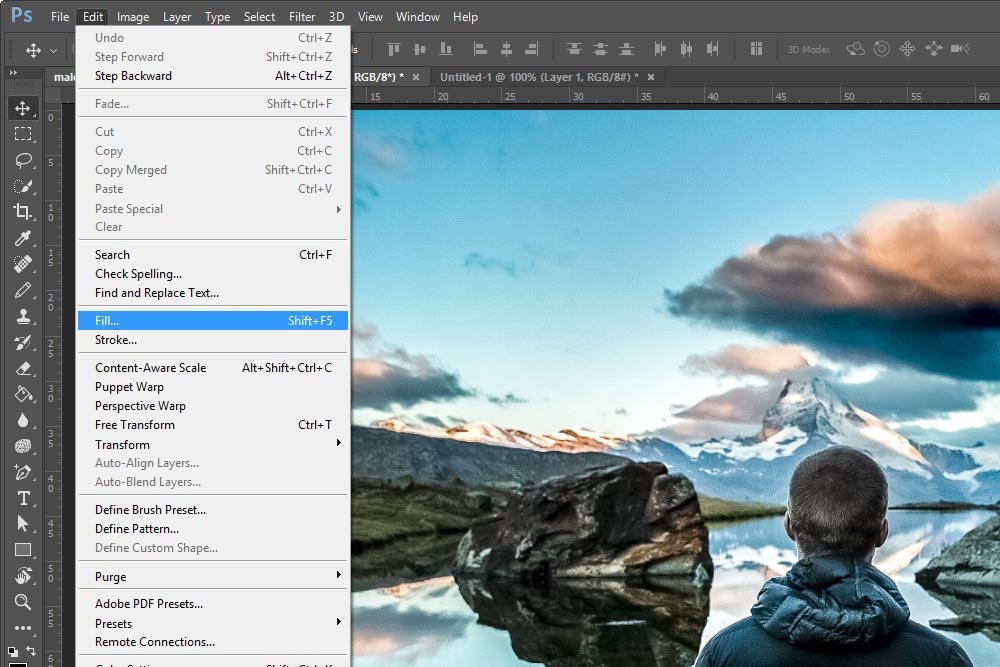
To duplicate the background layer, I dragged it down to the bottom of the Layers panel and dropped it on top of the Create New Layer icon. That gave me two identical layers. Then, I clicked on the Create New Layer icon with my mouse, which gave me an empty layer. Finally, while that empty layer was selected, I went up to the Edit > Fill menu item and clicked.

edit-fill.jpg

When the Fill dialog box appeared, I click the drop-down and chose white.

fill-dialog.jpg

I clicked OK to apply the color white to the empty layer and then I dragged that layer so it sat between both image layers in the Layers panel. That’s all I did to set this post up.

Activating the Free Transform Tool​

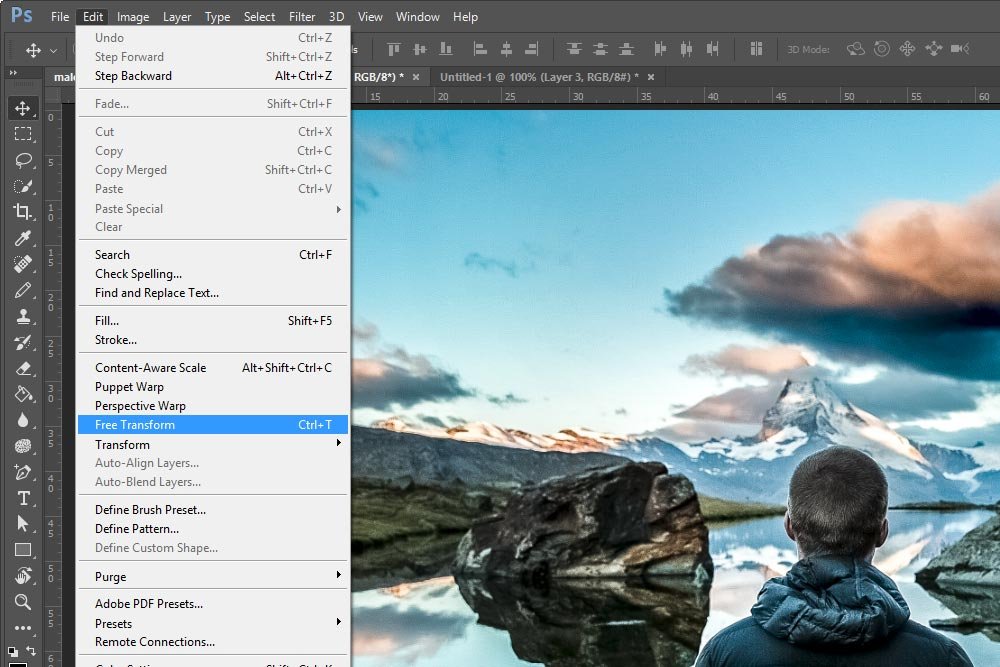
Now, I’ll activate the Free Transform tool. To do this, I’ll either press Ctrl+T on my keyboard or I’ll head up to the Edit > Free Transform menu item and click.

edit-free-transform.jpg

Trust me when I say this, just use the keyboard shortcut. You’ll be using it so much, the menu item will just waste time.

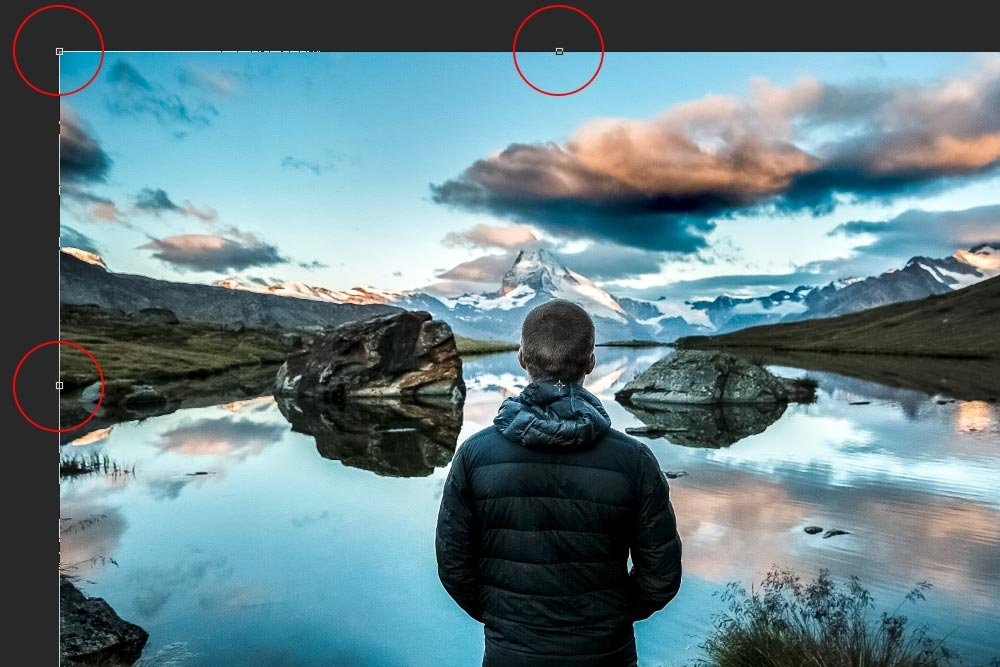
Anyway, once this tool is activated, an outline with a few handles will appear around the object in the layer you’re transforming. I’ve outlined these handles in red in the screenshot below.

transform-handles.jpg

Resizing the Layer Object​

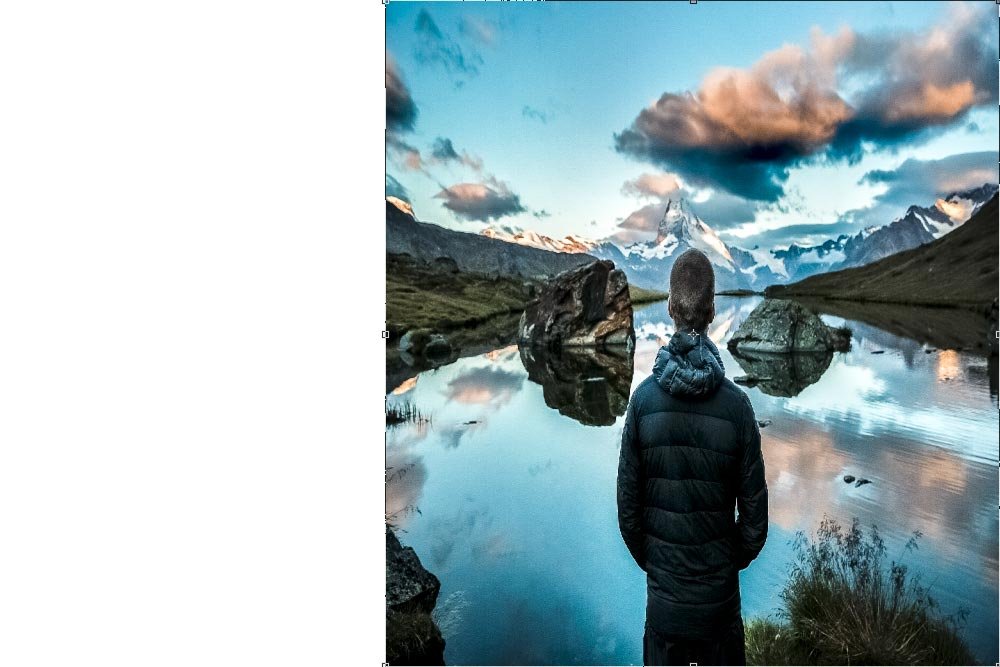
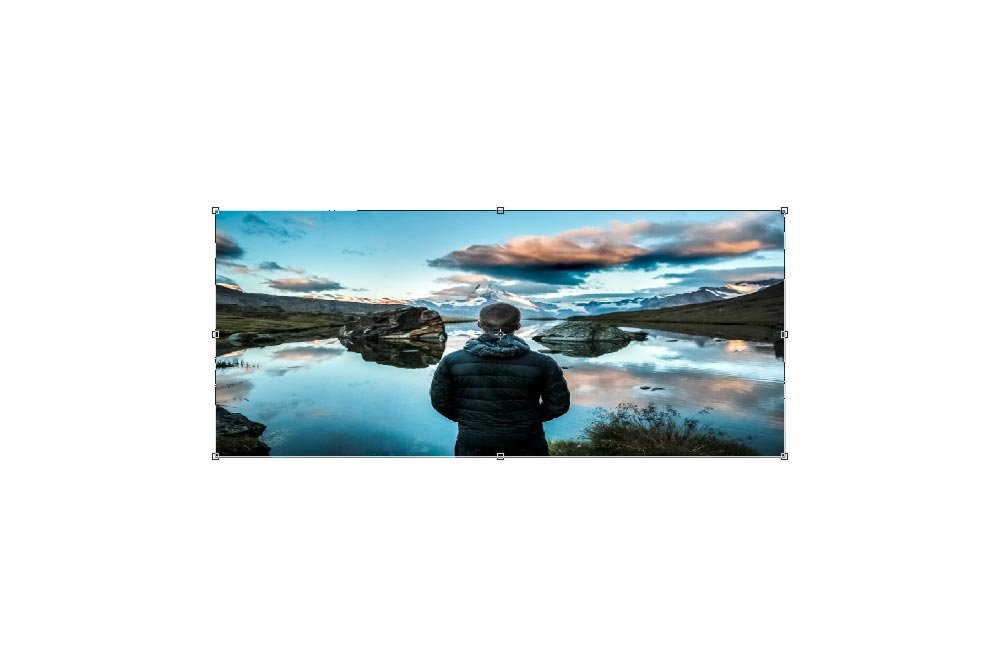
I’d say the most common use of this tool is to scale, or resize, something. The reason for this is because it’s so easy to do. Also, people need to constantly resize things. To resize an object in an image using the Free Transform tool, all you need to do is to click on one of the handles that are outlining the object and drag. So, if I clicked and dragged the handle on the left side of this picture, I can make it more narrow.

scaling-narrow.jpg

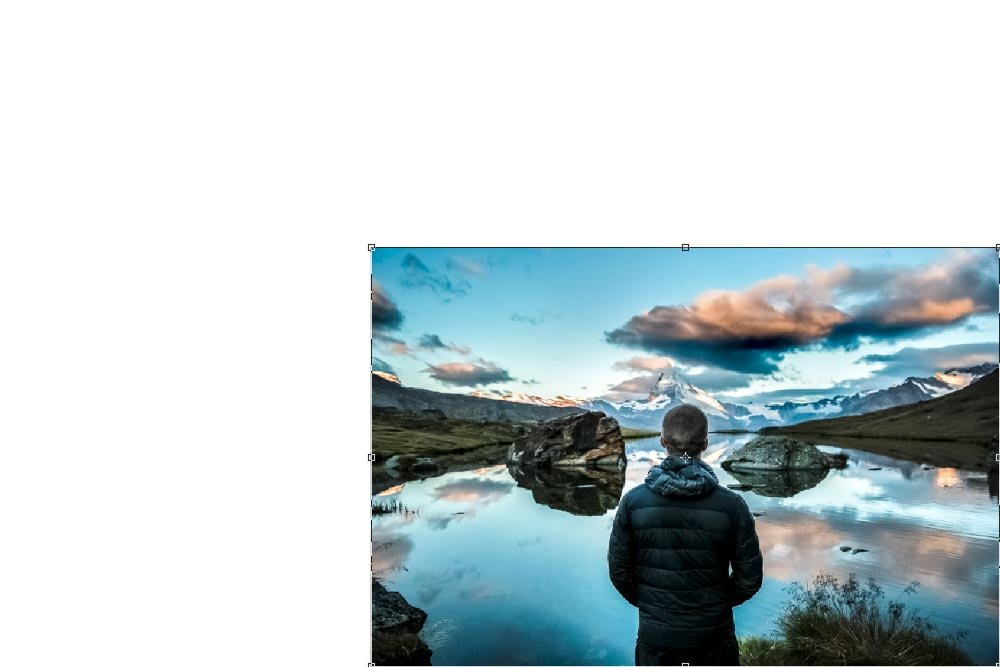
I could do the same thing from the top and drag down to scale this image wide. Also, I could drag any one of the corners in or out to change the entire dimension of the image. The issue with free-scaling like this, however, is that photos become distorted very quickly. Oftentimes, it’s best to constrain the proportions of an object will altering its dimensions. To do this, simply hold down the Shift key while dragging a corner and dragging it towards the center of the image or away from the center. Using the Shift key will lock the original dimensions in and you can make the object any size you’d like.

Below, I’ve held down the Shift key while dragging the upper left corner towards the center of the image.

scaled-propotion.jpg

Another neat trick is to hold down the Alt key while dragging a corner. If you’ll notice in the screenshot above, I dragged towards the center of the image and the lower right corner stayed where it was originally. If I held down the Alt key while dragging the same way, all the corners would converge around the anchor point, or “transformation origin point.” I’ll do this right now as an example.

scaling-towards-center.jpg

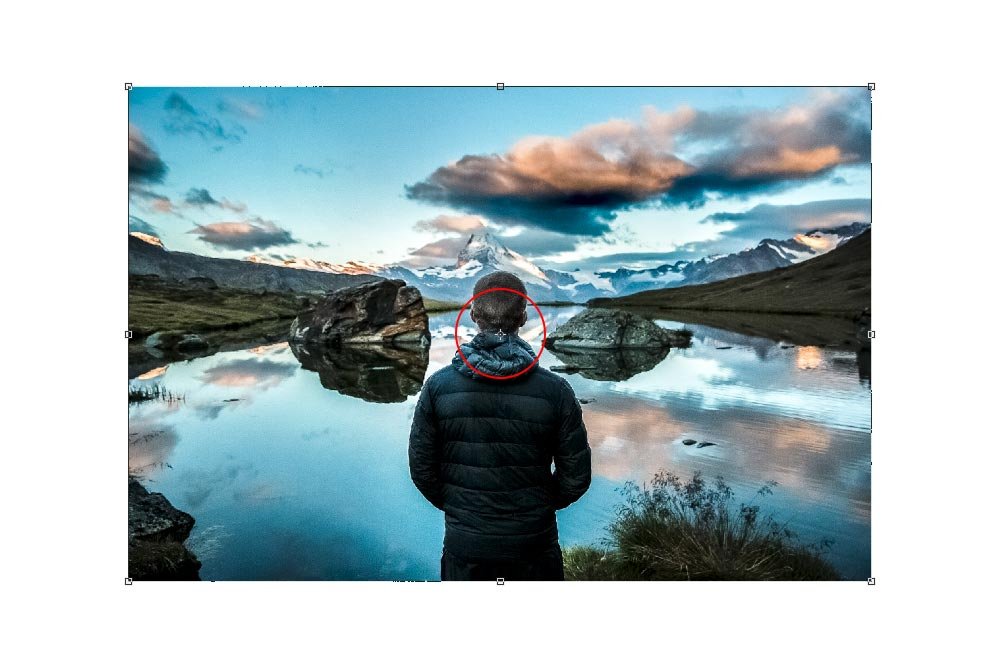
I bet I don’t even need to tell you what’s wrong with this picture. Even though I scaled down using the Alt key, the image still became distorted. So, while one trick worked, another failed. To scale down and keep the image locked to the origin point and to keep the photo locked into its original dimensions, I’ll need to hold down both the Shift and the Alt keys while dragging. This will reduce the size of the image while constraining its proportions while locking it to the origin point. I’ll even outline the origin point in red below.

scaling-origin-point.jpg

That’s beautiful. As I dragged, the photo maintained its proportions and all four corners moved towards the center of the image at the same time.

Moving the Anchor Point​

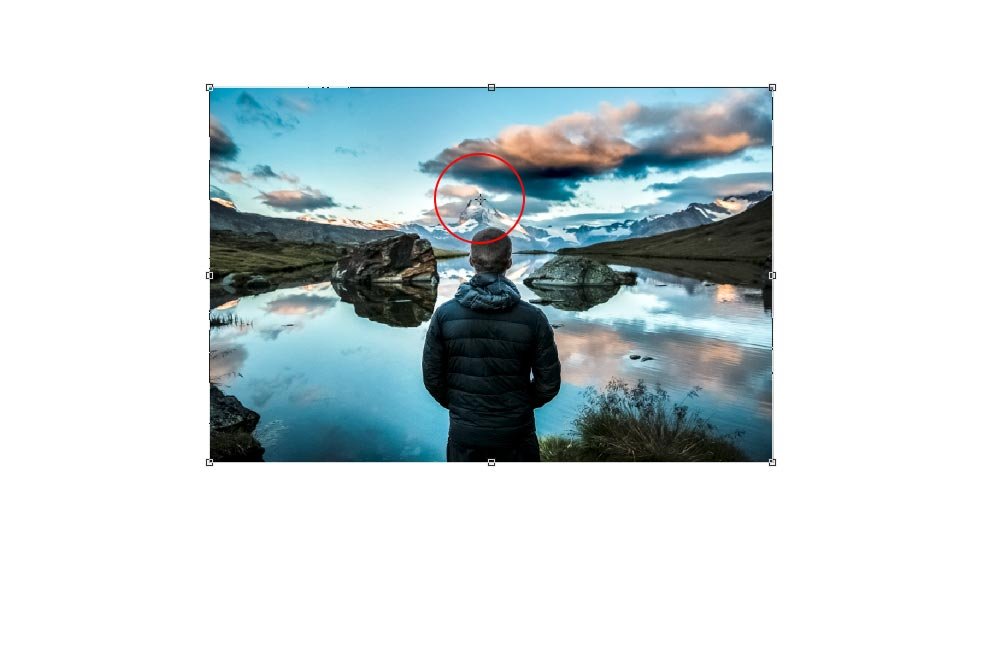
This center point has many names. It’s called a center point, an origin point and an anchor point. I prefer to use anchor point because the layer is anchored around that point. You can do a few different things with this point. Above, I showed you that you can scale an object and have that scaling be dictated by where the point is. To use this to our advantage, we can move the point anywhere we’d like, even outside the transformation boundaries. In this next screenshot, I’ll move the anchor point by clicking and dragging it to the peak of the mountain at the center of the photo. Then, I’ll click and drag to transform the photo like I did above.
moved-anchor-point.jpg

As you can see, when I scaled the image this time, it was centered around that anchor point. So when I dragged the corner inward, the photo shrunk down, but kept position around that point. This is very handy if you want to keep someone’s face as the center of the transformed photo. Or anything like that.

Also, just so you know, you don’t necessarily need to drag that center anchor point. You can hold down the Alt (Option on a Mac) key and simply click anywhere in the image and the anchor point will move to the position of your click.

Rotating the Layer​

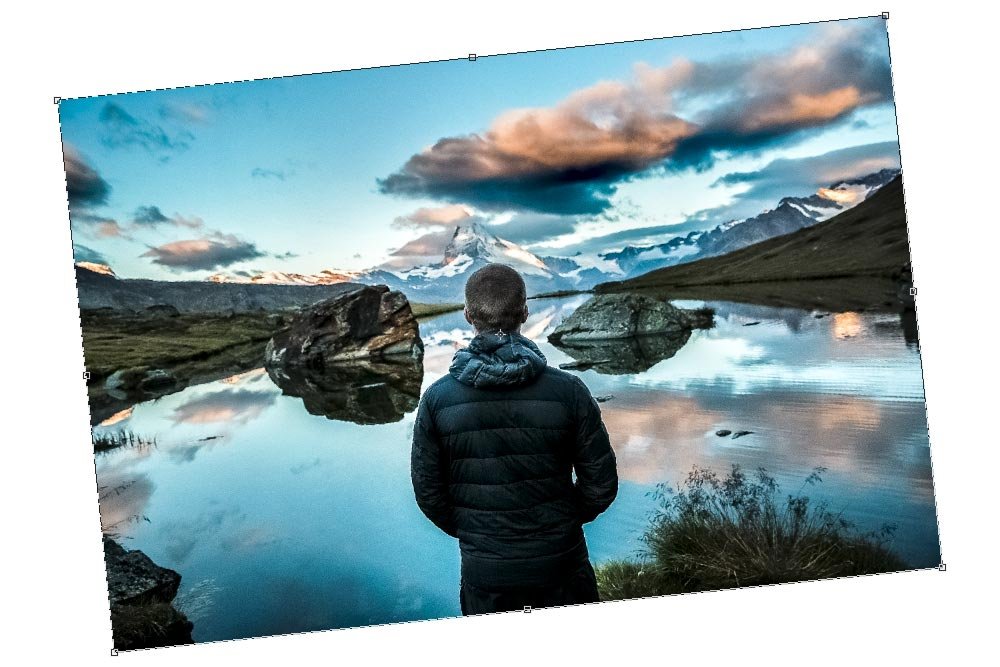
Rotating a layer with the Free Transform too is super easy. To do so, I’ll move my mouse outside of the transformation boundaries so the pointer turns into a curved double pointer. At that point, I can click and drag up or down and the layer will turn with my mouse.

rotated-layer.jpg

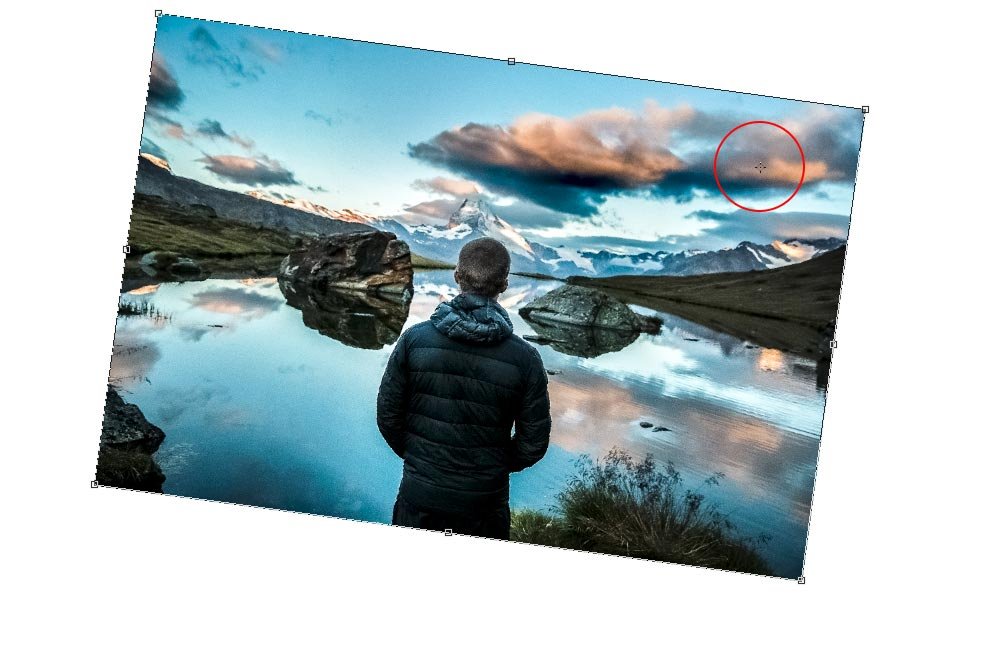
In some cases, you may want to rotate a layer around a certain point. Well, that’s easy. All you’d have to do is to move the center anchor point to the point you want to rotate around and follow the same instructions I just gave you.

In this next example, I moved the anchor point to the upper right portion of the photo. Then, I rotated the image. You can see how the layer rotated around that origin point. Think of it this way; pretend you hung a photo on a wall using a thumb tack. If you spun the photo around, the center of that spinning would be wherever that tack was. If you moved the tack, the photo would spin around that new point. The anchor point in Photoshop is the thumbtack.

rotating-around-center-point.jpg

Moving the Transformation​

This is a very short section. I wanted to tell you that, while transforming, you can move the layer anywhere you’d like by clicking inside the transformation boundaries and dragging the object around. It’s just like as if you weren’t transforming at all. Just click and drag with the Move Tool.

Further Options​

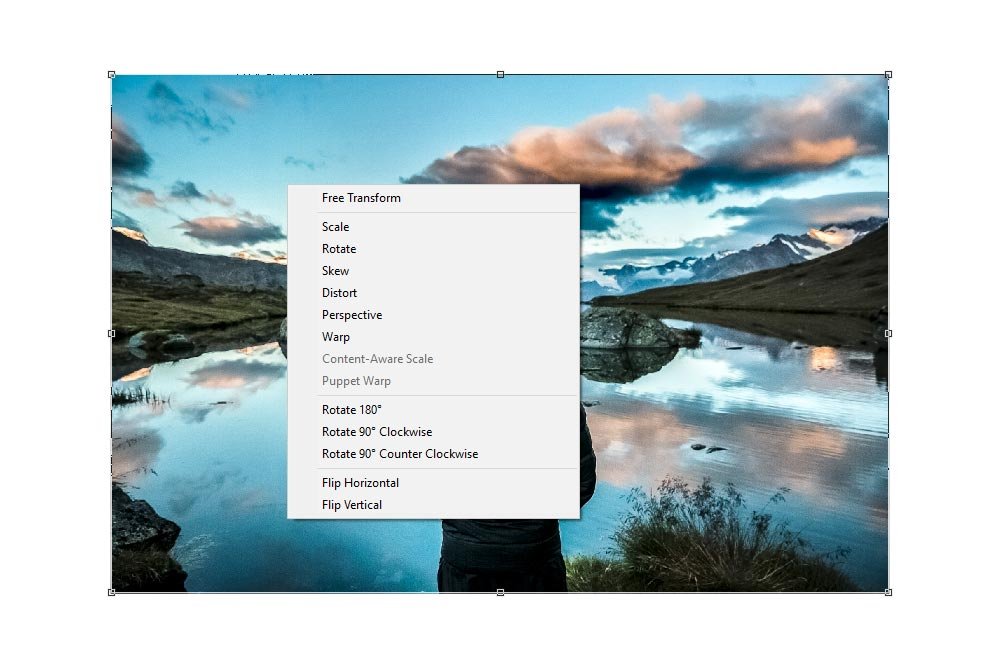
Remember back at the beginning of this post where I told you that you could access a heck of a lot of transform tools from Free Transform? Well, I’ll tell you how you can get to them. While transforming, if you right-click inside the boundaries, a menu will appear.

transform-options.jpg

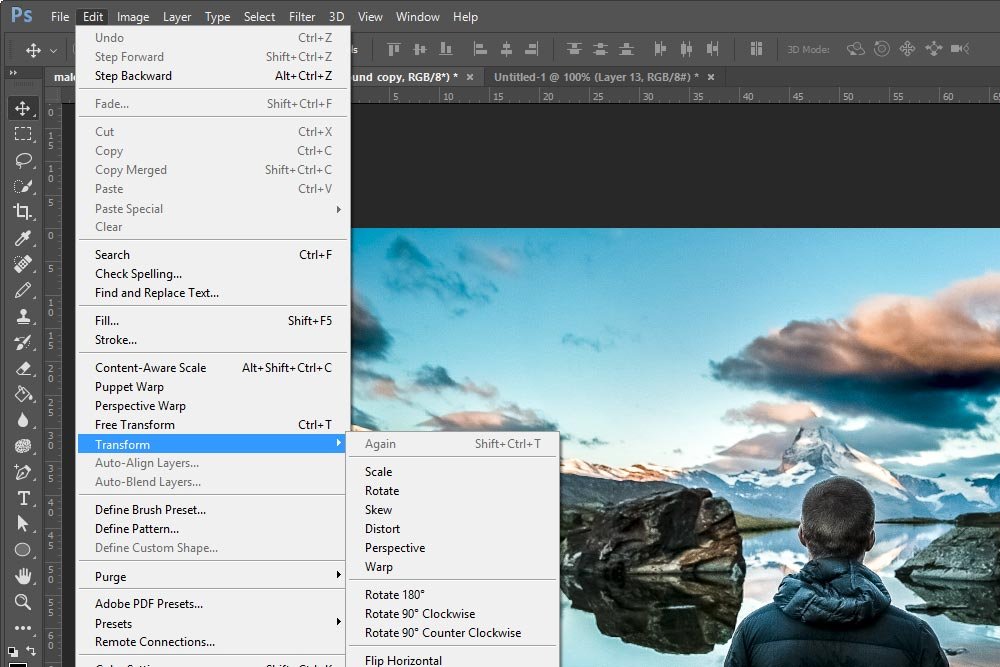
These options are the same exact ones you can access by using the Edit > Transform menu item. Check them out.

edit-transform-menu.jpg

Accessing these additional transform tools is faster when doing it via the Free Transform tool. Even if I wanted to use a tool that I could only get to through this menu, clicking Ctrl+T and then right clicking is more efficient than mousing up to the main menu and mousing around more after that. I’ll talk about some of the options that are available lower down on this menu in another post. If you’re interested in the upper ones, please read this post.

Confirming the Transformation​

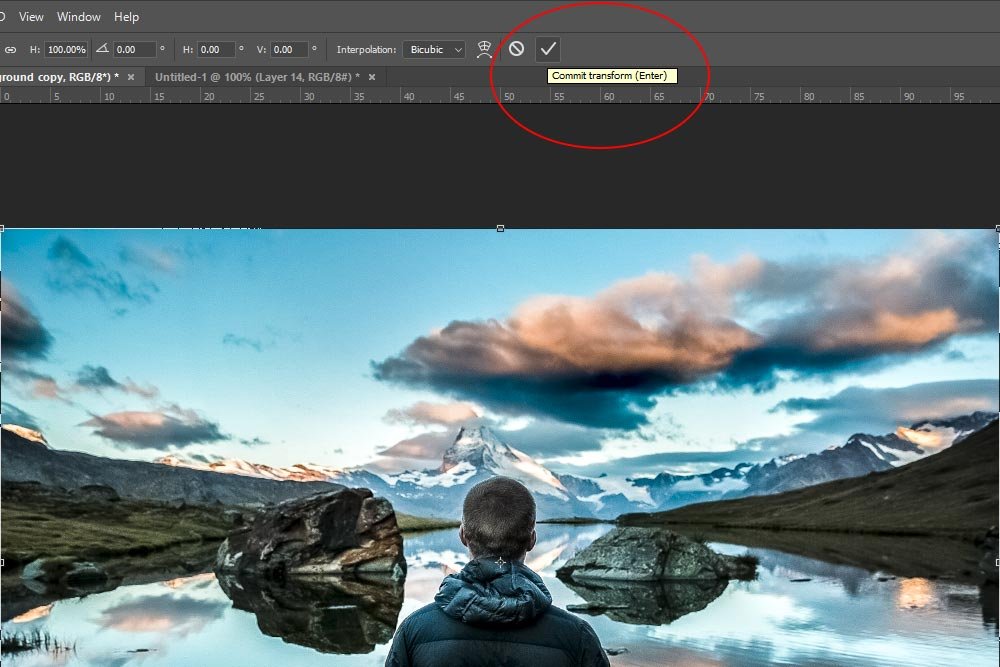
Once you’re all finished transforming whatever it was that you wanted transformed, you can confirm it so the boundary box disappears and the layer stays however you put it. To confirm the transformation, simply hit Enter on your keyboard or click on the Commit Transform check icon up in the options bar.

commit-transform.jpg

Remember, if you ever get in too deep and just want to get the heck out of the Free Transform tool, all you need to do is press Esc on your keyboard. That will get you out of there. It’s the equivalent of pressing undo a bunch of times and choosing another tool to get rid of the transform boundary box.

——

I know there is a lot more to all of these tools I talk about on this site, but one can only make a post so long. I have to decide which areas are the most important and which ones I’ll save for later. For today, I thought this would be helpful. I hope you got something out of it.

If you have any questions or concerns regarding this post, please let me know in the comment section below. Thanks for reading!
 
CampFireJack

CampFireJack

Member
Joined
May 9, 2021
Messages
118
Reaction Score
1
Points
16
  • #3

Keyboard Shortcuts for Skew, Distort & Perspective Transform in Adobe Photoshop​

You know you’re getting somewhere while learning applications such as Adobe Photoshop when you begin using keyboard shortcuts. It’s common practice to avoid them at all costs when you’re first starting out. After all, speeding things up is the last thing you need during those beginning stages. After a while though, when you’ve completed a command, or commands, time and time again, there really is no reason to have to “think” about things so much. It’s at this point that you’ll want to breeze through the easy stuff and get to what’s going to get things done. The things that matter most.

Today’s post is going to cover some interesting ground. Not only am I going to let you in on some really nifty keyboard shortcuts that work with the Free Transform Tool, but I’ll also show you how you can use different variations of this tool to complete many different tasks. These are the types of tricks you aren’t going to come across very often, so I encourage you to read on below.

Demo Photo​

I have the perfect image for this post. It’s of the head of a giraffe. It’s got some nice edges, which will make my demonstration all that much easier.

giraffe.jpg

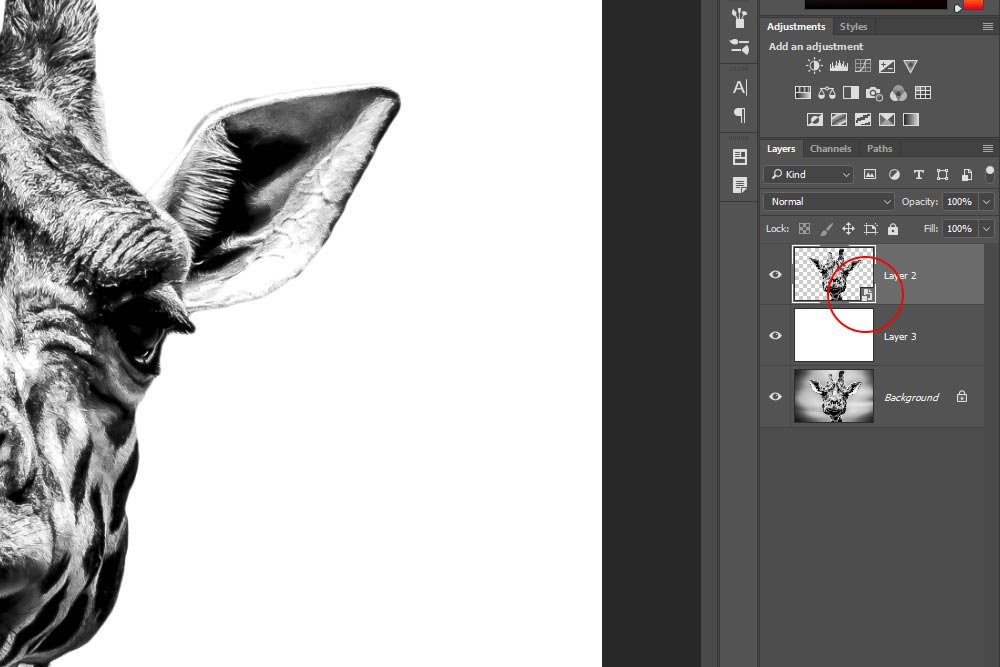
I’ve already gone ahead and selected the giraffe’s head, copied and pasted it to a new layer.

selected-pasted-giraffe-head.jpg

Isolating the head like this will allow me to show exactly how each transform works. By the way, I recently wrote a post where I clipped another animal, just the way I did this giraffe. Check it out here:

Using the Smudge Tool to Remove Edge Glow in Adobe Photoshop

Activating Free Transform​

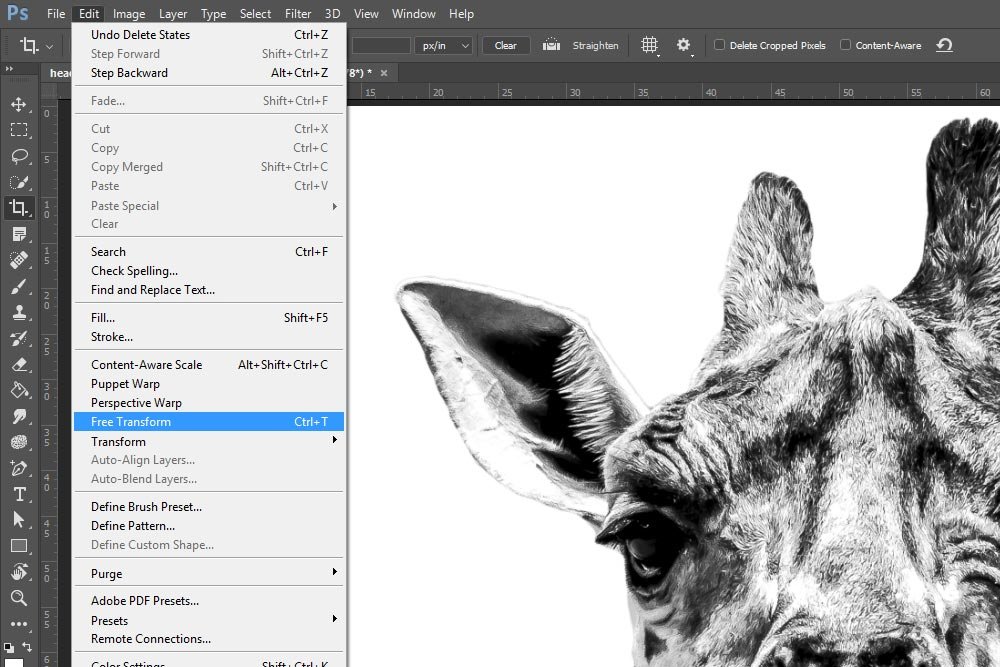
Free Transform is one of those tools that has a lot hidden behind the scenes. At first glance, you might think it just scales an object in a file. But a closer look will reveal that it does much, much more. I’ll show you all of that later on in this post, but for now, I’ll simply activate the Free Transform Tool by heading up to the Edit > Free Transform menu item and clicking.

edit-free-transform.jpg

In reality, I used the keyboard shortcut of Ctrl+T to activate this tool. I had to show you both methods though.

Now, before I go any further, I want to let you know that I’ve already written two posts that pretty much cover the regular uses of the Free Transform Tool and the Transform Tool. If you’re interested, you can read those posts by clicking below.

How to Use the Free Transform Tool in Adobe Photoshop

Using the Transform & Free Transform Tools in Adobe Photoshop

While both of those posts are very filling, I’ll go a step further in today’s post.

Creating a Smart Object​

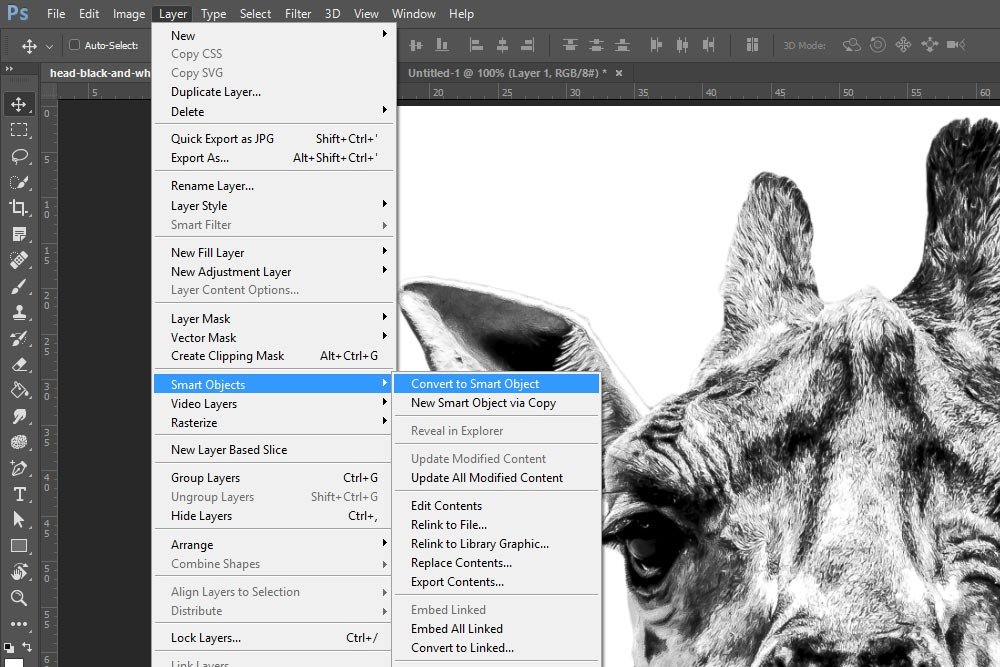
When you transform an object, the original pixel order gets all jumbled up. If you did this and then ever changed your mind and wanted to go back to the original shape, size or perspective, you’d be in for a rude awakening. Going back to the original never gives you a good result. To keep the dimensions and quality the file had when it was initially opened stored someplace, the working layer will need to be converted to a Smart Object. To do this, I’ll select the layer I’m going to transform over in the Layers panel and then head up to the Layer > Smart Objects > Convert to Smart Object menu item and click. Beyond what I just told you, I’ll show you how you can revert an object that’s been scaled back to its original quality later on.

layer-smart-object.jpg smart-object-icon.jpg

What are Smart Objects in Adobe Photoshop?

Converting Multiple Layers into a Smart Object in Adobe Photoshop

Right-Clicking For a Sub-Menu​

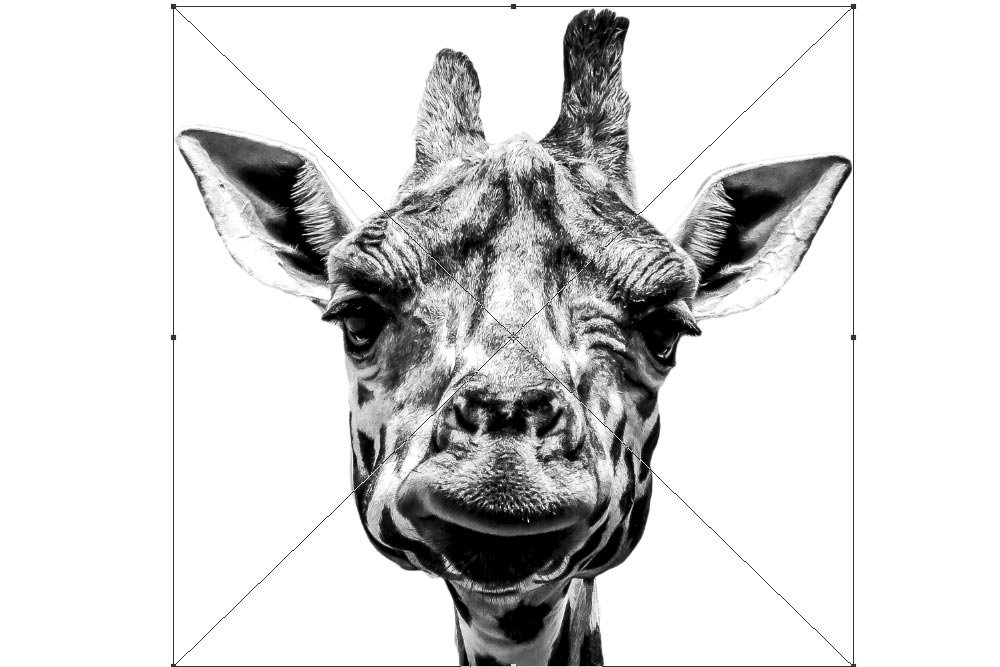
Okay, let’s get going. After I activate the Free Transform Tool, I’ll see some bounds appear. Basically, this is just a box with some anchor points along its outer edges and a center point in the middle. It looks like this:

free-transform-bounds.jpg

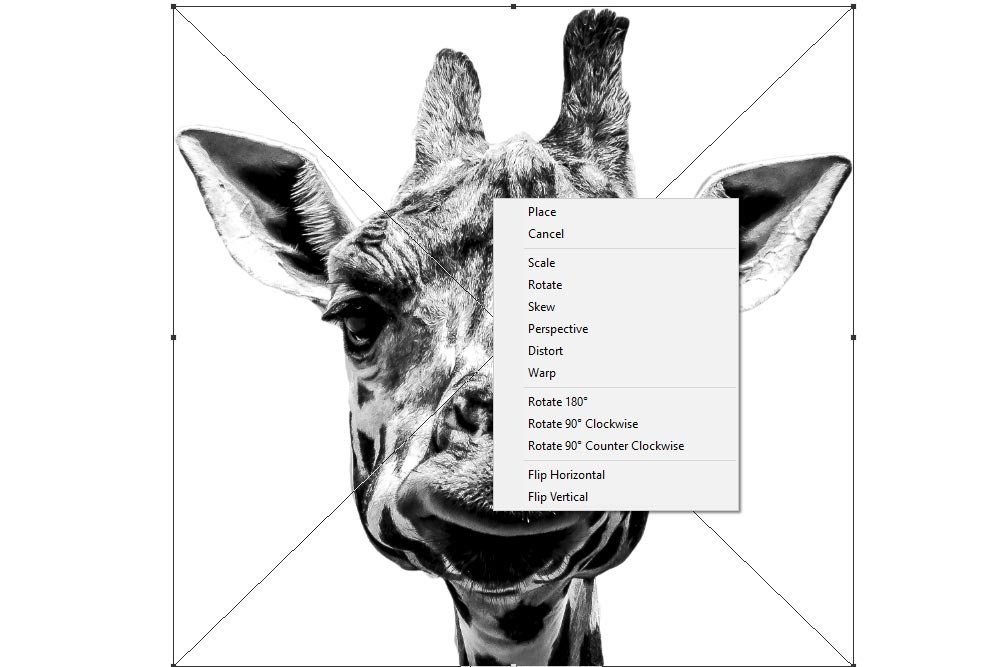
If I right-click inside the box, a new menu will appear.

transform-menu.jpg

Inside this menu are a few transform modes. In today’s post, I’ll focus on just three of them.

Skewing an Object​

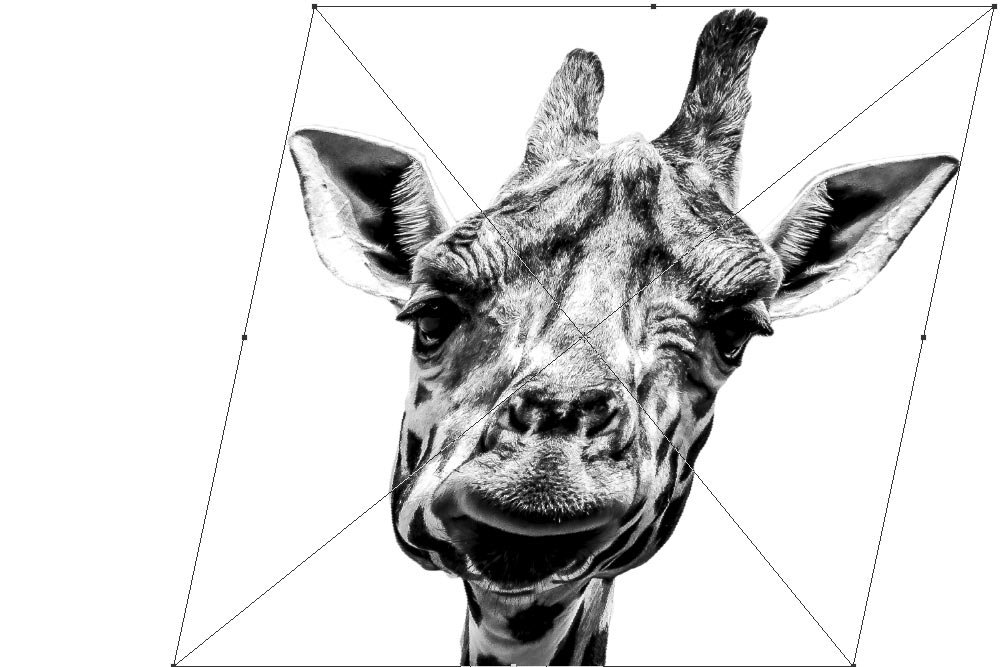
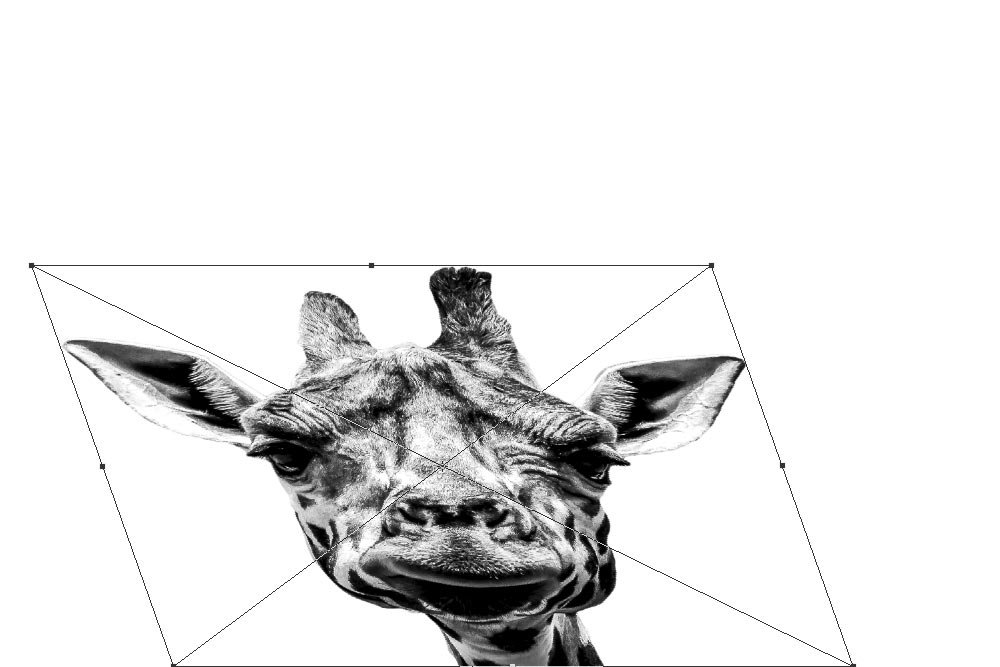
Skewing is pretty neat. It can do a few things. By dragging a center point on one side, you can drag that entire side back and forth or up and down and by clicking on a corner, you can drag that corner the same way – side to side or up and down.

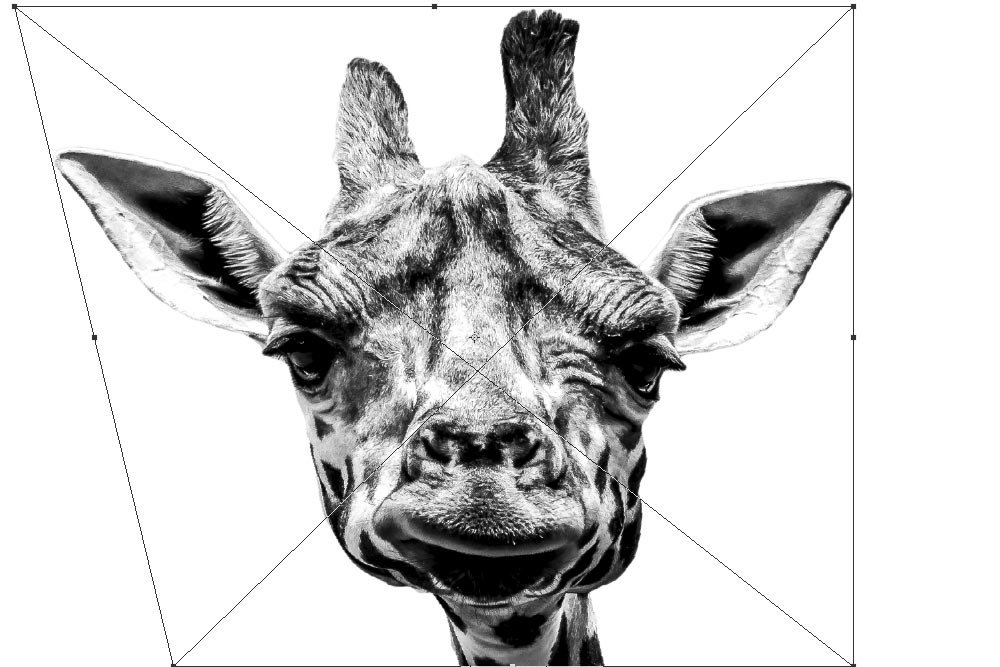
After right-clicking, if I select the Skew menu item, I can do the dragging I just mentioned. Below is a screenshot of me pulling the top of the image to the right.

skew-right.jpg

And if I click and drag the top left corner, I can drag that corner to the left or right or up or down. Here I am dragging it to the left.

skew-corner-left.jpg

In both screenshots above, you’ll notice that there were some limitations to what I dragged. When I dragged the top horizontal edge, I could only go side to side in a horizontal manner. When I dragged the corner, I could only go up or down or left or right. I couldn’t willy nilly drag things where I wanted to. Those are the constraints of the Skew Transform command.

Changing Image Perspective​

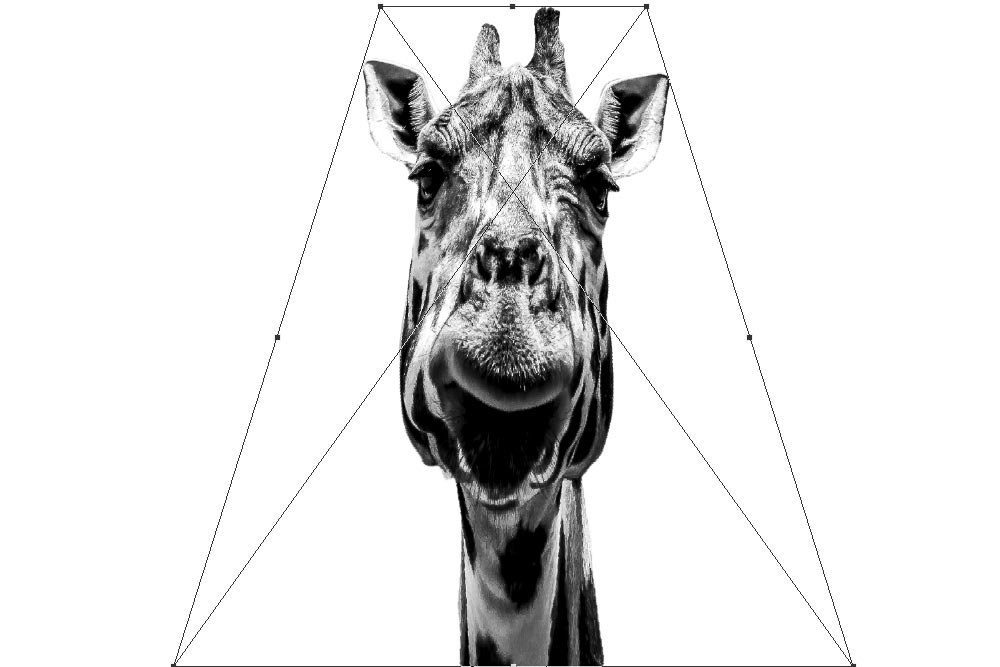
If I undo the transformations I just did and right-click inside of the transform boundary box again, but this time select Perspective, I’ll find some new limitations. This time, while the horizontal and vertical edges operate just like they did with the Skew command, corners are quite different.

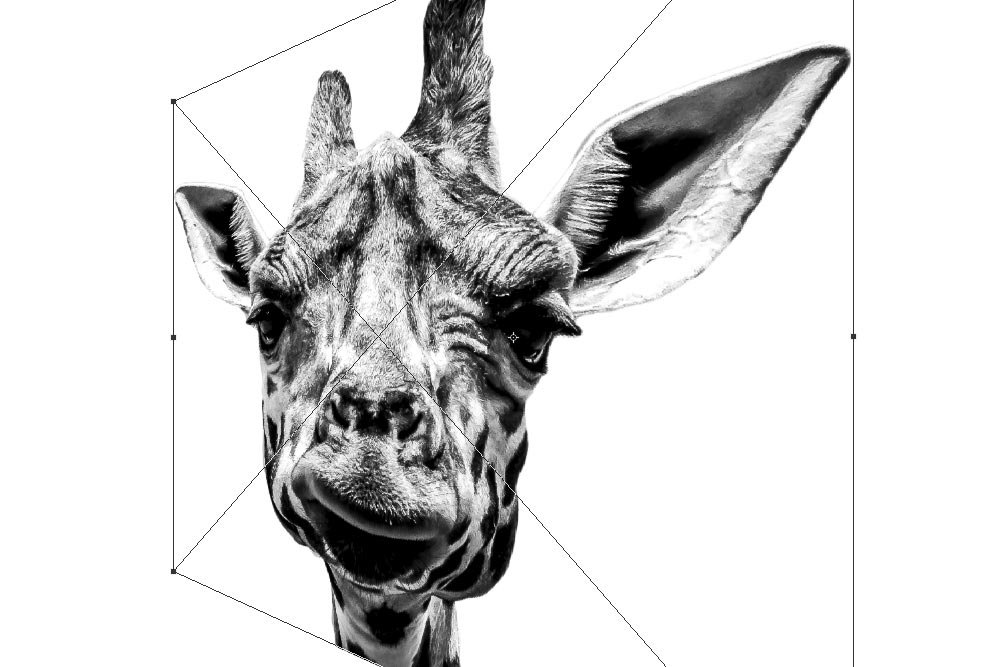
With Skew, each corner moved independently. Now, with Perspective, each corner moves in sync with the opposite corner. So, if I click and drag the top left corner towards the top center of the image, both corners move inward.

perspective-top.jpg

And if I drag that same corner towards the bottom left, both side corners will move in relation to each other.

perspective-side.jpg

When using this transform tool, you’d be altering the “perspective” of an object.

Distorting an Object​

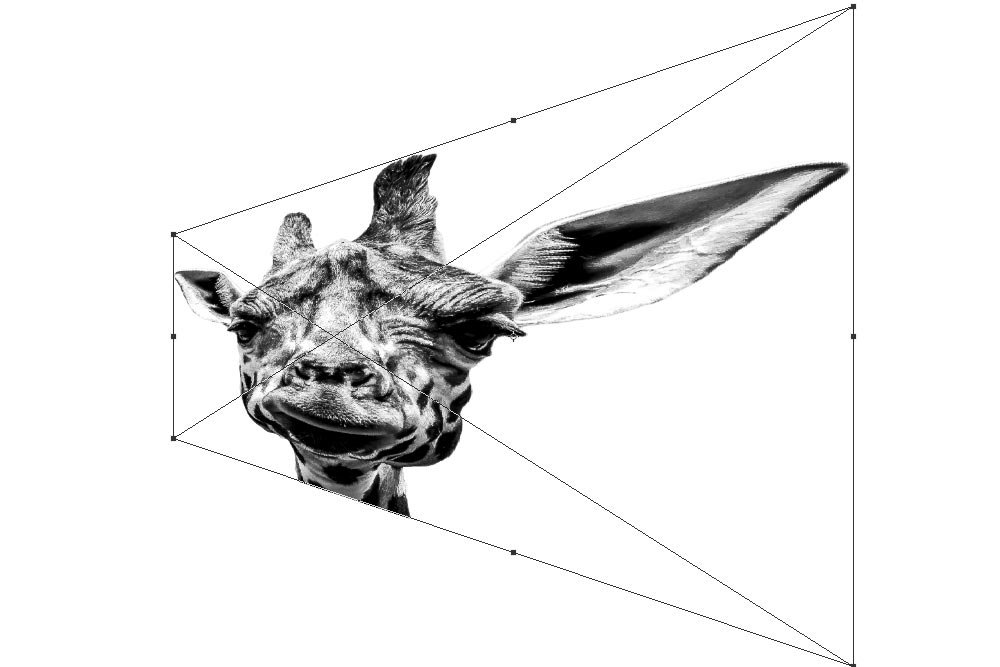
Remember that “willy nilly” I just spoke of? Well, here it is. If I undo everything again (either Ctrl+Z or the History panel) and right-click one last time, I can now select the Distort menu item. With Distort, I’m free to pretty much do whatever I want. If I click a horizontal or vertical edge, I can drag it anywhere. If I click a corner, I can drag that anywhere as well. While I’m dragging, nothing else moves and nothing stops me. Here I am, dragging the top horizontal edge down and to the left.

distort-top-down.jpg

And Here I am, dragging the top left corner straight toward the center of the image.

distort-top-left.jpg

If nothing else, you can see the power of the transform tools via my examples. There’s a lot you can do with them.

Resetting an Object to its Original State​

I mentioned earlier that I’d show you how to reset a scaled object to its original state if you go a little overboard with the Free Transform Tool. Basically, it’s all got to do with the options bar up above the workspace.

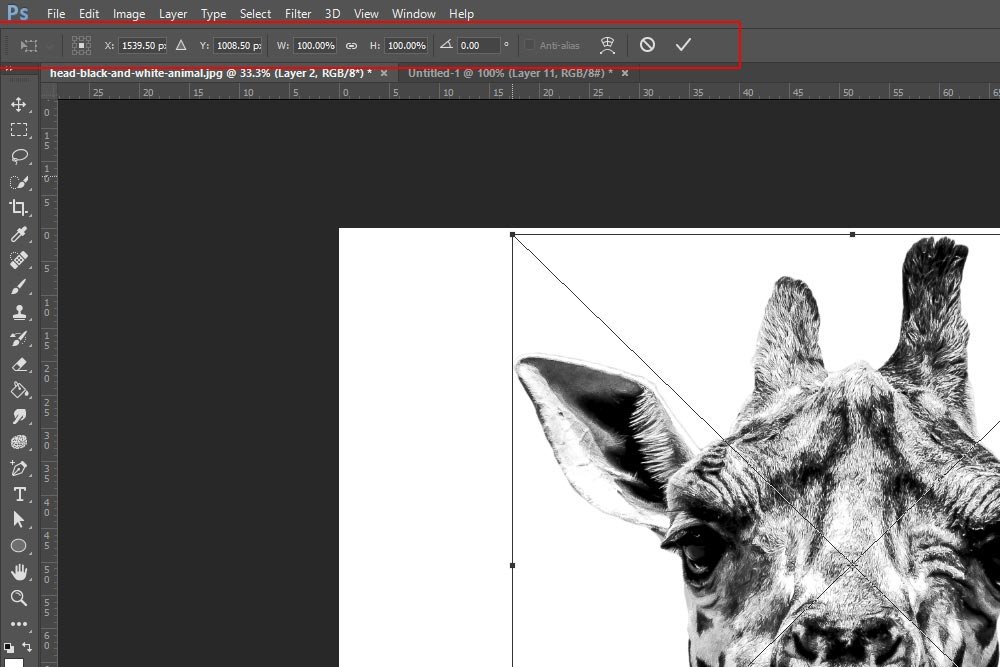
If I were to use the keyboard Ctrl+T to activate the Free Transform Tool, and not do anything further, I’d see that the Width and Height percentage values are set at 100% respectively.

transform-options-bar.jpg

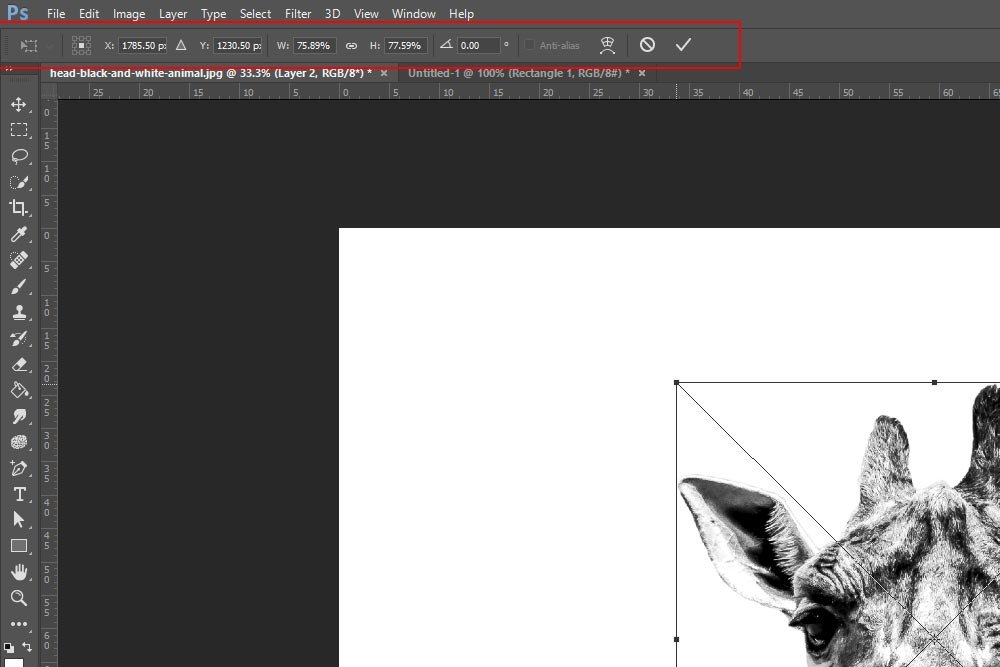
If I were to click and drag a corner somewhere other than its original location, those two percentage values would change to numbers smaller or larger than the initial 100%.

options-bar-changes-values.jpg

Even after I press the Enter key on my keyboard, those new values will be preserved in the options bar. So, if I want to bring the transformed object back to its original glory, all I’d need to do is to active the Free Transform Tool once again and overwrite the new percentage values with 100%. That will restore the earlier dimensions. And since the layer is a Smart Object, there will be no loss in quality anywhere.

Transform Keyboard Shortcuts​

While my examples above are all fine and dandy, they don’t really get us to the point of this post. In this section, I’ll give you some keyboard shortcuts that will allow you to do some pretty wild things.

First, after entering Free Transform mode again, if I press and hold the Ctrl key while clicking on a side anchor, I can skew the object. If I click and drag a corner of the object, I can distort it.

vertical-skew.jpg
ctrl-distort.jpg

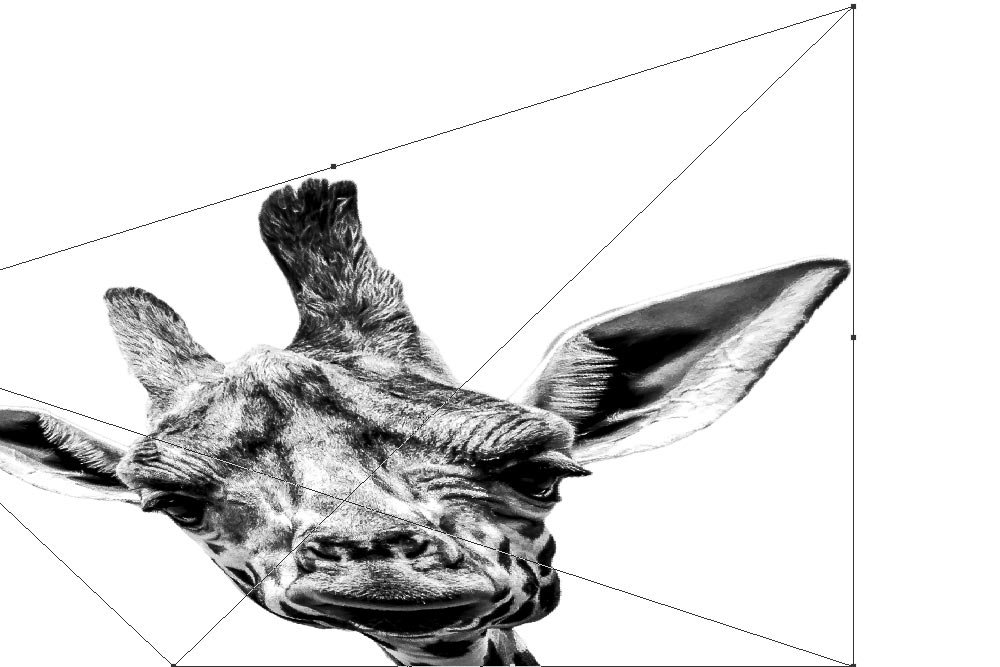
If I were to press Ctrl+Shift and click and drag a corner of the object, I’d essentially get the same result as I did above, when I activated the Skew command. Basically, the corner is constrained to either going up or down or left or right.

ctrl-shift-corner.jpg

Holding down the Ctrl+Shift keys and dragging a side anchor will have the same effect as the Skew command did above as well.

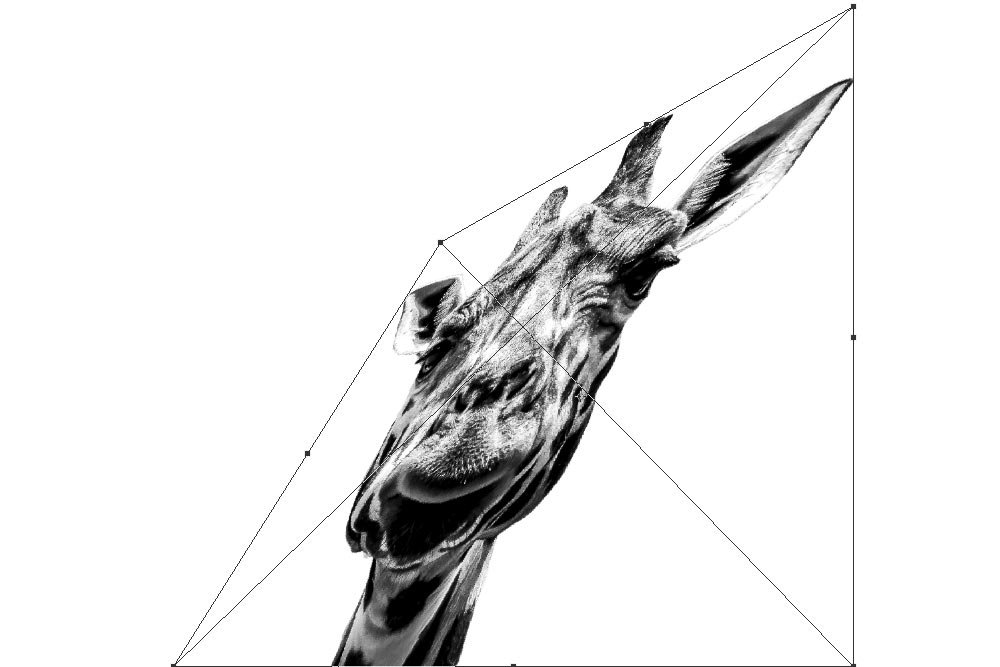
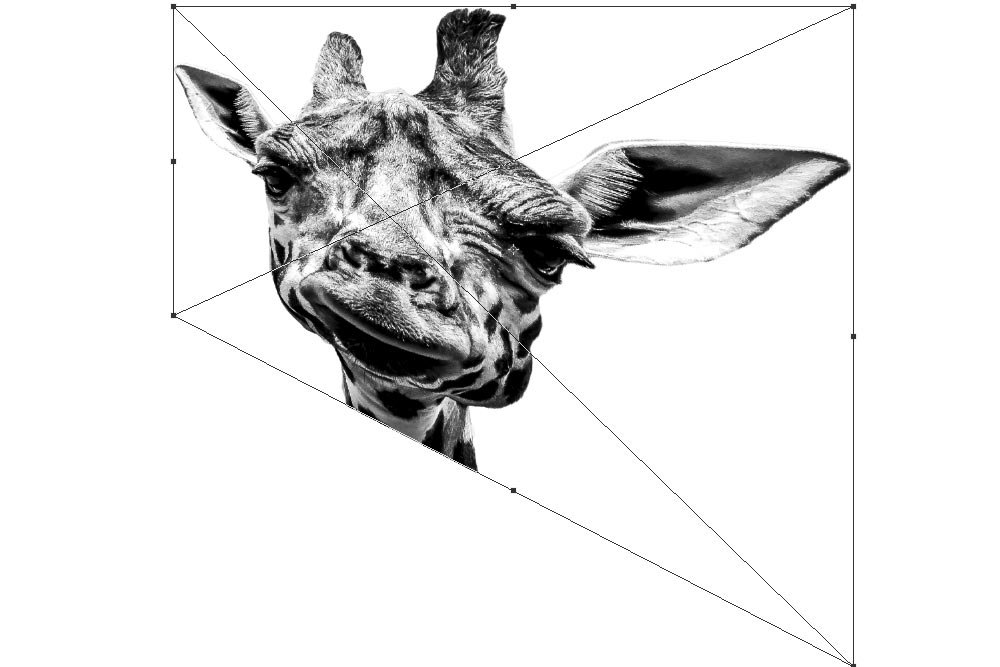
If I pressed and held the Ctrl+Alt keys on my keyboard and dragged a corner, both the corner I’m dragging and the opposing one would move equally and in an opposite manner. In the screenshot below, I clicked and dragged the bottom left corner slightly up and to the left. That made the upper right corner move downward and to the right, while both of the remaining corners stayed right where they were.

ctrl-alt-corner.jpg

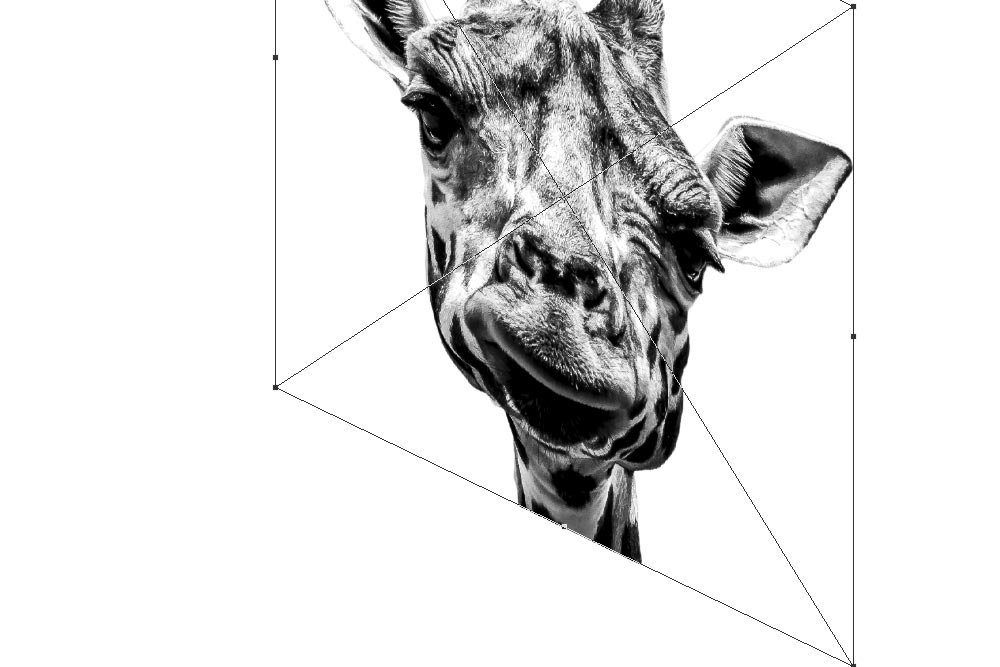
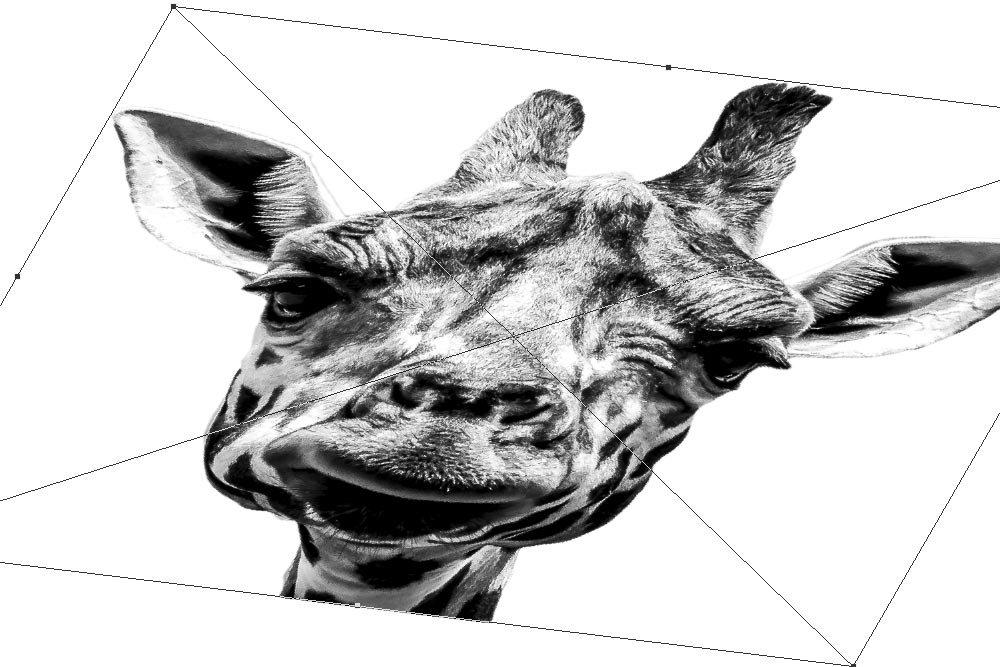
Last but not least, if I were to hold down Ctrl+Alt+Shift on my keyboard and drag a corner, I’d get the same result as I did above, while using the Perspective command. I could shrink or expand any side of an object. In the screenshot below, I pulled the bottom left corner up and the bottom right corner down. That really changed the perspective of the image.

ctrl-alt-shift-corners.jpg

And that, my friends, will get you very far if you ever decide to transform an object or an image in Adobe Photoshop.

Wow, that was kind of a long post. I hope I explained how to use the transform tools and some keyboard shortcuts effectively. If you have any questions or concerns regarding this post, please leave them in the comment section below. Thanks for reading!
 
Top