JGaulard
Administrator
Staff member
Site Supporter
Sr. Site Supporter
Power User
- Joined
- May 5, 2021
- Messages
- 319
- Reaction Score
- 2
- Points
- 18
- #1
This thread is all about how to make DIY business cards yourself. All you need is some good stiff stock, Adobe Photoshop, and a printer.
Anyway, since I already knew how to make a professional business card, that wasn’t an issue. I used to create some stunning, full color, double-sided, UV coated business cards for clients, back when I was in that business. I loved making those things. The only problem for today is, since I used to send those files to a print shop for printing, I never had to concern myself with any type of cutting. If I were to make these more “homemade” business cards, how would I go about cutting them? Well, I’ve got an answer and I’ll share the entire process with you down below.
In today’s post, I’d like to walk through the process or creating a business card template as well as a template that will assist with printing and cutting. While I won’t get into the nitty-gritty of how I created the actual graphics for the business card, I will talk about what’s important when it comes to setting up the file. And then I’ll move into setting up a larger dimension file for the actual printing of the cards. So, if you’ve ever been interested in creating your own business cards for a small time operation like the one I may be putting together in the future, read on. As a special reward, I’ll be including the actual templates in both PSD (Photoshop) and PDF format at the end of this post for you to download and use for your own projects. I mean, it took me a little while to put these files together and I’d hate for you to have to go through all of the work I already went through for no reason at all. What’s the sense in reinventing the wheel? Well, I suppose you could learn how to do these things yourself, which is valuable in its own right.
The next important consideration is the resolution of the file. If you’re making a graphic for use online, you would set the file up at 72dpi. If you’re creating a graphic for print, you would set the file up at 300dpi. At least 300dpi. I used to create large graphics for city buses that called for 1200dpi. Those were nuts. Anyway, 300dpi it is for this project.
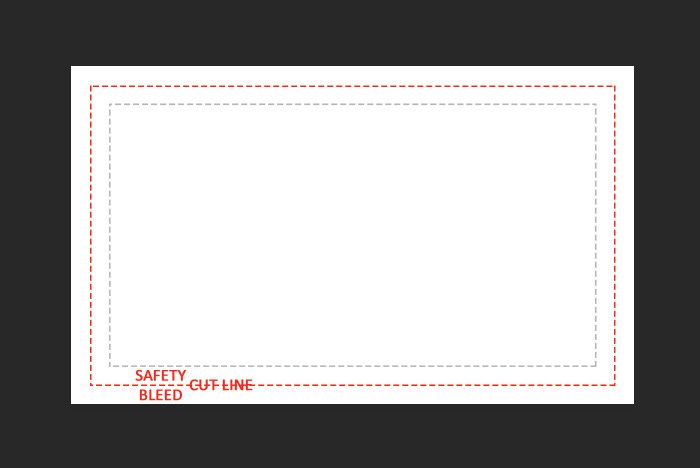
Finally, it’s important to understand that the card template I’ll be sharing with you today can be used for either a professional print shop or your own printer at home. I’ll talk about both options. The thing to remember is that there are a few margins to concern yourself with when creating the file. The first is called the Bleed and the second is called the Safety. The Bleed gets cut off by the printer and the safety is a margin that you need to keep your graphics inside of, just in case there’s some sort of shift that occurs. You wouldn’t want any pertinent information to be trimmed by accident. You also don’t want your information to be right up against an edge. That never looks good. I’ll show you all this below.
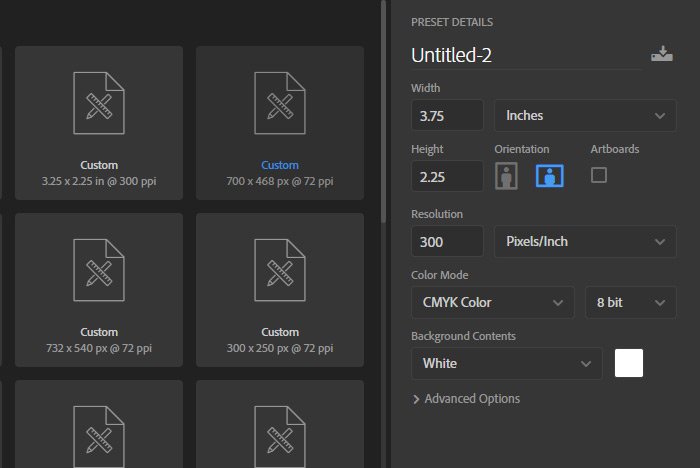
To start things off, I’ll head into Adobe Photoshop and click the File > New menu item. When the New Document dialog box appears, I’ll set the Width to 3.75 inches and the Height to 2.25 inches. I’ll show you why this extra space is needed down below. I’ll then set the Resolution to 300 pixels/inch. Finally, I’ll set the Color Mode to CMYK and then click the Create button. The reason I set the Color Mode to CMYK is because that’s the mode color printers use for accurate colors. We won’t go into that today, but just know that RGB is used for online graphics and CMYK is used for print.
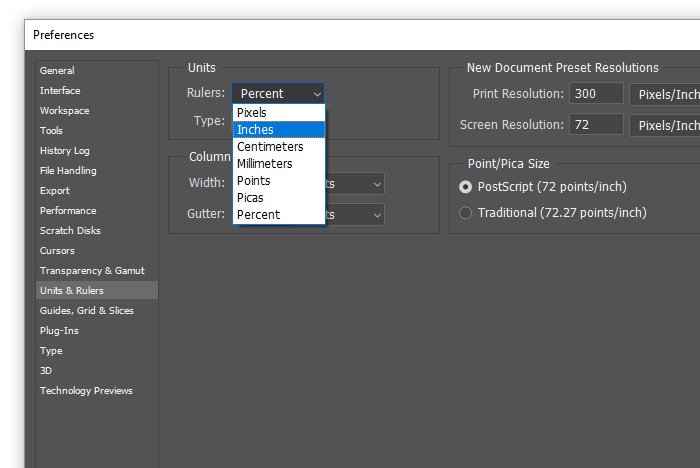
Then, once I see the rulers outlining the workspace, I’ll double-click on one of them to open the Preferences palette, directly to the Units & Rulers area. Once there, I’ll make sure the Rulers drop-down is set to Inches.
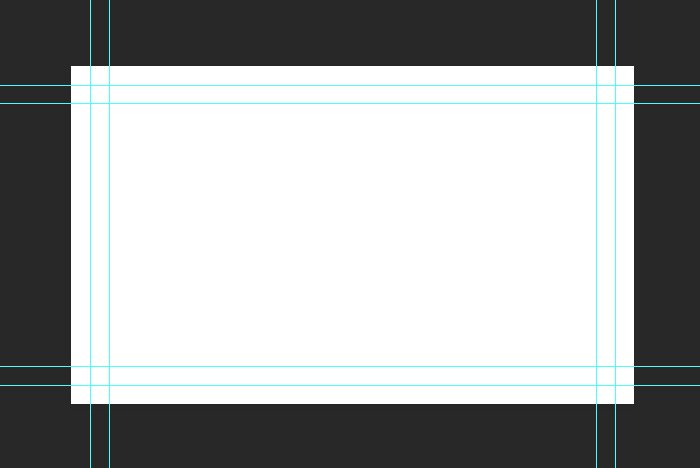
Finally, I’ll click inside the horizontal ruler with my mouse and drag down into the work area. I’ll do this four times until I have guides set at the 1/8″, 1/4″, 2″ and 2 1/8″ distances on the vertical ruler. Then, I’ll click inside the vertical ruler and drag to the right until I have four guides at the following measurements: 1/8″, 1/4″, 3 1/2″ and 3 5/8″. This is what the file looks like at this point.
To make things easier to deal with if you decide to download the PDF file version of this template, I’ll go ahead and use the Rectangle Tool to draw out some dashed boxes for the Safety and Bleed margins. I’ll draw the boxes and then set the shape to empty and the Stroke to 3px. I’ll also make the outer box red so you know it’s a hard cut and the inner box gray so you know it’s a soft margin. I’ll even label the boxes for you so it’s easier to remember later on. This is what the file will look like.
Free Business Card Templates
Do you like the way I used the word “free” above? I thought that was fun. Anyway, if you would like to download the PSD file, click below.
Individual Business Card Template (PSD - see below post)
If you would like to download the PDF file, click below.
Business Card Template PDF File (PDF- see below post)
I prefer that you download the Photoshop file because that way, you can hit the ground running when you’d like to start designing your cards. When you’re finished with whatever you create, all you need to do is hide those template layers so they don’t appear in your print.
I started things off by creating a new file. This time, I kept everything the same, except for the dimensions. I used 8.5″ wide and 11″ high, so the printout would be the same size as a regular piece of paper.
Once I had the print file created, I created an additional file with the dimensions of a regular business card. This is 3.5″ x 2″. I colored that file solid black, flattened all the layers and then dragged the black layer over into my print template file. Then, I duplicated the layer seven times so I had a total of eight layers. Then, I used guides and the rulers to equally distribute the black “business cards” inside of the file. This is what I came up with.
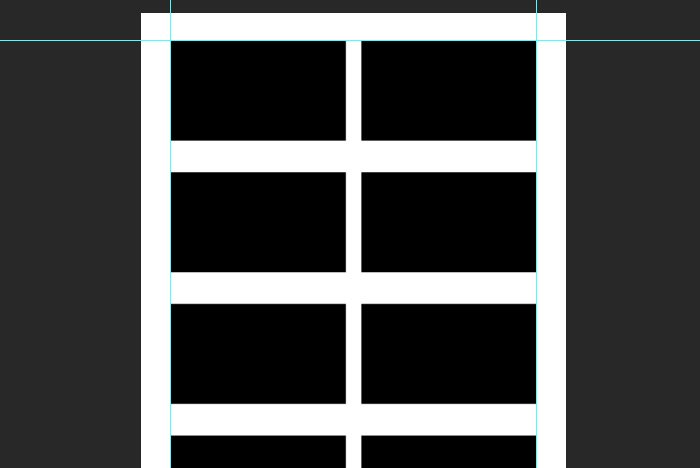
The bottom two cards are cut off, but you get the idea. Basically, I lined the cards up vertically and horizontally so when it came time to cut, I could do so accurately.
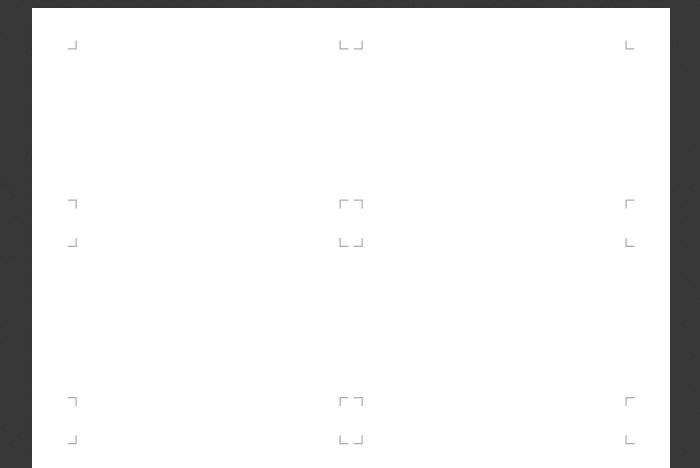
After one card’s corner combination was completed, I merged those four layers together and then duplicated that merged layer seven times. I applied each cut template layout to each black card. Finally, I hid the guides and then hid the black card placeholders. Here is the top half of the finished product. The bottom half is the same thing. I just couldn’t fit it in the screenshot.
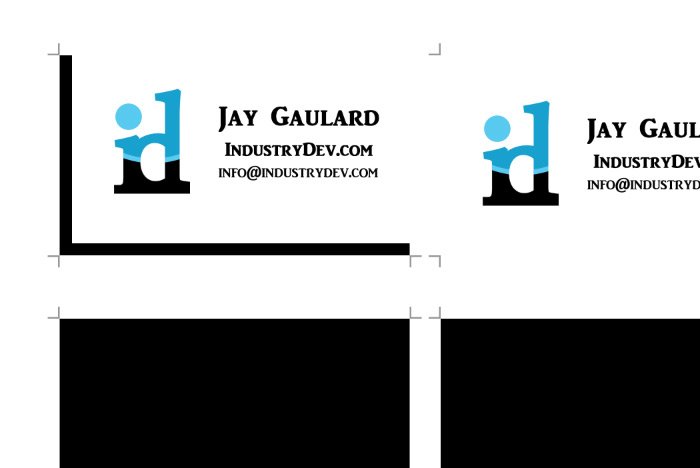
This is a screenshot of the business card almost in position on the left and in the perfect position on the right. I wanted to be clear with what I meant about covering up the black placeholder.
After I have all the card layers in position, I’ll hide the black placeholders, just in case an edge here or there decides to randomly print for some reason.

To make your life much easier, I’ll include the Photoshop PSD file in this post. If you’d like to download it for your own use, click below.
Business Card Print Template (PSD- see below post)
Well, I hope I taught you something with this post and I hope I saved you some time if you decide to use the templates I created. If you do use them, please let me know. I’d love to hear about it. Also, if you have any questions, let’s talk about them in the comment section below or in the Photoshop forum in the discussion board. Thanks for reading!
How to Make Homemade Business Cards (With Printing & Cutting Instructions)
I got a great idea the other day to create some sort of business card that I could include with any type of printing combination I may engage in in the future. For instance, if I was interested in perhaps creating some greeting cards to sell on Etsy, it would be nice to include a small ancillary card that includes my information on it, such as my name, website and email address. The same is true for any type of photographic print I might be interested in selling. If you’ve ever seen or purchased any sort of photography on Etsy or a related site, you most likely know that these packages come with whatever photography medium you purchased, along with a matte, cardboard backing, clear plastic protective sleeve and a business card to keep the seller’s name top of mind. These little add-ons are important.Anyway, since I already knew how to make a professional business card, that wasn’t an issue. I used to create some stunning, full color, double-sided, UV coated business cards for clients, back when I was in that business. I loved making those things. The only problem for today is, since I used to send those files to a print shop for printing, I never had to concern myself with any type of cutting. If I were to make these more “homemade” business cards, how would I go about cutting them? Well, I’ve got an answer and I’ll share the entire process with you down below.
In today’s post, I’d like to walk through the process or creating a business card template as well as a template that will assist with printing and cutting. While I won’t get into the nitty-gritty of how I created the actual graphics for the business card, I will talk about what’s important when it comes to setting up the file. And then I’ll move into setting up a larger dimension file for the actual printing of the cards. So, if you’ve ever been interested in creating your own business cards for a small time operation like the one I may be putting together in the future, read on. As a special reward, I’ll be including the actual templates in both PSD (Photoshop) and PDF format at the end of this post for you to download and use for your own projects. I mean, it took me a little while to put these files together and I’d hate for you to have to go through all of the work I already went through for no reason at all. What’s the sense in reinventing the wheel? Well, I suppose you could learn how to do these things yourself, which is valuable in its own right.
The Benefit of Homemade Business Cards
There’s a very real problem with business cards out in the world today. The problem is, most people who purchase them, purchase them by the thousand and then never use even close to the quantity they purchased. I should know. I’ve done this many times. I can’t even tell you how many times I’ve designed and had printed a box of business cards, only to never give a large majority of what I had bought away. I don’t even know why I ever made the business cards in the first place. I think I may have just liked the idea of having them. They made me feel professional. My point here is, if you’re an individual who works for yourself or someone who has a side-gig going on and you work online or for a small operation, you most likely don’t need a thousand business cards. There’s a benefit to creating a file in Photoshop and then printing the cards as you need them. Things are less expensive this way and if you ever need to update your information on the card itself, it’s so easy to do. You won’t need to throw out an entire box of cards, just because you changed your phone number. I actually love the idea of printing cards as you go. Or as I go. Whatever.Creating the Business Card Template in Photoshop
There are a few important things you need to know when it comes to creating a business card template. First, the size. For this card, I’ll be using the standard size of three and a half inches wide by two inches high, or 3 1/2″ x 2″. Of course, business cards come in all sorts of sizes and some even fold, but we’ll worry about those another day. For now, just know that 99% of business cards come in the standard size.The next important consideration is the resolution of the file. If you’re making a graphic for use online, you would set the file up at 72dpi. If you’re creating a graphic for print, you would set the file up at 300dpi. At least 300dpi. I used to create large graphics for city buses that called for 1200dpi. Those were nuts. Anyway, 300dpi it is for this project.
Finally, it’s important to understand that the card template I’ll be sharing with you today can be used for either a professional print shop or your own printer at home. I’ll talk about both options. The thing to remember is that there are a few margins to concern yourself with when creating the file. The first is called the Bleed and the second is called the Safety. The Bleed gets cut off by the printer and the safety is a margin that you need to keep your graphics inside of, just in case there’s some sort of shift that occurs. You wouldn’t want any pertinent information to be trimmed by accident. You also don’t want your information to be right up against an edge. That never looks good. I’ll show you all this below.
To start things off, I’ll head into Adobe Photoshop and click the File > New menu item. When the New Document dialog box appears, I’ll set the Width to 3.75 inches and the Height to 2.25 inches. I’ll show you why this extra space is needed down below. I’ll then set the Resolution to 300 pixels/inch. Finally, I’ll set the Color Mode to CMYK and then click the Create button. The reason I set the Color Mode to CMYK is because that’s the mode color printers use for accurate colors. We won’t go into that today, but just know that RGB is used for online graphics and CMYK is used for print.

Setting Guides
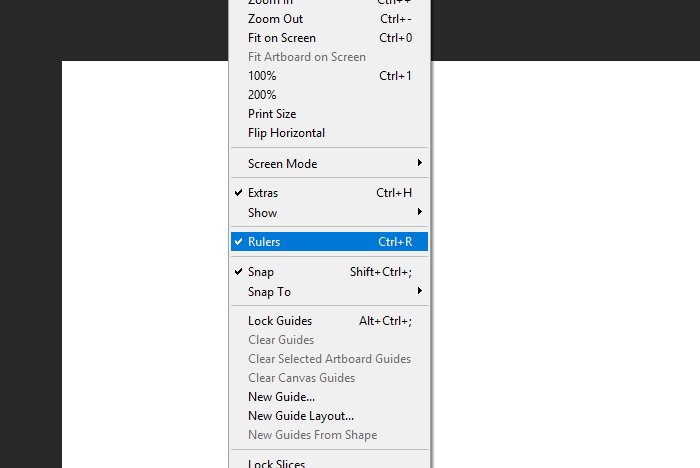
The next task I’ll take care of is setting the guides for this template. I’ll first set the rulers to show in the workspace by visiting the View > Rulers menu item and I’ll make sure there’s a black check mark next to that option. If there isn’t, I’ll click it so there is.
Then, once I see the rulers outlining the workspace, I’ll double-click on one of them to open the Preferences palette, directly to the Units & Rulers area. Once there, I’ll make sure the Rulers drop-down is set to Inches.

Finally, I’ll click inside the horizontal ruler with my mouse and drag down into the work area. I’ll do this four times until I have guides set at the 1/8″, 1/4″, 2″ and 2 1/8″ distances on the vertical ruler. Then, I’ll click inside the vertical ruler and drag to the right until I have four guides at the following measurements: 1/8″, 1/4″, 3 1/2″ and 3 5/8″. This is what the file looks like at this point.

Completing the Template
As it stands, this template is good enough to get your file to the print shop. The outer margin is the Bleed area and the inner margin is the Safety area. Anything in the outer margin will get trimmed off by a professional print shop, leaving the proper business card size behind, which is 3.5″x2″. So, as you can see, I made the template a quarter inch larger for both the width and height dimensions to account for that. As for the inner margin, you may add graphics there, but not text or important information. This one is meant for spacing. So, if you have a photograph as a background or some sort of graphic that you’d like to go right to the edge, be sure that it goes all the way to the edge of the entire file. As for the text, keep that inside the large empty area in the middle.To make things easier to deal with if you decide to download the PDF file version of this template, I’ll go ahead and use the Rectangle Tool to draw out some dashed boxes for the Safety and Bleed margins. I’ll draw the boxes and then set the shape to empty and the Stroke to 3px. I’ll also make the outer box red so you know it’s a hard cut and the inner box gray so you know it’s a soft margin. I’ll even label the boxes for you so it’s easier to remember later on. This is what the file will look like.

Free Business Card Templates
Do you like the way I used the word “free” above? I thought that was fun. Anyway, if you would like to download the PSD file, click below.
Individual Business Card Template (PSD - see below post)
If you would like to download the PDF file, click below.
Business Card Template PDF File (PDF- see below post)
I prefer that you download the Photoshop file because that way, you can hit the ground running when you’d like to start designing your cards. When you’re finished with whatever you create, all you need to do is hide those template layers so they don’t appear in your print.
Creating the Business Card Print Template
I’m going to whiz through this section because it’s not likely that you’ll want to create a print template like the one I created last night. It took a bit of time and to be honest, it would be a real pain for someone who isn’t proficient in Photoshop. I will give you the rundown of what I did though, just in case you’re interested in trying this out for yourself. It’s not terribly difficult, but it does take time.I started things off by creating a new file. This time, I kept everything the same, except for the dimensions. I used 8.5″ wide and 11″ high, so the printout would be the same size as a regular piece of paper.
Once I had the print file created, I created an additional file with the dimensions of a regular business card. This is 3.5″ x 2″. I colored that file solid black, flattened all the layers and then dragged the black layer over into my print template file. Then, I duplicated the layer seven times so I had a total of eight layers. Then, I used guides and the rulers to equally distribute the black “business cards” inside of the file. This is what I came up with.

The bottom two cards are cut off, but you get the idea. Basically, I lined the cards up vertically and horizontally so when it came time to cut, I could do so accurately.
Adding the Cut Marks
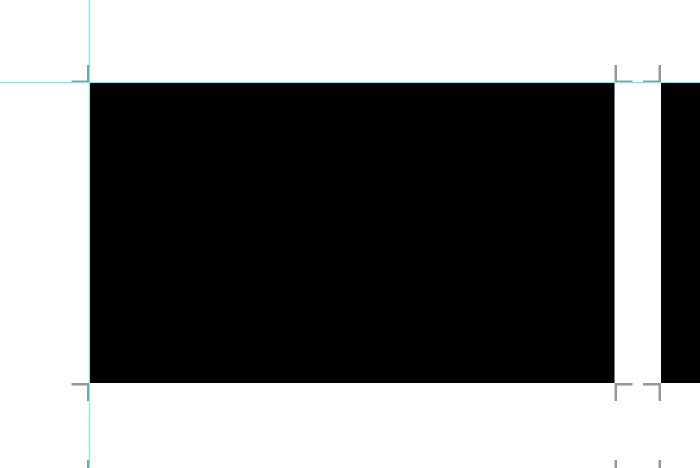
In the past, I’ve seen templates like the one I’m making right now include cut marks. Since I’ll eventually be cutting each card from the paper its printed on, I want to make sure my lines are straight and that I’m cutting the correct size. To add the “corners,” I used the Line Tool to make one horizontal line that was about one inch long. Then, I colored that line gray and duplicated it. I turned the duplicated line so it was vertical and then connected two ends together, so both lines formed a corner. After that, I merged the two line layers together and duplicated that merged layer together three times. I rotated and placed each corner so it was facing the corner of the black business card placeholder. Take a look.
After one card’s corner combination was completed, I merged those four layers together and then duplicated that merged layer seven times. I applied each cut template layout to each black card. Finally, I hid the guides and then hid the black card placeholders. Here is the top half of the finished product. The bottom half is the same thing. I just couldn’t fit it in the screenshot.

Adding the Business File to the Print Template
Now that I have the print template created, it’s time to apply the sample business card I prepared last night to it. It’ll be necessary to resize the canvas of the business card file if there’s a white background to 3.5″ x 2″. The reason for this is because I’ll need to place it directly over the black card position placeholders. Basically, the reason for this step is to make sure the card is centered inside of the cut marks and I can’t do that if the card is white and the print template is white. I’ll flatten the file so I can drag it over to the print template. I’ll do this now. If you’re doing this as well, be sure NOT to save your business card file after you flatten it. If you do that, it will become uneditable. This is what the print template looks like with the business card inside each position. After dragging the card over, I duplicated that layer seven times to fill in each spot.This is a screenshot of the business card almost in position on the left and in the perfect position on the right. I wanted to be clear with what I meant about covering up the black placeholder.

After I have all the card layers in position, I’ll hide the black placeholders, just in case an edge here or there decides to randomly print for some reason.
Printing & Cutting the Cards
To print these cards, you’ll want to use at least 60lb photo paper. I tried this last night with some matte photo paper and things looked pretty good. I would go with high gloss next time, since that’s the best of the best. To print, set your color photo printer up for the correct size of paper and then have at it. After that, place a straight edge along the edges of the cards and use an x-acto knife or a razor to do your cutting. I’ve tried this and I’ve also seen a number of videos where the video creator has used this method. It’s much better than using scissors. The result is as near to perfect as you’ll get. Just make sure the blade cuts inside the cut marks and you should be all set.
To make your life much easier, I’ll include the Photoshop PSD file in this post. If you’d like to download it for your own use, click below.
Business Card Print Template (PSD- see below post)
Well, I hope I taught you something with this post and I hope I saved you some time if you decide to use the templates I created. If you do use them, please let me know. I’d love to hear about it. Also, if you have any questions, let’s talk about them in the comment section below or in the Photoshop forum in the discussion board. Thanks for reading!
