LukeLewis
Member
- Joined
- May 7, 2021
- Messages
- 134
- Reaction Score
- 0
- Points
- 21
- #1

While this post will primarily cover how to go about moving and renaming folders and files inside of Adobe Lightroom, I’ll sprinkle some warnings and advice throughout as well. File structures are funny things and when you start changing your mind about where items are located on hard drives, Lightroom can have a tough time keeping up. I know this is a strange introduction to a post about an image organizer and editor, but I’m sure you’ll find that everything makes perfect sense as you read on below.
Do you remember that post I wrote a while back about one of the best methods of storing photographs on a computer or external hard drive? If you read that post, I encourage you to follow the guidance I offered there, because if you do, you’ll actually need very little of what I’m about to write below. Of course, not everyone maintains a perfect file structure and things pop up. With that in mind, I’ll begin with a discussion that talks about a few issues that have a tendency to make your editing life somewhat challenging.
Telling Lightroom Where Your Files Are
When you import photos into Lightroom, you’re essentially telling the application where your folders and files reside on either your local hard drive or your external hard drive. In return, Lightroom builds a database and tethers those locations with the folders that exist in its Library module and the thumbnails it creates. Without the tethering, you’ll end up with empty placeholders inside of your workspace in Lightroom.Let me give you an example of what I’m referring to. Say you create a “Photos” folder somewhere on your C: drive (local drive). You fill that folder with all the photographs you’d like to work on and then import them into Lightroom for editing. Everything works fine. Then, one day, you decide that you would like to move your folder and everything in it to an external drive. You decide that copying and pasting your “Photos” folder to your G: drive is a good idea. You do so, open Lightroom and put your hands to your cheeks in dismay. What happened? Well, you disrupted the tethering. You initially told Lightroom that your folder and files were in one location and then you went behind its back and moved everything. Lightroom now has no idea where anything is. It still “echos” the fact that something once existed, but you can’t work on question marks and hollow shells.
So, what’s the moral of the story? Decide where you want to store your images and keep them there. If that’s not possible, move your folders and files inside of Lightroom. Don’t worry, I’ll explain how to do that below.
Introducing the “Folders” Panel
Lightroom is a file manager. Just like the file explorer on your computer, Lightroom can create, rename and move files and folders. And as I mentioned above, it’s critical that, if you have the need, you use these features to keep your workflow humming along nicely.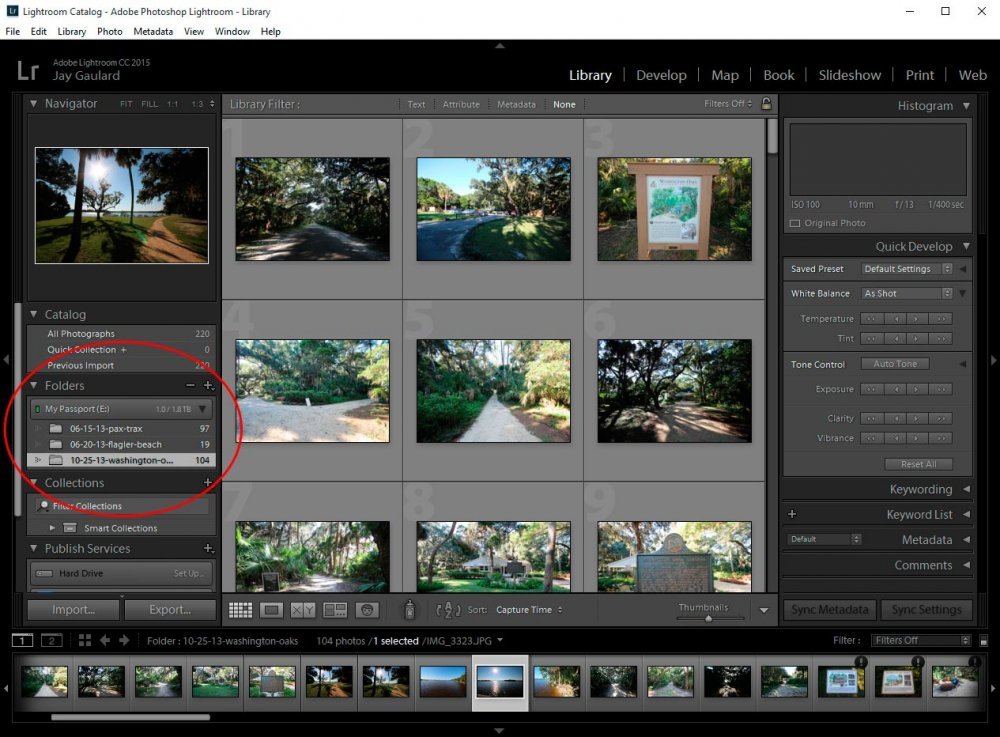
In the screenshot above, you can see that I imported three folders worth of images. I’ve outlined the “Folders” panel in red. The three folders are listed there. To the right of each folder name, Lightroom displays the number of images that it knows about contained within. To the left of each folder name, you can see a sort of grayed out arrow. The fact that this arrow isn’t solid indicates that I don’t have any sub-folders contained inside the main folder. If I did, the gray arrow would be solid and clickable.
Renaming Folders Inside Lightroom
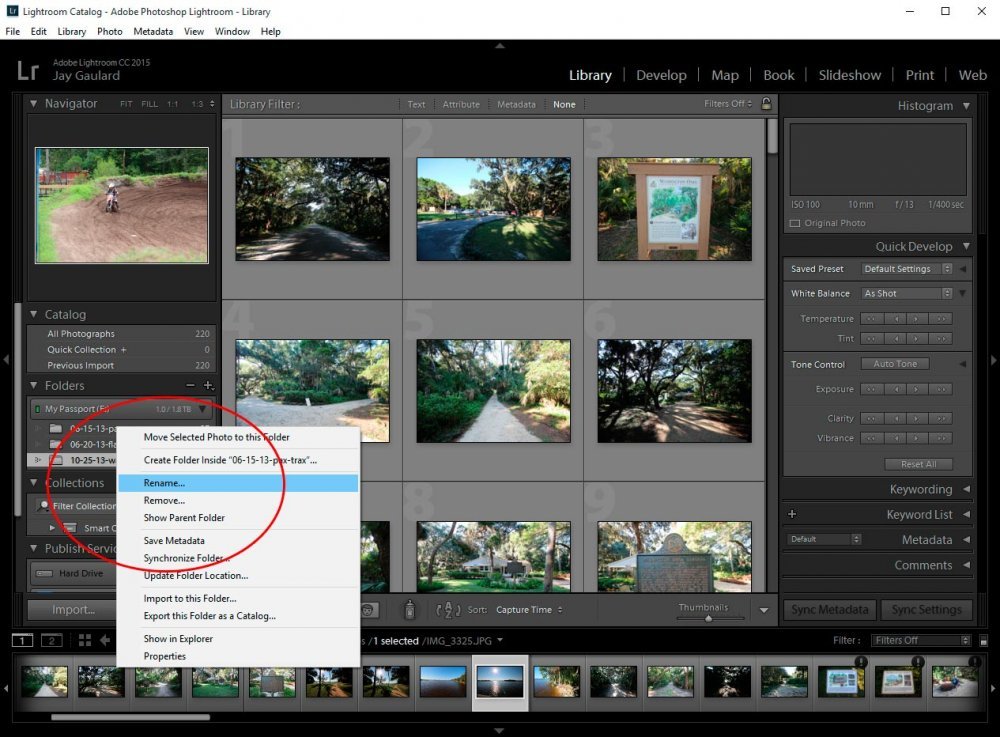
Now that we understand the importance of performing all our file and folder manipulation inside of Lightroom, let’s go over a few tasks that are easily accomplished. The first task is renaming a folder.In order to rename a folder that’s been imported into Lightroom, all you need to do is right-click on said folder in the Folders panel and click on “Rename.”
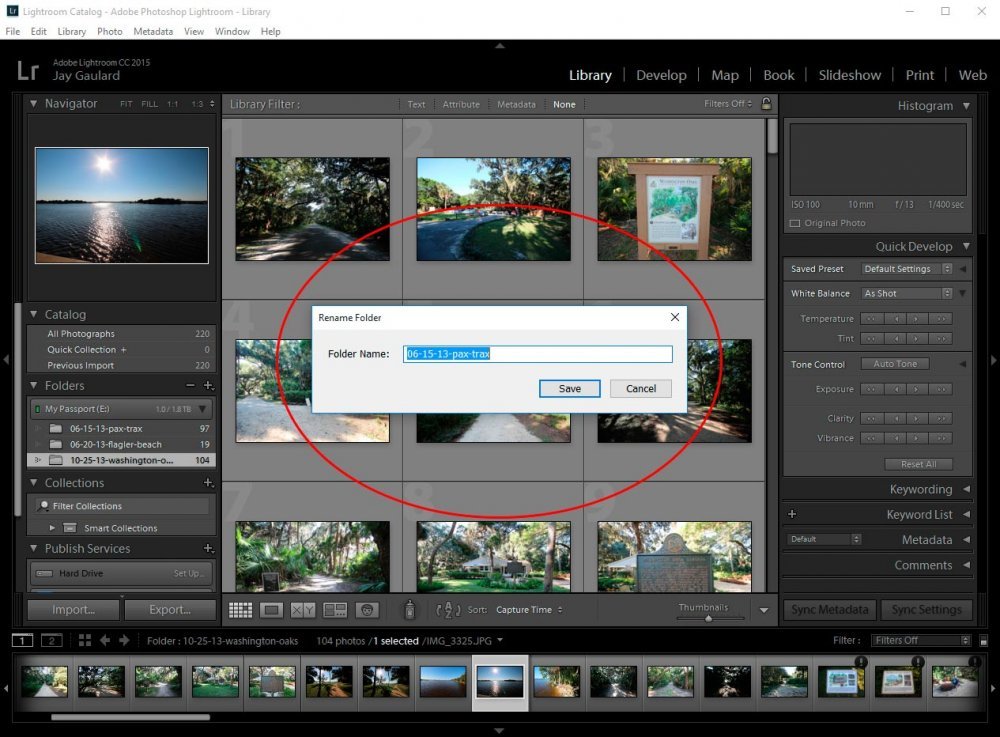
Once you click Rename, you’ll be presented with a box that pops up. This box gives you the ability to type a new name for your folder inside of it. If you decide to do this, go ahead and click “Save” and you’ll be set. Just a word of warning though – if you rename a folder or folders inside of Lightroom, your original folder or folders will be renamed as well. So if you browse around your computer or external hard drive with your file explorer while not using Lightroom, you’ll see your changes in real life.
Moving a Folder Inside Lightroom
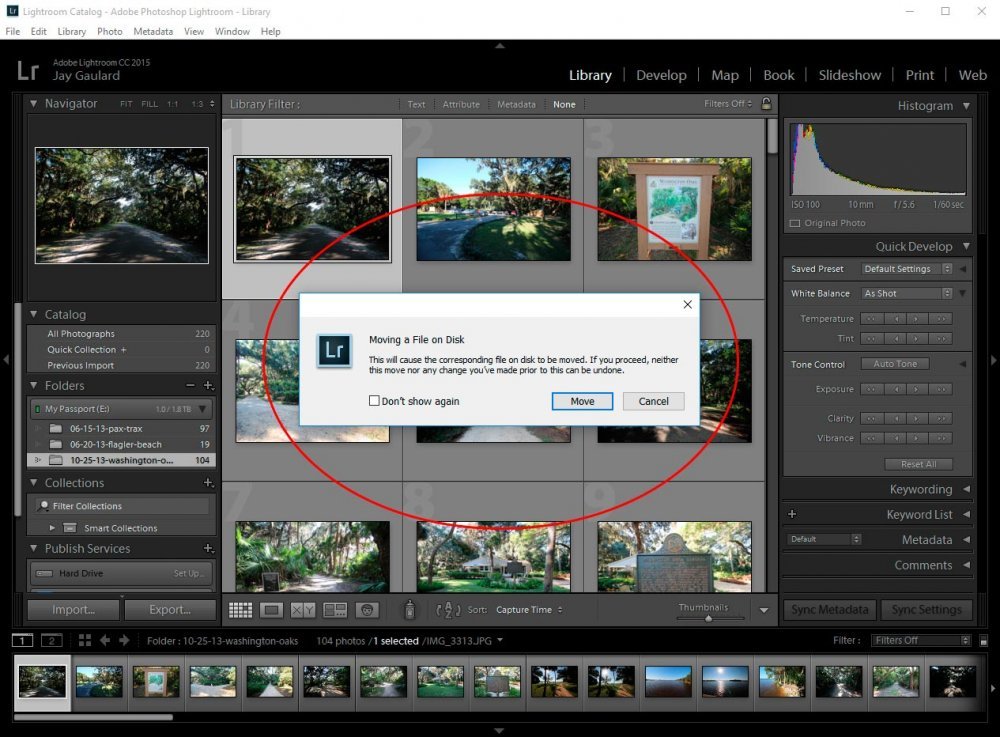
Moving a folder inside Lightroom is even easier than renaming one. If you’d like to move a folder, simply click and drag that folder inside the folder you’d like to relocated it to. Once you click, drag and unclick, another box will appear. This time, the popup box is merely a warning. It asks if you really want to perform the action you just attempted to perform. If you do, click “Move” and if you don’t, click “Cancel.”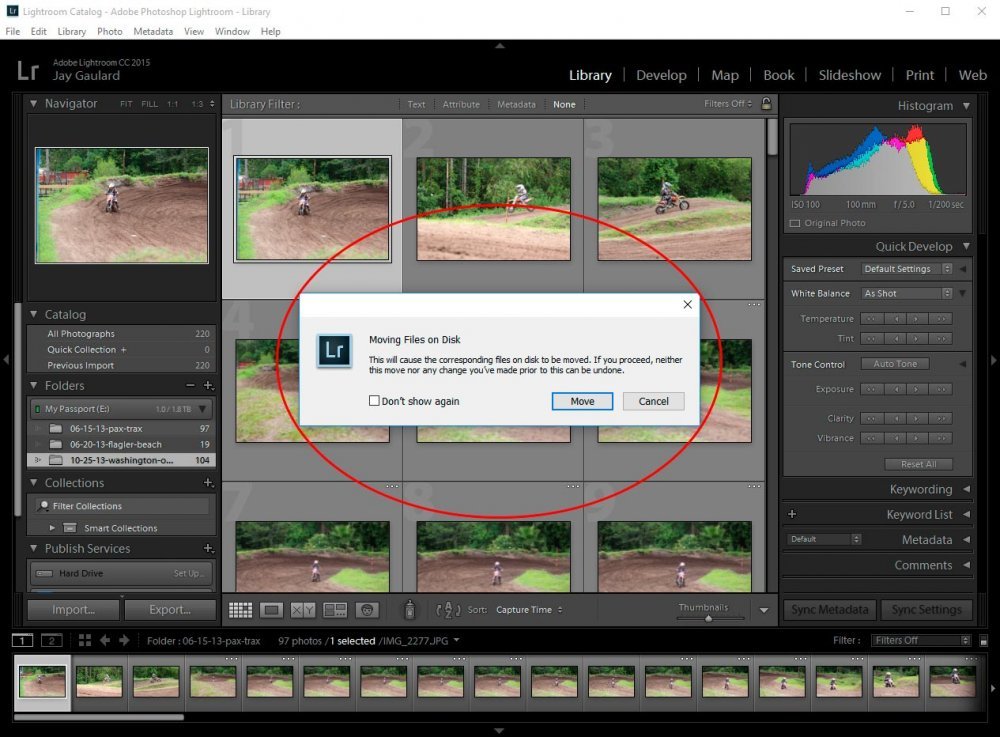
Moving Images Inside of Lightroom
I’m sure you’re getting the hang of things by this point. If you’ve ever used Windows, you most likely understand the concept of clicking and dragging. Well, I’m here to tell you that if you can click and drag around Windows, you can do the same inside Lightroom.Let’s say that we’d like to move a photo or photos from one imported folder to another inside our Lightroom workspace. To do this, all we need to do is click our image and drag it from one of our thumbnail views to our desired folder in the Folders panel. If you want to move multiple images, just grab then by using your Ctrl or Shift keys and drag them to the folder the same exact way. Once this is complete, you’ll be presented with a similar box to above. If you want to actually move the image(s) to a new folder, go ahead and click “Move” and if not, click “Cancel.”
Renaming Images Inside of Lightroom
If you’d like to, for whatever reason, change the file name of a photo inside of Lightroom, you need to go through a short process. It’s beyond me why you can’t simply right-click on the image and choose “Rename.” For one reason or another, if you’d like to rename an image, you have to head up to the main menu and click on “Library.” Once you do this, you’ll see the “Rename Photo” selection.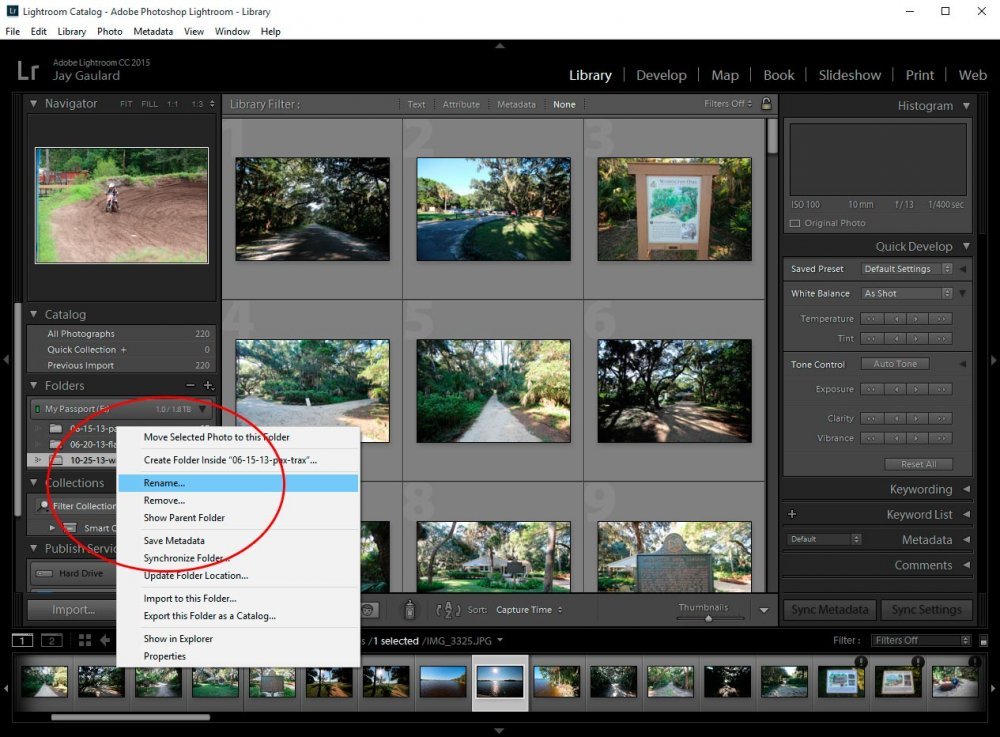
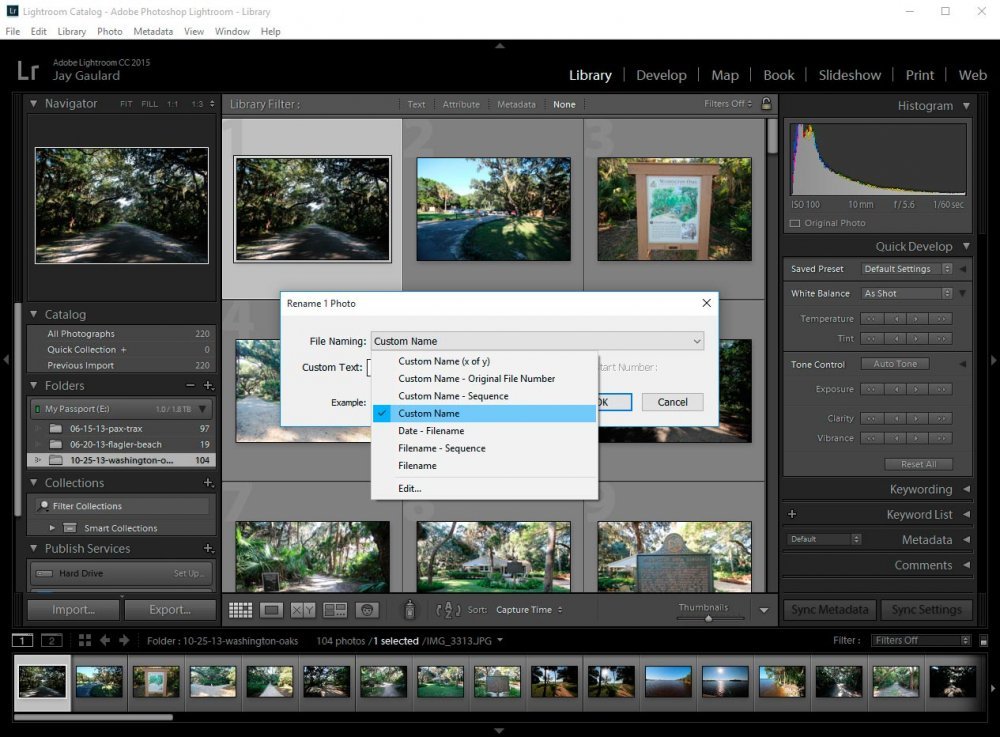
Once you make this selection, you’ll see another box appear. This time though, you’ve got some choices. If you only selected one of your thumbnails (images) to rename, you can simply choose one of the singular file name options, such as “Custom Name” from the drop-down box. All you need to do from here is type a new name and click “OK.”
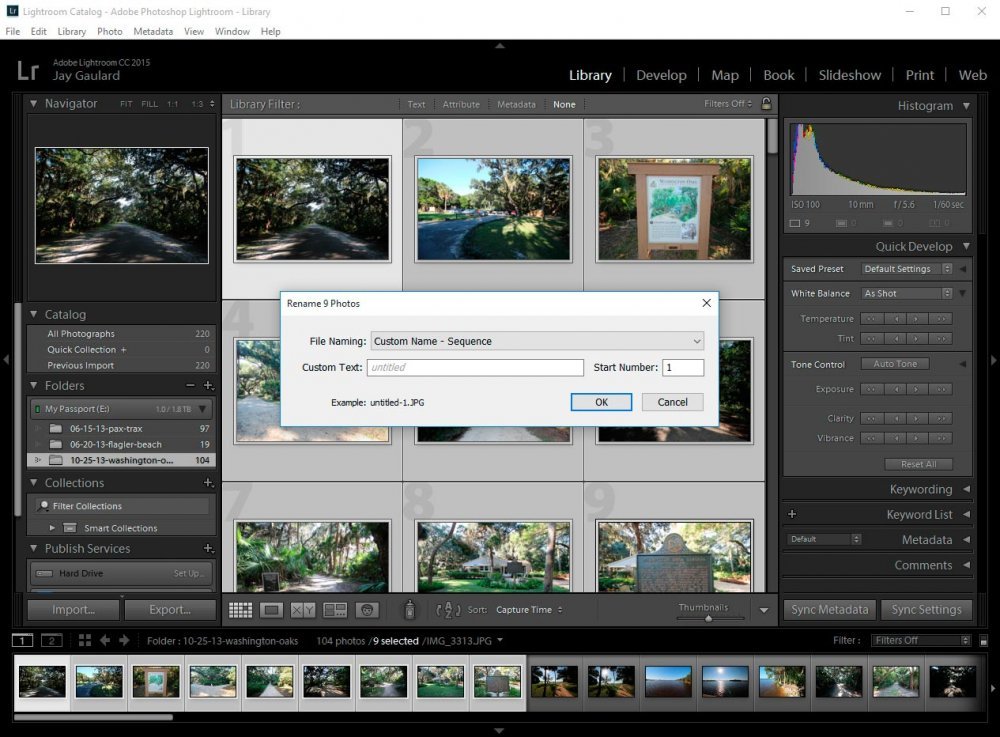
If you decided that you would like to rename multiple photos, or perhaps all your photos in a particular folder, you can choose one of the multiple file name options. Just like when you originally imported your photos into Lightroom, you’ve got some decisions to make. If you decide that you’d like to give your photos a custom name and then have a successive number applied to the ending of each file, go ahead and choose “Custom Name – Sequence.” When you do this, you’ll see these fields appear (screenshot below), where you can name your files and choose a start number. There are other choices available as well, so go through these to see which one fits your needs.
Removing a Folder From Lightroom
Sometimes, you want to get rid of a folder from Lightroom. Either you changed your mind or, after reviewing your images, you realized they weren’t up to snuff. Whatever the reason, it’s quite simple to remove a folder from your workspace.If you’d like to remove a folder from your Lightroom catalog, go ahead and right-click on the folder inside your Folders panel and then click “Remove.”
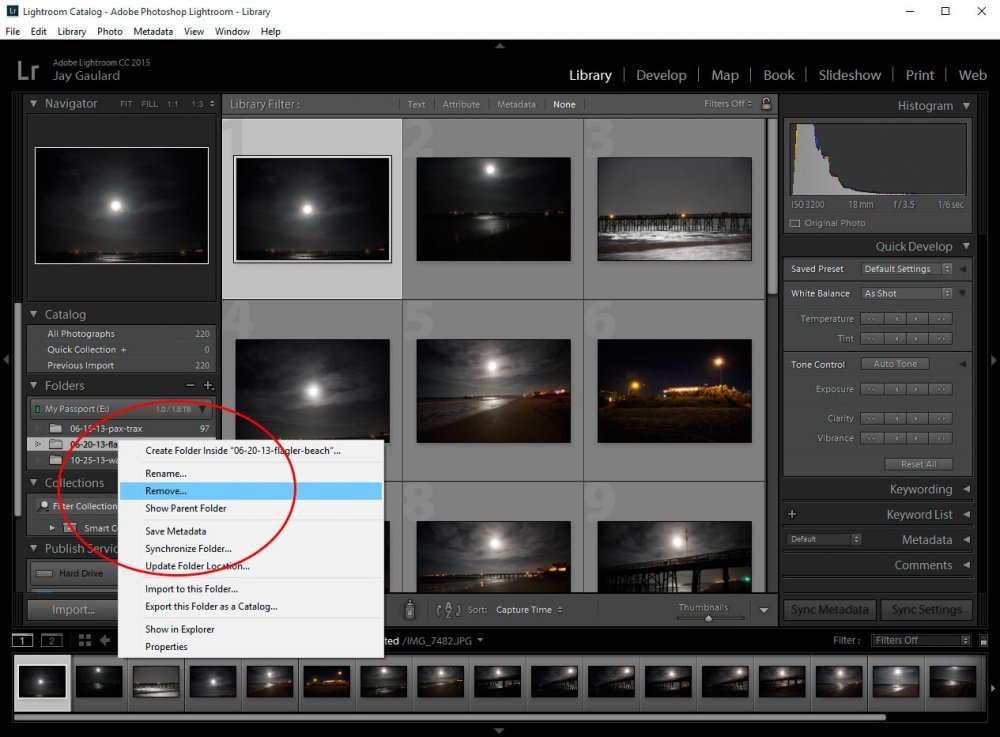
After you do this, a confirmation box will appear telling you that if you go ahead with this action, your folder will be removed from Lightroom, but not from your computer. If you agree with this, click “Remove.” If you changed your mind, click “Cancel.”
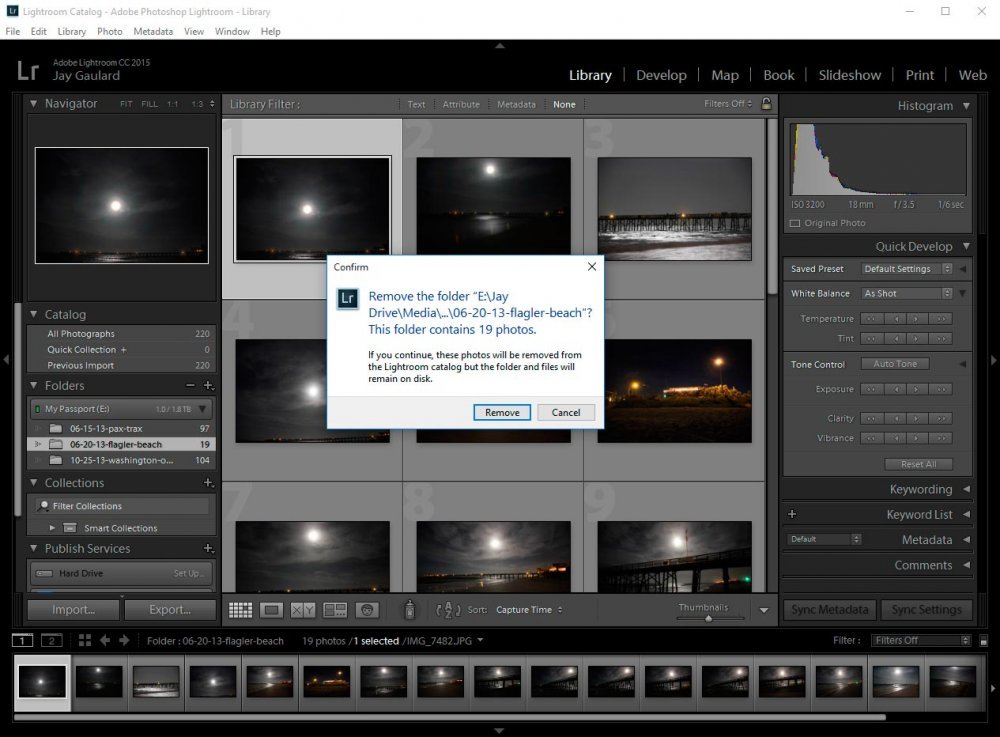
Deleting Photos From Lightroom (Or Your Computer)
Many times, photographers would like to delete imported photographs from Lightroom. Along the same lines, these photographers would like to, not only delete these photos from Lightroom, but would like to delete from from their hard drives as well. If you’re a photographer, you know how some photos just don’t make the grade. It’s better to have a look at them and then get rid of them in their entirety.Once your collection of photos is imported into Lightroom, it’s no problem at all to complete both tasks I described above. In order to delete a photo or photos, simply click on it or them and hit the “Delete” key on your keyboard. This will bring up a box that asks what you’d like to do.
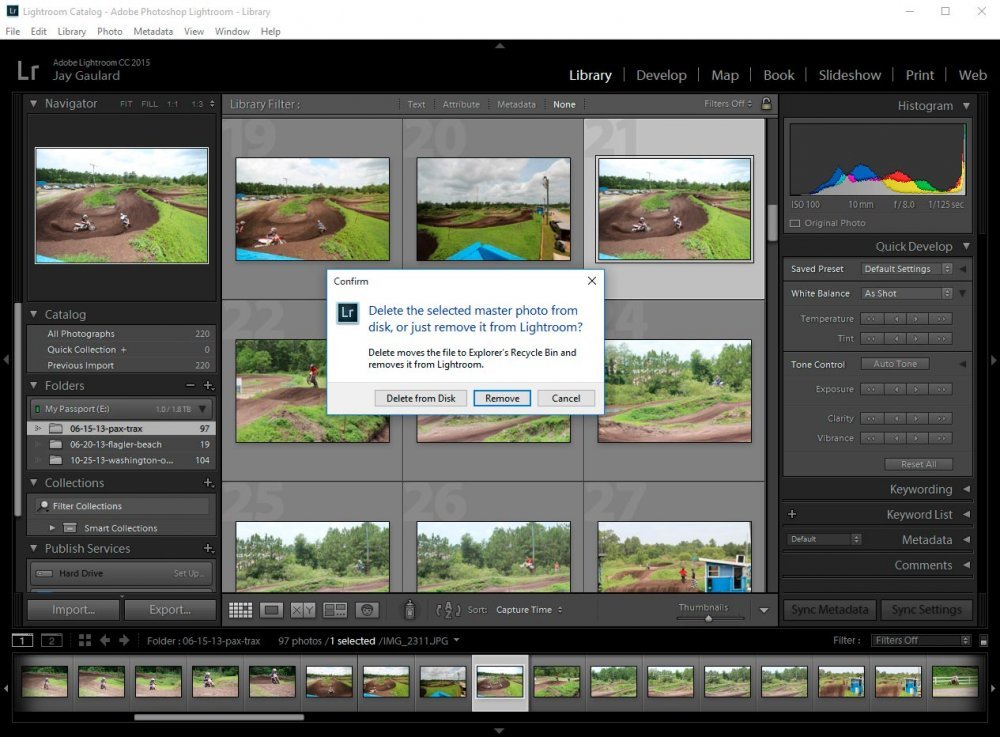
As you can see from the screenshot above, we’re asked if we’d like to remove the photo from our hard drive as a whole as well as from Lightroom, or just from Lightroom. If we delete it from both, the image will be removed from our file structure and will end up in our recycle bin. If we want it deleted just from Lightroom, it will be removed from our catalog, but not from our hard drive. In this example, I’m going to remove this image just from Lightroom because I want to use it for the next section in this post. To do this (and keep the photo on my hard drive), I click “Remove” and the photo disappears from my thumbnails. To confirm that it’s gone, I can take a look at the number of images I’ve got in this folder over in the Folders panel. In my case, the number dropped from 97 to 96.
Synchronizing Folders Inside Lightroom
In this final section, I’m going to explain how to add deleted images back into your Lightroom catalog or how to add new photos into an existing folder. If you refer back to the previous section, you’ll see that I deleted an image from one of my imported folders. If I browse that folder on my hard drive using my file explorer, I’ll find 97 files inside of it. If I browse the thumbnails contained inside that folder while in Lightroom though, I’ll find only 96. Essentially, I’ve only got 96 out of the 97 files in that folder included in my Lightroom catalog.The scenario I described above is quite similar to one where I add additional photographs to a folder that I’ve previously imported to Lightroom. If I do this, those additional photos won’t appear in my Lightroom catalog until I “Synchronize” the folder. I’ll give you can example so you can see what I’m talking about.
If I want to re-include a deleted image or add new images to an existing folder in Lightroom, all I need to do is to right-click on the folder in question. Once this is done, I can click on the “Synchronize Folder” option and a dialog box will appear. This box indicates how many new (or previously deleted) images I’ve got inside the folder.
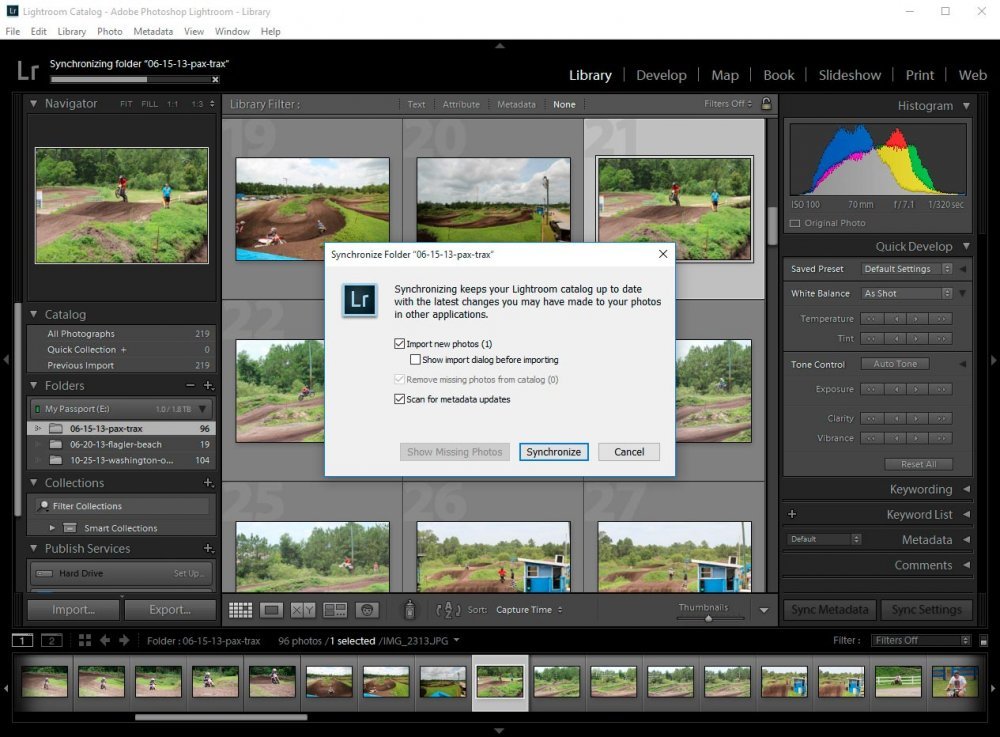
If I want to include these additional images, I simply click the “Synchronize” button. After that’s done, Lightroom will scan the folder and pull in any images that weren’t previously shown. It will increase the file count inside of the Folders panel and display only the added photos.
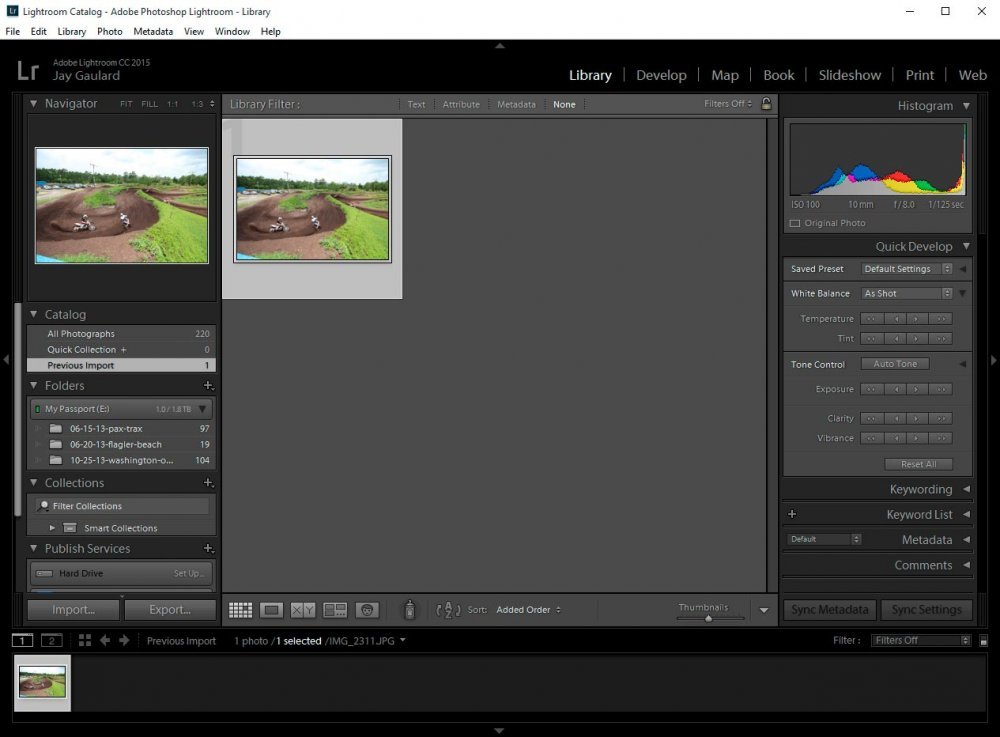
And finally, if I click the folder inside the Folders panel, I should see all the images that were already included in the catalog, as well as any new ones I just added.
