Search

Selection Tool in Photoshop

  • Thread starter CaptainDan
  • Start date
CaptainDan

CaptainDan

Member
Joined
May 9, 2021
Messages
113
Reaction Score
0
Points
16
  • #1

Different Types of Selection Tools in Photoshop​

Before I begin discussing the different types of selection tools that Adobe Photoshop has to offer, I'd like to first talk about the selection and execution process itself. Basically, it comes in two steps; the selection of an area of an image with one of the tools I'll cover below and then the application of some sort of a change with another one of Photoshop's tools. For instance, let's say I would like to apply a filter to only a very specific area of a photograph. I would first use the appropriate selection tool to isolate the area in which I'd like to work and then I'd go ahead and apply whichever filter I deemed fit.

What's best about Photoshop's selection tools is what I just mentioned above; isolation. Whichever tool you decide to use, rest assured that by making a selection, you'll be separating the selected area from the rest of your file. And once selected, you can delete that area, copy it, alter the pixels in some way, apply a color cast, apply a filter - whatever. This is the power of selections. The only thing you need to do now is decide on which one of the available tools is best to use and then to learn exactly how to use it. In today's post, I'll talk about which group of tools is most appropriate in which circumstances and then in later posts, I'll talk about how to go about using each tool in great detail.

Types of Selection Tools​

Photoshop organizes their selection tools into four groups; geometric, freehand, edge-based, and color-based. I'll talk about each one below.

Geometric Selections - These selection tools include the Rectangular Marquee Tool, Elliptical Marquee Tool, Single Row Marquee Tool, and the Single Column Marquee Tool. In my opinion, these are the easiest tools of the bunch to use. When you choose one of them, you can make some settings in the options bar that can create very exacting measurements. If you were to hold the Shift key on your keyboard (or not hold it), you can create exactly proportionate shapes. Let's say you would like to copy and paste an area of your image that's shaped like a square. You could easily do that with the Rectangular Marquee Tool. You can also easily create column and row lines and borders when you combine the last two tools with some layer styles.
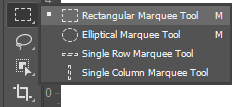
geometric-selection-tools-adobe-photoshop.gif

Freehand Selections - This group of selection tools includes the Lasso Tool, Polygonal Lasso Tool, and the Magnetic Lasso Tool. With the first tool, you can pretty much freehand draw a selection and then do what you want with it. It's sort of like having a crayon in your hand and choosing an area to select. With the second tool, you can click your mouse to create anchor points to form any shape you'd like. When completed, you'll have your selection. With the third tool, under the right circumstances (high contrast between what you'd like to select and its background), you can trace an object in your image and the selection area will "cling" to it as you move the tool around the object (hence the term "magnetic"). This is a very cool tool. It's perfect for selecting odd or jagged objects.
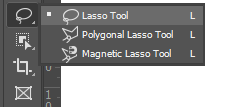
freehand-selection-tools-adobe-photoshop.gif

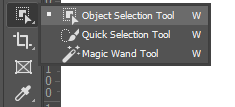
Edge-Based Selections - As you become more familiar with making selections in Photoshop, you'll undoubtedly seek more powerful tools. The next three should fit the bill. For this group, two tools can be put to good use. They are the Object Selection Tool and the Quick Selection Tool. The first tool is especially powerful in that it can select a distinct object in an image by just surrounding it. You can surround the object with something like the built-in rectangular marquee or lasso. Once surrounded and if the object is of sufficient contrast with its surroundings, it'll be selected. For the second tool, this one sort of works like the Magnetic Lasso Tool does. As you "paint" with its brush, it'll cling to shapes in the image. But with this tool, an entire area can be selected in one fell swoop. You don't need to encircle it.
edge-color-based-selection-tools-adobe-photoshop.gif

Color-Based Selections - This final group consists of only one tool, the Magic Wand Tool. Like the preceding few tools, this one needs to be used under the proper conditions. Based on the settings you choose in the options bar, this tool will make its selection based on pixel color. So if you've got distinct colors in an image and would like to select everything of that color, you can make one click with your mouse and you'll have your selection. This tool is a bit quirky and it takes a while to learn sufficiently, but with the proper images and shape colors, it can be a huge time saver.

So there you have it - a fairly decent description of the various groups of selection tools in Adobe Photoshop. If you've got something to add, please share down below. Also, if you've got any questions, you may ask them down below as well. Thanks!
 
15Katey

15Katey

Member
Joined
May 10, 2021
Messages
130
Reaction Score
0
Points
23
  • #2

How to Invert Selection in Photoshop​

Inverting a selection in Adobe Photoshop is one of the most simple tasks available. Basically, it's only a few steps. In today's post, I'll be explaining exactly how to invert your selection and then I'll be working through an example that demonstrates the process, step by step.

To start off, here are the instructions:

- First, make your selection with any of the available selection tools in Photoshop.

- Then, head up to the Select > Inverse menu item in the top bar and click. You'll instantly see the result you're looking for. Whatever it is you initially had selected won't be anymore and everything that wasn't selected will be. You'll be inverting it, if you will.

Okay, now that that's out of the way, let's get into a quick demonstration.

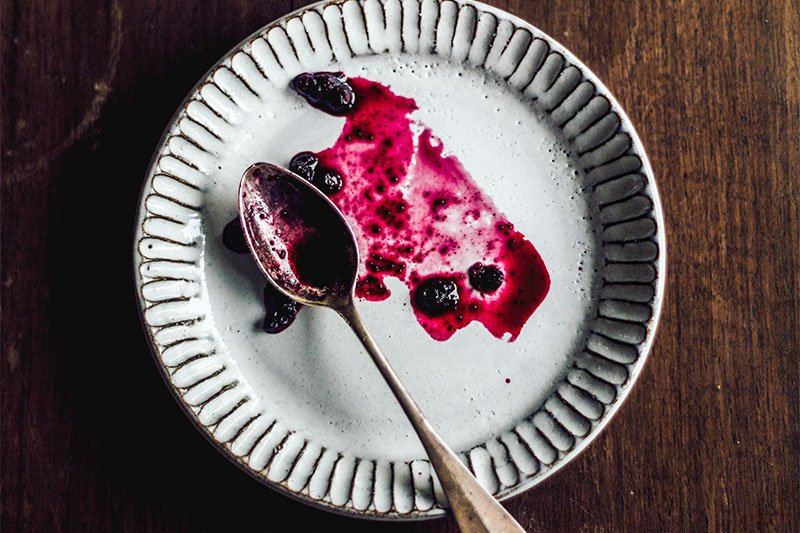
I'll open Photoshop and then I'll open (File > Open or Ctrl+O) a photograph in the application. I'll start off with a photo of a dessert plate with a spoon sitting on it.

dessert-plate-spoon.jpg

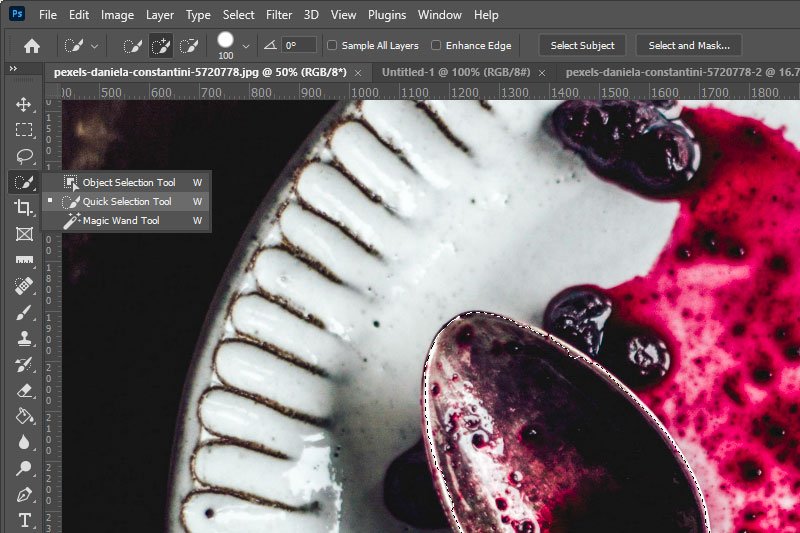
Then, I'll head over to the Quick Selection Tool in the left toolbar.

photoshop-quick-selection-tool.jpg

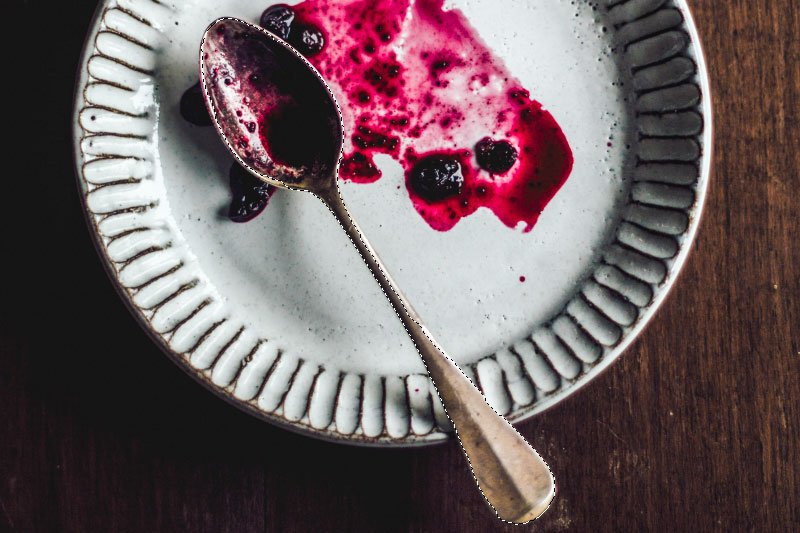
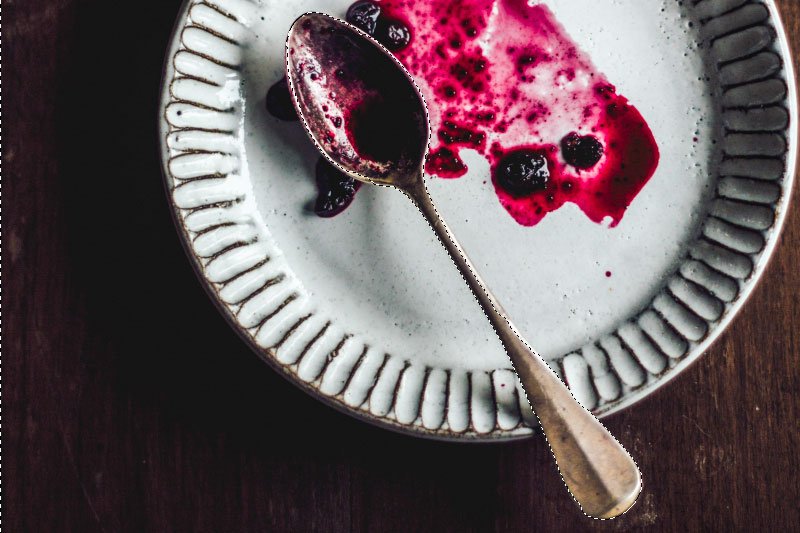
Once I have that tool chosen, I'll go ahead and make my selection. In this case, I'll select the spoon. Since this is for demonstration purposes, I'll just do this quickly and dirtily. Or, quick and dirty.

photoshop-selection.jpg

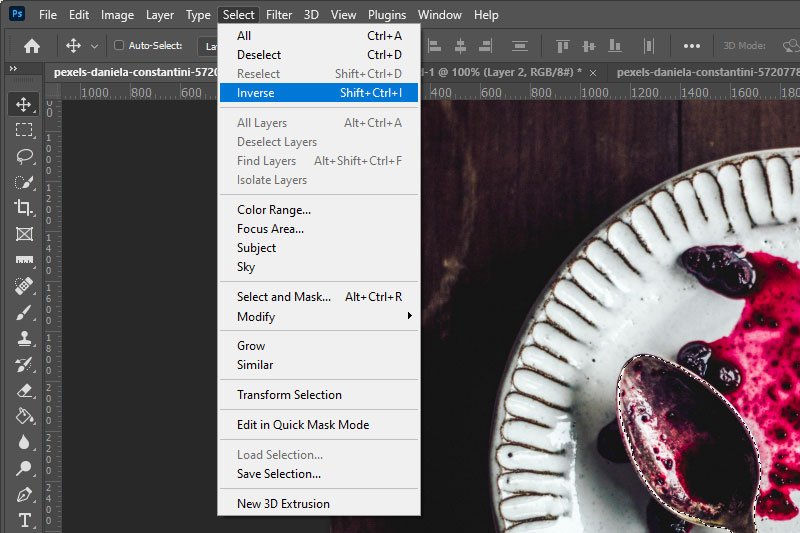
Now, if I wanted to select everything but the spoon, I could easily do that. I'll go to the Select > Inverse menu item in the top menu and click.

select-inverse-menu-item.jpg

With that chosen, I'll see that the original selection has been inverted. So basically, everything in the image is now selected, other than the spoon itself. Take a look at the next image. See the selection marching ants on the outer border and around the spoon? Those outer border ants are the only way we can tell what's actually selected.

inverse-selection-photoshop.jpg

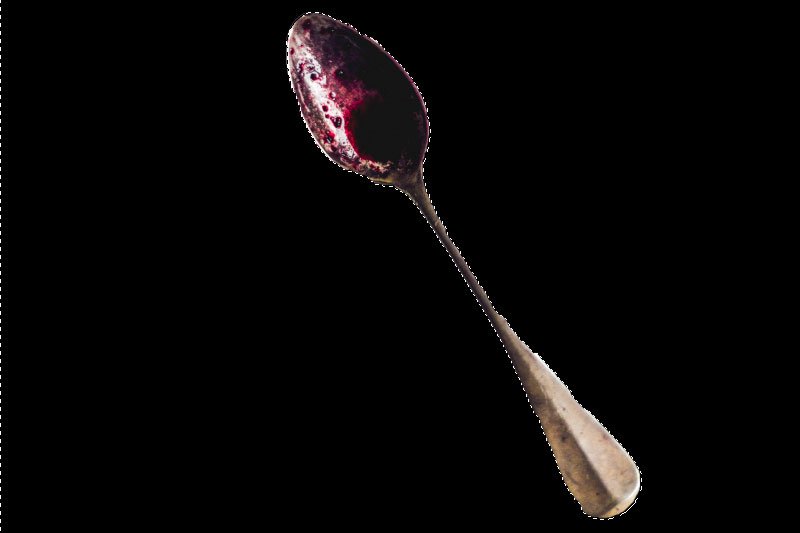
I suppose if I fill the selection with black, the selected area would be more obvious. Here that is.

filled-selection.jpg

And that's all there is to it. Mind you, you can use any selection tool here to accomplish this, from the Rectangular Marquee Tool, the Elliptical Marquee Tool, and so on. If you've got any questions about this process or if you've got anything to add, please do so below. Thanks!
 
Newman

Newman

Member
Joined
May 11, 2021
Messages
106
Reaction Score
0
Points
23
  • #3
using-selection-tool-adobe-photoshop.jpg

Today, I’m going to touch on the ultra-beginnings of making selections in Adobe Photoshop using the Rectangular Marquee tool. Since this tool is so useful and so popular, I’ll be writing many posts that cover how you can take advantage of it, and its variations, during your photo editing workflow. At this moment though, my plan is to merely introduce you to one aspect of what’s in store.

In today’s post, I’ll talk about what the rectangular marquee tool is, what it looks like in practice (how you can identify it) and what you can accomplish with it. Regarding this tool and others like it, things begin very slowly, but become quite complex the further you go. A solid foundation is essential.

What is the Rectangular Marquee Tool?​

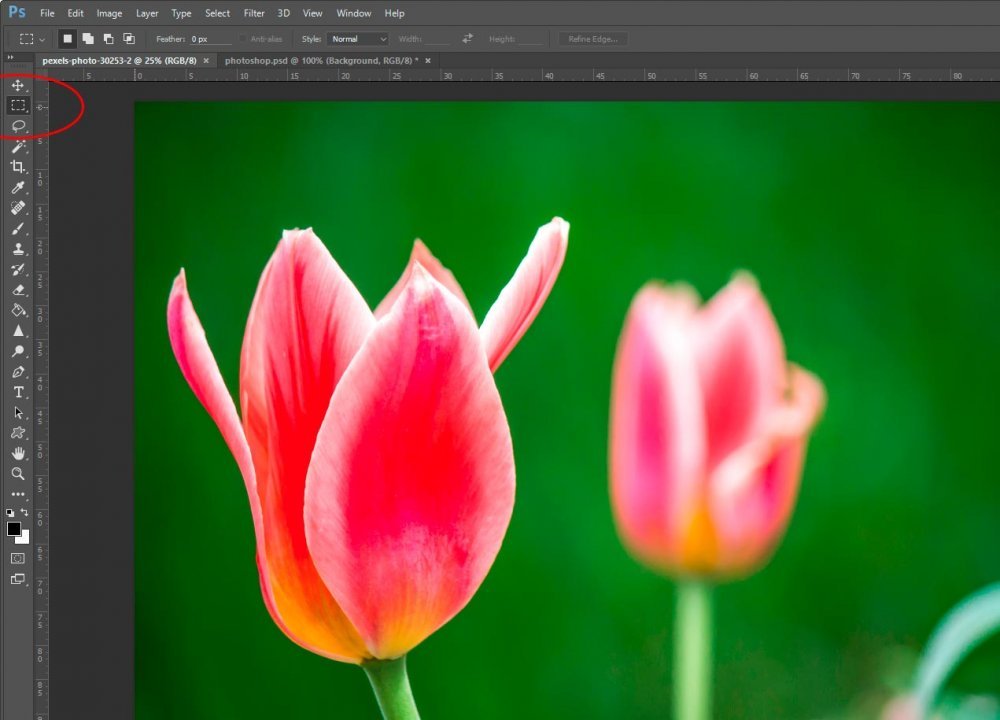
The Rectangular Marquee tool is a tool that’s located in the left toolbar that allows you to select something in a layer. There are multiple variations of this tool, which we’ll discuss in later posts. For right now, I’ll focus primarily on this one because it’s fairly straightforward.

rectangular-marquee-tool-adobe-photoshop.jpg

If you click on the area I’ve circled in the screenshot above, you can drag your mouse out to explore similar tools. For now, keep the Rectangular Marquee tool selected.

Selecting Part of an Image​

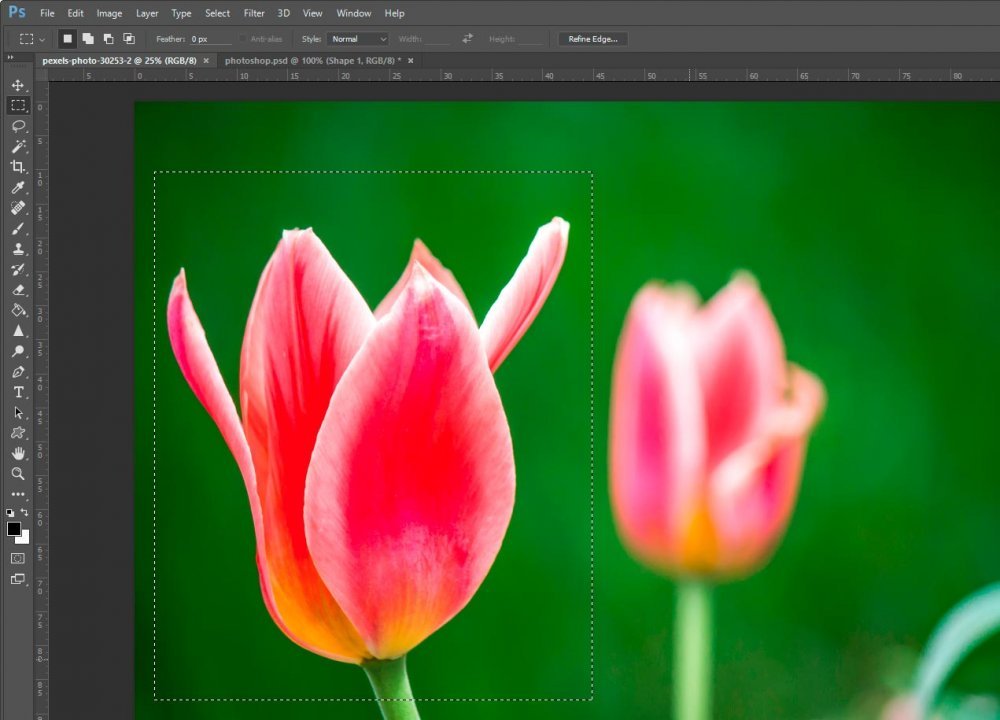
Once you select the Rectangular Marquee tool, you can move over to your image, click down with your mouse pointer and drag in a specific direction. The goal here is to encompass the area of the image you’d like to select.

selecting-image-rectangular-marquee-tool.jpg

To select the area that’s outlined in the above screenshot, I clicked at the upper left corner and dragged down to the lower right. That’s where I let go of the mouse pointer.

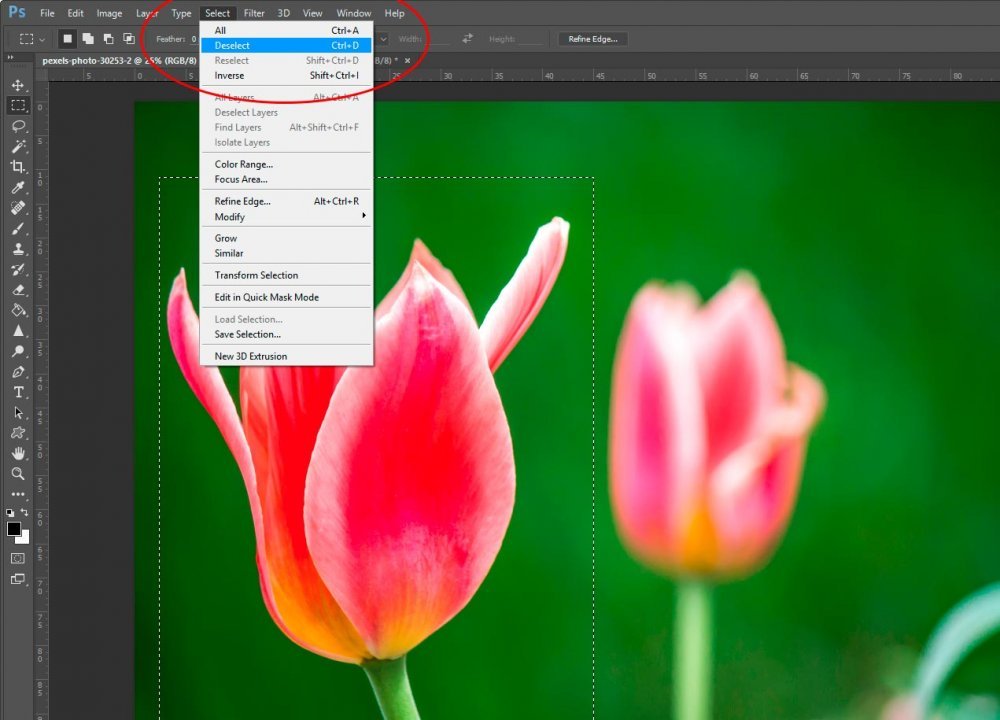
In the beginning, this may take some practice. After a few tries though, you’ll find that you can become an expert – fast. If you select something and then decide you don’t want it selected anymore, you can simply click outside of your selection. That will make the selected outline disappear. Another method for deselecting something is to head up to the top menu and click on Select > Deselect. This will have the same effect.

deselecting-in-adobe-photoshop.jpg

By the way, the dashed outline is called Marching Ants in the Photoshop world. This is because, while not seen in the screenshot, the dashed line moves, similar to what marching ants would look like.

Moving a Selected Area​

After you select something in Photoshop, you most likely want to use it somewhere else. Right now, I’ll show you one method for moving something and when I’m finished with this, I’ll show you another method – a better one.

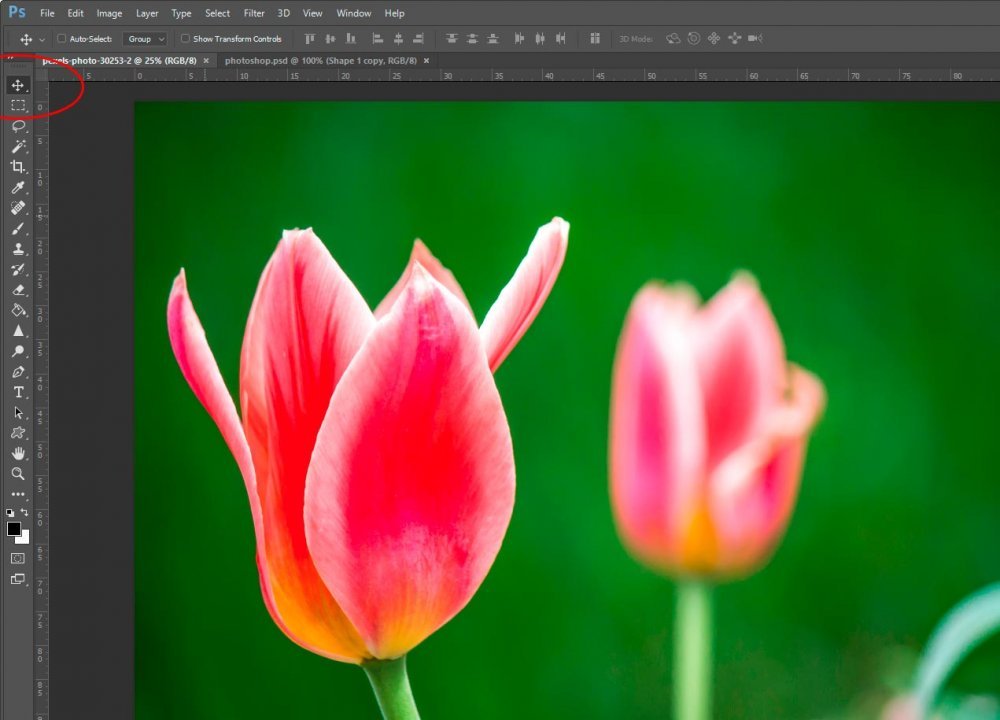
Let’s say I select the left flower of my image. I’d like to see that flower moved over to the right. One method I can use to accomplish this is to, while the flower is selected, click on the Move Tool.

move-tool-in-adobe-photoshop.jpg

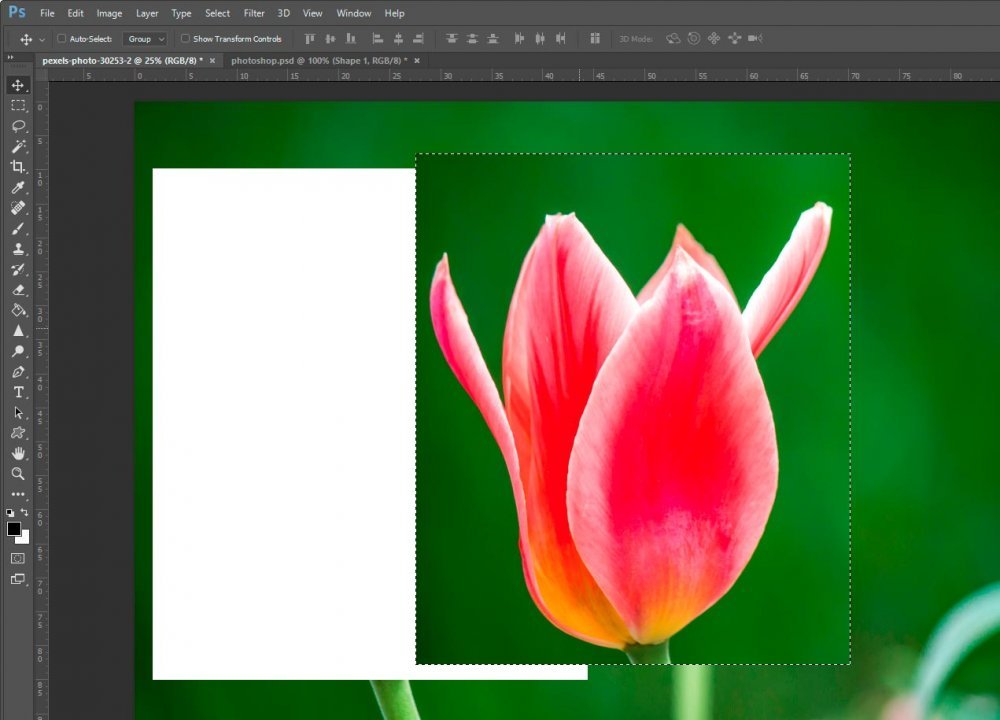
Once I click on that tool, I can click anywhere inside my selected area and drag to the right.

move-selected-area-in-adobe-photoshop.jpg

The only problem with this is that, while the selected area was moved, it’s now stuck in the same layer. We also have this big empty area that resides where the selected area used to be. FYI – in all my years using Photoshop, I’ve never once moved something using this method. I simply show it to you so if you accidentally end up with something that looks like this someday, you’ll know what you did. Perhaps some day in the future I’ll do something like this, but I’ll need to discover a reason first.

Copy Selection to New Layer​

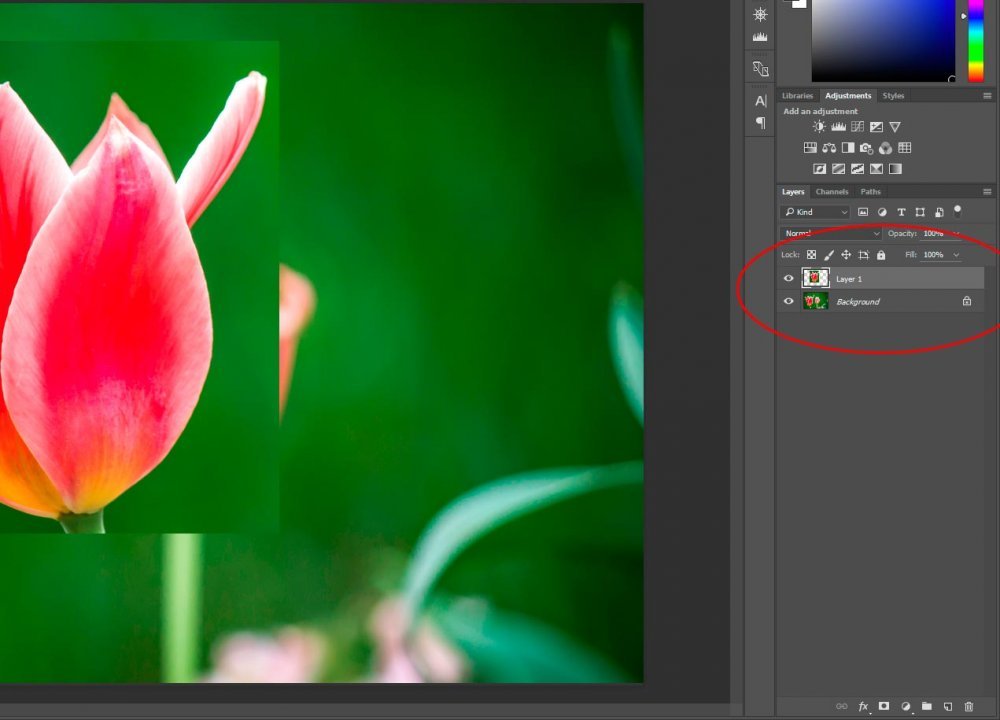
In general, when making a selection, it’s advisable to copy and paste that selection to a new layer. This will give you the versatility you otherwise wouldn’t have.

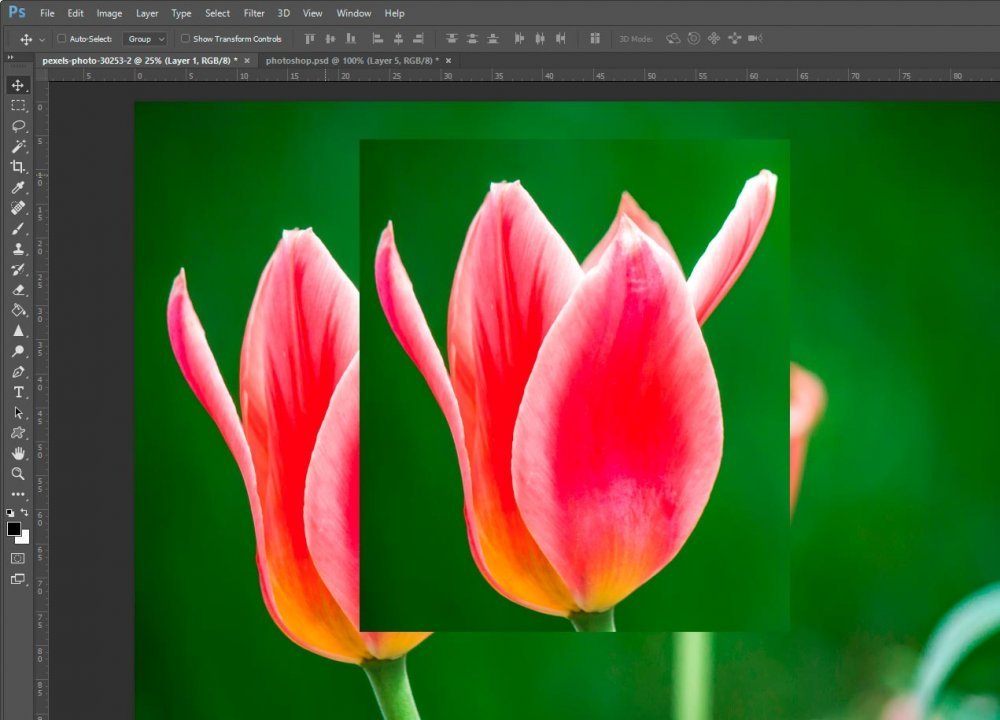
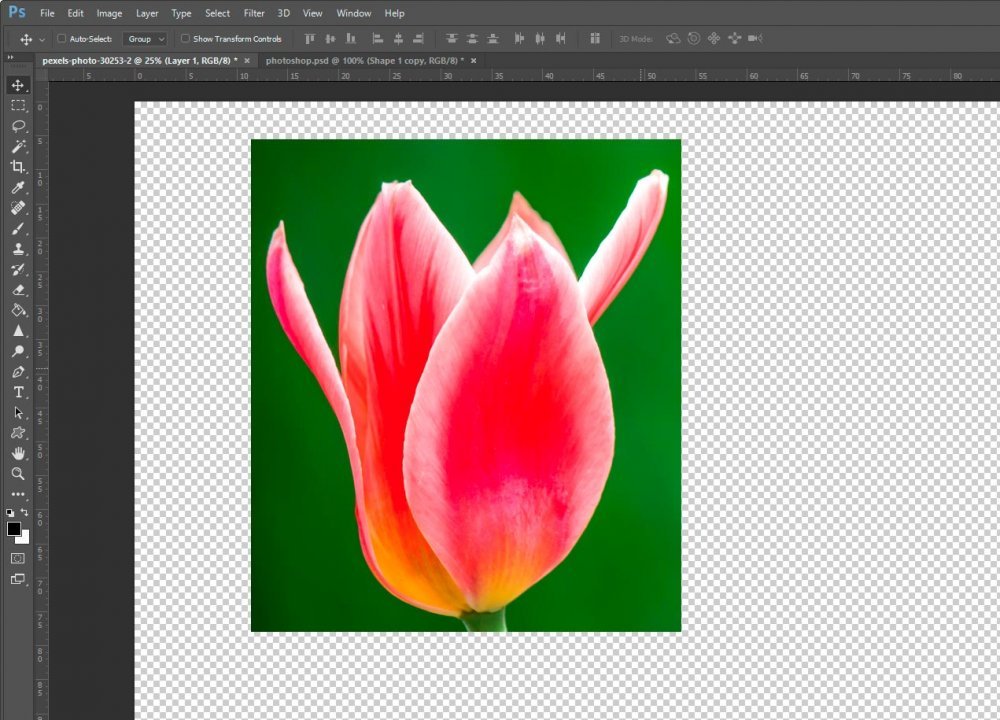
Now, there are a few methods for copying and pasting a selection to a new layer. The first is to make the selection and then click Ctrl+C to copy and then Ctrl+V to paste. When you do this, a new layer will be automatically created and the selected section will appear in that layer. If you’d like an even easier keyboard shortcut, can you make your selection and simply click Ctrl+J. This will have the same effect and you reduce the operation by one click. And, as usual, there is always the top menu. If you make your selection and then head up there and click on Edit > Copy and then Edit > Paste, the same exact series of events will occur.

The best part of the copy/paste method is that it’s non-destructive, meaning, the layer you’re selecting from remains in tact. If you hide that layer from view, you’ll always have it to work from.

copy-paste-selection-to-new-layer-adobe-photoshop.jpg

created-new-layer-rectangular-marquee-tool-adobe-photoshop.jpg

hide-background-layer-adobe-photoshop.jpg
 
15Katey

15Katey

Member
Joined
May 10, 2021
Messages
130
Reaction Score
0
Points
23
  • #4

How to Invert a Selection in Adobe Photoshop​

invert-selection-in-adobe-photoshop.jpg

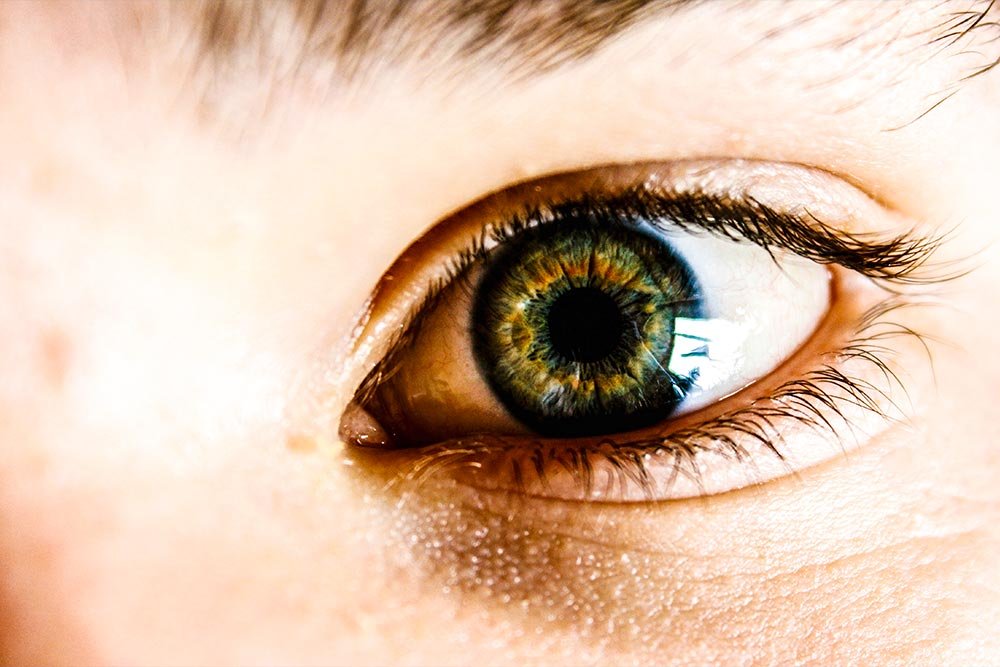
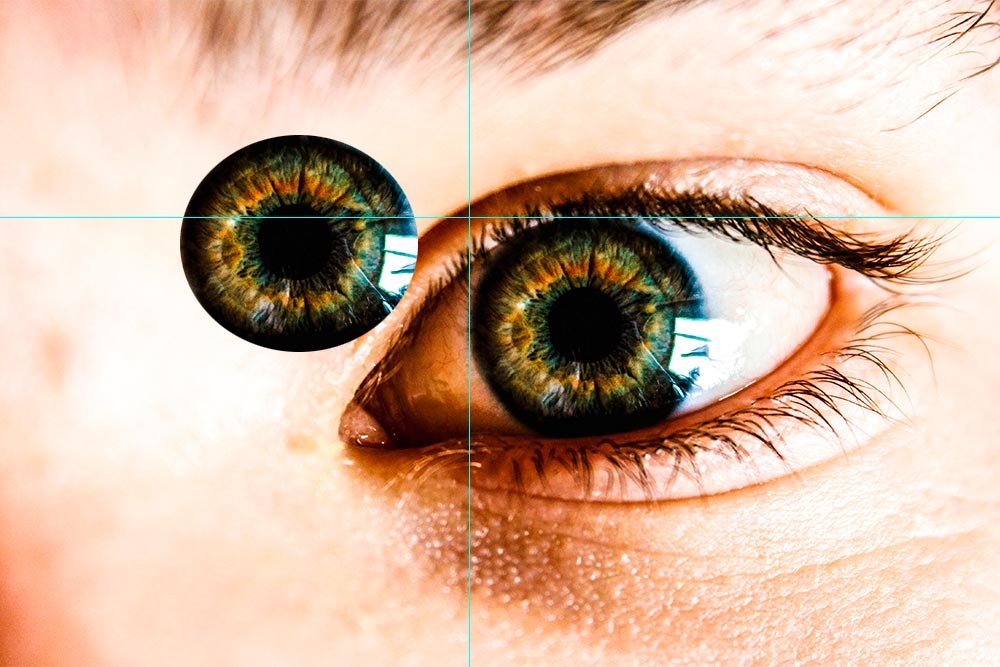
Have you ever wanted to change the attributes of something other than what you’ve already selected in Adobe Photoshop? What I mean is, let’s say you have a photo like the one above. You use one of the many selection tools that Photoshop has to offer and you select the iris of the eye. The thing is, you’re already happy with the way the iris is portrayed. What you’d like to do is change everything else in the photo. Maybe it’s the hue, saturation or the contrast. If you’ve ever wondered how designers and photo editors do things like this, you’re in luck. Today I’m going to show you how it’s done.

In this post, I’m going to explain how to go about selecting an area of a photograph and then how to invert that selection. By doing this, you’ll have the ability to alter everything but what you initially selected. This is a very handy bit of knowledge to have in your back pocket, so be sure to read the post all the way through. Also, at the end, I’ll give you a quick tip that will help accomplish the same task by using a different method.

Making My Selection​

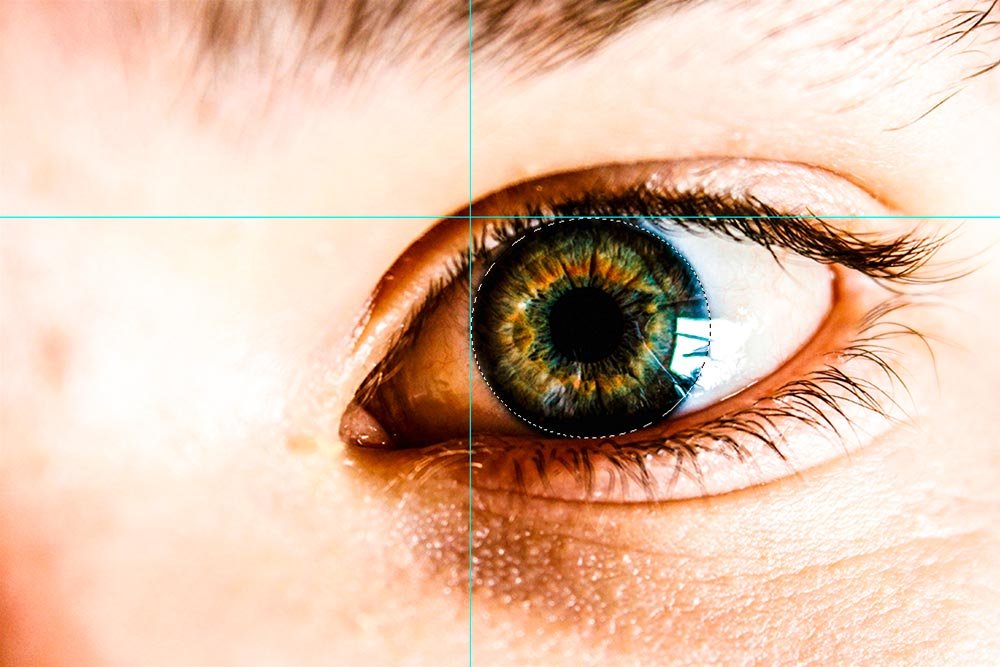
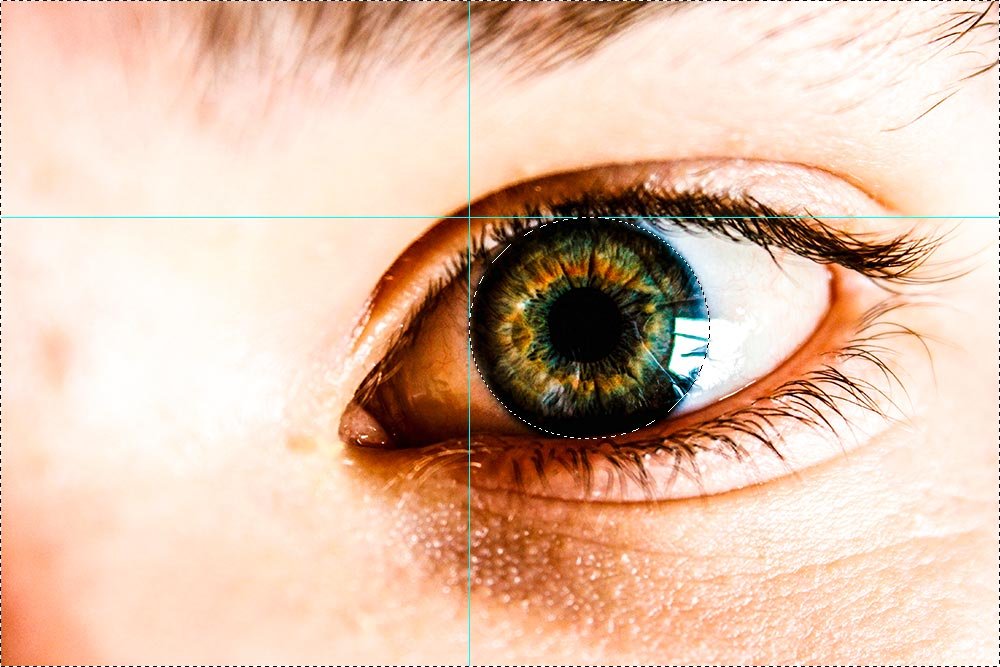
I’m going to stick to using the simple selection tools in this post. I could go for one of the more advanced ones, but since I have yet to talk about them, I don’t want to confuse anyone. Especially since this isn’t a post about selection, per se. Because this is the case, I’ll use the Elliptical Marquee Tool from the left toolbar. With this tool, I want to select the iris. Because the area I’d like to select is round and challenging to accurate encapsulate, I’m going to drag one guide from the ruler that runs along the top of my work area and another that runs along the left side. For the top guide, I’m going to rest the horizontal line right on top of the iris and for the left guide, I’ll line it up with the leftmost edge of the iris. Then, I’ll rest my tool pointer right on top of the intersection of my guides and click and drag down and to the right. This will effectively circle the iris with the Elliptical Marquee Tool. When I feel the iris is selected to my liking, I’ll let go of the mouse. I know this sounds like a lot of steps. It isn’t. Just take a look at the photo below.

rulers-elliptical-marquee-tool-adobe-photoshop.jpg

I’ve got a tip for you. If you want to select something and make your selection either a perfect square or circle, simply hold down the Shift key on your keyboard as you’re dragging the tool. That will lock those proportions. Also, if you don’t see any rulers in your workspace, head up to the View > Rulers menu and make sure that item is checked off. To create a guide from a ruler, simply click on top of one of the actual rulers and drag your mouse outward towards where you’d like the guide to rest. To adjust the position of a guide, use the Move Tool from the left toolbar and hover over the guide. When the mouse pointer changes to a different icon, you can click and drag anywhere you’d like. To remove a guide, click and drag it right off the screen. Let go of the mouse and it’ll disappear.

Inverting the Selection​

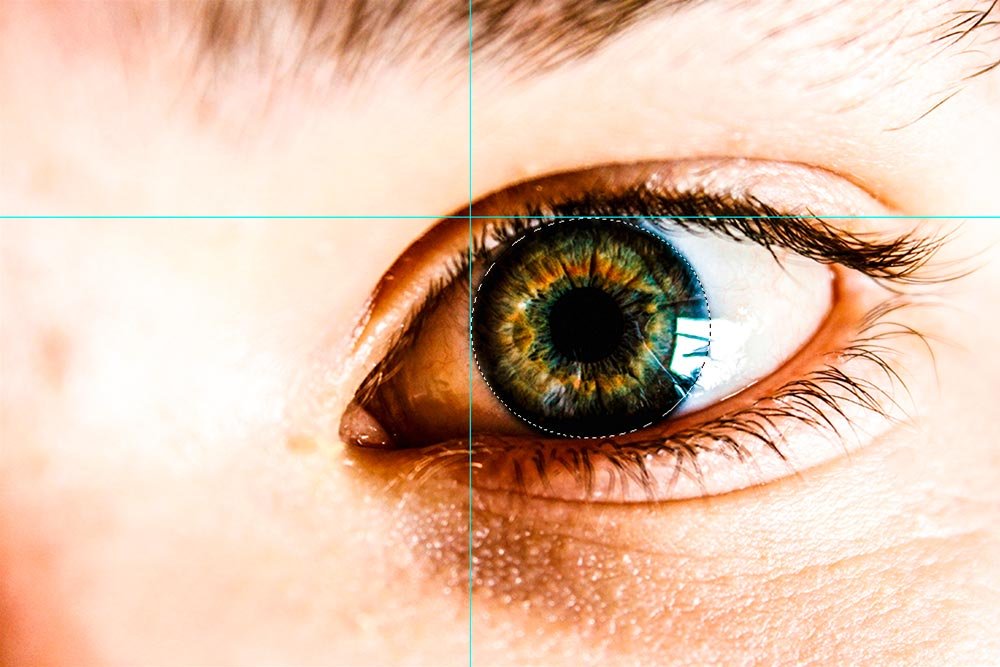
Now that I have the area I want to protect selected, I can invert the selection so it encapsulates everything but this initial area. To do this, I’ll head up to the Select > Inverse menu item and click. Take a look at what happens when I do that.

invert-selection-adobe-photoshop.jpg

To see what happened, look closely at the above screenshot. At first glance, you might not notice anything. Take a look at the outer edge of the screenshot. Instead of having the iris selected, the selected area reversed itself and now everything but the iris is selected. What good is this? I’ll show you.

Desaturating Selected Area​

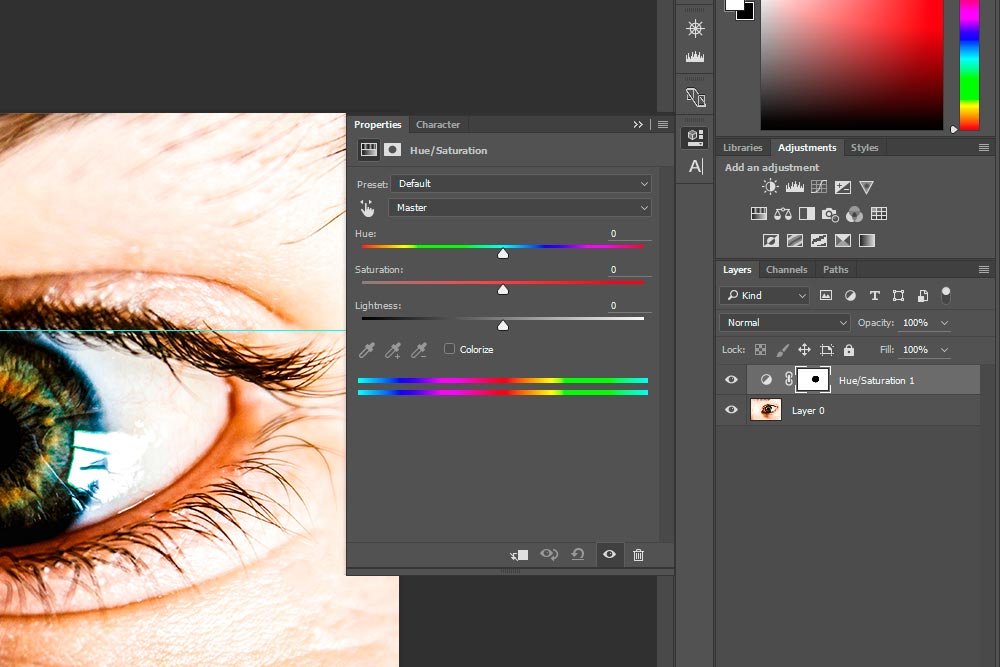
My goal for this project is to make the iris really stand out from the rest of the photo. To accomplish this, I’ll desaturate the selected area. To do this in a non-destructive manner I’ll head over to the Adjustments panel and click on Hue/Saturation.

adjustments-panel-hue-saturation-adobe-photoshop.jpg

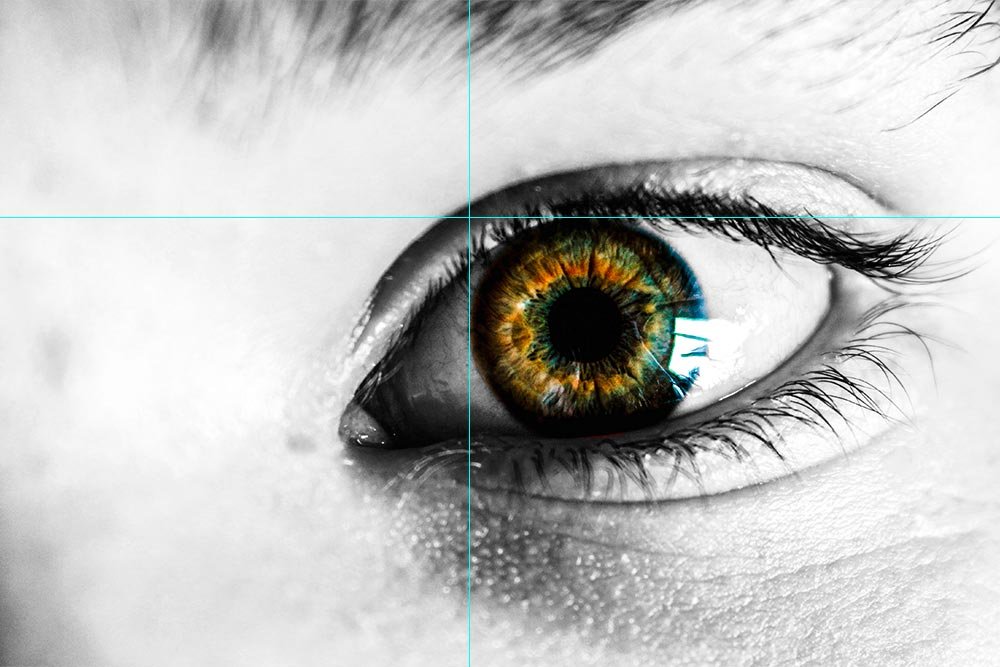
From there, I’ll move the Saturation slider all the way to the left. This will remove all color.

desaturated-selected-area-adobe-photoshop.jpg

See what happened? It’s sort of like those photos where everything is in black and white, except for one item. Usually a rose or something like that. It’s fairly easy to accomplish. Well, if the area to initially select is round or square. If it’s oddly shaped, it’s going to be more of a chore. I’ll get to that in a later post.

Bonus Method​

As promised, I’ll give you a bonus method that will accomplish the same task. Now, the only reason I’m giving this method is because this is a simple project. I can get away with it. If I had different or further goals, I might not use this.

Since I want to separate the iris from everything else in the photo, I’ll set up the rulers and select it like I did above.

rulers-elliptical-marquee-tool-adobe-photoshop.jpg

Once selected, I’ll click Ctrl+C and then Ctrl+V on my keyboard to copy and paste the selection. This will turn the iris into it’s own layer. Here, I’ll move it around a bit just to prove that.

copy-paste-selected-area-adobe-photoshop.jpg

Of course, I clicked on Edit > Undo after I moved the layer because I want it in the correct position, which is where it started.

Now that I have the iris on its own distinct layer, it’s protected from what happens to the original layer beneath it. So, if I click on the bottom layer with the photo in it and then head up to the Adjustments panel and click on Hue/Saturation again, I can follow the same exact instructions as I gave above. I can move the saturation slider all the way to the left to desaturate the entire layer, while leaving the layer above untouched. I’ll get rid of the guides and show you the result.

black-white-color-adobe-photoshop.jpg

See? I get the same result. And to be honest, in certain cases, this method is more versatile. But, this post was supposed to be about how to invert a selection, so you can safely ignore this second method.

Questions? Please ask below. I love to answer any and all of them.
 
CaptainDan

CaptainDan

Member
Joined
May 9, 2021
Messages
113
Reaction Score
0
Points
16
  • #5

Using Selection Tools to Enhance Photos in Adobe Photoshop​

using-selection-tools-enhance-photos-adobe-photoshop.jpg

Photoshop can do a lot of things. Some of them are fairly straightforward and need to get done, while others are more creative and probably should get done, if you want to jazz things up. Whatever the task though, there are usually many methods of going about it. Almost everyone you ask will have something new to add.

In this post, I’m going to combine a few of my previous posts and offer you a really neat way to add some distinct character to your photos. This is definitely one post you don’t want to miss, so be sure to read on down below.

By the way, I just mentioned that I’m going to reference a few of my previous posts. If you’re curious as to which they are, here’s a short list:

Using the Levels Adjustment in Adobe Photoshop for Photography

Using the Adobe Photoshop Curves Tool For Photography

Making Selections in Adobe Photoshop

If you browse through the above, you’ll gain some insight into what I’m about to discuss below.

My Photo​

Today, I’ll be working with a fairly unique photograph. The reason I chose this photo is because the areas I’d like to alter are clearly distinct from their surroundings. While what I’m going to cover today can be used with any type of photo (with a bit of cleverness), it’s much easier to explain with images like this.

example-photo-before.jpg

Selecting the Smoke​

Although this photo is pretty cool the way it is, I’ve been thinking that I want to explore some different colors for the smoke. Right now, it’s a whitish blue, which is nice, but I’m wondering if it would look good as something else. Let’s see how this can be done.

I know I’ve already discussed how to use the Rectangular Marquee tool to make a selection in Photoshop, but unfortunately, that tool isn’t going to work in this case. Since the smoke is wildly shaped, as opposed to a rectangle, we’ll need to find something else. Let’s look at the Magic Wand Tool.

magic-wand-tool-adobe-photoshop.jpg

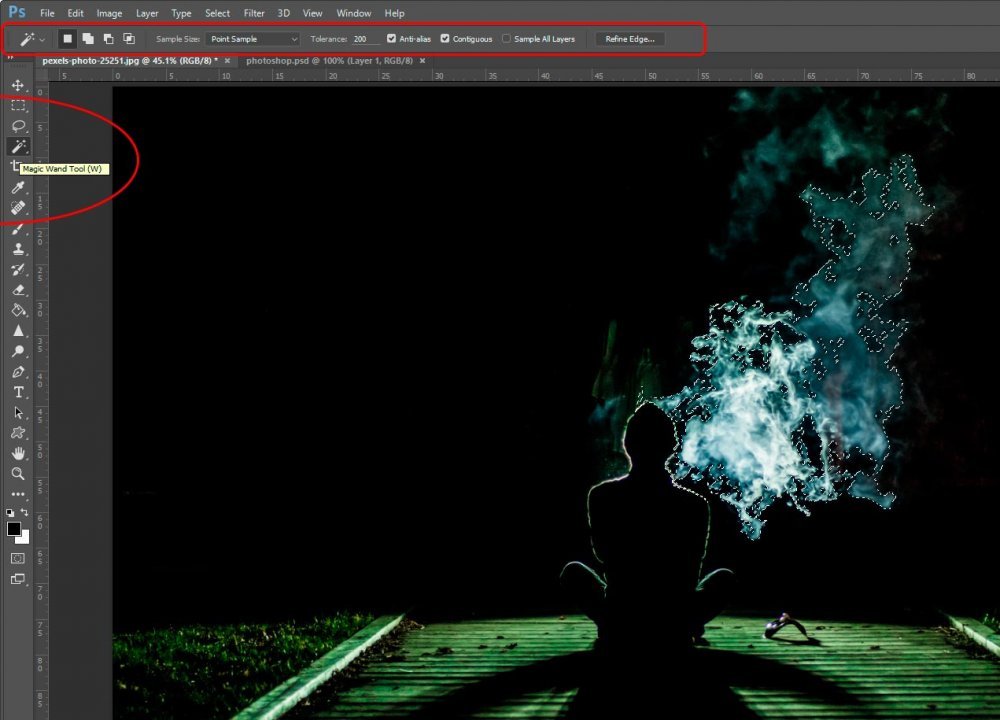
There are a few things going on in the above screenshot. First, I clicked on the Magic Wand Tool in the left vertical toolbar. After that, I went up to the options bar and typed in the value of 200 in the Tolerance field. This field controls how much similar data this tool will select when something is clicked on. For example, if I set the Tolerance to 1, the tool would probably only select a few pixels in this image. If the image was a completely solid color, it would select the entire thing. As you raise the tolerance value, the tool lessens its restriction to gradients and moves more and more outward from a single point. The best way to understand this is to play around with it. Open a photo and use the tool with varying values for Tolerance. You’ll see exactly how it works.

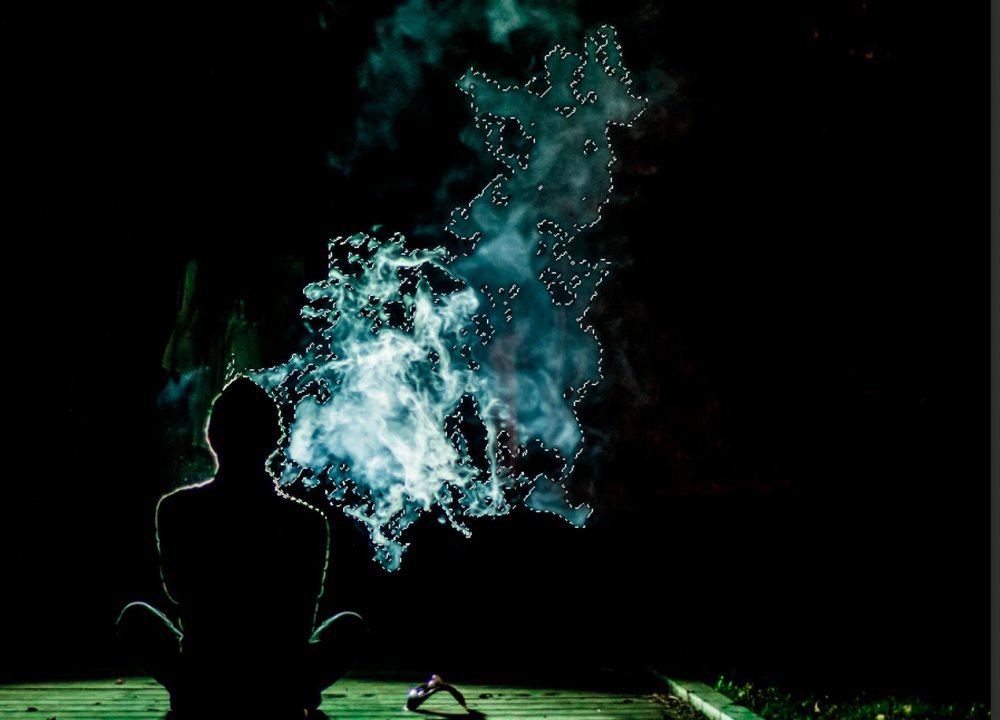
Lastly, I brought the Magic Wand Tool over to the smoke and clicked around a bit. I finally found a spot that selected a good sized area. An area that I could work with.

magic-wand-tool-selecting-smoke.jpg

I had to enlarge the screenshot a bit, so it’s blurry. You can clearly see the selected area though.

Creating an Adjustment Layer​

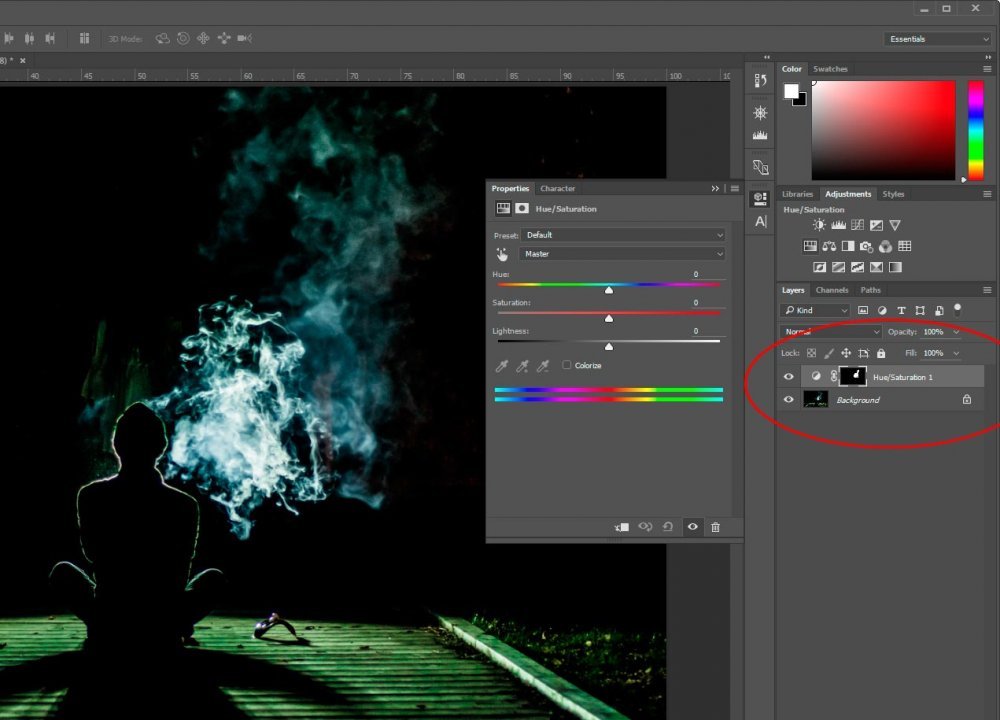
Since I want to alter the color of the smoke, I’m going to head over to the Adjustments panel and click on the Hue/Saturation button.

hue-saturation-adjustment-layer-adobe-photoshop.jpg

The moment I clicked that button in the Adjustments panel, the appropriate Properties box popped open and an adjustment layer was created in the Layers panel. Also, the marching ants (selected area) disappeared.

Making Adjustments​

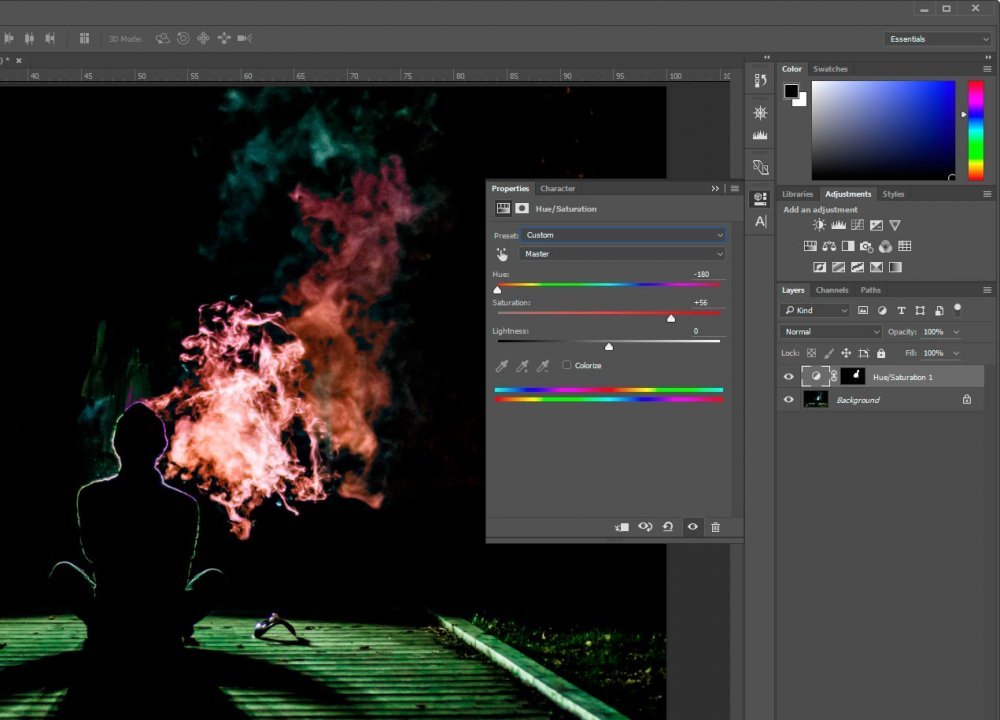
From here, I’ll move the Hue slider to the left to alter the blue color to red. After that, I’ll increase the saturation a bit, by moving the Saturation slider to the right, so it really pops out and you can see the difference.

adjusting-hue-saturation-adjustment-layer-adobe-photoshop.jpg

I’m sure you’re beginning to see the possibilities of exploring and working with these tools.

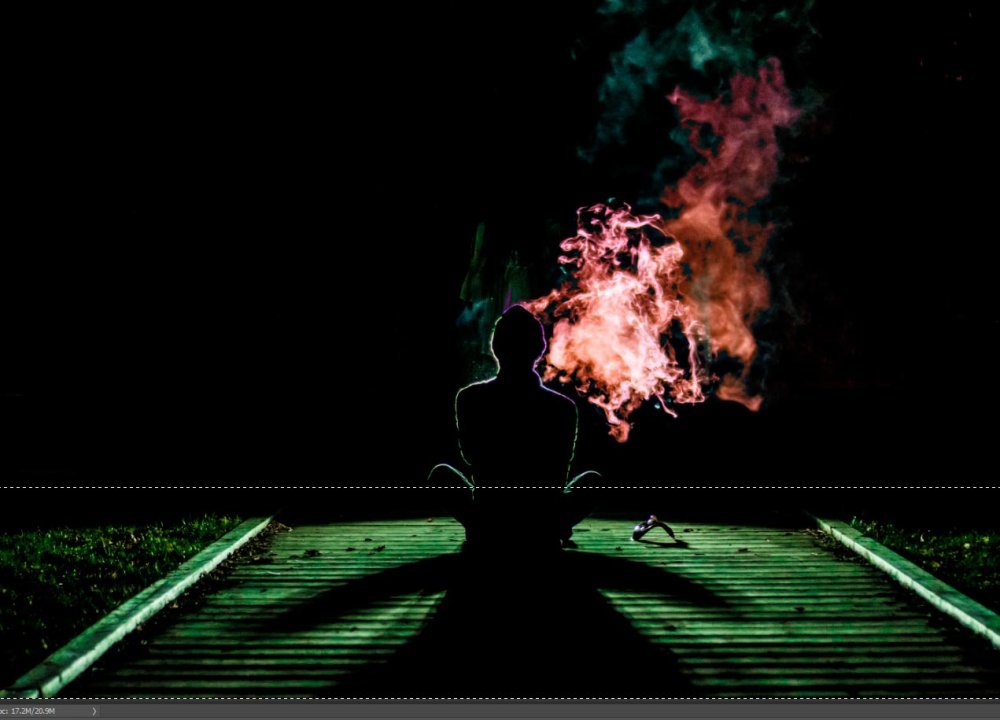
Now that my smoke looks pretty good, I was thinking that I’d like to really isolate it by changing, or removing the saturation from, the lower portion of the photo. Right now, it’s sort of green. I’d like to strip it of any color so the viewer’s eye goes straight to the smoke. For this, I’ll be sure my image layer is selected and then use my Rectangular Marquee Tool to select the entire area.

using-rectangular-marquee-tool-to-select-adobe-photoshop.jpg

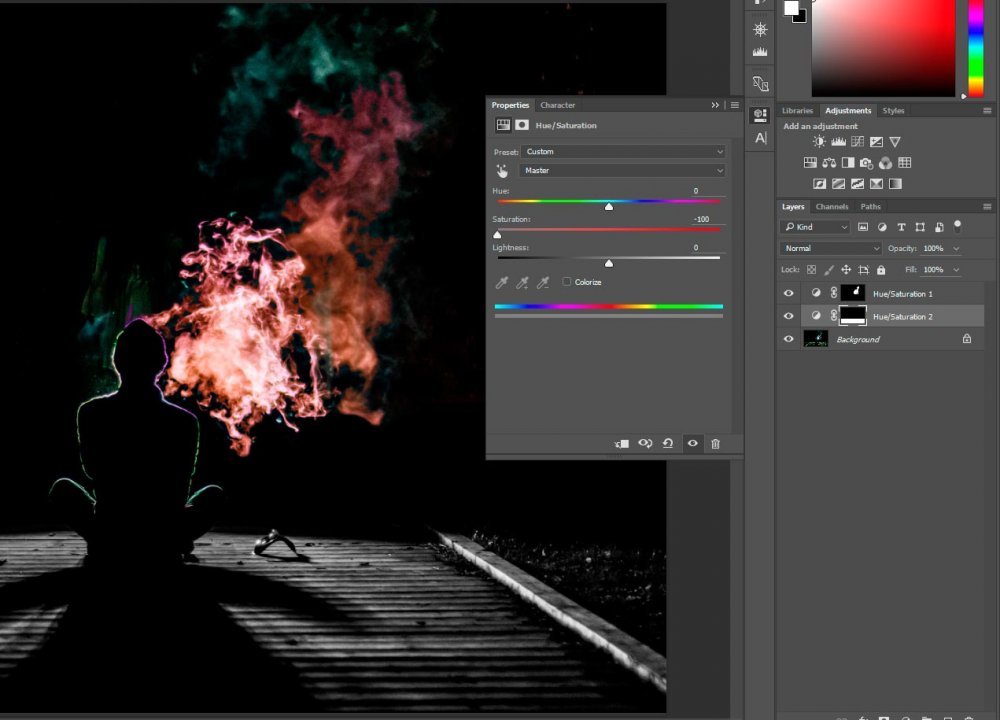
Now that the lower area is selected and highlighted, I can head back over to the Adjustments panel again and click on the Hue/Saturation button once more. I’ll move the Saturation slider all the way to the left so the color disappears from that area only. Also, you’ll notice that another adjustment layer was created in the Layers panel to handle this specific selected area.

removing-saturation-from-selected-area-adobe-photoshop.jpg

Remember, when working with adjustment layers like I just did above, you can turn your edits off and on. You don’t need to fear making changes because you can always go back to the original image by simply deleting the adjustment layers. And finally, I just made adjustments to the hue and saturation of this image. I could just as easily have selected an area and clicked the Brightness/Contrast or Levels (or any other) buttons. After making a selection, you can get as creative as you want with which adjustments you choose.

Check out the before and after shots.

example-photo-before.jpg

example-photo-after.jpg
 
CaptainDan

CaptainDan

Member
Joined
May 9, 2021
Messages
113
Reaction Score
0
Points
16
  • #6

Selecting Objects & Refining Edges in Adobe Photoshop​

selecting-objects-refining-edges-adobe-photoshop.jpg

One of my most frequent tasks in Adobe Photoshop has to do with selecting objects. Whether it be to separate them from something else or to add some sort of edge or color alteration, I can tell you that I use the selection tools all the time. One tool that’s especially helpful for things like this is the Quick Selection Tool. This tool is sort of like a brush in that you can either add selection or remove it. It’s pretty wild.

In today’s post, I’m going to be demonstrating which tool the Quick Selection Tool is and a bit about how it works. Then, I’m going to make a selection from the photo above and demonstrate how the Refine Edges portion of this tool can really help define the outer border of the selection. I think you’ll enjoy it.

The Quick Selection Tool​

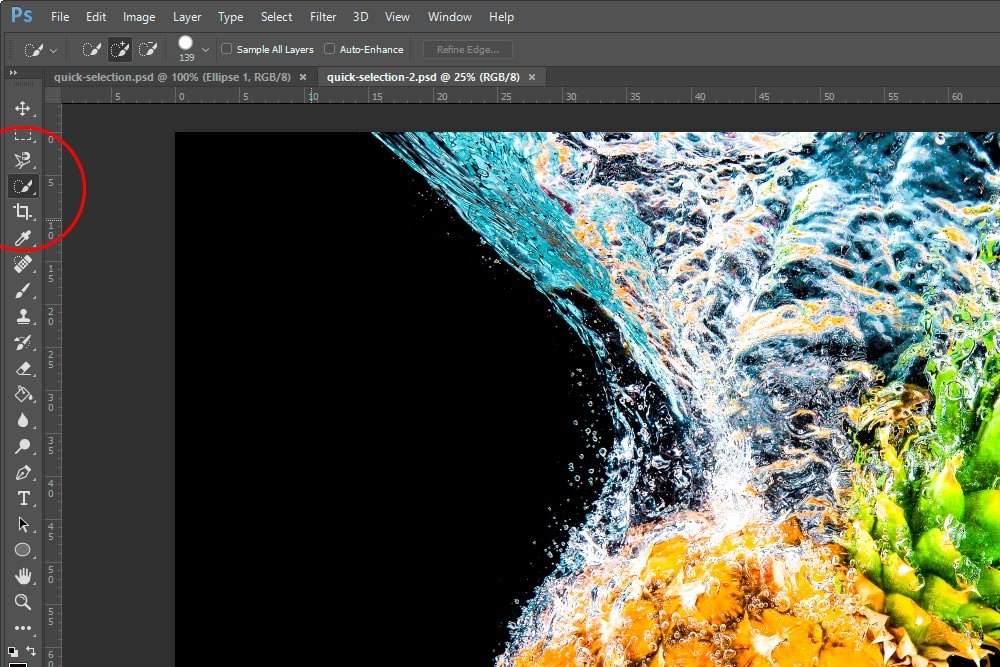
If you look over in the left toolbar, fourth tool down, you’ll see the Quick Selection Tool. You may have to click and drag out with your mouse to expose it. It’s coupled with another tool called the Magic Wand Tool.

quick-selection-tool-adobe-photoshop.jpg

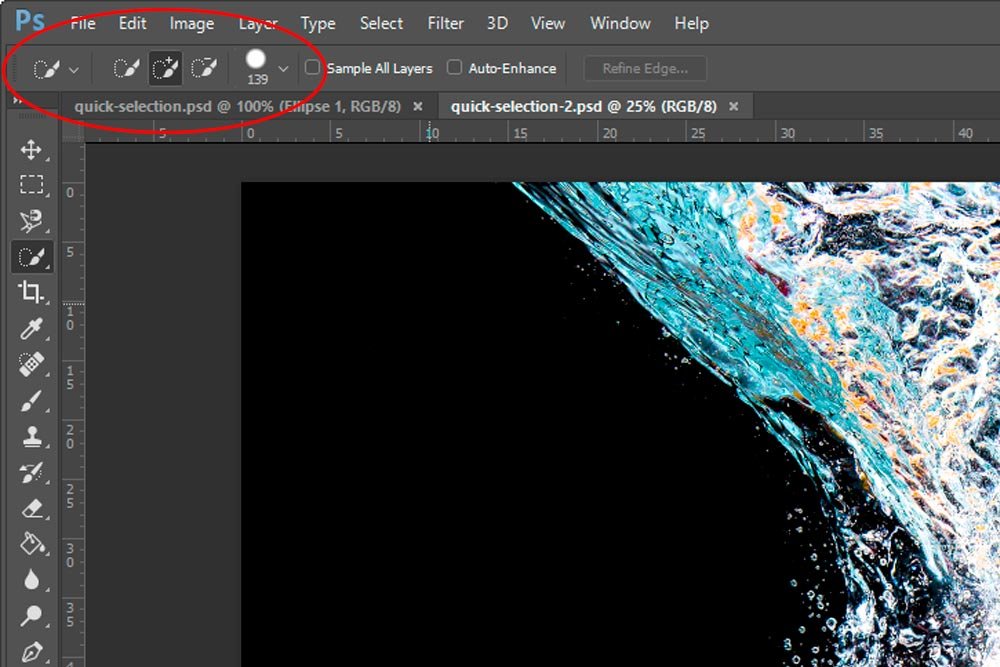
Once you click on the tool, you’ll see an options bar appear above the workspace.

quick-selection-tool-options-bar-adobe-photoshop.jpg

I want you to take a look at the four options, beginning with the second one in from the left.

The second one is the New Selection option. This is what you use if you have already begun or are finished selecting something and would like to start over. This will clear any selection previously made.

The next option is Add to Selection. I mentioned above that this tool is sort of like a paintbrush. Well, this is what I mean. Let’s say that you already made some selections and can see the marching ants (selected areas) and would like to continue adding to that current selection. Well, you can do that with this option. You can click your mouse button to make a selection, let go of the mouse and then click it again to make further selections. The original selected areas remain and are added to. Sort of like painting a wall. Just because you stopped painting for a while doesn’t mean you can pick up the brush and continue later on.

After that, we have the Subtract from Selection option. This acts as an eraser. If you selected too much (as I’m sure I will in my example below), you can reduce the selected area. You would simply click and drag your mouse pointer around where you don’t want any selection. It’s quite versatile.

Finally, we have a dropdown that controls the aspects of the tool. When you click the dropdown, you can adjust the size of the selection tool, the hardness of it as well as its spacing. Brush spacing is a post for another day, so for now, leave it at its default setting of 25%. Size is fairly straightforward in that as you increase the size, your selection tool grows and, in turn, selects more with fewer movements. Hardness controls the accuracy of the selection tool edge. The harder the edges, the more precise. The softer the edge, the more fuzzy and inaccurate. Just remember, if you’re working on making selections from large, clean edges, you’ll most likely want a larger selection (brush) size and if you’re into the nitty gritty, you’ll want a smaller one. If the edges are defined, such as a white circle on a black background, you’ll want a harder edge and if you’re selecting some pieces of grass from a meadow, you’ll want a softer edges. It’ll take practice to get used to these settings.

Making Selections​

I chose this particular photo as an example because the edges are a mess. There’s no way I’ll be able to quickly make any selections and I’ll have to use various brush sizes to get anywhere. It’s perfect. Currently, the image is a bit over 5000px wide, so it’ll allow me to zoom in to show you some of the details of what I do.

Okay, I’m going to attempt to select the entire pineapple and its related splashing water and isolate it from the black background. Normally, this would take some time to do a nice job. Since this is only a demonstration, I’m going to work quicker to give you a general sense of what I’d like to do.

To select the majority of the area I’m after, I’m going to increase my brush size to 510px and then click and drag the tool around the inside edge of the area I want to select. As I move, I notice that the tool acts sort of like a magnet, clinging to the edges it can decipher. I’ll zoom in so you can see what happened.

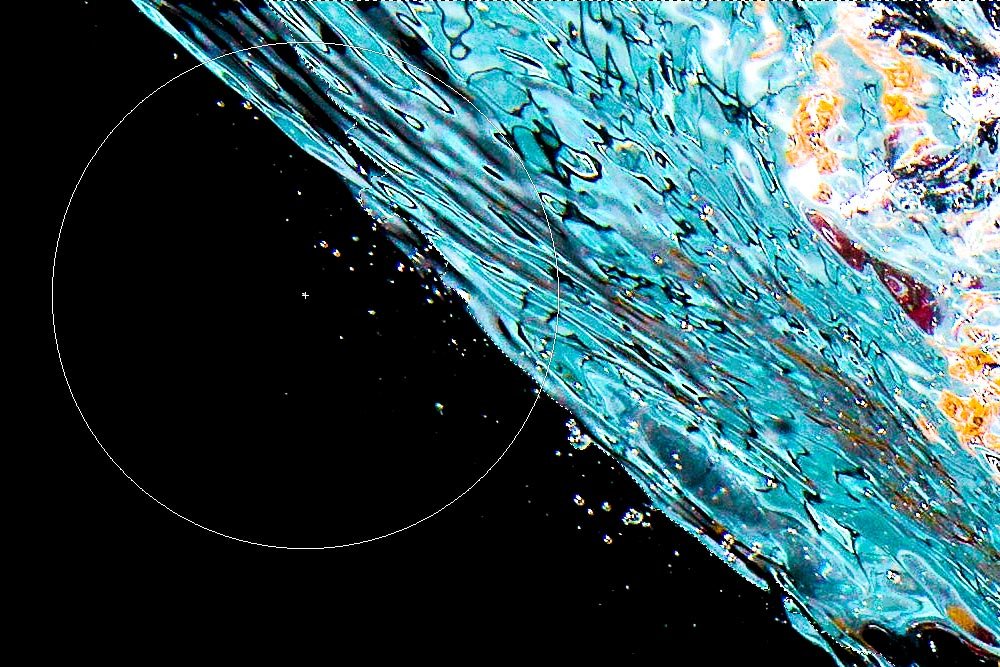
selected-area-adobe-photoshop.jpg

If you look closely at the above screenshot, you’ll see the marching ants. They’re not exactly tracing the outer edge of my desired area, but what I have is a good start. The next step is to reduce my brush size so I can sneak into some more detailed areas. I’ll bring it down to 70px.

reducing-quick-selection-brush-size-adobe-photoshop.jpg

If you’ll look closely, you can see that all the gaps are filled in with the marching ants. The edge (in this particular area) is fairly well defined. If I wanted to select each of those little bubbles, I can do that. All I’d need to do is reduce the brush size even further and to zoom into the photo so I had more room to work with. I’m not going to do that today.

Refining the Edges​

In general, when making selections, the edges of the selected area end up rather ugly. They either aren’t as sharp as you’d like or as soft as you’d like. Something is usually wrong with them. Luckily, there’s a tool within Photoshop that will allow us to analyze the edges and make any changes to them that we see fit.

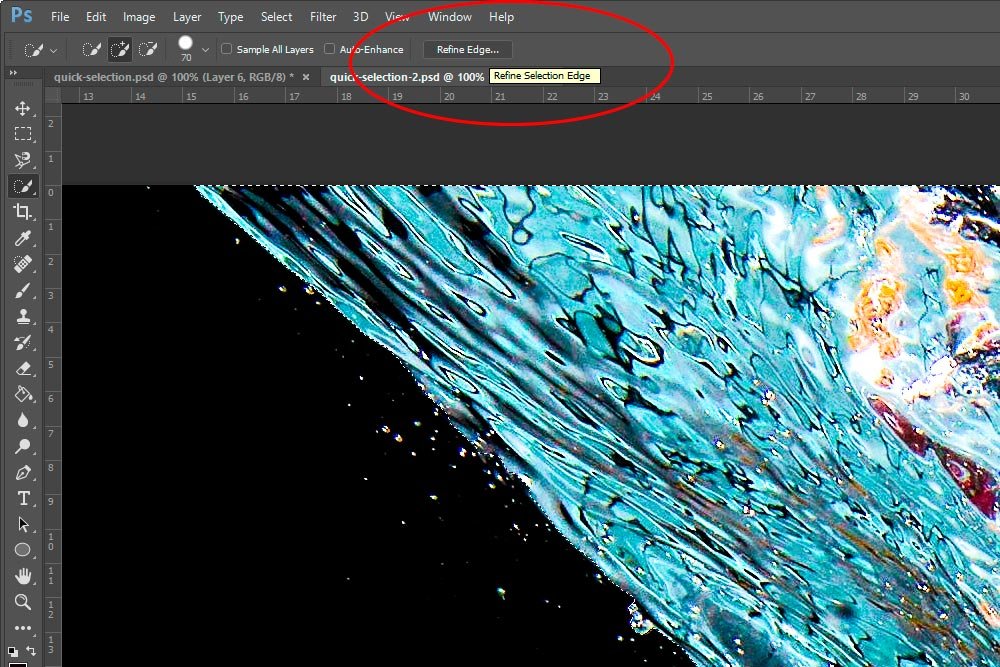
With the area I want selected and the tool still chosen, I’ll head up to the Refine Edge button and press it.

refine-edge-button-adobe-photoshop.jpg

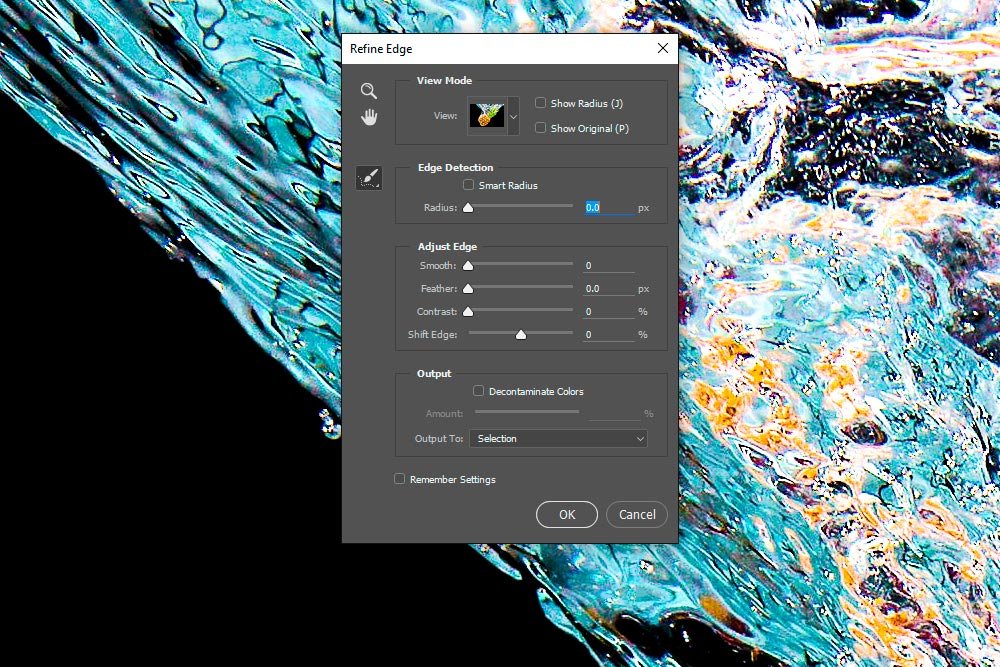
The moment I do this, a dialog box appears.

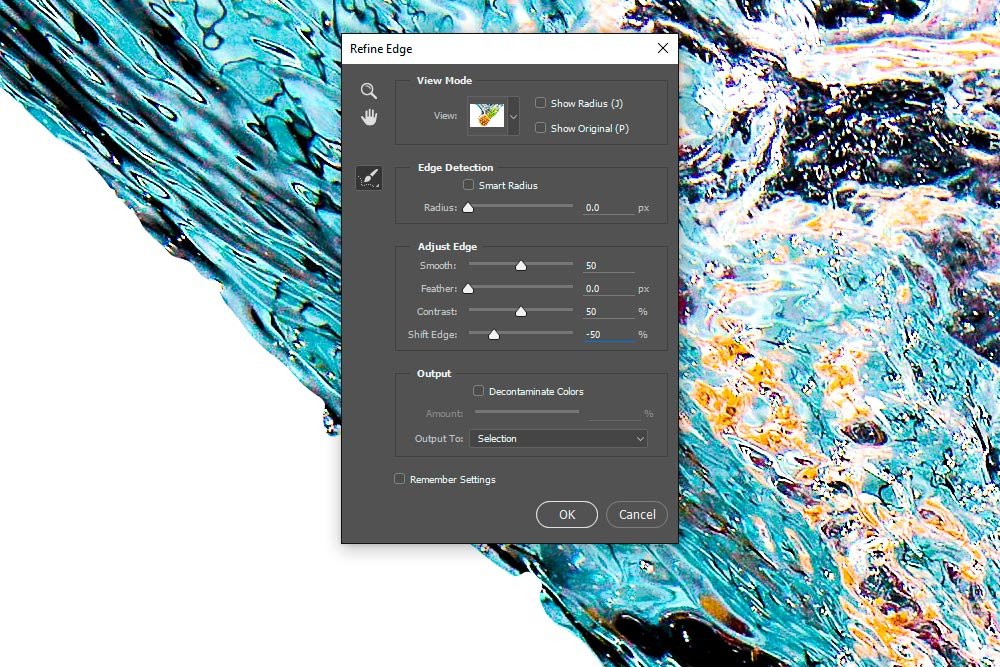
refine-edge-dialog-box-adobe-photoshop.jpg

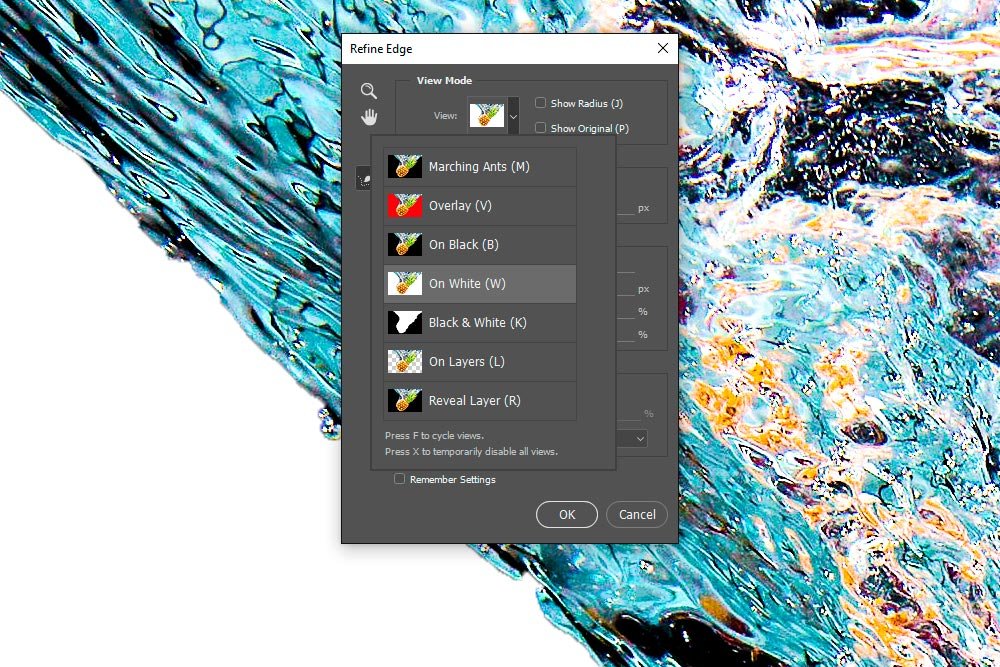
As you can see, there are a few options inside this box. The first one you’re going to want to set is the View Mode. Since I’m selecting something that’s on a black background, I want to change the not selected area to something opposite of black. This will give me the clearest picture of what my edge looks like. So, I’ll click the View Mode drop-down and choose On White.

refine-edge-view-mode-adobe-photoshop.jpg

As you can see, by making this selection, my selected area stayed put and everything else was made white. Now, I can really get a good look at the edges. And just as I suspected, the edges are muddled and soft. They’re jagged and aren’t smooth lines as I’d like them to be. I’ll need to make some adjustment.

I’m going to leave the Radius alone. It’s currently set to 0, which is good because I don’t want to add area to my edge. Actually, I want to do the opposite. Next, I’ll increase the Smooth setting to 50. This will reduce the jaggedness I just referred to above. After that, I’ll leave the Feather setting at 0 because, again, I don’t want to increase the softness of the edge, I want to harden it. I’ll increase the Contrast setting to 50% because I want more definition between the selected area and the background and finally, I’ll slide the Shift Edge setting to the left at 50% to actually remove some of the outer material of the selected area. This will really sharpen the edge. Here is the result.

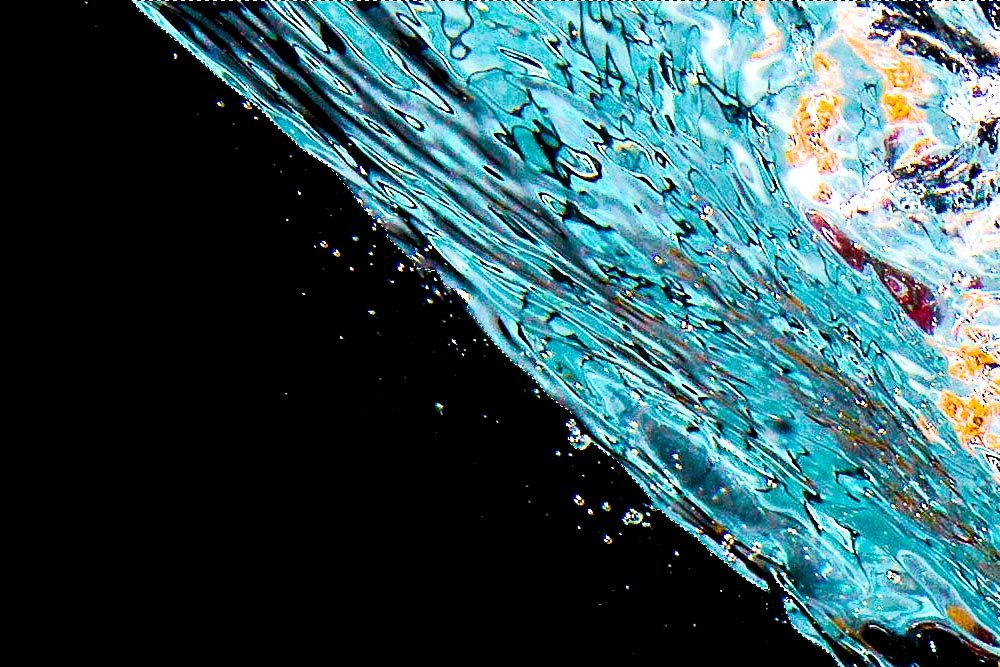
refined-edges-selection-adobe-photoshop.jpg

If you look closely at the previous two screenshots, you’ll see a slight difference in the quality of the edges.

The challenging part of a project like this is to apply everything I just discussed to the entire photograph. Before refining any edges, I’d need to be sure my selection was finished. Then, I could go ahead with cleaning up the outer border.

What to do Next?​

I wrote a post that talked about what to do with selections a while ago. If you want, you can read it here:

Making Selections in Adobe Photoshop

Most of the time, after selecting an object, I’d copy and paste it to a new layer. to do that quickly, I simply push Ctrl+C and then Ctrl+V on my keyboard. This copies the selection and then creates a new layer and pastes it automatically.
 
CaptainDan

CaptainDan

Member
Joined
May 9, 2021
Messages
113
Reaction Score
0
Points
16
  • #7

Growing, Shrinking, & Transforming a Selection in Adobe Photoshop​

growing-shrinking-transforming-selection-adobe-photoshop.jpg

I was going to title this post Adding to, Subtracting From & Transforming a Selection in Adobe Photoshop, but that didn’t work for me. Growing and shrinking doesn’t do much better, so I’ll need to explain what I’d like to do below. It’s a pretty cool trick you may have never known about. Basically, there’s a method available that allows you to add to a selection that you’ve already made. Or, you can subtract from it. Let’s say you selected a square from a photo, but don’t want to include one corner. You can use this method to cut the corner out. It’s really neat, as you’ll see below.

I’m also going to go through a quick demo project today that I think you’ll enjoy. I’m going to make a selection from the cat picture above, transform that selection and then enhance it so it sort of looks like a postcard. Of course, I’ll play with adjusting some contrast and saturation and may even throw in a blending mode. I went over the project already and it came out nicely, so I think you’ll get something from it.

Making a Selection​

Now, I’m not actually going to select anything, per se, from the cat photo. What I am going to do though is use the Rectangular Marquee tool to highlight an area, to show you the marching ants outline.

making-selection-adobe-photoshop (1).jpg

Adding to a Selection​

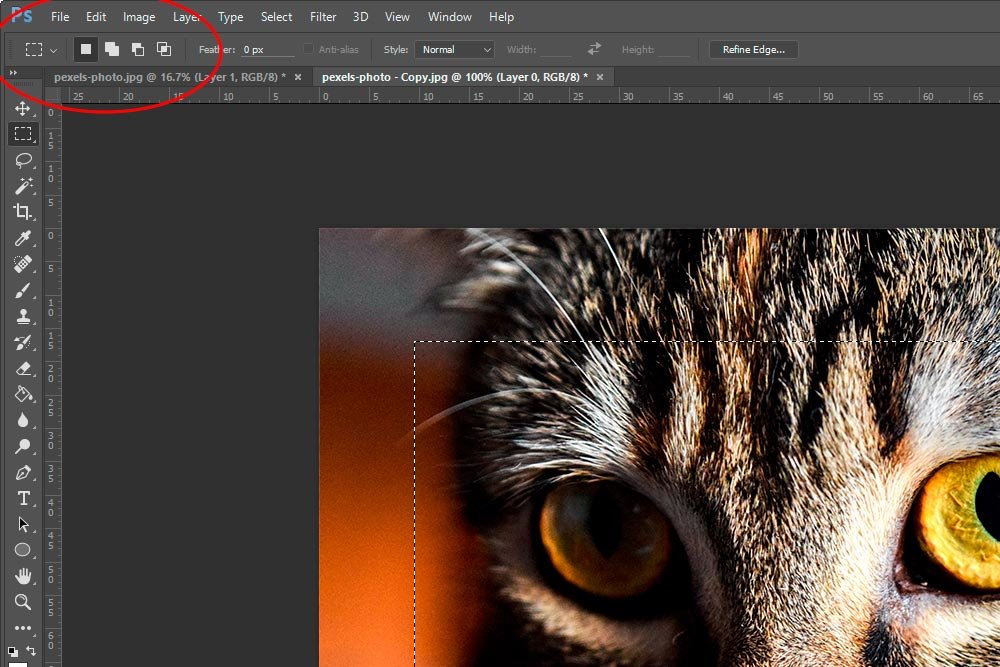
As you can see in the above photo, I highlighted the area around the cat’s eyes. What if I wanted to also select the area around the mouth and add that to the area that’s already been selected? Well, if you look up at the options bar (while still in the Rectangular Marquee tool, or any selection tool for that matter), you’ll see a few additional features.

selection-tool-options-adobe-photoshop.jpg

The four options shown are New Selection, Add to Selection, Subtract from Selection and Intersect with Selection. I already used the New Selection option. Photoshop defaults to that one when you choose a selection tool to work with.

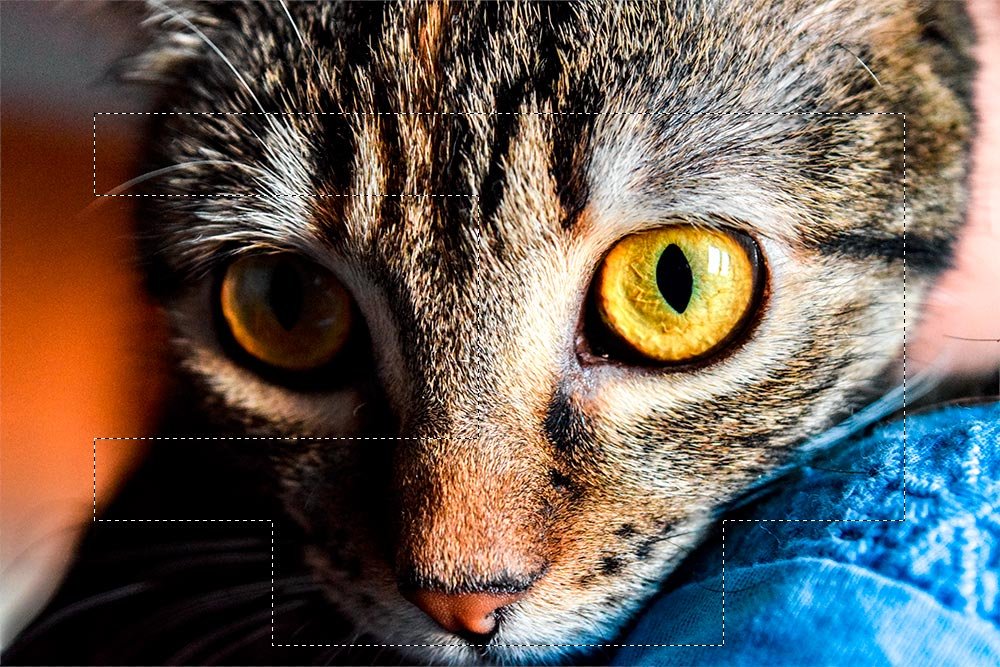
Now, while my selection is active, I’m going to click on the Add to Selection option. I’ll see that this option is active by looking at my mouse pointer. It should be a cross with a small + in the lower right corner of the pointer. With this new option active, I’ll select the area around the cat’s mouth.

add-to-selection-adobe-photoshop.jpg

That’s pretty cool. I could have done the same thing with any selection tool. It works the same way. Also, I could keep adding and adding until I selected everything I want.

Subtracting From a Selection​

What if I didn’t want to have a particular area selected? Let’s say that I wasn’t interested in having the cat’s right eye in my selection area. Well, if I click on the next option, the Subtract from Selection one, and “select” the area to deselect, I could remove it from the area. Let’s try it.

subtract-from-selection-adobe-photoshop.jpg

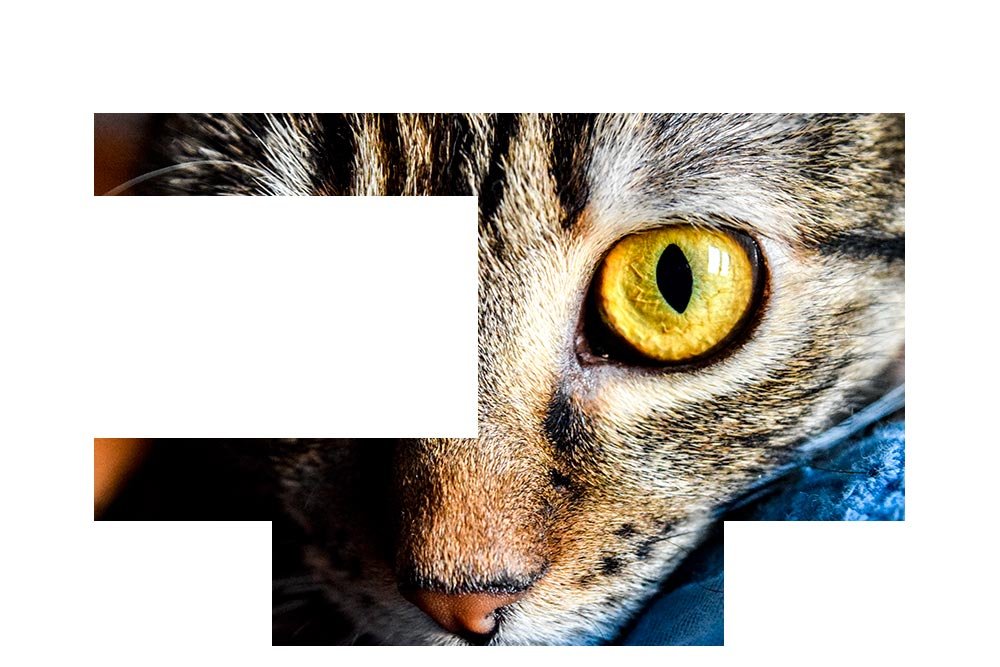
That’s awesome. Here, I’ll copy and paste the selected area into a new layer by clicking Ctrl+C and Ctrl+V on my keyboard. I’ll then place it on a white background to make it as clear as possible.

selected-area.jpg

I’m sure you can see the possibilities with using this set of tools. If this is the shape I was going for, my method surely saves a bunch of time when compared to selecting rectangles and then trying to paste them together in new layers.

Transforming a Selection​

Let’s start over. I’ll get rid of the white background and the pasted selection from above. We’ll start with the original cat picture.

My goal with this section is to make a similar selection to the one I originally made, but to twist it to the right a bit. I’d like to accentuate the cat’s eyes. First, I’ll make my selection.

making-selection-adobe-photoshop.jpg

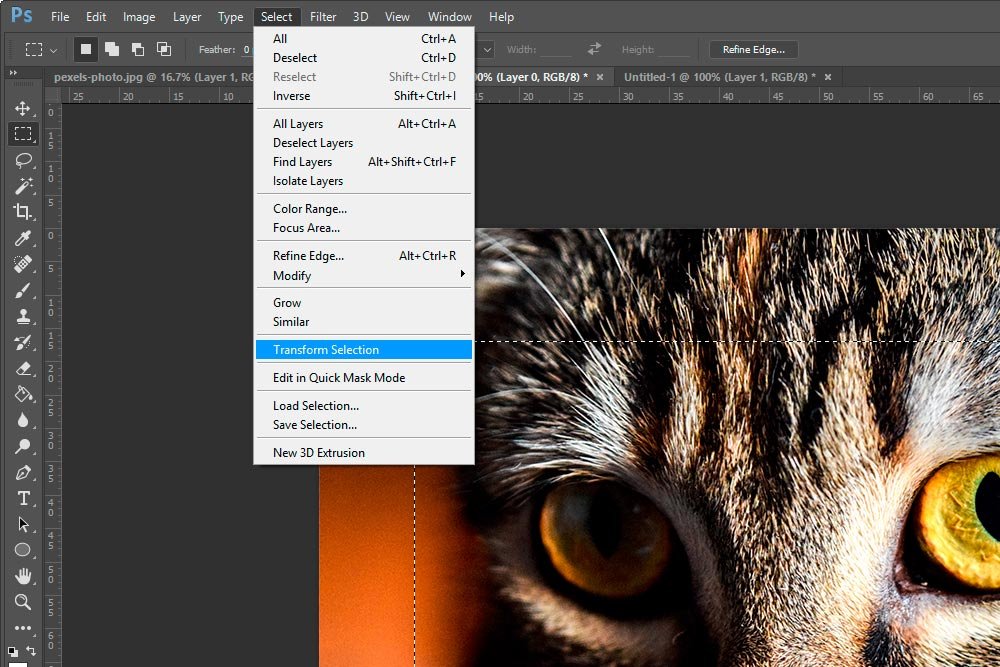
Next, I’ll head up to the Select > Transform Selection menu item and click on it.

select-transform-selection-menu-item-adobe-photoshop.jpg

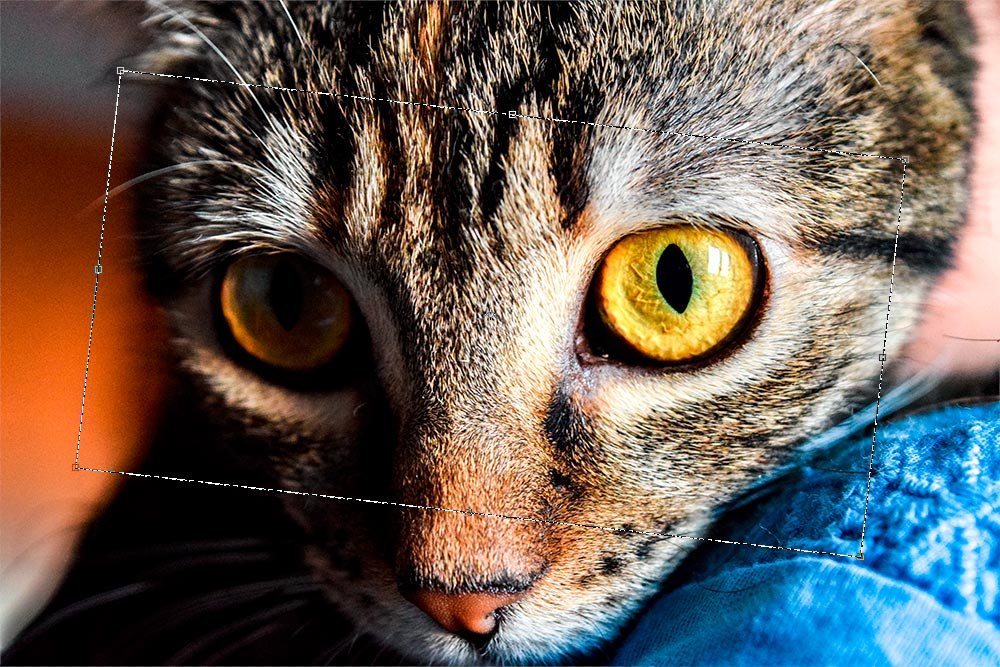
The moment I do this, the transform handles appear around the selected areas. These handles have the same capabilities that the Free Transform handles have under the Edit menu (if I was transforming something in a layer). So, if I bring my mouse outside the selected area and wait for the mouse pointer to turn into a curved double arrow, and then click, hold and drag, I can twist the selected area any way I wish. I’ll go to the right.

transform-selection-adobe-photoshop.jpg

In the screenshot above, you can see the transformed selection area as well as the handles. To apply the transformation, I’ll need to click Enter on my keyboard.

Now, I can click Ctrl+C and Ctrl+V on my keyboard to copy and paste the selected area into a new layer.

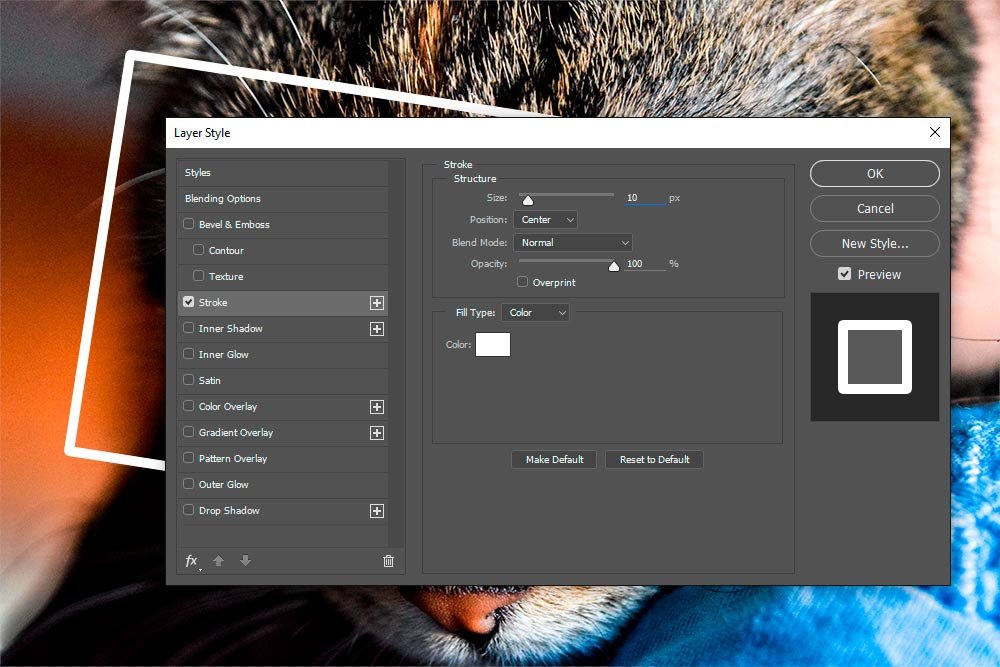
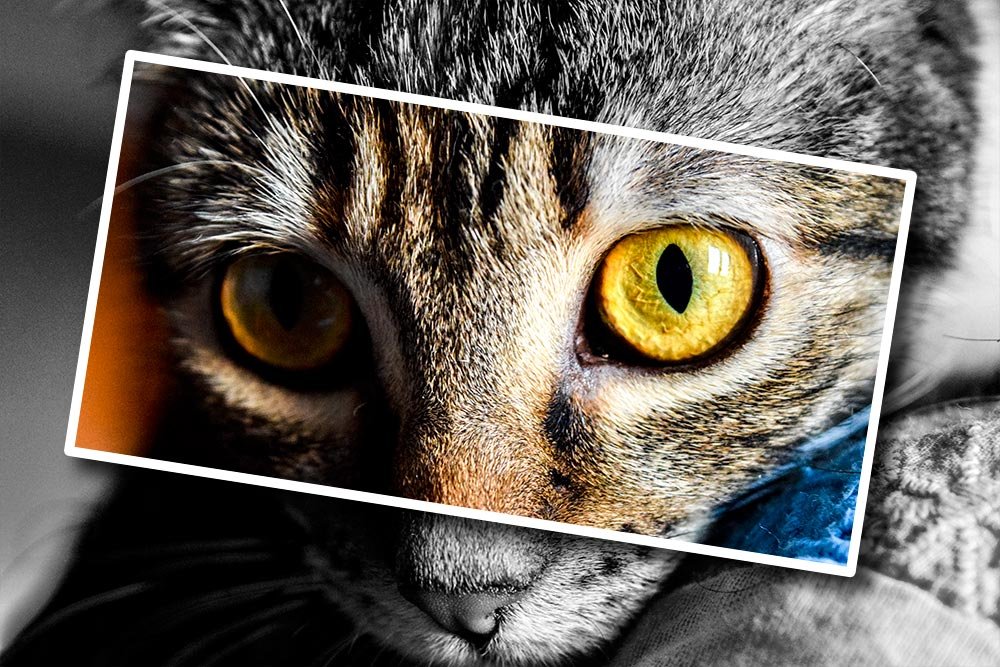
Let’s play around a bit. As I mentioned above, I’d like to make this image into sort of a postcard look. To do so, I’ll double-click on the layer I just pasted to open up the Layer Style dialog box. Then, I’ll apply a stroke, change the stroke color to white and give it a width of 10 pixels.

layer-style-dialog-box-adobe-photoshop.jpg

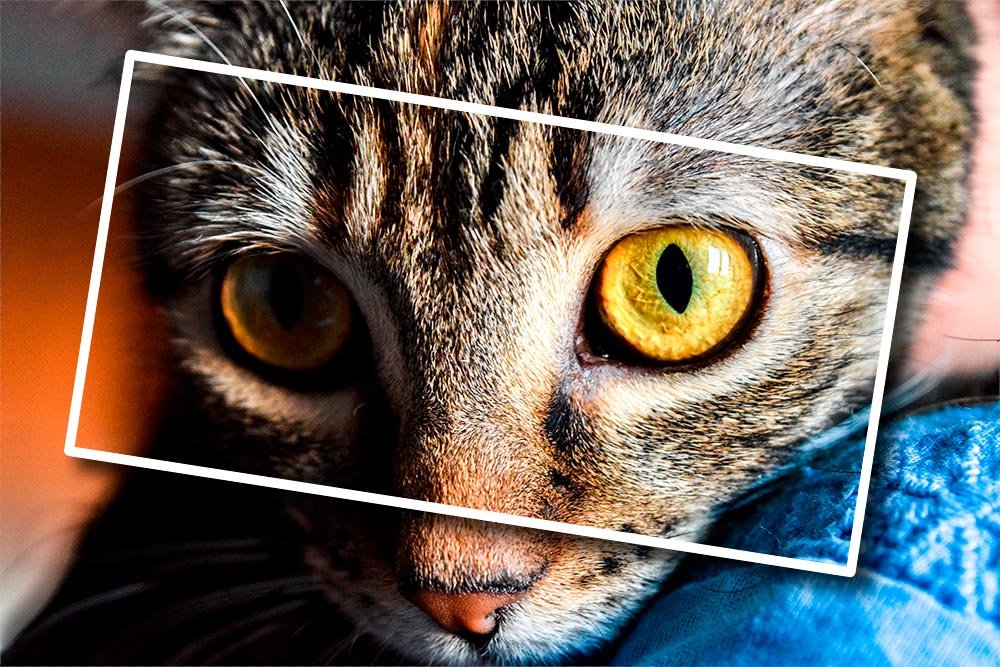
Using the same dialog box, I’ll also give the layer a drop shadow, change the angle to 135 degrees, make the blend mode normal and alter a few other small settings. This is what I end up with.

applying-styles-to-layer-adobe-photoshop.jpg

It’s coming along, but it’s not quite there yet.

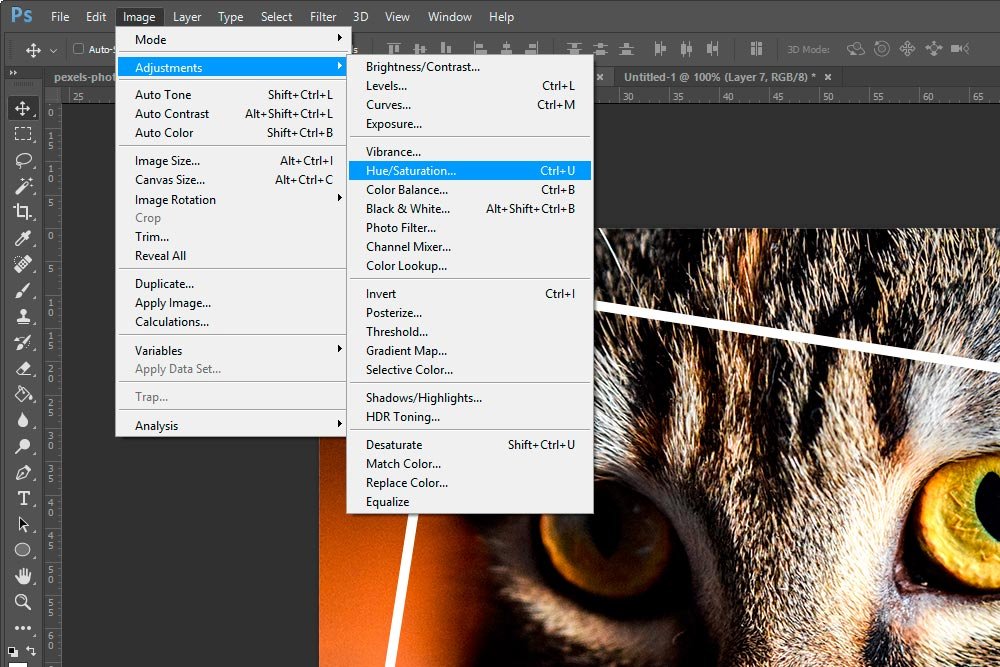
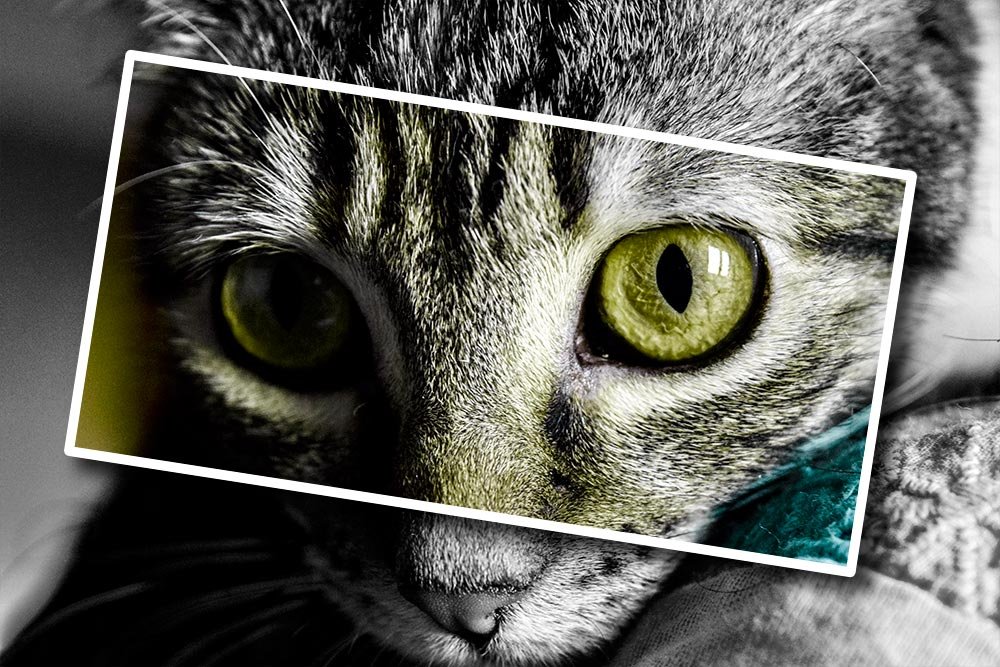
Since the top layer is nice and colorful, I’d like to differentiate it from the bottom layer some more. To do this, I’ll desaturate the bottom layer. I’ll head up to the Image > Adjustments > Hue/Saturation menu item and click. From there, I’ll push the Saturation slider all the way to the left. This will remove all color from the bottom layer.

image-adjustments-hue-saturation-menu-item-adobe-photoshop.jpg

This is what I get.

postcard-look-adobe-photoshop.jpg

I’d say that looks really good. I could stop there, but I wonder what the top layer would look like if I applied the Darken blend mode to it. Let’s give it a try.

darken-blend-mode-adobe-photoshop.jpg

I could go on all day, but I think you get the picture. The possibilities are limitless.

I hope you enjoyed this post. I covered how to add to, subtract from and transform a selected area in Adobe Photoshop. Give it a try yourself and remember, all comments are welcome!
 
CaptainDan

CaptainDan

Member
Joined
May 9, 2021
Messages
113
Reaction Score
0
Points
16
  • #8

Selecting with the Rectangular & Elliptical Marquee Tools in Adobe Photoshop​

I know this is a super basic post, but just the fact that both the Rectangular and Elliptical Marquee Tools are so popular justifies it. Almost everyone I know who has done any amount of work in Photoshop has used either of these tools and the fact that the tools behave so similarly makes this post all that much easier to write. Don’t worry, it won’t be a long one.

In today’s post, I’d like to discuss a few aspects of what these two selection tools can do. Basically, I’d like to cover how you can draw the selection you want to draw, how you can move that selection around and how to can transform the selection. As I said, it’s a beginner post, but a worthy one.

Accessing the Marquee Tools​

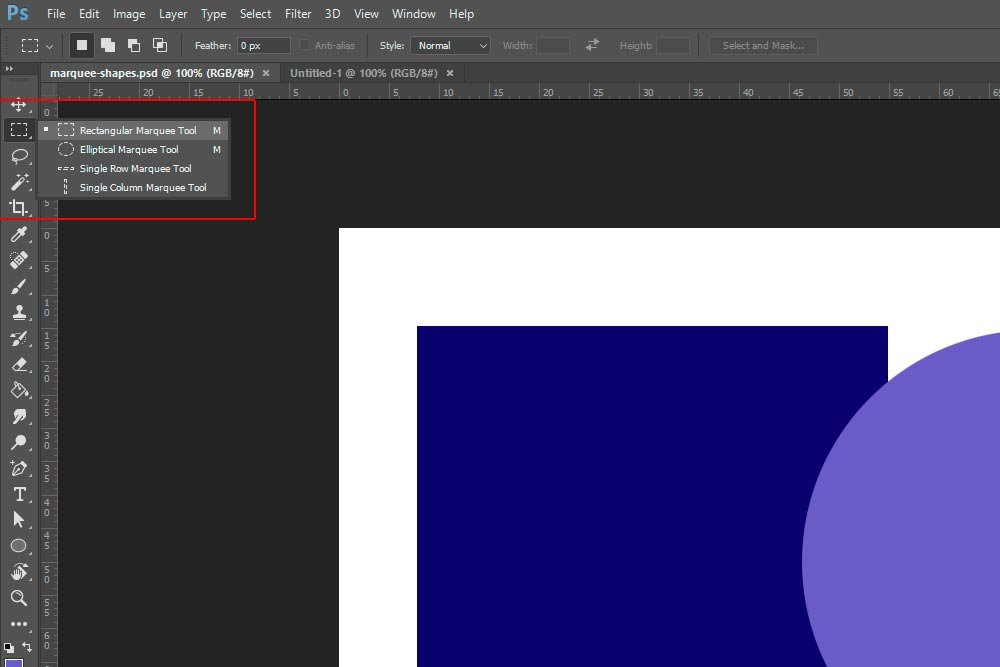
Both of the tools I’ll be referring to in this post can be accessed via the left vertical toolbar. If you click on the second tool from the top and drag out to the right, you’ll see four tools in all. For now, we’ll focus on the top two.

marquee-tools-toolbar.jpg

From here, if I click on either one of these, that tool will become active.

Drawing a Selection with a Marquee Tool​

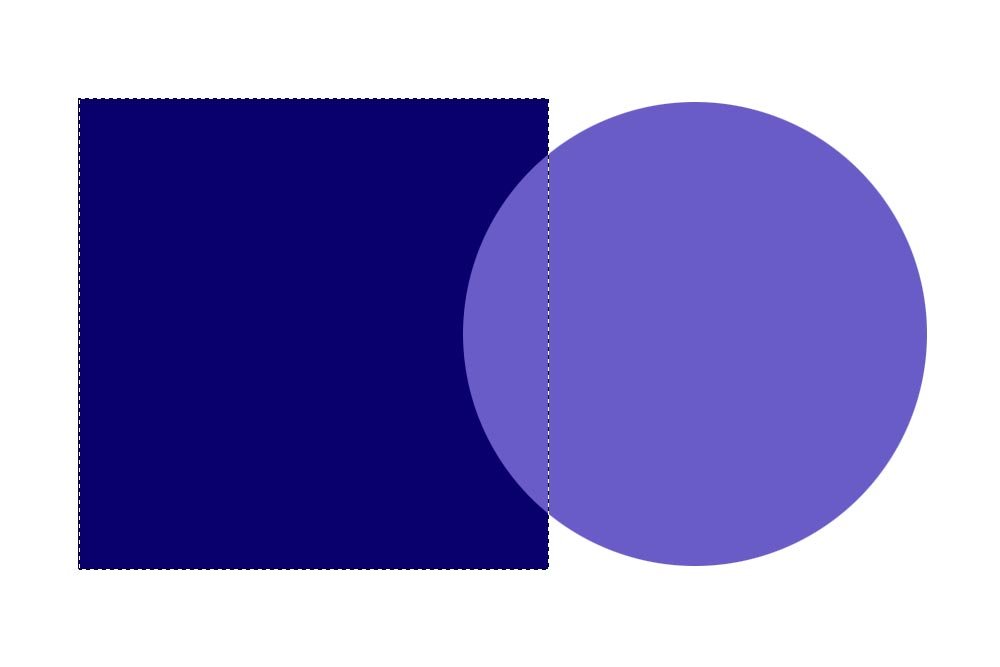
After I click a tool, I can begin to draw with it. That’s really no big deal and I’m sure everyone already knows this. Here’s what it looks like when I click and drag freehand with the Rectangular Marquee Tool from the top left corner of the square to the bottom right corner.

drawing-marquee-1.jpg

Again, no big deal. You can clearly see the marching ants surrounding the edge of the square.

I can do that with the Elliptical Marquee Tool as well and I’d get nearly the same result.

Constraining the Proportions​

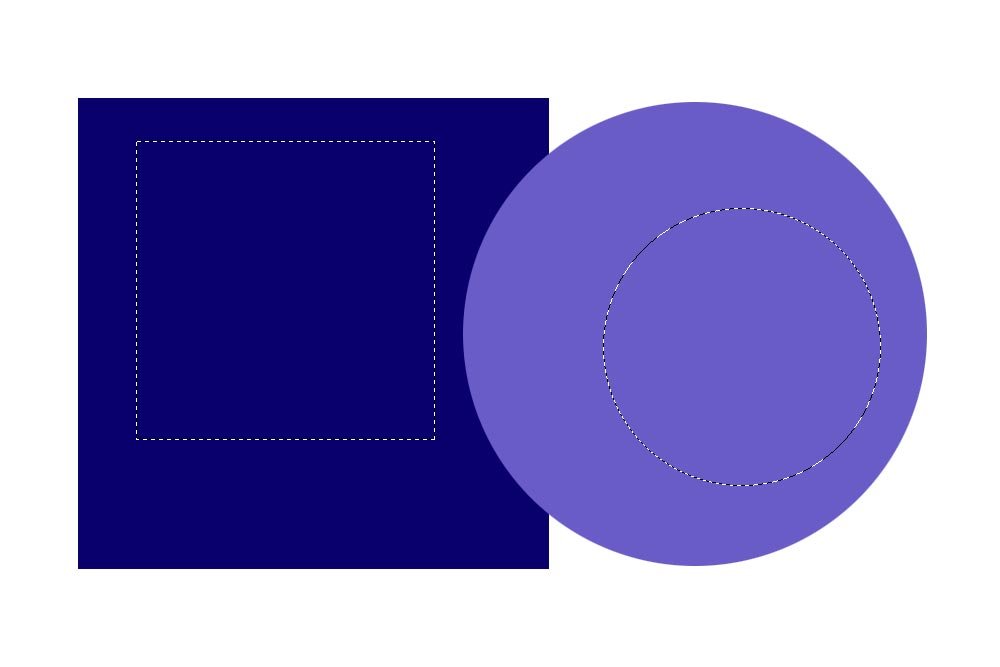
While working freehand is fun, it’s oftentimes more accurate to constrain the proportions of a marquee tool to achieve a better result. In this case, since both the square and the circle are perfectly proportional, I can use the Shift key on my keyboard to lock in either a perfect square or a perfect circle as I’m dragging. Here I am holding the Shift key down as I drag both a square and a circle.

proportioned-shapes.jpg

If you look closely, you can see two shapes of marching ants. One is a square and one is a circle. Again, by holding down the Shift key on my keyboard, I lock in the fact that both shapes should stay equally proportioned and not get stretched one way or the other.

Starting From the Center​

If I were to press the Alt (Opt on Mac) key and draw the same selections, instead of the shapes starting from the corner or the edge, they’d grow from the direct center. This is helpful if you know where the center of an object you want to select is. Sometimes, it’s a challenge to accurately select a shape in its entirety.

Starting From the Center & Keeping Proportion​

If I held down the Alt key and the Shift keys on my keyboard at the same time, each new selection would originate from the center and stay perfectly square or circle. Give this a try yourself and I’m sure you’ll come up with a few cases when this might be helpful.

Using Guides to Save the Day​

Have you ever tried to select a circle with the Elliptical Marquee Tool? If so, were you successful the first try? If I had to guess, I’d say you probably weren’t. It’s very difficult to select a circle because you really never know where to begin drawing from. Well, I’m here today to give you a really nice tip. Use guides.

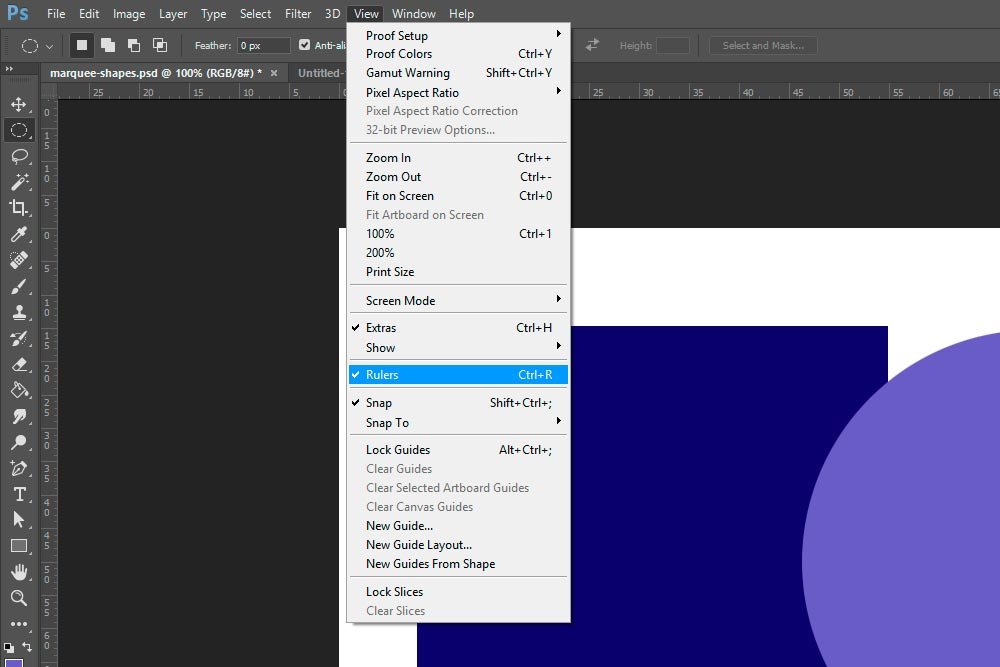
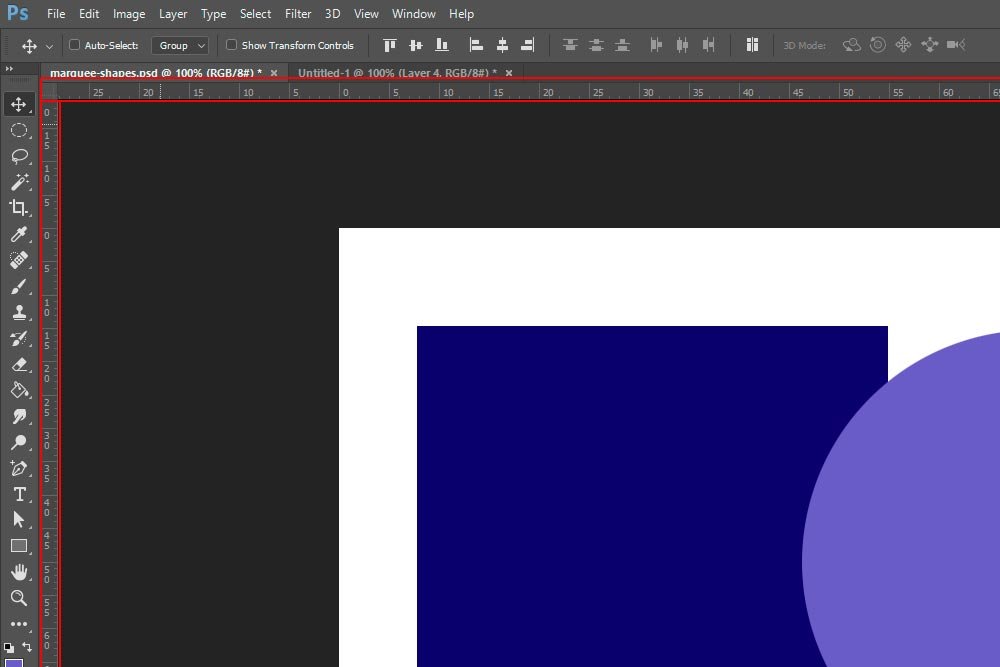
If I head up to the View > Rulers menu item and click that item so it’s checked, I’ll see rulers appear on the left side and the top of the workspace.

view-rulers.jpg workspace-rulers.jpg

After the rulers appear, I can click inside of the top one and drag down to create a horizontal guide and the left one and drag to the right to create a vertical guide.

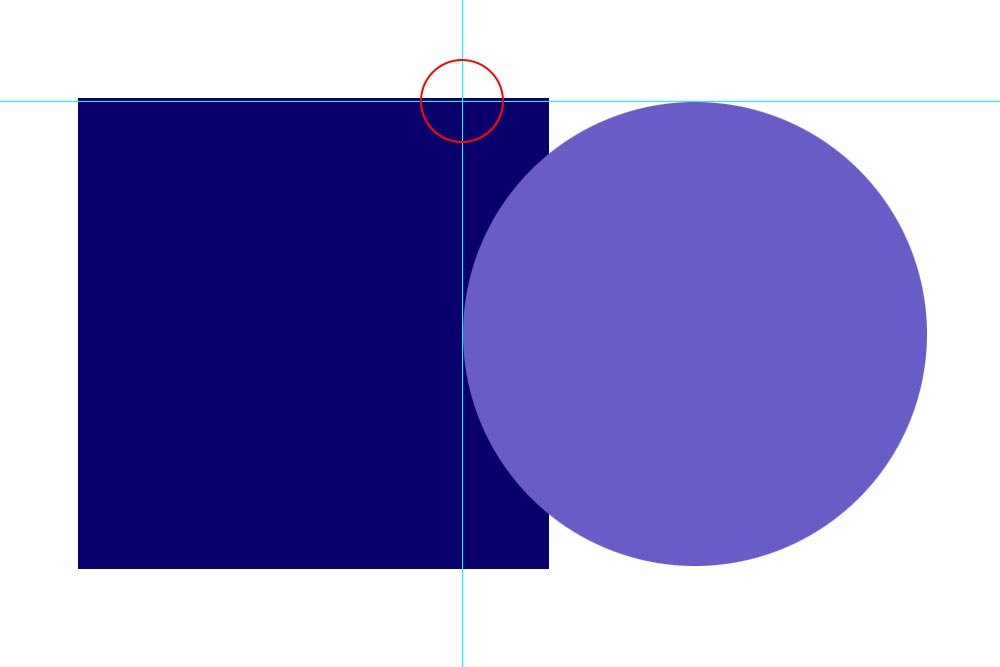
Now, here’s the cool part. If I drag a guide so it’s just touching the top edge of the circle and another one so it just touches the left edge, I’ll have created an intersection point that I could use to begin drawing my selection from. Let me show you how I set the guides up first.

guides-intersection-point.jpg

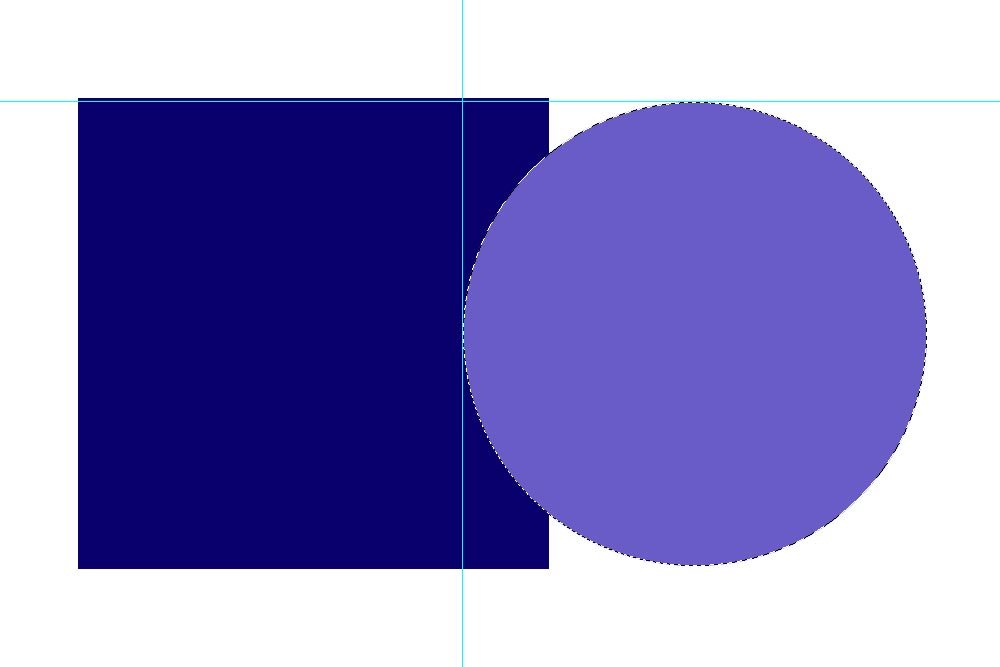
If I now use the Elliptical Marquee Tool and begin drawing from the intersection point (circled in red), I could hold down the Shift key to accurately trace the edge of the circle as I drag down and to the right.

traced-circle.jpg

The reason I would only need to use this for a circle is because squares and rectangles already have a corner to begin drawing from. Circles are much more difficult to deal with.

So, the moral of this story is to use guides as tools to help out with a variety of things. I use guides all the time, so I generally keep the rulers exposed.

How to Move a Selection​

This is actually true with all types of selections, not only the ones created from the Rectangular and Elliptical Marquee Tools. Once you draw a selection, you can use the arrow keys on your keyboard to move it around the screen. It doesn’t need to stay glued to whatever it is you selected. Using the arrow keys is a great option for only slightly inching a selection in tight quarters.

If you would like to move a selection a further distance than you would with the arrow keys, move your mouse inside of the selection and click and drag. Be sure not to click and drag outside of the selection because if you do that, you’ll actually deselect the selection and begin drawing a new one. This isn’t very difficult to keep track of because your cursor will change when it goes inside and outside of a selection.

Drawing Additional Selections on the Same Layer​

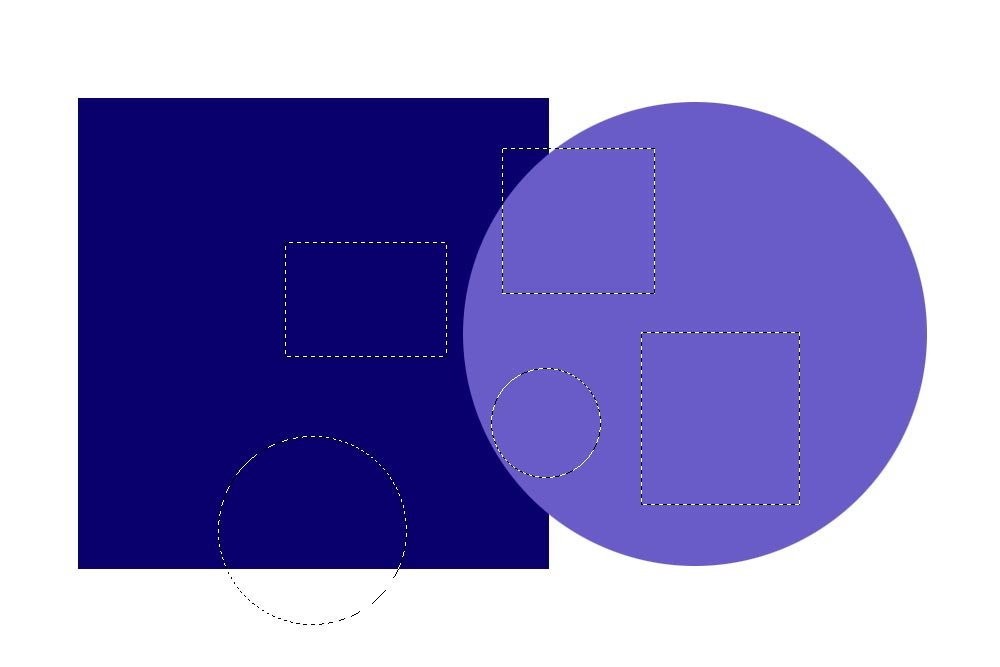
At any time, you can easily make many selections on the same layer. Once you create one selection, hold down the Shift key on your keyboard to begin drawing another one. Once you hold the Shift key, you’ll see a small + symbol appear next to your mouse pointer. That + sign means you’re going to add a new selection. If you don’t hold the Shift key and try to draw outside of the original selection, again, you’ll end up deselecting the first selection.

many-selections.jpg

Regarding creating selections on the same layer, sure, you can do that. Personally, I like to, and usually end up, making my selections on different layers. Oftentimes, I mask the selections and move them around independently, so having them sit in their own layers gives me that flexibility.

If you’d like to constrain the proportions of an additional selection, first hold down the Shift key and begin drawing. Then, once you do that, let go of the Shift key and then hold it down again. You’ll see the selection snap to either a perfect square or circle.

How to Transform a Selection​

Sometimes, it’s easier to transform a selection after it’s already drawn than it is to try to draw the perfect selection in the first place. That’s fine. I know a lot of folks who use this method.

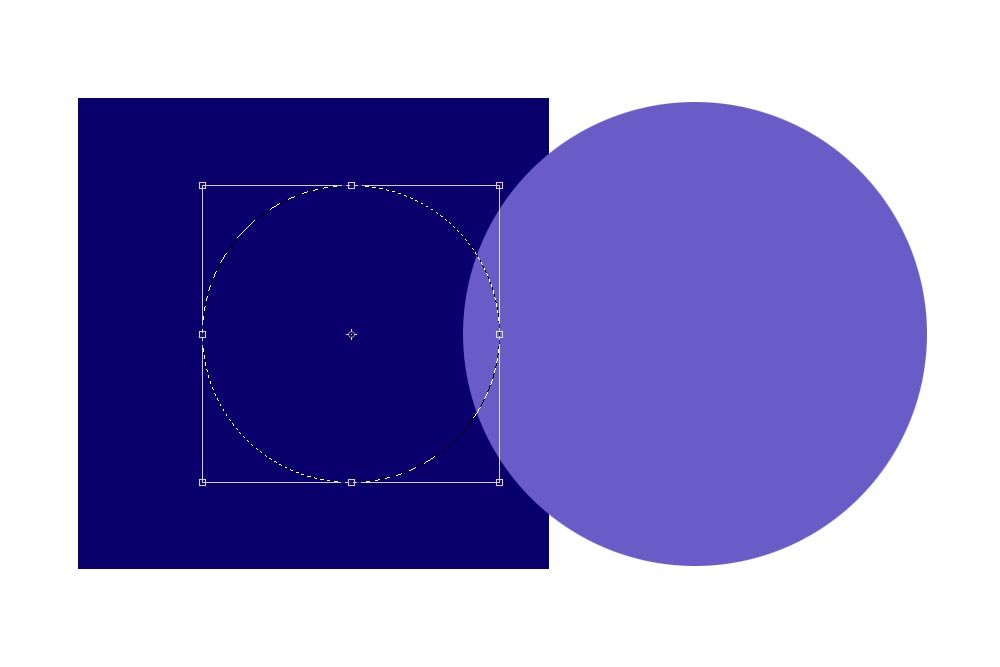
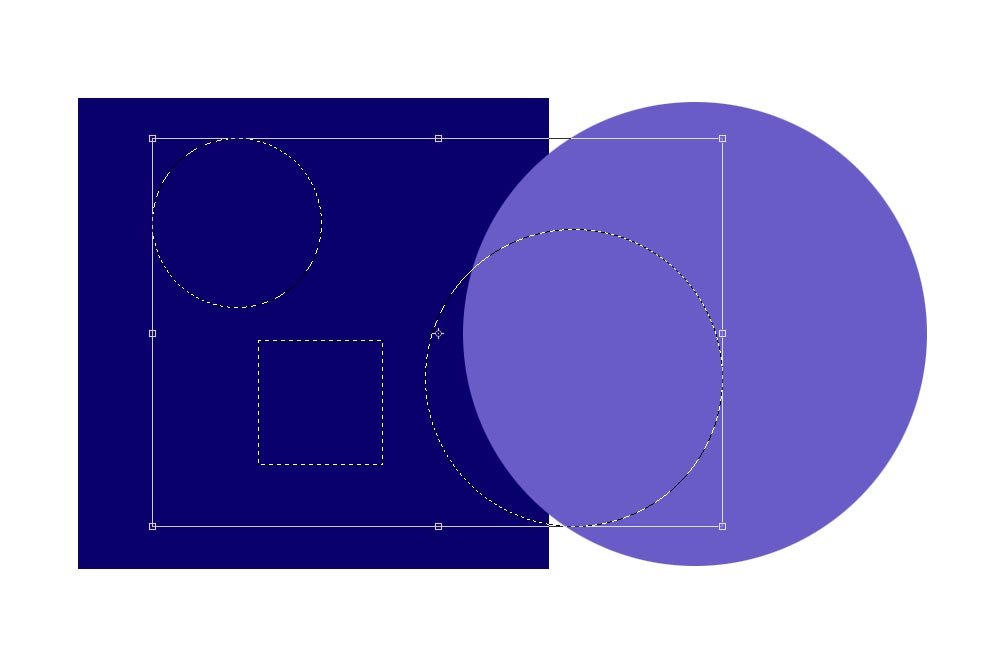
To transform a selection in Photoshop, first draw the selection. Then, once that’s done, you can use the keyboard shortcut of Ctrl+T to free transform the marching ants.

transform-selection.jpg

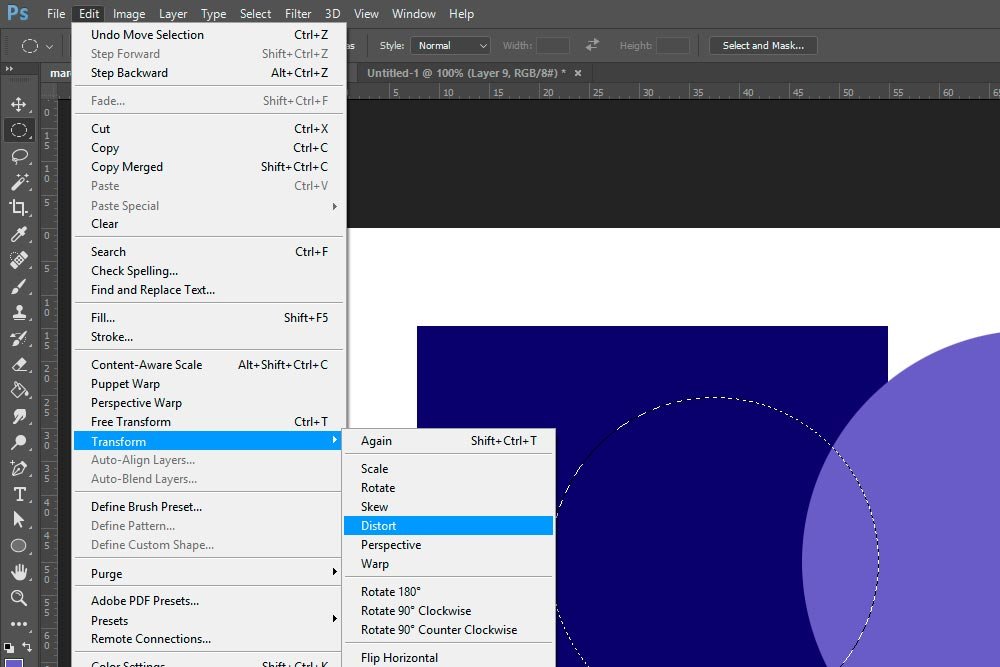
If you have a particular type of transformation in mind, you could always go up to the Edit > Transform menu and click one of the options there.

edit-transform.jpg

Using the Transform & Free Transform Tools in Adobe Photoshop

Remember, if you have multiple selections and want to transform something, after you choose your method of transformation, all the selections will be grouped together.

grouped-transform.jpg

Keep this in mind. If you’d like to transform an individual selection, do so before drawing the other selections or make your selections on their own layers.

I hope you got something out of this post. I tried to effectively explain how to create selections using the Rectangular and Elliptical Marquee Tools in Adobe Photoshop. I also discussed how to move selections and finally, how to transform them. If you have any questions or concerns regarding this post, please let me know in the comment section below. Thanks for reading!
 
Top