WendyMay
Member
- Joined
- May 11, 2021
- Messages
- 142
- Reaction Score
- 0
- Points
- 21
- #1
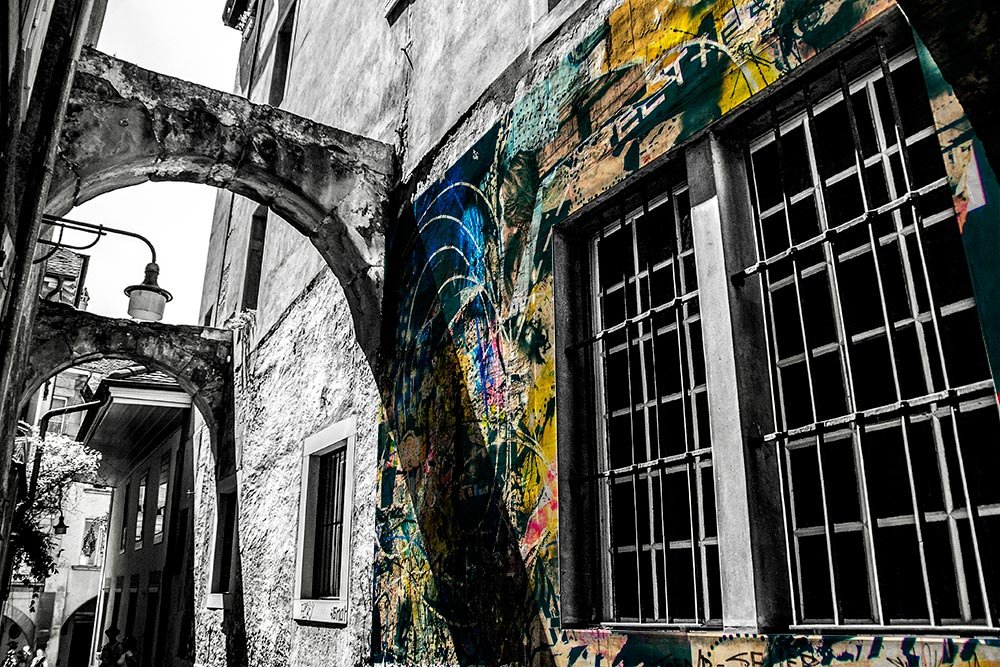
Oftentimes, designers use Adobe Photoshop to create mockups to show clients what things may look like if a change were to be made to something. This is actually very common and I think it’s important to understand just how you can use the tools that Photoshop offers to quickly and easily accomplish such a task.
In today’s example, I’m going to pretend that someone has asked me to show them what a particular wall would look like with a specific design applied to it. Of course, these are only demonstration images, but by the end of this post, I think you’ll find that you’ll be able to take what I’ve shown you and apply it across any number of projects. All you’ll need to complete this project is a few images and about five minutes of time. I practiced going through the steps once and it took about ten minutes. The second go round, it was under two. That’s how little time it can take to learn something like this.
Now, I want to stress the versatility of the tool I’m going to introduce today. Back in a previous life (2002-2007), I used to work for a cluster of radio stations in lower New York and did a lot of design work. I frequently created graphics for billboards, vehicles and large buses. If you’ve ever heard of a car wrap or a bus back, that’s what I’m talking about. Back when I did these types of projects, I’m not sure Photoshop even had this tool, so I was forced to use templates that various print shops and ad agencies sent over to me. I now think about how much easier my life would have been if I had been exposed to Vanishing Point.
Starting Images
I’ll be using two images for this post. The first is the actual wall. I’m going to say that a friend or client sent me the image and it’s this surface they’re interested in adding the artwork to.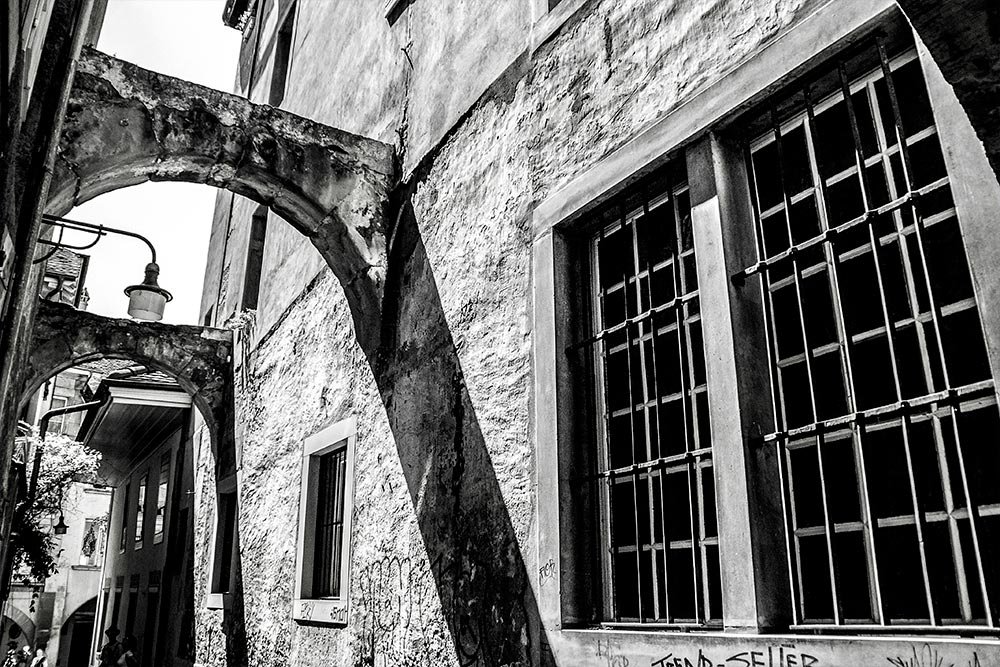
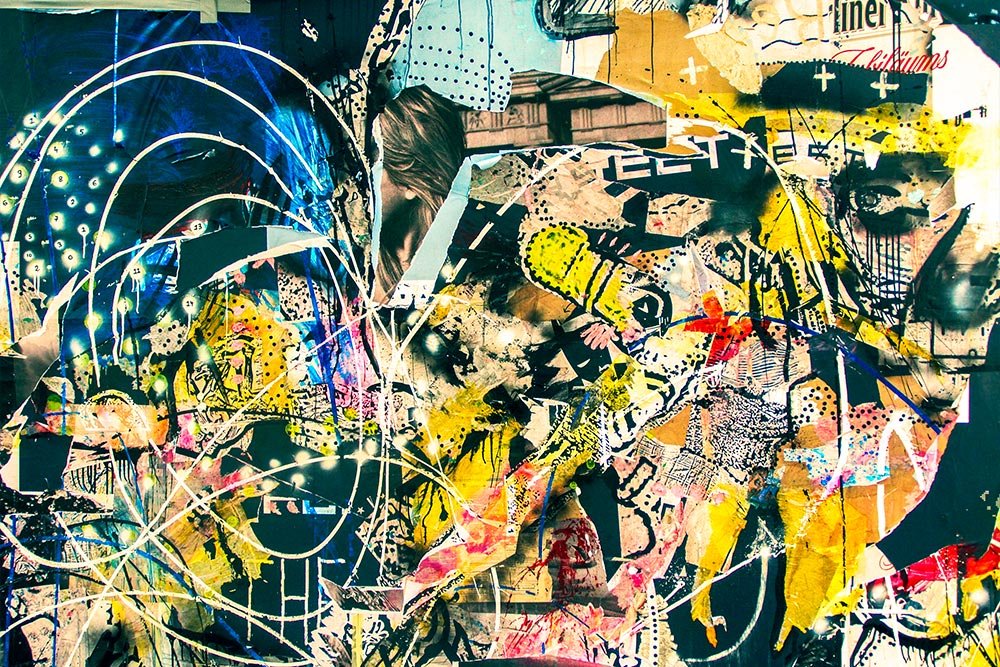
The second image is the artwork itself. This is what the client would like to overlay on the wall.
Vanishing Point
In art and design, there’s an idea called Vanishing Point. It’s a rather simple concept to understand. I’ll try to explain the area of the concept we’ll be using in this post.In many drawings and photographs, there are lines that lead to a point in the piece of work that, if followed, will disappear or vanish. Think about standing on train tracks and looking straight down the rails as far as you could see. The point you can’t see anymore is the vanishing point. Say you’re looking down a long river or a straight highway, the same idea applies. The point at which the object disappears is called the vanishing point.
If you look at the photo of the wall above and follow the lines of the large window from right to left, you’ll eventually end up at a spot that intersects. That’s the vanishing point. Vanishing points aren’t always easy to figure out, but oftentimes, they are there. You just need to get used to how to find them.
Open Files Into Photoshop
The very first task I want to take care of is to open the photos I’m going to be using into Photoshop. I’ve already done that. You can see the two tabs, plus the one I’m using for screenshots, below.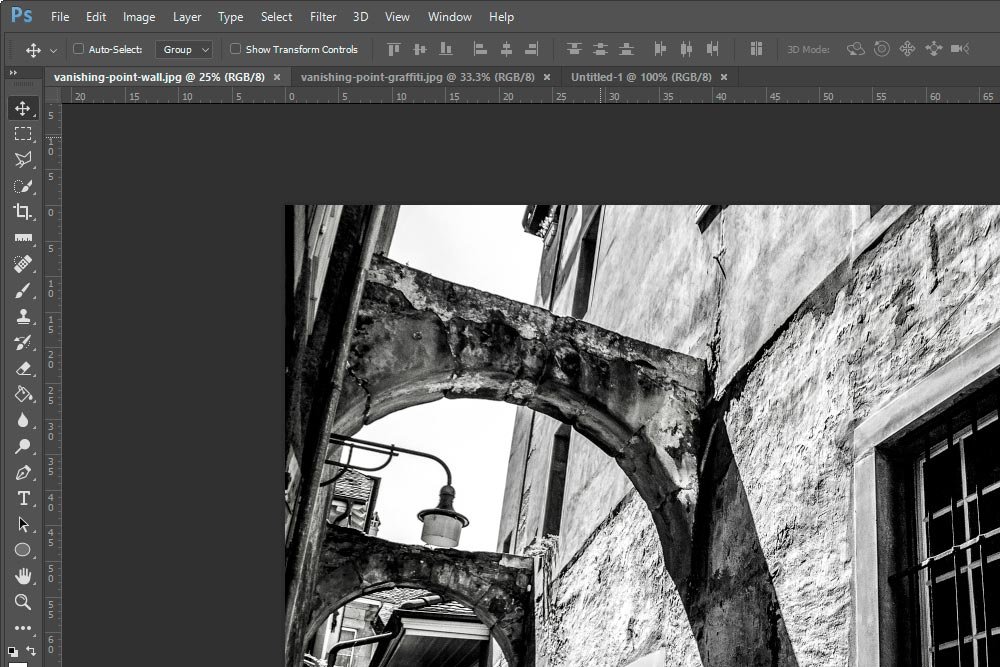
Create New Layer
The next step is to create a new layer inside the document I’ll be using as the background. Since the wall image is the background, I’ll create a new layer in this file. The reason for the new layer is to hold the graffiti image I’ll apply later on.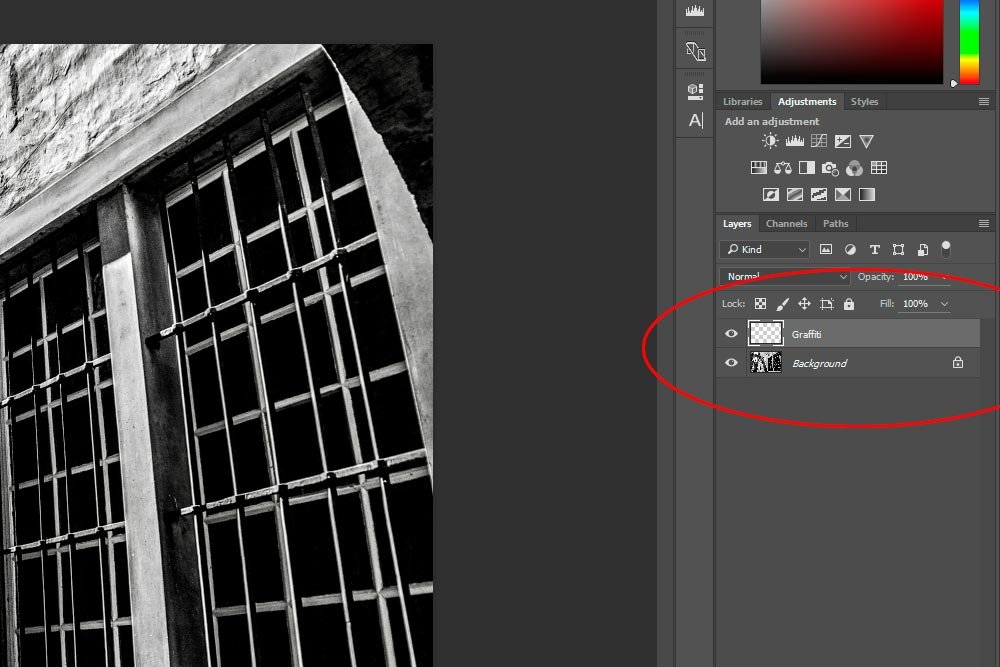
Copy Overlay Image to Clipboard
Now, I’m going to go to the graffiti image and select the entire thing with the Rectangular Marquee tool. To do this, I simply hit Ctrl+A to select all and then Ctrl+C to copy to the clipboard. You can see the marching ants in the screenshot below.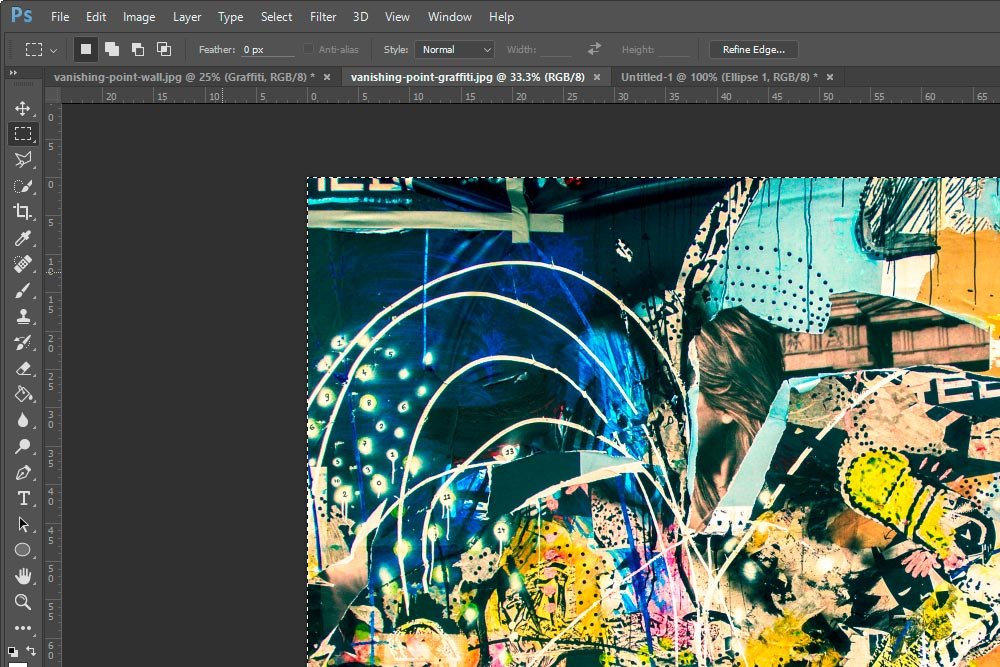
Now, whatever I selected is sitting in the clipboard of my operating system.
Open the Vanishing Point Tool
Now, that my graffiti image is stored in the clipboard, I can click the wall tab to return to that. Next, I’ll head up to the Filter > Vanishing Point menu item and select it.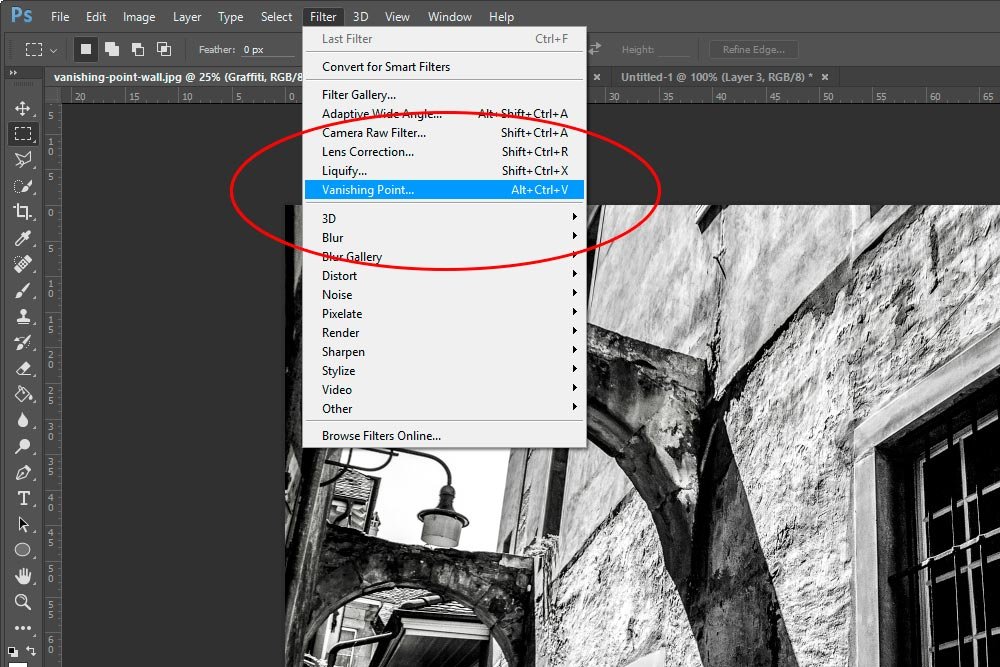
This will open the Vanishing Point tool, which is in a new window inside of Photoshop.
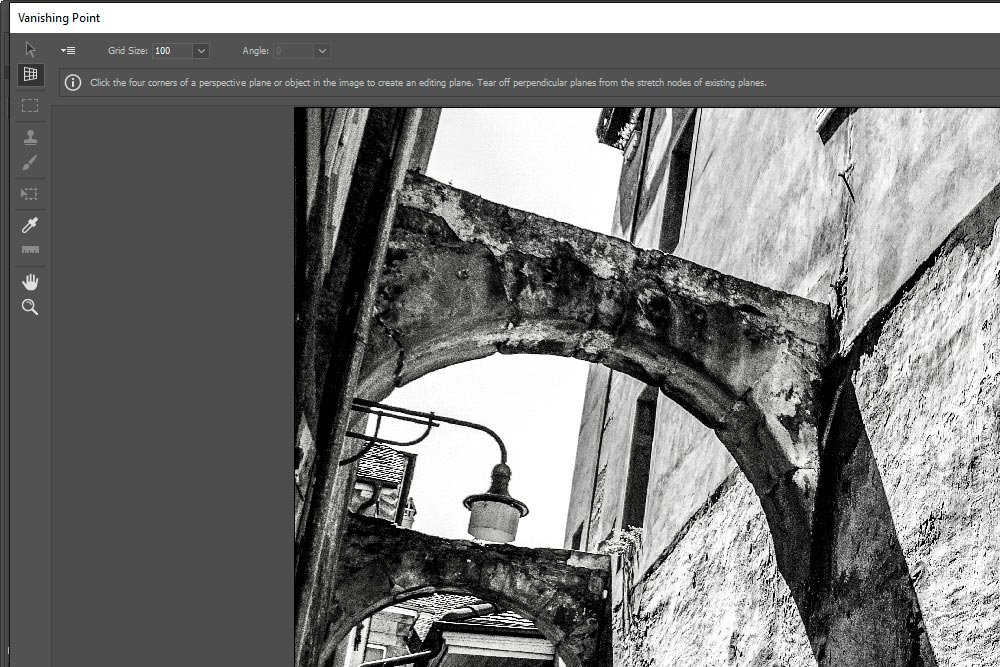
Now, I want to give you a quick breakdown of what exactly the Vanishing Point tool is. In the most basic sense, it’s a tool that allows you to draw a shape over an image. Once the shape is drawn, you can paste another image into it. The image you paste into it will take the form of the shape you drew. Really, that’s it. If you tried hard enough, you could probably accomplish the same task by using some sort of distort transform tool, but trust me, this method is much easier. In the sections below, I’ll clarify how to draw the shape and apply the image.
Creating a Plane
After I open the Vanishing Point tool, I’ll have the opportunity to create a plane, or in more simple terms, draw my shape. The goal here is to follow the lines that will lead to the vanishing point. In the case of the window image, these lines can be found on the wall and around the window. I’ll show you in the following screenshots.The tool I’ll use is called Create a Plane. If you look at the screenshot above, you can see it in the left vertical toolbar. It’s the second tool down (currently selected) and has a grid icon inside of the button. Photoshop defaults to this selection when you launch the Vanishing Point tool.
Basically, the way to draw the shape is to click once on one corner of it. Then, when you let go of your mouse pointer, you’ll see that a string is following it. Head to the next corner in clockwise fashion and click it. Then, continuing to follow the plane, click the next corner and finally the last one. What you should see is an outline of the shape with a grid running through it. To better accomplish this, you can use the Ctrl+ and Ctrl- to enlarge and shrink the view. Take a look at my plane.
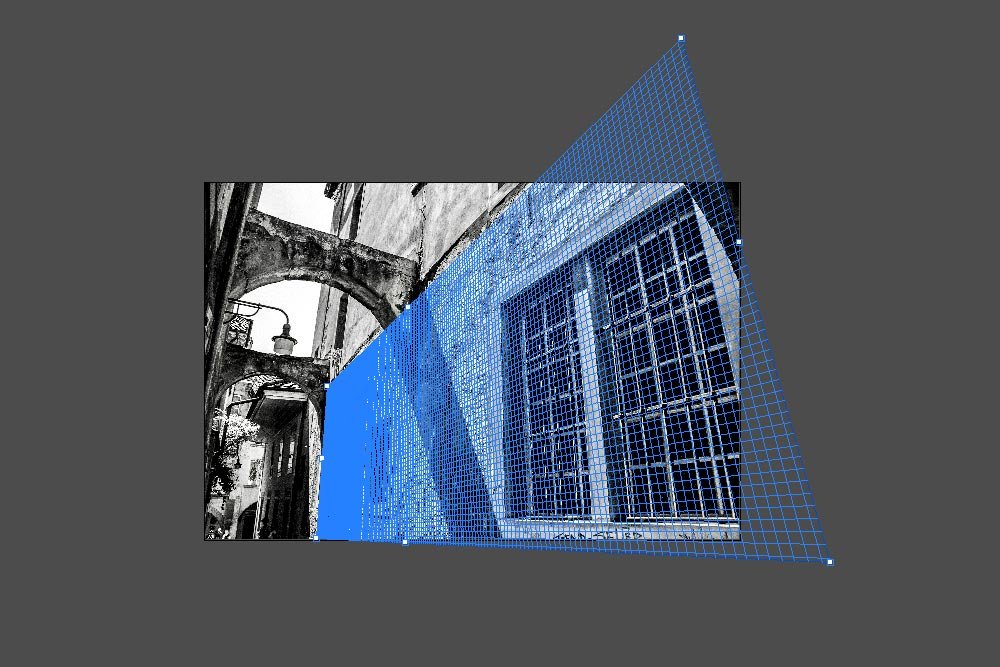
I know that’s not that easy to see. Let me give you a closer view. It’s cut off a bit, but I can explain better from this one.
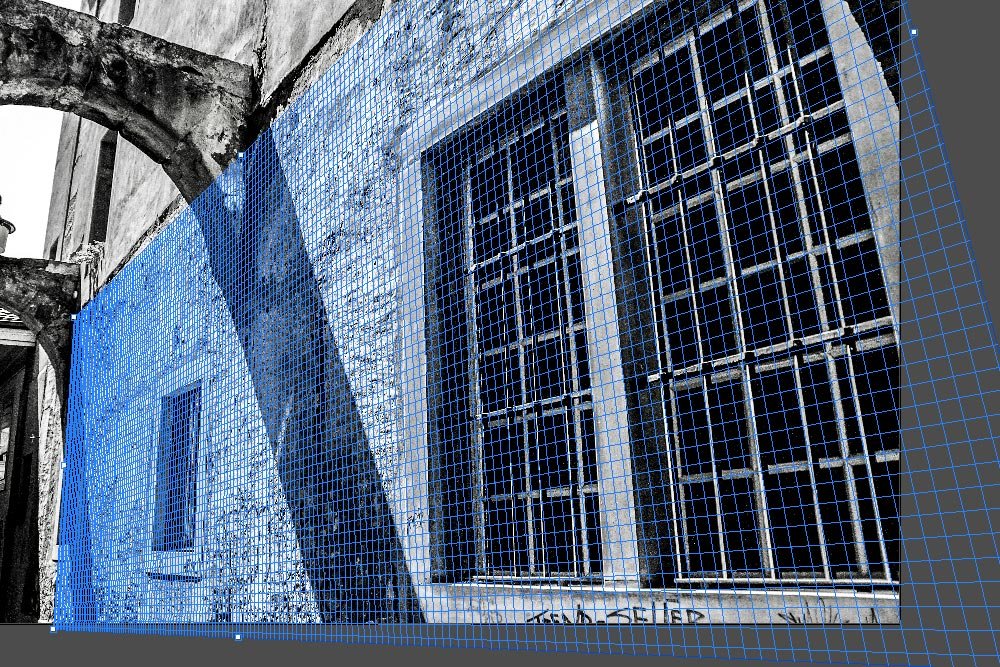
Do you see how the grid follows the vanishing point? It’s larger on the right and shrinks down towards the left. It the grid continued, it would eventually vanish. Also, take notice of the lines on the wall I followed to create this grid. As I said above, I use the lines on the wall and the ones around the window. The window is the biggest giveaway here. That made this easy.
Now that the grid is made, I can hit Ctrl+V on my keyboard to paste the graffiti image into the Vanishing Point tool window. Remember – the graffiti image is still sitting in the clipboard.
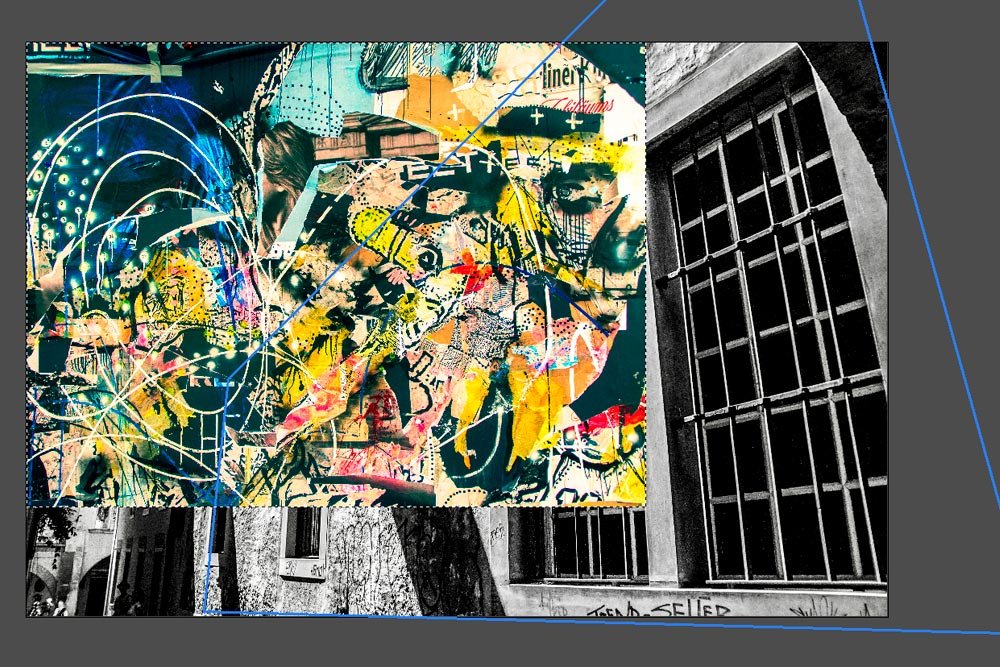
After I paste the image into the tool, it’ll sit in the upper left corner, just like in the screenshot above. To move the image into the grid area, so it takes the shape of it, I’ll need to click the Transform Tool, which is the 6th one down in the vertical toolbar in the Vanishing Point tool window. If you aren’t sure which one it is, you can hover over each button with your mouse and after a few seconds, a small popup with a description of the tool will appear.
I’ll go ahead and move the image into the grid area. Watch what happens.
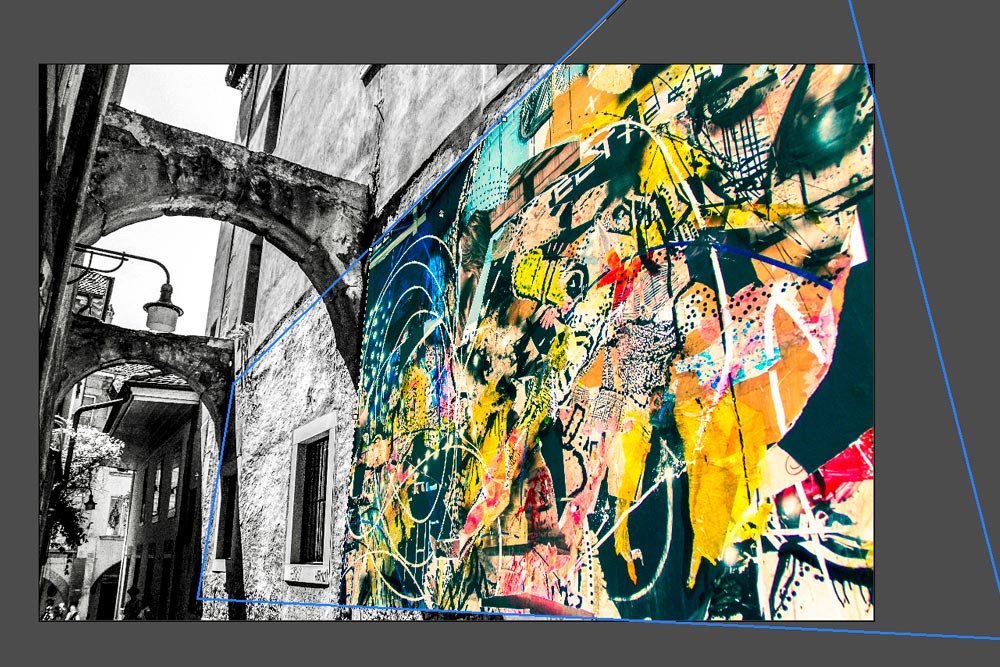
It snapped to the shape of the grid. From here, all I need to do is drag the pasted image around a bit so it sits the way I’d like it to and then I can hit the Okay button in the upper right corner. This will close the Vanishing Point tool window and return me to the regular tabs in Photoshop.
Trimming the Window Area
Take a look at the image as it currently stands.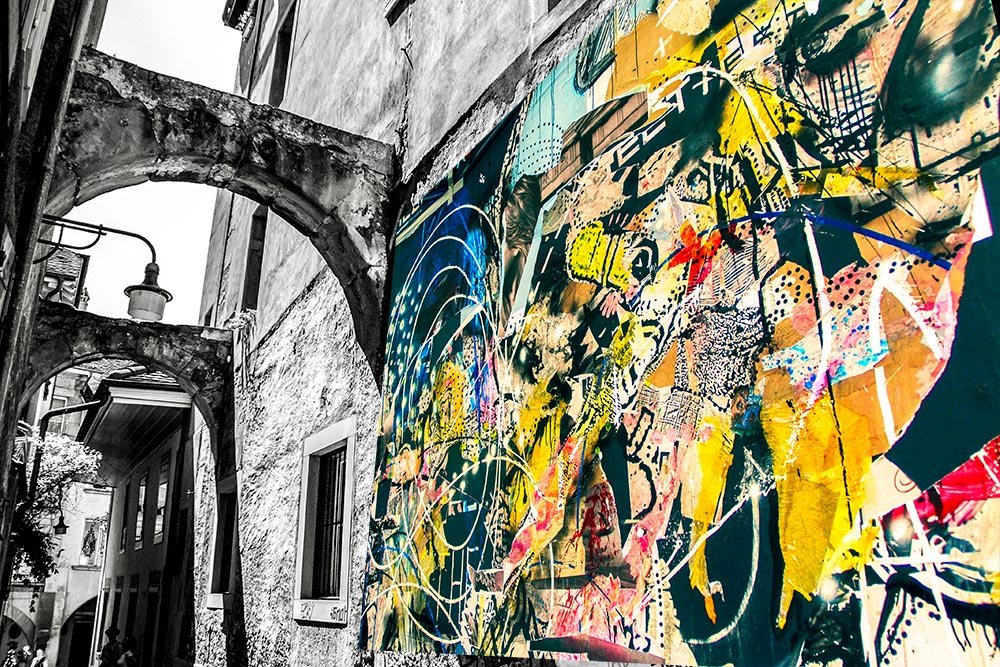
We’ve got two problems. The first is that our graffiti covers the window. Second, we can’t see and of the wall texture through the graffiti. We can fix both of these issues.
In order to clip away the part of the graffiti image that’s covering the window, I’ll need to hide the graffiti layer by clicking the little eye icon in the layer itself (making sure the layer stays selected).
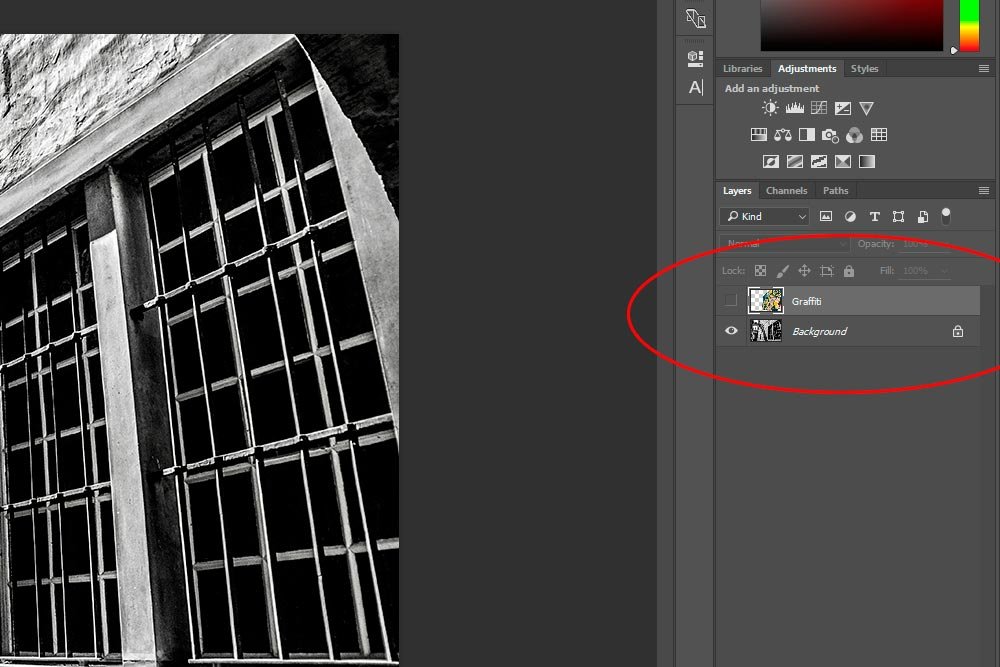
Next, I’ll use the Polygonal Lasso tool to draw a shape around where I want to remove the image.
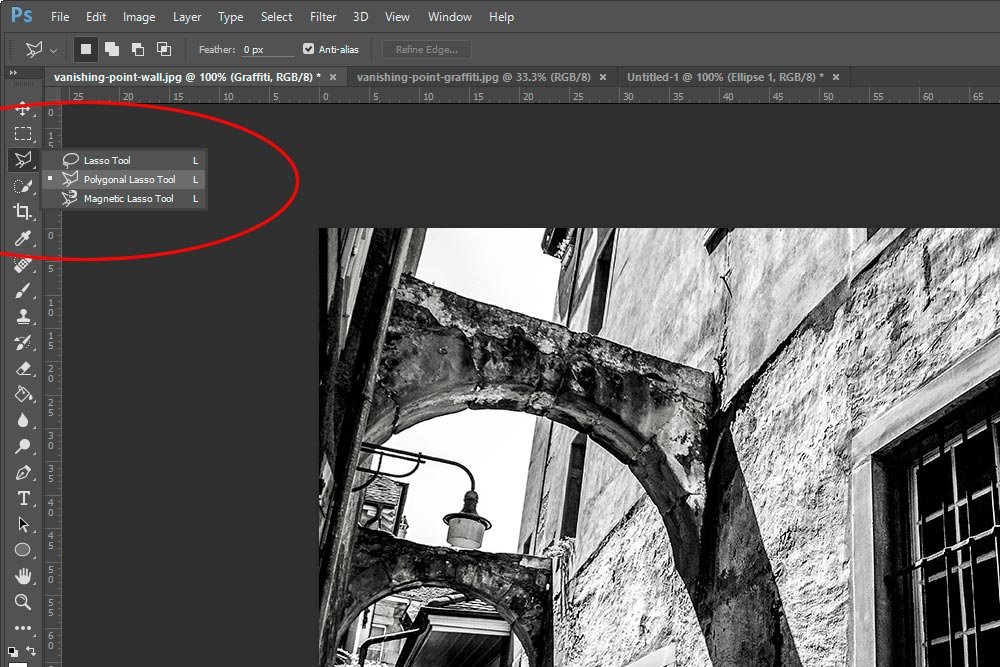
This works much like the previous shape tool did. Click one corner, let go of the mouse pointer and continue clicking the corners until you make it back to the very first point you clicked. When you see a small circle appear at the tip of your mouse pointer, you can click once more to close the loop. This will select the area and create the marching ants.
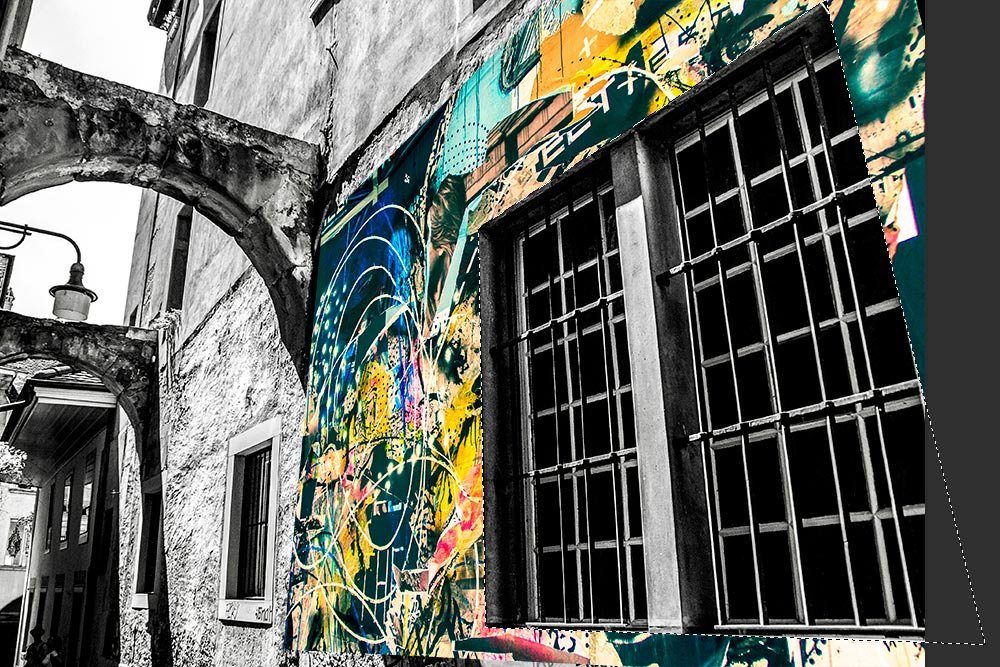
To remove the selected area, I simply hit Delete on my keyboard and I’ll end up with the screenshot above. To remove the marching ants, or deselect the area, I’ll click inside of it once.
Applying a Blend Mode
To give the overlay sort of a transparent look that will show the texture of the wall, I can use a blend mode. I went through a few of them and found that Multiply worked best. It allowed the shadow to come through and the texture to appear lifelike.
That’s it. The project is finished and I can hand the image to my client. This will give a good idea of what some artwork would look like on his wall.
I know you have questions. This was a lot of information and something is bound to be unclear. Please ask questions below and I’d be happy to help in any way I can.
