KodyWallice
Member
- Joined
- May 7, 2021
- Messages
- 123
- Reaction Score
- 1
- Points
- 23
- #1
There are many things that can render a photograph useless. Too dark, too light, blurriness, graininess and yes – red eye. Red eye could quite possibly be the worst. I’ve seen folks flip through blurry photos in the past and not think twice. I’ve never seen someone ignore, or not notice, someone in a photo who has blazingly red eyes. That one is tough to get past. Red eye is what I like to call the “photo killer.”
Luckily, it’s not the most challenging thing in the world to fix. Adobe Camera Raw has a very intuitive feature that can walk you straight through the process of turning pupils black again. And right inside the Red Eye Removal panel is a selection that can fix pet eye. You know, those glowing eyes your dog or cat has after to use your flash to take a picture of them? I guess dogs don’t know that they shouldn’t stare right at the camera.
In today’s post, I’ll walk through the process of removing red eye from a portrait photograph in Camera Raw. I’ll go through the steps and along the way, I’ll show you where you can access the feature that eliminates pet eye as well.
Here is the original photo of the model:

And here is the model after some creative editing. Now, just so you know – this is legitimate red eye. I clipped some pupils from another photo and pasted them into this photo. These aren’t just red circles that I drew in here.

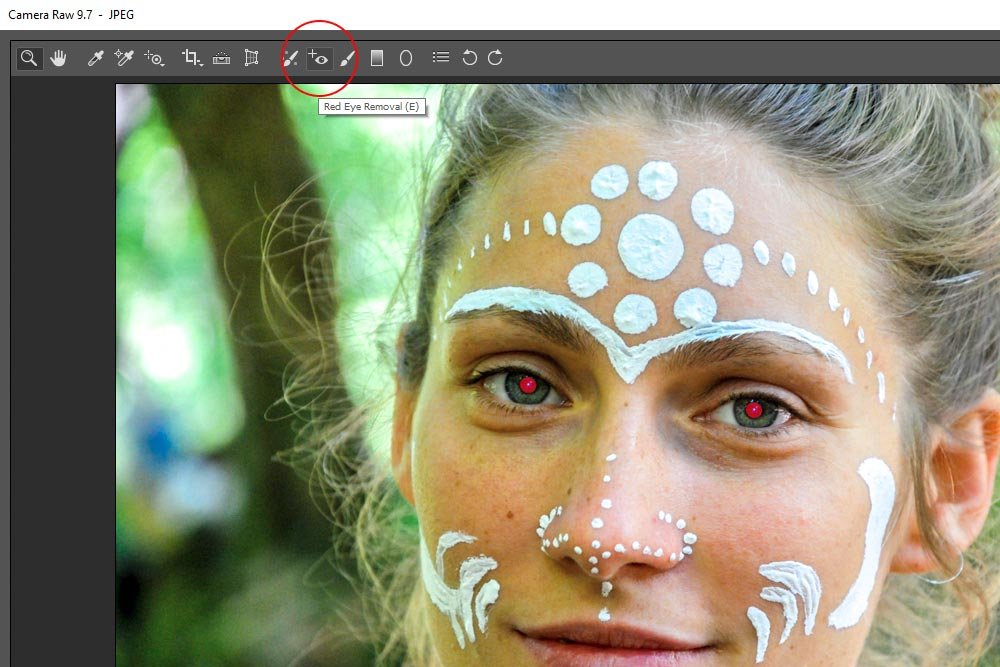
Once I click that icon, the Red Eye Removal panel opens on the right side of Camera Raw.
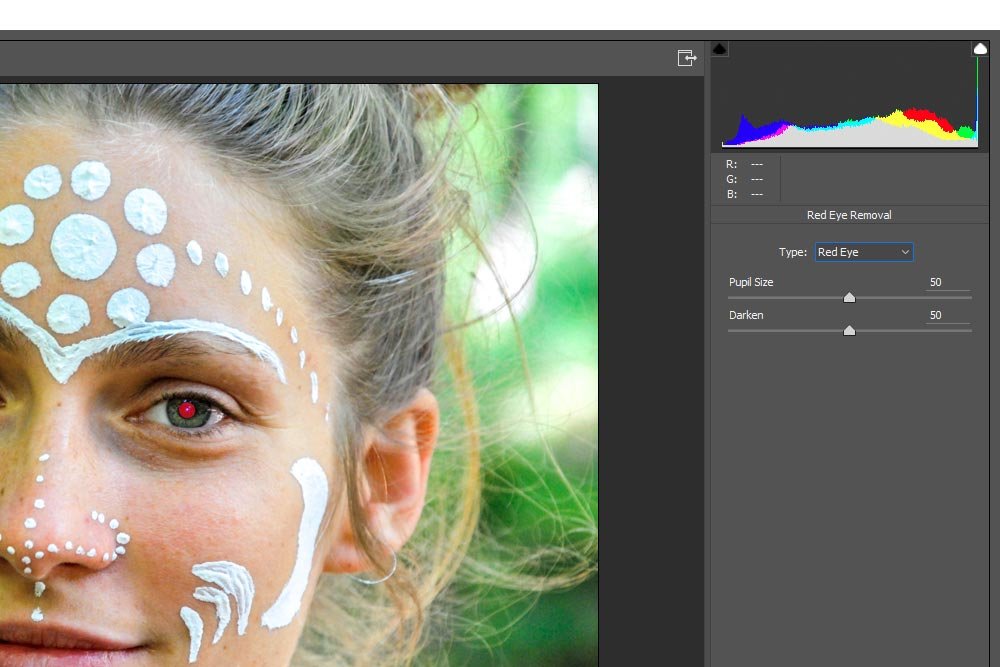
If you look inside this panel, you’ll see a drop-down box. Inside this box are two available choices. The first corrects Red Eye and the second corrects Pet Eye. Depending on the issue you’re dealing with, you’ll need to make the appropriate selection.
In this section, I’ll drag my mouse across each eye area so each red eye pupil is highlighted.
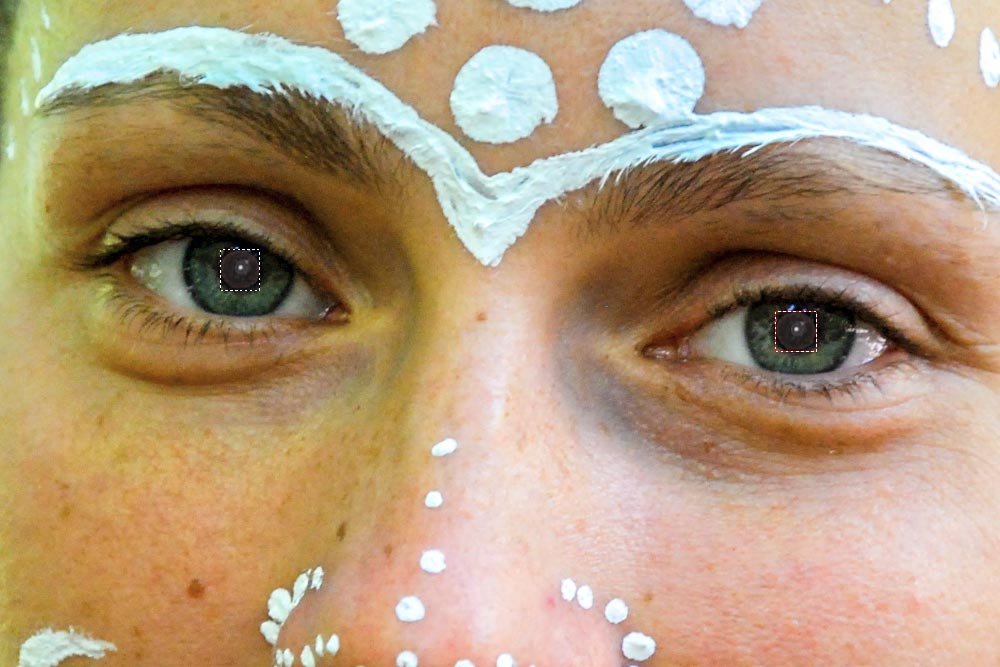
As you can see, even though I selected a larger area (the entire eye), Camera Raw intelligently reduced the selections to only the red in the pupils. It also removed the red and turned it to black.
Now that the pupils have been selected, I can push the sliders in the Red Eye Removal panel to where I need them to be. The first slider, Pupil Size, does two things. If pushed to the left to reduce pupil size, the darkening of the pupil around the edges will be removed, which will reveal a red ring. If you push this slider to the right, a dark outer glow around the pupil will appear. You’ll need to adjust this slider so it meets your needs.
The next slider, Darken, controls the darkness or brightness of the new pupil color. If I push this slider to the left, the pupil will become brighter, turning into a gray. If I push the slider to the right, the pupil will get darker and will lean towards being black. Again, adjust this so it meets your needs.
In my case, I’ll push the top slider to the right so it has a value of 75 and I’ll push the bottom slider to the right so it has a value of 100. To return to the regular view so the selections disappear, just click on the Hand Tool in the top toolbar.
As this point, I’ll zoom out a bit to see how things look.
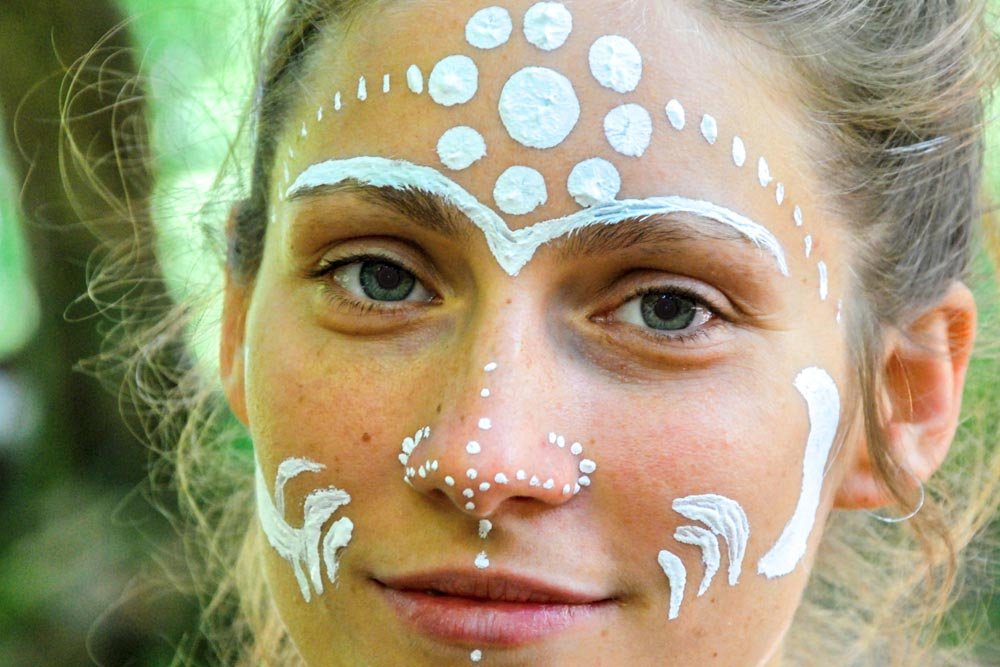
I think it looks pretty good.

If I were to spend time on this, I would definitely brighten the eyes, add some accuracy to the pupils and add reflection. I’ll surely return to this topic later on.
I think I’ll stop there. I hope I clearly covered how to remove red eye from a photograph while using Adobe Camera Raw. If you have any questions or comments, please leave them below. Thanks for reading!
Luckily, it’s not the most challenging thing in the world to fix. Adobe Camera Raw has a very intuitive feature that can walk you straight through the process of turning pupils black again. And right inside the Red Eye Removal panel is a selection that can fix pet eye. You know, those glowing eyes your dog or cat has after to use your flash to take a picture of them? I guess dogs don’t know that they shouldn’t stare right at the camera.
In today’s post, I’ll walk through the process of removing red eye from a portrait photograph in Camera Raw. I’ll go through the steps and along the way, I’ll show you where you can access the feature that eliminates pet eye as well.
Original Photo
Believe it or not, I wasn’t able to locate a demo photo to use for this post that exposed red eye on a model. As hard as I tried, I was unsuccessful. I was actually going to abandon this post in its entirely because of this. Then I got an idea. Even though I couldn’t find an existing “red eye” photo, why not give someone red eye? So that’s what I did. A little copy/paste and here we are.Here is the original photo of the model:

And here is the model after some creative editing. Now, just so you know – this is legitimate red eye. I clipped some pupils from another photo and pasted them into this photo. These aren’t just red circles that I drew in here.

Accessing the Red Eye Removal Panel
For this step, I’ll open the photo in Adobe Camera Raw. Once there, I’ll click the Red Eye Removal tool that’s located in the top toolbar.
Once I click that icon, the Red Eye Removal panel opens on the right side of Camera Raw.

If you look inside this panel, you’ll see a drop-down box. Inside this box are two available choices. The first corrects Red Eye and the second corrects Pet Eye. Depending on the issue you’re dealing with, you’ll need to make the appropriate selection.
Correcting Red Eye
This is a very simple process. To capture and correct red eye in a photograph, you’ll need to select the offending areas. Of all tasks, this is probably the most tricky. If you go to select too small of an area, Camera Raw might not have enough information available to determine exactly where the red eye is in the photo. If you drag your mouse closely across the red eye itself, you’ll likely hear a “bing” from your computer or receive an error message from Camera Raw that tells you there isn’t enough data to capture what you’re looking for. If this happens, simply draw a larger area. Move your mouse further away from the pupil so there’s more to compare the actual red eye with the surrounding area.In this section, I’ll drag my mouse across each eye area so each red eye pupil is highlighted.

As you can see, even though I selected a larger area (the entire eye), Camera Raw intelligently reduced the selections to only the red in the pupils. It also removed the red and turned it to black.
Now that the pupils have been selected, I can push the sliders in the Red Eye Removal panel to where I need them to be. The first slider, Pupil Size, does two things. If pushed to the left to reduce pupil size, the darkening of the pupil around the edges will be removed, which will reveal a red ring. If you push this slider to the right, a dark outer glow around the pupil will appear. You’ll need to adjust this slider so it meets your needs.
The next slider, Darken, controls the darkness or brightness of the new pupil color. If I push this slider to the left, the pupil will become brighter, turning into a gray. If I push the slider to the right, the pupil will get darker and will lean towards being black. Again, adjust this so it meets your needs.
In my case, I’ll push the top slider to the right so it has a value of 75 and I’ll push the bottom slider to the right so it has a value of 100. To return to the regular view so the selections disappear, just click on the Hand Tool in the top toolbar.
As this point, I’ll zoom out a bit to see how things look.

I think it looks pretty good.
The Final Image
Camera Raw can only do so much in the way of removing red eye. In the most basic sense, the application locates the red in the pupil and desaturates it. In most cases, this will look just okay. To obtain a more polished look, you’ll likely need to bring the image into Photoshop, where you can darken the pupils even more and then add some reflection. I quickly did this in this next photo, but will wait for another tutorial to cover the steps I took. I don’t want to go off track too much here.
If I were to spend time on this, I would definitely brighten the eyes, add some accuracy to the pupils and add reflection. I’ll surely return to this topic later on.
I think I’ll stop there. I hope I clearly covered how to remove red eye from a photograph while using Adobe Camera Raw. If you have any questions or comments, please leave them below. Thanks for reading!
