WendyMay
Member
- Joined
- May 11, 2021
- Messages
- 142
- Reaction Score
- 0
- Points
- 21
- #1
In a previous post, I talked about how we can launch multiple photos into Adobe Camera Raw and edit them all simultaneously. As you can imagine, this is a huge time saver. Doing these types of things one by one can become monotonous, especially if the photos were taken of similar objects or subjects under the same lighting conditions. Really, there’s no reason not to “mass edit” these types of things.
I began using this feature in Camera Raw a while back. When photographing, I would focus my efforts on clusters of similar photos with this type of editing in mind. This way, when I returned to my computer from outside, or from wherever it was I was taking the photos, I could easily group them together for some quick modifications. The things is, I quickly realized I needed a bit of flexibility. Having the same exact edits apply to every single image that I opened into Camera Raw sort of tied my hands. I knew I needed to learn more about what was going on behind the scenes because the way things were, I was getting stuck when I went to edit those outlying photos. You know, the ones with the differences that just didn’t fit in with the rest.
In today’s post, I’ll open a few random images into Adobe Camera Raw with the intent of demonstrating how we can edit them all together or how we can use Camera Raw’s algorithms to edit them simultaneously, but independently. I know, that’s weird to think of. Let’s just say that we can have more them one photo launched onto Camera Raw and selected, but have different edits applied to each image. If you found my previous post about editing multiple images helpful, you should find this one just as helpful.
Once I do that, Camera Raw will look like this:
Now, if you compare the previous two screenshots, you’ll notice there’s a difference between them. The first one has only one image selected and visible while the second one has all five images selected with the same one visible.
In the title of this section, I wrote that I’d like to “select” a new image. In reality though, all five are selected. What I mean is that I’d like to select a new image to make it visible in the center panel instead of having the very first image in the series visible. Making this change is very simple.
If I merely clicked on a new thumbnail with the intention of making it visible, I’d deselect all the other images in the series. To keep the others selected, but make a different photo visible, I’d have to first press and hold down the Alt key on my keyboard. Once I do that, I can click on a different thumbnail so that one is visible. I’ll do that right now. Notice how a different image is visible at the center of the application while all the others are still highlighted in the left column.
With all five thumbnails selected in the left column, I can move over to the Basic panel in the right column. From there, I can begin my editing.
In my previous post where I discussed editing more than one image at a time, I told you that if more than one image is selected in Camera Raw and a slider in the Basic panel is moved, both images will take on the exact value of that slider, no matter what the image looks like. This is why I said editing this way is perfect for groups of photos that were taken of similar items under similar conditions. You certainly wouldn’t want to use this method to edit two photos; one of bright daylight and one of a dark interior room in a house.
There are, however, methods for editing groups of images independently, no matter their capture conditions. For instance, now that I have all five photos selected in the left column, I can click on the Auto link in the Basic panel. When I do this, the slider values will change depending on what’s actually inside of each image, not just as a blunt instrument. Camera Raw will intelligently adjust all selected images uniquely.
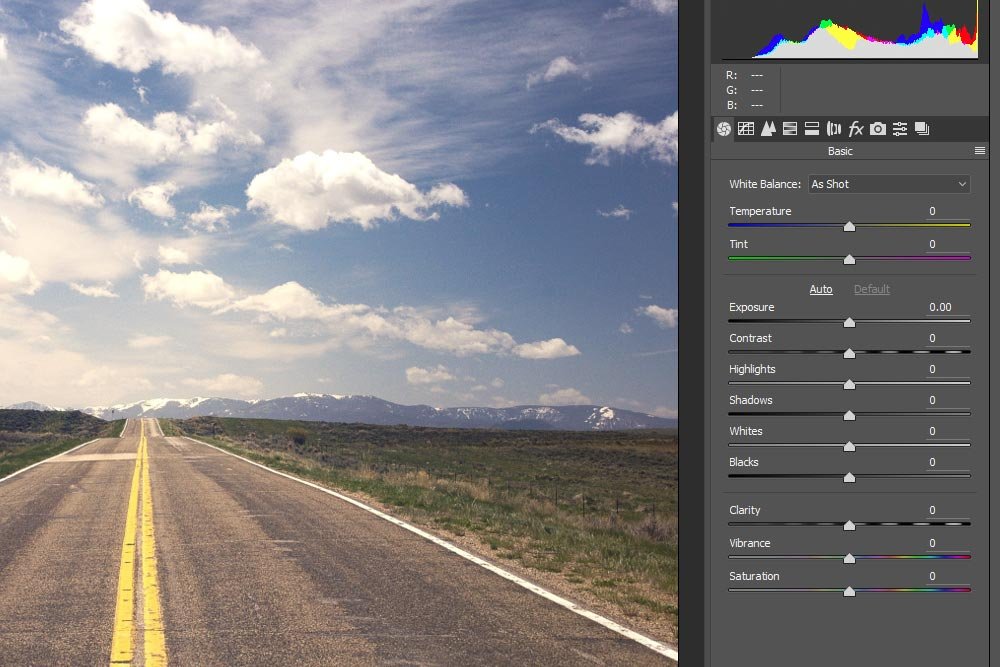
Let’s compare the slider values of two different photos after I press the Auto link in the Basic panel (directly above the Exposure slider).
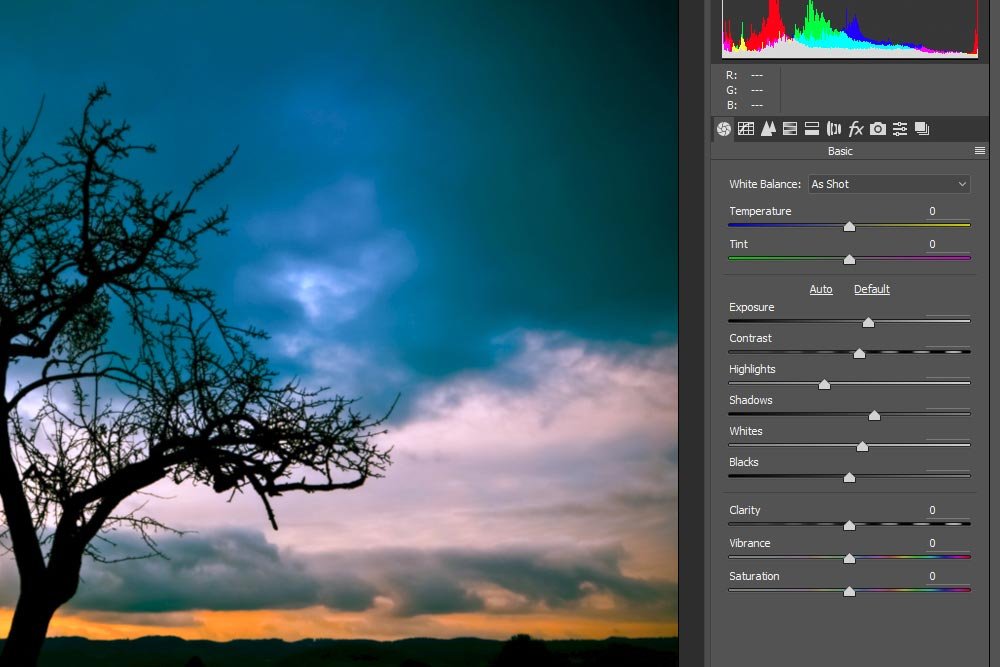
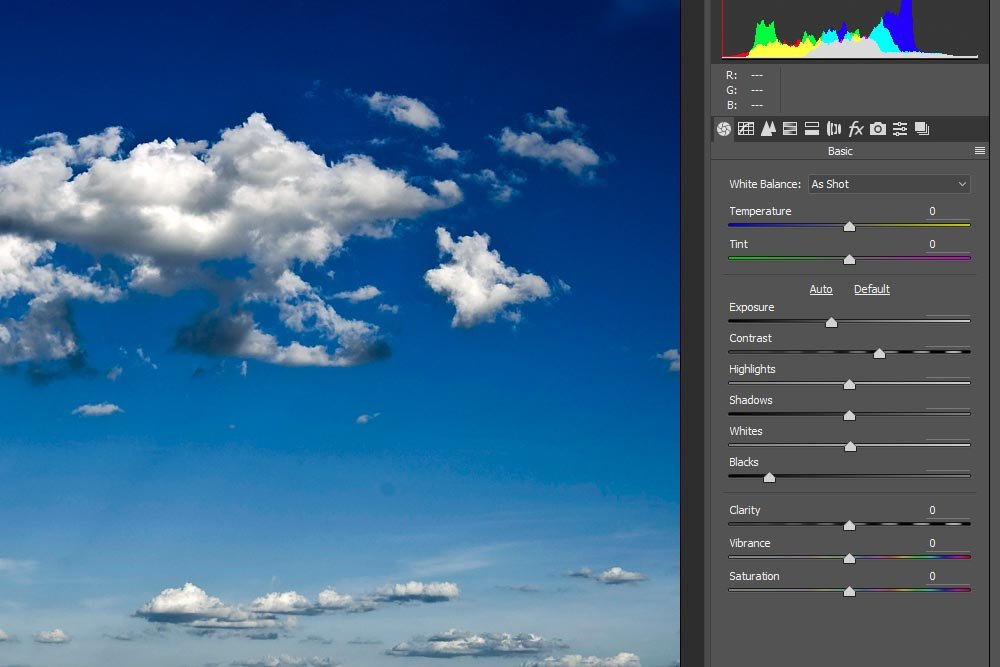
As you can see, each image has wildly different slider values, yet they were both edited at the same time. I’m sure you can see the benefit of this, especially if you use the Auto feature frequently. By the way, Auto does a really great job. Even if you use it as a starting point and then edit via the sliders later on, it’s pretty spot on.
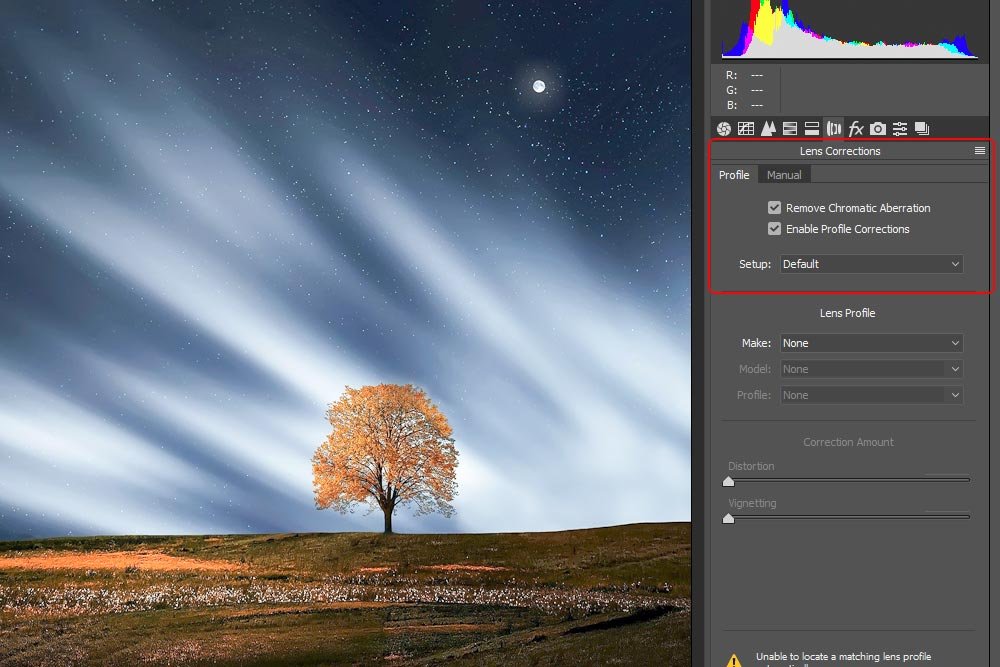
In this panel, I can check off the two top check boxes to allow Camera Raw to automatically adjust and correct any lens issues I happen to have with the photos in hand. Again, since this is an “auto” function, Camera Raw will treat each photo independently.
I do want you to be aware of something though. Just because we can use this auto feature and Camera Raw will determine each photo’s needs uniquely, that doesn’t mean we can go nuts with changing all sorts of things in this panel. Just like in the Basic panel, if I change something manually, that manual change will apply to all selected photos equally. We’re back to the blunt instrument type of thing. So, if I choose Apple from the Lens Profile drop-down box, that value will apply to each and every photo I currently have selected. Think of it this way: auto features are unique among photos and manual changes area applied across the board.
Let’s take a quick look into the Transform panel. I’ll click the Transform Tool from the top toolbar and the panel will appear. Inside the panel, I can click on the Auto button to let Camera Raw auto correct each of the selected photos. Each photo will be corrected independently, while if I pushed a slider at this point, that slider value would be applied to all images the same exact way.
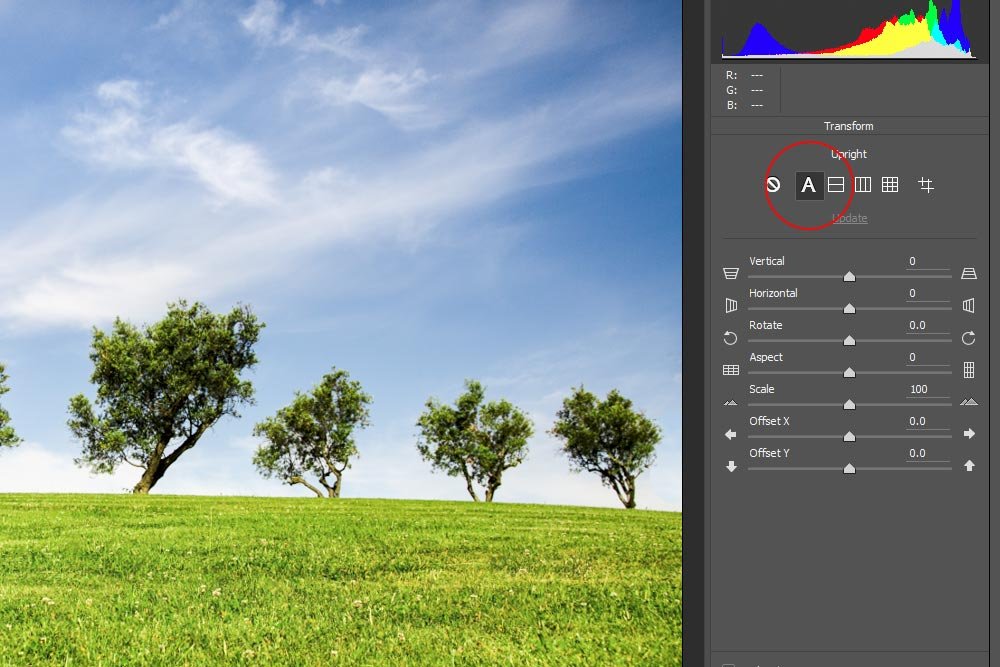
In the screenshot above, I used the auto feature. I’ll go ahead now and push a slider and show you how that affects the thumbnails. This will give you a clear picture of what I mean.
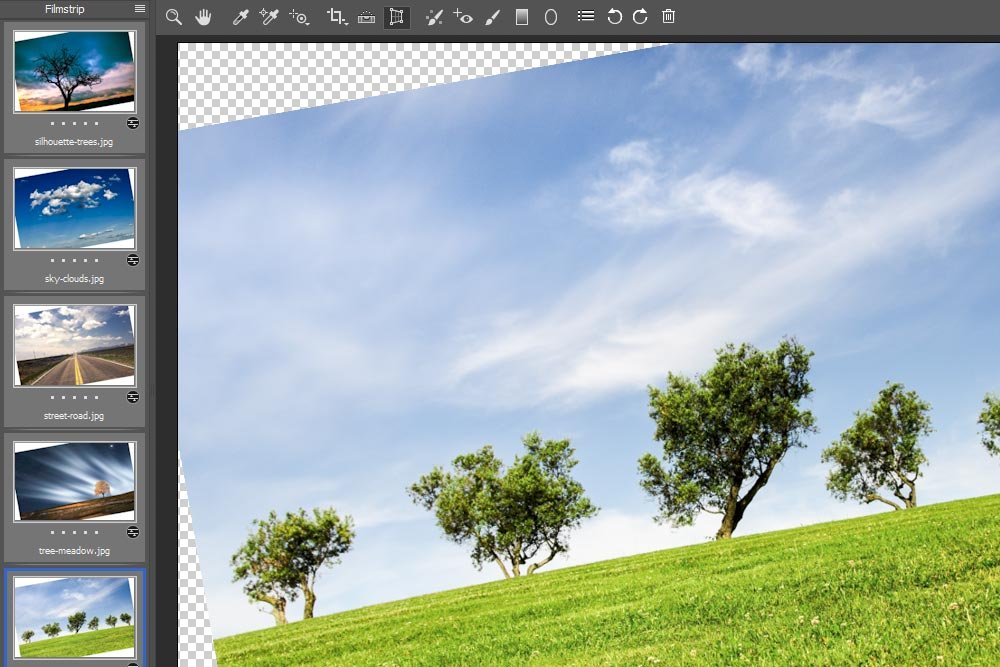
In the above screenshot, I pushed the Rotate slider all the way to the left. When I did this, all selected photos were rotated. Obviously, this is not a good way to edit different photographs.
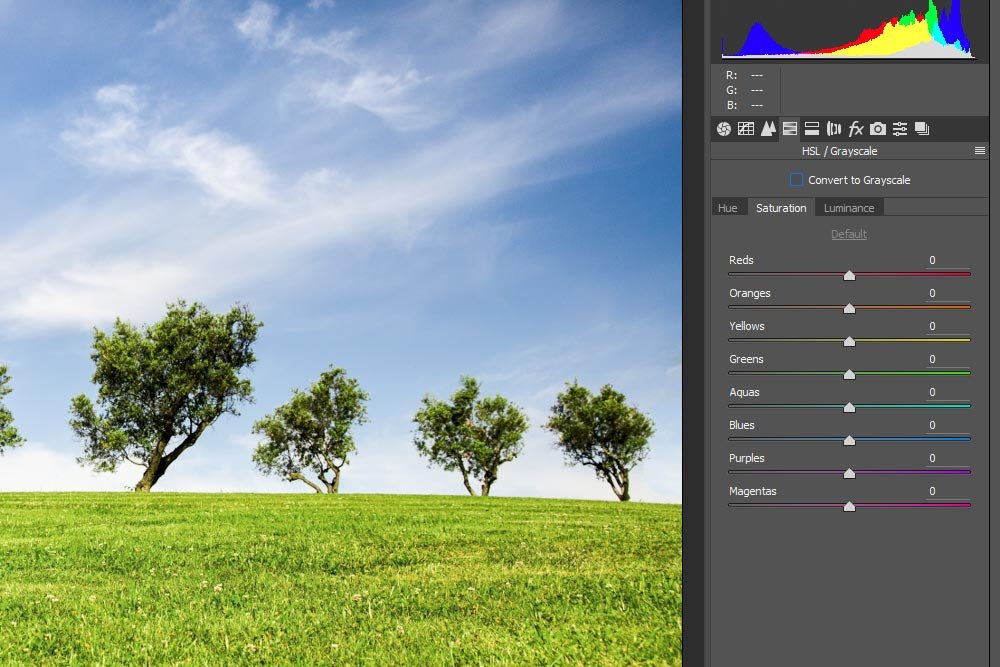
If I click inside the Convert to Grayscale checkbox, each selected image will turn to grayscale, but with unique slider values. Take a look.
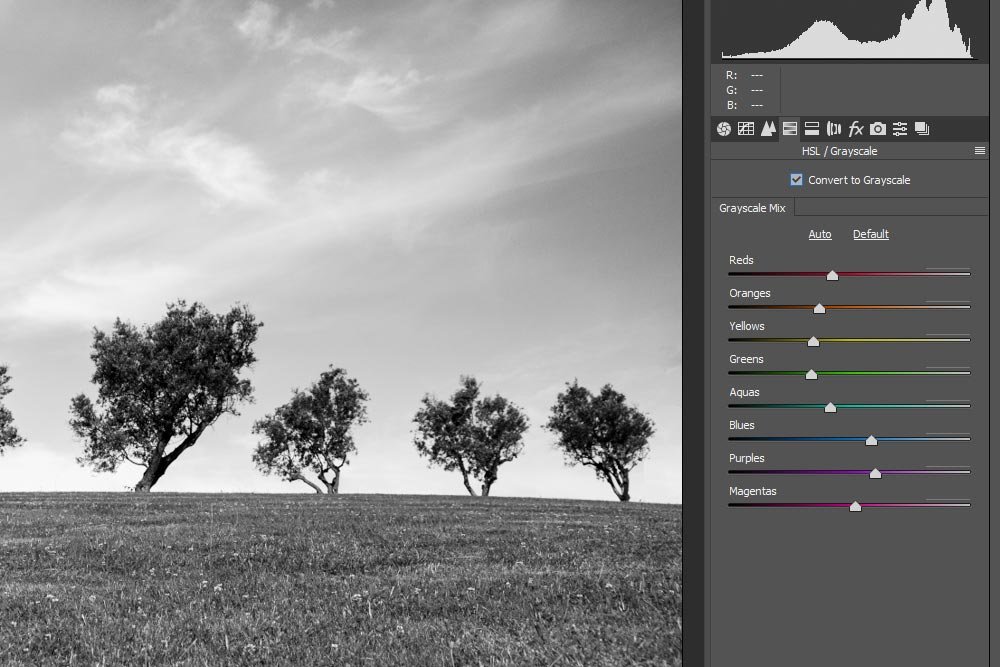
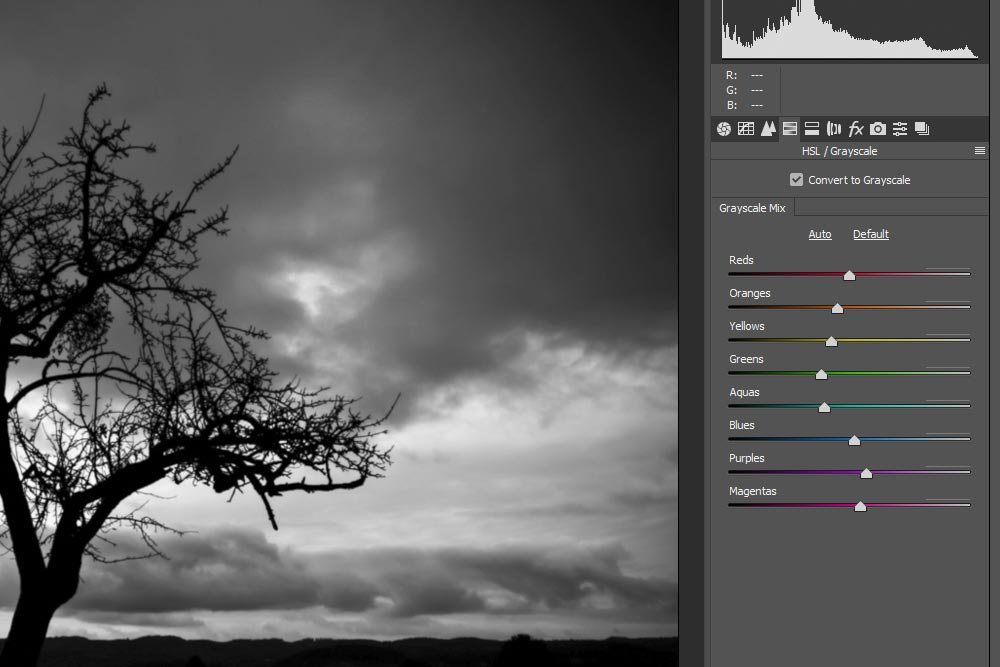
You can see from the two screenshots above that each photo has different slider values. If I went ahead now and pushed one of the color sliders manually, I’d set that value among all photos the same way. Again, the “auto” feature uniquely changes photos while manual changes are applied to all photos the same way.
If you’d like to learn more about how to make photos black and white in Camera Raw, please take a look at these posts:
Creating Black & White Photos in Adobe Camera Raw
How To Enhance Black & White Portraits in Adobe Camera Raw
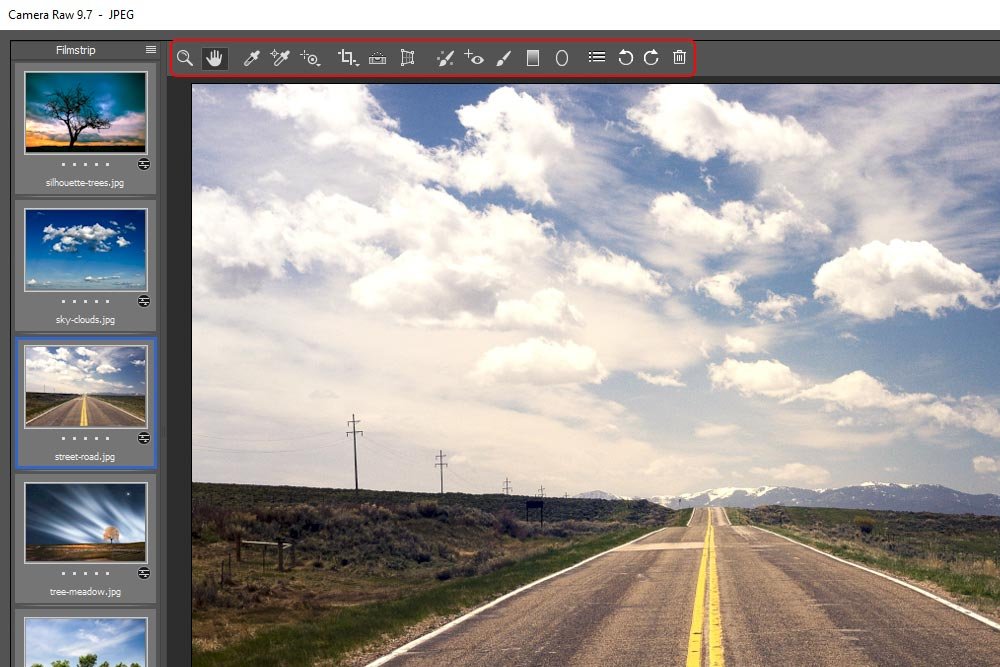
As you can well imagine, you should really use some of the tools for independent photographs. For instance, if I cropped one photo to a certain shape while all thumbnails are selected, each and every photo will be cropped the same way. The same is true for the White Balance Tool, Color Sampler Tool, Targeted Adjustment Tool, Spot Removal and Red Eye Removal tools. If you make a change to a photo with one of these tools, that change will apply to everything selected. That’s actually a good thing and a huge time saver in its own right.
Basically, what I’m trying to say here is that you really need to work with each tool to see what it does. Many of them behave differently when you have multiple photos selected. While editing images simultaneously is a huge time saver, you don’t want to do the wrong thing and have to backtrack, especially if you’ve got dozens of photos open at the same time.
I hope I’ve given you a good introduction into working with and editing multiple photographs simultaneously inside of Adobe Camera Raw. If you have any questions or concerns, please leave them in the comment section below. Thanks for reading!
I began using this feature in Camera Raw a while back. When photographing, I would focus my efforts on clusters of similar photos with this type of editing in mind. This way, when I returned to my computer from outside, or from wherever it was I was taking the photos, I could easily group them together for some quick modifications. The things is, I quickly realized I needed a bit of flexibility. Having the same exact edits apply to every single image that I opened into Camera Raw sort of tied my hands. I knew I needed to learn more about what was going on behind the scenes because the way things were, I was getting stuck when I went to edit those outlying photos. You know, the ones with the differences that just didn’t fit in with the rest.
In today’s post, I’ll open a few random images into Adobe Camera Raw with the intent of demonstrating how we can edit them all together or how we can use Camera Raw’s algorithms to edit them simultaneously, but independently. I know, that’s weird to think of. Let’s just say that we can have more them one photo launched onto Camera Raw and selected, but have different edits applied to each image. If you found my previous post about editing multiple images helpful, you should find this one just as helpful.
Opening Image Via Adobe Bridge
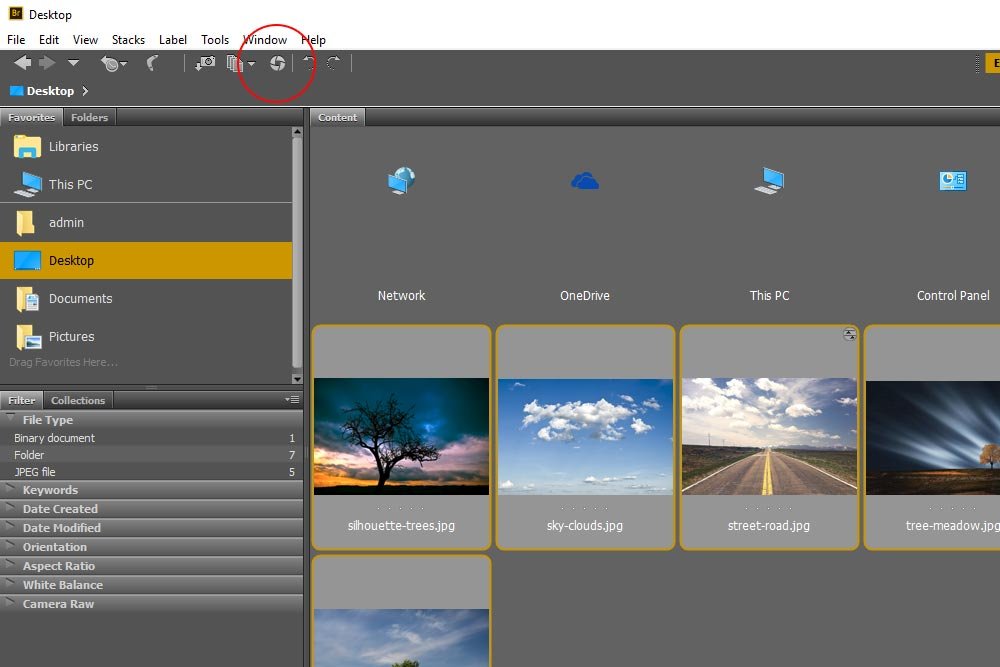
The first thing I’ll do is to open Adobe Bridge. I’ll locate the images I intend to launch into Camera Raw, select them and click on the Open in Camera Raw icon.
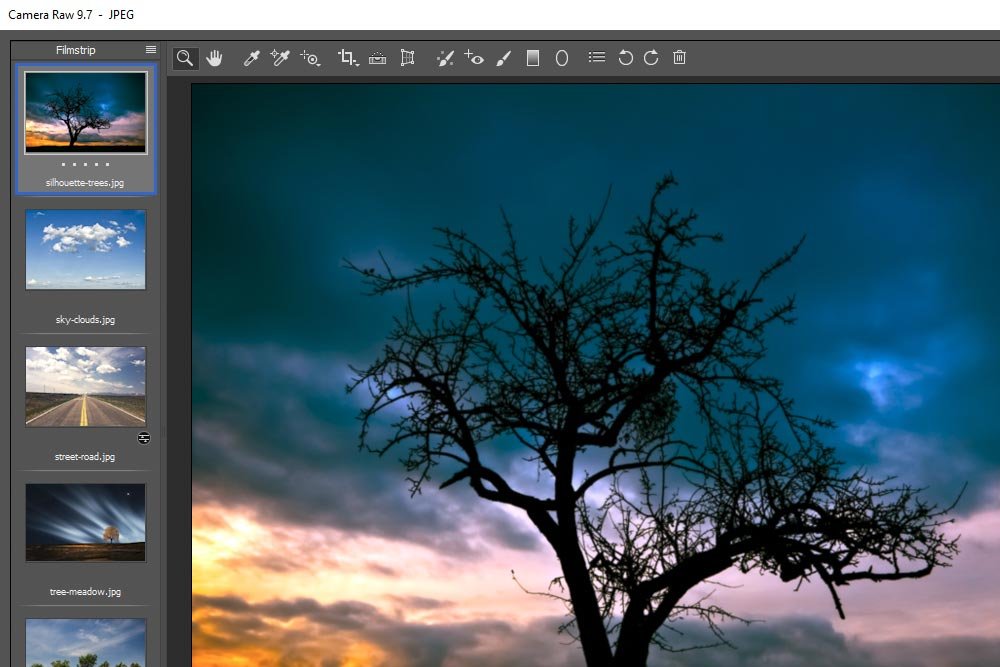
Once I do that, Camera Raw will look like this:

Selecting All the Images
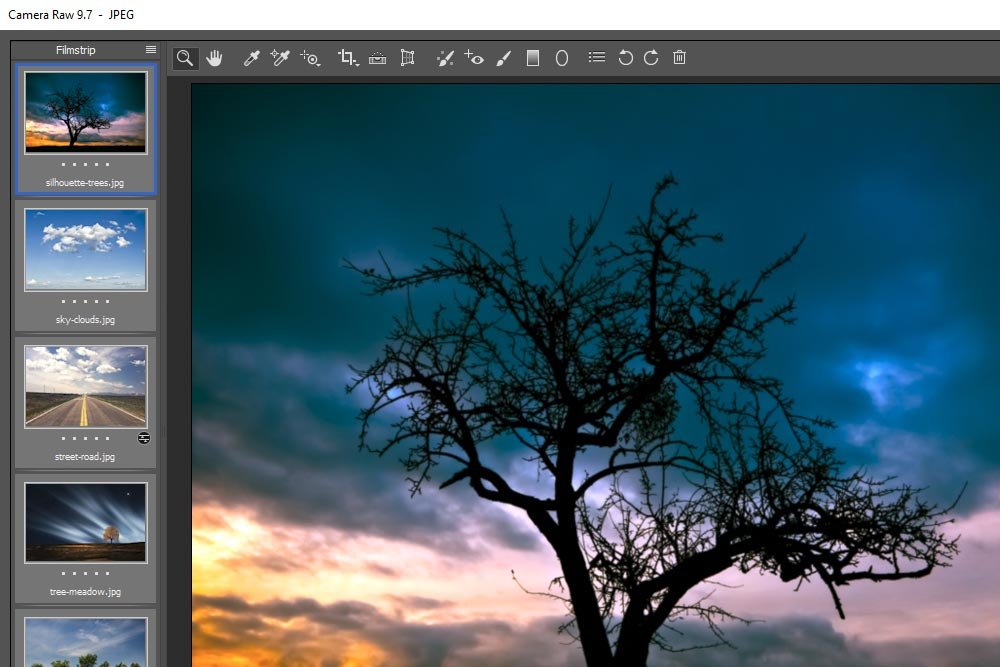
If you look at the screenshot above, you’ll see that only one of the five images I opened is currently selected (the first one). To select them all, I’ll simply hold down the Shift key on my keyboard and click on the last image in the series. They will appear highlighted when I do this, with the first one still visible.
Now, if you compare the previous two screenshots, you’ll notice there’s a difference between them. The first one has only one image selected and visible while the second one has all five images selected with the same one visible.
Selecting a New Image
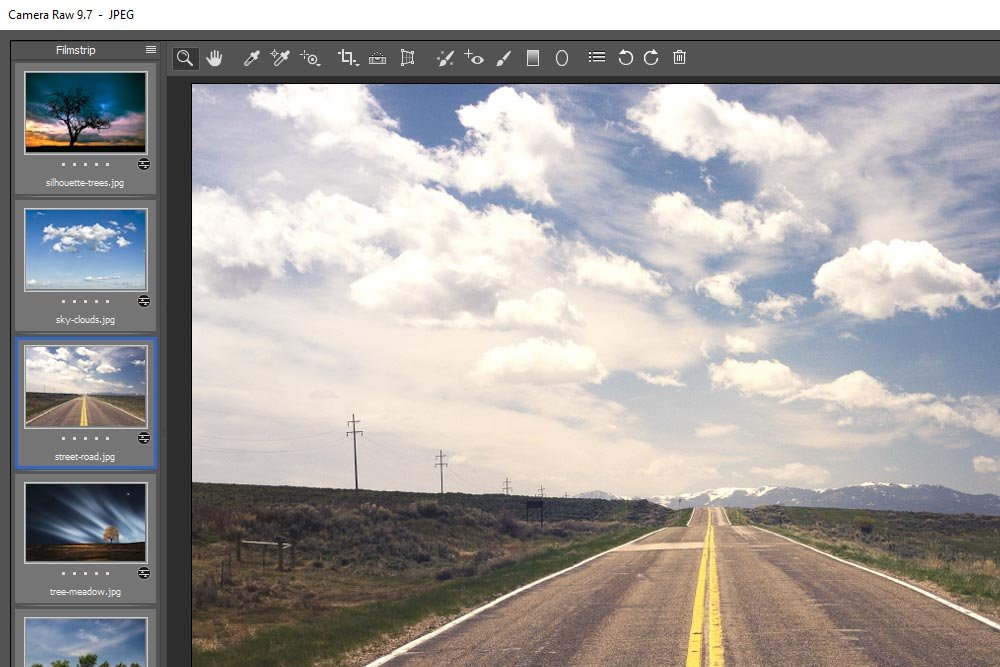
Where things stand, I have all five thumbnails “selected.” That word is sort of misleading though, so I think a few definitions are in order. When a thumbnail (image) in Camera Raw is selected, it will appear highlighted, meaning, it will have a light gray box around it. If the image is “visible,” it will appear in the content panel at the center of the screen and will not only be highlighted with a light gray box around it in the left column, it will also display a blue outline around the gray box. This is an easy way of distinguishing between which images are selected and which one is actually visible.In the title of this section, I wrote that I’d like to “select” a new image. In reality though, all five are selected. What I mean is that I’d like to select a new image to make it visible in the center panel instead of having the very first image in the series visible. Making this change is very simple.
If I merely clicked on a new thumbnail with the intention of making it visible, I’d deselect all the other images in the series. To keep the others selected, but make a different photo visible, I’d have to first press and hold down the Alt key on my keyboard. Once I do that, I can click on a different thumbnail so that one is visible. I’ll do that right now. Notice how a different image is visible at the center of the application while all the others are still highlighted in the left column.

Auto-Editing in the Basic Panel
Much of this post is going to stray from the “how-to” type of writing I typically engage in to a more “informative” style. There are areas of Camera Raw that essentially need to be explained. I can’t tell you how to do some of these things because there’s really nothing to do. I do want you to be aware of some aspects though. With the knowledge I share below, you’ll definitely be able to go ahead and make all sorts of edits the way you see fit.With all five thumbnails selected in the left column, I can move over to the Basic panel in the right column. From there, I can begin my editing.

In my previous post where I discussed editing more than one image at a time, I told you that if more than one image is selected in Camera Raw and a slider in the Basic panel is moved, both images will take on the exact value of that slider, no matter what the image looks like. This is why I said editing this way is perfect for groups of photos that were taken of similar items under similar conditions. You certainly wouldn’t want to use this method to edit two photos; one of bright daylight and one of a dark interior room in a house.
There are, however, methods for editing groups of images independently, no matter their capture conditions. For instance, now that I have all five photos selected in the left column, I can click on the Auto link in the Basic panel. When I do this, the slider values will change depending on what’s actually inside of each image, not just as a blunt instrument. Camera Raw will intelligently adjust all selected images uniquely.
Let’s compare the slider values of two different photos after I press the Auto link in the Basic panel (directly above the Exposure slider).


As you can see, each image has wildly different slider values, yet they were both edited at the same time. I’m sure you can see the benefit of this, especially if you use the Auto feature frequently. By the way, Auto does a really great job. Even if you use it as a starting point and then edit via the sliders later on, it’s pretty spot on.
Lens Correction & Transform
Using the Lens Correction and Transform features are other areas where you can edit different photos uniquely, but simultaneously. If I head into the Lens Corrections panel, I can see what’s going on.
In this panel, I can check off the two top check boxes to allow Camera Raw to automatically adjust and correct any lens issues I happen to have with the photos in hand. Again, since this is an “auto” function, Camera Raw will treat each photo independently.
I do want you to be aware of something though. Just because we can use this auto feature and Camera Raw will determine each photo’s needs uniquely, that doesn’t mean we can go nuts with changing all sorts of things in this panel. Just like in the Basic panel, if I change something manually, that manual change will apply to all selected photos equally. We’re back to the blunt instrument type of thing. So, if I choose Apple from the Lens Profile drop-down box, that value will apply to each and every photo I currently have selected. Think of it this way: auto features are unique among photos and manual changes area applied across the board.
Let’s take a quick look into the Transform panel. I’ll click the Transform Tool from the top toolbar and the panel will appear. Inside the panel, I can click on the Auto button to let Camera Raw auto correct each of the selected photos. Each photo will be corrected independently, while if I pushed a slider at this point, that slider value would be applied to all images the same exact way.

In the screenshot above, I used the auto feature. I’ll go ahead now and push a slider and show you how that affects the thumbnails. This will give you a clear picture of what I mean.

In the above screenshot, I pushed the Rotate slider all the way to the left. When I did this, all selected photos were rotated. Obviously, this is not a good way to edit different photographs.
Converting to Grayscale
This is a very helpful topic. If I visit the HSL/Grayscale panel, I’ll see a bunch of color sliders.
If I click inside the Convert to Grayscale checkbox, each selected image will turn to grayscale, but with unique slider values. Take a look.


You can see from the two screenshots above that each photo has different slider values. If I went ahead now and pushed one of the color sliders manually, I’d set that value among all photos the same way. Again, the “auto” feature uniquely changes photos while manual changes are applied to all photos the same way.
If you’d like to learn more about how to make photos black and white in Camera Raw, please take a look at these posts:
Creating Black & White Photos in Adobe Camera Raw
How To Enhance Black & White Portraits in Adobe Camera Raw
Other Tools
Editing multiple images simultaneously is a great way to speed up your workflow. You do have to use this method with caution though. If we look up at the toolbar that runs across the top of Camera Raw, we’ll get a glimpse of the available tools.
As you can well imagine, you should really use some of the tools for independent photographs. For instance, if I cropped one photo to a certain shape while all thumbnails are selected, each and every photo will be cropped the same way. The same is true for the White Balance Tool, Color Sampler Tool, Targeted Adjustment Tool, Spot Removal and Red Eye Removal tools. If you make a change to a photo with one of these tools, that change will apply to everything selected. That’s actually a good thing and a huge time saver in its own right.
Basically, what I’m trying to say here is that you really need to work with each tool to see what it does. Many of them behave differently when you have multiple photos selected. While editing images simultaneously is a huge time saver, you don’t want to do the wrong thing and have to backtrack, especially if you’ve got dozens of photos open at the same time.
I hope I’ve given you a good introduction into working with and editing multiple photographs simultaneously inside of Adobe Camera Raw. If you have any questions or concerns, please leave them in the comment section below. Thanks for reading!
