Search

Virtual Copies in Adobe Lightroom

  • Thread starter LukeLewis
  • Start date
LukeLewis

LukeLewis

Member
Joined
May 7, 2021
Messages
134
Reaction Score
0
Points
21
  • #1
virtual-copies-adobe-lightroom.jpg

What are Virtual Copies in Adobe Lightroom?​

In this post, I’d like to talk briefly about how both Lightroom’s and Camera Raw’s non-destructive capabilities work. They are truly a work of genius. The reason I’d like to discuss this attribute of both applications is because by understanding the concept, the point of this post will be understood as well. And that point has to do with virtual copies, which, if you don’t already know, are absolutely awesome.

An Example of Destructive Editing​

Let’s walk through the process of destructively editing a photo first, so we can get a better grasp of what’s going on. Say I open a JPG picture into Adobe Photoshop. I do a few things to it via the Image > Adjustments menu as well as through adjustment layers. When I’m finished with my edits, I visit the File > Save menu item and click. There. I’m done. Perfect.

An hour later, I take another look at the photo I just edited and decide that it’s far too light. Apparently, I pushed the Brightness adjustment layer slider too far one way or another. That’s fine, I’ll just go back to the original…uh oh. Wait a second. I already edited and saved over the original. While I can open it up again and edit it, I’ll never get those original pixels back and I’ll never get the photo to look the way it once did. This is what we call destructive editing. I destroyed pixels that mattered.

If you aren’t in the know, I’ll tell you that this is bad. Bad, bad, bad.

Now, back in the day, I used to have a workaround for this. I would open a photo into Photoshop and duplicate the background (image) layer. Then, I’d save the file as a PSD and make my changes to the copies of the layers that I created. This worked, but it wasn’t elegant. At times, I’d also copy the original JPG image into a folder and name it “original.jpg.” Then, I’d copy it again, make some edits to it and name the new file “edit.jpg.” I’d do that again and again until I had a folder full of images called “crop-wide.jpg,” crop-narrow.jpg” and “brighter.jpg.” I think you can see where this is going. Hey, at least I didn’t destroy any pixels because I kept the original safe.

Think about this though – if I did this type of file copying and editing over and over for years, how much room would I be using on my hard drive? And how confused would I be? To be honest, I am not a great decider between two edited files. I never really know what I did to which.

I laugh as I ponder about this time in my life. Have you ever done or seen the classic file revisions? They were like this: “new.doc,” “new-new.doc,” new-(i-really-mean-it-this-time).doc” and then ultimately “final.doc.” Awesome days. Talk about getting stressed.

Lightroom & Camera Raw​

Here comes the fun part. Let’s say that I open a RAW file in either Lightroom or Camera Raw. That RAW file is naturally going to have a much larger file size, but with that large file size comes great opportunity. While the size of one RAW file may equal that of five JPG files, I have the ability to edit RAW files as much as I’d like and never have to worry about making duplicates. So, in the long run, taking RAW photographs may end up saving space on a hard drive.

The way both of these applications do this is to keep the original file intact and apply any edits that might be made to what’s called a sidecar file. This file simply holds the edit instructions.

For example, let’s say I open a RAW image into Adobe Lightroom. The image I opened is the original. If I went ahead and adjusted the exposure, the original file wouldn’t change at all. What would happen, though, is that a new file would be created. This file is what I just referred to – the sidecar file. The sidecar file is a text file that contains lines of code. In the case of the example I’m working with, the code could be translated to something like: “Exposure Original Value = 50% – Exposure New Value 75%.” I think we can all agree that keeping the original file by itself and just overlaying a tiny text file with an edit instruction is a much more efficient use of drive space. It also, as I mentioned earlier, keeps the original file untouched.

Regarding JPG files that are edited in Camera Raw and Lightroom – I’ve done this a bunch. I believe any changes you make to these files are stored in the metadata of each file, so it’s possible to make a change, close the program and then go back and undo that change. I know that I’ve done that. What I’m not sure about is how long having that ability will last. If the metadata gets somehow cleared, the changes will be lost. I’ve also experienced varied results with my attempting to revisit JPG files and make additional edits to them with these applications. Sometimes, what I thought would be non-destructive edits transformed themselves into destructive ones.

Lightroom Virtual Copies​

In the previous section, I described how we have the ability to launch a RAW file into Lightroom, make a change and have that change store itself in a sidecar file. This is great, but there’s one small issue. What if we wanted to make a whole bunch of changes, without exporting them, and keep them hanging around for however long we wanted them to? The way it works right now (excluding any special techniques) is that only one edit is allowed at any given time. If I wanted to open a file, crop it and then export the final image, I can do that. The problem is, if I wanted to crop it in a different direction, I’d have to work on that original again, re-crop the image and then export it. If this went on again and again, my editing would become quite cumbersome.

Think about wedding photographs and how many different ways they’re edited and cropped. It’s mind boggling. Wouldn’t it be nice if there was a way to make as many “virtual” copies of the original as we wanted to and edit them any way we wish – and have those copies not take any more space than a few mere text files would? Wouldn’t that be nice?

Guess what – the magic is here.

In later posts, I’ll be demonstrating a few methods that will explain exactly how to go about creating virtual copies of an original image. These copies will allow you to make as many edits as you want and to store those changes in a sidecar file. For now, in this post, I merely wanted to introduce and explain the feature. I’ll do that below.

Let’s say I have one RAW file in my current Lightroom catalog. The size of this file on my hard drive is 25MB. I go ahead and make a virtual copy of that file. Now, I’m using 25MB plus something like 1KB – basically just a reference to a phantom file that’s pulling its essence from the original. I go ahead and make nine more virtual copies. Again, there is an increase of only a few kilobytes on my hard drive because I haven’t made any real copies, only virtual ones.

I can leave the original file the way it sits. I don’t even need to edit it at all. For the remaining ten copies of the file, I make ten different edits. The great part about this is that the edits I make to the virtual copies are stored in the sidecar file the same way the edit would be stored for the original file. So again, hardly any space on my hard drive is being used.

It’s at this point that I could show a client or a friend or a business partner all the edits. I could ask them to choose between them or whatever I wanted to do. When ready, I can export the chosen edits as final files. It’s only at this point that the edits in the sidecar file actually apply themselves as destructive pixel alterations – to the exported files, not the virtual copies. So, even if we work with virtual copies and make many, many of them, any edits we make remain non-destructive.

I hope I’ve done a good job explaining all this. Please be patient and continue reading my later posts on this topic. I’ll be using examples to clarify. This is important because it can truly transform your workflow into something super-efficient.
 
LukeLewis

LukeLewis

Member
Joined
May 7, 2021
Messages
134
Reaction Score
0
Points
21
  • #2

How to Create Virtual Copies in Adobe Lightroom​

A few weeks ago, I wrote a post that introduced something called “Virtual Copies.” These virtual copies are a feature in Adobe Lightroom that allow you to work with many instances of a file in a non-destructive manner. Really, if you haven’t yet read my previous post, please do:

What Are Virtual Copies in Adobe Lightroom?

In today’s post, I’m going to move on from a mere introduction to something much more interesting – how to actually create a virtual copy in this application. The process is as simple as 1-2-3, so please read on.

Methods of Creating a Virtual Copy​

I’ve got a lot of photos in my play folder. I use these photos for many of the posts I write. In today’s case, I’ll be using a picture of a sound mixer.

virtual-copies-adobe-lightroom.jpg

I just pulled this out of a hat. In your own library, you can use whatever photo you like.

There are a few different ways to create a virtual copy in Lightroom. In this section, I’ll cover the three most popular.

Method #1 – Right Click

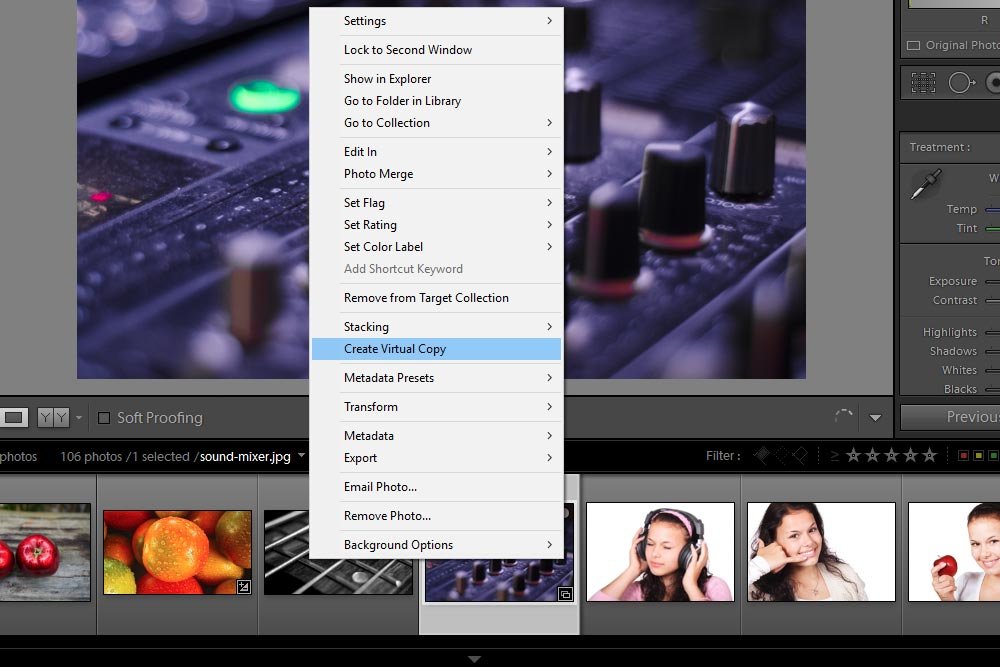
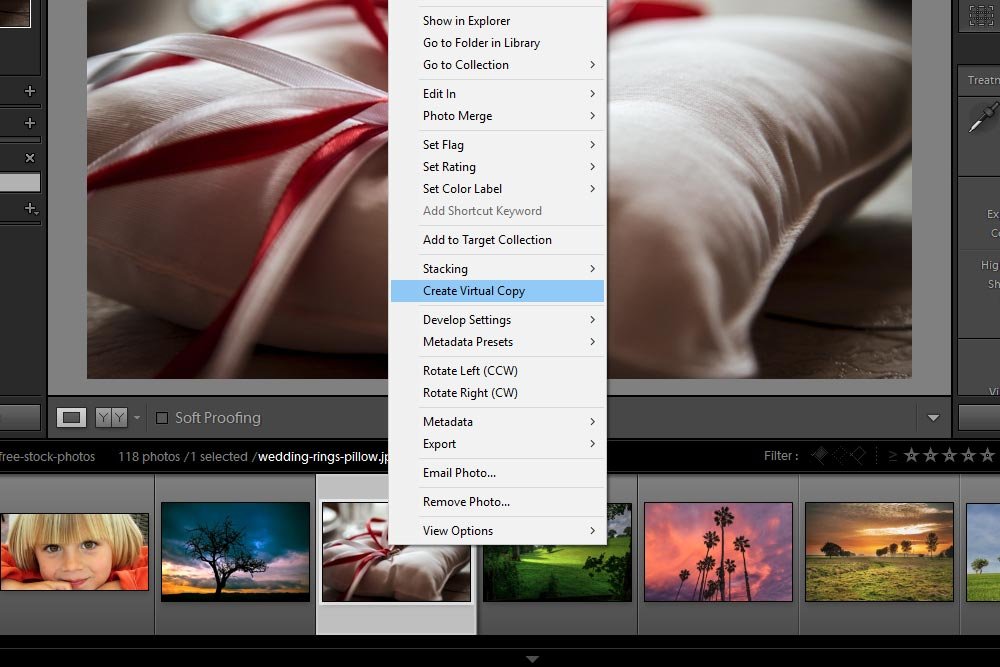
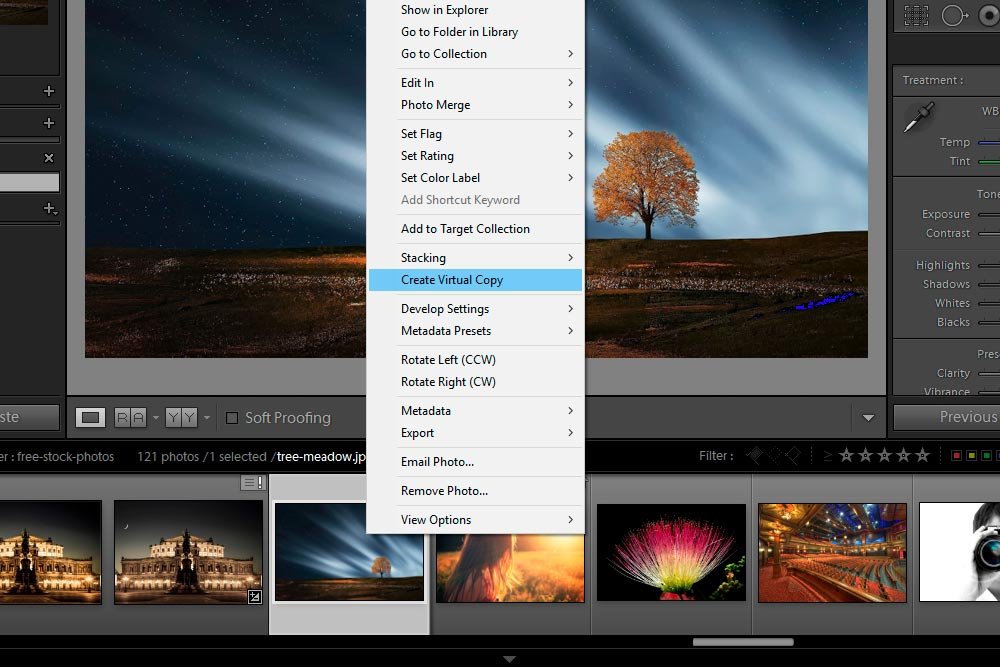
The first method is to simply right-click on either the thumbnail in the filmstrip view at the bottom of Lightroom or on the thumbnail or loupe view in the center column. This same method works identically in either the Library or the Develop modules. Here’s a screenshot of me in the Develop module right-clicking on the larger image in the center column:

right-click-menu.jpg

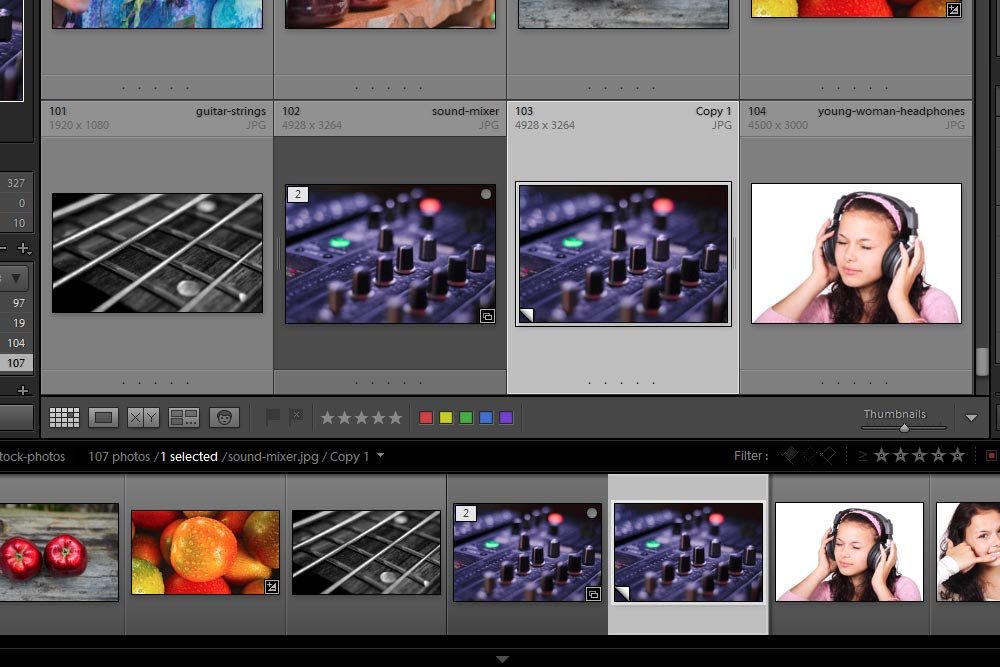
Once the menu opens, just click on the Create Virtual Copy option and the copy will appear in the filmstrip or the thumbnail view. Here’s a screenshot of the thumbnails in the Library module:

virtual-copy.jpg

I’ve got the copy selected, so it’s highlighted. If you’ll notice, the copy has a small fold at the bottom left of the thumbnail. That’s the quick indication of what type of file it is. It’s also named Copy 1. If I create another virtual copy, that next one will be named Copy 2. And on and on.

Method #2 – Photo Menu

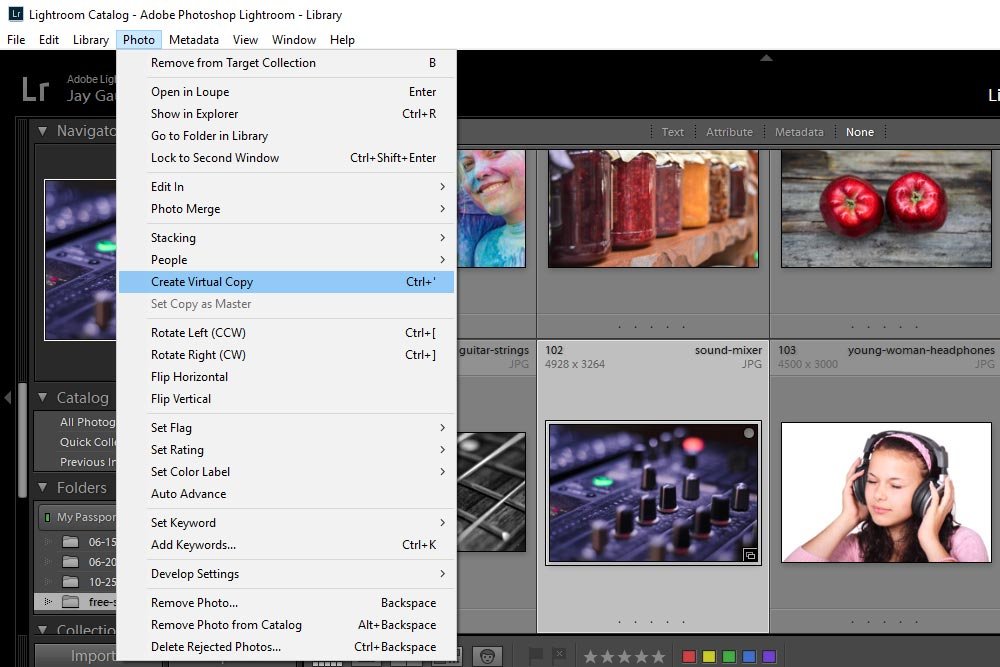
The second method for creating a virtual copy is to use the Photo menu at the top of the application. If I click on that with my mouse, I’ll see the same Create Virtual Copy selection available. If I click on that, the exact same result will occur as did earlier. I’ll have a new virtual copy.

photo-create-virtual-copy.jpg

Method #3 – Keyboard Shortcut

The last method I’m going to share with you today is to use a keyboard shortcut. If you select the photo thumbnail that you’re interested in creating a copy of and press the Ctrl+’ (Windows) or Command+’ (Mac) keys on your keyboard, again, the same thing will happen. You’ll get your copy. Just to be clear, the second key in this keyboard shortcut is the apostrophe.

Deleting Virtual Copies​

As you can see, creating these types of copies is very fast and easy. The thing is, we sometimes go overboard when going about something like this. During the time I spent writing this post, I crated about 15 of them. I had to create one and then delete it, create one and delete it. Since I made so many, I think sharing with you how to get rid of them only makes sense.

Method #1 – Right Click

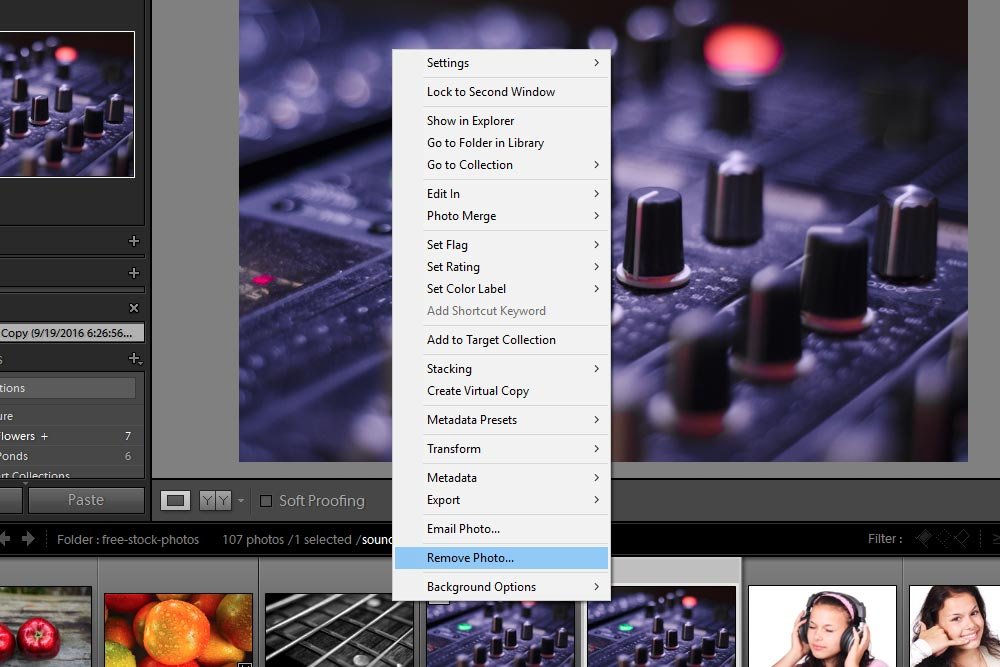
As you read this section, I think you’re going to discover a theme. The methods for creating virtual copies and deleting virtual copies are pretty much the same. The first way to remove a copy is to right click on it the same way you right-clicked on either the photo or thumbnail in either the Library or Develop modules earlier. Once you do that, the same menu will appear. Once you see the menu, find where it says Remove Photo and click on that selection.

remove-photo.jpg

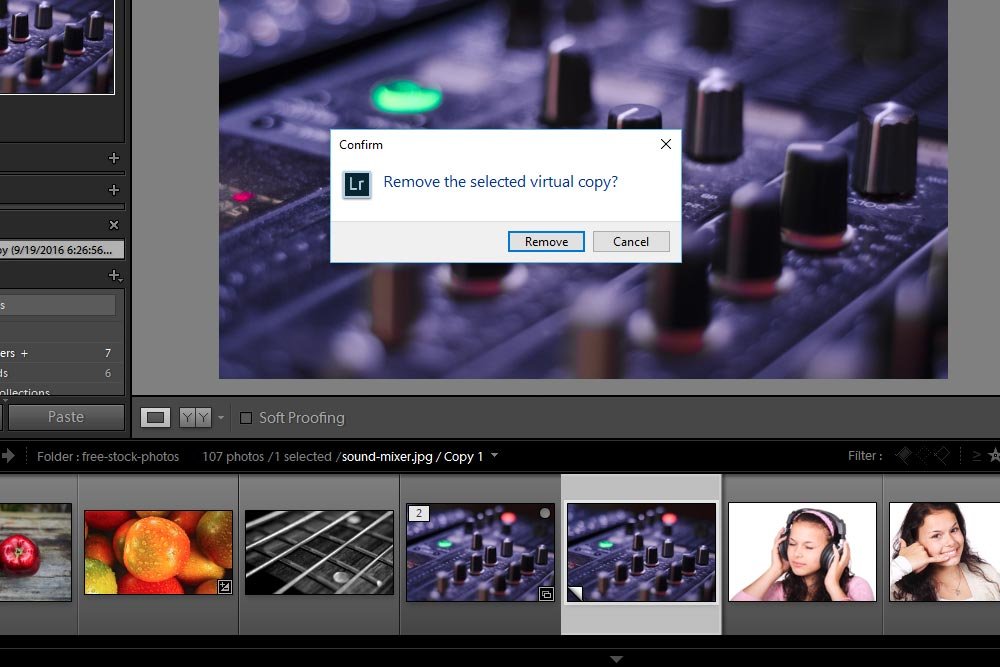
After you do that, a small confirmation dialog box will pop up asking if you really mean it. Since you do, click on Remove and the image will no longer appear.

confirm-dialog.jpg

Method #2 – Photo Menu

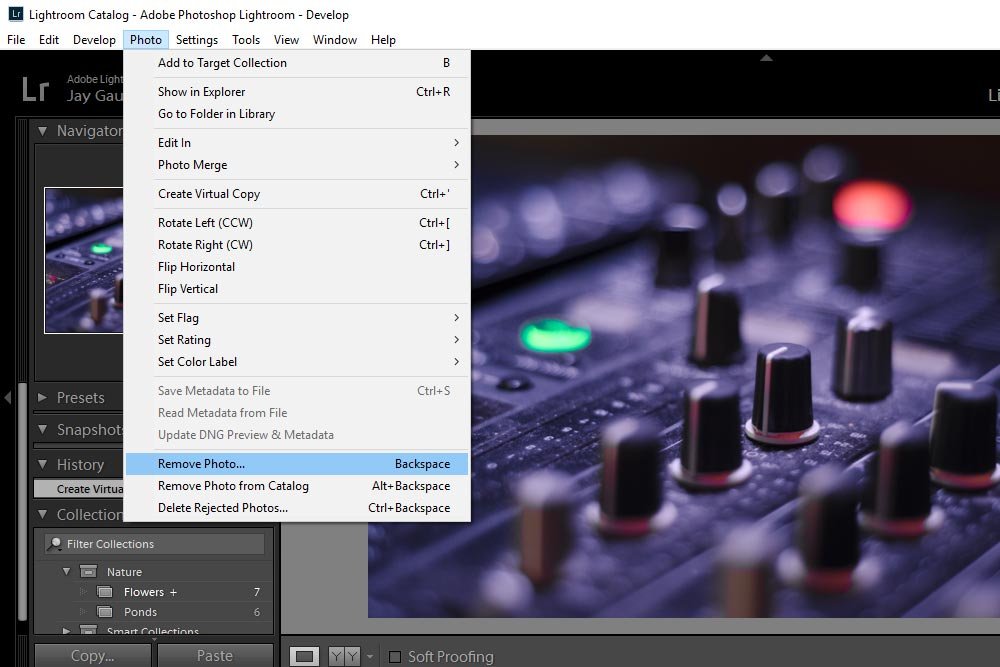
The second way to delete a virtual copy is to use the Photo menu. If I head up to that menu and look for the Remove Photo selection and click on it, the same thing as before will happen. The confirmation dialog box will appear and I’ll click Remove.

photo-remove-photo.jpg

See what I was talking about when I said you’d notice a theme? Each method for creation has a very similar method for deletion.

Method #3 – Keyboard Shortcut

The official keyboard shortcuts for removing a virtual copy from Lightroom is to press the Delete key on a Mac or the Backspace key on a Windows machine. I’m here to say that both the Delete and the Backspace keys work for Windows. I wasn’t even aware that the backspace key worked until recently.

Once you press either of these keys, the same confirmation dialog will appear where you can press the Remove button with your mouse. It’s that simple.

Well, that was easy. I like writing posts like this where there isn’t a lot of brain work required and where the concept is simple. I guess that since performing a task like this is so popular, Adobe wanted to make it super quick. Anyway, if you have any questions or comments, please leave them in the comment section below. I’m always here to help. Thanks!
 
LukeLewis

LukeLewis

Member
Joined
May 7, 2021
Messages
134
Reaction Score
0
Points
21
  • #3

Creating Sample Photos with Virtual Copies in Adobe Lightroom​

I had a nice conversation a few days ago with a friend who wants to become a wedding photographer. She has been leisurely photographing for years, but has never gone further than the typical Photoshop adjustments for post-processing. She knows nothing about organizing her photos, storing them, editing in Camera Raw, Lightroom or anything like that. Of course, I suggested that she sign up for my blog email list and that she begin reading through my posts. She can quickly get a handle on things if she does that.

One area she was particularly interested in was making different variations of a photo in Adobe Lightroom. She knows that Lightroom is “the” program for wedding photographers. She also has a friend in the business and was told that clients love to see the same shot in different styles. She’s all about “wowing” people and she’s thinking ahead to future business. She wants every client to say something like, “She really was the best wedding photographer. She gave us multiple options for many photos and we truly enjoyed seeing the variety of styles.” I couldn’t help but to agree.

Because this is on my mind, I figured I’d write a post that specifically walks through the process of creating different “looks” for the same photo. I’ll use the type of picture that you’d typically see in a wedding portfolio and I’ll use virtual copies in Lightroom to make my point.

Now, just in case this is your first time hearing about or seeing virtual copies, you should definitely check out my previous posts on the topic. They are chock full of great information.

What Are Virtual Copies in Adobe Lightroom?

How to Create Virtual Copies in Adobe Lightroom

Original Photo​

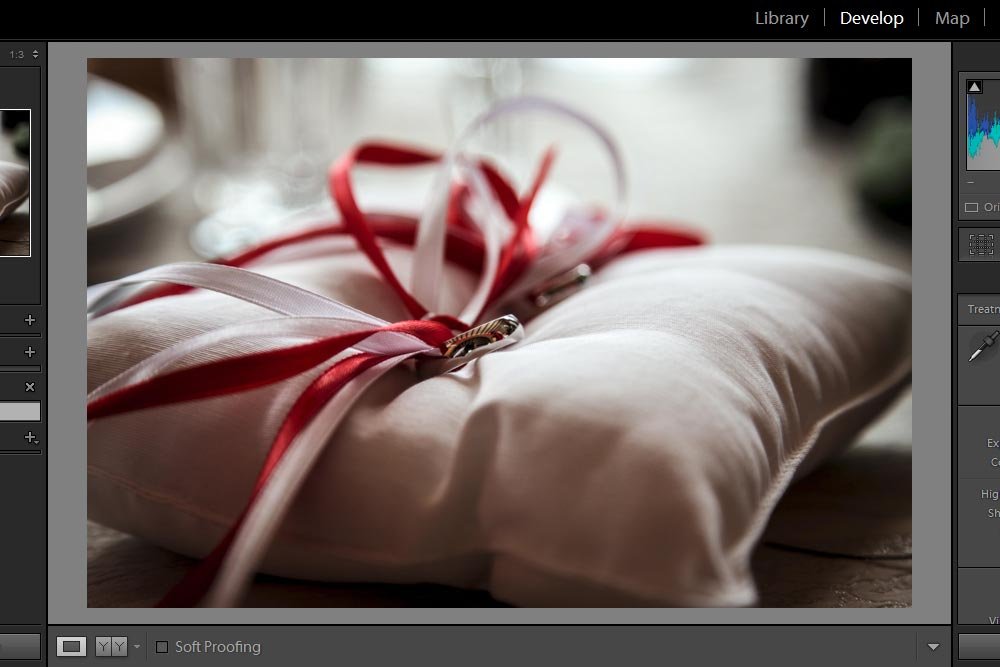
For this post, I’ll use a really nice picture of two rings on a pillow. People love these types of shots and it’s surely one that would look great in different situations. Here’s the photo.

wedding-pillow.jpg

Creating Virtual Copies​

My goal with this post is to end up with the original photo file, along with three additional virtual copies of it. For each version, I want a different style. At the end, I’ll show you how you can preview all four versions of the photo at once in Lightroom. This is really helpful if you have someone standing over your shoulder or if you have your laptop visible to someone close by. They’ll be able to quickly and easily get the gist of what you created.

I already have the photo imported into Lightroom and am currently in the Develop module using the Loupe view.

develop-panel.jpg

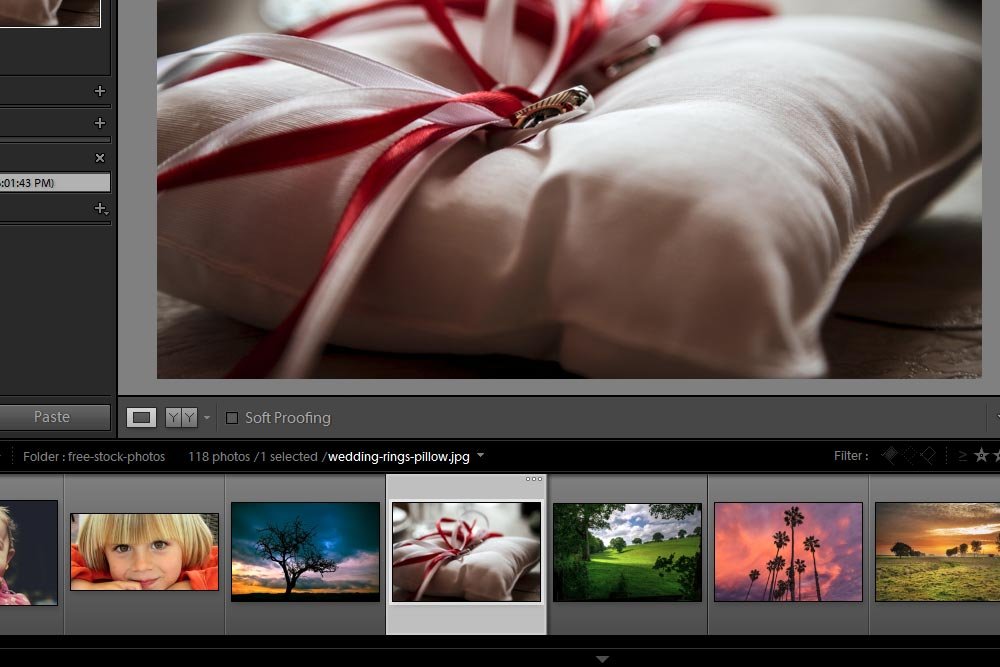
You can also see the thumbnail in the filmstrip view at the bottom of the application.

filmstrip-view.jpg

To create the three virtual copies, I’ll right click on the original image thumbnail and select Create Virtual Copy.

create-virtual-copy.jpg

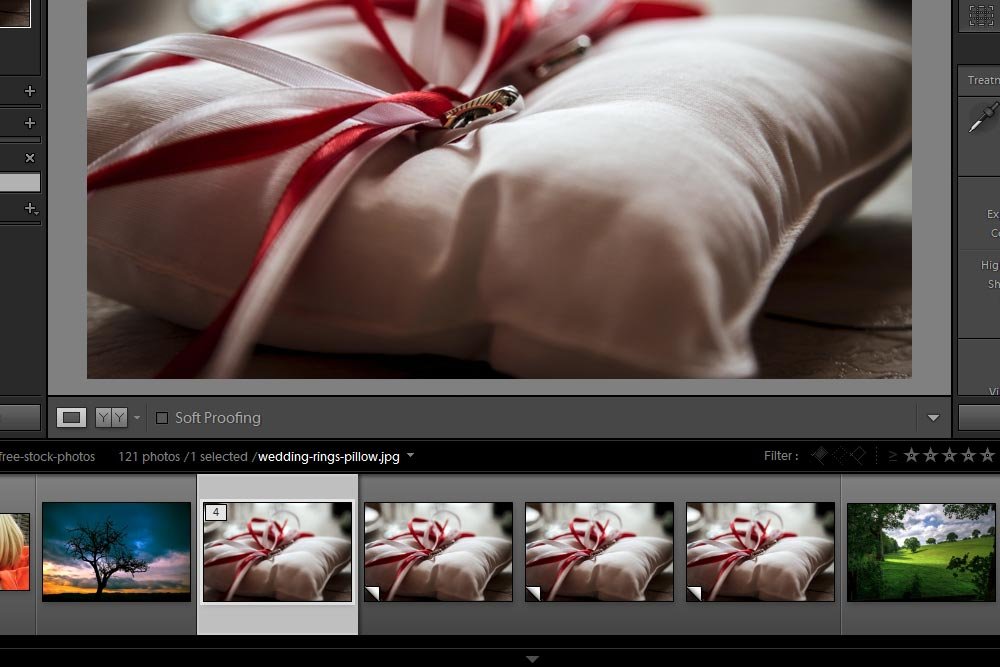
I’ll do this for a total of three times. This will give me four instances of the image. Take a look at the thumbnails in the filmstrip now.

multiple-thumbnails.jpg

Now that the virtual copies have been made, I can move forward with editing each version.

Editing the Virtual Copies​

I’ve written about editing photos in Lightroom and Camera Raw in tons of other posts, so I won’t go over that part of the process here. What I’ll do is simply edit each instance of the photo in a way that clearly differentiates it from the others. Remember, the ultimate goal is to review the differences between the photos right here in Lightroom, so it would be nice if those differences were noticeable.

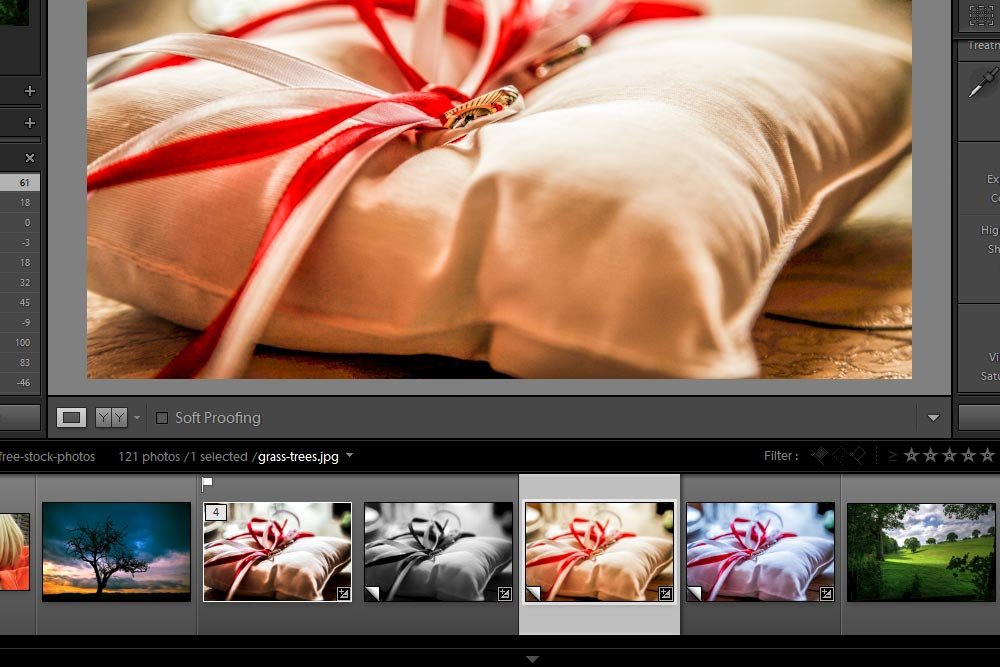
Okay, I’ve gone ahead and made the edits. If you look at the thumbnails now, you’ll see the differences. They aren’t very clear though, so that’s what we’ll take care of in the next section.

edited-photos.jpg

For the first image, I merely went through some typical edits that cleaned up the photo. I made some highs a bit higher and some lows a bit lower. I added some clarity, vibrance and contrast as well.

I changed the second image to black and white and then pushed the color sliders around somewhat to either harden or soften those specific areas of the photo. To learn more about this technique, you can read this post:

How To Enhance Black & White Portraits in Adobe Camera Raw

Even though the above post uses Camera Raw as the demo image processor, the same steps can be taken in Lightroom.

For the last two variations of the image, I used the settings for the first thumbnail and copied them over. I then brightened the Shadows and pushed the Temperature slider either to the right or to the left. One adds warmth and the other adds coolness.

Previewing the Photo Variations​

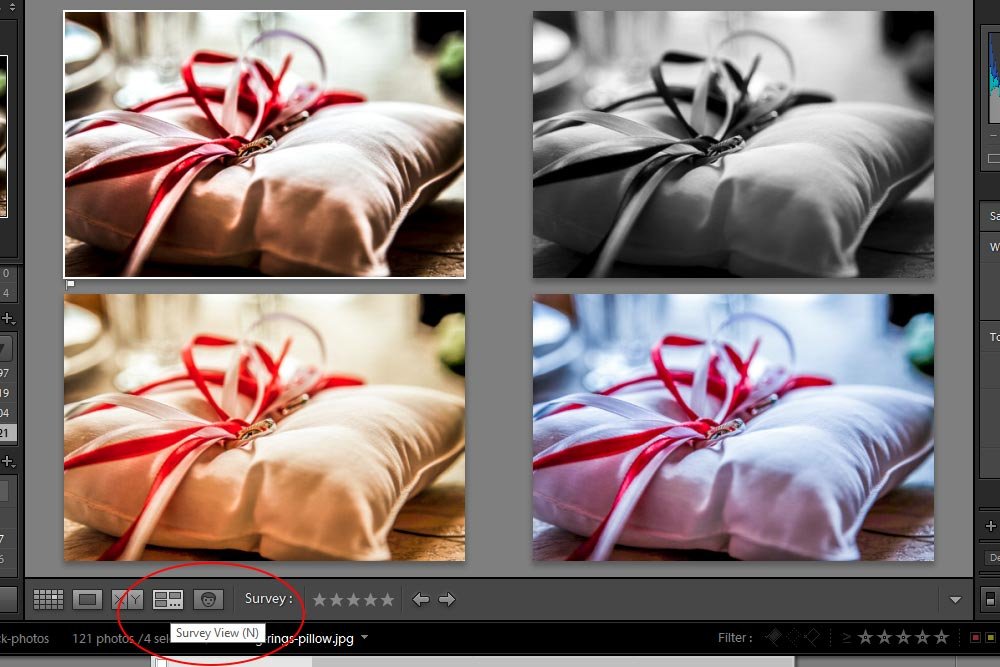
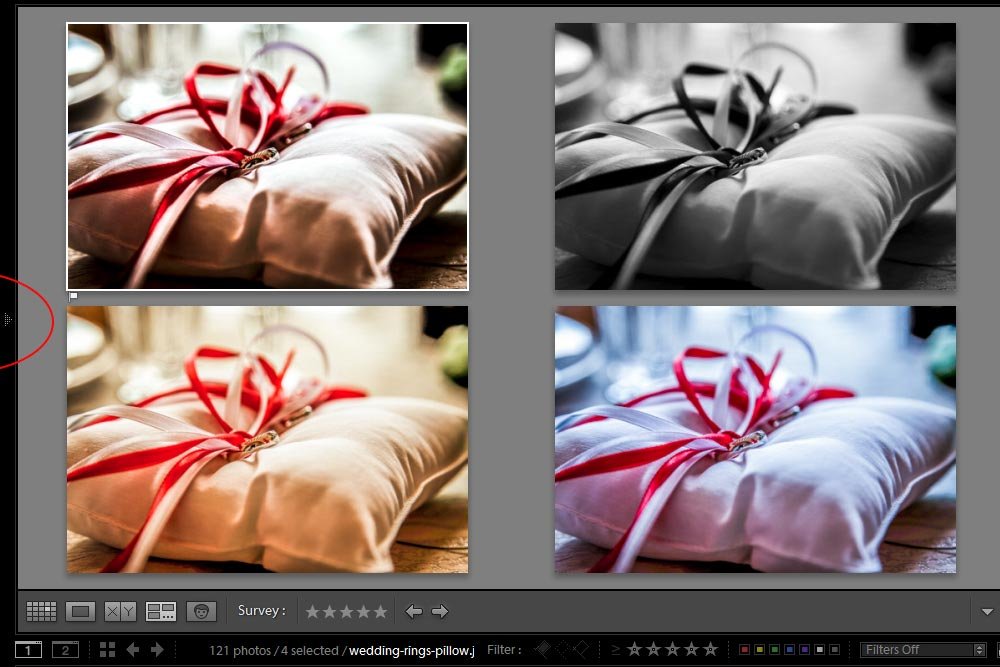
This is really easy. Basically, I want to change my view from Loupe to Survey. To do that, all I need is a few clicks of the mouse.

The first step I’ll take is to highlight the images I want to preview in Survey View. To do this, I’ll click on the first thumbnail in the collection, hold down the Shift key on my keyboard and then click on the last thumbnail in the collection.

When I’m done with that, I can do two things. I can either click the Survey View button that’s located at the bottom of the center panel or I can simply use the keyboard shortcut to accomplish the same thing. The shortcut is the N key. Here’s the Survey View. I even circled the Survey View button for you as well.

survey-view.jpg

To get an even more up-close view of the photos, I can hide the side panels. To hide the panels, I can either click the small arrows that are located at the sides of the application or I can press the Tab key on my keyboard. Tab is easier, because it hides both side panels at once.

tab-view.jpg

I circled the arrow on the left side of the screenshot above. These arrows are located on both sides and they control whether or not the side panels show.

I also made Lightroom more narrow so it fit better in the screenshot. I usually have things much wider.

There you have it. The workflow you’ll need to follow to create different variations of a photo using virtual copies in Adobe Lightroom. If you have any questions or concerns, please leave them in the comment section below. Thanks for reading!
 
LukeLewis

LukeLewis

Member
Joined
May 7, 2021
Messages
134
Reaction Score
0
Points
21
  • #4

Building Sequential Virtual Copies For Easier Edits in Adobe Lightroom​

I was doing some work in Adobe Lightroom last week when I stumbled upon an idea for a post. The project I was working on called for a certain black and white look for a photograph. I wasn’t sure exactly what I wanted, but I was definitely sure that I didn’t want to create one black and white virtual copy of a photo and then create brand new ones thereafter. My idea was to create one black and white virtual copy of the photo, work on it, and then create another copy based on the one I just made changes to. I could repeat the process as much as I needed to and constantly build from what I had already done. Doing this would quickly and efficiently lead me to my desired result.

I completed the project successfully. Since I had saved so much time with the technique I used, I decided to share it here. It’s a small tip, but one that can have profound time saving advantages.

In today’s post, I’ll be using a demo photo to go through the same exact process as I followed with my project last week. I’ll start with the original photo and create a sequence of changes via the use of virtual copies in Adobe Lightroom.

Original Photo​

The photo I’ll be working on today to demonstrate the necessary steps in this tutorial is below. It’s the perfect photo to transform into black and white. It’s simply fierce.

virtual-copies-adobe-lightroom.jpg

Creating Virtual Copies​

If you aren’t experienced with creating virtual copies in Adobe Lightroom, have no fear. I’ve already written a few good posts on the topic. Check them out below.

What Are Virtual Copies in Adobe Lightroom?

How to Create Virtual Copies in Adobe Lightroom

Creating Sample Photos with Virtual Copies in Adobe Lightroom

Just for this post, I’ll go ahead and create a new virtual copy now.

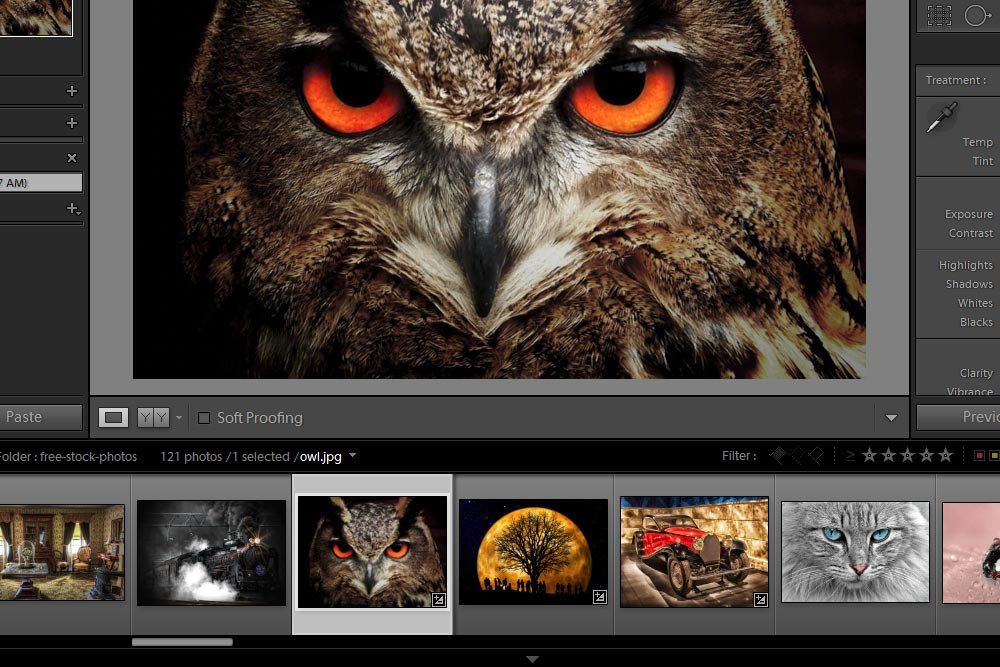
The first thing I’ll do is launch Lightroom and click on the Develop tab up at the top of the application. This will bring me to the photos I already imported a while back. I’ll move through the filmstrip view at the bottom of Lightroom until I locate the image I’d like to work with.

develop-filmstrip-view.jpg

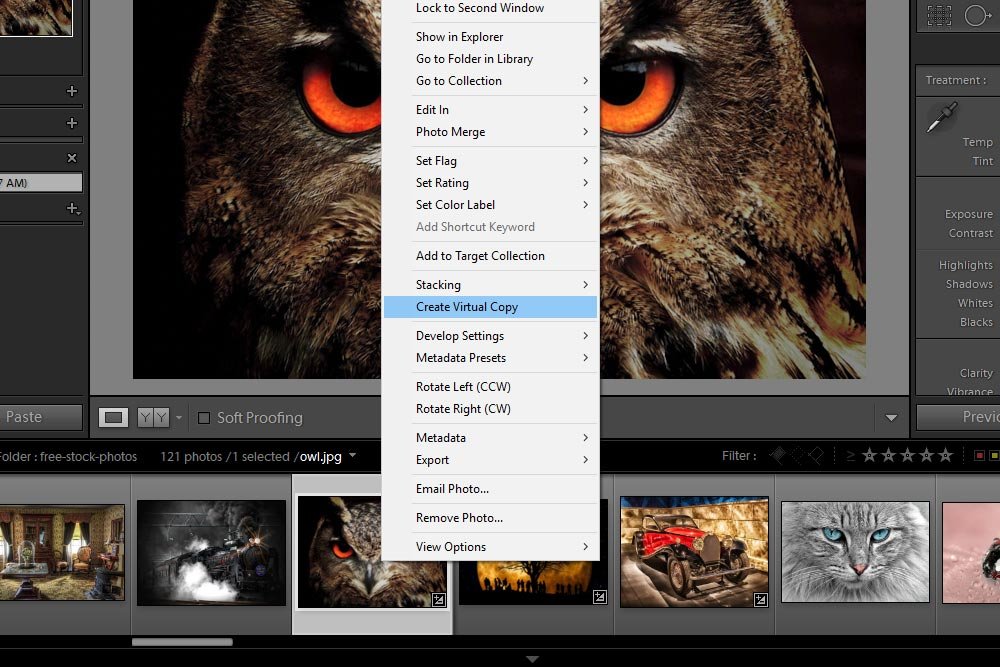
Next, I’ll right-click on the owl thumbnail (or larger version of the photo in the center Content panel) and select Create Virtual Copy from the menu that appears.

create-virtual-copy.jpg

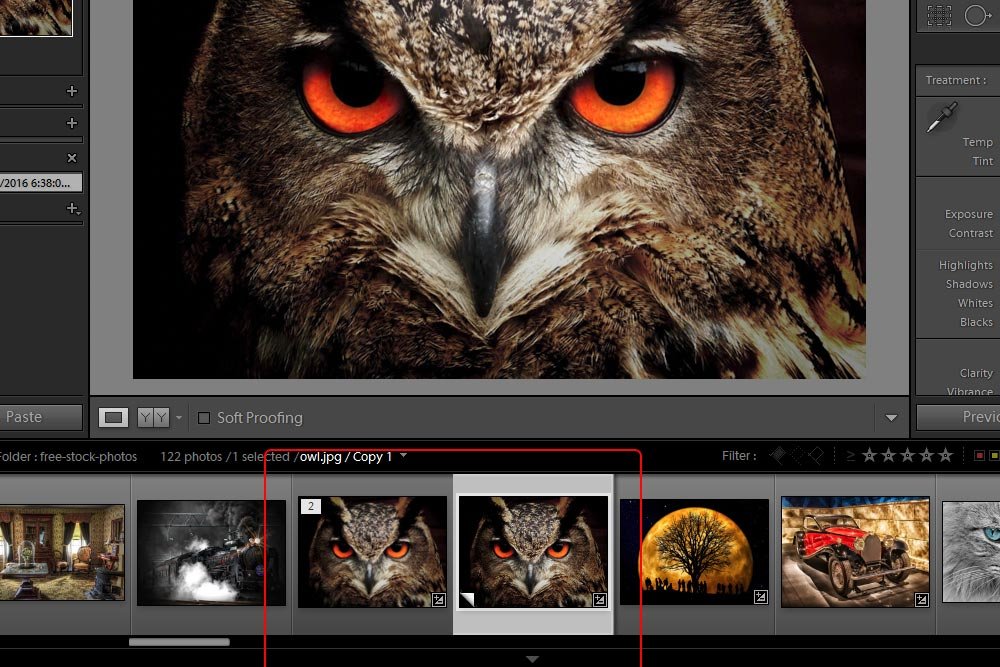
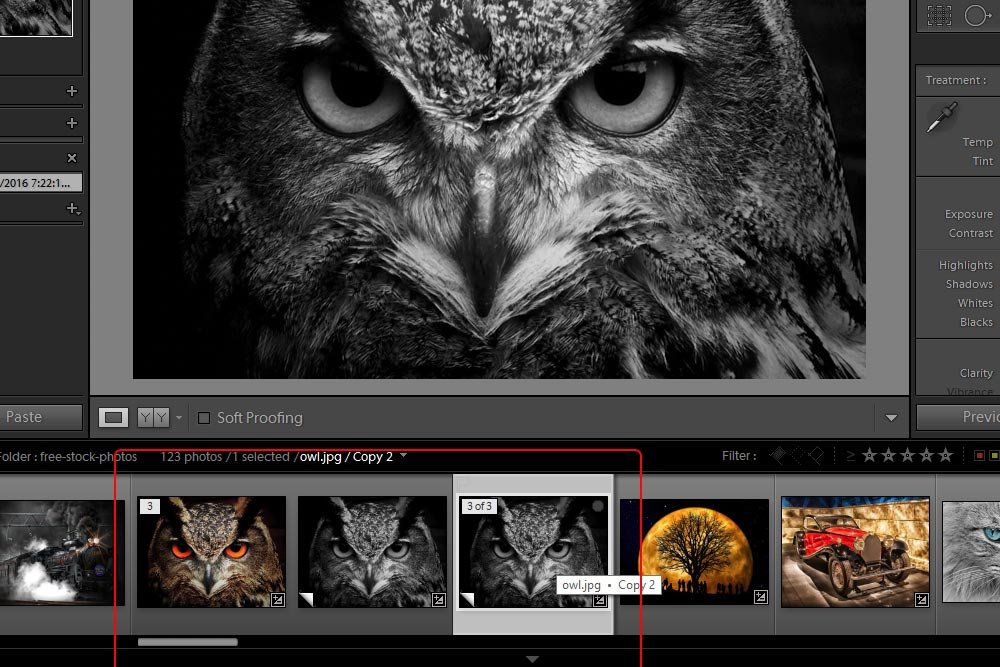
Doing this will give me two similar looking thumbnails down in the filmstrip view. The original and the virtual copy. To learn what exactly a virtual copy is, please read this post.

original-virtual-copy-thumbnails.jpg

Transforming to Black & White​

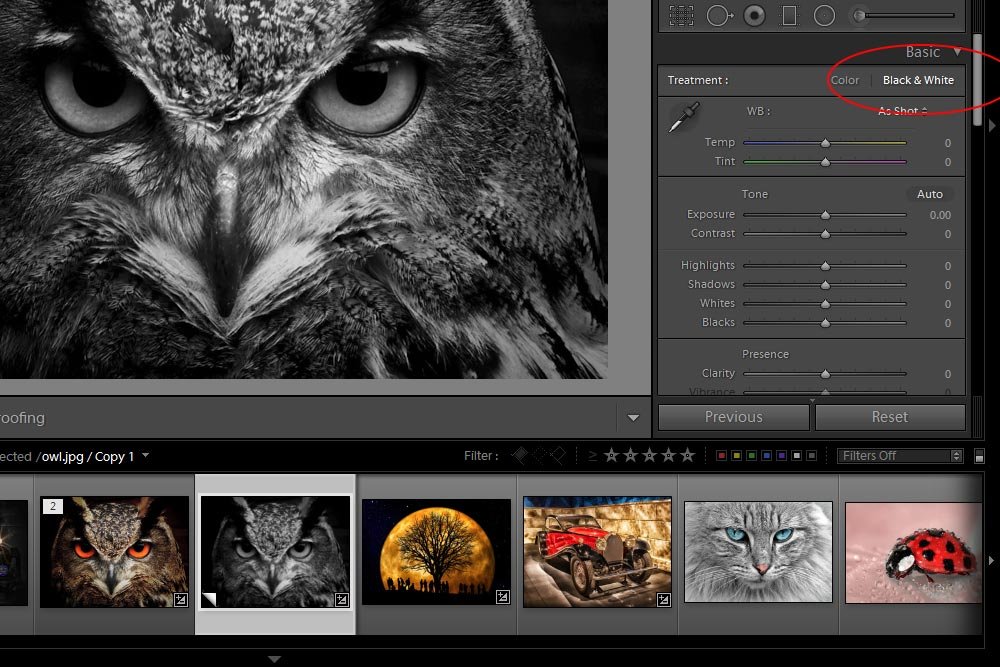
Converting an image (or virtual copy) from color to black and white in Lightroom is simple. All that needs to be done is to click on the Black & White link in the Basic panel. I’ll do this now for the virtual copy I just created.

converting-black-white.jpg

Clicking this link will instantly turn any color photo to black and white.

Creating a Sequence of Changes​

In this section, I’ll get to the point of this post. I don’t really need to change this photo for any particular reason. I’m merely going to change it to demonstrate how I can do it in a logical order so things make more sense later on.

I have my original image and I already made a black and white virtual copy. Let’s say that I have a client who wants to see three versions of the black and white. They would like to browse incremental changes, starting with just the plain black and white conversion and continuing on with further changes for each additional photo. This isn’t difficult to achieve at all.

Since I already have the black and white version, I’m done with that. That’s one down. Now, if I were to go ahead and make another virtual copy from the original color version, I’d have to repeat the step of converting the copy to black and white again. To keep things as efficient as I can, I’ll make the next virtual copy from the black and white copy I already made. This is important to understand. I’ll need to right-click on the virtual copy. I’ll do that now.

second-virtual-copy.jpg

If I had copied the color image, I’d have two color images right now. That wouldn’t be all too helpful.

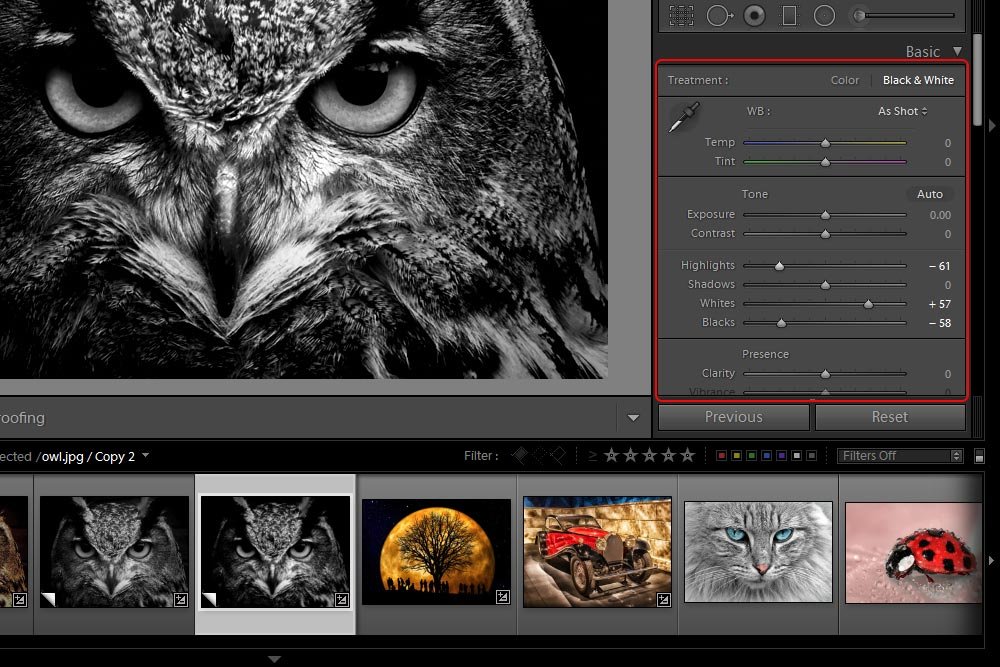
I’m going to go ahead and make some changes to this new copy. I’ll push the sliders around a bit.

first-slider-changes.jpg

So far, I’ve got two versions of the black and white image to show the client. All I need is one more.
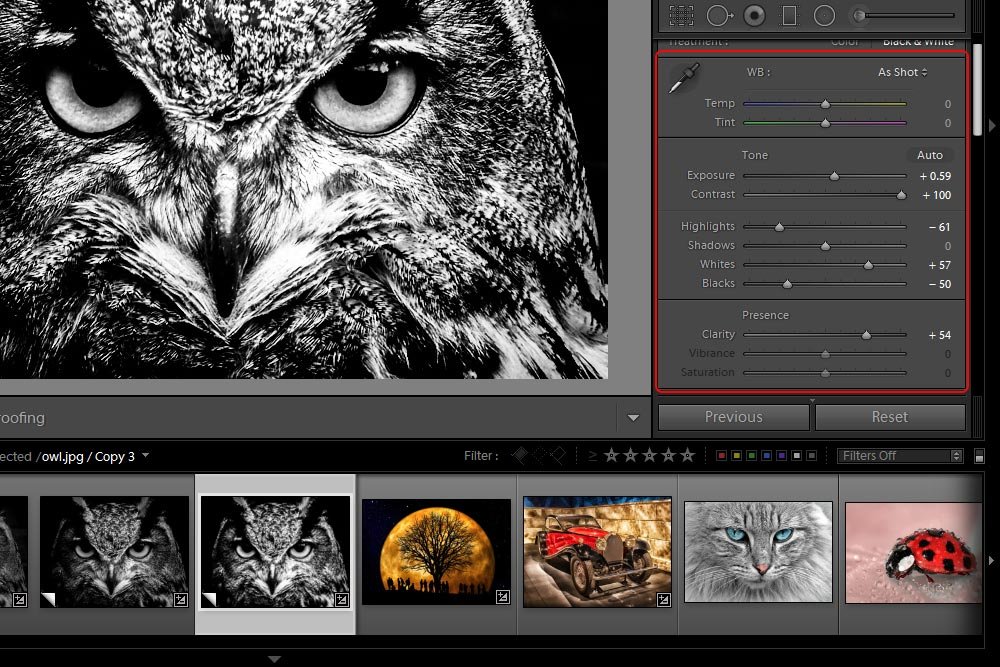
Since I’m building a sequence here, I’ll need to work from the copy with my most recent changes. To accomplish this, I’ll right click on this latest copy and create another (and final) virtual copy. This last copy will automatically incorporate all the changes I’ve made thus far. After that, I’ll make a few more changes in the Basic panel.

final-virtual-copy.jpg

The Method to Create an Efficient Sequence of Changes​

I know I’m repeating myself here, but this really is the point of this post. The create an efficient sequence of changes using virtual copies in Adobe Lightroom, you need to build from the most recent virtual copy created. By doing this, all previous changes will be saved and applied to the newest version. You won’t need to apply anything again – it’ll all be done already.

There we have it. I hope I explained this post clearly and effectively. If you have any questions or concerns, please let me know in the comment section below. Thanks for reading!
 
LukeLewis

LukeLewis

Member
Joined
May 7, 2021
Messages
134
Reaction Score
0
Points
21
  • #5

Finding, Sorting & Filtering Virtual Copies in Adobe Lightroom​

On this website, I write a lot about how to edit photos and how to work with Adobe Camera Raw, Lightroom and Photoshop. Much of what I write has to do with what I call “technique.” That is, “how to do” either this or that. In my opinion, that’s fine. It produces a result and that’s what most people are looking for.

There are occasions, though, that call for instruction on how to “manage” photos. After all, applications such as Bridge and Lightroom are just as much management tools as they are editing ones. Well, Lightroom is much more editing that Bridge is, but that’s what it was created for.

In today’s post, I’ll be focusing on how to somewhat manage and organize virtual copies in Adobe Lightroom.

Within Lightroom, we have the ability to create virtual copies. So far, I’ve talked about their benefits and how to work with just a few photos at a time. The question arises; what if we have more than just a few photos and what if we create more than just a few virtual copies? How do we ever find them? What if we have tons of photos and scrolling through the filmstrip panel isn’t good enough? Is there a way to isolate virtual copies so we can work with just them? Finally, can we organize virtual copies in such a way that makes them easier to see?

In this post, I’ll attempt to answer some of these questions because once you move past editing one photo at a time and begin working with collections, you’ll need all the help you can get. You’ll need efficiency.

Photos I’ll Be Working With​

In order to clearly explain what I’d like to explain, I need to first create multiple virtual copies. In order to create virtual copies, I need to choose a few photos. I chose these two.

virtual-copy-photos.jpg

These photos don’t represent anything in particular. I just closed my eyes and pointed at the screen. I already have some pictures imported into Lightroom, so these two are the ones I happened to land on.

Creating Virtual Copies​

To kick things off, I’ll create three virtual copies for each of the demo photos.

create-virtual-copy.jpg

To do this, I basically right-clicked on each of the two thumbnails in the filmstrip panel (Develop Module) three times and for each time, I chose Create Virtual Copy from the menu that appeared.

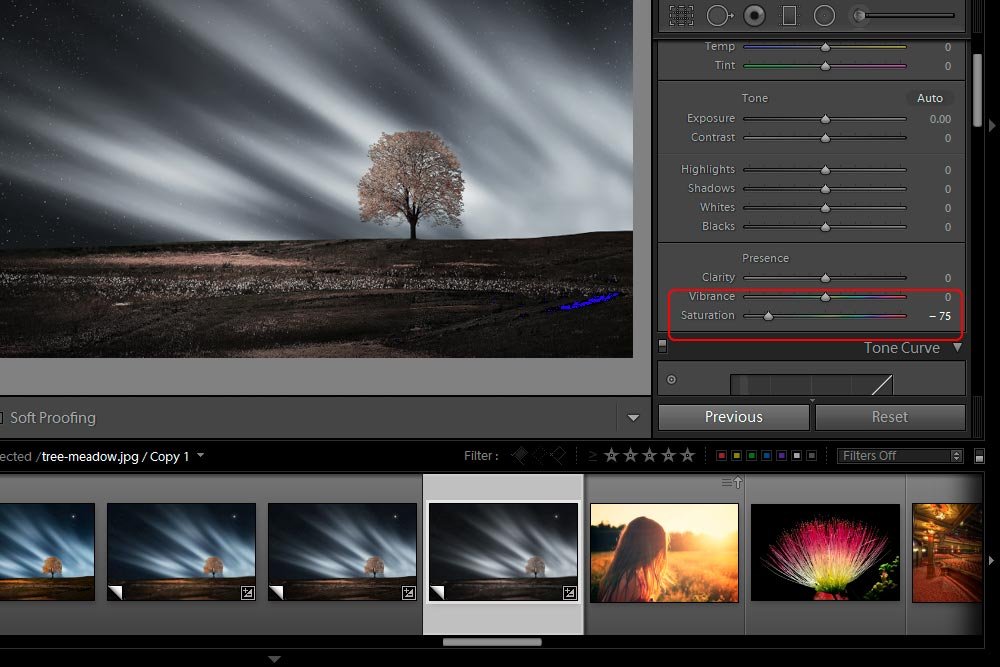
Now, to make these virtual copies stand out, I’ll need to make them look different than the original. I think I’ll reduce the saturation for each copy to -25, -50 and -75 respectively.

reducing-saturation.jpg

I’ll do this for each of the two photos so I’ll end up with two originals and six virtual copies. Remember, this is all just to demonstrate how to find and organize these things. Nothing special is going on.

Identifying a Virtual Copy​

Sometimes, when creating multiple virtual copies, like I just did, things can get confusing. It’s oftentimes challenging to figure out which was the original photo and which is the copy. In this section, I’ll show you a quick tip that will help with identifying what’s what.

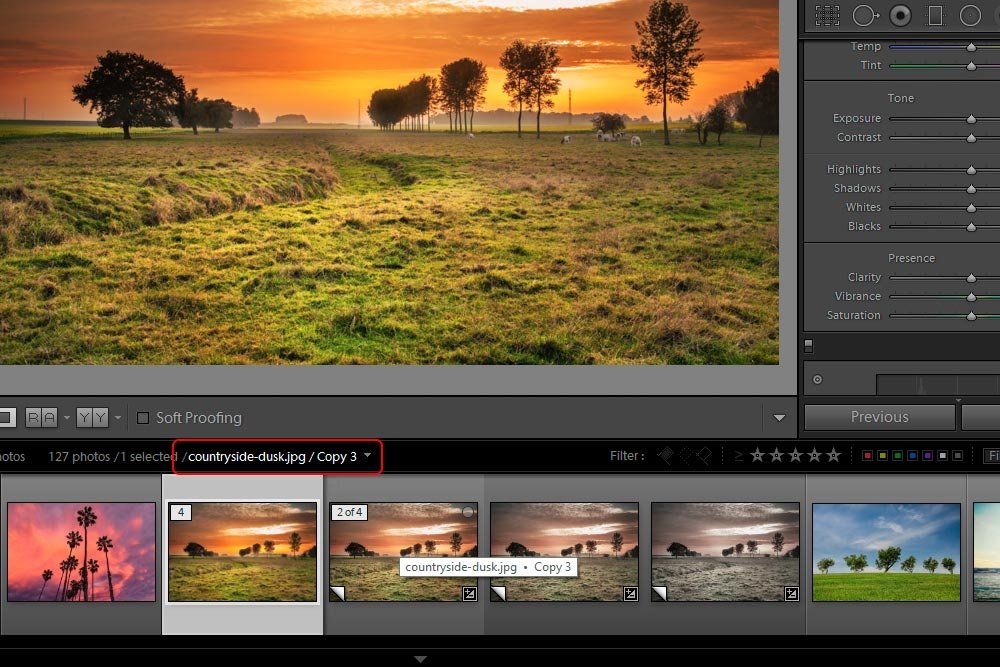
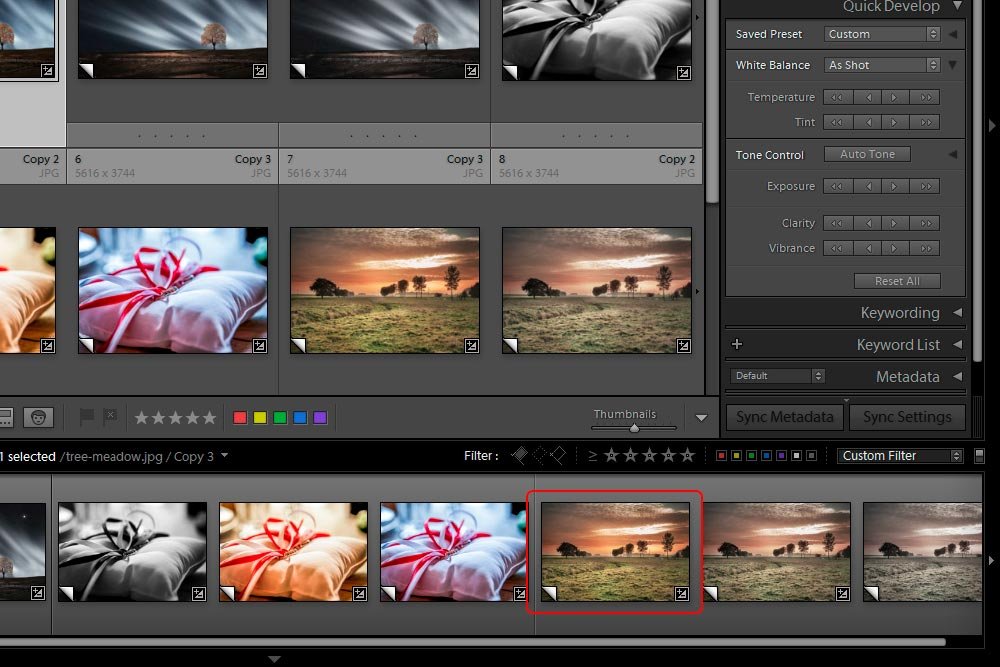
I just finished making the virtual copies for the second photo. I now have four very similar photos. Even though I reduced the saturation of the copies, I still can’t seem to clearly differentiate the images from each other. To deal with this, I’ll roll over the thumbnails in the filmstrip panel at the bottom of Lightroom. This will give me the information I need to know in a few different places.

identifying-copy.jpg

If you take a look at the above screenshot, you’ll notice a few different things. First, check out what I circled in red. If you look at the end of the file name, you’ll see Copy 3. This means that this particular image is the third copy I made from the original. If it were the original itself, it would not say anything about being a copy.

Second, if you look at the upper left corner of the thumbnail I’m rolling over, you’ll see a small square that identifies the image as being the second of four (2 of 4). That’s pretty self-explanatory. The original is first and then the three copies follow in the current series.

Finally, if you hover over a thumbnail long enough, the file name will appear with an indication of whether or not it’s a virtual copy. In this case, it says countryside-dusk.jpg – Copy 3.

Filtering the Photos​

Let’s get to the meat of this post. I’d now like to show you how to filter these photos and virtual copies.

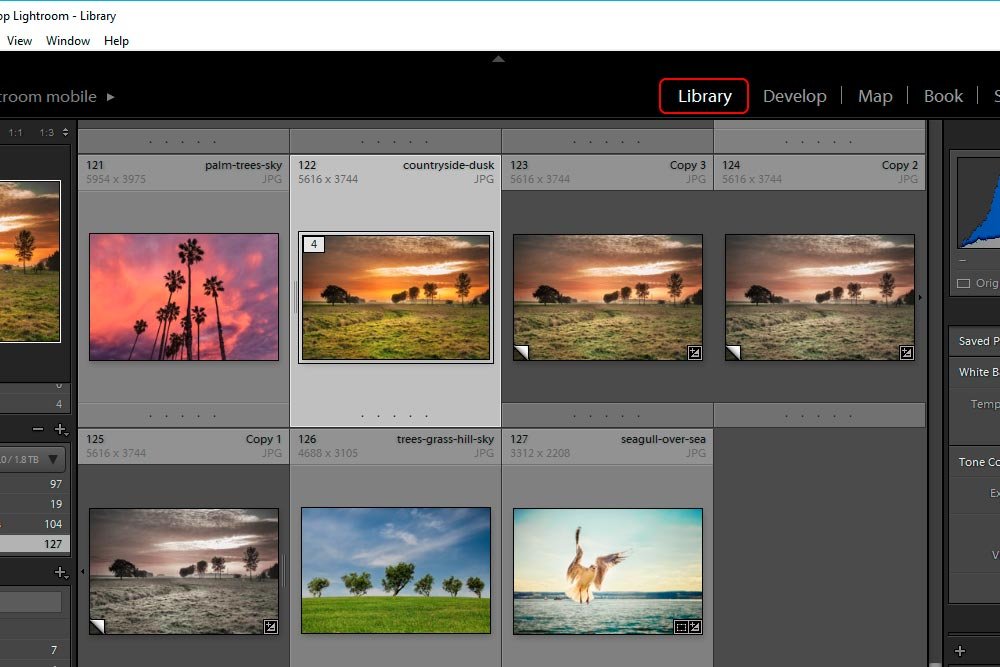
To begin working my way through these images, I’ll need to move over to the Library module. So, I’ll click Library up at the top of Lightroom.

library-module.jpg

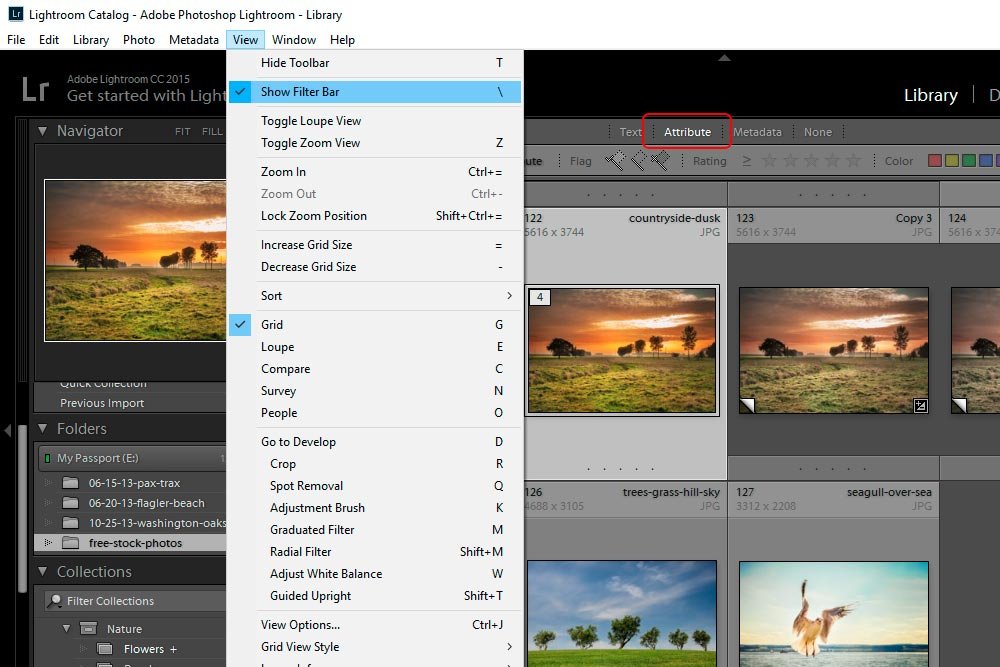
Next, I’ll head up to the View > Show Filter Bar menu item and click. Then, once the filter bar appears, I’ll click Attribute.

show-filter-bar-attribute.jpg

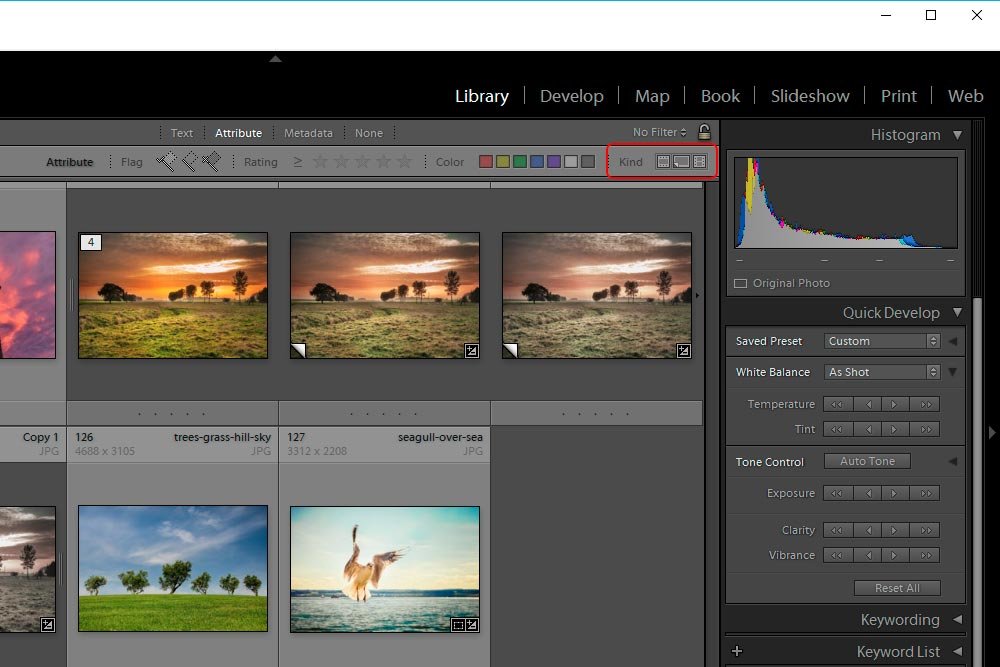
The area I’ll be specifically focusing on is located at the right side of the light gray bar. It’s titled Kind.

filter-by-kind.jpg

Inside the red outline in the screenshot above are three choices. The first is Master Photos, the second is Virtual Copies and the third is Videos. For this post, we’ll ignore Videos and only focus on the other two.

Okay, here’s how these things work – let’s say I have 100 master photos and 100 virtual copies that I made from those originals. By default, all of those images are displayed in the Library. I’ll have a total of 200 thumbnails. If I head up to the Master Photos button and push it, the virtual copies will be hidden. If I click that same button again, the copies will return to view.

The same is true for the next button. If I press Virtual Copies, the original master photos disappear. Again, if I click that same button once more, the masters will return to view. So essentially, by pushing a button, I’m “filtering” out things I don’t want and keeping the things I do.

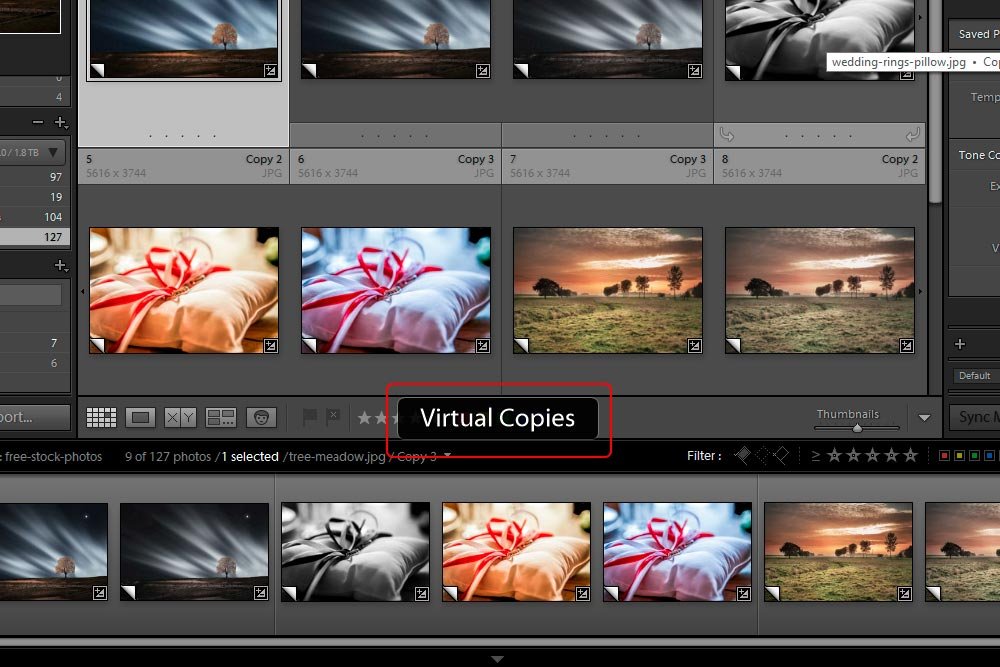
I want to give you a quick warning here. If you click both the Master Photos and Virtual Copies buttons, both of those types of thumbnails will remain in view and it will appear that nothing happened. Keep you eye on the text at the bottom of the grid after you push a button. It’ll tell you exactly what type of images you’re looking at.

virtual-copies-filter.jpg

In the above screenshot, you can see that only a few thumbnails are in view. The virtual copies I just made for this post and a few others I had left over from a previous one.

I’ll go ahead and reset the filters so everything is showing again.

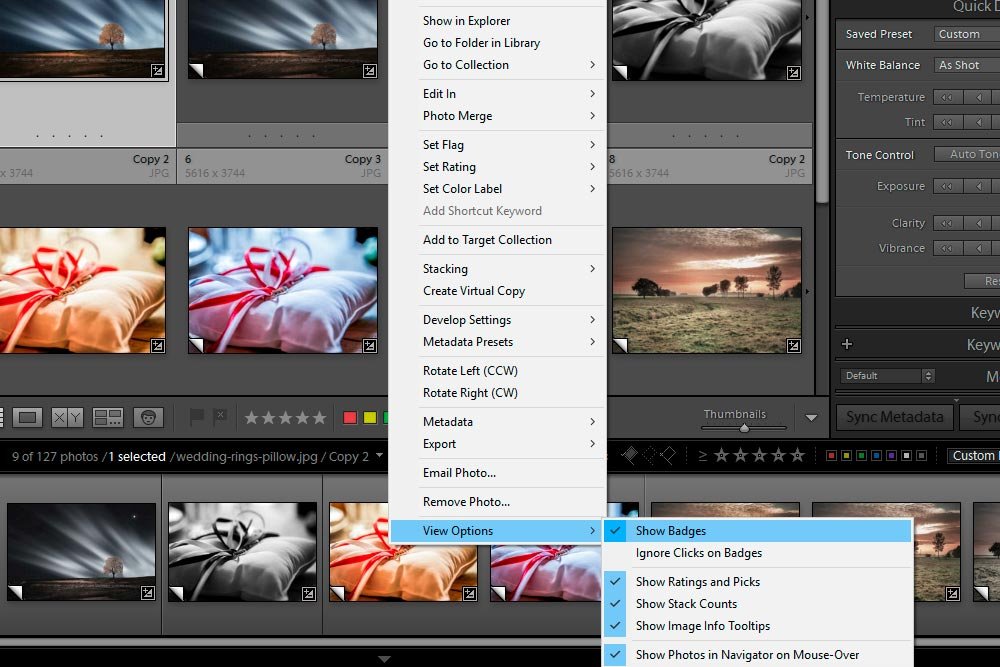
The next method for identifying, or visually filtering, virtual copies is to have what’s called a “Badge” applied to the virtual copy thumbnails. You may have noticed earlier that I already had these showing. I didn’t say anything about them because I was waiting for this section.

A badge is a small icon that applied to a copy. It looks like the corner of a piece of paper that’s being folded over.

If you look inside any virtual copy thumbnail, you’ll see what I’m referring to.

virtual-copy-badge.jpg

The way to turn these things on and off is to right-click on any thumbnail and roll over the View Options menu item and then to click on the Show Badges option.

show-badges-menu-item.jpg

Sorting Thumbnails in the Library​

This trick actually applies to both regular “master” thumbnails as well as virtual copies. It doesn’t really matter what’s being shown in the Library grid. It’ll work for everything.

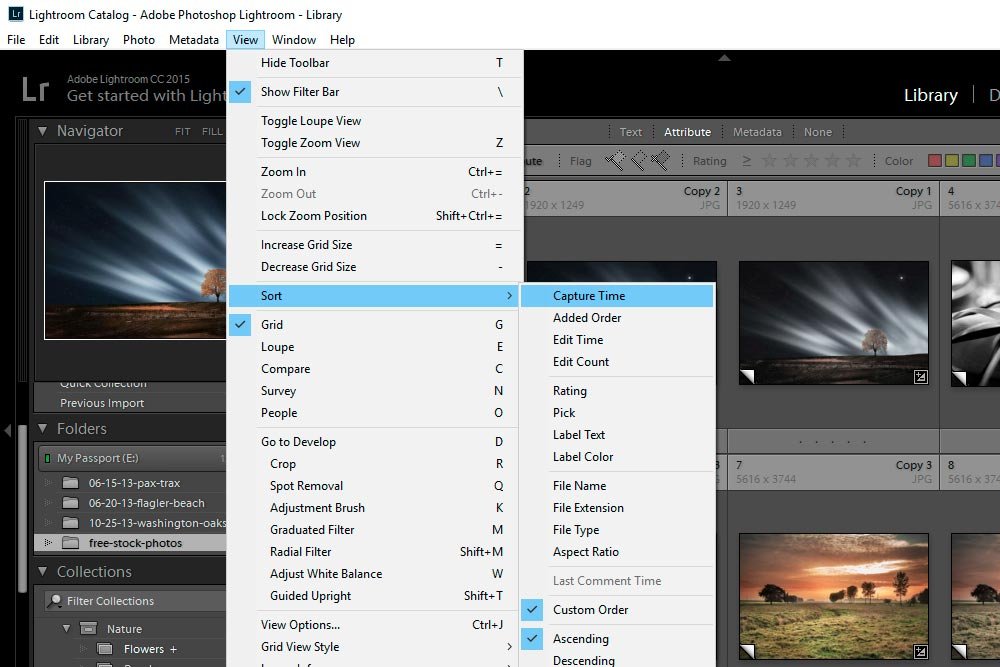
To sort thumbnails in Lightroom is easy. All you need to do is head up to the View > Sort menu item and roll over it.

view-sort-menu-item.jpg

To actually sort, you’ll need to determine how exactly you’d like to view the thumbnails and make that selection. Currently, I have them viewed as a Custom Order, which means that I dragged some things around manually, and Ascending. I could reverse the current order by clicking on the Descending option. Or, if I had ratings applied to these thumbnails, I could sort by those ratings. The list goes on. Really, you just need to experiment with this menu and find what you work with the most. Then, use that sort option, if necessary.

Wow, that was longer than I thought it was going to be. I do think I answered all of the questions I posed at the beginning of this post though. That’s a good thing. I really could go on and on. With this particular post, I had to lop off an entire section because I’d like to save it for one all its own, so you’ll be seeing that soon. Anyway, if you have any questions or concerns, please leave them in the comment section below. As always, thanks for reading!
 
LukeLewis

LukeLewis

Member
Joined
May 7, 2021
Messages
134
Reaction Score
0
Points
21
  • #6

Collapsing Stacks & Organizing Virtual Copies in Adobe Lightroom​

I’ve got some really great tips for you today. If you’re into using virtual copies in Lightroom, these shortcuts will be truly helpful. They’re the types of things you’ll likely use every time you take advantage of virtual copies themselves, so keep on reading below.

In today’s post, I’d like to talk about how we can organize virtual copies so they don’t take up so much room in the center panel grid view or in the bottom filmstrip view in Adobe Lightroom. I’ll show you how we can go about collapsing what we call “stacks.” Also, along those same lines, I’ll demonstrate how to change up which photo shows on top of the stack, or which one is the stack’s “representative.” Finally, I’ll walk through the process of changing which photo, among those in the stack, is the primary one. This is extraordinarily helpful if you’ve made many edits to a virtual copy and would like to make that copy the master photo. It’s as easy as 1-2-3.

Creating Some Virtual Copies​

For this post, I’ll go ahead and create two virtual copies of a random photo. If you aren’t familiar with how to do this type of thing, you can catch up by reading a few of my previous posts above.

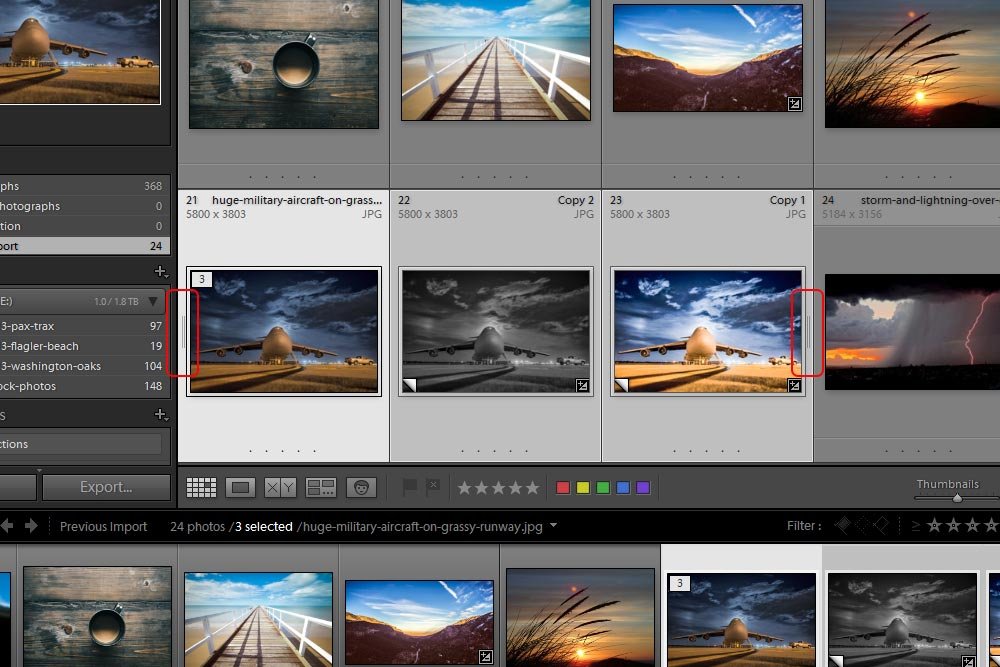
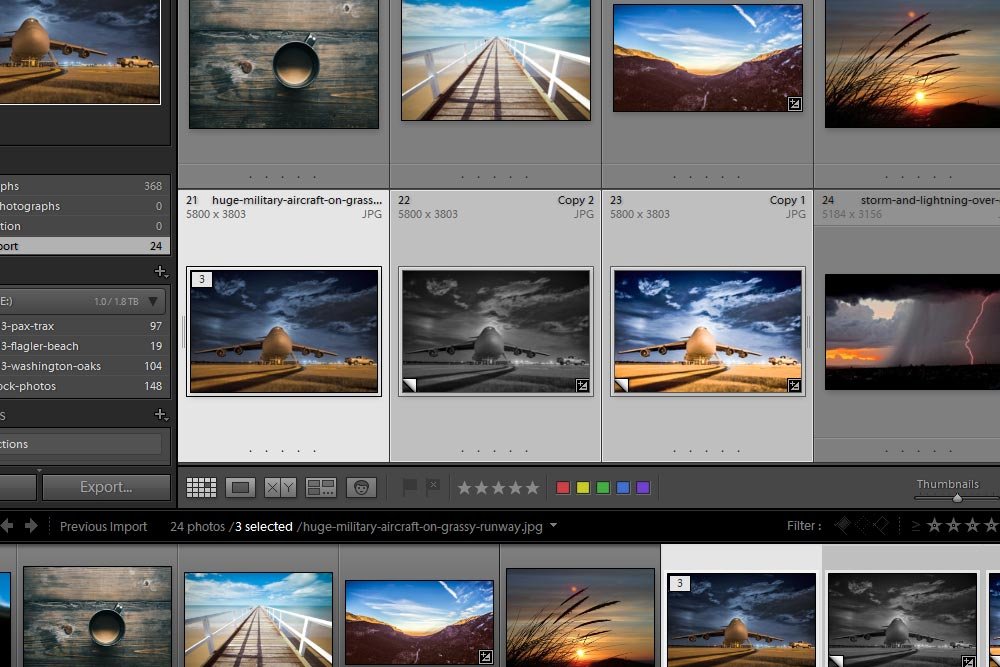
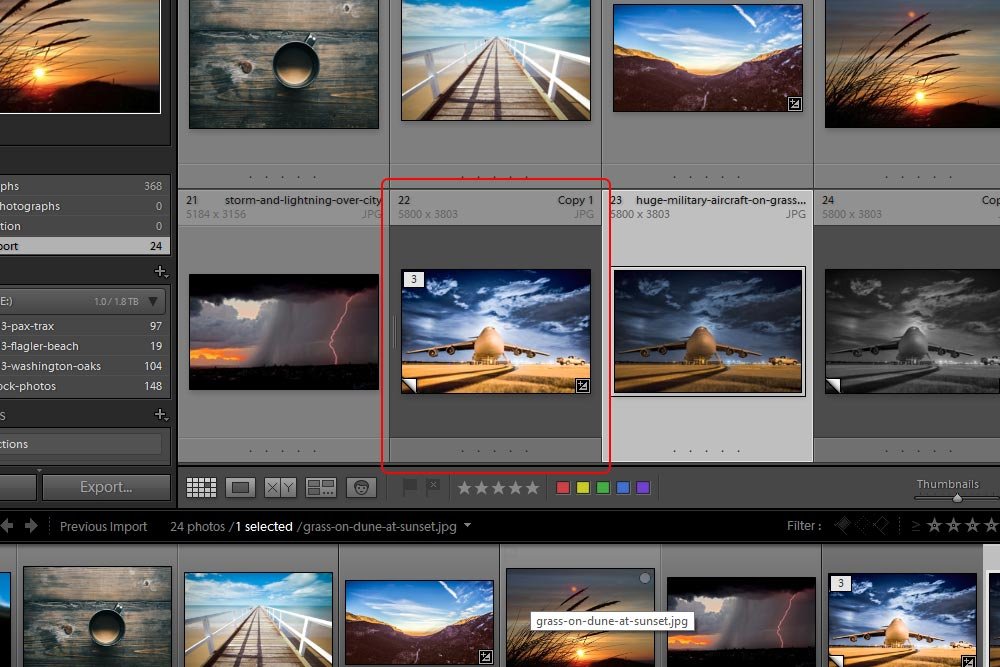
In the screenshot below, you can see the one master photo and the two virtual copies of that photo. They are of an airplane and all three are highlighted (selected).

lightroom-grid-view.jpg

As you can see, I’ve gone ahead and made the first virtual copy, which is the second in the row, black and white. After that, I enhanced the colors of the second virtual copy, which is the last in the row of three images. The master is the dull one at the beginning.

Collapsing the Stack​

The three images that are selected are called a “stack.” If I had multiple groups of master and virtual copy images, I’d have multiple stacks. Now, you can imaging that if I worked extensively with virtual copies in Lightroom, each of these stacks would take up a lot of room, which isn’t necessarily a good thing if I’m trying to navigate around the application. Also, in this case, I only have two virtual copies. If I had twenty, all of those copies would really be in the way. If I were a wedding photographer, I could imagine this scenario multiplied many times over. My point is, hiding all the virtual copies that aren’t currently being worked on is the perfect way to keep a workspace clean and easy to get around.

Collapsing a stack is really easy to accomplish. All you have to do is to click on one of the thin vertical lines at either side of the stack. In the next screenshot, you can see both of the stack handles. I’ve outlined them in red.

stack-handles.jpg

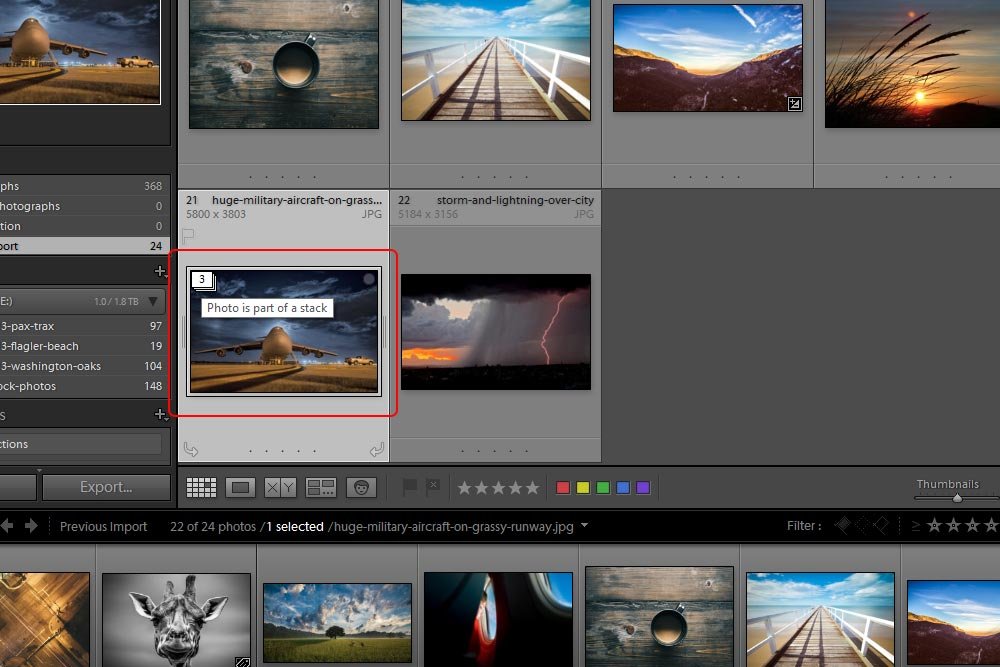
If I click one of the handles, the stack will collapse, saving me tons of room in my workspace.

collapsed-stack.jpg

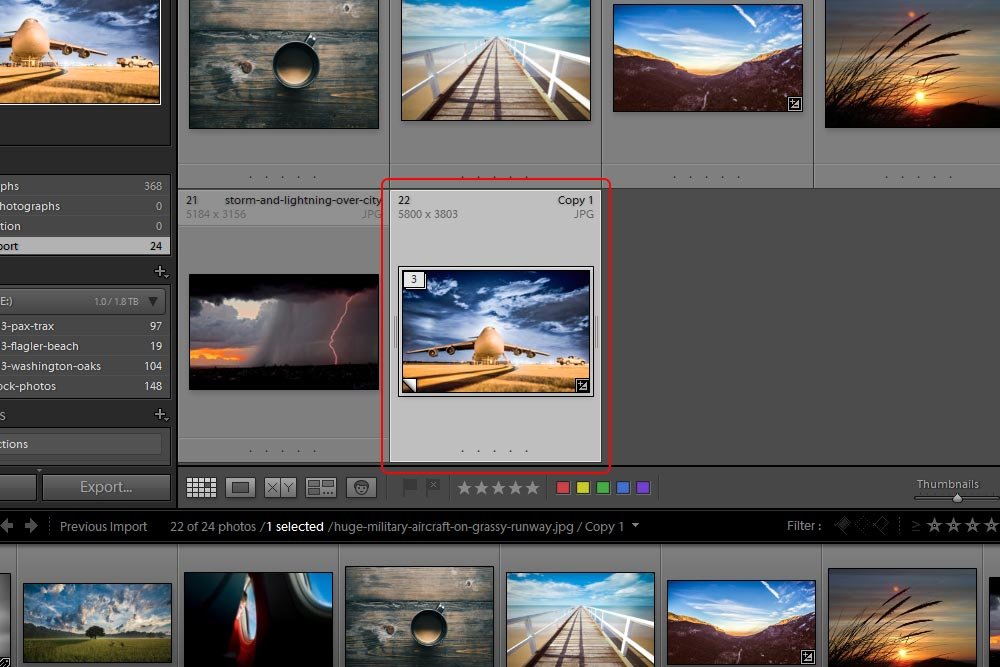
Now, you may be asking yourself right now, “If a stack is collapsed and only one photo is showing, how do I know that virtual copies exist?” Well, if you look at the previous screenshot, you can see the small number in the upper left corner of the thumbnail. That’s the number of photos in the stack. If that number is rolled over with a mouse pointer, a popup box appears telling you that a stack exists. Once you get used to looking for that number, it’s fairly simple to recognize.

Also, just so you’re aware, the stack is also collapsed in the filmstrip view that runs along the bottom of Lightroom.

Changing the Top of the Stack​

In the above screenshot, you can see that the top of the stack, or the representative photo, is the master. In this case, it’s rather dull. And in reality, it doesn’t represent what I’d like to see if I were quickly browsing through all of the thumbnails. The good thing is, I can change which photo shows when a stack is collapsed. This effort is almost as straightforward as the one in the previous section.

To change which thumbnail appears on top of a stack when it’s collapsed, make sure the stack is open and all virtual copies are showing. Then, click and drag the photo you’d like to appear on top, to the leftmost position in the series of images. Then, let go.

reordering-stack-thumbnails.jpg

As you can see, the more colorful virtual copy is now at the beginning of the series, leaving the master image second in line. If I go ahead and collapse the stack now, let’s see which image remains visible.

visible-virtual-copy.jpg

Just as I suspected. The thumbnail I wanted is now at the top of the stack.

Changing Which is the Master Photo​

For whatever reason, you may want to change which image is the master in the series of virtual copies. Let’s say that you made a few copies off of a “not so spectacular” master and worked on one of those copies for a good long time. In this case, you may want to actually change which photo is the original.

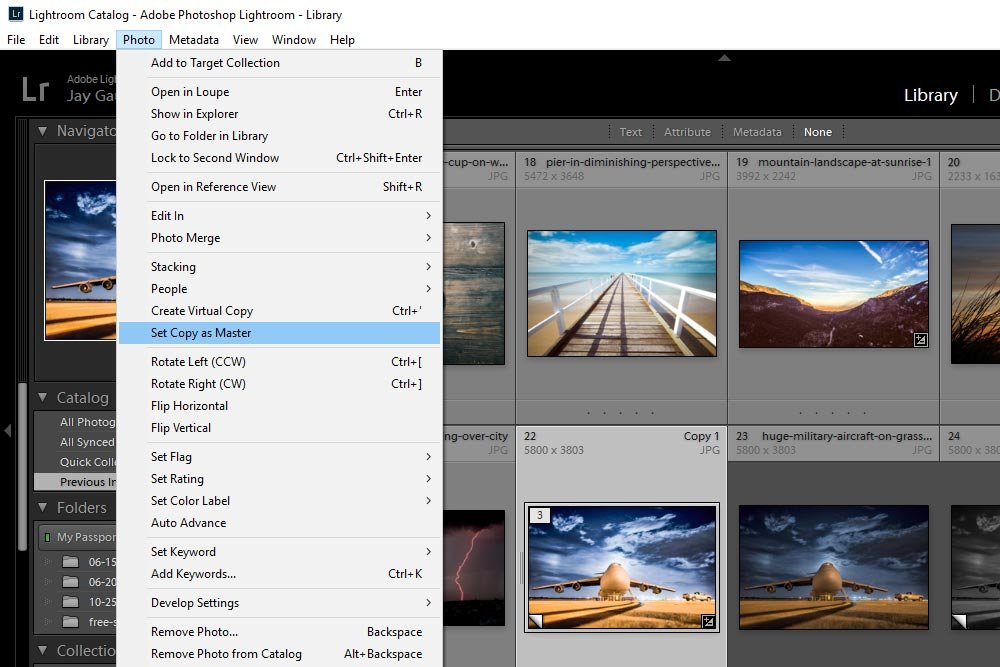
To make a virtual copy the master photo, first select the copy thumbnail. Then, head up to the Photo > Set Copy as Master menu item and click.

photo-set-copy-master.jpg

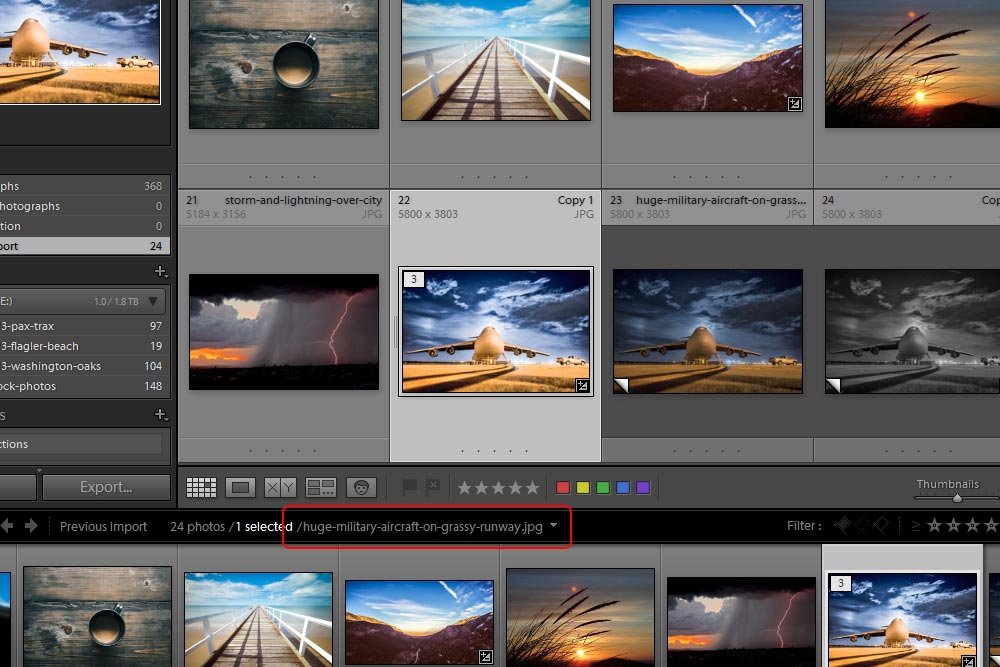
Once that’s done, the copy will switch over to become the master and the original master will now be considered a virtual copy. To be sure this has happened, you can select the new master thumbnail and look at its file name. No longer will it be appended with / Copy. It will take on the file name of the original master.

file-name.jpg

Also, you’ll see the small number in the upper left of the new master thumbnail and you’ll see the folded lower left corners of the virtual copy thumbnails. You can change which copy is the master as many times as you wish.

That’s about it. I hope you got something from this post and enjoyed reading it. If you have any questions or concerns, please leave them in the comment section below. Thanks for reading!

QUESTION: I was just re-reading this article. If you change a copy into a master photo, will it literally rename your original RAW file? I could see where that would get organizationally complicated if you’re not careful.

Also, I shoot in both RAW + JPEG format simultaneously (long story). If you change a virtual copy into a master photo, will it change the name of BOTH your original RAW and JPEGs? That seems like the most important question.
 
LukeLewis

LukeLewis

Member
Joined
May 7, 2021
Messages
134
Reaction Score
0
Points
21
  • #7

Organizing Virtual Copies into Collections in Adobe Lightroom​

When it comes to organizing, I’m a total freak. I have a long history of being a mess and the moment I learned how to get myself together a few years ago, I totally went overboard. Today, I have almost everything I own compartmentalized and tucked away safely. Even though I’ve been this way for a while, I’m still sometimes shocked when I find something where it’s supposed to be. I guess I’m still burning off the memories of the past.

One of the most critical areas of organization in my life is on my computer. If I let that go, I’d be in real trouble. Each and every day, I manage, move, add, delete and manipulate all types of files. Because of this, I’ve developed a system. In today’s post, I’ll discuss one small sliver of an idea for working with and organizing a very specific type of file inside of Adobe Lightroom.

By the way, if you’re a photographer and are looking for a method of file organization, I invite you to read through my ideas on the topic.

How Do Photographers Store Their Photographs?

Virtual Copies​

Since this post has to do with something called Virtual Copies in Lightroom, I thought I should lead you to some resources on that. So, if you’re interested in some background on this feature, please read through the posts I've written above.

As time goes on and as I write more about these things, you can just search “Virtual Copies” in the site search bar above. That will bring you to the latest and greatest posts.

Lightroom Collections​

For today’s post, I’ll be creating two different collections inside of Lightroom. The first collection will house similarly themed photos and the second collection will house variants of those photos. First, I’ll go through the actual creation of the collections and then after that, I’ll explain why this type of organizational method is important.

If you’d like to learn more about collection in general, please click through to this post below.

Creating Collection Sets in Adobe Lightroom

To kick things off, I’ll head into my primary catalog where all the photos I’ll be working with live. I’ll be in the Library view.

lightroom-library-view.jpg

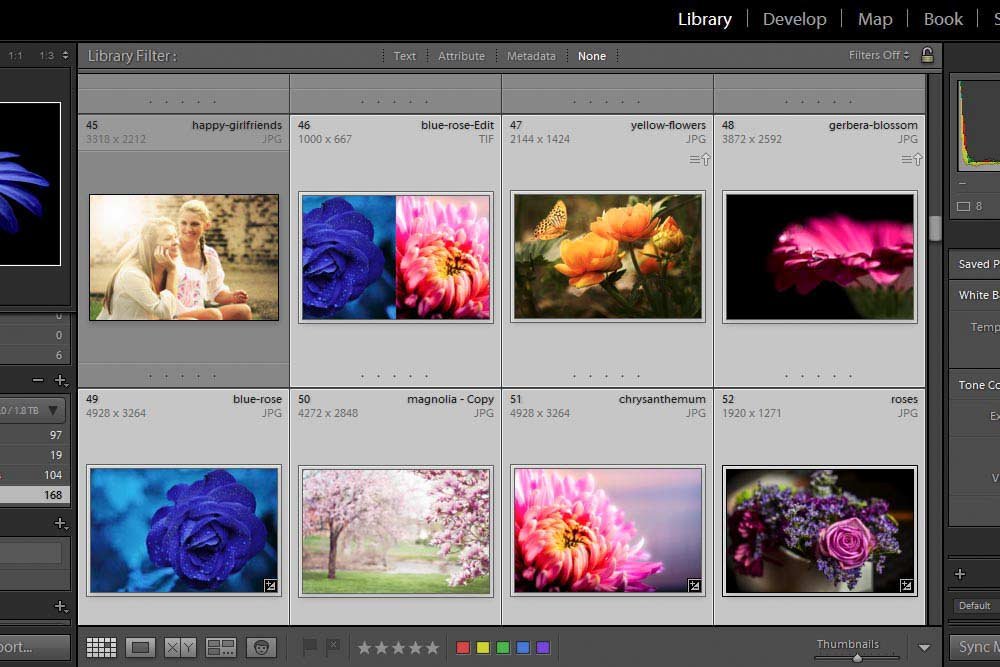
Next, I’ll scroll down until I see some photos of flowers. When I do see a photo, I’ll click on it to highlight it. To highlight multiple random pictures, I’ll click and hold down the Ctrl or Command key while clicking the additional photos.

001.jpg

The light gray boxes around the images are the ones I selected.

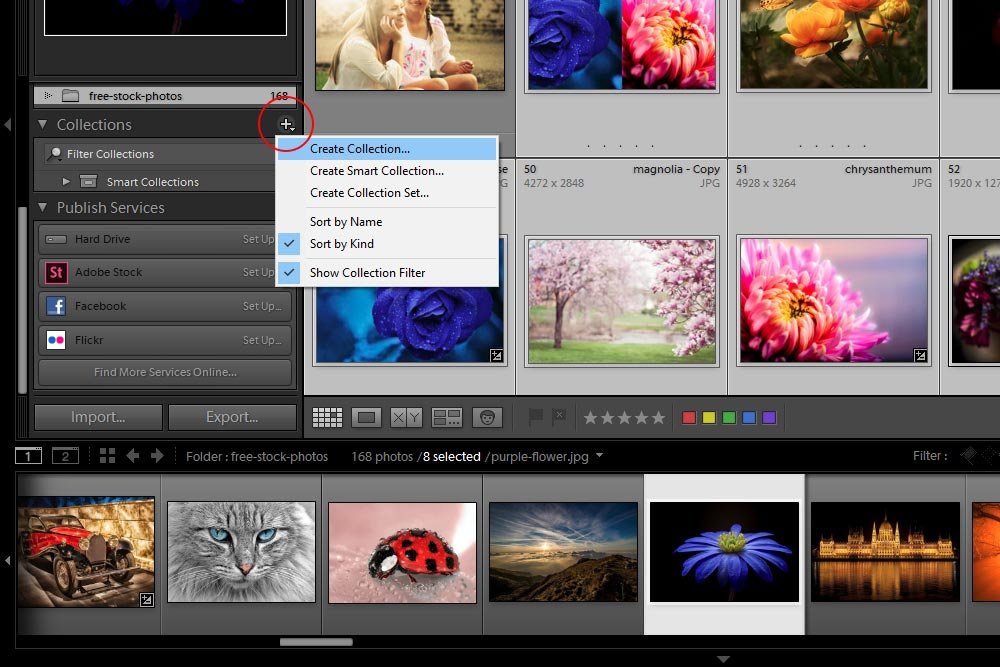
Finally, I’ll head over to the left column where I’ll find the button that will assist in creating a new collection. Inside of the Collections section, I’ll press the + icon.

create-new-collection-icon.jpg

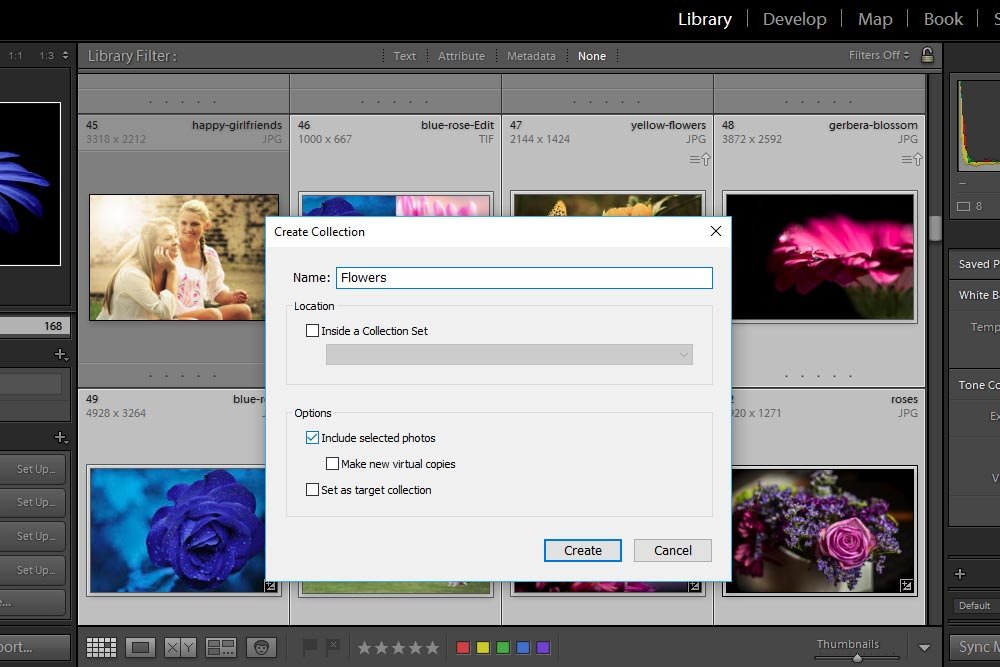
After I click on the Create Collection menu item, I’ll see the Create Collection dialog box appear.

create-collection-dialog.jpg

In this box, I’ll name the new collection. In this case, I simply named it Flowers. Under the Options section title, I made sure to only check the Include Selected Photos check box. When finished, I’ll click the Create button.

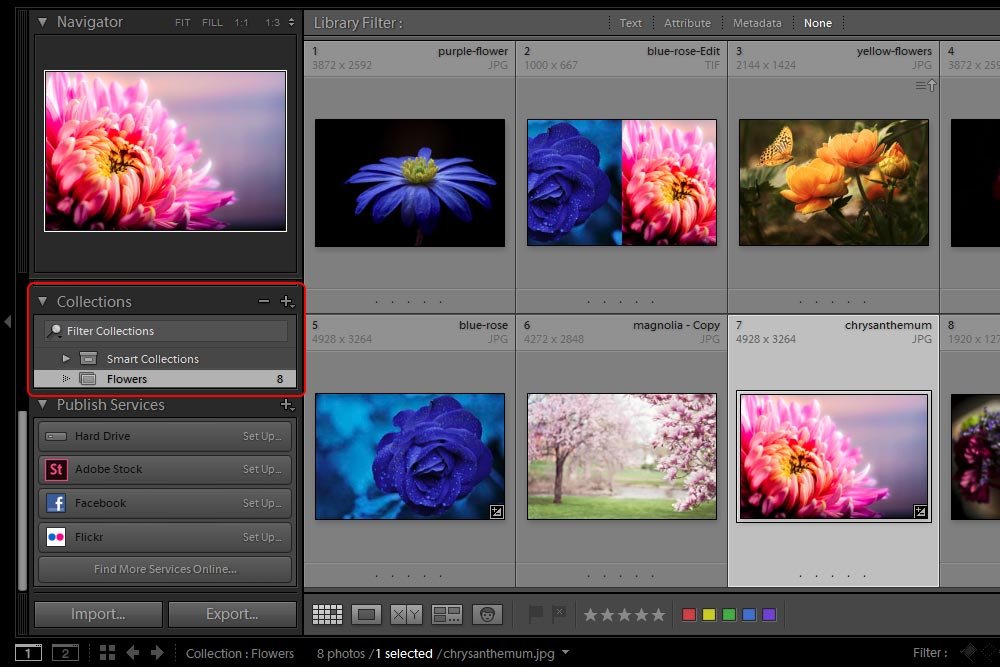
Now when I look at the Collections section over in the left column, I’ll see the Flowers collection I just created. When I select that collection, only the flowers I selected earlier will appear in the center Content panel.

flower-collection.jpg

Why Create a Collection?​

I’d like to stop here for just a moment to talk about why I’m doing this. Let’s say I’m a nature photographer and have recently gone outside to take hundreds and hundreds of photos. I downloaded them to my computer and imported them into Adobe Lightroom to review. All of the photographs are in the same catalog, meaning there are many of them, which can get confusing to look at and to work with.

Upon review, I’ve decided that I’m interested in editing only a handful at the moment. With this in mind, I’d like to separate out those I’m interested in while leaving the rest behind. I don’t want to delete anything, I just want to leave them in their original location. This is exactly what collections are for. Organization. Just like I mentioned at the beginning of this post.
Creating a Collection of Virtual Copies​

Since I now have the flower photos I’d like to edit tucked away in their own collection, which was my first goal, I’d like to leave them there as the originals. My plan now is to create virtual copies of these photos and then edit them the way I see fit. I’d also like to have these edited virtual copies organized in their own collection. Having two collections, one with the original flower images and then another with the edited images would be very helpful when it comes to satisfying my over-organized mind.
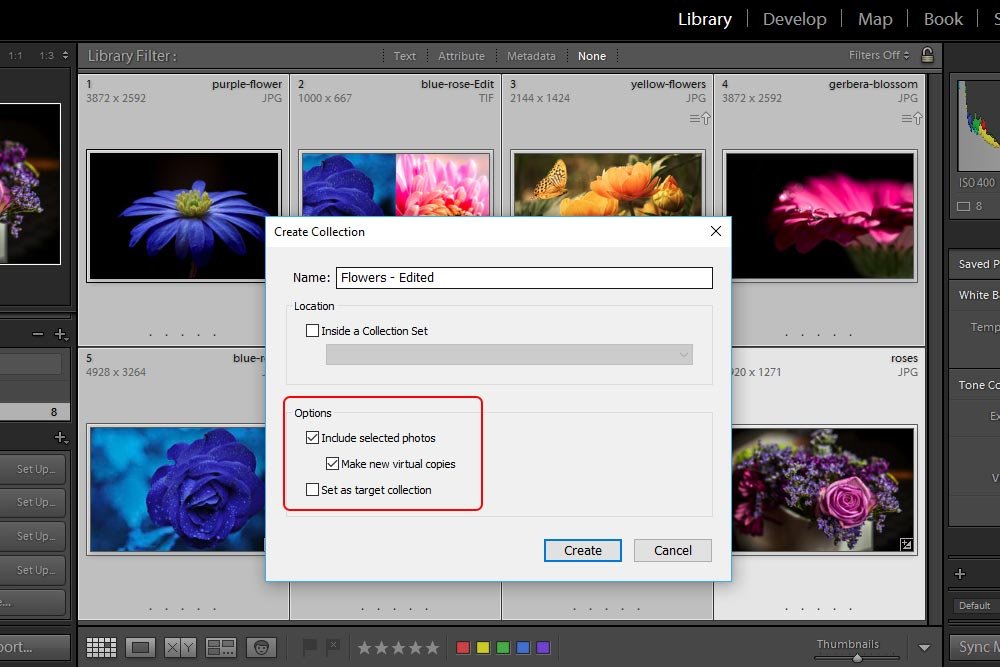
To create a new collection that contains these flower images, I’ll stay right in the current collection. I’ll select all of the photos and follow the same exact steps I took above. I’ll click on the + icon and then on the Create Collection menu item when it appears. After the Create Collection dialog box shows up on the screen, I’ll name the new collection and make one minor change when compared to what I did previously.

create-collections-options.jpg

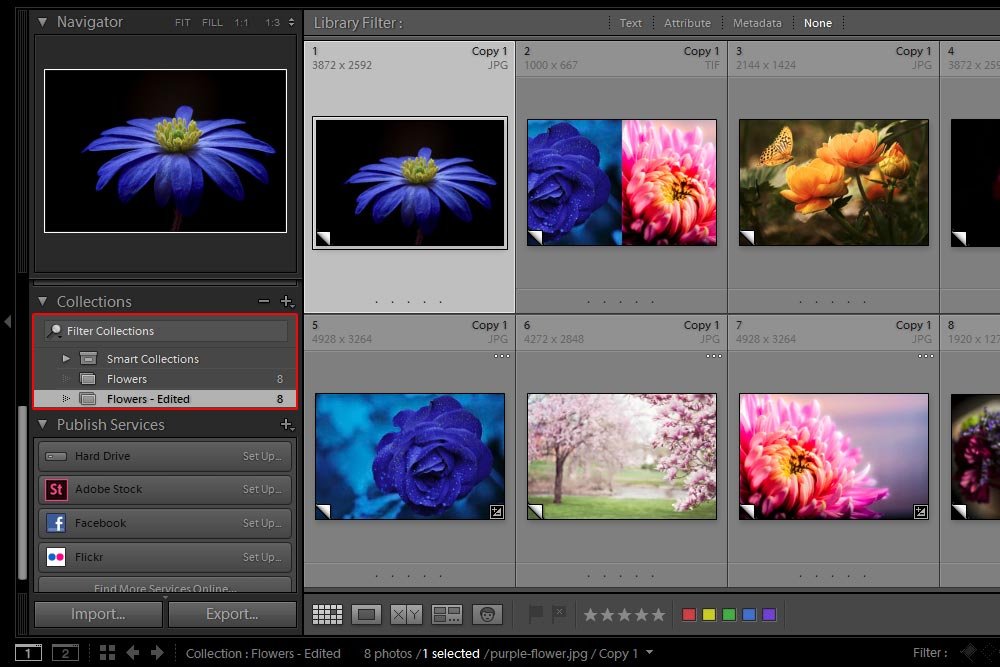
First, I’ll name this new collection Flowers – Edited. This will differentiate the two collections. Next, I’ll keep the first box checked in the Options section, but I’ll also check the second box as well. This one says Make New Virtual Copies, so when this new collection is created, virtual copies of the flower photos will be included in it, not the originals.

virtual-copy-collection.jpg

If you look at the screenshot above, you’ll notice a few changes from the previous ones. First, you’ll see that a new Flowers – Edited collection has been created. I outlined that in red. Also, inside the center panel, you’ll see that each image thumbnail has a small uplifted corner at the bottom left portion. This means these images are virtual copies.

It’s at this point, I could go ahead and edit these virtual copies. If I wanted to enhance their colors, I could do that without affecting the original images. If I wanted to make these versions black and white, I could do that in the same way as well.

Again, Why?​

Here’s the real charm for taking advantage of this type of organization and workflow. Since my primary catalog has tons of photos in it, I was able to separate out the images I wanted to work on. Since I didn’t want to affect the original images, I made virtual copies of them. The thing is, when I created these virtual copies, they are also created in the original content catalog, so if I went back to that panel, I’d see all of the tons of original photos, plus these new virtual copies. Can you image how confusing things would get if I tried to stay in that one combined panel and created multiple groups of virtual copies? Just me working on this post has me confused.

So, the true benefit of this workflow is that I’m able to easily identify images I’ve worked on and can easily delete them when I don’t want them anymore. Instead if manually filtering through hundreds of photos in an effort to located which ones are virtual copies and which ones aren’t, I can simply click on the Flowers – Edited collection and delete the copies from there. Now that’s satisfying.

I truly hope you learned something and got some ideas from this post. If you have any questions or concerns, please leave them in the comment section below. Thanks for reading!
 
Top