Search

Softening & Adding Glow to a Portrait in Photoshop

  • Thread starter KristinaW
  • Start date
KristinaW

KristinaW

Member
Joined
May 7, 2021
Messages
127
Reaction Score
0
Points
18
  • #1
softening-adding-glow-portrait.jpg

When it comes to portrait photography, there are a few tricks you can take advantage of in Adobe Photoshop that can add some subtle effects to your photos. In future posts, I’ll be covering just about every styling effect under the sun, but today, I’m going to discuss one small slice of the entire pie.

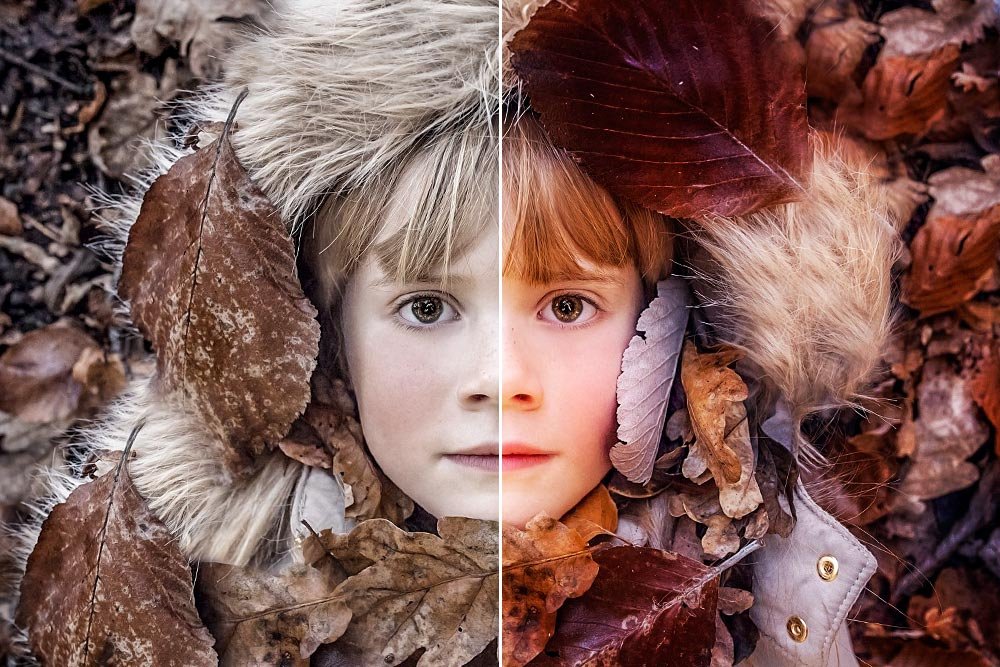
In today’s post, I’m going to complete a small project using a sample photo of a child lying down in the leaves. I’ll be using a variety of tools to add some saturation, a faint glow and some softening to the overall photo. I think this type of effect would be most popular with wedding shots as well as some more glamorous types of portraits, but as I was experimenting with different subjects and settings before sitting down to write this post, I found that it looks pretty good with a wide variety of types of photography.

The tools I’ll be taking advantage of in Photoshop for this project are Smart Objects, Filters and Blend Modes. Let’s get to it.

Original Photo​

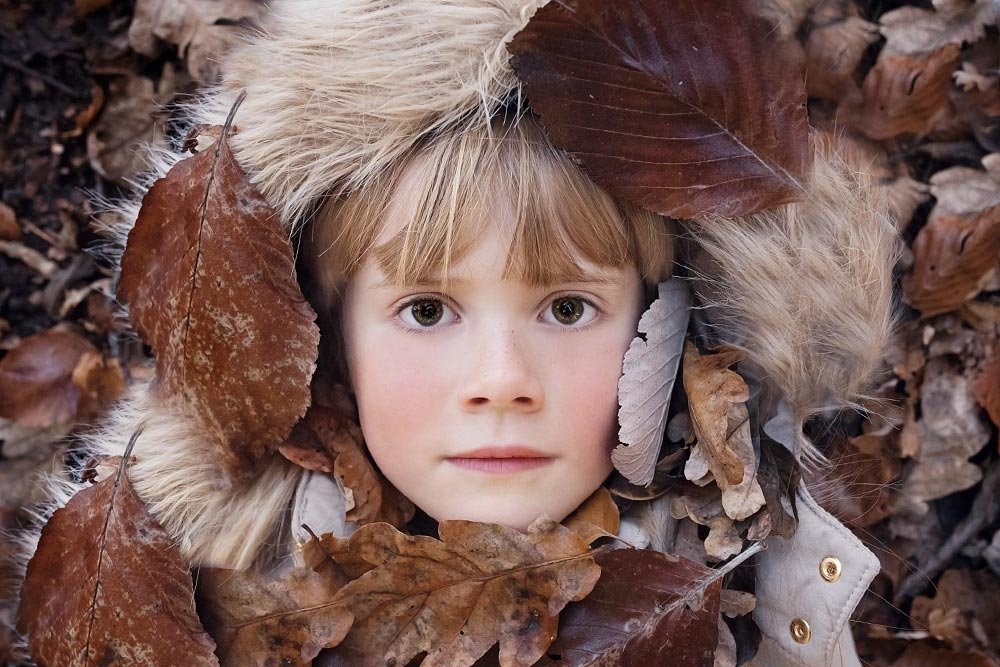
This is the original photo that I’ll be using for this post. I haven’t done anything to it besides straighten it and crop it to size in Photoshop.
original-photo-1.jpg

Convert to Smart Object​

There are a few methods that I could use (duplicating layers) to add the effect I’m after to this photo, but I’m going to limit what I discuss to converting the photo layer to a Smart Object. Smart Objects have tons of flexibility and if I wanted to make an adjustment after adding an effect when using one, I could do that. If I were to simply duplicate the photo layer and then add the effects and they didn’t come out the way I intended, I’d have to delete the duplicated layer and start over again. Smart Objects were created to avoid issues like this (by being non-destructive), so it’s in your best interest to learn as much as you can about them and to use them in your workflow. I’ve covered their characteristics and benefits right here on this website, so if you’re interested in discovering their magical powers, do a simple site search for “Smart Object.” Later on in the post, I’ll discuss their benefits more as I go through the steps necessary to complete this project.

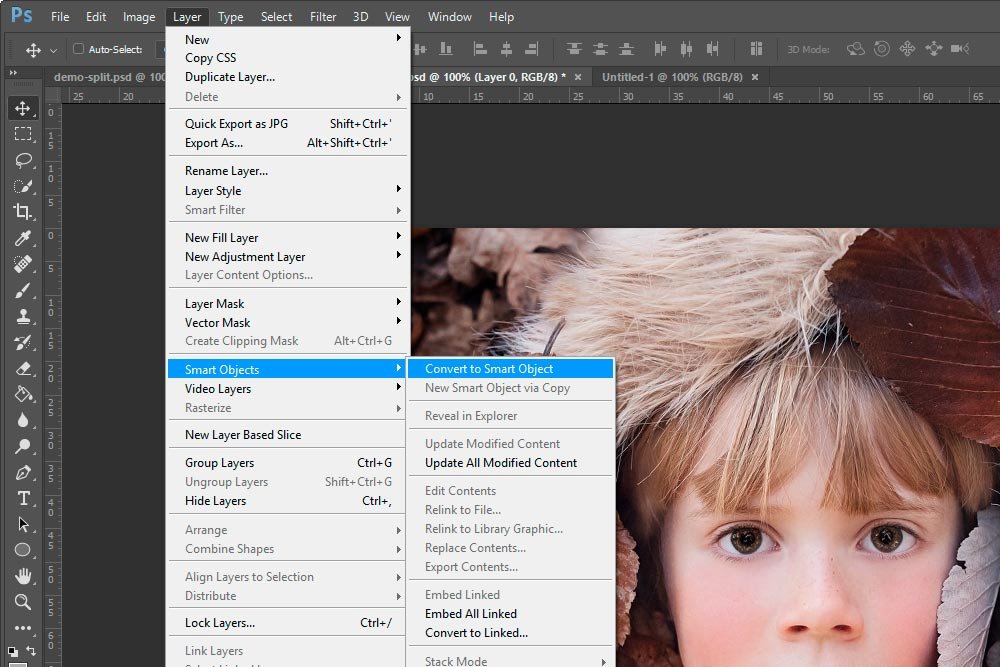
Converting a layer to a Smart Object is super simple. To do so, I’ll click the layer I want to convert, which is easy to do because it happens to be the only layer in the file, and then head up to the Layer > Smart Objects > Convert to Smart Object menu and select that choice.
layer-smart-objects-convert-to-smart-object.jpg

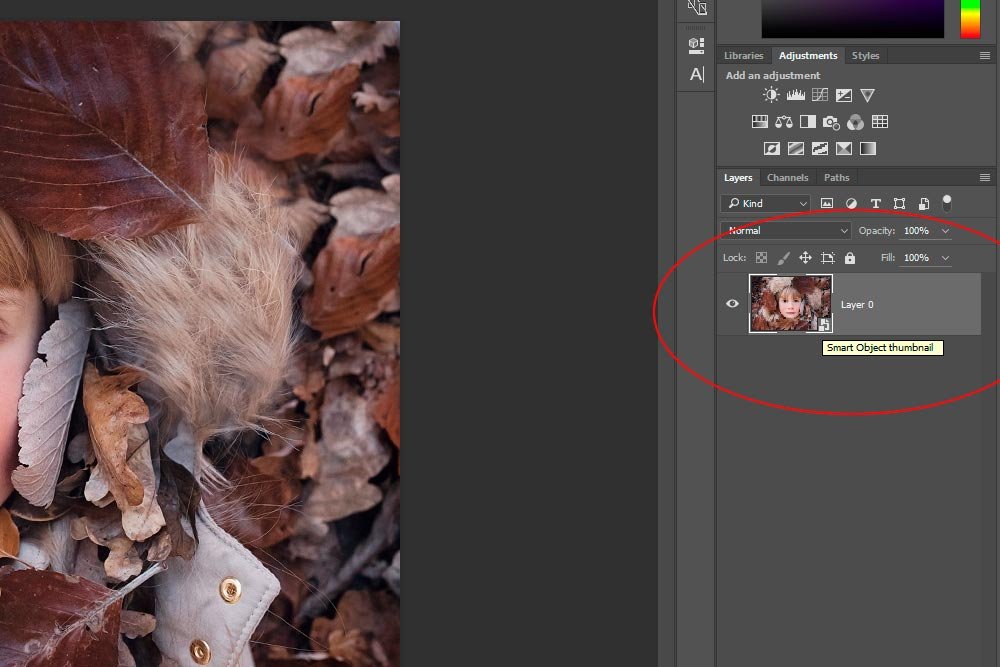
To confirm that the layer has been converted from a pixel based layer to a Smart Object, I can look for the small icon in the lower right corner of the layer thumbnail. If I see the icon and roll over it with my mouse, a small tool-tip that says Smart Object Thumbnail should appear.
smart-object-thumbnail.jpg

At this point, any changes I make to the layer will be non-destructive, which is just what I want.

Adding a Blur Filter​

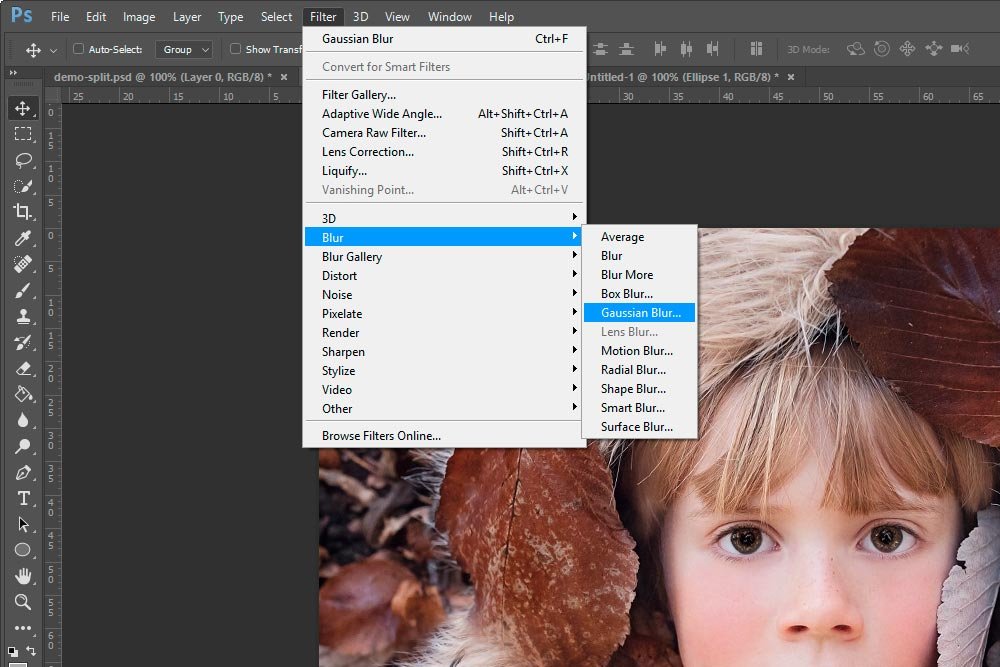
The first part of adding a softening/glow effect to this photo is to apply a blur filter to it. To do this, I’ll head up to the Filter > Blur > Gaussian Blur menu item and select it.
filter-blur-gaussian-blur.jpg

When I do that, a small dialog box will appear.
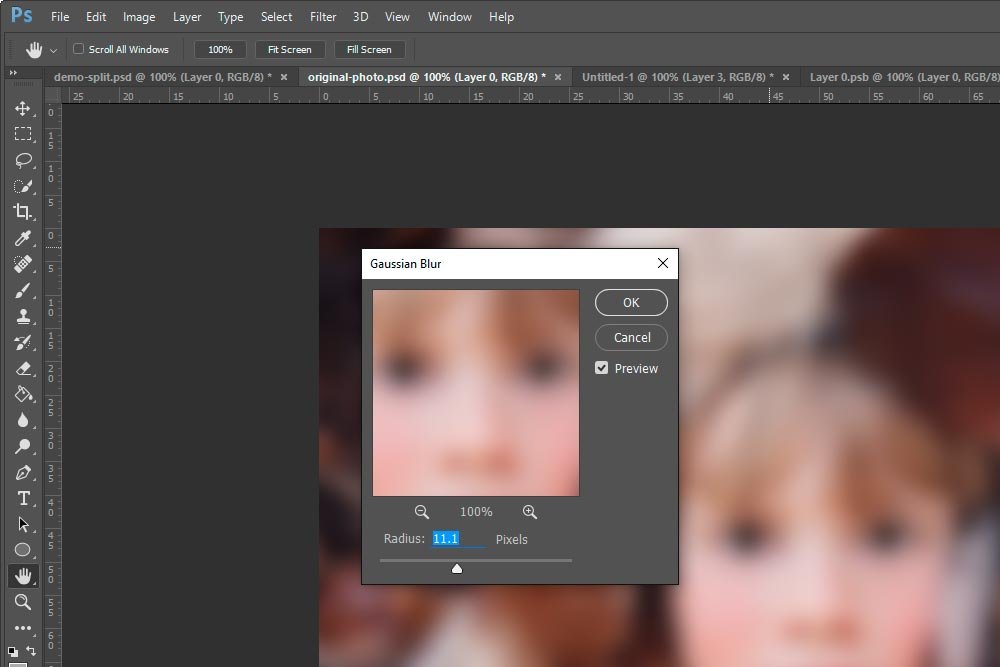
gaussian-blur-dialog-box.jpg

When this box appears, I’m going to immediately click OK. I’ll explain why I don’t need to set the blur size just yet below.

If I take a look at the photo layer now, I’ll see that the Smart Object has applied a filter to it. It sits below the object as its own entity.
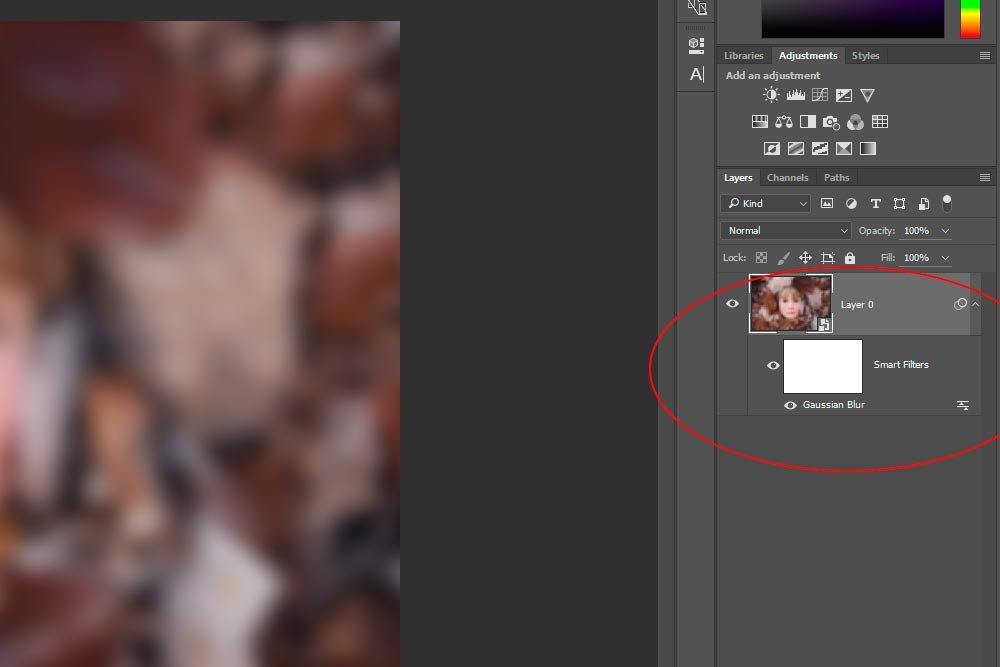
gaussian-blur-smart-filter.jpg

If I click on the little eye icon that’s situated at the left side of the Smart Filters layer, I can turn the blur filter on and off. That’s the first benefit of using Smart Objects – the separation of effects from the original layer.

If you take a look at the bottom-most part of the Smart Filters layer, you’ll see a small icon all the way to the right. When I roll over it, a tool-tip pops up that says Double-Click to Edit Filter Blending Options. This is very handy because it’s exactly what I want to do. I’ll double-click that icon now.

Adding a Blend Mode to a Filter​

When I double-click the icon, another dialog box appears. This one is the Blending Options box and applies a blend mode to the actual filter, which is really cool.
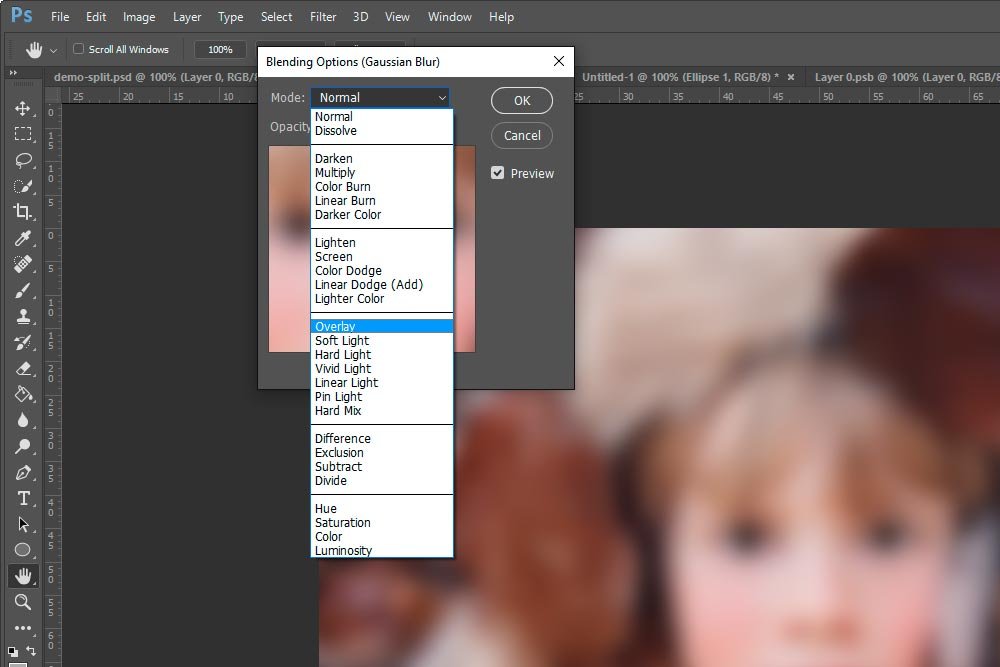
gaussian-blur-blending-options.jpg

For this project, I’ll apply the Overlay blend mode. Let’s see what that does to this photo.
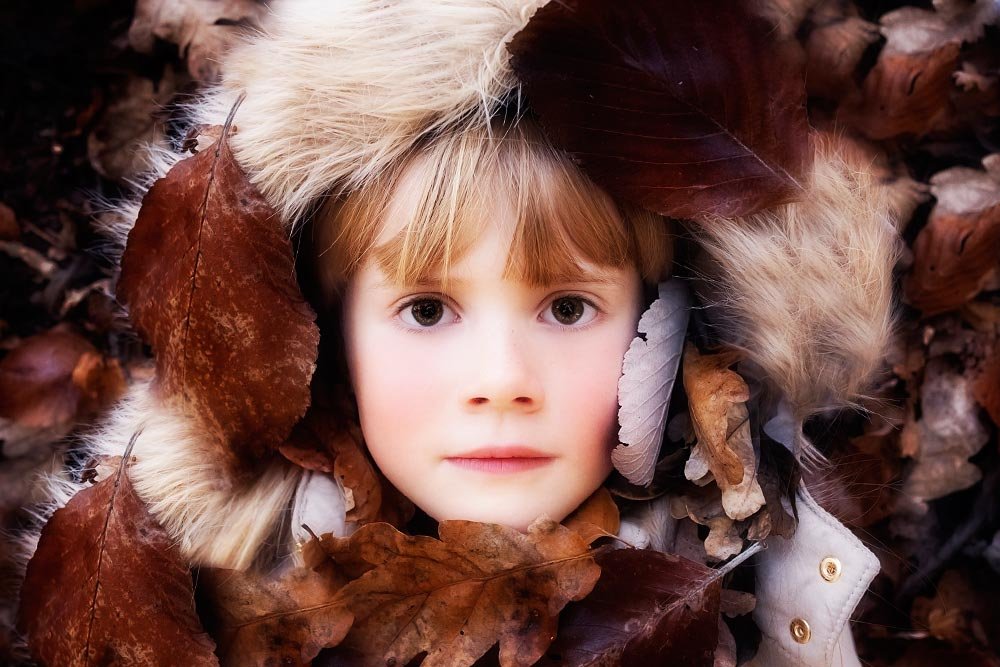
soft-glow-portrait.jpg

Wow – as you can see, I’ve already achieved the softening glow effect that I’m after. And I’ve got some saturation as well. The thing is, various levels of blur offer different softening effects. So, if I wanted to, I could either lessen or increase the amount of blur that’s applied to this photo.

Adjusting the Level of Blur​

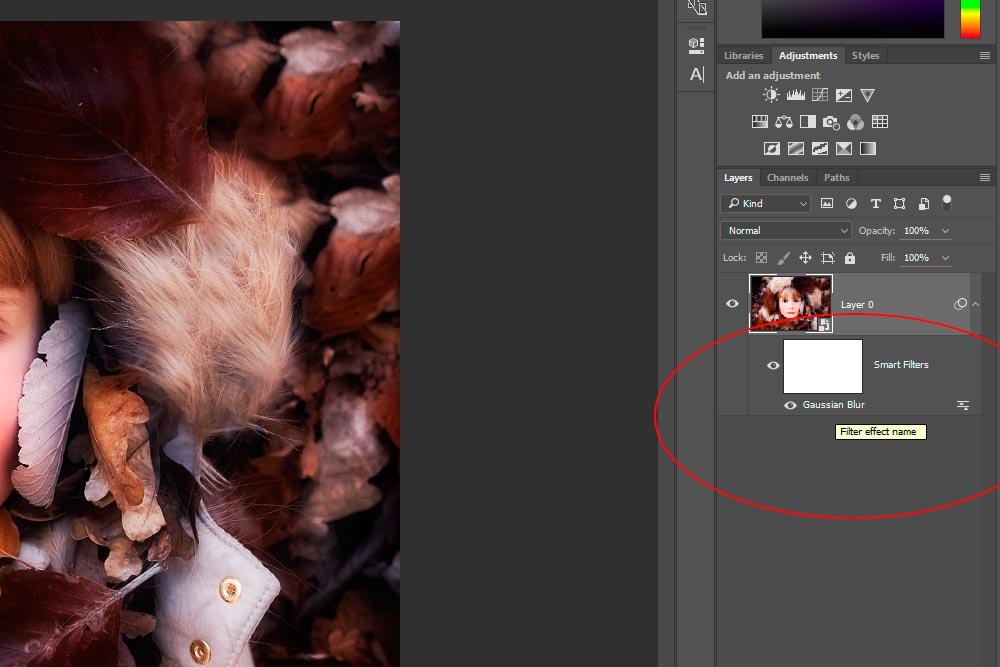
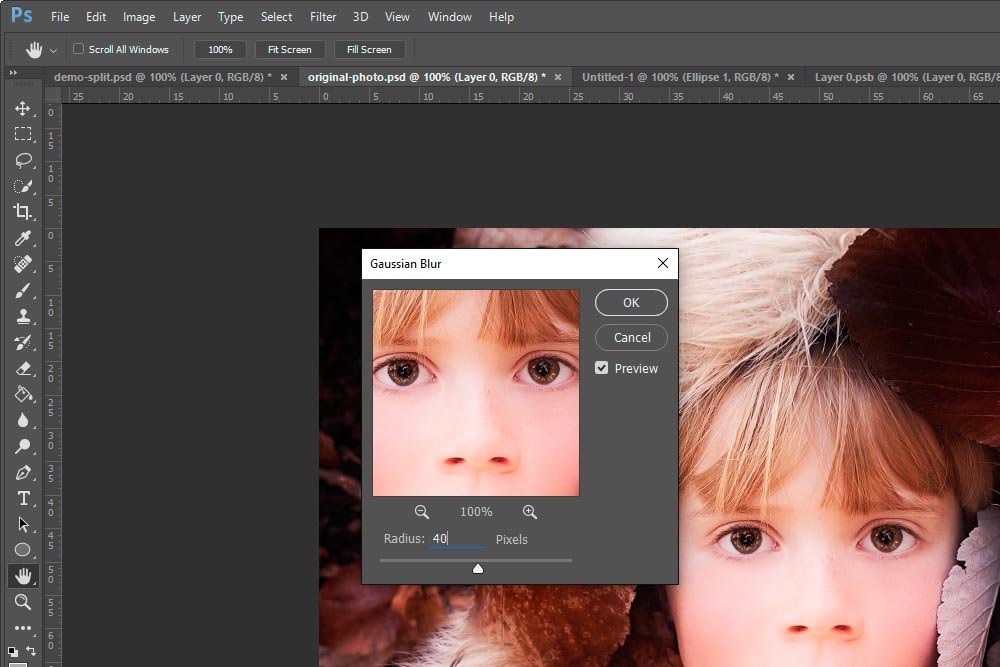
If I tried to do this to a regular layer that I simply applied a filter to, I wouldn’t be able to. I’d have to delete the layer and try again. In my opinion, that’s no way to edit. By converting the original layer to a Smart Object, I can turn on and off and edit anything I’ve added to the photo during this tutorial. So, to adjust the level of the Blur filter, all I need to do is to double-click the filter effect name over in the Layers panel.
filter-effect-name.jpg

When I do this, the Gaussian Blur dialog box appears again and I’m able to adjust the level of blur. Now that’s flexible. The best part is, I get a real-time preview of what effect my adjustments are having on the photo.
adjusting-gaussian-blur.jpg

The best way to see what looks good for any particular photo is to follow the instructions I gave above and then play with the results. I would fool around with which blend modes I applied to the filter as well as the level of blur. I could even go so far as to apply different filters to the photo. This is exactly how developers create actions for Photoshop to sell. They take photos and use their creativity to put the pieces of great looking photos together.
 
LukeLewis

LukeLewis

Member
Joined
May 7, 2021
Messages
134
Reaction Score
0
Points
21
  • #2
Yay!!! A portrait tutorial! Very cool, thanks.
Question: I’ve never worked with smart objects so don’t know, but I see the smart layer appears white (in your examples) Does this mean you can work with it like a layer mask painting in black if you wanted effect only in certain areas?
 
KristinaW

KristinaW

Member
Joined
May 7, 2021
Messages
127
Reaction Score
0
Points
18
  • #3
Great question – The answer is yes. The Smart Filter Mask behaves the same way a Layer Mask does. You can apply a Smart Filter Mask and then remove and add back some areas just the same way you would a normal mask. The best part is, you can also apply multiple filters to the same Smart Object. When you use the paintbrush on the mask, however, your actions affect all the filters that you’ve applied. Give it a shot and let me know how it works out for you.

Thanks for the comment!

PS – Just remember, to have any effect, you must first click the white box of the Smart Filter Mask. Then, apply your black or white (or any shade between) paint. Also, to see a larger view of what you’ve applied, simply hold down the ALT (OPT) key on your keyboard and click the white mask box under the Smart Object. A larger view will appear. To back out of that view, just repeat the previous steps. ALT and then click again.
 
LukeLewis

LukeLewis

Member
Joined
May 7, 2021
Messages
134
Reaction Score
0
Points
21
  • #4
Many thanks. Given that ALL effects would be affected if you paint out / in on the mask, should one make multiple copies of background layer, each made into a smart object? Or is that just a nightmare scenario?
 
KristinaW

KristinaW

Member
Joined
May 7, 2021
Messages
127
Reaction Score
0
Points
18
  • #5
If I get where you’re coming from, you’d like to separate out the layers to apply individual effects to each one? If I’m taking this correctly, I’m not sure that would work because each Smart Object would cover the one(s) below, therefore rendering them invisible. Please let me know if I’m on the right track here.

Thanks!
 
LukeLewis

LukeLewis

Member
Joined
May 7, 2021
Messages
134
Reaction Score
0
Points
21
  • #6
Oh, also, is there any reason to duplicate the photo before applying it as a smart object? I know it is non destructive, but is it still a good idea to make a duplicate of the background layer into the smart object?
 
KristinaW

KristinaW

Member
Joined
May 7, 2021
Messages
127
Reaction Score
0
Points
18
  • #7
Yes, I would personally duplicate the layer before doing anything, just because that’s the way I am. I like to make backups of stuff. Although, I’ll tell you, you can work on a Smart Object all day long and back it up at any point. To do so, simply drag the Smart Object down on top of the Create New Layer icon at the bottom of the Layers panel to duplicate it. At this point, you’ll have a duplicate of everything – masks and all. To remove the Filter Mask, right-click on that part of the layer and choose Delete Filter Mask. Then, right-click on the Smart Filter area in the Layers panel and choose Clear Smart Filters. Now, you’ll be left with a simple Smart Object. To bring the layer back to its original pixel-based state, select the layer and head up to the Layer > Rasterize > Smart Object menu item and select it. You’ll be left with your backup, just as if you had done it originally when you opened the file.

I hope this helps.
 
Newman

Newman

Member
Joined
May 11, 2021
Messages
106
Reaction Score
0
Points
23
  • #8
Great tutorial about portraits! I’ve been wanting to read articles like this and it will help amateur photographers get started with their portrait image processing.
 
KristinaW

KristinaW

Member
Joined
May 7, 2021
Messages
127
Reaction Score
0
Points
18
  • #9

Softening & Brightening a Portrait in Photoshop​

Have you ever wondered how magazines and professional image editors work their portrait photos so they look as good as they do? I’ve wondered this for a long time and I think I’m making some progress in figuring out how they get things done. It’s the secret sauce that I’m interested in and I’ve recently discovered that much of what they do pertains to filters and blend modes in Adobe Photoshop. Down below, I’ll work through a process that might just help you out if you’re interested in the same thing as I am.

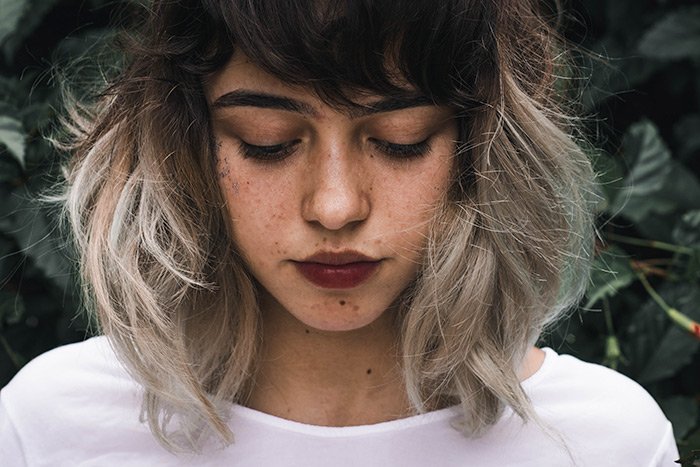
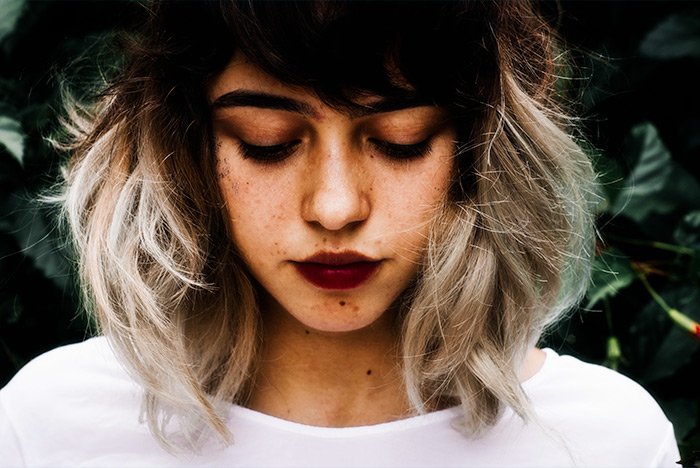
To start off with, I’ll take a regular portrait shot of someone and open it up in Photoshop.

girl-portrait.jpg

Next, I’ll duplicate the photo layer in the Layers panel by using the keyboard shortcut of Ctrl (Command)+J and then I’ll rename the layer to Blended or something similar to indicate that this is the layer I’ll be working on. This naming isn’t critical, but it’s good to get in the habit of keeping things organized as you work in Photoshop.

After that, I’ll right-click in the gray area of the named layer somewhere and I’ll select the Convert to Smart Object option that appears in the menu that pops up. So basically, I’ve now got two layers, while one of them is a named Smart Object.

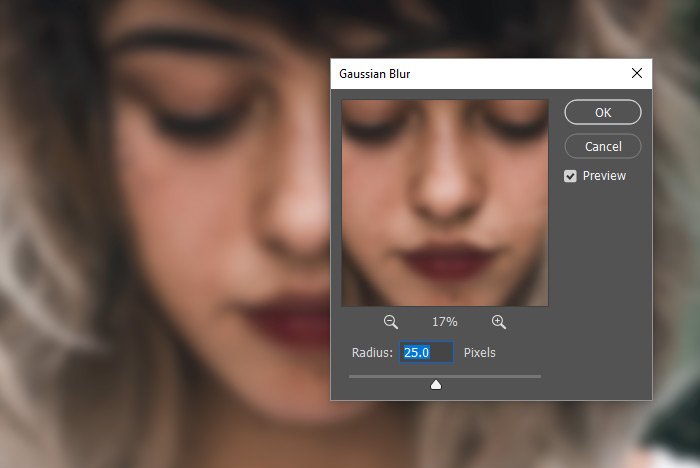
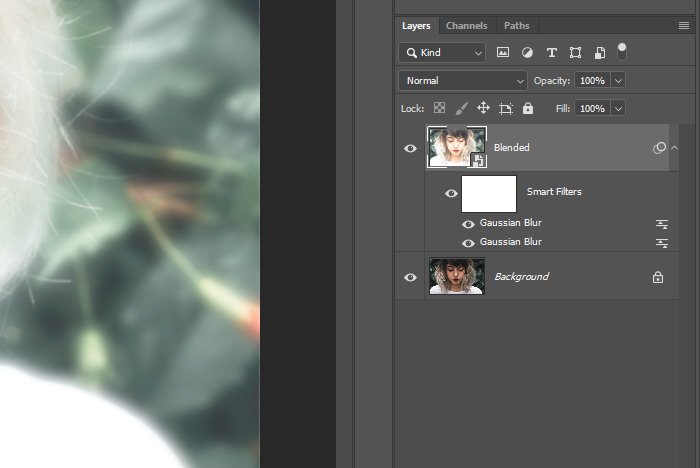
At this point, I can begin adding some filters to the Smart Object layer. I’ll go to the Filter > Blur > Gaussian Blur menu item and click. When the Gaussian Blur dialog box appears, I’ll set the Radius value to 25. The effect of this value will differ among photos. It depends on the size of the photo (pixel dimensions). For me, a value of 25 was good. You basically want to blur the contents of the image, without making it unidentifiable. Take a look at the image I’m working on.

gaussian-blur.jpg

When that’s done, I’ll click the OK button to close the dialog box and to accept the changes.

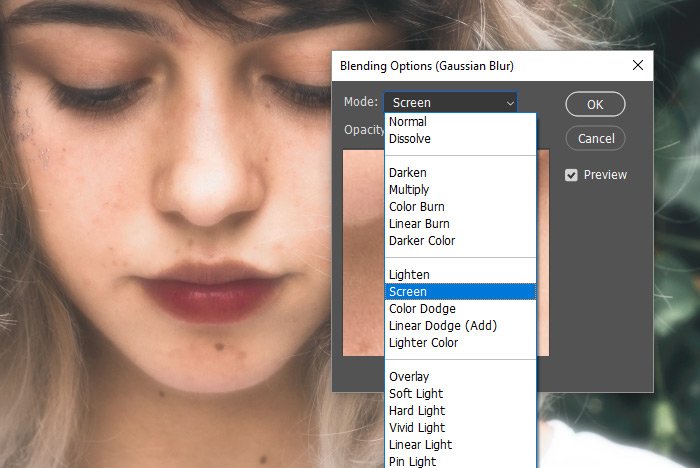
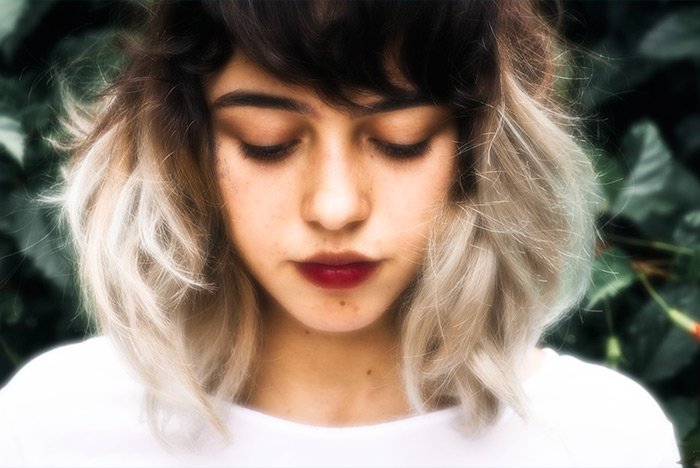
The next thing I’m going to do is brighten and soften the image. The way I’ll do this is to change the blending mode of the filter I just applied. So, in the Layers panel, I’ll double-click the blending mode icon that’s to the right of the filter name and I’ll choose the Screen blending mode option from the Mode drop-down.

screen-blending-mode.jpg

Do you see how some of the blur disappeared and was replaced by a nice bright softness? This is exactly what the pros do to make their photos look magical.

Okay, at this point, I’d like to add another blur filter to this image. I can do this because of the fact that I’m working with a Smart Object. I can add many filters and they’ll be stacked right on top of one another in the Layers panel. Since I’ve already got the filter I want, all I’ll need to do is duplicate it. If you aren’t aware, it’s easy to duplicate, or copy, a filter in Photoshop. All you need to do is hold down the Alt key on your keyboard and click and drag the filter you’d like to copy, upward. I’ll do that now and I’ll end up with two identical filters.

duplicate-filters.jpg

For this second filter though (the one on top), I’ll change the blend mode to Soft Light. This will take away some of the fairy tale softness and replace it with contrast.

sotened-image.jpg

As you can see, the photo still looks far too soft. My initial goal was to soften it, but to keep it sharp. I wanted to accentuate the dreaminess of it. To accomplish that, I’ll change the blend mode of the entire layer, not just the filter. So, I’ll click on the blend mode drop-down in the Layers panel while the top Smart Object layer is selected and I’ll change the blend mode of everything to Soft Light. Let’s see how that looks.

accentuated-photo.jpg

Pretty good, right? I like that a lot. It’s got more punch to it than the original image did. It’s almost as if I added one of those Instagram filters to it.

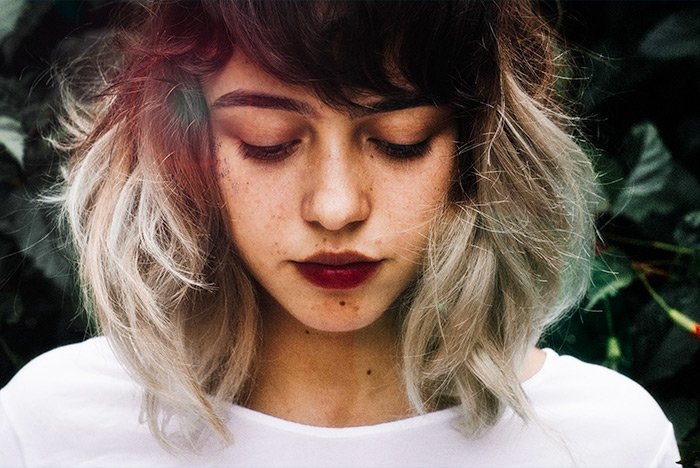
As I mentioned, I can add eve more filters to this image. To experiment, I’ll add the Noise filter with a value of 25 and then I’ll add a Lens Flare. Let’s see the result of those two additional filters. I’ll keep them both without any additional blend modes applied to them, since the Soft Light one is already affecting them.

final-image.jpg

Well? What do you think? Now imagine the effects I just applied to this photo being applied to one of yours. All you need to do is open your up in Photoshop and copy the instructions I just gave in this tutorial. It’s that easy. Of course, you can experiment with the levels of each filter and blend mode to match your tastes, but I think this is a simple way to make photographs and portraits pop out with some additional flavor.

If you have any questions about how I did anything in this post, please let me know down below. I love to answer questions. Thanks!
 
Top