Cameron
Member
- Joined
- May 10, 2021
- Messages
- 108
- Reaction Score
- 3
- Points
- 23
- #1
I have a habit when turning my Windows 10 computer on. I like to push the on/off button and then walk away and do something else. I understand that Windows takes a while to get going, so I head into the kitchen to make coffee, get a bite to eat or whatever. Well, this is what I used to do when I didn’t have to log into each and every session.
The problem with logging in is this – I’m not in a public place. I work in a house with only two people living in it. Security really isn’t a concern. Even if security was a concern, I’ve never heard of a Windows password keeping anything safe for very long. Also, the log in process only slows down the boot up process. When I turn my computer on and then walk away, I have to come back to log in and then walk away again. By this point, everyone knows that Windows takes forever to load all those background applications. Wouldn’t it be nice to have everything load, uninterrupted, immediately after turning the machine on? Well, now you can enjoy that experience and all it takes is the changing of one simple setting.
In today’s post, I’m going to walk you through the process of turning off the requirement that forces a user input a login and a password when engaging in a session on a computer. By all means, if you’re working in an unsecure area, keep the login. If you’re working at home and only have one user per PC and you’d like to bypass the log in process altogether, read on below.

Once you type “run,” click on the top result in Cortana. That will open the Run dialog box. The instructions in this box say Type the Name of a Program, Folder, Document or Internet Resource and Windows Will Open it For You.
Perfect. Now, type netplwiz and click the OK button.

The trick here is to find the user you’d like to turn on or off the log in and password requirement for. In my case, since I’m the only user, there’s only one account listed.

Finally, to turn on or off the log in and password requirement, either check or uncheck the small check box right above the area I just described. If you currently need to log in, you’ll see that it’s checked and if you don’t, you won’t.

Once you make the change in that check box, simply click on the OK button below and enjoy the fruits of your labor. That’s it!
I hope you enjoyed today’s post. If you have any questions or concerns, please leave them in the comment section below. Thanks for reading!
The problem with logging in is this – I’m not in a public place. I work in a house with only two people living in it. Security really isn’t a concern. Even if security was a concern, I’ve never heard of a Windows password keeping anything safe for very long. Also, the log in process only slows down the boot up process. When I turn my computer on and then walk away, I have to come back to log in and then walk away again. By this point, everyone knows that Windows takes forever to load all those background applications. Wouldn’t it be nice to have everything load, uninterrupted, immediately after turning the machine on? Well, now you can enjoy that experience and all it takes is the changing of one simple setting.
In today’s post, I’m going to walk you through the process of turning off the requirement that forces a user input a login and a password when engaging in a session on a computer. By all means, if you’re working in an unsecure area, keep the login. If you’re working at home and only have one user per PC and you’d like to bypass the log in process altogether, read on below.
The Run Command
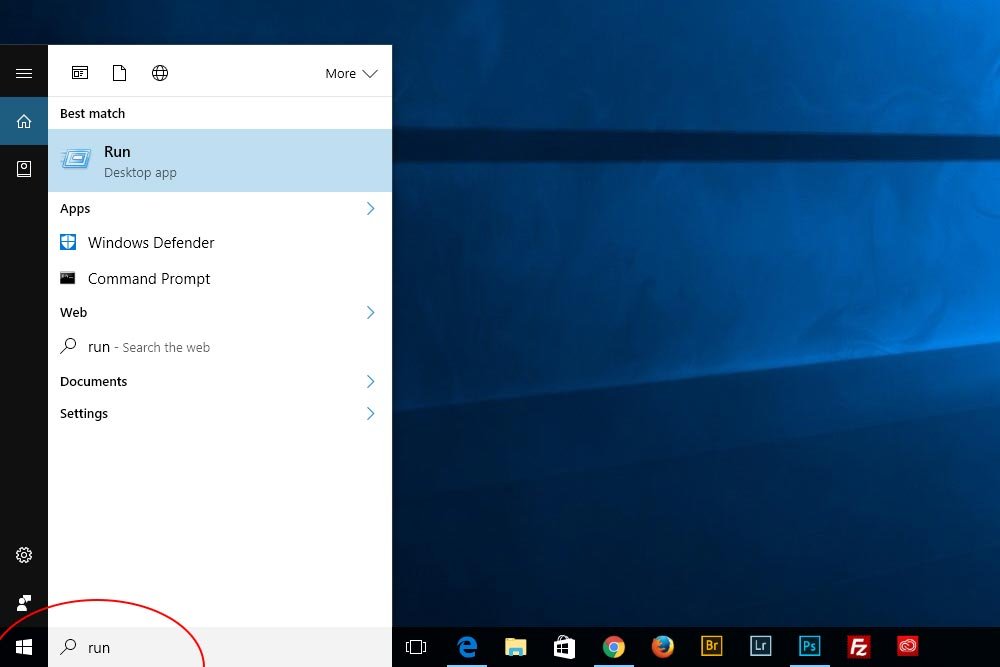
The fastest method for accessing the dialog box we’re looking for is to use the Run command in Windows 10. To take advantage of this, simply type Run into the Cortana search box in the bottom task bar.
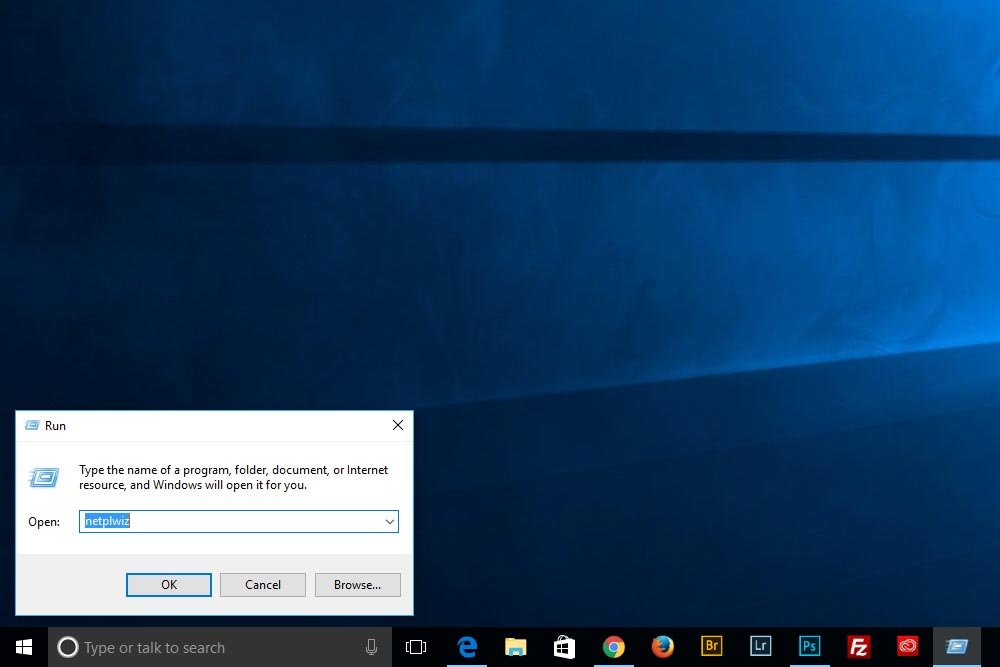
Once you type “run,” click on the top result in Cortana. That will open the Run dialog box. The instructions in this box say Type the Name of a Program, Folder, Document or Internet Resource and Windows Will Open it For You.
Perfect. Now, type netplwiz and click the OK button.

User Accounts
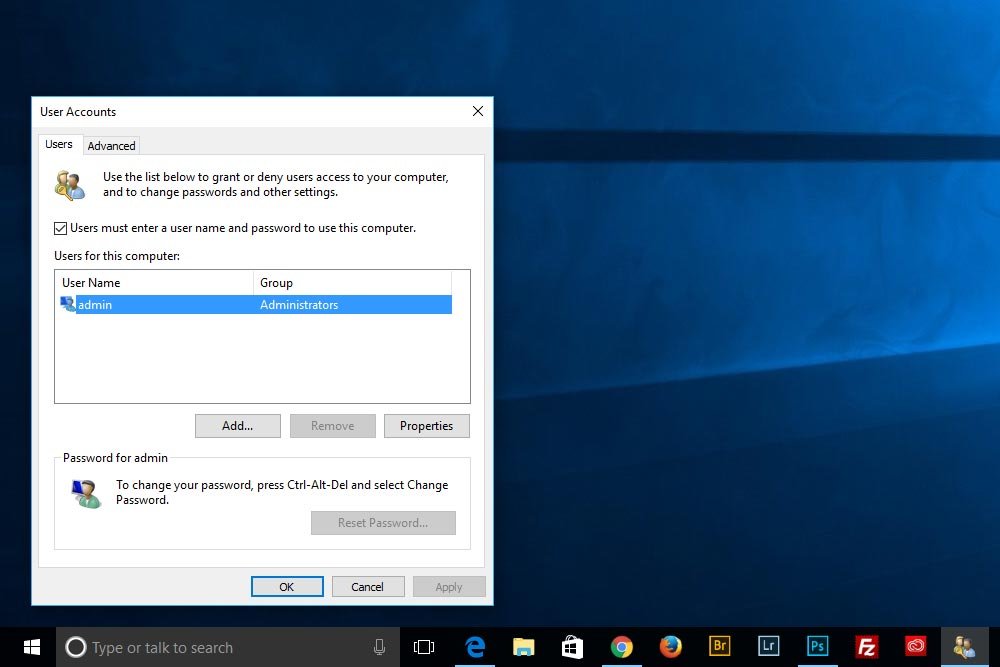
After you click the OK button in the Run app, the User Accounts dialog box will appear. At the center of this dialog is a list of all users for the particular computer. If there are enough users, this area will have a scroll bar. Also, this area is titled Users For This Computer.The trick here is to find the user you’d like to turn on or off the log in and password requirement for. In my case, since I’m the only user, there’s only one account listed.

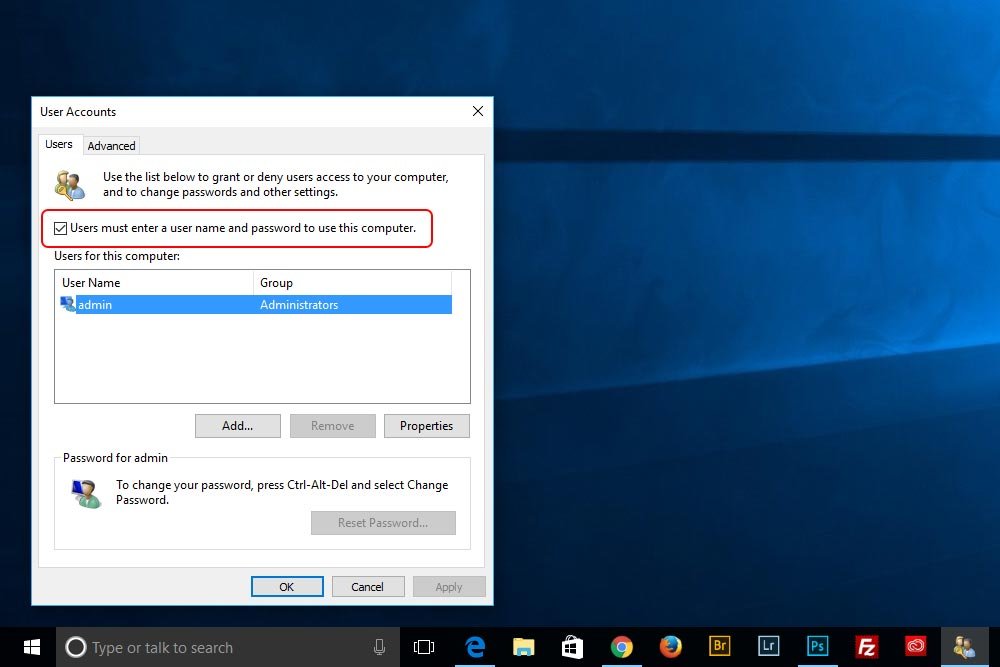
Finally, to turn on or off the log in and password requirement, either check or uncheck the small check box right above the area I just described. If you currently need to log in, you’ll see that it’s checked and if you don’t, you won’t.

Once you make the change in that check box, simply click on the OK button below and enjoy the fruits of your labor. That’s it!
I hope you enjoyed today’s post. If you have any questions or concerns, please leave them in the comment section below. Thanks for reading!
