Phoenix1
Member
- Joined
- May 7, 2021
- Messages
- 135
- Reaction Score
- 0
- Points
- 23
- #1
There may be times when you take photos that are overexposed. Whether you set your camera to allow too much light in, your camera made the settings automatically, or your camera's sensor was just too large for the brightness of the scene, it really doesn't matter. You've got an image that's simply too bright and you want to fix it. That's where I come in. I've been fixing overexposed images for years and I can tell you what to do to make your own photos look a lot better than they do now.
In today's post, I'll be working in Adobe Camera Raw to correct a picture of a flowering tree. While the photo is very nice, I feel it's just too bright for my tastes. I'd like to bring some bolder colors back into the image.
Down below, I'll walk through my simple correction process step by step so you can see exactly what's going on. Don't worry, it's an easy process that's comprised of only a few steps. First though, let me show you the original image.
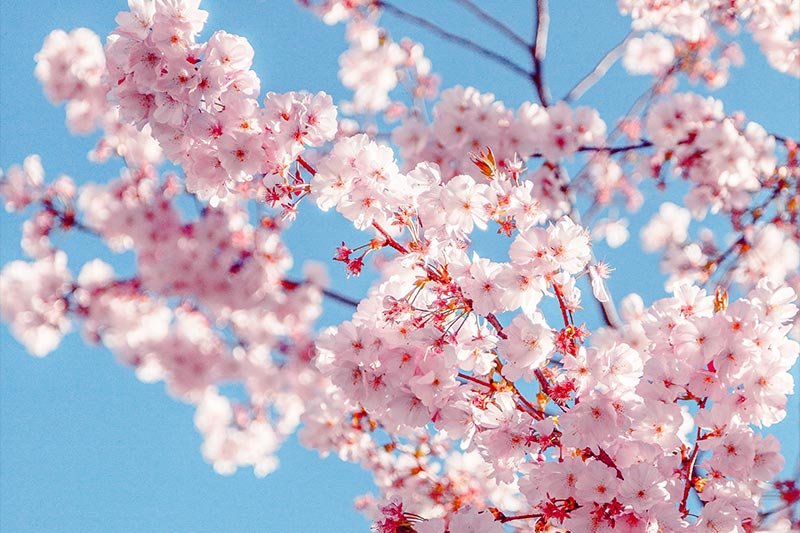

Once the image is available in Camera Raw, I'll begin making my changes.
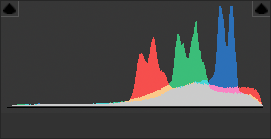
As you can see, the photo is indeed too bright. The data in the histogram is pushed to the right too much. It should be more centered. To deal with this, I'll begin pushing the sliders in the Basic panel. This panel is located directly below the histogram. I'll make my edits now and then give you a screenshot of those changes in the panel.
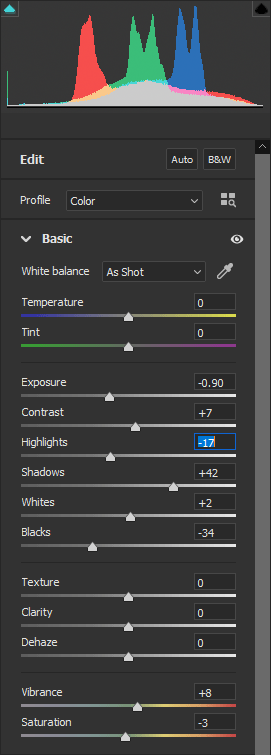
Okay, the first thing I'd like you to look at is the histogram up top. Do you see how it's now centered? That's a good thing. That means the highs and lows in this image are now more balanced.
When editing any overexposed image, the first slider you want to push is going to be the Exposure slider. That's kind of obvious. In this case, that's exactly what I did and it made somewhat of a difference. It brought some of the image to a place I'd like to see. The other sliders you see pushed in the above graphic I touched for the sake of bringing the image in even more alignment with my needs. When the exposure is reduced in an image during post-processing, it can leave things sort of dull. That's why I brightened the shadows, increased the highlights, and darkened the blacks. Those three things were akin to adding contrast. So in all, here are the changes I made:
Exposure: -.90
Contrast: +7
Highlights: +17
Shadows: +42
Whites: +2
Blacks: -32
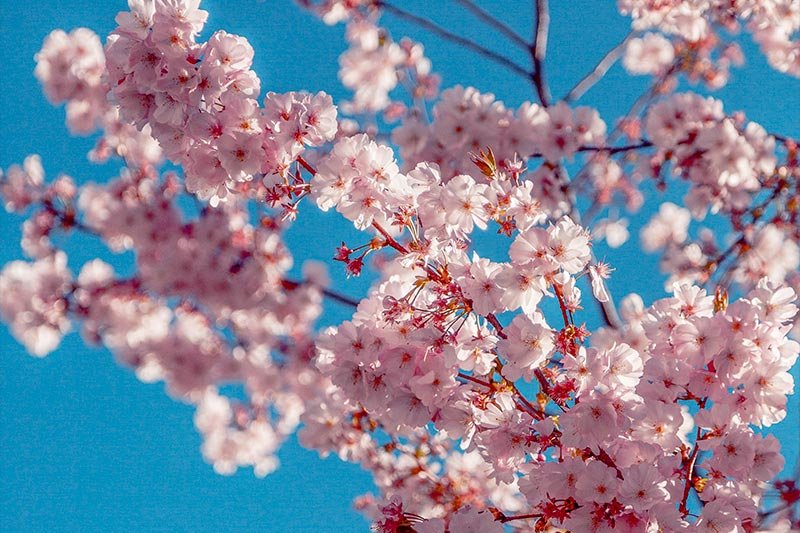
Much better, right?
From here, I would likely click the Open button at the bottom right corner of Camera Raw to move the image into Photoshop, where I'd crop it and export it. But for now, I'll leave things here. I explained what I want to explain.
If you have any questions about correcting an overexposed photograph in Adobe Camera Raw, please let me know down below. Also, if you have anything to add, please do down there as well. Thanks!
In today's post, I'll be working in Adobe Camera Raw to correct a picture of a flowering tree. While the photo is very nice, I feel it's just too bright for my tastes. I'd like to bring some bolder colors back into the image.
Down below, I'll walk through my simple correction process step by step so you can see exactly what's going on. Don't worry, it's an easy process that's comprised of only a few steps. First though, let me show you the original image.

Opening the Image From Adobe Bridge into Camera Raw
To start off, I'll open Adobe Bridge and then navigate to the flower image. Once it's selected, I'll go ahead and click the Open in Camera Raw button.
Once the image is available in Camera Raw, I'll begin making my changes.
Editing the Photo in Camera Raw
Before I begin making any changes to the image, I'll first take a look at the histogram that's located in the upper right corner.
As you can see, the photo is indeed too bright. The data in the histogram is pushed to the right too much. It should be more centered. To deal with this, I'll begin pushing the sliders in the Basic panel. This panel is located directly below the histogram. I'll make my edits now and then give you a screenshot of those changes in the panel.

Okay, the first thing I'd like you to look at is the histogram up top. Do you see how it's now centered? That's a good thing. That means the highs and lows in this image are now more balanced.
When editing any overexposed image, the first slider you want to push is going to be the Exposure slider. That's kind of obvious. In this case, that's exactly what I did and it made somewhat of a difference. It brought some of the image to a place I'd like to see. The other sliders you see pushed in the above graphic I touched for the sake of bringing the image in even more alignment with my needs. When the exposure is reduced in an image during post-processing, it can leave things sort of dull. That's why I brightened the shadows, increased the highlights, and darkened the blacks. Those three things were akin to adding contrast. So in all, here are the changes I made:
Exposure: -.90
Contrast: +7
Highlights: +17
Shadows: +42
Whites: +2
Blacks: -32
The Corrected Image
Let's take a look at the corrected photo. I think you'll notice a lot more color in this version. That's the result of pulling some of the brightness out, which, in turn, added saturation.
Much better, right?
From here, I would likely click the Open button at the bottom right corner of Camera Raw to move the image into Photoshop, where I'd crop it and export it. But for now, I'll leave things here. I explained what I want to explain.
If you have any questions about correcting an overexposed photograph in Adobe Camera Raw, please let me know down below. Also, if you have anything to add, please do down there as well. Thanks!
