CraigHardy
Member
- Joined
- May 11, 2021
- Messages
- 223
- Reaction Score
- 2
- Points
- 18
- #1
One aspect of operating a computer, for who knows how long, that’s been problematic is the saving of a file or document as a PDF. If you’re not sure what a PDF is, it’s an acronym for Portable Document Format and it was created by Adobe. In the most basic sense, a PDF is a format for specific files that’s used to present documents in a fashion that’s independent of application software, hardware or operating system. It’s a wonderful thing that folks in the computer world have been using for a very long time.
Let me give you a quick example. Say I create a Microsoft Word document on my Windows computer. Let’s say I want to send that file over to my friend who uses a Mac. Now, I’m not sure about this, but the last time I checked, it’s a bit of a process to open this file. I believe you can do it, but again, it’s a process. If I had just converted the .DOC file to a .PDF file, he wouldn’t have any issues.
A few years ago, I began using Google Chrome. One of Chrome’s best features is that it can easily “print” a document or web page to a PDF really, really easily. I used to only use this feature in OpenOffice Calc, but it’s becoming much more widespread, so I use it more frequently these days. Today, with the popular usage of Windows 10, anyone can turn a file into a PDF. Personally, I find this incredibly useful because this type of document really is the way to go.
In today’s post, I’ll walk through the process of printing a file to a PDF. The original file stays the same, so there’s nothing to worry about there. All that happens is that the file is essentially copied and transformed into another version. A version that’s widely accepted.
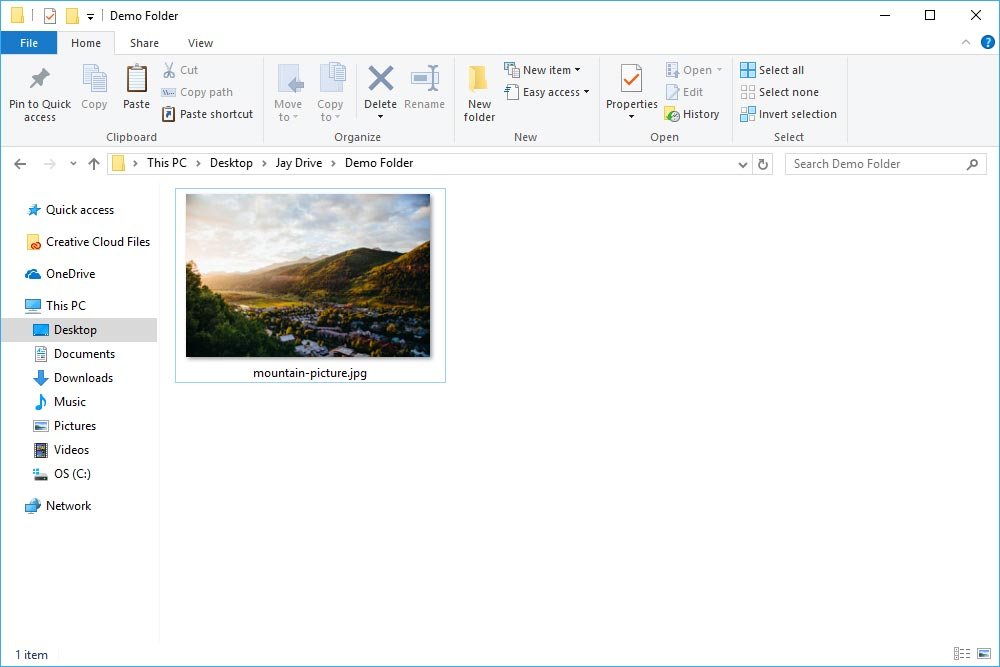
If you have an interest in turning a file into a PDF, you’ll need to visit the folder where that file is stored.
At the top of the window my image is located, there are a few tabs. I actually wrote a post about these tabs previously. If you’d like to read up on that, you can do so here. In the meantime though, go ahead and click the Share tab and select the file in question. Again, in my case, it’s the image file, so I’ll simply click on that to highlight it.
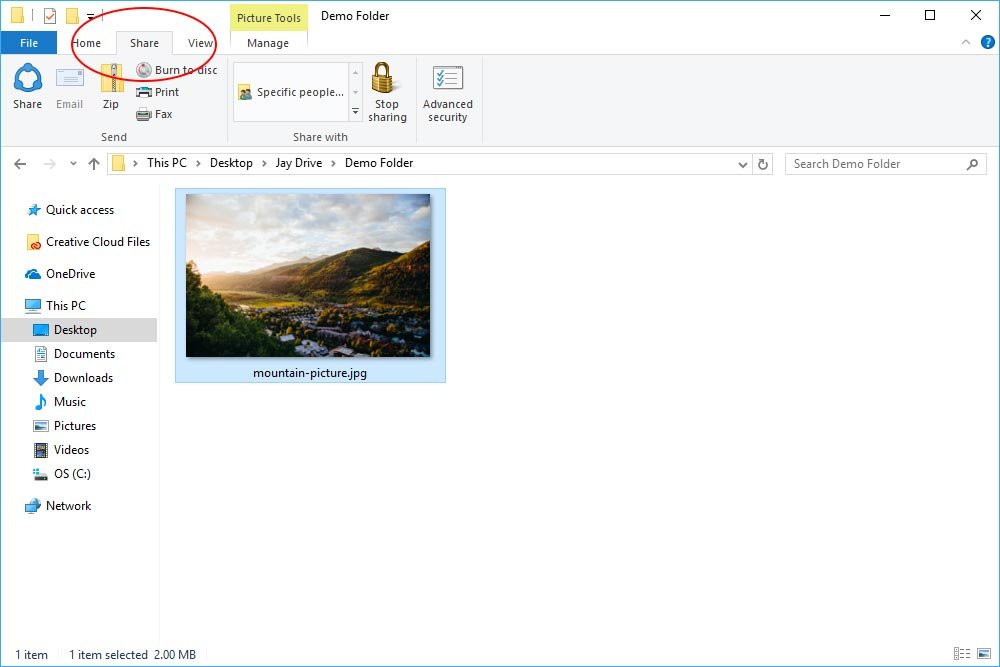
You may notice that once you select the file, the Print option comes to life.
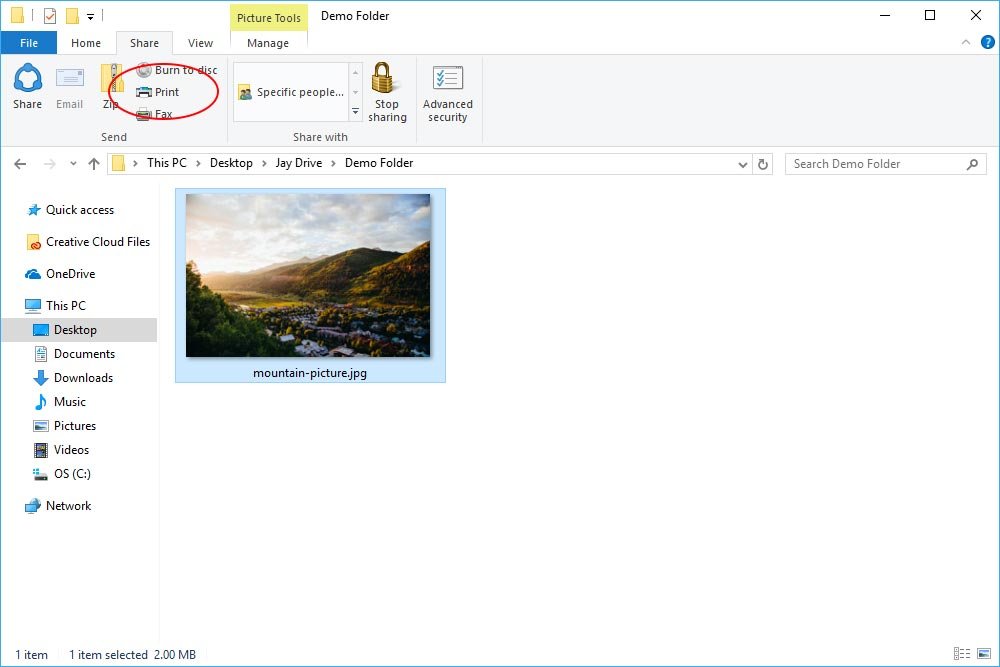
If you click Print, you’ll see the (in my case) Print Pictures dialog box appear.
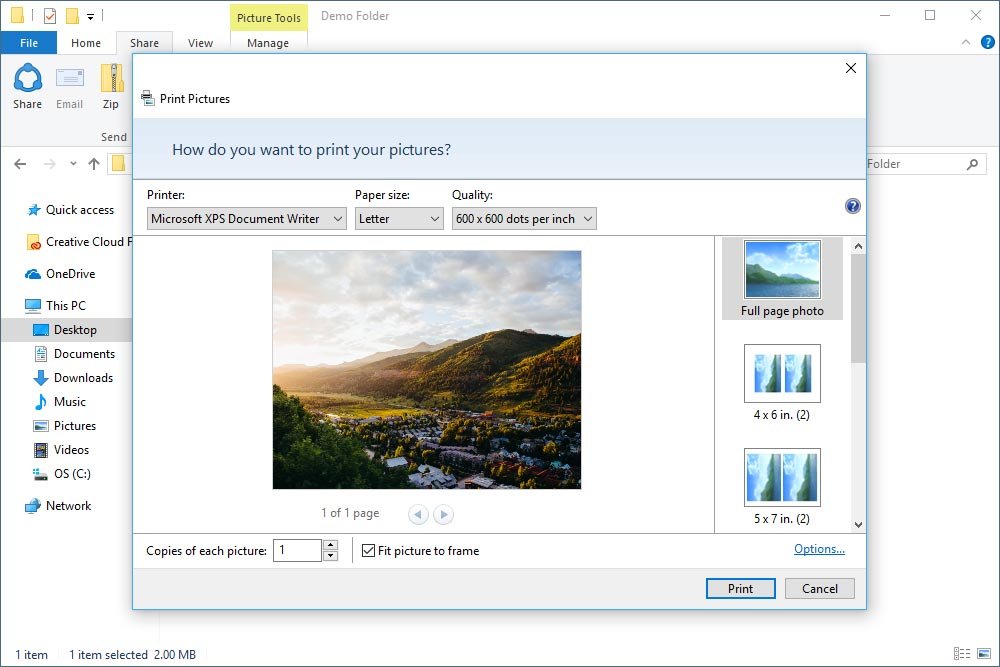
If you’re attempting to convert a text document, or something like that, to a PDF, your dialog box will appear differently. In that case, all you need to do is choose the Save as PDF option at the bottom of the dialog. In this case though, we have a few additional options to choose from.
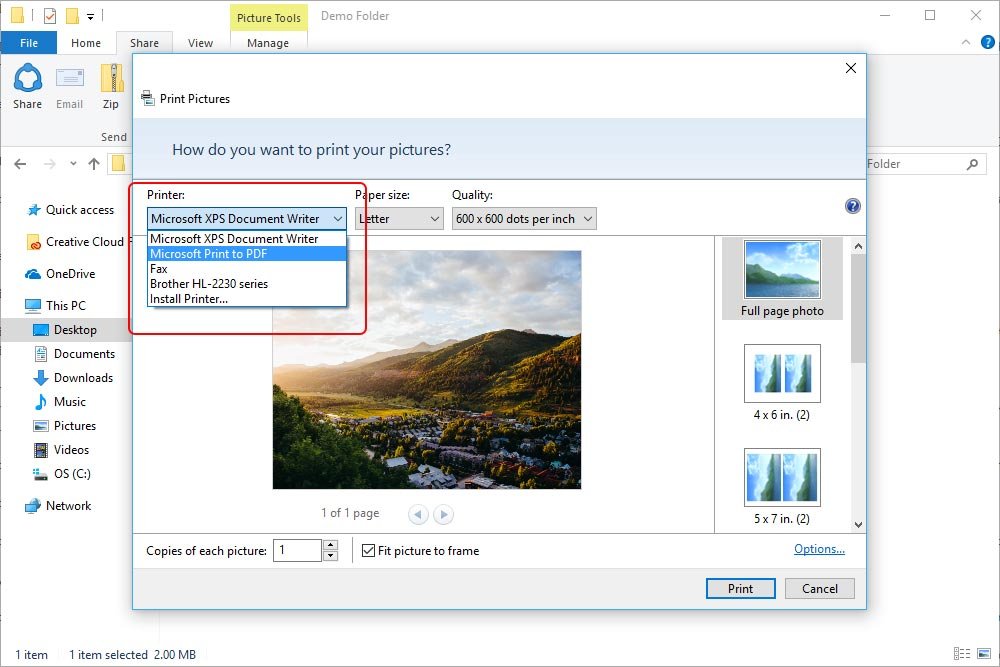
The first thing I’m going to do is to click the leading drop-down box. This contains the instructions of what I’d like to do with the file. I’ll click on Microsoft Print to PDF.
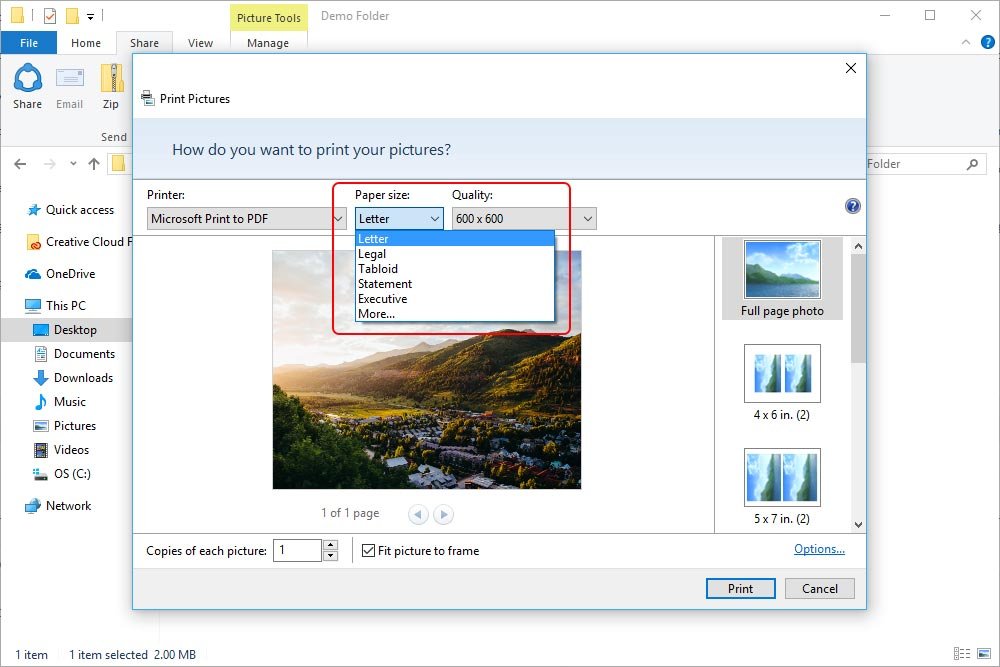
Next, I’ll click the center drop-down and select the output Paper Size.
To the right of that is the Quality drop-down. Since 600 x 600 is the only option, I’ll obviously keep that there.
Next up, I’ll select the layout for this PDF file. Since I’m messing around here, I’ll choose to shrink the size of the image down to a quarter size.
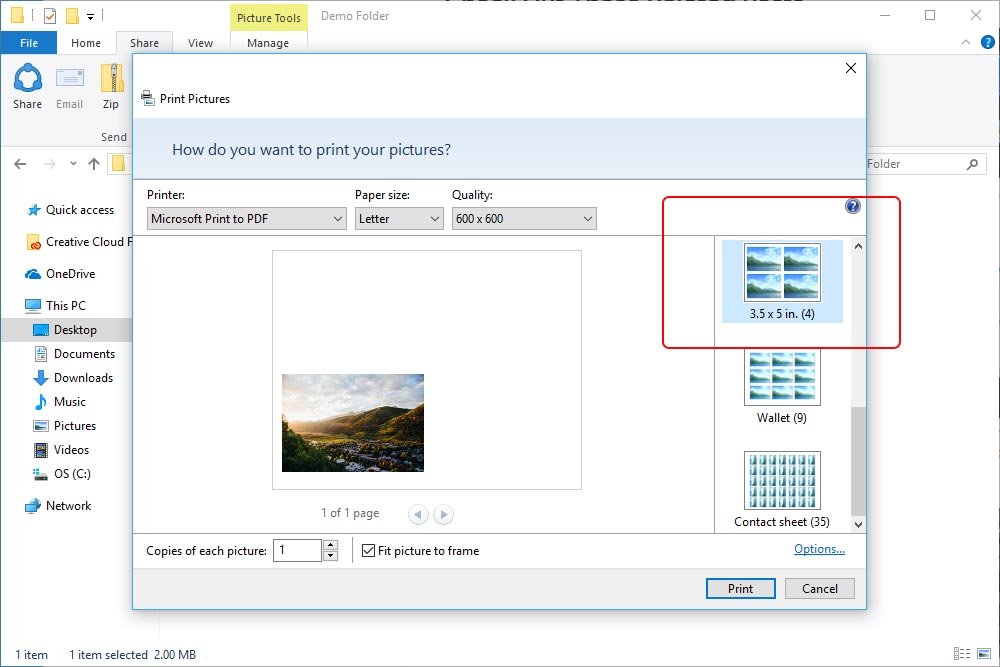
And because only one is showing, I’ll increase the number of images per page to four.
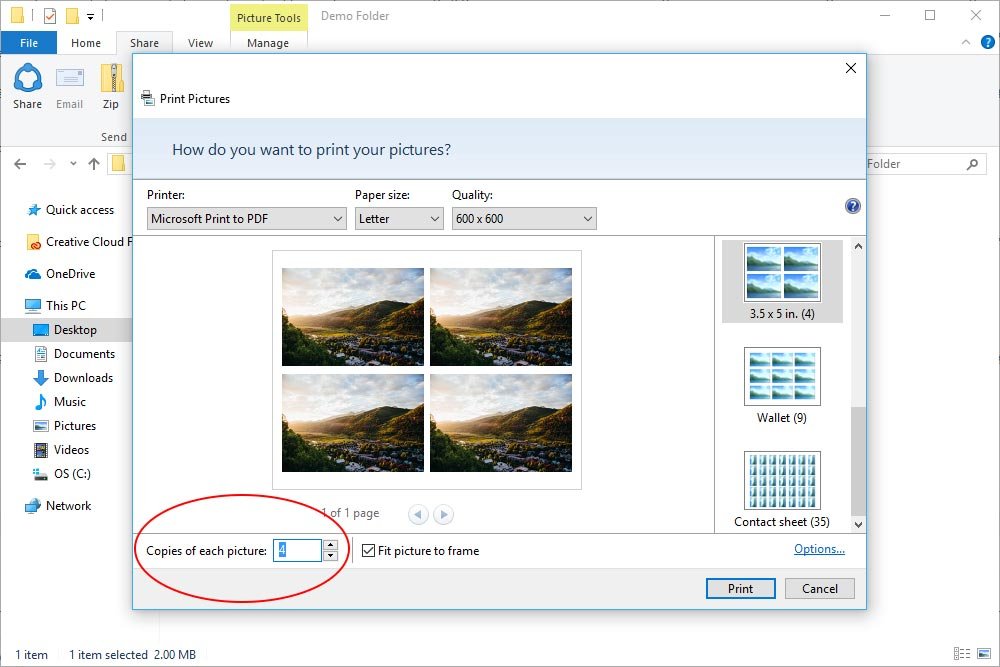
At this point, I can see all four photos on this one PDF file. Pretty cool.
Finally, all I need to do is click the Print button down in the bottom right corner. Doing this will bring up the Save Print Output As dialog box, where I would choose my save location, name the file and then click the Save button. After I press Save, it will take a few seconds to do what it has to do. This is what the intermediary screen looks like.
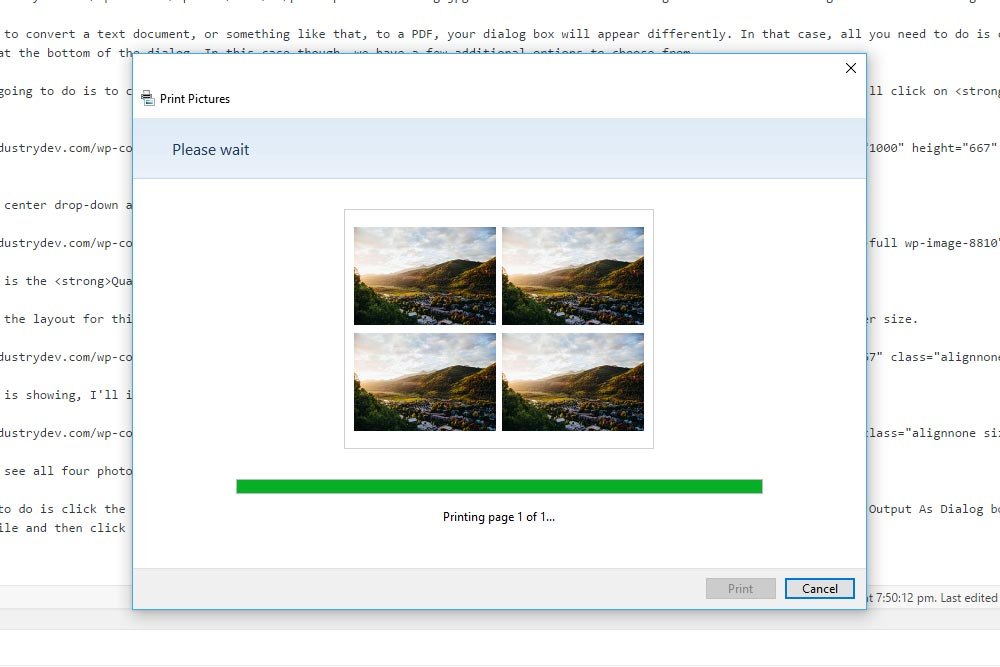
If I go ahead and open up the freshly created PDF file, I’ll see the images, just as I left them.

And that’s it! See, I told you it was easy.
If you have any questions or concerns regarding this post, please let me know in the comment section below. Thanks for reading!
Let me give you a quick example. Say I create a Microsoft Word document on my Windows computer. Let’s say I want to send that file over to my friend who uses a Mac. Now, I’m not sure about this, but the last time I checked, it’s a bit of a process to open this file. I believe you can do it, but again, it’s a process. If I had just converted the .DOC file to a .PDF file, he wouldn’t have any issues.
A few years ago, I began using Google Chrome. One of Chrome’s best features is that it can easily “print” a document or web page to a PDF really, really easily. I used to only use this feature in OpenOffice Calc, but it’s becoming much more widespread, so I use it more frequently these days. Today, with the popular usage of Windows 10, anyone can turn a file into a PDF. Personally, I find this incredibly useful because this type of document really is the way to go.
In today’s post, I’ll walk through the process of printing a file to a PDF. The original file stays the same, so there’s nothing to worry about there. All that happens is that the file is essentially copied and transformed into another version. A version that’s widely accepted.
Navigating to the Correct Folder
The very first thing I’m going to do is to navigate to the folder where the document I’d like to convert to a PDF resides. In this case, I created something called Demo Folder, just for this post. Inside of it, I placed a beautiful image of a mountain scene.
If you have an interest in turning a file into a PDF, you’ll need to visit the folder where that file is stored.
“Printing” the File
When turning a file into a PDF, it’s oftentimes referred to as “printing.” In actuality, you’re not sending anything to your printer. You don’t even need a printer. The term “print” merely means that you’re going to send a copy of the original to a place where a conversion is going to occur.At the top of the window my image is located, there are a few tabs. I actually wrote a post about these tabs previously. If you’d like to read up on that, you can do so here. In the meantime though, go ahead and click the Share tab and select the file in question. Again, in my case, it’s the image file, so I’ll simply click on that to highlight it.

You may notice that once you select the file, the Print option comes to life.

If you click Print, you’ll see the (in my case) Print Pictures dialog box appear.

If you’re attempting to convert a text document, or something like that, to a PDF, your dialog box will appear differently. In that case, all you need to do is choose the Save as PDF option at the bottom of the dialog. In this case though, we have a few additional options to choose from.
The first thing I’m going to do is to click the leading drop-down box. This contains the instructions of what I’d like to do with the file. I’ll click on Microsoft Print to PDF.

Next, I’ll click the center drop-down and select the output Paper Size.

To the right of that is the Quality drop-down. Since 600 x 600 is the only option, I’ll obviously keep that there.
Next up, I’ll select the layout for this PDF file. Since I’m messing around here, I’ll choose to shrink the size of the image down to a quarter size.

And because only one is showing, I’ll increase the number of images per page to four.

At this point, I can see all four photos on this one PDF file. Pretty cool.
Finally, all I need to do is click the Print button down in the bottom right corner. Doing this will bring up the Save Print Output As dialog box, where I would choose my save location, name the file and then click the Save button. After I press Save, it will take a few seconds to do what it has to do. This is what the intermediary screen looks like.

If I go ahead and open up the freshly created PDF file, I’ll see the images, just as I left them.

And that’s it! See, I told you it was easy.
If you have any questions or concerns regarding this post, please let me know in the comment section below. Thanks for reading!
