EmeraldHike
Member
- Joined
- May 10, 2021
- Messages
- 133
- Reaction Score
- 0
- Points
- 21
- #1
In general, when I leave my computer, I put it to sleep. The reason I use this option is because I leave for extended periods of time. If I were working in an office and had to get up for only ten minutes or so, I certainly wouldn’t put the machine to sleep. I’d likely lock it instead.
If you aren’t aware, putting a Windows 10 computer asleep means that you are essentially sending it to a dormant state. Its heart is still beating, but it isn’t breathing anymore. When you return to the computer and wake it up, and if you have a password set, you’ll need to jiggle the mouse or hit a key on the keyboard and then log in.
When you lock a computer, all you’re doing is stopping the ability for someone to use the computer under your username. The power supply fan still hums along and the computer is wide awake. When you return to the computer to continue your work, you’ll need to do the same things as above. One those are completed, you can resume whatever it is that you were doing.
Remember, putting a computer to sleep means you’ll enjoy an energy savings. Locking it offers you no such savings.
Anyway, what I’d like to write about today is how you can take advantage of a pretty neat feature in Windows 10 that will allow a slideshow to play when your computer is locked. By default, after locking the PC, a random “Windows” provided image appears. This image is called a Windows Spotlight and is chosen and downloaded for you by Microsoft. Inside the Settings area, you can change the image that appears and even set things up so multiple images show with a nice transition between each one. That’s where I’m headed below.
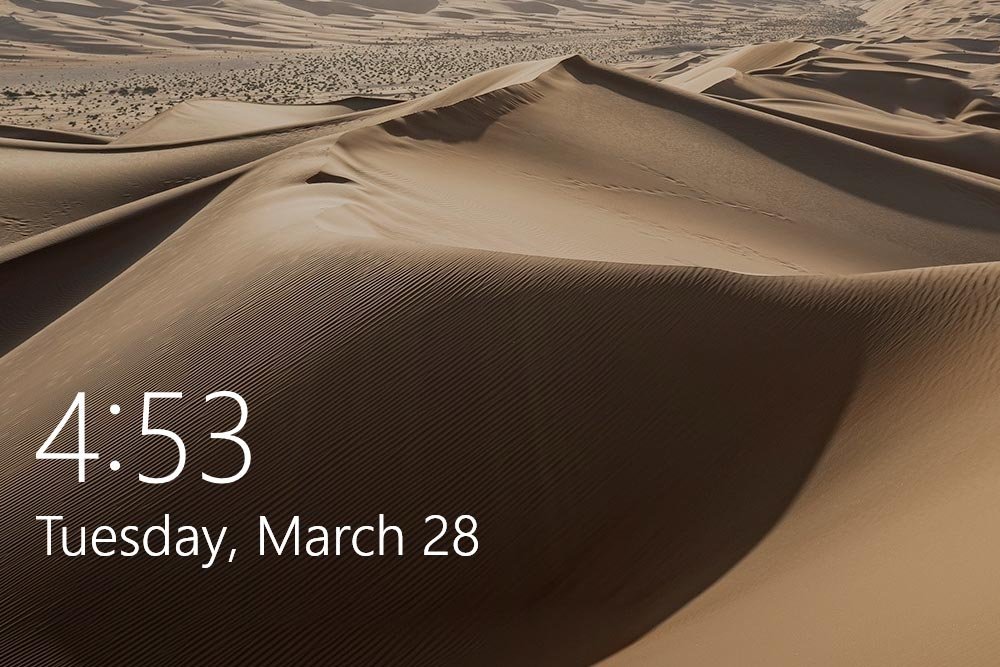
Once your computer is locked, it’ll likely show you a screen with a picture on it. You’ll also see any apps you have set for that screen and probably an uplifting message about how you should live your life. Right now, mine looks like this:
In the sections that follow, I’ll demonstrate how to change this photo and even set up a slideshow for this screen.
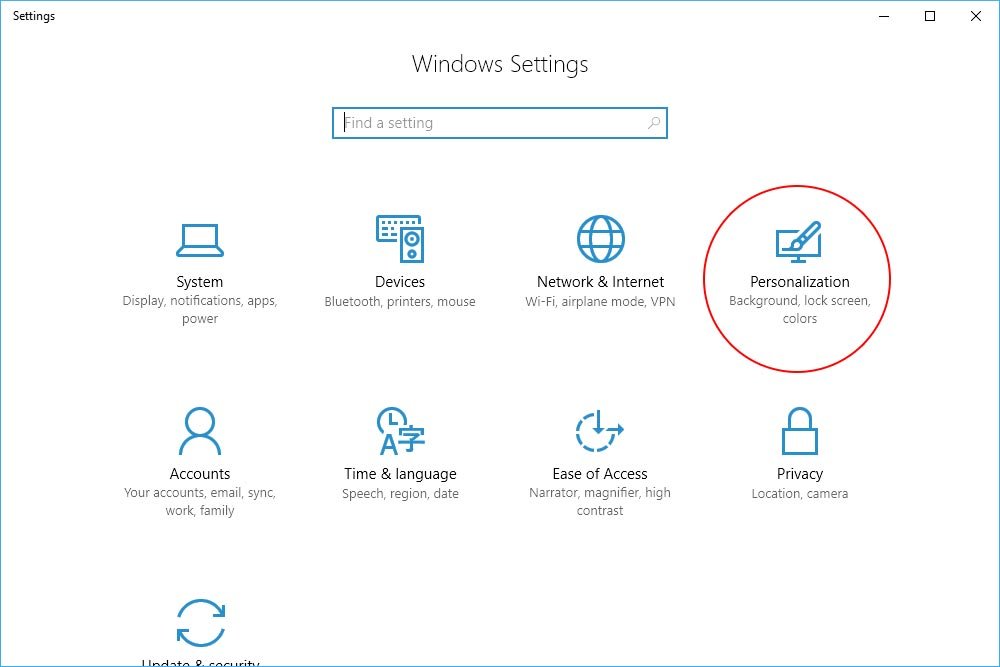
Once the Settings window appears, click the menu item that says Personalization.
Then, click the Lock Screen menu item in the left column. That will bring you to the proper place.
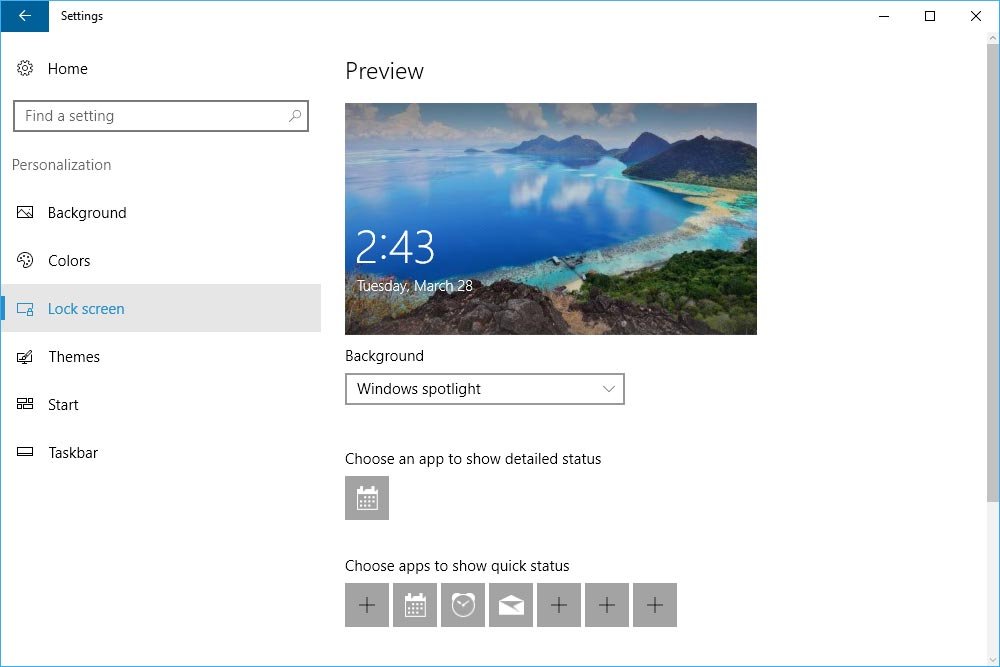
Now, inside this Lock Screen window is a lot of stuff. Most of it, I’ll ignore for this post. What I’d like to focus on is limited.
If you were to click on the drop-down box that sits directly below the large image, you’d see three options. They are Windows Spotlight, Picture and Slideshow.
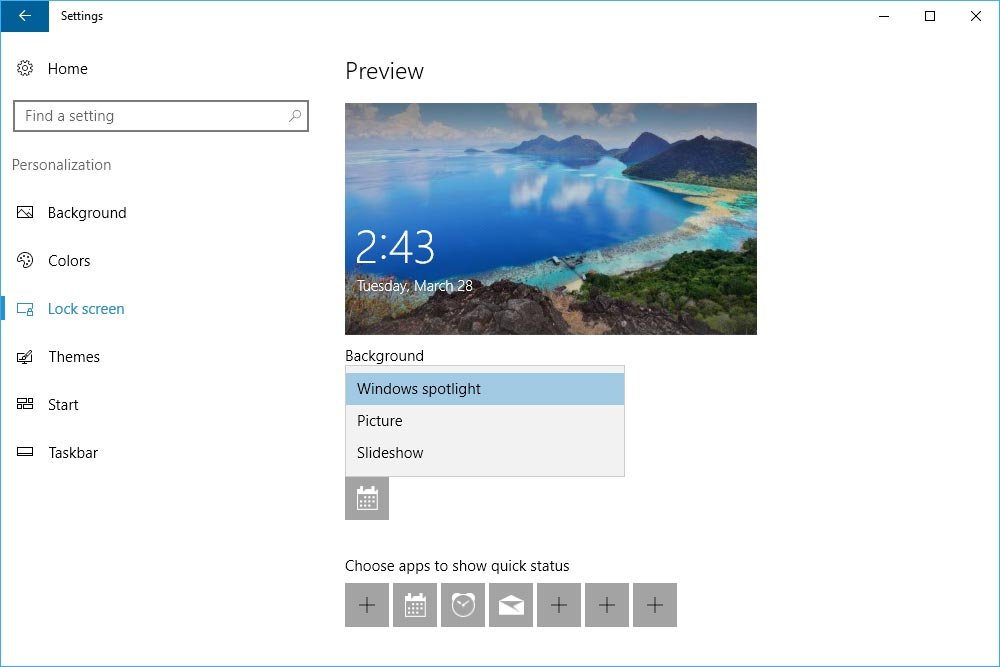
For now, I’ll select the one that says Picture.
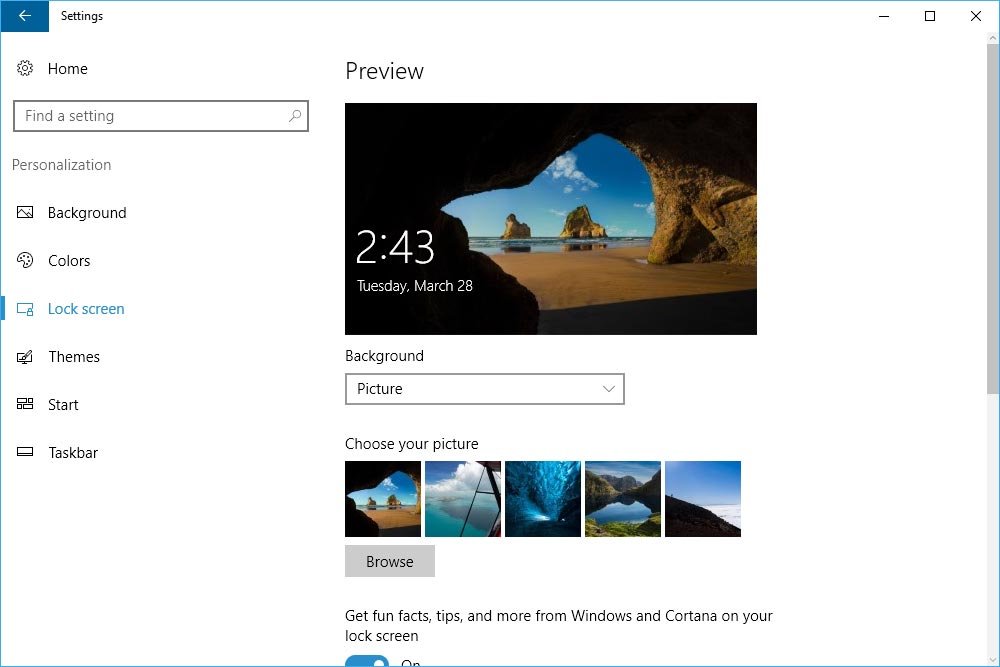
If you take a look at the above screenshot, you’ll see that the options have changed since I selected Picture from the drop-down menu. Now, I can select which picture I’d like to see from a selection of pre-loaded Windows photos. If I’m not happy with any of these, I can always click the Browse button to search around through my files on my computer for a different one. Once I select something, it will appear in the thumbnail selection and I can choose it and set it from there. Really, it’s that easy. I don’t need to save it out or anything else like that. All I need to do once I make my choice is to exit out of that window and my photo will appear the next time I lock the computer.
To do this, I’ll head back up to the Background drop-down box and select Slideshow.
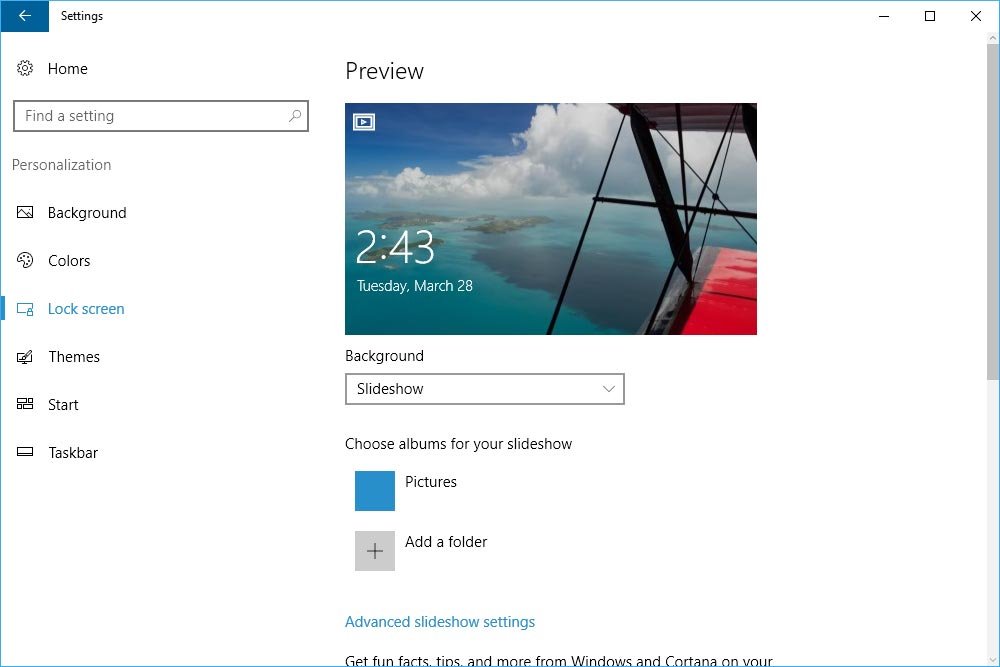
The moment I do this, the options below the drop-down will once again change. As things stand right now, I have two choices. I can either select the option called Pictures, which will include any photos I currently have in my Windows Pictures folder, or I can choose to add a folder for this slideshow. For this demonstration, I went ahead and added some random photos to the Pictures folder (This PC > Pictures) and locked the computer. Let’s see what happens.
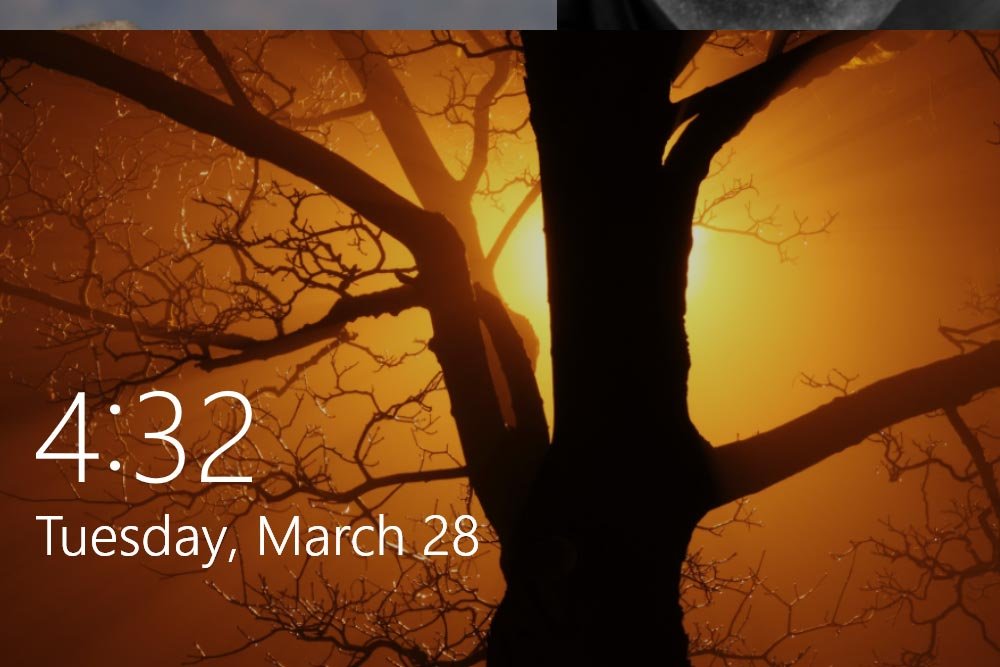
Yup, just as I expected. The slideshow that begins after I lock the screen simply cycles through the photos I placed in that folder. Of course, there’s a nice transition as well as a screen that combines multiple photos, but the real point here is the source of these photos. So, if you’ve got photos, you can simply add them to your system Pictures folder.
Let’s say I already have a folder stored somewhere on my computer that’s got some really great photos in it. Instead of placing pictures in the Pictures folder, I can just access that existing folder and use that as the source. Honestly, this avenue is much easier.
To do this, I’ll click on the Add a Folder option that’s right below the previous one. From there, I’ll navigate to the folder I want to draw from and select it. After that, I’ll press the Choose this Folder button and it will automatically be added to the list of photo sources. It’s that easy.
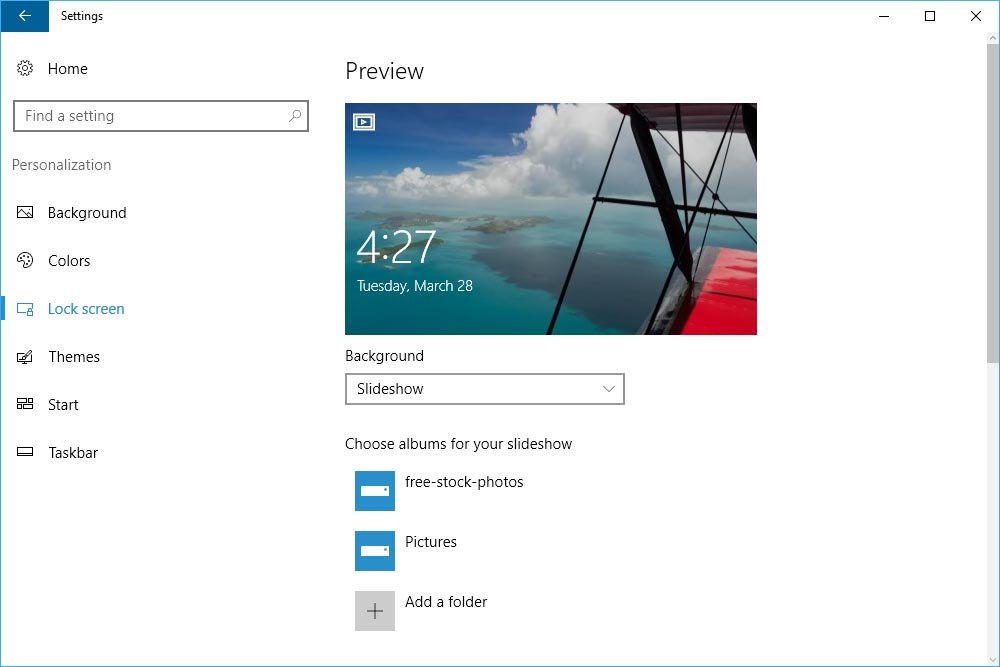
In this case, I added a folder that I store free stock photos in. I thought that was a good choice.
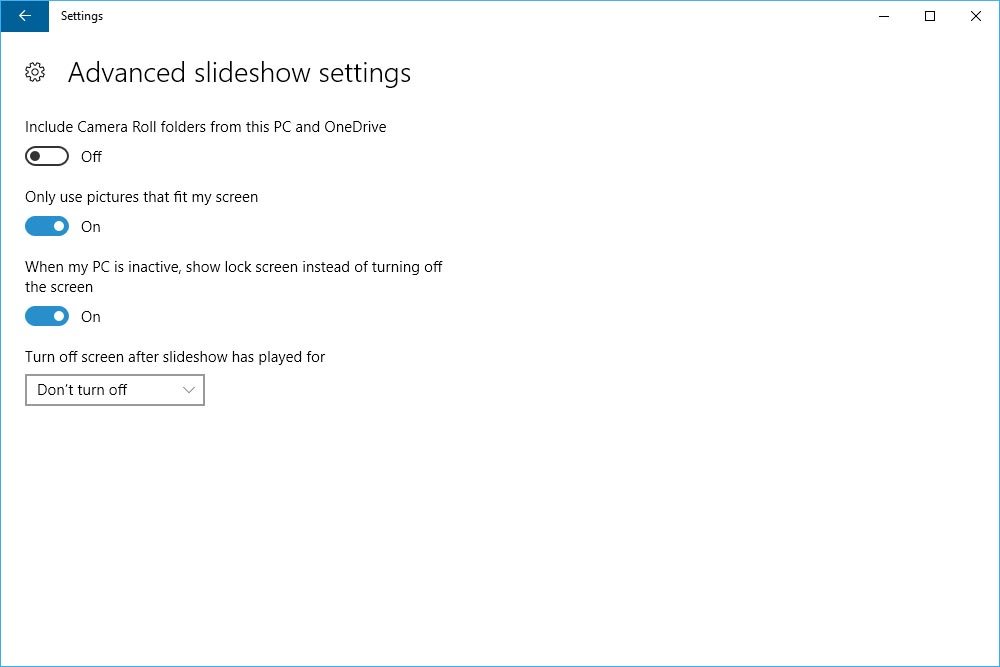
The first option gives you the opportunity to draw photos from the Camera Roll folders from your PC and from OneDrive. So, if you have multiple devices and store your photos in this type of a folder, you can certainly use this option.
Next, and I really like this one, is the option to limit which photos are shown based on quality and shape. I would hate to see lousy or small photos show in my slideshow, so I could limit what’s shown by turning or keeping this one on.
The next two options deal with when and how the slideshow is shown. The first one says that the lock screen will be displayed when the computer is inactive as opposed to going dark and then next one says that the lock screen should go dark after a certain time. That only makes sense and will save a bit of electricity to boot.
That’s really it. I would suggest you explore these related windows to get your feet wet with all the available options regarding the display of a photo or slideshow during your lock screen interval. It’s pretty cool what you can show, especially if you leave your computer in a semi-public place. I bet you can get a lot of oohs and aahs, depending on what you decide to store in these folders.
If you have any questions or concerns regarding this post, please leave them in the comment section below. Thanks for reading!
If you aren’t aware, putting a Windows 10 computer asleep means that you are essentially sending it to a dormant state. Its heart is still beating, but it isn’t breathing anymore. When you return to the computer and wake it up, and if you have a password set, you’ll need to jiggle the mouse or hit a key on the keyboard and then log in.
When you lock a computer, all you’re doing is stopping the ability for someone to use the computer under your username. The power supply fan still hums along and the computer is wide awake. When you return to the computer to continue your work, you’ll need to do the same things as above. One those are completed, you can resume whatever it is that you were doing.
Remember, putting a computer to sleep means you’ll enjoy an energy savings. Locking it offers you no such savings.
Anyway, what I’d like to write about today is how you can take advantage of a pretty neat feature in Windows 10 that will allow a slideshow to play when your computer is locked. By default, after locking the PC, a random “Windows” provided image appears. This image is called a Windows Spotlight and is chosen and downloaded for you by Microsoft. Inside the Settings area, you can change the image that appears and even set things up so multiple images show with a nice transition between each one. That’s where I’m headed below.
How to Lock Your Computer
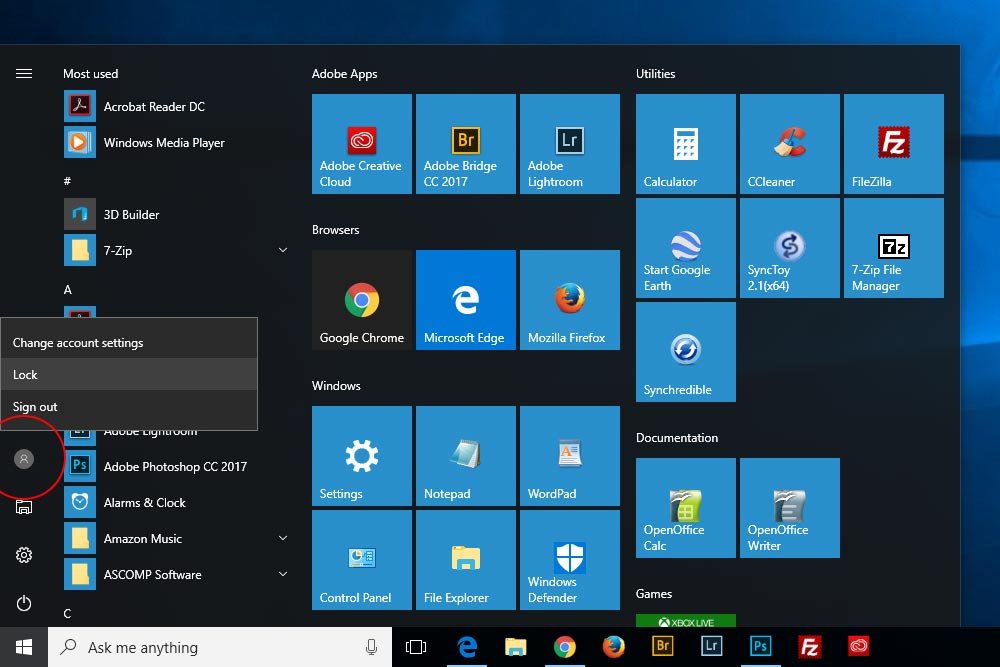
Locking a computer is simple. All you need to do is to head down to the Start menu and click. Then, once the menu appears, go to your account icon and click that. A menu will appear with three choices. These choices are Change Account Settings, Lock and Sign Out. You want to choose Lock.
Once your computer is locked, it’ll likely show you a screen with a picture on it. You’ll also see any apps you have set for that screen and probably an uplifting message about how you should live your life. Right now, mine looks like this:

In the sections that follow, I’ll demonstrate how to change this photo and even set up a slideshow for this screen.
Changing the Photo
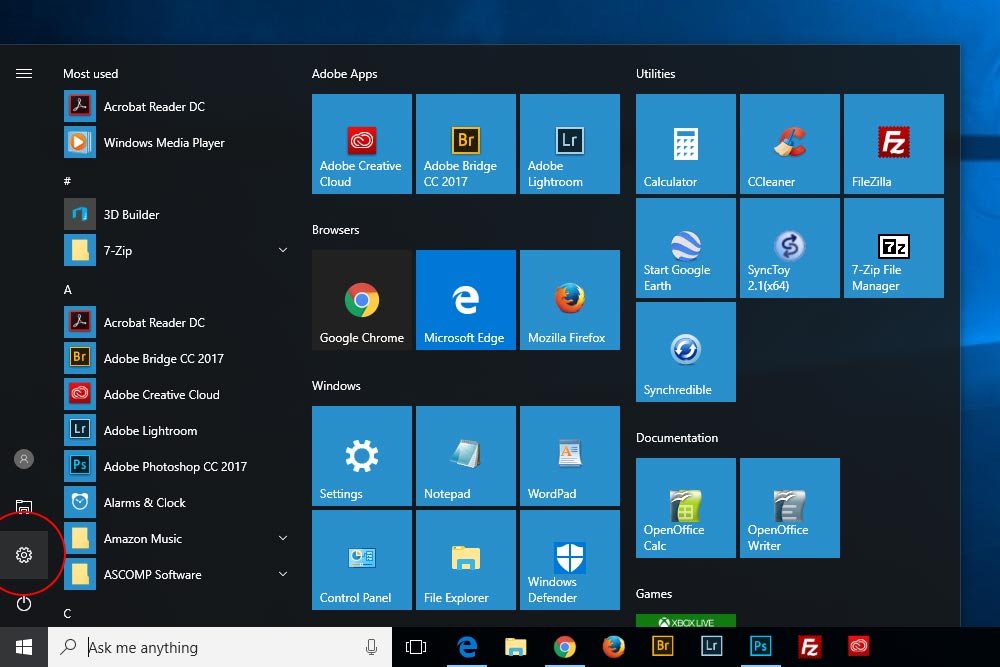
The area where all these related settings are kept is the Settings > Personalization > Lock Screen section. To get there, you’ll need to open the Start menu again, but this time, click the Settings icon that’s all the way over to the left.
Once the Settings window appears, click the menu item that says Personalization.

Then, click the Lock Screen menu item in the left column. That will bring you to the proper place.

Now, inside this Lock Screen window is a lot of stuff. Most of it, I’ll ignore for this post. What I’d like to focus on is limited.
If you were to click on the drop-down box that sits directly below the large image, you’d see three options. They are Windows Spotlight, Picture and Slideshow.

For now, I’ll select the one that says Picture.

If you take a look at the above screenshot, you’ll see that the options have changed since I selected Picture from the drop-down menu. Now, I can select which picture I’d like to see from a selection of pre-loaded Windows photos. If I’m not happy with any of these, I can always click the Browse button to search around through my files on my computer for a different one. Once I select something, it will appear in the thumbnail selection and I can choose it and set it from there. Really, it’s that easy. I don’t need to save it out or anything else like that. All I need to do once I make my choice is to exit out of that window and my photo will appear the next time I lock the computer.
Creating a Slideshow
In this section, I’d like to get to the point of this post. That is – how to set up a slideshow.To do this, I’ll head back up to the Background drop-down box and select Slideshow.

The moment I do this, the options below the drop-down will once again change. As things stand right now, I have two choices. I can either select the option called Pictures, which will include any photos I currently have in my Windows Pictures folder, or I can choose to add a folder for this slideshow. For this demonstration, I went ahead and added some random photos to the Pictures folder (This PC > Pictures) and locked the computer. Let’s see what happens.

Yup, just as I expected. The slideshow that begins after I lock the screen simply cycles through the photos I placed in that folder. Of course, there’s a nice transition as well as a screen that combines multiple photos, but the real point here is the source of these photos. So, if you’ve got photos, you can simply add them to your system Pictures folder.
Let’s say I already have a folder stored somewhere on my computer that’s got some really great photos in it. Instead of placing pictures in the Pictures folder, I can just access that existing folder and use that as the source. Honestly, this avenue is much easier.
To do this, I’ll click on the Add a Folder option that’s right below the previous one. From there, I’ll navigate to the folder I want to draw from and select it. After that, I’ll press the Choose this Folder button and it will automatically be added to the list of photo sources. It’s that easy.

In this case, I added a folder that I store free stock photos in. I thought that was a good choice.
Additional Options
If you thought those were your only options for creating a slideshow, you were mistaken. If you click the link directly below the photo source options that says Advanced Slideshow Settings, you’ll see a few additional settings you can take advantage of.
The first option gives you the opportunity to draw photos from the Camera Roll folders from your PC and from OneDrive. So, if you have multiple devices and store your photos in this type of a folder, you can certainly use this option.
Next, and I really like this one, is the option to limit which photos are shown based on quality and shape. I would hate to see lousy or small photos show in my slideshow, so I could limit what’s shown by turning or keeping this one on.
The next two options deal with when and how the slideshow is shown. The first one says that the lock screen will be displayed when the computer is inactive as opposed to going dark and then next one says that the lock screen should go dark after a certain time. That only makes sense and will save a bit of electricity to boot.
That’s really it. I would suggest you explore these related windows to get your feet wet with all the available options regarding the display of a photo or slideshow during your lock screen interval. It’s pretty cool what you can show, especially if you leave your computer in a semi-public place. I bet you can get a lot of oohs and aahs, depending on what you decide to store in these folders.
If you have any questions or concerns regarding this post, please leave them in the comment section below. Thanks for reading!
