Newman
Member
- Joined
- May 11, 2021
- Messages
- 106
- Reaction Score
- 0
- Points
- 23
- #1
I used to be one of the types of people who liked to know everything that was going on, all the time. Over the years, I’ve loosened up quite a bit and I no longer need to have that sort of control in my life. One of the areas I always enjoyed toying with and figuring out was what happened with any sort of app, whether it be on my desktop, my tablet or my phone. I never got into the whole, let it do it’s own thing and download anything it wants, any time it wants. One of the reasons was that I used to have a very slow internet connection. If my desktop PC downloaded anything it wanted to at any time, I’d certainly feel it as I was trying to work. Back then, I’d let the computer do its updates during the off time.
Today, I have a much faster internet connection and honestly, I really don’t mind what’s being updated in the background. So far, for the past few years, I’ve had no issues with Windows 10 in general. But, since there are a lot of people out there who still enjoy a certain semblance of control over technology, this post is for you.
In today’s post, I’m going to show you how to change one setting inside of the Windows Store that will allow you to control when your downloaded apps get updated. The default setting is to have all apps from the Store update automatically. The nice thing is, if that’s not the setting we want, we can change it easily. We can turn the auto update off. I’ll demonstrate how to go about doing this below.
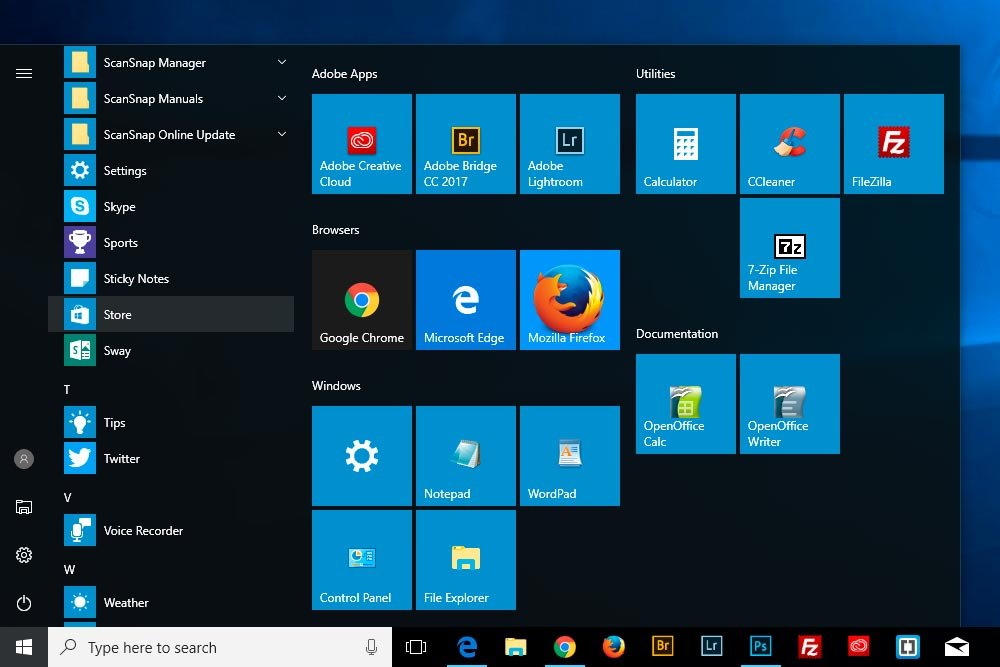
To access the Windows Store, click the Start menu in the lower left corner of your screen. Scroll down in the left column until you reach the S heading. Under that heading, you should see the Store menu item. Click that.

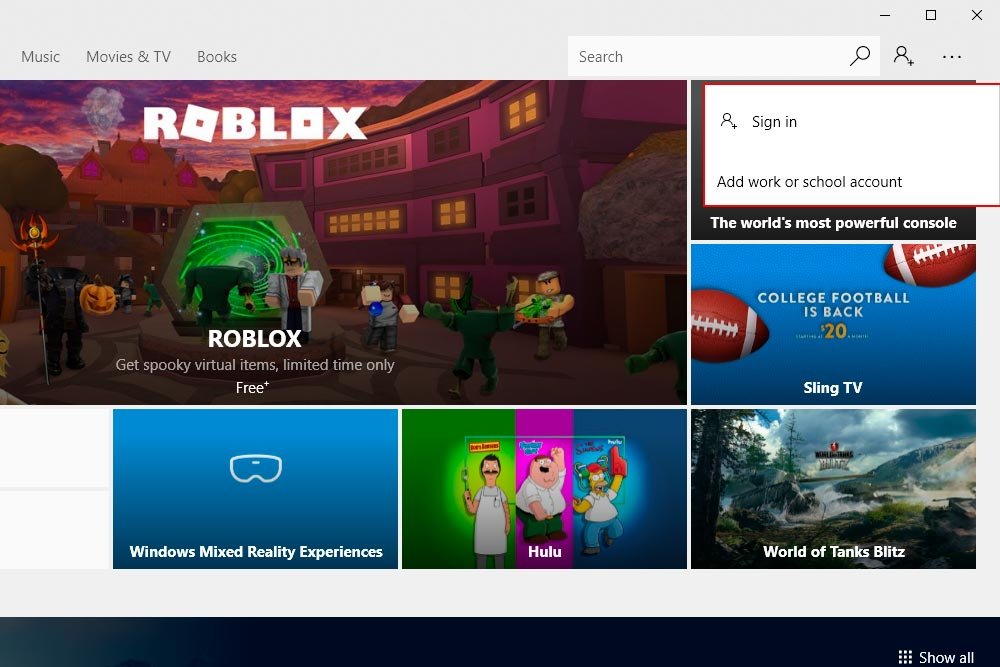
To sign in, click the small user icon in the top menu bar. It should have a + symbol attached to it. Go through the process of signing in.

Once you’re logged in, you’ll see that small user icon change either to your photo or to a generic one without the + symbol.

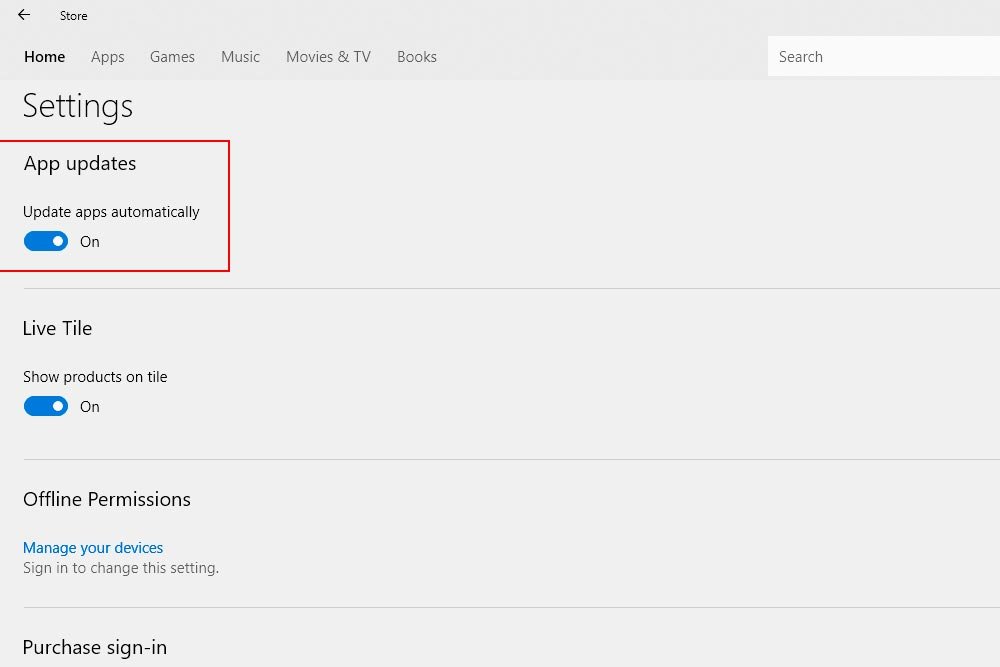
After clicking that menu item, you’ll see a bunch of settings that you can turn on and off. The first one is the App Updates setting.

To turn off the automatic app updates that Windows performs behind the scenes, simply click the blue switch. That will turn it off. After it’s off, you’ll have to update each app when it needs to be updated. You’ll likely receive a notification when using the app itself.
——
I hope I clearly explained how to go about turning off the Windows Store auto app update feature in this post. If you have any questions or concerns, please leave them in the comment section below. Thanks for reading!
Today, I have a much faster internet connection and honestly, I really don’t mind what’s being updated in the background. So far, for the past few years, I’ve had no issues with Windows 10 in general. But, since there are a lot of people out there who still enjoy a certain semblance of control over technology, this post is for you.
In today’s post, I’m going to show you how to change one setting inside of the Windows Store that will allow you to control when your downloaded apps get updated. The default setting is to have all apps from the Store update automatically. The nice thing is, if that’s not the setting we want, we can change it easily. We can turn the auto update off. I’ll demonstrate how to go about doing this below.
Accessing the Windows Store
If you have a brand new Windows 10 computer, you’ll most likely see a panel shortcut tile to the Windows Store in your Start menu. Since I’ve modified the layout of mine, I’ll show you how to get there via the list of applications.To access the Windows Store, click the Start menu in the lower left corner of your screen. Scroll down in the left column until you reach the S heading. Under that heading, you should see the Store menu item. Click that.

Logging In
Once the Store opens, you should see an icon of your face or a generic user up in the top menu bar. This icon used to be located to the left of the search bar, but now it’s located to the right. If you don’t see it, this means you’re not logged in. You’ll need to log in to access many options in the Store. Although you can complete what I’m about to show you below without being logged in, I encourage you to do so to take advantage of everything else the store has to offer.To sign in, click the small user icon in the top menu bar. It should have a + symbol attached to it. Go through the process of signing in.

Once you’re logged in, you’ll see that small user icon change either to your photo or to a generic one without the + symbol.
Changing the Auto Update Setting
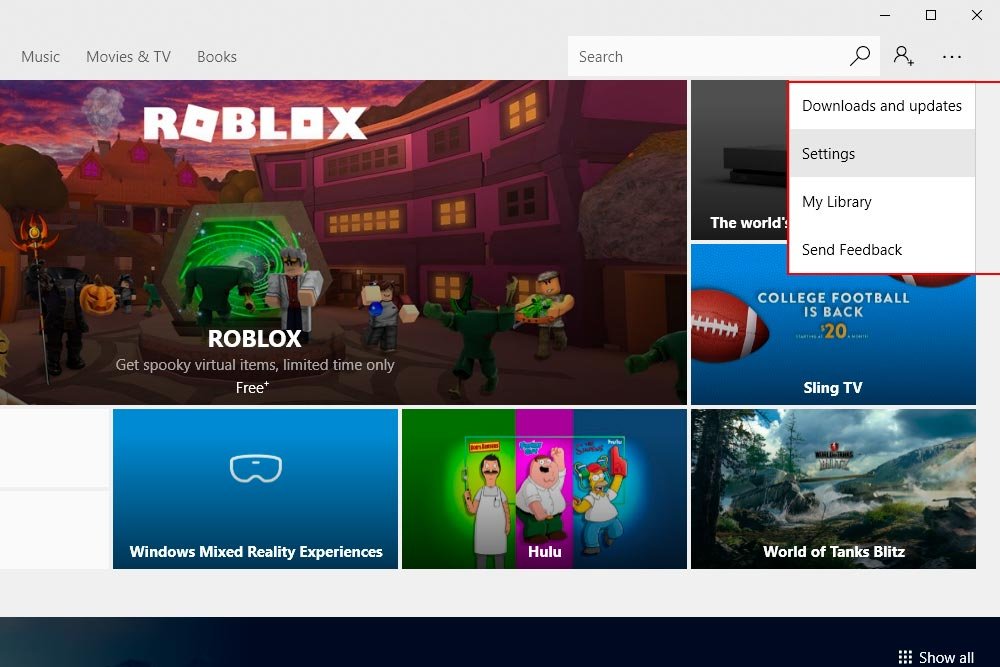
To the right of the user icon is another icon that consists of three dots. Click that. Then, to access the Settings menu, click the Settings menu item.
After clicking that menu item, you’ll see a bunch of settings that you can turn on and off. The first one is the App Updates setting.

To turn off the automatic app updates that Windows performs behind the scenes, simply click the blue switch. That will turn it off. After it’s off, you’ll have to update each app when it needs to be updated. You’ll likely receive a notification when using the app itself.
——
I hope I clearly explained how to go about turning off the Windows Store auto app update feature in this post. If you have any questions or concerns, please leave them in the comment section below. Thanks for reading!
