KodyWallice
Member
- Joined
- May 7, 2021
- Messages
- 123
- Reaction Score
- 1
- Points
- 23
- #1
When a camera meters a scene, it's only able to capture a certain level of darkness and brightness in the same shot. The distance between the darkest and brightest pixels is called dynamic range. Here's a fairly decent definition of dynamic range for you:
In photography, the “dynamic range” is the difference between the darkest and lightest tones in an image, generally pure black and pure white. It's more often used to talk about the maximum dynamic range a camera is capable of.
Basically, cameras can't see pure white and pure black in the same scene. They're just not capable of doing that. They're only capable of seeing a certain percentage of lightness and darkness, which can impact the true nature of reality. Less expensive and older cameras have a smaller dynamic range and more expensive and newer cameras have a bigger one. It's getting better every day with new technology, but there's still a long way to go. Acquiring your desired dynamic range usually requires editing in post processing.
An excellent method for adding dark darks and bright lights is to capture multiple shots of the same scene, but at different exposure levels. For instance, if you wanted to take a photo of a car and have that photo display the greatest dynamic range possible, you'd take three to five photos of the car (on a tripod), starting at underexposed levels and continuing up all the way to overexposed levels. This way, you'd get those black blacks and white whites. The trick then would be to merge those images together to display the entire range in the resulting photograph.
Adobe Camera Raw offers an excellent tool that makes this process very simple. It's called Merge to HDR and I'll show you how to use it down below. Before I begin though, I'd like to tell you that Adobe has hidden the link to the Merge to HDR command in version 13.1 and greater in Camera Raw. I'll show you where it is down below. Also, I'll be using sample images that I found on a stock photo website. I wouldn't use moving action photos like this in real life because I'd never be able to take the identical shots I'd need. Creating HDR (high dynamic range) photos that only differ in exposure requires that there's no movement. Because of this, you usually see landscape photos and the like that show off their HDR characteristics.
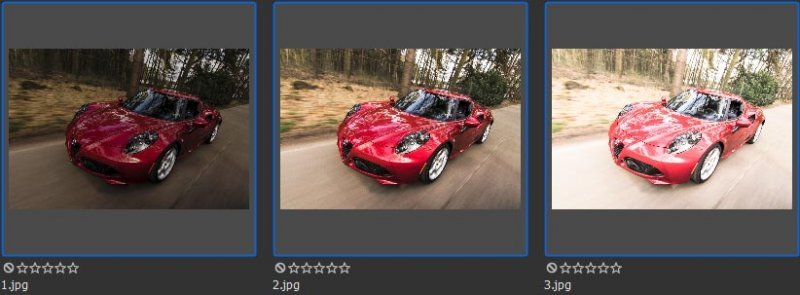
Do you notice how the image on the left is underexposed and the one on the right is overexposed? That's the goal. The one on the left has those darks I'm looking for and the one on the right has those brights. I wouldn't be able to get those tones by just taking a regular photo. I've had to force the issue.
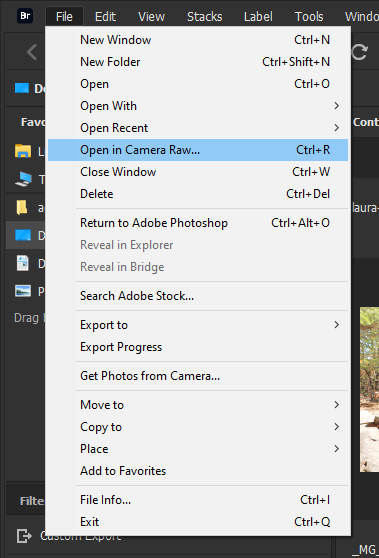
To launch these three photos into Camera Raw from Bridge, I'll head up to the top menu and click the File > Open in Camera Raw option.

After I make those selection, I'll look directly below the thumbnails for a small button. If I hover my mouse over this button, I'll see a Click to Hide Filmstrip (/). Click and Hold for Filmstrip Menu message. I'll click and hold that button until the menu appears. This is what the button looks like:

And this is what the menu looks like.
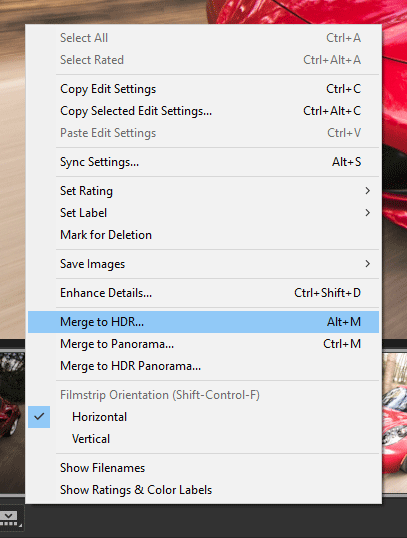
To continue on, I'll click the Merge to HDR menu item. After I do that, I'll be presented with an HDR Preview window that's got a few options to choose from. Here, I can align the images and set it so Camera Raw automatically sets the tone. I can also allow Camera Raw to "deghost" the images, meaning, if there was movement in the images that made them not exactly identical to one another, Camera Raw will do its best to remove and correct any of that ghosting. I'll set the three options and then click the Merge button. After I do that, the photos will be merged and a DNG file will be created. That's the final file, but it's still able to be edited right in Camera Raw. So if I feel as though I need to stretch the highs and lows even further, I can do that. In my case today, this is what I came up with.
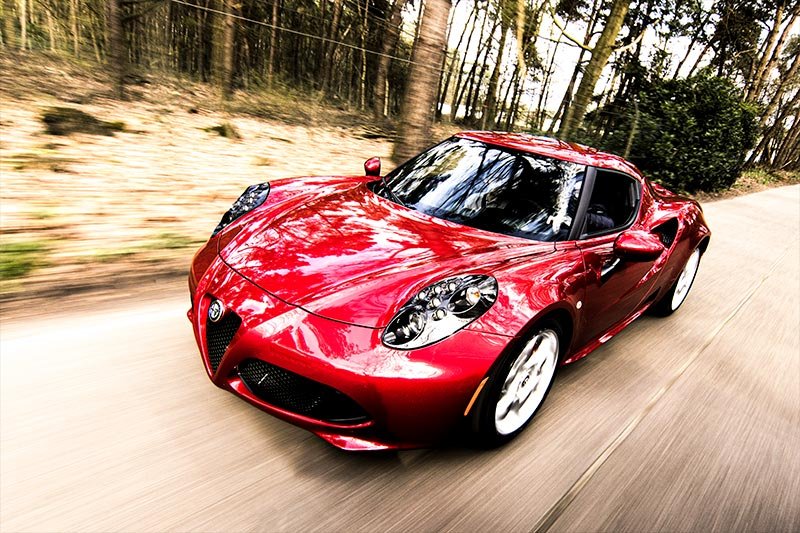
Pretty nice, right?
Do you have any questions about the process of merging multiple photos into one HDR image using Camera Raw? If so, please ask down below. Also, if you have any tips to share, I'd love to read them. Please share them down below too. Thanks!
In photography, the “dynamic range” is the difference between the darkest and lightest tones in an image, generally pure black and pure white. It's more often used to talk about the maximum dynamic range a camera is capable of.
Basically, cameras can't see pure white and pure black in the same scene. They're just not capable of doing that. They're only capable of seeing a certain percentage of lightness and darkness, which can impact the true nature of reality. Less expensive and older cameras have a smaller dynamic range and more expensive and newer cameras have a bigger one. It's getting better every day with new technology, but there's still a long way to go. Acquiring your desired dynamic range usually requires editing in post processing.
An excellent method for adding dark darks and bright lights is to capture multiple shots of the same scene, but at different exposure levels. For instance, if you wanted to take a photo of a car and have that photo display the greatest dynamic range possible, you'd take three to five photos of the car (on a tripod), starting at underexposed levels and continuing up all the way to overexposed levels. This way, you'd get those black blacks and white whites. The trick then would be to merge those images together to display the entire range in the resulting photograph.
Adobe Camera Raw offers an excellent tool that makes this process very simple. It's called Merge to HDR and I'll show you how to use it down below. Before I begin though, I'd like to tell you that Adobe has hidden the link to the Merge to HDR command in version 13.1 and greater in Camera Raw. I'll show you where it is down below. Also, I'll be using sample images that I found on a stock photo website. I wouldn't use moving action photos like this in real life because I'd never be able to take the identical shots I'd need. Creating HDR (high dynamic range) photos that only differ in exposure requires that there's no movement. Because of this, you usually see landscape photos and the like that show off their HDR characteristics.
Opening Photos From Bridge to Camera Raw
I'll start off by selecting my three demo photos inside of Adobe Bridge.
Do you notice how the image on the left is underexposed and the one on the right is overexposed? That's the goal. The one on the left has those darks I'm looking for and the one on the right has those brights. I wouldn't be able to get those tones by just taking a regular photo. I've had to force the issue.
To launch these three photos into Camera Raw from Bridge, I'll head up to the top menu and click the File > Open in Camera Raw option.

Merging to HDR in Camera Raw
Once the photos open in Camera Raw, I'll make sure to select all three by clicking on the first thumbnail, holding down the Shift key on my keyboard, and then clicking on the last thumbnail. They'll look like this:
After I make those selection, I'll look directly below the thumbnails for a small button. If I hover my mouse over this button, I'll see a Click to Hide Filmstrip (/). Click and Hold for Filmstrip Menu message. I'll click and hold that button until the menu appears. This is what the button looks like:

And this is what the menu looks like.

To continue on, I'll click the Merge to HDR menu item. After I do that, I'll be presented with an HDR Preview window that's got a few options to choose from. Here, I can align the images and set it so Camera Raw automatically sets the tone. I can also allow Camera Raw to "deghost" the images, meaning, if there was movement in the images that made them not exactly identical to one another, Camera Raw will do its best to remove and correct any of that ghosting. I'll set the three options and then click the Merge button. After I do that, the photos will be merged and a DNG file will be created. That's the final file, but it's still able to be edited right in Camera Raw. So if I feel as though I need to stretch the highs and lows even further, I can do that. In my case today, this is what I came up with.

Pretty nice, right?
Do you have any questions about the process of merging multiple photos into one HDR image using Camera Raw? If so, please ask down below. Also, if you have any tips to share, I'd love to read them. Please share them down below too. Thanks!
