CampFireJack
Member
- Joined
- May 9, 2021
- Messages
- 118
- Reaction Score
- 1
- Points
- 16
- #1
I have no idea how popular Adobe Bridge is. Actually, I don’t think it’s very popular at all. I know a lot of people enjoy using their operating system’s file explorer tools and are fine with that. I was for years. That is, until I discovered how cool Bridge really is and until I explored much of what it can do. Today, I’m a huge proponent of Bridge and I hope you’ll read what I have to say below. You may just end up loving Bridge as much as I do.
In today’s post, I’m going to show you something really cool. Since I’m the type of person who has somewhat settled on my editing style (99% of photos get the same treatment) in Camera Raw, I could certainly benefit from having my process automated. I used to set up automated processes in Photoshop. Those were called Actions. In Camera Raw, they’re called Presets. Basically, both Actions and Presets record any edits made to an image and save them as an instruction. The next time an editor would like to make the same exact edits to a photo as they did when they created an instruction, instead of pushing sliders around, they could simply hit the Action or Preset button and the edits would be applied automatically.
Now, that’s all fine and good and you may already know about these small pieces of magic. What you may not know is that once a Preset is created in Camera Raw, you no longer have to launch a photo into that application to apply it. You can do it straight from Bridge and be done with it. You can even apply the Preset to multiple images via Adobe Bridge, saving even more time.
I swear, I’m getting sucked more and more into Bridge every time I use it. There are so many hidden tricks that it’s definitely worth diving into and making it a part of the workflow.
How To Open Files & Photos Into Adobe Camera Raw
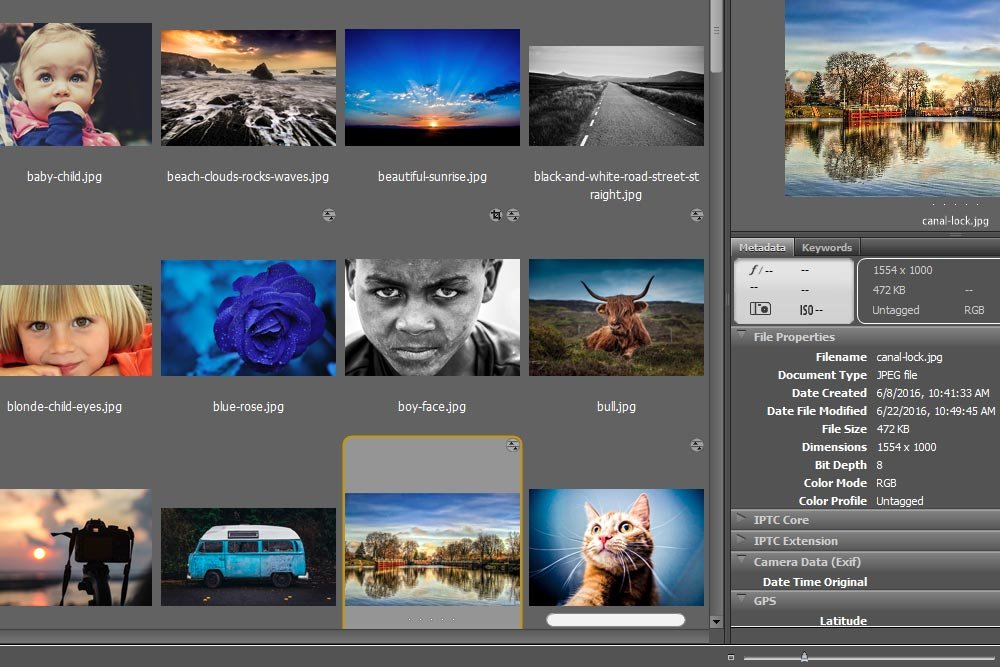
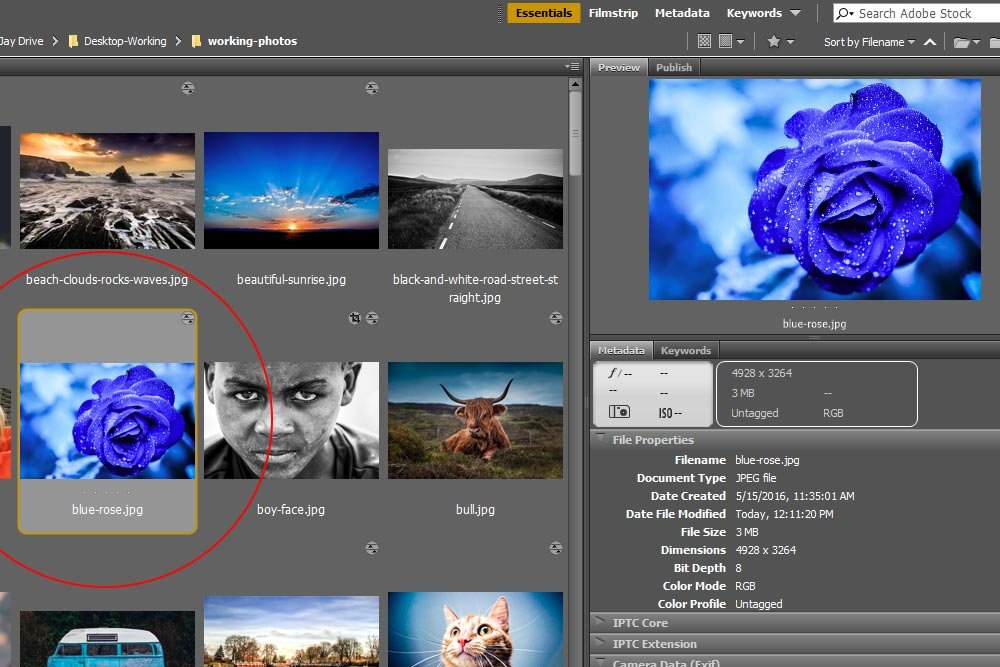
This is the folder I’m going to be working from in Bridge.
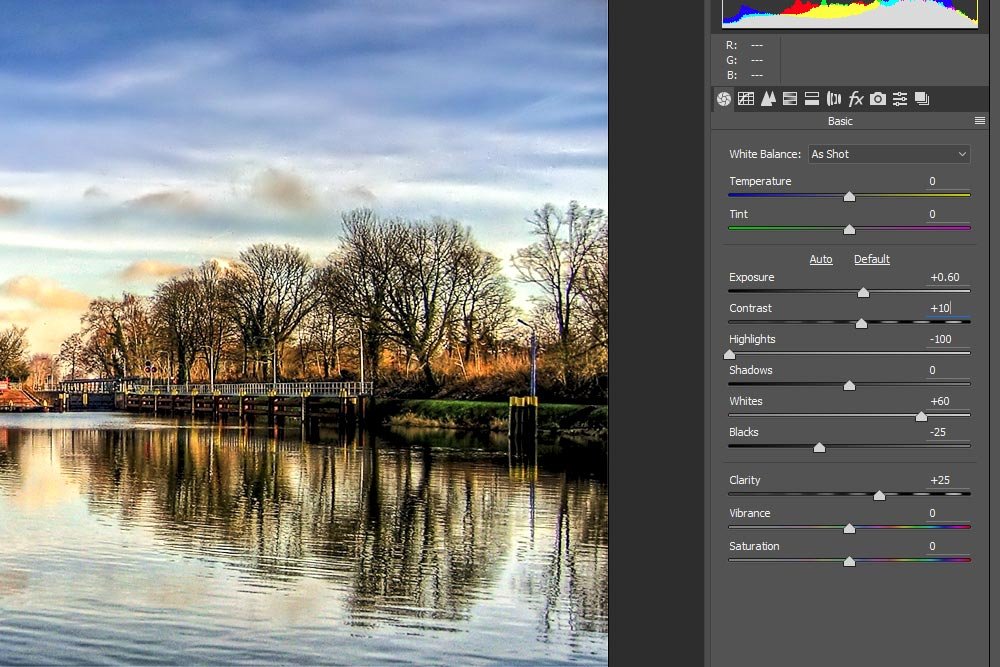
I’ll start by pushing some of the sliders that are in the Basic panel.
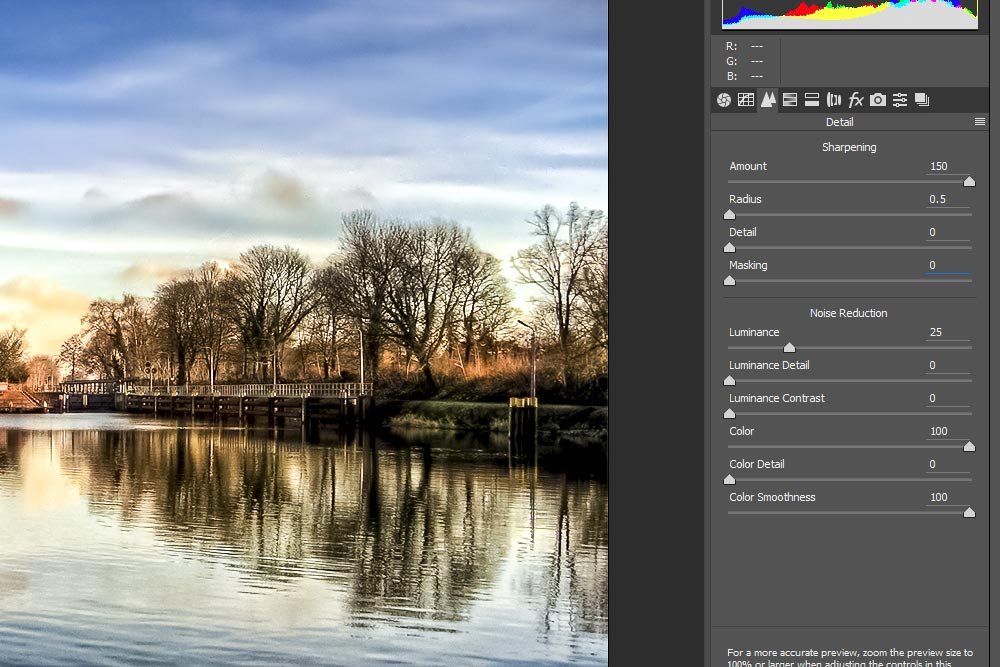
Next, I’ll head into the Detail panel and make my usual changes there.
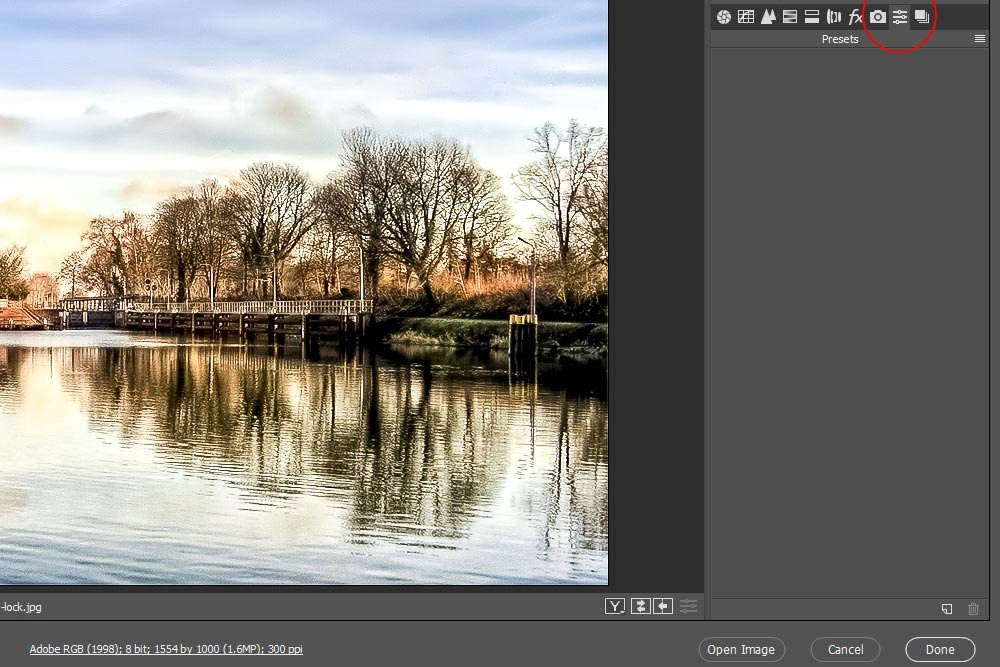
Finally, I’ll head into the Presets panel by clicking on the appropriate tab.
To create a Preset, I’ll need to click the New Preset button that’s located at the bottom of the Presets panel.
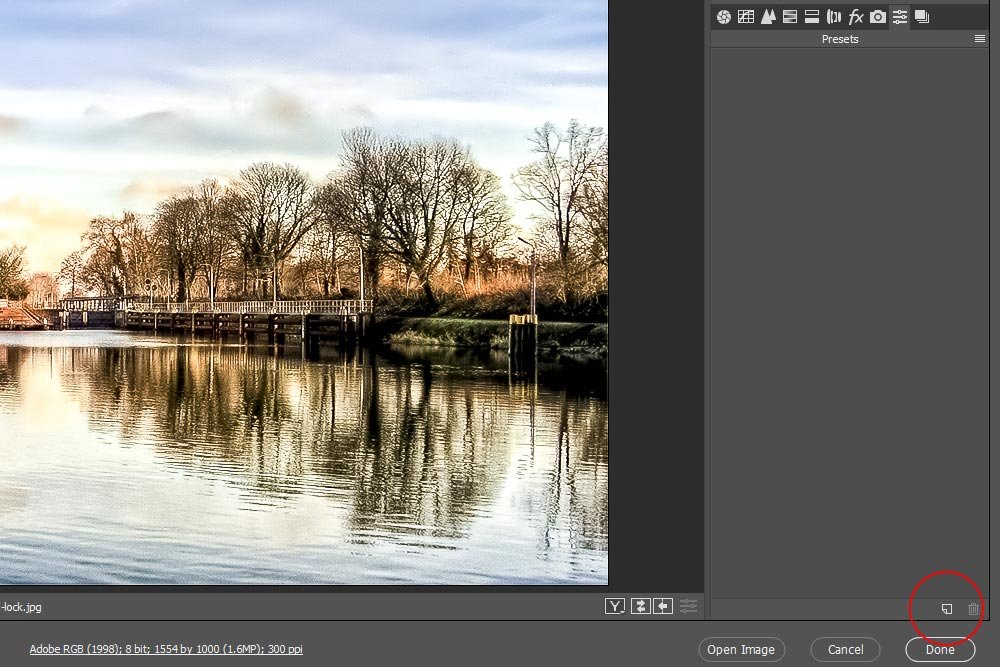
After I do that, the New Preset dialog box will appear.
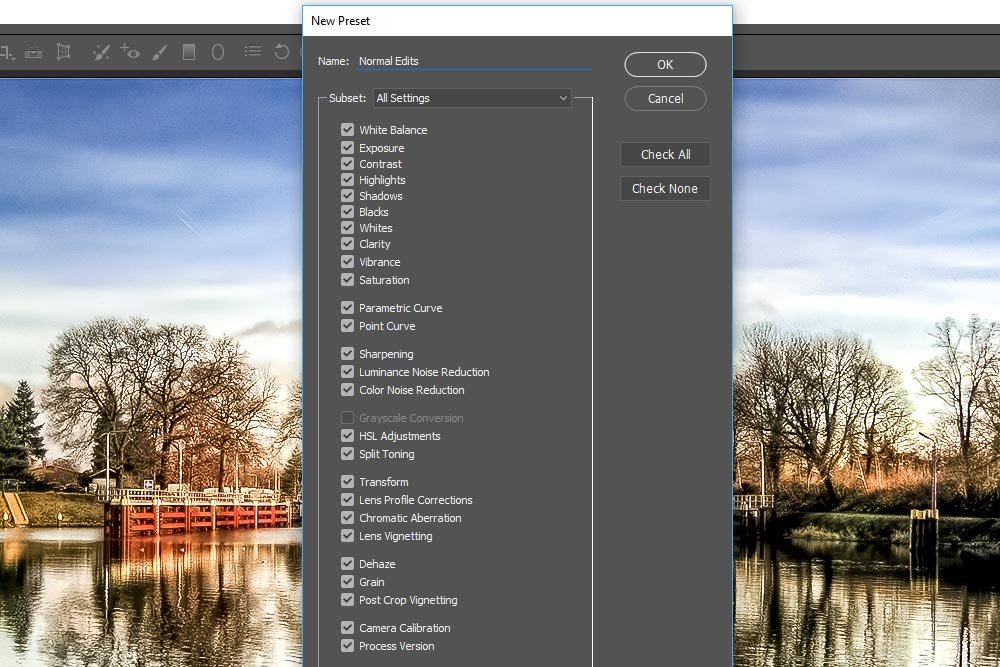
Since I’d like to apply all the changes I made to the image to my new Preset, I’ll leave all the boxes in this panel checked off. If I only wanted a few of them applied, such as the settings I made in the Detail panel, I would only keep those checked (or choose Details from the Subset drop-down box). The same goes for the edits I made in the Basic panel. You can really pick and choose here if you wanted to. If you did it this way, you could create multiple Presets that slice and dice what you have the ability to apply to images in the future.
I’ll go ahead and name this new Preset Normal Edits and click the OK button to create the Preset.
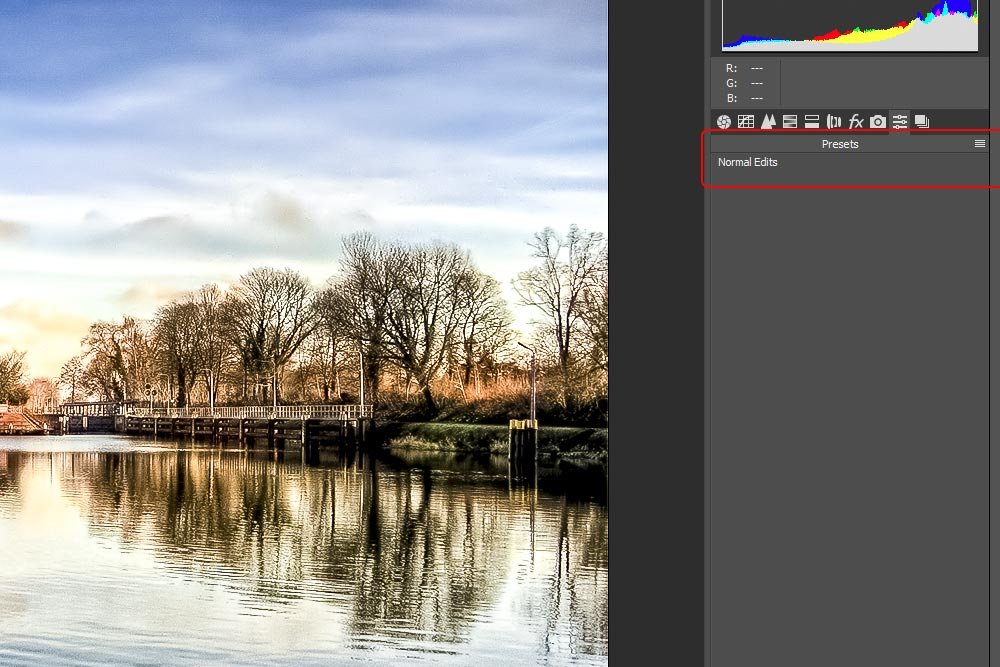
At this point, the Preset has been created. Any time I launch an image into Camera Raw and want to apply the same exact edits that I applied to the image I created the Preset from, all I would need to do is visit the Presets panel and click on the Normal Edits Preset. That would automatically apply the previous edits to the new photo. It’s that simple.
Let’s say that I have 100 photos from a photo shoot I shot on a nice afternoon. All the images are very similar and they would all need to be edited the same way. Sort of like I just did above in the “Creating a Preset” example. While creating a Preset would certainly help and while it would cut down on my editing time dramatically, I’d still need to launch each and every one of those 100 photos into Camera Raw to apply the Preset. As you can imagine, any time you have to do something 100 times in a row, you’ll end up wishing you were doing something else. That’s just the way it is.
Wouldn’t it be cool if you could apply the Preset right from Adobe Bridge? You know, without even opening Camera Raw? Well, I have some good news for you. You can. Let me show you how.
Since my Preset has already been created in Camera Raw, I can close that down. I’ll be working directly from Bridge now.
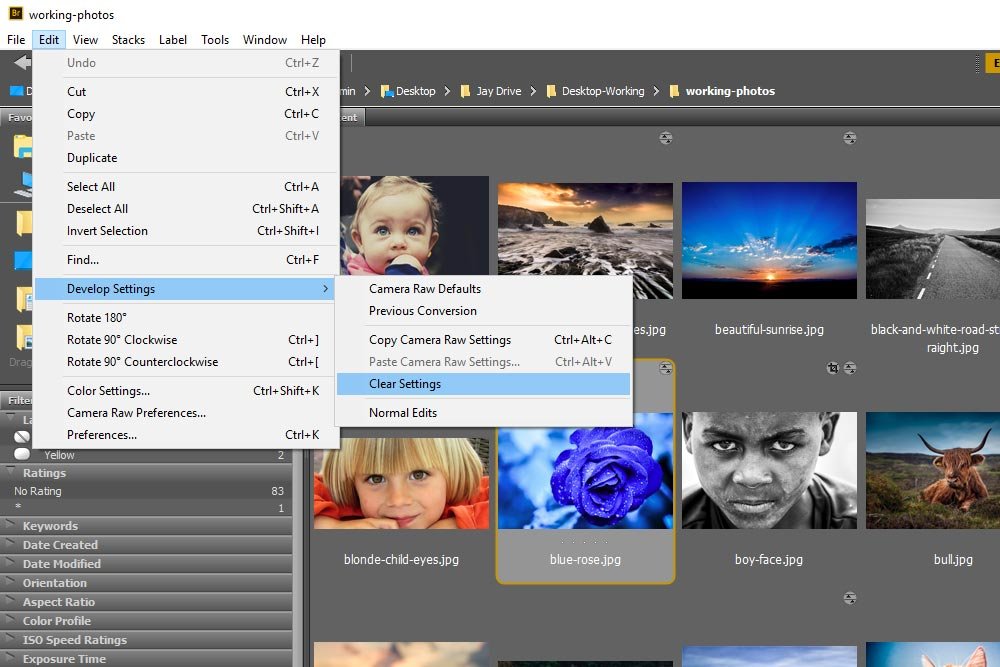
The first thing I’ll need to do is to find and select the thumbnail of the image, or images, I’d like to apply the Preset to via Bridge. Once the image is selected, I’ll head up to the Edit > Develop Settings menu item. Inside the Develop Settings sub-menu will be any Preset that has been created in Camera Raw. In this case, the Normal Edits Preset is sitting down at the bottom of the sub-menu.
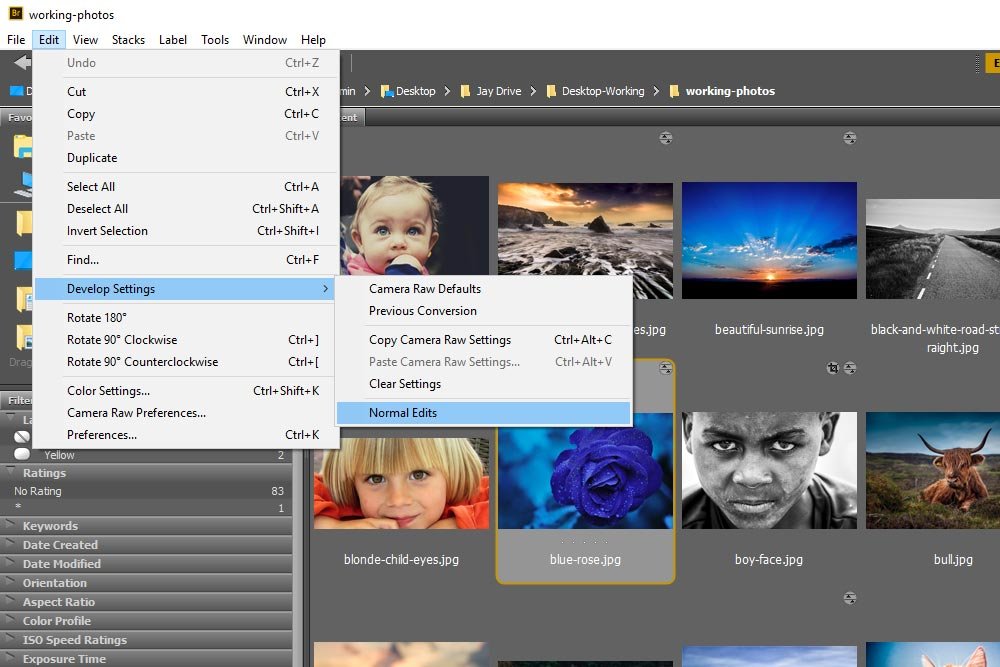
If I click on Normal Edits, that Preset will be instantly applied to the image. I’ll immediately see the thumbnail update with the new edits applied.
If I wanted to apply the preset to multiple images, all I would need to do is select multiple thumbnails and follow the same instructions above. How awesome is that? Now, after applying the Preset, I could launch the individual images into Camera Raw to tweak any of the settings. Nothing is etched into stone here. It’s just that the base edits have been made automatically.
To undo any Presets you have applied from Adobe Bridge, go to the Edit > Develop Settings > Clear Settings menu item and click. The Presets will be cleared out and you’ll start over from the beginning. It’s that simple.
Luckily, I already wrote a few posts that discuss how we can open photos straight from Bridge into Photoshop. If you’d like to read them, click the links below.
How to Open a File in Photoshop Directly From Adobe Bridge
How to Open RAW Files Straight From Adobe Bridge to Photoshop
Those posts should help.
Well, there it is. I hope I thoroughly and clearly explained how to create Presets inside of Adobe Camera Raw. I also hope I helped with applying those Presets via Adobe Bridge. If you have any questions or concerns, please leave them in the comment section below. Thanks for reading!
In today’s post, I’m going to show you something really cool. Since I’m the type of person who has somewhat settled on my editing style (99% of photos get the same treatment) in Camera Raw, I could certainly benefit from having my process automated. I used to set up automated processes in Photoshop. Those were called Actions. In Camera Raw, they’re called Presets. Basically, both Actions and Presets record any edits made to an image and save them as an instruction. The next time an editor would like to make the same exact edits to a photo as they did when they created an instruction, instead of pushing sliders around, they could simply hit the Action or Preset button and the edits would be applied automatically.
Now, that’s all fine and good and you may already know about these small pieces of magic. What you may not know is that once a Preset is created in Camera Raw, you no longer have to launch a photo into that application to apply it. You can do it straight from Bridge and be done with it. You can even apply the Preset to multiple images via Adobe Bridge, saving even more time.
I swear, I’m getting sucked more and more into Bridge every time I use it. There are so many hidden tricks that it’s definitely worth diving into and making it a part of the workflow.
Launching From Adobe Bridge
To kick things off, I’ll open up Adobe Bridge. From there, I’ll navigate to the folder I’m interested in. Then, I’ll select a thumbnail and launch it into Camera Raw. If you aren’t familiar with how to open files into Camera Raw, you can check out this post:How To Open Files & Photos Into Adobe Camera Raw
This is the folder I’m going to be working from in Bridge.

Creating a Preset in Camera Raw
The next thing I want to do is to edit the photo in Camera Raw the way I normally do. I need to be careful to keep things on the straight and narrow. In this step, I’ll be creating the template that my Preset will be modeled from, so I don’t want to get too particular with specifics that this image may need. What I’m trying to do here is to reduce the amount of work I’ll be doing in the future.I’ll start by pushing some of the sliders that are in the Basic panel.

Next, I’ll head into the Detail panel and make my usual changes there.

Finally, I’ll head into the Presets panel by clicking on the appropriate tab.

To create a Preset, I’ll need to click the New Preset button that’s located at the bottom of the Presets panel.

After I do that, the New Preset dialog box will appear.

Since I’d like to apply all the changes I made to the image to my new Preset, I’ll leave all the boxes in this panel checked off. If I only wanted a few of them applied, such as the settings I made in the Detail panel, I would only keep those checked (or choose Details from the Subset drop-down box). The same goes for the edits I made in the Basic panel. You can really pick and choose here if you wanted to. If you did it this way, you could create multiple Presets that slice and dice what you have the ability to apply to images in the future.
I’ll go ahead and name this new Preset Normal Edits and click the OK button to create the Preset.

At this point, the Preset has been created. Any time I launch an image into Camera Raw and want to apply the same exact edits that I applied to the image I created the Preset from, all I would need to do is visit the Presets panel and click on the Normal Edits Preset. That would automatically apply the previous edits to the new photo. It’s that simple.
Applying a Camera Raw Preset From Adobe Bridge
I have to admit, Presets are really cool and they make life a lot easier. Especially when it comes to blogging. Before I began shooting in RAW and before I learned about Camera Raw, I would apply an Action I created in Photoshop to edit photos en masse. The reason I did this was because I found myself editing the same exact way, image after image. It was tiring and I needed a better method. I’m just happy that Camera Raw offers the ability to make Presets that do almost the same thing.Let’s say that I have 100 photos from a photo shoot I shot on a nice afternoon. All the images are very similar and they would all need to be edited the same way. Sort of like I just did above in the “Creating a Preset” example. While creating a Preset would certainly help and while it would cut down on my editing time dramatically, I’d still need to launch each and every one of those 100 photos into Camera Raw to apply the Preset. As you can imagine, any time you have to do something 100 times in a row, you’ll end up wishing you were doing something else. That’s just the way it is.
Wouldn’t it be cool if you could apply the Preset right from Adobe Bridge? You know, without even opening Camera Raw? Well, I have some good news for you. You can. Let me show you how.
Since my Preset has already been created in Camera Raw, I can close that down. I’ll be working directly from Bridge now.
The first thing I’ll need to do is to find and select the thumbnail of the image, or images, I’d like to apply the Preset to via Bridge. Once the image is selected, I’ll head up to the Edit > Develop Settings menu item. Inside the Develop Settings sub-menu will be any Preset that has been created in Camera Raw. In this case, the Normal Edits Preset is sitting down at the bottom of the sub-menu.

If I click on Normal Edits, that Preset will be instantly applied to the image. I’ll immediately see the thumbnail update with the new edits applied.

If I wanted to apply the preset to multiple images, all I would need to do is select multiple thumbnails and follow the same instructions above. How awesome is that? Now, after applying the Preset, I could launch the individual images into Camera Raw to tweak any of the settings. Nothing is etched into stone here. It’s just that the base edits have been made automatically.
Undoing the Preset From Bridge
By now, I’m sure you have been thinking of all sorts of Presets that you’d like to create in Camera Raw. The thing is, by creating many Presets, you’ll be adding to the list in the Develop Settings sub-menu in Bridge. As you can imagine, when you have a lot to choose from, mistakes can be made. What do you do if you choose the wrong Preset? Whoops.To undo any Presets you have applied from Adobe Bridge, go to the Edit > Develop Settings > Clear Settings menu item and click. The Presets will be cleared out and you’ll start over from the beginning. It’s that simple.

Opening Photos Straight Into Photoshop
When I first began using this method of editing, I was left a bit stumped. I thought it was really neat that I could quickly make tons of edits straight from Bridge, bypassing Camera Raw completely. The thing is, I wondered what to do with all the edited images. How could I get them into Photoshop for my final editing? Would I still need to pass them through Camera Raw and if so, what was the benefit of doing what I just did from Bridge?Luckily, I already wrote a few posts that discuss how we can open photos straight from Bridge into Photoshop. If you’d like to read them, click the links below.
How to Open a File in Photoshop Directly From Adobe Bridge
How to Open RAW Files Straight From Adobe Bridge to Photoshop
Those posts should help.
Well, there it is. I hope I thoroughly and clearly explained how to create Presets inside of Adobe Camera Raw. I also hope I helped with applying those Presets via Adobe Bridge. If you have any questions or concerns, please leave them in the comment section below. Thanks for reading!
