Newman
Member
- Joined
- May 11, 2021
- Messages
- 106
- Reaction Score
- 0
- Points
- 23
- #1
I’ve written a few posts that talk about Presets in Adobe Camera Raw. Those posts discuss how to create one, how to install third-party presets and how to apply them to a photo you’re editing. There are tons of great tips in these posts, so if you’re interested in this type of thing, please be sure to read through them. They’ll give you a good background for what I’m going to write about below.
In today’s post, I’d like to continue on in the Preset world. I know there isn’t too much left to cover when it comes to the basics, but if you ever decided that you wanted to create your own Presets and sell them, things get huge fast. I’m going to avoid all that for now and simply stick to what can help that majority of photo editors who use Camera Raw.
The first area I want to talk about I can get done really quickly. I merely want to show you one more method for applying Presets via Adobe Bridge. After that, I’d like to show you how you can use an existing or imported Preset, modify it and then save it as a version of the original. This is as straightforward as you can get, so there’s no sweat at all. After that, I’d like to explain how you can rename a Preset if you ever wanted to and finally, I’m going to go ahead and demonstrate two different methods for deleting those Presets you no longer need or want.
While this sounds like a lot, it really isn’t. And to help you out, I’ll give you a quick tip below that will certainly speed things up if you ever become a Preset master.
In this section, I just want to go over one more very simple method for doing the exact same thing. This time, it has to do with right-clicking on a thumbnail as opposed to using the Edit menu.
If I open Bridge and navigate to the folder where my thumbnails live, I can select a thumbnail, right-click on it and find the Develop Settings menu item that appears. If I roll over that item, all of my installed or created Presets will appear, along with some other options at the way top of the sub-menu.
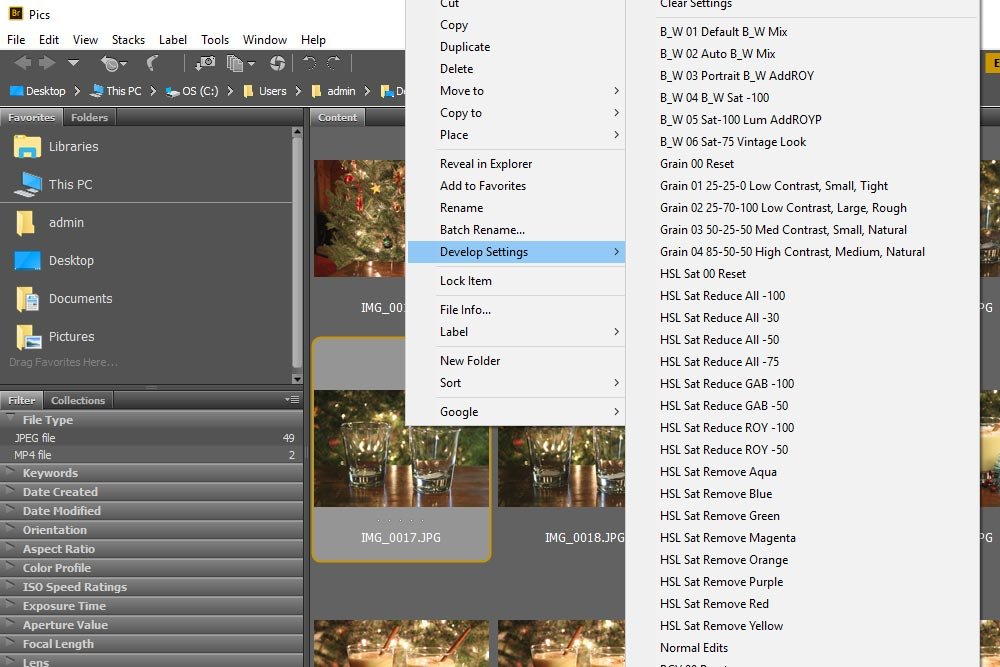
This menu has many of the same options as the one from the Edit menu item up at the top of the application. It even has the Clear Settings option I mentioned in my earlier post.
So this is just another way to access presets via Adobe Bridge. I told you it was easy.
Let’s say I open a photo into Camera Raw.
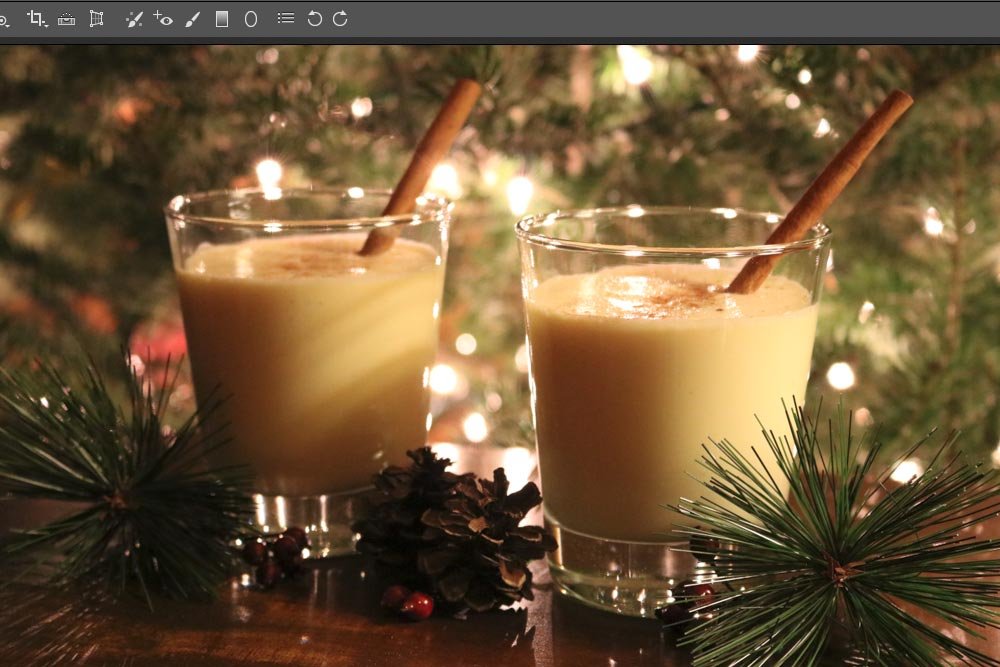
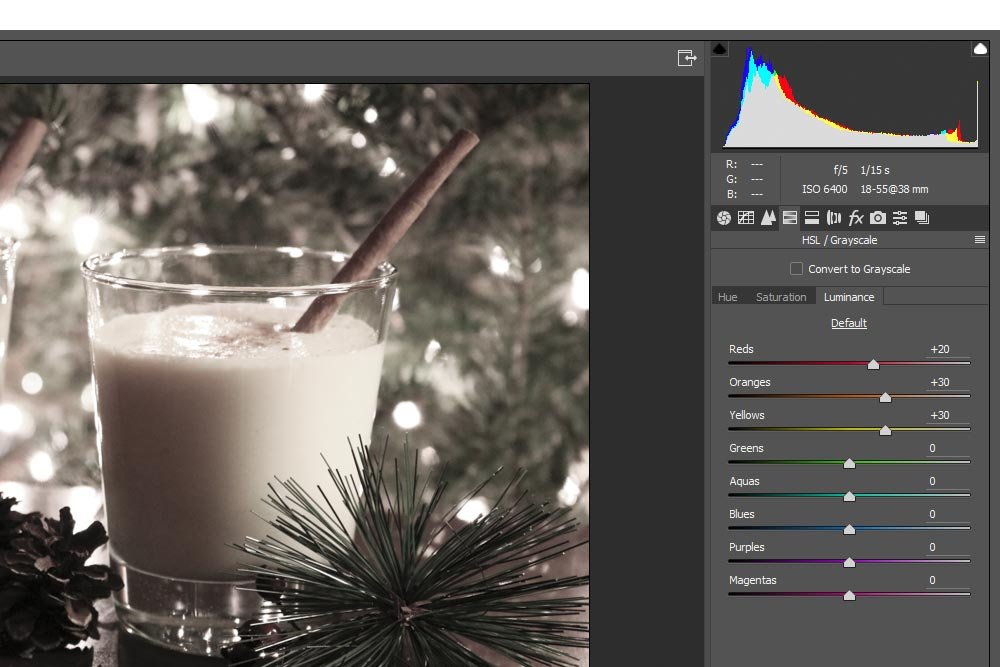
Now, I’ll head to the Presets panel and apply the Vintage Look preset. Actually, the full name of this preset is B_W 06 Sat-75 Vintage Look.
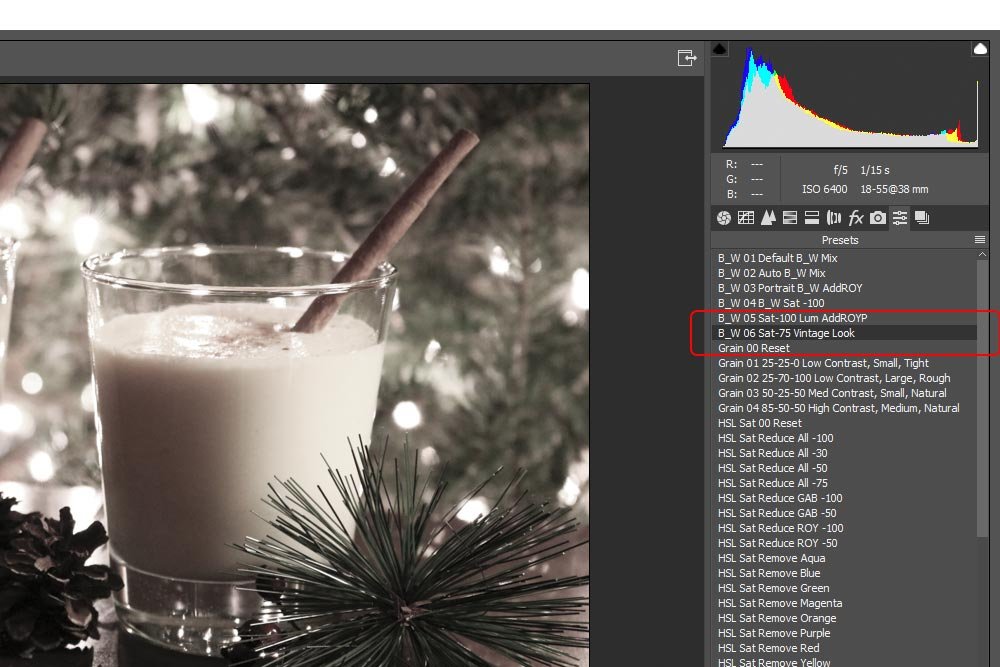
Now, just by looking at this, I already know that I want some more contrast. I already took a look through the various panels to see what changes were made to create the preset and discovered that everything resides in the HSL / Grayscale panel. It seems as though all of the color sliders were reduced to the value of -75 in the Saturation tab and the Red, Orange and Yellow sliders were increased to +20, +30 and +30, respectively, in the Luminance tab. While these edits aren’t difficult at all to make, I sure wouldn’t want to make them over and over again if I had many photos to apply them to.
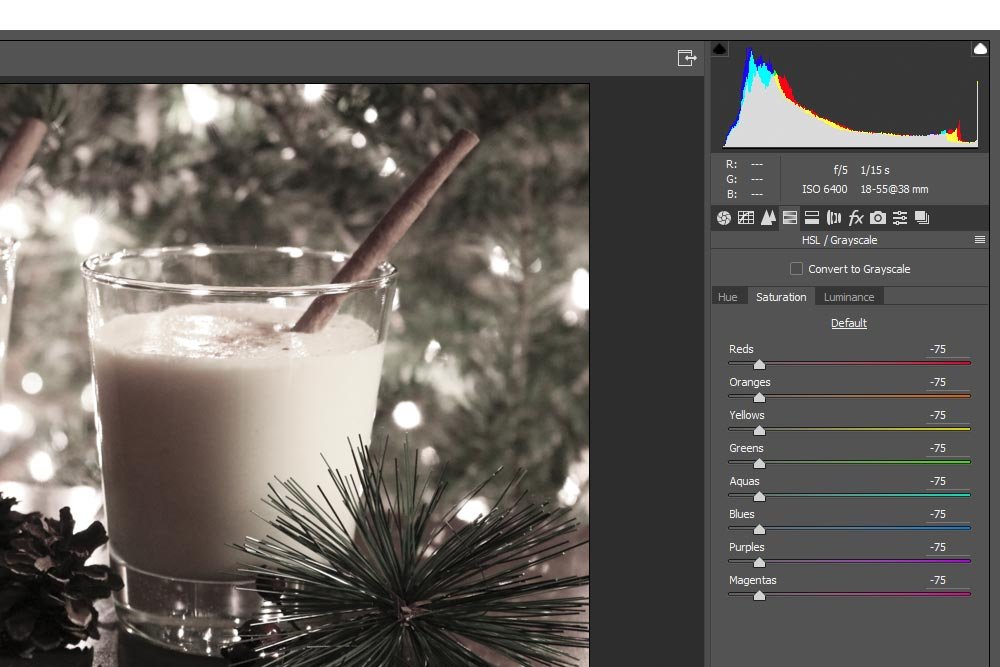
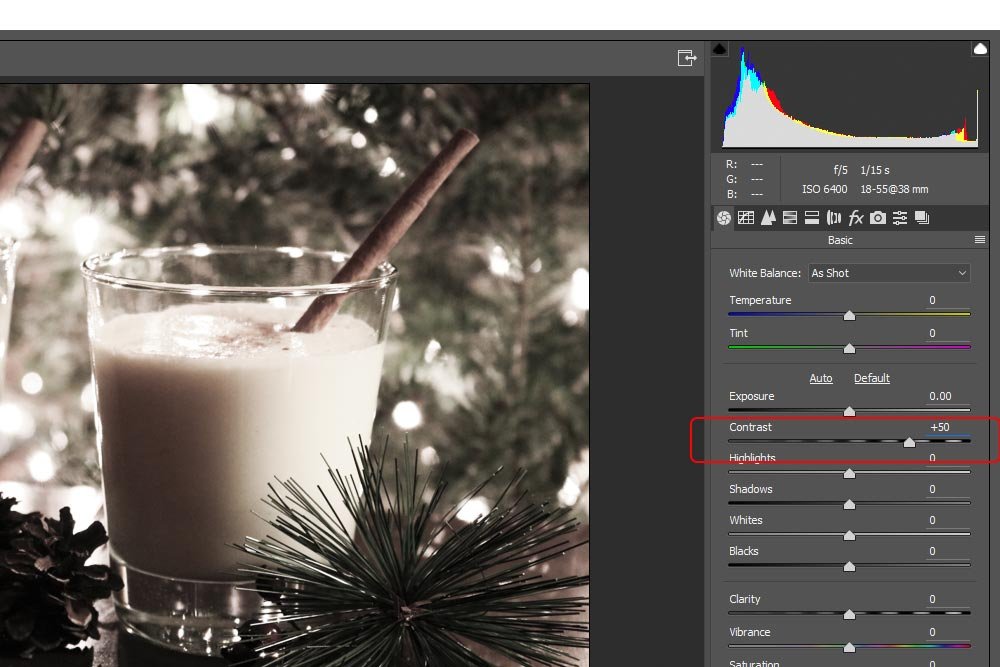
I mentioned above that what I’m seeing after I apply this preset isn’t good enough. I want more contrast and I probably will for the duration. So, to help out, I’m going to head towards the Basic panel and increase the Contrast to a value of +50.
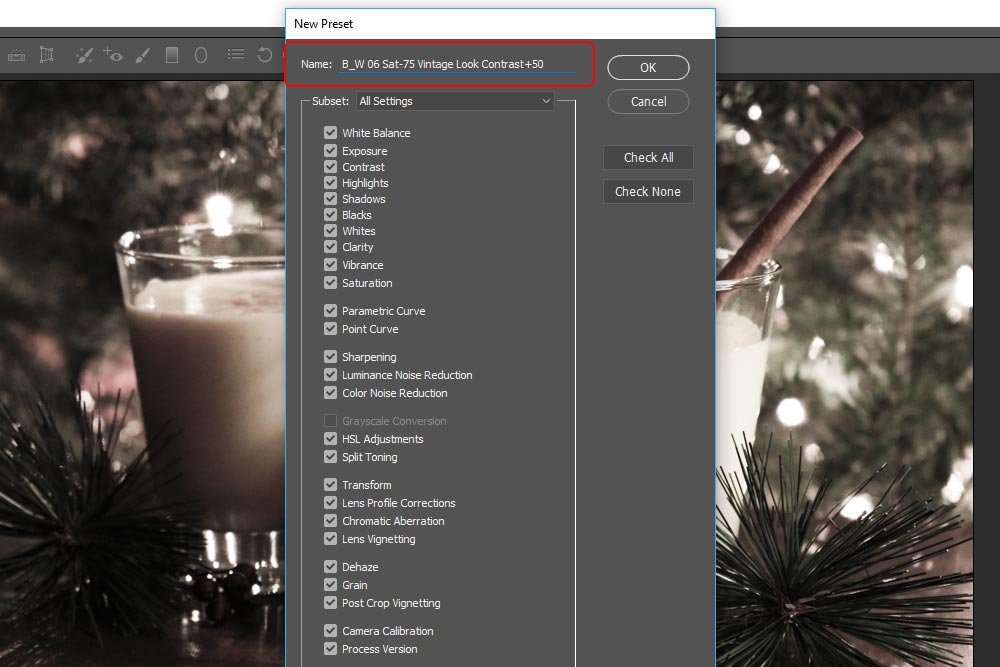
And since I want this to happen automatically from now on, I’ll create a new preset that’s based on the original values from the previous preset and the new value I added. To do this, I’ll go back to the Presets panel and click on the New Preset button down at the bottom (see instructions for creating new presets). Then, after the New Preset dialog box opens, I’ll type in the name of the original preset, which was “B_W 06 Sat-75 Vintage Look” and add to it whatever change I made. So, the new name will be “B_W 06 Sat-75 Vintage Look Contrast+50.”
When I’m done, I’ll click on the OK button and look at the presets in the panel. Low and behold, the preset I just created is there. The best part is, since presets are listed alphabetically, it’s directly under the original, which keeps things simple and easy to find.
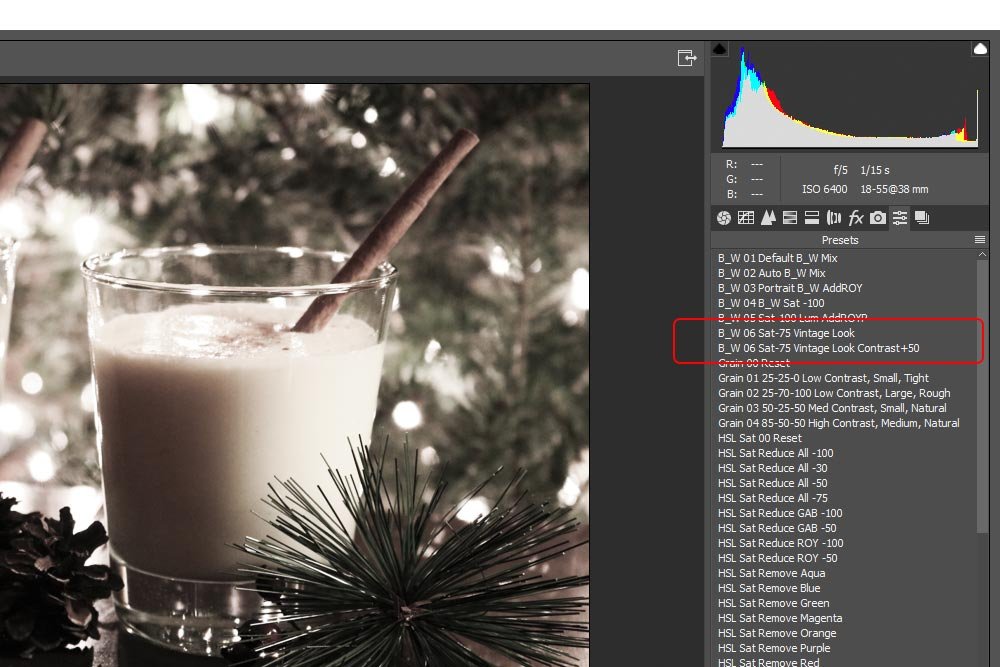
Being listed alphabetically is important here because, oftentimes, folks change existing presets a lot. Having an entire list that’s organized really saves a lot of time.
After it’s created and is sitting there in the folder in front of you, drag it to your desktop or where ever it will be easy to access. I know that it’s a real pain in the butt to navigate to the folder where these Presets are stored. That’s why I’m suggesting this. Also, if you don’t know which folders I’m referring to, please read this post.
Okay, now on to renaming a preset.
Doing this is simple. Again, navigate to the folder where the presets are stored, find the one you’d like to rename, right-click on it and choose Rename.
You can either right-click on the file or slow-click on it twice. That means that you click once, wait a second and then click again. Either way, the file name will become editable.
From there, type in the new name you want and hit Enter on your keyboard. You’ll see the name update in the folder and when you head back into the Camera Raw Presets panel, it’ll be updated there as well.
Anyway, after you install hundreds of presets you’ll never use, you can easily get rid of them. To do this, simply navigate to the same folder I just mentioned again – the one where the presets are stored. From there, you can click on any preset you don’t want and hit Delete on your keyboard. That will get rid of it for good. If you want to remove many at once, you can click on the first one in a series, hold down the Shift key on your keyboard and then click on the last one in the series. Then, press Delete and they will all disappear in both the folder and Camera Raw. If you’d like to delete many randomly placed presets from this folder, click on the first preset you want to remove, then hold down the Ctrl key on your keyboard and choose the rest. When they’ve all been selected, press the Delete key and you’ll get the same result as above.
If you’re working inside Camera Raw and would like to remove a small number of presets, you can do it from there as well. All you’ll need to do is select a preset and then click on the small trash can icon in the lower right corner.
That will remove the preset from Camera Raw and the folder. Just remember, once you click that preset, whatever it is will be applied to the photo, even after it’s gone, so be sure to get rid of these things and then click the Cancel button in the lower right corner to close out of Camera Raw without applying any changes.
Wow, that was pretty long. I hope I showed you how to work with presets in Camera Raw a bit more than I did in my previous posts. If you have any questions or concerns, please leave them in the comment section below. Thanks for reading!
In today’s post, I’d like to continue on in the Preset world. I know there isn’t too much left to cover when it comes to the basics, but if you ever decided that you wanted to create your own Presets and sell them, things get huge fast. I’m going to avoid all that for now and simply stick to what can help that majority of photo editors who use Camera Raw.
The first area I want to talk about I can get done really quickly. I merely want to show you one more method for applying Presets via Adobe Bridge. After that, I’d like to show you how you can use an existing or imported Preset, modify it and then save it as a version of the original. This is as straightforward as you can get, so there’s no sweat at all. After that, I’d like to explain how you can rename a Preset if you ever wanted to and finally, I’m going to go ahead and demonstrate two different methods for deleting those Presets you no longer need or want.
While this sounds like a lot, it really isn’t. And to help you out, I’ll give you a quick tip below that will certainly speed things up if you ever become a Preset master.
Applying a Camera Raw Preset From Adobe Bridge
In this post, I explained how you can easily apply a Camera Raw preset straight from Bridge, without ever opening Camera Raw at all. I have to admit, this method is pretty slick. I love it when I can make wide ranging alterations with minimal work.In this section, I just want to go over one more very simple method for doing the exact same thing. This time, it has to do with right-clicking on a thumbnail as opposed to using the Edit menu.
If I open Bridge and navigate to the folder where my thumbnails live, I can select a thumbnail, right-click on it and find the Develop Settings menu item that appears. If I roll over that item, all of my installed or created Presets will appear, along with some other options at the way top of the sub-menu.

This menu has many of the same options as the one from the Edit menu item up at the top of the application. It even has the Clear Settings option I mentioned in my earlier post.
So this is just another way to access presets via Adobe Bridge. I told you it was easy.
Modifying a Preset & Saving the Modification
Trust me, this is going to happen all the time. You’ll find a sweet Preset that has almost everything you want. The problem is, you find that no matter how many times you use the Preset, you always need to go to one area of Camera Raw to make a simple tweak. Perhaps even a few tweaks. When this happens, it’s worthwhile to use the existing Preset, modify it like you always do and then save everything as a new Preset. Let me show you how this works.Let’s say I open a photo into Camera Raw.

Now, I’ll head to the Presets panel and apply the Vintage Look preset. Actually, the full name of this preset is B_W 06 Sat-75 Vintage Look.

Now, just by looking at this, I already know that I want some more contrast. I already took a look through the various panels to see what changes were made to create the preset and discovered that everything resides in the HSL / Grayscale panel. It seems as though all of the color sliders were reduced to the value of -75 in the Saturation tab and the Red, Orange and Yellow sliders were increased to +20, +30 and +30, respectively, in the Luminance tab. While these edits aren’t difficult at all to make, I sure wouldn’t want to make them over and over again if I had many photos to apply them to.


I mentioned above that what I’m seeing after I apply this preset isn’t good enough. I want more contrast and I probably will for the duration. So, to help out, I’m going to head towards the Basic panel and increase the Contrast to a value of +50.

And since I want this to happen automatically from now on, I’ll create a new preset that’s based on the original values from the previous preset and the new value I added. To do this, I’ll go back to the Presets panel and click on the New Preset button down at the bottom (see instructions for creating new presets). Then, after the New Preset dialog box opens, I’ll type in the name of the original preset, which was “B_W 06 Sat-75 Vintage Look” and add to it whatever change I made. So, the new name will be “B_W 06 Sat-75 Vintage Look Contrast+50.”

When I’m done, I’ll click on the OK button and look at the presets in the panel. Low and behold, the preset I just created is there. The best part is, since presets are listed alphabetically, it’s directly under the original, which keeps things simple and easy to find.

Being listed alphabetically is important here because, oftentimes, folks change existing presets a lot. Having an entire list that’s organized really saves a lot of time.
How to Rename a Preset
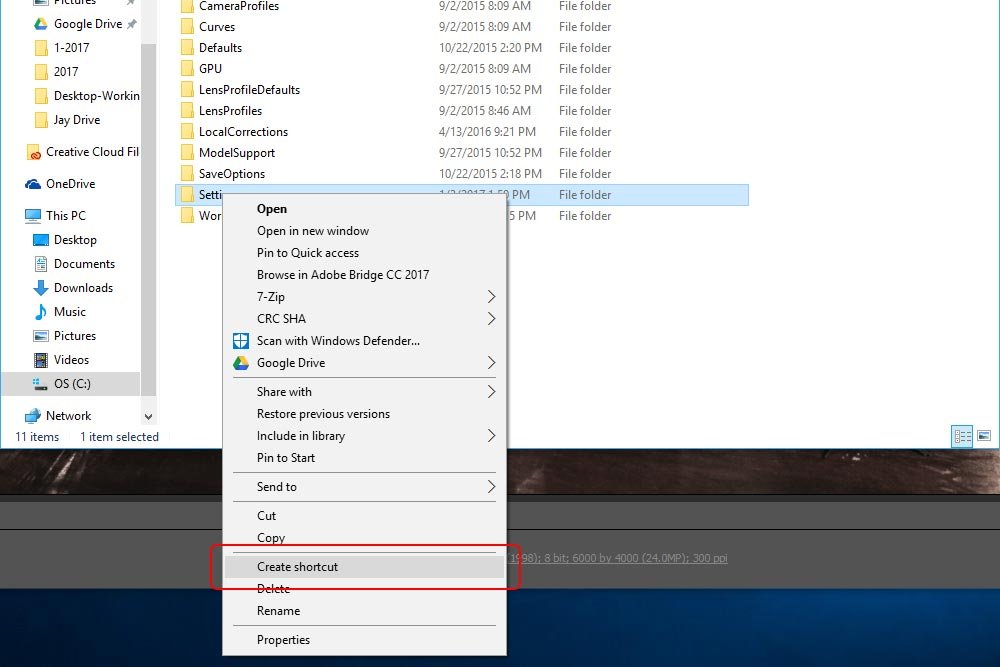
Here’s a quick and helpful tip for you. If you plan on working with Presets often, make a shortcut of the folder they’re located in and add that shortcut to your desktop. To create a shortcut in Windows, just navigate to the folder just above the folder you’d like to create the shortcut for, right-click on it and select Create Shortcut.
After it’s created and is sitting there in the folder in front of you, drag it to your desktop or where ever it will be easy to access. I know that it’s a real pain in the butt to navigate to the folder where these Presets are stored. That’s why I’m suggesting this. Also, if you don’t know which folders I’m referring to, please read this post.
Okay, now on to renaming a preset.
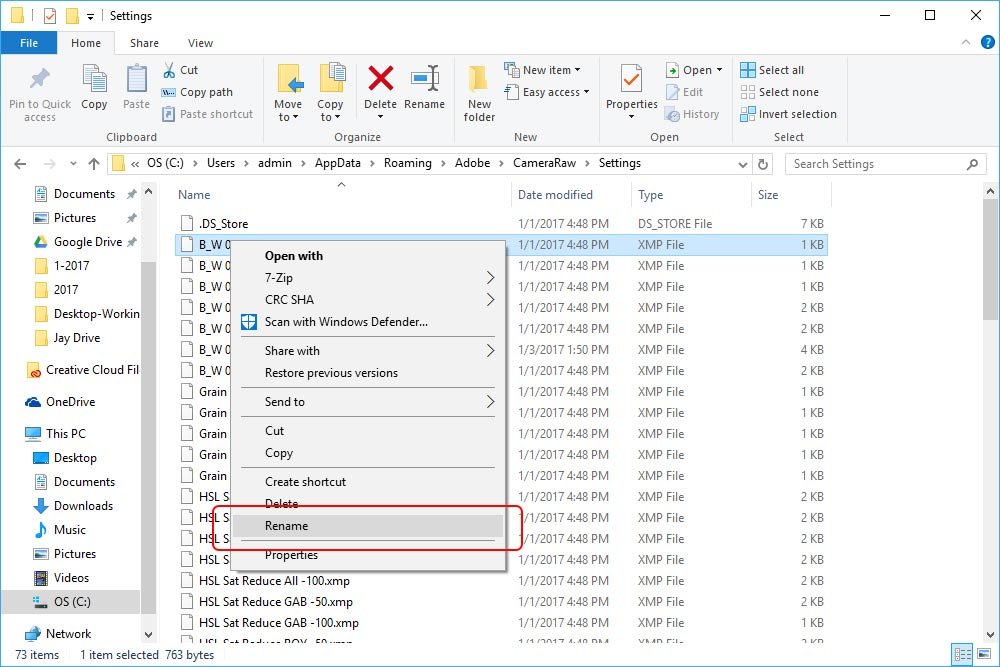
Doing this is simple. Again, navigate to the folder where the presets are stored, find the one you’d like to rename, right-click on it and choose Rename.

You can either right-click on the file or slow-click on it twice. That means that you click once, wait a second and then click again. Either way, the file name will become editable.

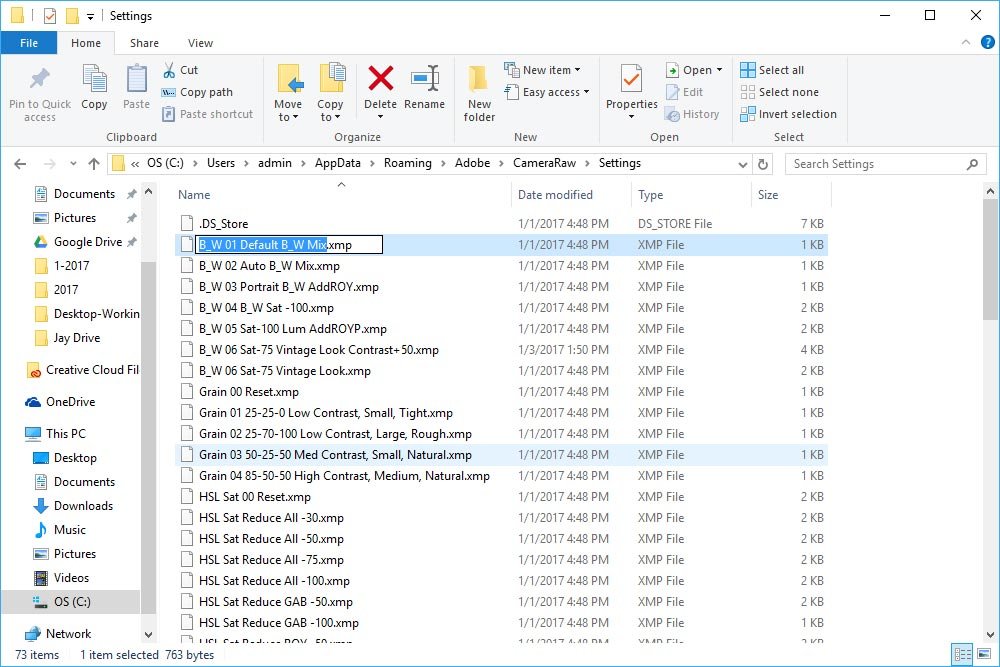
From there, type in the new name you want and hit Enter on your keyboard. You’ll see the name update in the folder and when you head back into the Camera Raw Presets panel, it’ll be updated there as well.
How to Delete a Preset
Sometimes, we get carried away and install far too many presets than we’ll ever use. I know this from experience. It’s jut something you have to go through when you enter this field. Don’t worry, the lesson will be learned soon enough. More isn’t always better.Anyway, after you install hundreds of presets you’ll never use, you can easily get rid of them. To do this, simply navigate to the same folder I just mentioned again – the one where the presets are stored. From there, you can click on any preset you don’t want and hit Delete on your keyboard. That will get rid of it for good. If you want to remove many at once, you can click on the first one in a series, hold down the Shift key on your keyboard and then click on the last one in the series. Then, press Delete and they will all disappear in both the folder and Camera Raw. If you’d like to delete many randomly placed presets from this folder, click on the first preset you want to remove, then hold down the Ctrl key on your keyboard and choose the rest. When they’ve all been selected, press the Delete key and you’ll get the same result as above.
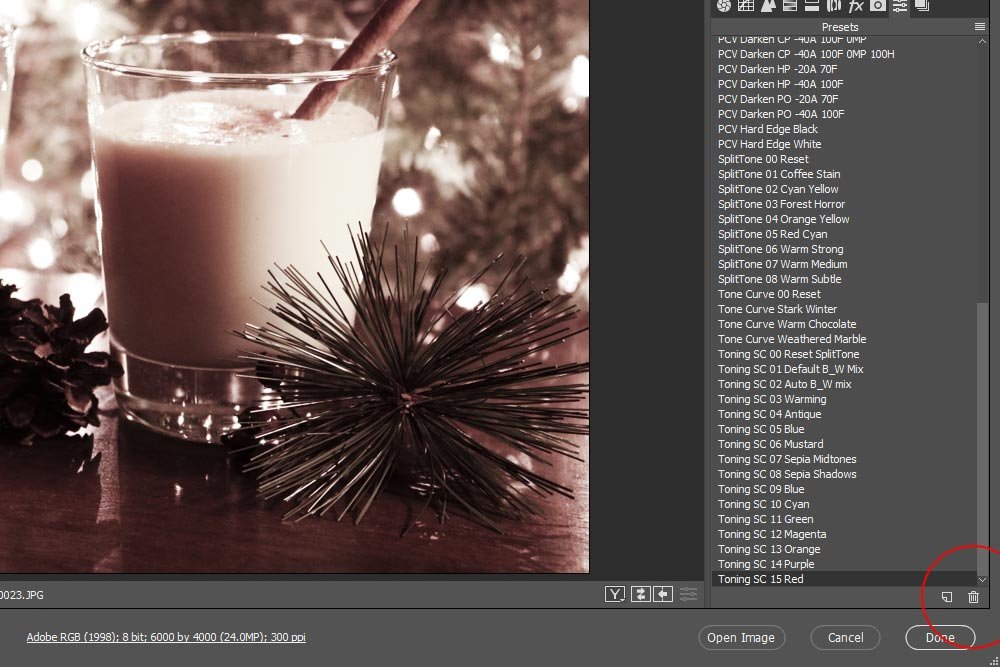
If you’re working inside Camera Raw and would like to remove a small number of presets, you can do it from there as well. All you’ll need to do is select a preset and then click on the small trash can icon in the lower right corner.

That will remove the preset from Camera Raw and the folder. Just remember, once you click that preset, whatever it is will be applied to the photo, even after it’s gone, so be sure to get rid of these things and then click the Cancel button in the lower right corner to close out of Camera Raw without applying any changes.
Wow, that was pretty long. I hope I showed you how to work with presets in Camera Raw a bit more than I did in my previous posts. If you have any questions or concerns, please leave them in the comment section below. Thanks for reading!
