KristinaW
Member
- Joined
- May 7, 2021
- Messages
- 127
- Reaction Score
- 0
- Points
- 18
- #1
Have you ever wondered how to alter a photo so it appears that you changed the time of day it was taken? For instance, perhaps you captured a scene in the morning some time, but needed it to look like you took it during the evening. Not completely dark, mind you, but just as the sun was going down. Or perhaps a bit later on a moon lit night. Believe it or not, you can do a pretty decent job at accomplishing something like this right in Adobe Camera Raw. It only takes a few moments.
In today’s post, I’d like to tackle just this type of project. I’m going to launch a daytime photo from Adobe Bridge into Camera Raw and change it so it looks like it was taken just after the sun went down. The best part is, every slider I push will be located right in the Basic panel, so there won’t be any curve balls to deal with.
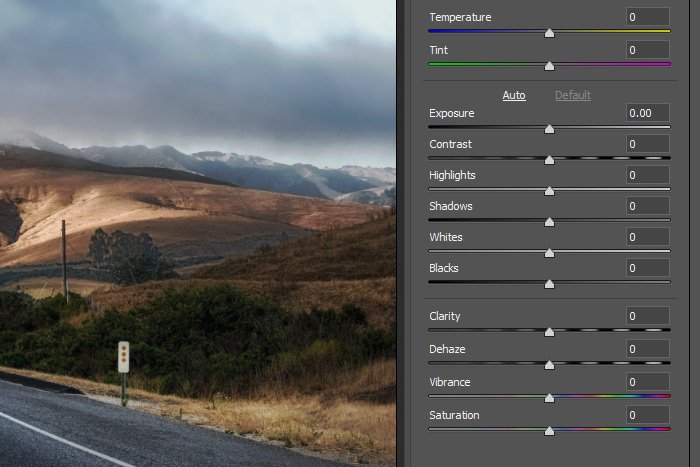
Okay, I already selected the photo thumbnail in Bridge and clicked on the Open in Camera Raw button. That means the image is ready for editing and that it’s opened in Camera Raw. As it stands, no sliders have yet been touched.
Before I begin, I want to give you some background on what’s happening here. When you see something in daylight, you’re seeing the object with the full visible spectrum. When you see an object at dusk or at night, much of that spectrum isn’t visible anymore. With that in mind, part of what I do below is simply to remove some of the spectrum. More specifically, I’ll want to cool down the photo and somewhat desaturate it so it looks as realistic as possible. If you think about it, when was the last time you saw something in full color after the sun went down? Actually, you lose a lot of color if the sun hides behind a cloud, so this part of things is rather sensitive.
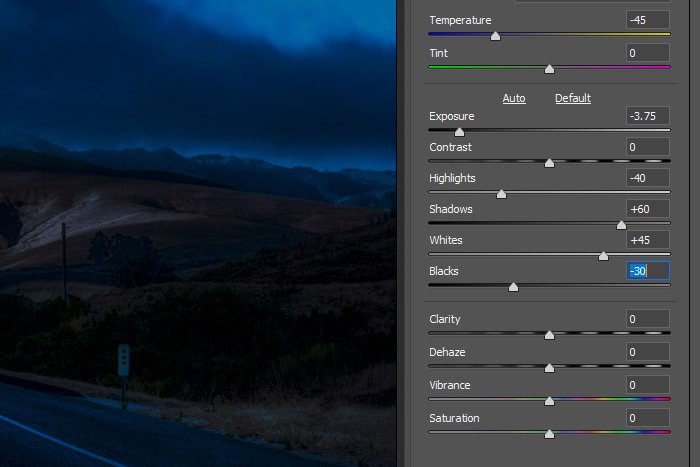
The first slider I’m going to push is Exposure. Since there’s less light available at dusk, it only makes sense to reduce the exposure in this application. I’ll push the Exposure slider to the left so it sits around the -3.00 mark. I can always adjust this later on as I see fit.
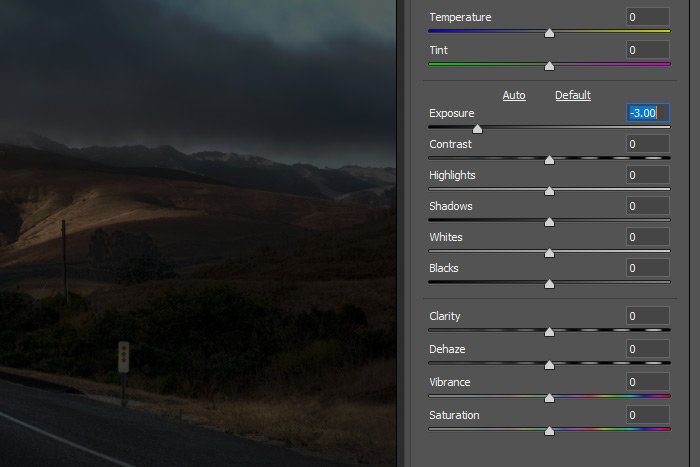
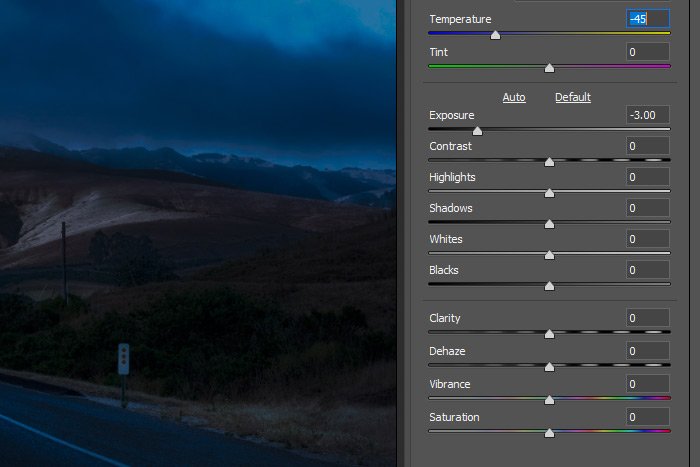
If you take a look at the above screenshot, you’ll notice the brown in the mountains and the green in the trees. It doesn’t look very realistic with those colors still visible. Also, the photo looks too warm, so next, I’ll head up to the Temperature slider and push that to the left until it reaches -45. As you’ll see from the below screenshot, things have really cooled off, which is good. Just that one adjustment makes things look more “real.”
Next, I’ll work on some of the image’s contrast values, but I won’t touch the actual Contrast slider. What I will do is push the Highlights slider to the left so the value is -40, the Shadow slider to the right so the value is +60, Whites to the right so the value is +45 and the Blacks to the left so the value is -30. Doing this adds some punch to the photo, especially in the sky and on the road.
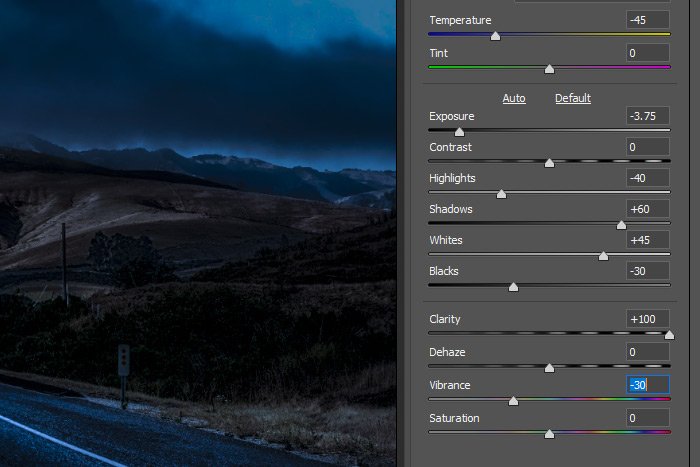
Finally, I’ll push the Clarity slider to the right so the value is +100 and the Vibrance slider to the left so the value is -30. Regarding the Clarity slider; basically, I feel as though this one represents to the glow of the moon on the objects on the ground. The higher I pushed this value, the more I saw that glow. Since I liked the look it gave me at full clarity, I just kept it that way. Also, the Vibrance slider did a great job at removing some of that extra color in the image that wasn’t removed with any of the previous sliders. If you’ll recall, I mentioned that I needed to get rid of some of that color above.
Let’s take a look at the final photo.
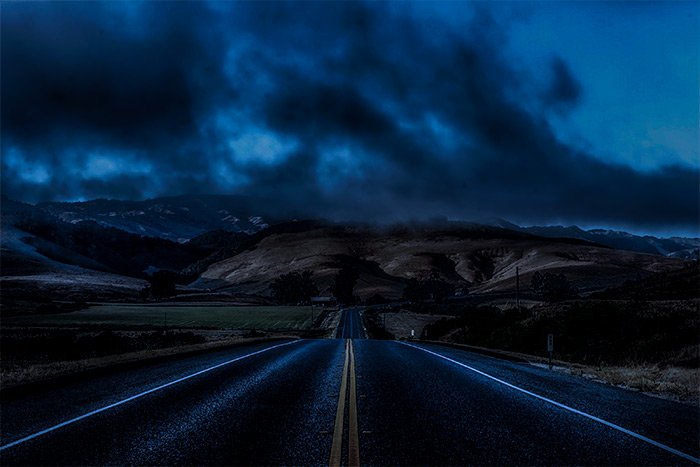
How cool is that? It looks pretty realistic to me, but I may have been looking at it for too long. What do you think about it? Let’s have a before and after compare.
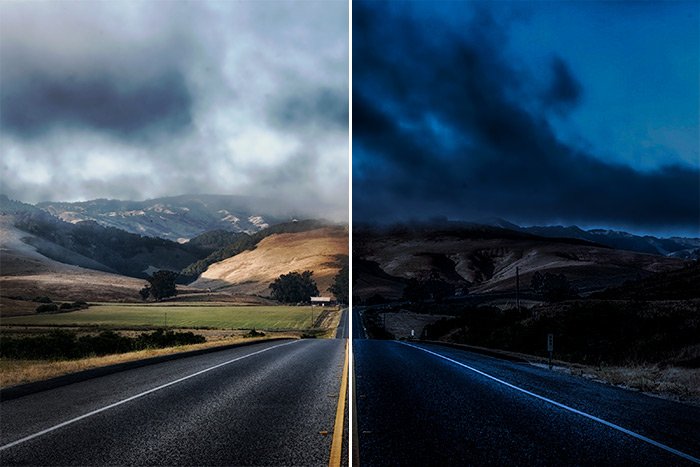
I just love projects like this that are nice and easy and that turn out well.
——
I hope I clearly explained how you can quickly and easily edit a photo so that it looks like it went from day to night. If you have any questions or concerns regarding this post, please let me know in the comment section below. Thanks for reading!
In today’s post, I’d like to tackle just this type of project. I’m going to launch a daytime photo from Adobe Bridge into Camera Raw and change it so it looks like it was taken just after the sun went down. The best part is, every slider I push will be located right in the Basic panel, so there won’t be any curve balls to deal with.
The Demo Photo
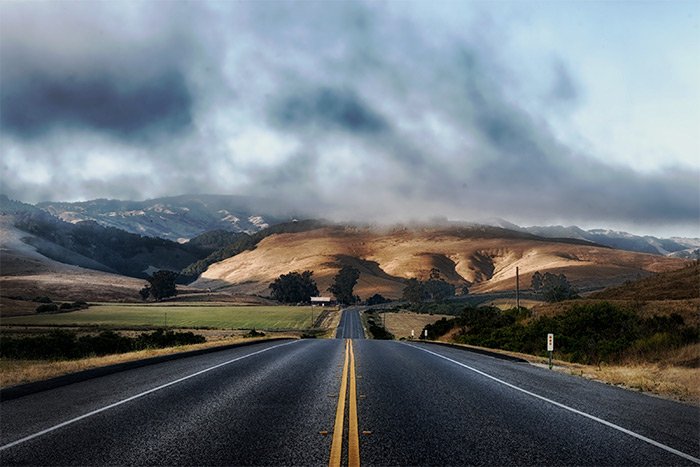
The reason I chose this photo was because of the partial cloud cover. I thought it would be too easy to edit a photo with no clouds in it, so I felt this one would be good. You’ll see what when I start pushing the sliders to get some highlights. Those make it look like the moon is shining, which is pretty cool. Here’s the photo.
Pushing Those Sliders
This post will be relatively brief because there isn’t that much to talk about. Like I said above, everything I need to change it right in the Basic panel.Okay, I already selected the photo thumbnail in Bridge and clicked on the Open in Camera Raw button. That means the image is ready for editing and that it’s opened in Camera Raw. As it stands, no sliders have yet been touched.

Before I begin, I want to give you some background on what’s happening here. When you see something in daylight, you’re seeing the object with the full visible spectrum. When you see an object at dusk or at night, much of that spectrum isn’t visible anymore. With that in mind, part of what I do below is simply to remove some of the spectrum. More specifically, I’ll want to cool down the photo and somewhat desaturate it so it looks as realistic as possible. If you think about it, when was the last time you saw something in full color after the sun went down? Actually, you lose a lot of color if the sun hides behind a cloud, so this part of things is rather sensitive.
The first slider I’m going to push is Exposure. Since there’s less light available at dusk, it only makes sense to reduce the exposure in this application. I’ll push the Exposure slider to the left so it sits around the -3.00 mark. I can always adjust this later on as I see fit.

If you take a look at the above screenshot, you’ll notice the brown in the mountains and the green in the trees. It doesn’t look very realistic with those colors still visible. Also, the photo looks too warm, so next, I’ll head up to the Temperature slider and push that to the left until it reaches -45. As you’ll see from the below screenshot, things have really cooled off, which is good. Just that one adjustment makes things look more “real.”

Next, I’ll work on some of the image’s contrast values, but I won’t touch the actual Contrast slider. What I will do is push the Highlights slider to the left so the value is -40, the Shadow slider to the right so the value is +60, Whites to the right so the value is +45 and the Blacks to the left so the value is -30. Doing this adds some punch to the photo, especially in the sky and on the road.

Finally, I’ll push the Clarity slider to the right so the value is +100 and the Vibrance slider to the left so the value is -30. Regarding the Clarity slider; basically, I feel as though this one represents to the glow of the moon on the objects on the ground. The higher I pushed this value, the more I saw that glow. Since I liked the look it gave me at full clarity, I just kept it that way. Also, the Vibrance slider did a great job at removing some of that extra color in the image that wasn’t removed with any of the previous sliders. If you’ll recall, I mentioned that I needed to get rid of some of that color above.

Let’s take a look at the final photo.

How cool is that? It looks pretty realistic to me, but I may have been looking at it for too long. What do you think about it? Let’s have a before and after compare.

I just love projects like this that are nice and easy and that turn out well.
——
I hope I clearly explained how you can quickly and easily edit a photo so that it looks like it went from day to night. If you have any questions or concerns regarding this post, please let me know in the comment section below. Thanks for reading!
