LukeLewis
Member
- Joined
- May 7, 2021
- Messages
- 134
- Reaction Score
- 0
- Points
- 21
- #1
Have you ever seen one of those really colorful and wonderful looking sunset photos where things look so vibrant and perfect that you’re left wondering how the photographer was lucky enough to own the best equipment and how he or she arrived at the scene at just the perfect moment to capture it? I sure have. And what’s interesting is that I have never in my life, ever, captured a photo that looks as good as the ones I see online. It’s a shame too because I really try out there. I try to take pictures that are as colorful as those beautiful ones I see on the internet. I just can’t though, which makes me sort of sad. In general, I chalk it up to my lousy camera equipment, my lack of skill or me arriving at the wrong time of day or in the wrong weather.
Do you want to know a little secret? Okay, I’ll tell you. Nobody takes beautiful shots like the one I’m describing above. If you were to take a glance at what comes out of photographers’ cameras and compare it to what the photos look like after post-processing, you’re jaw would hit the floor. The secret is that 90% of the robust beauty you see in photography has been created in Adobe Lightroom, Camera Raw and Photoshop. And that’s the truth.
In today’s post, I’d like to walk you through a simple post-processing scenario that will truly awaken a photo and bring it to life. I’ll play on the photo’s inherent strengths and will accentuate those strengths in such a way as to ultimately transform the photo, but keep it the same, if that makes any sense. Basically, in more simple terms, I’ll make a somewhat dull photo much more colorful and I’ll use Adobe Camera Raw and Photoshop to do it.
To accomplish my task, I’ll first duplicate the photo using Adobe Bridge. Then, I’ll take advantage of the Split Toning tab inside of Camera Raw. Finally, I’ll add a few adjustment layers inside of Photoshop and will play with the masking just a tad. The final product should look like one of those photos I referred to above. But I might go over the top in this post, just to prove a point.
Alternately, I could have just right-clicked on the image thumbnail in Bridge and have chosen Duplicate from there as well. Both options do the same thing. Ultimately, I’ll have two thumbnails in Bridge.
Once the photos are opened up in Camera Raw, I’ll select one of them over in the left column, where the two thumbnails are.
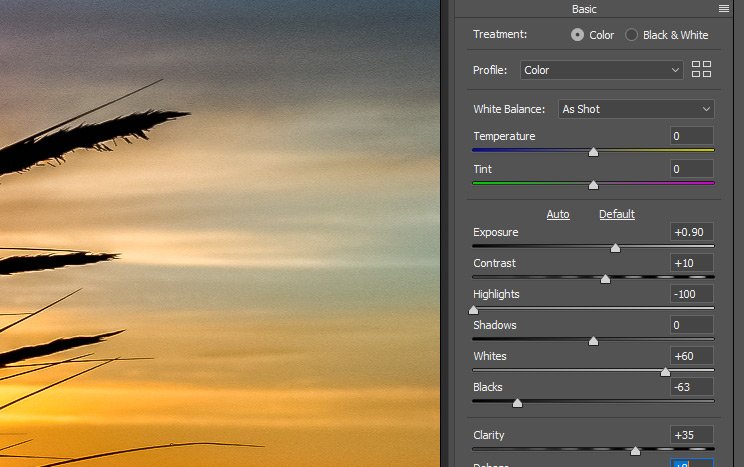
Then, I’ll go about editing in the Basic panel. My goal in this panel is to simply make any blacks in the image, blacker. I want them as dark as possible. I can also add a bit of contrast as well. One very important aspect here is to warm the entire image using the Temperature slider in the Basic panel. To warm the image, I’ll push the slider to the right (accurate slider position not shown in screenshot below).
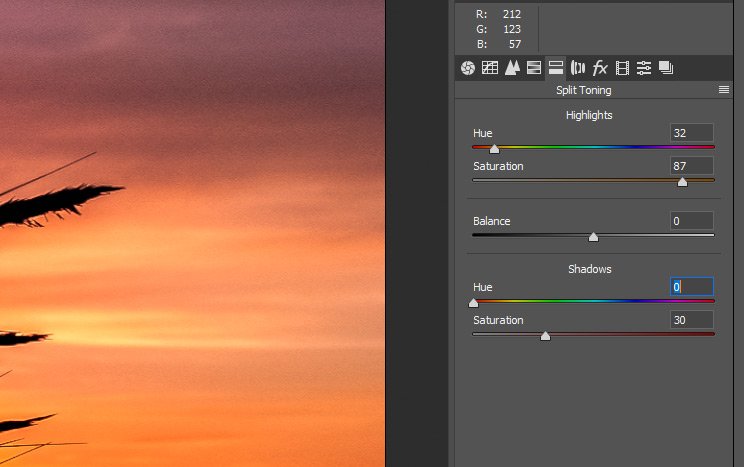
After I’m finished in the Basic panel, I’ll click the Split Toning tab over in the right column. Inside of this tab, I’ll push the sliders around a bit. My goal is to warm up the entire photograph. I want the warmth to be dramatic. At this point, I don’t mind if the look is slightly over the top. I’ll adjust both the Highlights and the Shadows.
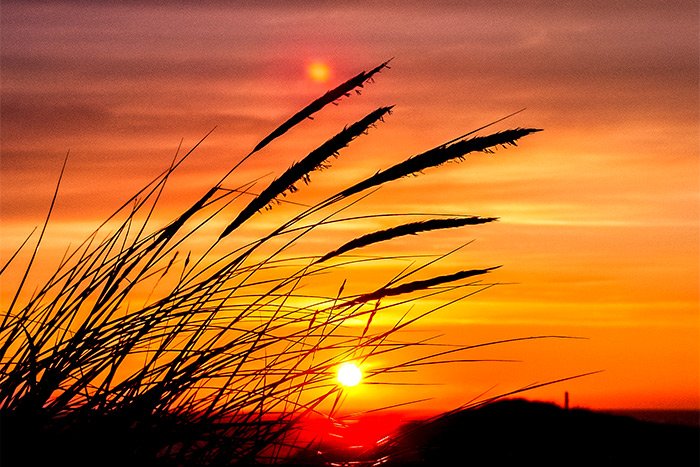
Here are the results of this effort.
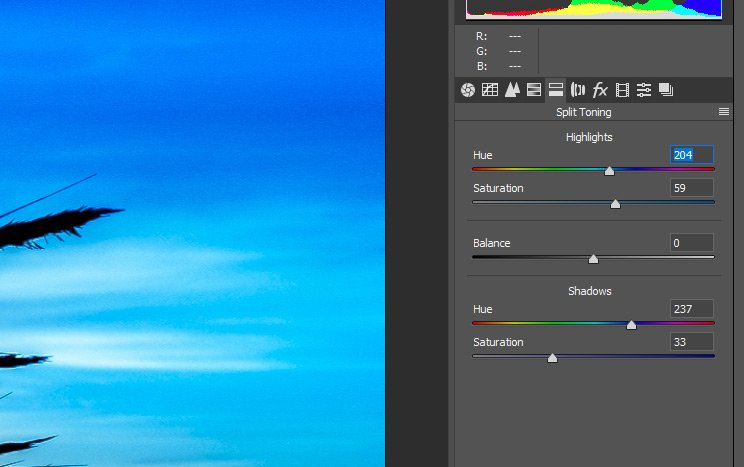
At this point, I’ll go back and select the other thumbnail that’s sitting in the left column of Camera Raw. I’ll make the same edits in the Basic panel as I did to the other image (this time though, I’ll cool the image by pushing the Temperature slider to the left) and again, I’ll move into the Split Toning tab when I’m finished with that. In the Split Toning tab, things will be a bit different than last time. Instead of warming up the sunset, I’ll be cooling it down. I’d like a blue hue to the image. As I do this, I’ll be keeping an eye on the top of the sky area. I want that nice and cool looking.
Here are the results of my efforts with this one.
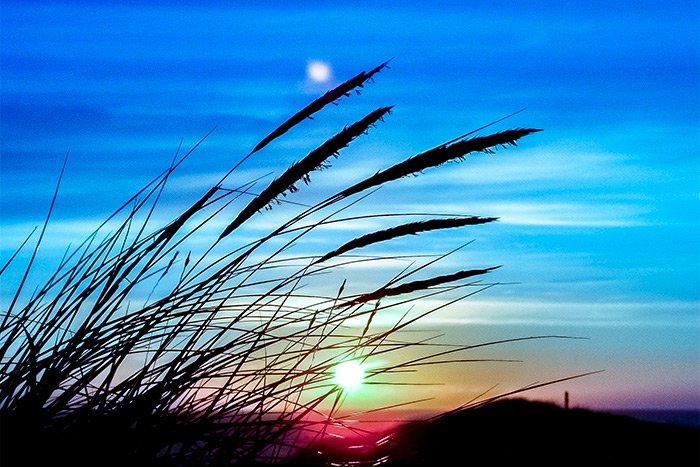
I actually quite like the look of both of these images. Let’s see if we can combine them for something special. First though, I need to close out of Camera Raw, so I’ll press the Done button that’s located down at the bottom right of the application. Doing this will bring me back to Bridge, where I’ll see the changes I made in the thumbnails.
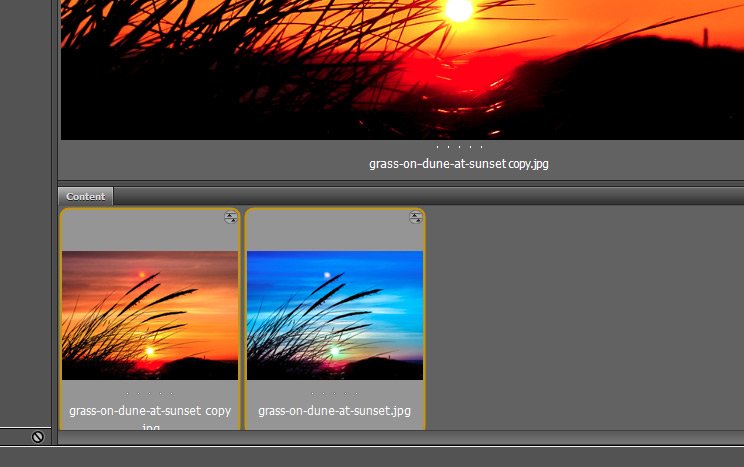
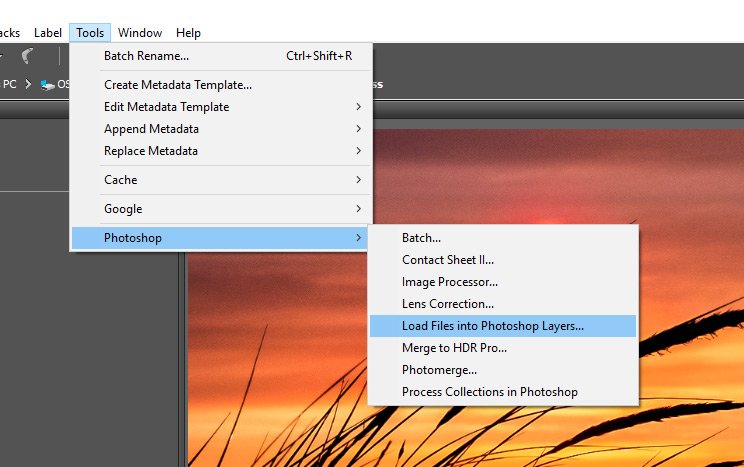
Once the images are selected, I’ll head up to the top menu and find the Tools > Photoshop > Load Files into Photoshop Layers option. I’ll click that and watch as the images are transferred over to the same Photoshop file.
Take a look at the photo layers in the Layers panel in Photoshop after the files have been transferred.
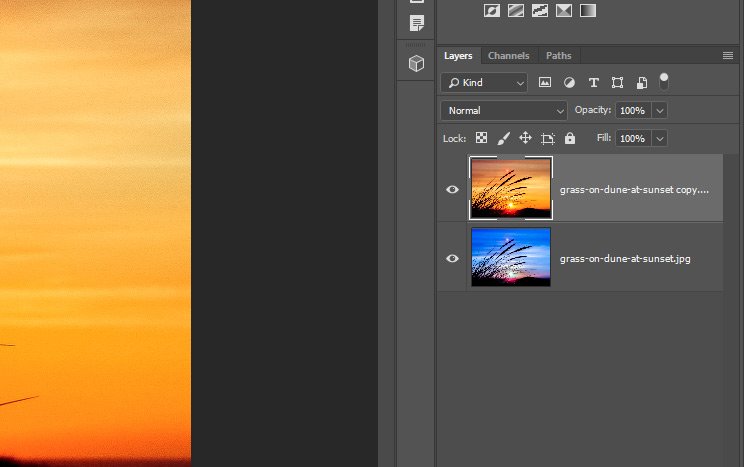
Okay, the goal with this step is to remove some of the orange layer from the blue. I want the blue to show through up at the top of the sky and since the orange layer is currently the top layer in the Layers panel, that’s the one I’ll need to add the mask to. To do that, I’ll click on the warm layer in the Layers panel to activate it and then I’ll head down to the bottom of the Layers panel and I’ll click on the Add Layer Mask icon.
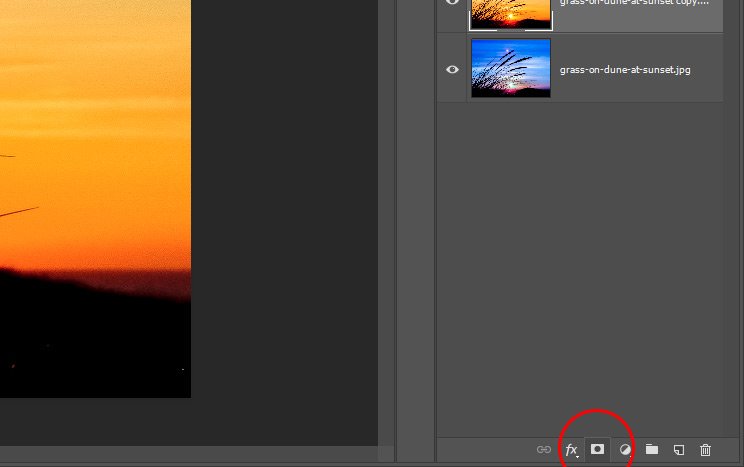
After that, I’ll click on the mask thumbnail to activate it and then I’ll use the Brush Tool and the color black to remove some of the warmth from the coolness. I’ll size the brush so it’s really big (almost as large as the photo itself) and I’ll make the edges very soft. Then, I’ll simply paint across the top of the image.
In this next screenshot, please take notice of how the mask thumbnail looks. You can see both the white and black areas of it. The white areas reveal the area of the layer it’s attached to and the black area hides that part of the layer.
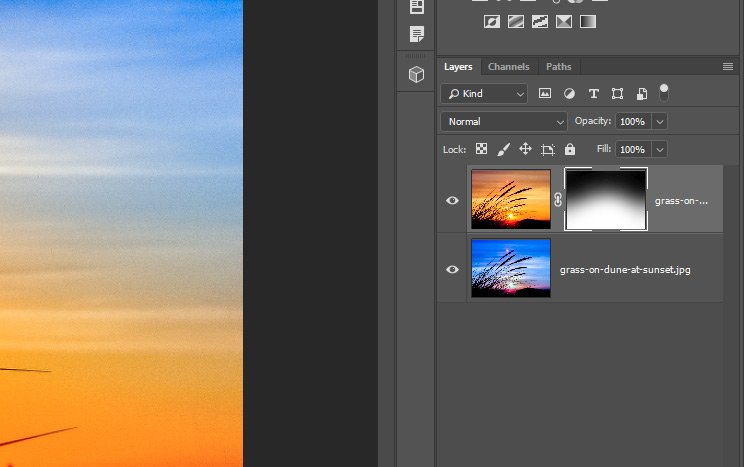
As you can see, I kept the warmth visible around the sun, so things look realistic. Let’s see the final photo.
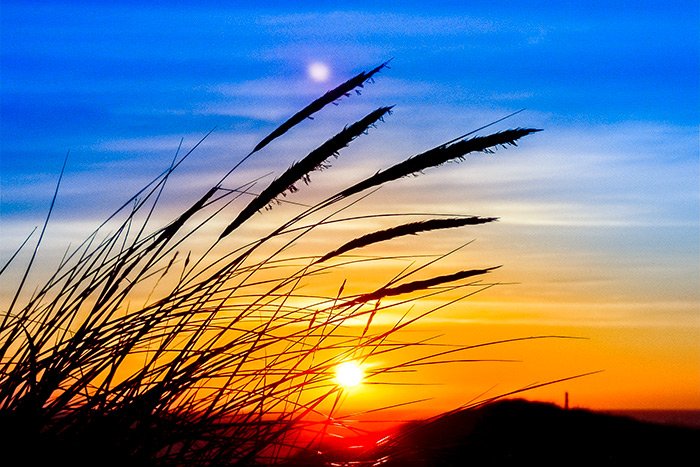
I know this image might be slightly too colorful, but I wanted to really have at it so you could clearly see what’s going on. I think I made my point. Also, if I wanted to alter one of the layers, I could always change things up in Camera Raw and re-import that altered image into this file and swap it with the original. I could even add adjustment layers to change up the colors if I wanted to. The sky’s the limit!
One final note: I used only two images for this project, but I was in no way limited to that number. I could have used a dozen if I wanted to, all with different color overlays. That’s what the pros do.
——
I hope I clearly explained how to use Adobe Bridge, Camera Raw and Photoshop to change a dull sunset photo into a vibrant and colorful one. If you have any questions about this post, please leave them in the comment section below. Thanks for reading!
Do you want to know a little secret? Okay, I’ll tell you. Nobody takes beautiful shots like the one I’m describing above. If you were to take a glance at what comes out of photographers’ cameras and compare it to what the photos look like after post-processing, you’re jaw would hit the floor. The secret is that 90% of the robust beauty you see in photography has been created in Adobe Lightroom, Camera Raw and Photoshop. And that’s the truth.
In today’s post, I’d like to walk you through a simple post-processing scenario that will truly awaken a photo and bring it to life. I’ll play on the photo’s inherent strengths and will accentuate those strengths in such a way as to ultimately transform the photo, but keep it the same, if that makes any sense. Basically, in more simple terms, I’ll make a somewhat dull photo much more colorful and I’ll use Adobe Camera Raw and Photoshop to do it.
To accomplish my task, I’ll first duplicate the photo using Adobe Bridge. Then, I’ll take advantage of the Split Toning tab inside of Camera Raw. Finally, I’ll add a few adjustment layers inside of Photoshop and will play with the masking just a tad. The final product should look like one of those photos I referred to above. But I might go over the top in this post, just to prove a point.
The Original Photo
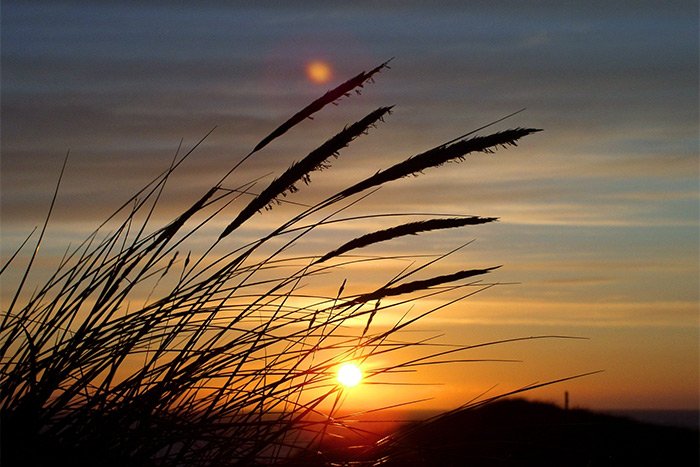
This is the photo I’ll be using for this post. I want you to take a close look at it and notice the color of the sky that’s all the way at the top. To me, it looks somewhat bluish. Then, I want you to take a look at the area around the sun itself and along the horizon line. To me, that looks orangish and reddish. It’s these two areas that I’ll be attempting to draw out.
Duplicating the Image
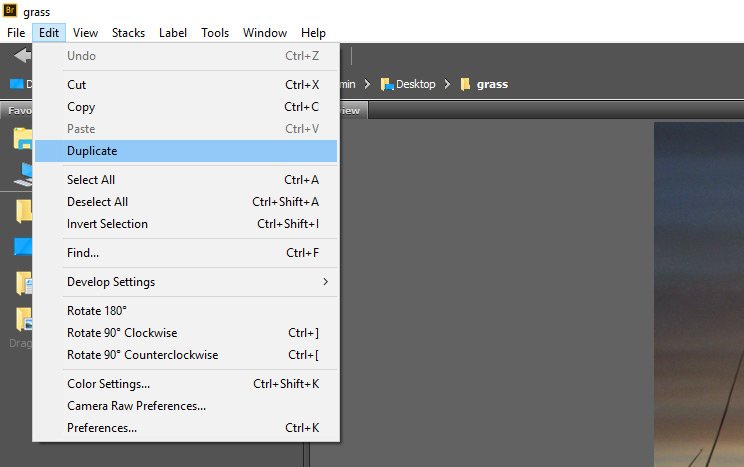
Because I’ll need two of the identical images later on in this project, I’ll need to duplicate the original now. To do this, I’ll find the image using Bridge and I’ll select it. Then, I’ll head up to the Edit > Duplicate menu item and click.
Alternately, I could have just right-clicked on the image thumbnail in Bridge and have chosen Duplicate from there as well. Both options do the same thing. Ultimately, I’ll have two thumbnails in Bridge.
Adding Warmth & Coolness in Camera Raw
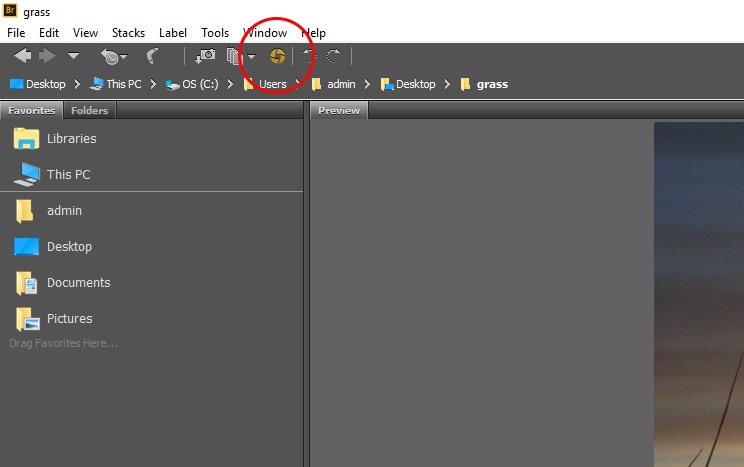
To launch both images into Camera Raw at the same time, I’ll click on one of the thumbnails, hold the Shift key on my keyboard down and then click on the other thumbnail. Then, I’ll click on the Open in Camera Raw button up top.
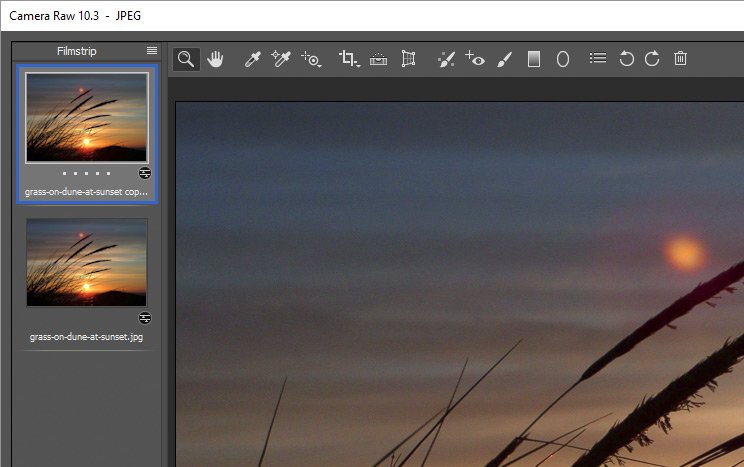
Once the photos are opened up in Camera Raw, I’ll select one of them over in the left column, where the two thumbnails are.

Then, I’ll go about editing in the Basic panel. My goal in this panel is to simply make any blacks in the image, blacker. I want them as dark as possible. I can also add a bit of contrast as well. One very important aspect here is to warm the entire image using the Temperature slider in the Basic panel. To warm the image, I’ll push the slider to the right (accurate slider position not shown in screenshot below).

After I’m finished in the Basic panel, I’ll click the Split Toning tab over in the right column. Inside of this tab, I’ll push the sliders around a bit. My goal is to warm up the entire photograph. I want the warmth to be dramatic. At this point, I don’t mind if the look is slightly over the top. I’ll adjust both the Highlights and the Shadows.

Here are the results of this effort.

At this point, I’ll go back and select the other thumbnail that’s sitting in the left column of Camera Raw. I’ll make the same edits in the Basic panel as I did to the other image (this time though, I’ll cool the image by pushing the Temperature slider to the left) and again, I’ll move into the Split Toning tab when I’m finished with that. In the Split Toning tab, things will be a bit different than last time. Instead of warming up the sunset, I’ll be cooling it down. I’d like a blue hue to the image. As I do this, I’ll be keeping an eye on the top of the sky area. I want that nice and cool looking.

Here are the results of my efforts with this one.

I actually quite like the look of both of these images. Let’s see if we can combine them for something special. First though, I need to close out of Camera Raw, so I’ll press the Done button that’s located down at the bottom right of the application. Doing this will bring me back to Bridge, where I’ll see the changes I made in the thumbnails.
Loading Images into Photoshop as Layers
Adobe Bridge has a really cool feature that allows us to open multiple images straight from it into Photoshop. The multiple images will appear in the same file in Photoshop as layers, which is extremely helpful when working with a project such as the one I’m working on. To open these files in Photoshop as layers, I’ll select both thumbnails by clicking and dragging over both of them down in the Filmstrip view. This is simply an alternate option to the one I showed earlier for selecting multiple items.
Once the images are selected, I’ll head up to the top menu and find the Tools > Photoshop > Load Files into Photoshop Layers option. I’ll click that and watch as the images are transferred over to the same Photoshop file.

Take a look at the photo layers in the Layers panel in Photoshop after the files have been transferred.

Masking for the Final Image
There are a few ways to finish this project up and I think I’ll go with the most simple. I was initially going to use adjustment layers to add more color, but after I saw the output from Camera Raw, I really doing think I need any more. With this in mind, I’ll work with a simple mask instead.Okay, the goal with this step is to remove some of the orange layer from the blue. I want the blue to show through up at the top of the sky and since the orange layer is currently the top layer in the Layers panel, that’s the one I’ll need to add the mask to. To do that, I’ll click on the warm layer in the Layers panel to activate it and then I’ll head down to the bottom of the Layers panel and I’ll click on the Add Layer Mask icon.

After that, I’ll click on the mask thumbnail to activate it and then I’ll use the Brush Tool and the color black to remove some of the warmth from the coolness. I’ll size the brush so it’s really big (almost as large as the photo itself) and I’ll make the edges very soft. Then, I’ll simply paint across the top of the image.
In this next screenshot, please take notice of how the mask thumbnail looks. You can see both the white and black areas of it. The white areas reveal the area of the layer it’s attached to and the black area hides that part of the layer.

As you can see, I kept the warmth visible around the sun, so things look realistic. Let’s see the final photo.

I know this image might be slightly too colorful, but I wanted to really have at it so you could clearly see what’s going on. I think I made my point. Also, if I wanted to alter one of the layers, I could always change things up in Camera Raw and re-import that altered image into this file and swap it with the original. I could even add adjustment layers to change up the colors if I wanted to. The sky’s the limit!
One final note: I used only two images for this project, but I was in no way limited to that number. I could have used a dozen if I wanted to, all with different color overlays. That’s what the pros do.
——
I hope I clearly explained how to use Adobe Bridge, Camera Raw and Photoshop to change a dull sunset photo into a vibrant and colorful one. If you have any questions about this post, please leave them in the comment section below. Thanks for reading!
