WendyMay
Member
- Joined
- May 11, 2021
- Messages
- 142
- Reaction Score
- 0
- Points
- 21
- #1
A while back, I wrote a post that talked about the HSL/Grayscale panel in Adobe Camera Raw. The HSL section of this panel is a place that gets more and more attention the better someone becomes at editing. Primarily, newer editors stick with making the majority of their changes to a photo in the Basic panel, but as the editor grows, learns more and his or her needs become more demanding, they tend to end up browsing through the various features the HSL panel has to offer.
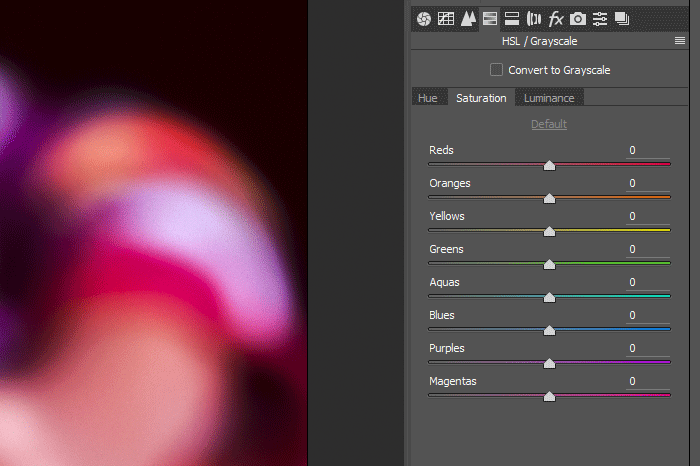
There are a few different ways to adjust color in Camera Raw via the HSL panel. The first and most popular method is to simply push the color sliders to the left and to the right. This will have obvious and immediate effects on whatever it is you’re working on and will most likely get the job done. And by the way, if you don’t know what HSL stands for, it’s Hue, Saturation and Luminance. Hue controls the color itself, saturation controls how much color is absorbed (intensity) into a particular area and luminance controls how bright or dark a color is. These controls are very straightforward and really, that’s all there is to it. The rest of color editing is up to the imagination. Here’s a screenshot for you, so you can see what the panels look like.
In today’s post, I’d like to take a different approach to color adjustment in Camera Raw. To do this, I’ll be toying around with the Targeted Adjustment Tool. This tool is more advanced than the simple slider push I described above and I think it’s important to explain some of how editors can accomplish different tasks as well as what happens when they do.
Plus, what’s not to love about crayons?
What about purple? Okay, I think blue and red make purple. But what about dark purple or light purple? Or magenta? I think you see what I’m saying here. While there are no shortage of tools and sliders to take advantage of in Camera Raw, sometimes they need to be understood a bit more than the average person does and sometimes they need another helper tool to assist with relieving some of the stress involved. This is where the Targeted Adjustment Tool comes into play.
As I go through this post, I’ll be moving sliders like it’s nobody’s business, over and over again. It’s extremely helpful to have a button (or link) to push that resets everything in one fell swoop. I do want to make you aware of a one small detail though. Each panel’s Default command controls only the sliders in that panel. If I want to reset just the Hue panel, I can click the link. The remaining panels will keep their slider positions intact. If I wanted to reset them, I’d have to visit each one and click Default for each. Also, if I double-click on each slider in whatever panel, I can reset them one by one. That’s what people do when they are fine tuning. For the more broad and overall reset, click Default.
Adjusting Hue, Saturation & Luminance in Adobe Camera Raw
What I’d like to do in the sections below and for the remainder of this post is to offer some examples of what happens when I adjust certain colors with the Targeted Adjustment Tool. Again, this is very straightforward, but it’s meant to merely give you a primer on the tool itself. You know, just to increase your comfort level with it.
To access this particular tool, I’ll head up to the top toolbar and click the icon that looks like it has a bullseye in it.
In the above screenshot, you can see the tooltip below the icon. Also, if I were to click and drag that icon down, I’d see further options.
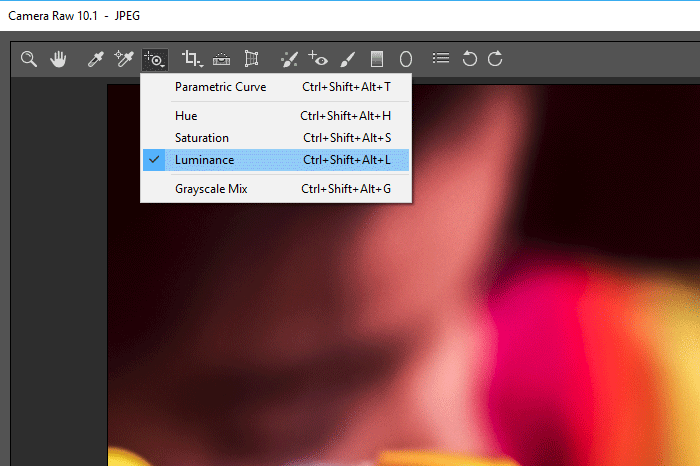
As you can see, I can choose which type of adjustment I’d like to make for each color I edit. I can click Hue, Saturation or Luminance from this menu or I can simply visit the sub-panel over in the HSL/Grayscale panel and adjust in real time after I enter the panel of choice. If I do this, the Targeted Adjustment Tool will pick up on what panel I’m in and will only make those adjustments. It’s very intuitive and you can work very quickly this way.
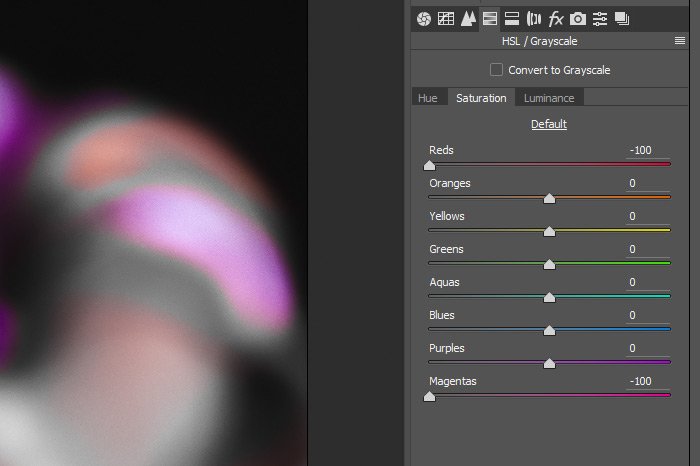
As we can see, the Reds slider has been pushed all the way to the left as well as the Magentas slider. See? I wouldn’t have pushed the Magenta at all. I didn’t know that color was involved.
As you can see, the tool I’m using picked up on the fact that there were not only purples in the crayon I clicked on, but blues as well. If I had done this by hand, I would have only adjusted the Purples slider and I would have left the Blues out of it. That would have been a mistake.
Let’s take a look at which color sliders moved this time. Remember, I would have chosen only the Orange slider.
I guess I can’t say I’m surprised. Both the Reds and the Oranges sliders moved this time. Again, I wouldn’t have pushed the Reds, which would have been a mistake. What I’m attempting to show you here is that using this tool really is the way to go when editing color in the application at hand.
——
I hope I clearly demonstrated the advantages of using the Targeted Adjustment Tool over adjusting individual color sliders in Adobe Camera Raw. If you have any questions or concerns regarding this post, please leave them in the comment section below. Thanks for reading!
There are a few different ways to adjust color in Camera Raw via the HSL panel. The first and most popular method is to simply push the color sliders to the left and to the right. This will have obvious and immediate effects on whatever it is you’re working on and will most likely get the job done. And by the way, if you don’t know what HSL stands for, it’s Hue, Saturation and Luminance. Hue controls the color itself, saturation controls how much color is absorbed (intensity) into a particular area and luminance controls how bright or dark a color is. These controls are very straightforward and really, that’s all there is to it. The rest of color editing is up to the imagination. Here’s a screenshot for you, so you can see what the panels look like.

In today’s post, I’d like to take a different approach to color adjustment in Camera Raw. To do this, I’ll be toying around with the Targeted Adjustment Tool. This tool is more advanced than the simple slider push I described above and I think it’s important to explain some of how editors can accomplish different tasks as well as what happens when they do.
Demo Photo
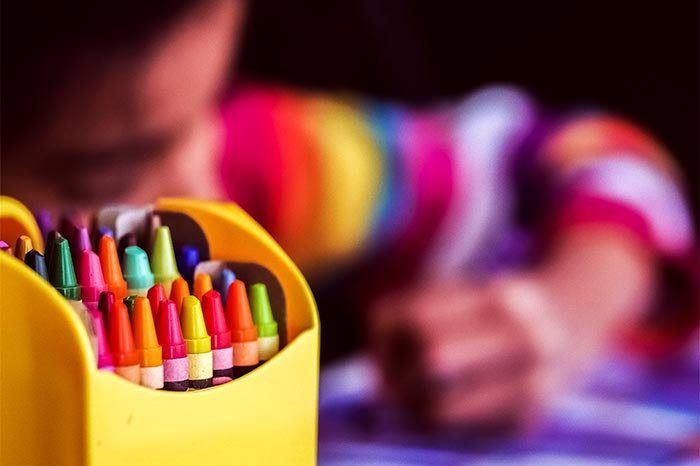
My goal with this post is to experiment with color and to do that, I needed a colorful photograph. After many contenders, I settled on this one. While there were a few others that had more distinct and identifiable hues and saturations, I believe this image will serve my purposes.
Plus, what’s not to love about crayons?
What’s the Problem?
While there aren’t all that many really obvious issues with the HSL panel in Camera Raw, I did notice something straight off the bat when I first began using it. While the colors in the photo I just displayed are somewhat obvious, on occasion, there are some that aren’t. In those cases (or in cases of setting an image to Grayscale), how does one decide which slider to push to make edits? Take the color brown for example. Let’s say that you wanted to make that lighter. I would guess that by switching to the Luminance panel and then pushing the red, orange and some other slider to the right would do the trick. But am I sure? What colors combine to make brown? Anyone?What about purple? Okay, I think blue and red make purple. But what about dark purple or light purple? Or magenta? I think you see what I’m saying here. While there are no shortage of tools and sliders to take advantage of in Camera Raw, sometimes they need to be understood a bit more than the average person does and sometimes they need another helper tool to assist with relieving some of the stress involved. This is where the Targeted Adjustment Tool comes into play.
The “Default” Command
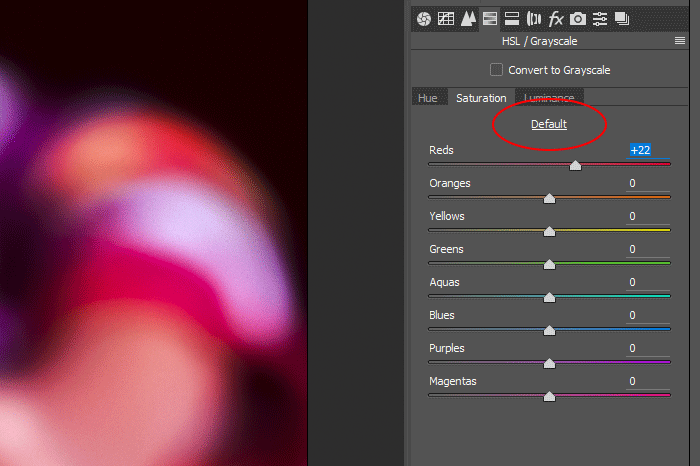
Before I go any further, I want to mention one very important aspect of the panels I’ll be experimenting with today. This aspect is called the Default command and it basically resets all the sliders back to their, well, default positions.
As I go through this post, I’ll be moving sliders like it’s nobody’s business, over and over again. It’s extremely helpful to have a button (or link) to push that resets everything in one fell swoop. I do want to make you aware of a one small detail though. Each panel’s Default command controls only the sliders in that panel. If I want to reset just the Hue panel, I can click the link. The remaining panels will keep their slider positions intact. If I wanted to reset them, I’d have to visit each one and click Default for each. Also, if I double-click on each slider in whatever panel, I can reset them one by one. That’s what people do when they are fine tuning. For the more broad and overall reset, click Default.
The Targeted Adjustment Tool
I want to remind you that I already wrote a post that covers a lot of information regarding this panel and its sub-panels. You may view that post here.Adjusting Hue, Saturation & Luminance in Adobe Camera Raw
What I’d like to do in the sections below and for the remainder of this post is to offer some examples of what happens when I adjust certain colors with the Targeted Adjustment Tool. Again, this is very straightforward, but it’s meant to merely give you a primer on the tool itself. You know, just to increase your comfort level with it.
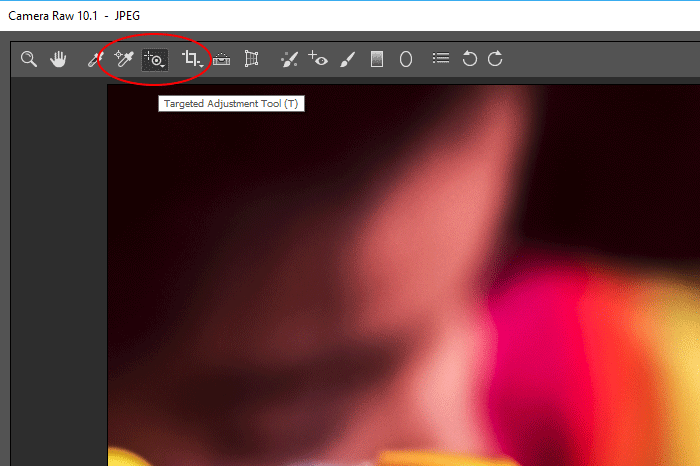
To access this particular tool, I’ll head up to the top toolbar and click the icon that looks like it has a bullseye in it.

In the above screenshot, you can see the tooltip below the icon. Also, if I were to click and drag that icon down, I’d see further options.

As you can see, I can choose which type of adjustment I’d like to make for each color I edit. I can click Hue, Saturation or Luminance from this menu or I can simply visit the sub-panel over in the HSL/Grayscale panel and adjust in real time after I enter the panel of choice. If I do this, the Targeted Adjustment Tool will pick up on what panel I’m in and will only make those adjustments. It’s very intuitive and you can work very quickly this way.
Adjusting Saturation
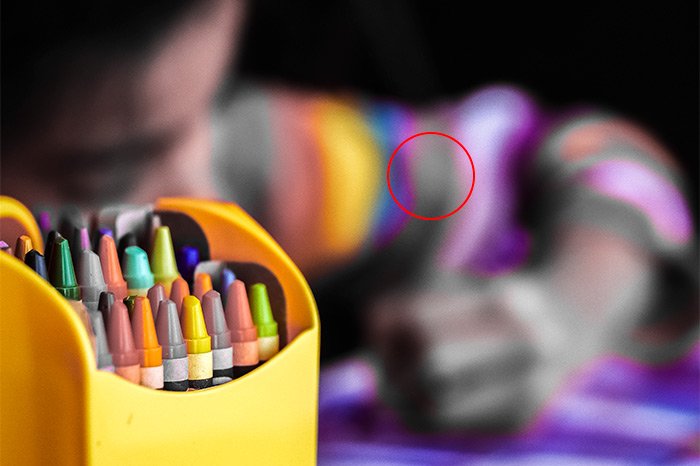
To start off, I’ll make sure the Saturation sub-panel is activated at the right of the screen. Then, with the Targeted Adjustment Tool, I’ll click on a red area and drag to the left. Let’s see what happens. Basically, I want to remove the red stripes from the shirt. Which sliders move when I use this tool?

As we can see, the Reds slider has been pushed all the way to the left as well as the Magentas slider. See? I wouldn’t have pushed the Magenta at all. I didn’t know that color was involved.
Adjusting Hue
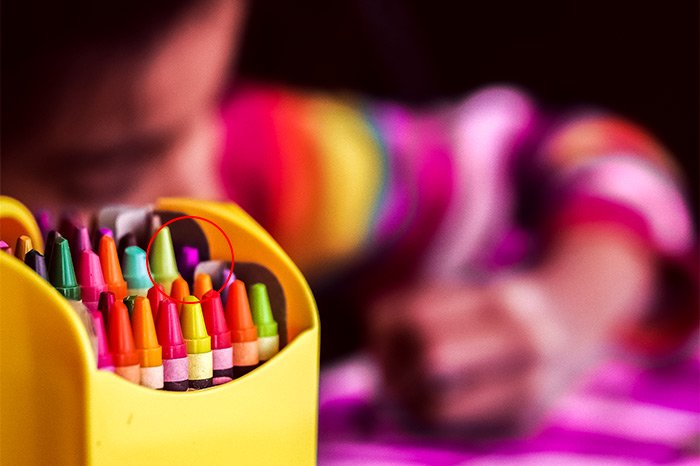
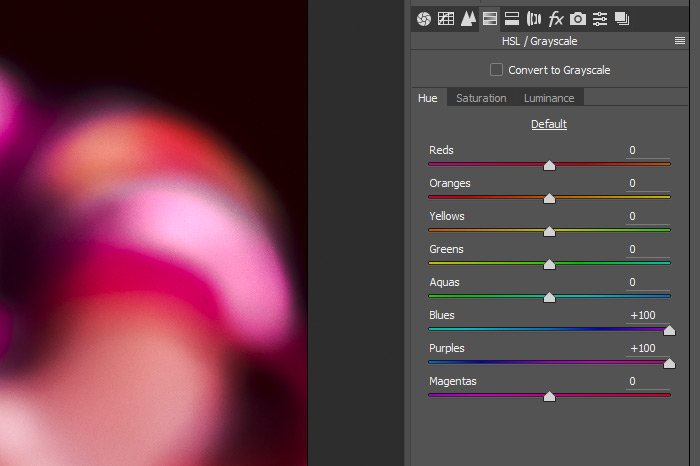
Next, I’ll adjust the Hue of a color. After resetting the previous sliders and moving over to the Hue sub-panel, I’ll click on a purple crayon and drag to the right. My goal is to change the color purple to something else.

As you can see, the tool I’m using picked up on the fact that there were not only purples in the crayon I clicked on, but blues as well. If I had done this by hand, I would have only adjusted the Purples slider and I would have left the Blues out of it. That would have been a mistake.
Adjusting Luminance
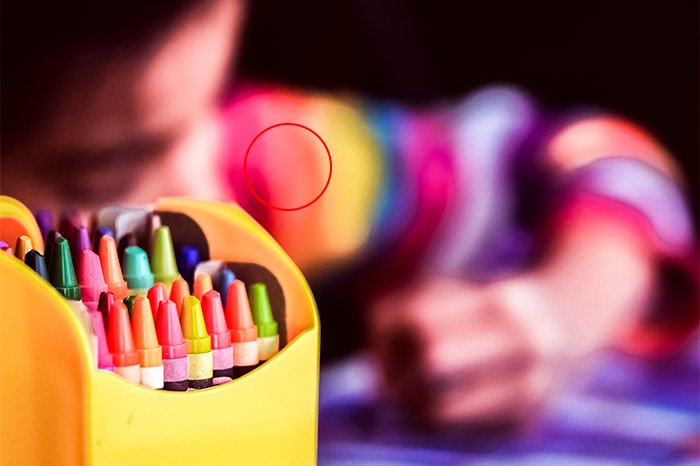
I’ll go ahead and reset the sliders one last time. I’ll then activate the Luminance sub-panel by clicking its tab. Finally, I’ll brighten the orange colors by clicking on an orange area of the sleeve and dragging to the right.
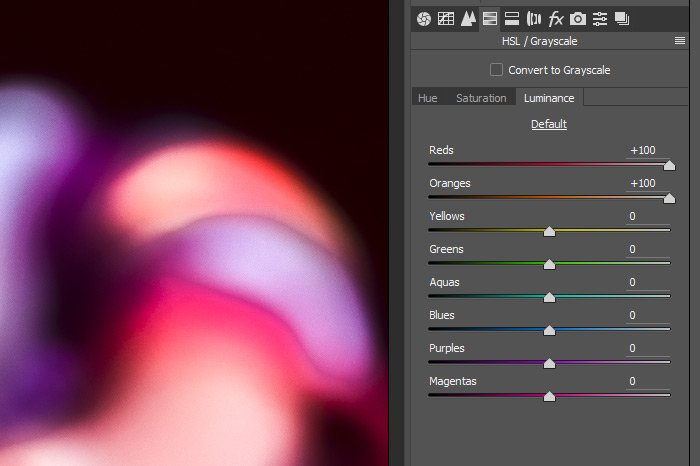
Let’s take a look at which color sliders moved this time. Remember, I would have chosen only the Orange slider.

I guess I can’t say I’m surprised. Both the Reds and the Oranges sliders moved this time. Again, I wouldn’t have pushed the Reds, which would have been a mistake. What I’m attempting to show you here is that using this tool really is the way to go when editing color in the application at hand.
——
I hope I clearly demonstrated the advantages of using the Targeted Adjustment Tool over adjusting individual color sliders in Adobe Camera Raw. If you have any questions or concerns regarding this post, please leave them in the comment section below. Thanks for reading!
