KodyWallice
Member
- Joined
- May 7, 2021
- Messages
- 123
- Reaction Score
- 1
- Points
- 23
- #1
If you’ve been working with Adobe applications for any amount of time, you surely know that there are many methods for getting the same result. How do I open a file? That’s easy. Pick one of these seven ways. How do I make a selection? That’s easy, four tools and ten strategies later, you’ll have your selection. Basically, you’ll probably never see a duplicate workflow among editors because there are simply too many avenues to choose from. That’s why it’s important to have a good breadth of knowledge of Adobe’s editing programs. You’ll eventually find the groove that works best for you.
In today’s post, I’d like to talk about a few different methods for opening files from Adobe Camera Raw into Adobe Photoshop. I know I’ve discussed this topic a few times in the past, but what I want to discuss today is different. Basically, I’ll cover the easiest and most common method used to open a file from Camera Raw into Photoshop. Then, I’ll tell you how to open a file copy into Photoshop and finally, I’ll tell you how to open a smart object from Camera Raw into Photoshop. All three of these workflows have their drawbacks and their advantages, so it’s important to understand which one will work best for your situation.

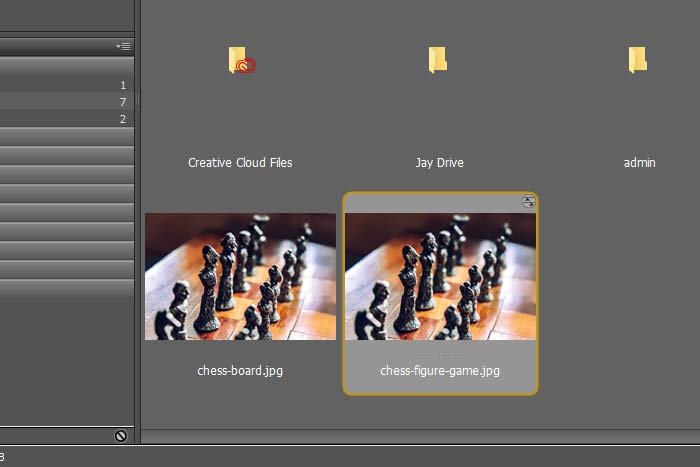
For this example, I’ll start off in Adobe Bridge, which is an awesome photo organizing application. I’ll open Bridge and then I’ll navigate to the folder where the file is located and I’ll select it. This file is on my Desktop.
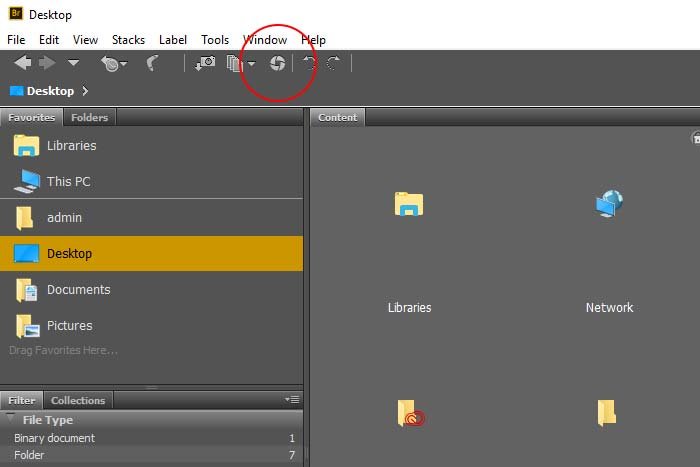
After that, I’ll either use the keyboard shortcut of Ctrl+R to launch the photo into Camera Raw or I’ll simply press the Open in Camera Raw button in Bridge.
Either way, the photo will open in Camera Raw.
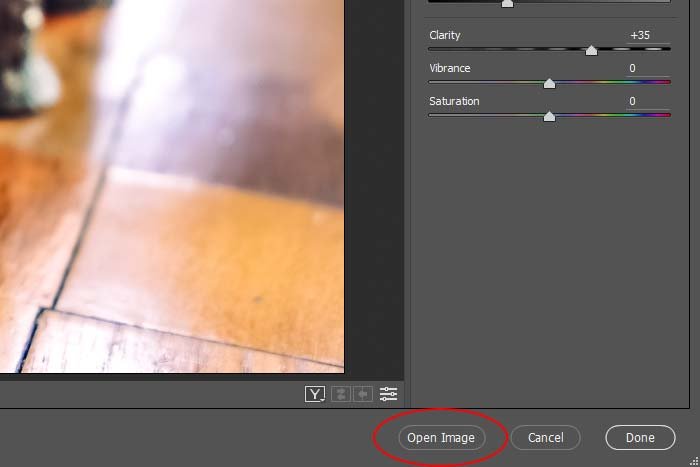
Once the photo is in Camera Raw, I can edit it any way I see fit. When I’m finished, I’ll click the Open Image button that’s located at the bottom right part of Camera Raw.
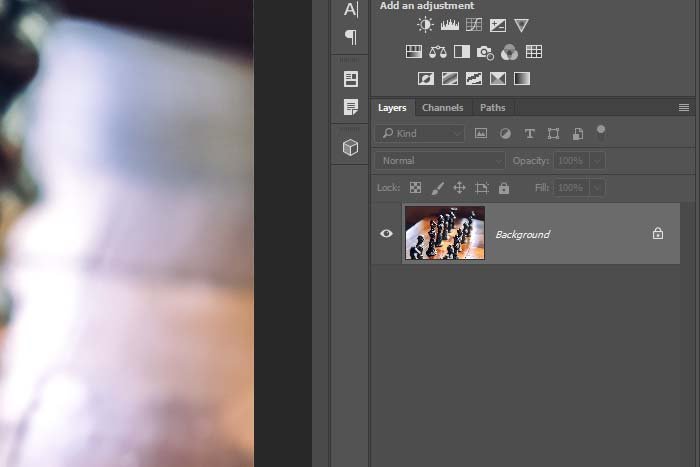
That’s it. After I do that, I’ll see the edited image transfer over into Photoshop as a locked layer and I’m done. Inside Photoshop, I can do whatever I want to the layer, but that’s a story for another post. Here, take a look at the layer in Photoshop. You can see that it’s a background layer that’s locked, just the way it should be.
Okay, I’m back in Camera Raw. I have the same edited version of the chess board open that I just used in my last example. I already moved the sliders around and applied my usual changes. And I already opened up this version of the photo in Photoshop in the previous section.
What I’d like to do now is to alter the image in Camera Raw somewhat so I have a variation of the original and then I’d like to launch that altered version of the photo into Photoshop, but keep the originally edited version back in Bridge. I know, this sounds a bit confusing. Keep reading below.
For the sake of clarity, I’ll make a wild change to this photo in Camera Raw. I’ll push the Temperature slider all the way to the left, so the entire image looks blue.
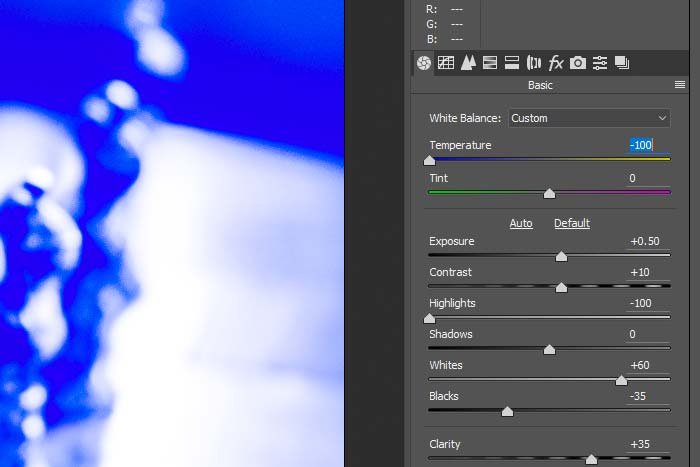
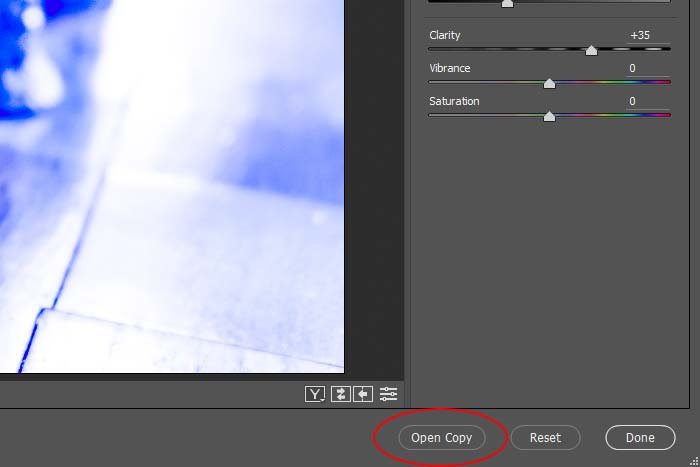
Now that I’ve got my variation of this image, I’m ready to launch it into Photoshop as a copy of the original. To do this, I’ll hold down the Alt key on my keyboard and then press the Open Copy button that’s down in the same spot the Open Image button was. Basically, the Open Image button changes into the Open Copy one.
Now, let’s look inside Photoshop to see what we’ve done.
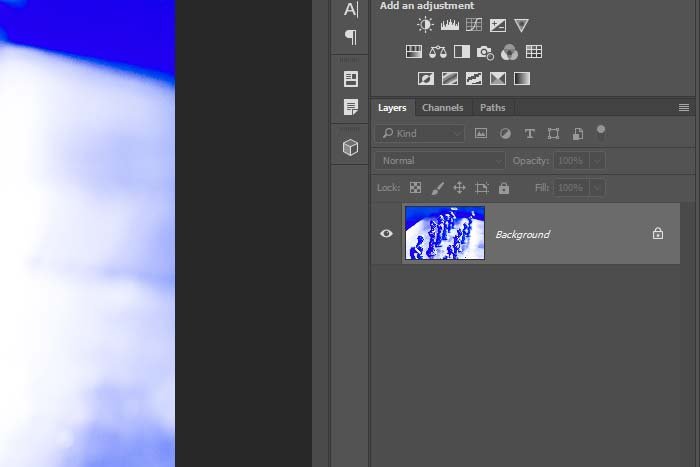
As you can see, the copy is now a background layer in Photoshop, just as the other image was in the first section of this post. So, you may be asking yourself what the difference between this action and the previous one was. All I did was change the image in Camera Raw and then open it into Photoshop. I seemingly already did that. Well, let’s take a look back at the image thumbnail in Bridge.
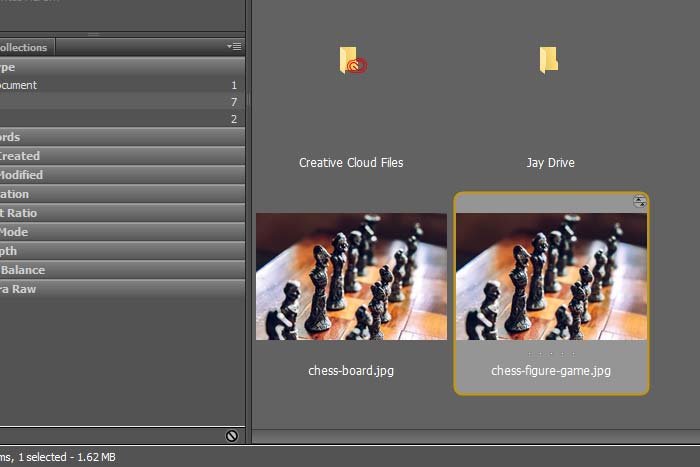
Ahh, do you see? The changes that I made to the image in Camera Raw didn’t save. Sure, the copied image is now in Photoshop waiting for further edits, but the original image stayed the same. This is helpful because if I needed to make many alterations, I wouldn’t have to go back and undo each one in Camera Raw, over and over again, after I launch them into Photoshop. This is a huge time saver.
I’ll go ahead and open the same photo into Camera Raw again. This time, I’ll use the first edited version that I displayed at the beginning of this post. Then, when I’m ready, I’ll hold down the Shift key on my keyboard and press the Open Object button where the Open Image and Open Copy buttons were. As you may have guessed, this button likes to change a lot.
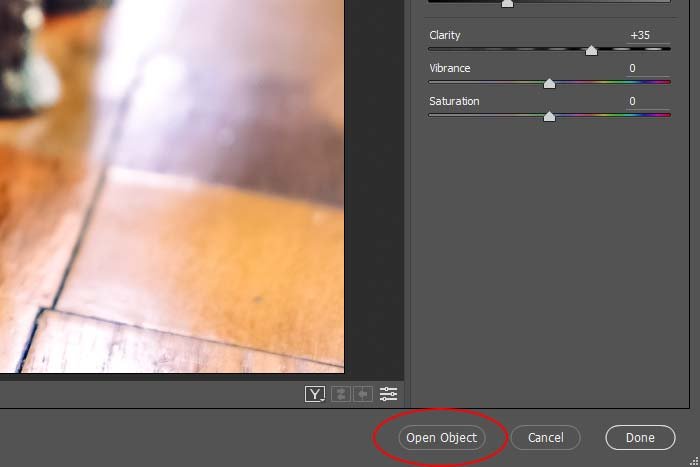
After I press this button, the edited image will open in Photoshop, but it won’t open as a regular layer. It’ll open as a Smart Object. Also, the layer won’t be locked anymore.
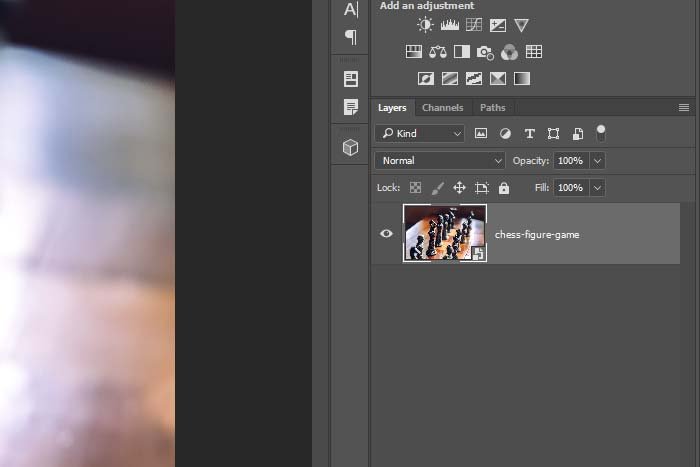
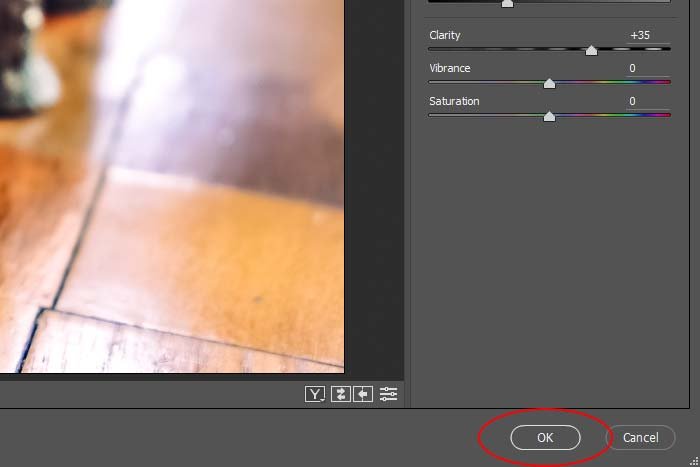
The power of the Smart Object is that if its layer thumbnail is double-clicked, the image will open right back up in Camera Raw. The Camera Raw window will appear over the Photoshop one and you’ll be able to make any change you want to. Then, once you’re finished there, you can press the OK button that’s located where all the other buttons were. Those new changes will overwrite the smart object layer in Photoshop and will update the image. You can jump back and forth like this as many times as you’d like to. It’s that easy. This is my preferred method for editing photos because of its flexibility.
And there you have it, three different methods for opening photos from Camera Raw into Photoshop.
——
I hope I clearly explained how to execute each of these different methods. If you have any questions or concerns regarding this post, please leave them in the comment section below. Thanks for reading!
In today’s post, I’d like to talk about a few different methods for opening files from Adobe Camera Raw into Adobe Photoshop. I know I’ve discussed this topic a few times in the past, but what I want to discuss today is different. Basically, I’ll cover the easiest and most common method used to open a file from Camera Raw into Photoshop. Then, I’ll tell you how to open a file copy into Photoshop and finally, I’ll tell you how to open a smart object from Camera Raw into Photoshop. All three of these workflows have their drawbacks and their advantages, so it’s important to understand which one will work best for your situation.
Demo Photo
For this post, I’ll be using just one demo photo. It’s a random shot of a chess board. The reason I chose this photo is because any edits I make to it should be clearly visible, which will give you a good understanding of what’s going on.
Opening a Photo From Camera Raw to Photoshop, the Regular Way
Okay, by now I’m sure you already know how to launch a photo from Camera Raw into Photoshop. But just in case you’re not familiar with the process, I’ll quickly go over it.For this example, I’ll start off in Adobe Bridge, which is an awesome photo organizing application. I’ll open Bridge and then I’ll navigate to the folder where the file is located and I’ll select it. This file is on my Desktop.

After that, I’ll either use the keyboard shortcut of Ctrl+R to launch the photo into Camera Raw or I’ll simply press the Open in Camera Raw button in Bridge.

Either way, the photo will open in Camera Raw.
Once the photo is in Camera Raw, I can edit it any way I see fit. When I’m finished, I’ll click the Open Image button that’s located at the bottom right part of Camera Raw.

That’s it. After I do that, I’ll see the edited image transfer over into Photoshop as a locked layer and I’m done. Inside Photoshop, I can do whatever I want to the layer, but that’s a story for another post. Here, take a look at the layer in Photoshop. You can see that it’s a background layer that’s locked, just the way it should be.

Opening a Photo “Copy” From Camera Raw to Photoshop
Sometimes, opening just one version of the photo into Photoshop isn’t good enough. I’m sure you can think of a dozen instances when you needed to present variations of a graphic or a photograph. The thing is, oftentimes, much of the time-consuming editing in Camera Raw is consistent across all variations. It’s just those small tweaks that create the differences between images. Wouldn’t it be perfect if there was a way to keep the originally edited image saved, but to open up all the differently edited versions in Photoshop anyway? Well, there is and it’s really easy to do.Okay, I’m back in Camera Raw. I have the same edited version of the chess board open that I just used in my last example. I already moved the sliders around and applied my usual changes. And I already opened up this version of the photo in Photoshop in the previous section.
What I’d like to do now is to alter the image in Camera Raw somewhat so I have a variation of the original and then I’d like to launch that altered version of the photo into Photoshop, but keep the originally edited version back in Bridge. I know, this sounds a bit confusing. Keep reading below.
For the sake of clarity, I’ll make a wild change to this photo in Camera Raw. I’ll push the Temperature slider all the way to the left, so the entire image looks blue.

Now that I’ve got my variation of this image, I’m ready to launch it into Photoshop as a copy of the original. To do this, I’ll hold down the Alt key on my keyboard and then press the Open Copy button that’s down in the same spot the Open Image button was. Basically, the Open Image button changes into the Open Copy one.

Now, let’s look inside Photoshop to see what we’ve done.

As you can see, the copy is now a background layer in Photoshop, just as the other image was in the first section of this post. So, you may be asking yourself what the difference between this action and the previous one was. All I did was change the image in Camera Raw and then open it into Photoshop. I seemingly already did that. Well, let’s take a look back at the image thumbnail in Bridge.

Ahh, do you see? The changes that I made to the image in Camera Raw didn’t save. Sure, the copied image is now in Photoshop waiting for further edits, but the original image stayed the same. This is helpful because if I needed to make many alterations, I wouldn’t have to go back and undo each one in Camera Raw, over and over again, after I launch them into Photoshop. This is a huge time saver.
Opening a Photo From Camera Raw as a Smart Object in Photoshop
This one is really the best. This method will allow you to flip back and forth between Photoshop and Camera Raw really very quickly and seamlessly. If we imagine that we want to keep making slight changes to a photo in Camera Raw to see the output in Photoshop, we’d really need a fast way to change and view, change and view. There is one such method.I’ll go ahead and open the same photo into Camera Raw again. This time, I’ll use the first edited version that I displayed at the beginning of this post. Then, when I’m ready, I’ll hold down the Shift key on my keyboard and press the Open Object button where the Open Image and Open Copy buttons were. As you may have guessed, this button likes to change a lot.

After I press this button, the edited image will open in Photoshop, but it won’t open as a regular layer. It’ll open as a Smart Object. Also, the layer won’t be locked anymore.

The power of the Smart Object is that if its layer thumbnail is double-clicked, the image will open right back up in Camera Raw. The Camera Raw window will appear over the Photoshop one and you’ll be able to make any change you want to. Then, once you’re finished there, you can press the OK button that’s located where all the other buttons were. Those new changes will overwrite the smart object layer in Photoshop and will update the image. You can jump back and forth like this as many times as you’d like to. It’s that easy. This is my preferred method for editing photos because of its flexibility.

And there you have it, three different methods for opening photos from Camera Raw into Photoshop.
——
I hope I clearly explained how to execute each of these different methods. If you have any questions or concerns regarding this post, please leave them in the comment section below. Thanks for reading!
