KristinaW
Member
- Joined
- May 7, 2021
- Messages
- 127
- Reaction Score
- 0
- Points
- 18
- #1
I can’t even count how many times I’ve worked on a photo inside of Adobe Camera Raw and when half way through, I told myself that I wanted to scrap everything I have done so far and start over. If you’ve been editing for any length of time, you’ve surely experienced something like this. It’s not all too uncommon. Luckily, Camera Raw makes it really easy to undo what’s been done so far to basically reset itself back to the way things were when the application was first launched. Now, don’t get me wrong here. I’m not referring to returning Camera Raw back to its original state when it was first installed. I’m talking about deleting any alterations that have been made to an image. You know, undoing any edited slider positions and removing any filters that have been applied. That sort of thing.
In today’s post, I’d like to make a few changes to a photo to see how I like them. After each change, I’ll purposefully decide that the edit just isn’t for me, which will call for me bringing the photo back to its original state. There are two methods for accomplishing this in Camera Raw. One uses a menu and the other uses a key on the keyboard. Both are equally straightforward.

How to Save Tool Presets in Adobe Camera Raw
This is the darker photo.

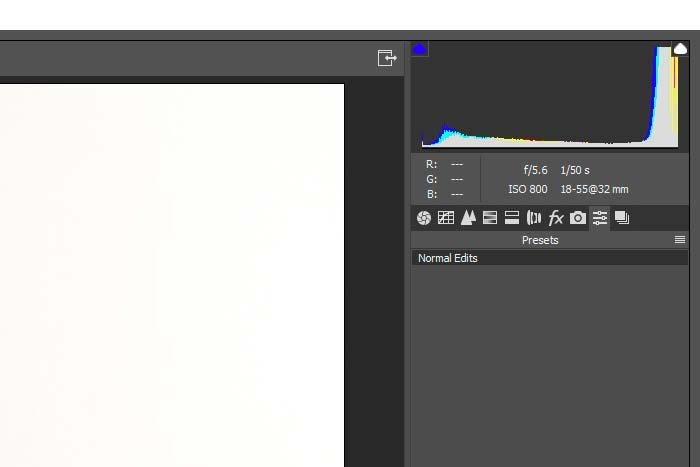
Now, I’ll head into the Presets tab and then I’ll click on the Normal Edits preset.
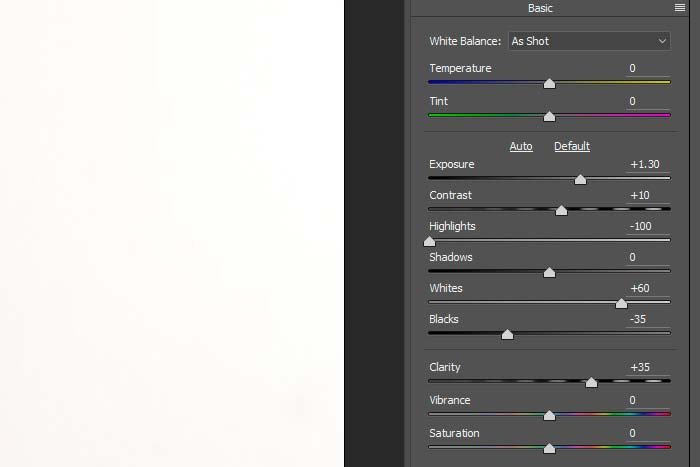
Again, doing this will apply all the slider edits I once made and saved into the preset. Here’s a look at those slider edits.
Okay, now that this part of the process is complete, I’ll move into the Effects panel and push the Post Crop Vignetting slider to the left until it reaches a value of -40.
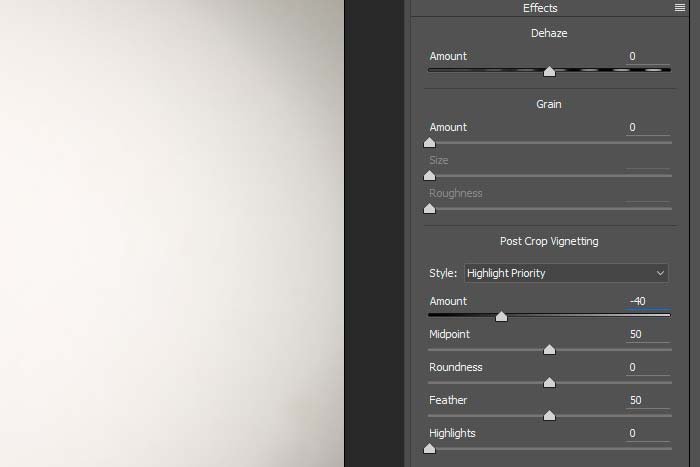
Here is the resulting image.

I don’t know. I don’t think I like this at all. I’d like to undo everything I’ve done so far. I’ll cover the first method for accomplishing this in the next section. By the way, if you’d like to read about how to create a nice post crop vignette, check out this post.
How to Add & Adjust a Border Vignette in Adobe Camera Raw
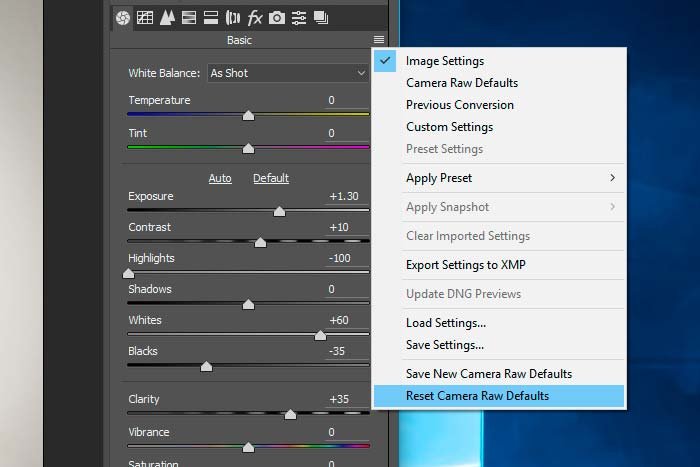
If I open the menu and then click on the bottom option that reads Reset Camera Raw Defaults, everything will go back to the way it was when the image wasn’t edited at all. This applies to any edits you previously made during another session. Everything will be reset. Everything.
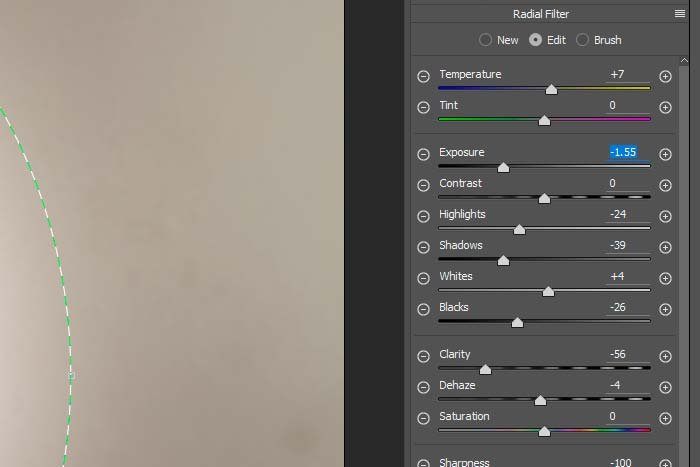
I’ll head back to the Presets menu and apply the Normal Edits preset once again, just to brighten the photo up, sharpen it and do a few other things. Then, I’ll activate the Radial Filter tool by clicking on it up in the top menu. I’ll draw the radial filter around the woman’s face in the photo and push some sliders around until I think things look presentable.
After that, I’ll send the photo over to Photoshop for some cropping and then I’ll save the file as a JPG and upload it here. Let’s have a look at the final result.

Wow, that looks a lot better. I think I really like this one. The only problem is, I’d like to show my friend how to go about this process, so I’ll need to undo everything I’ve done to bring the image back to its original state. The thing is, I’ve already transferred the file to Photoshop, which essentially closed out Camera Raw. I wonder if the next reset process will still work after I open the image back into Camera Raw. Let’s see.
To undo all the edits I’ve made to this image and to restore its original state, I’ll hold down the Alt key on my keyboard. Then, I’ll head down to the bottom right area of the application and click the Reset button. If you’ll notice, this Reset button was once the Cancel button, but since holding the Alt key down, it switches to Reset.
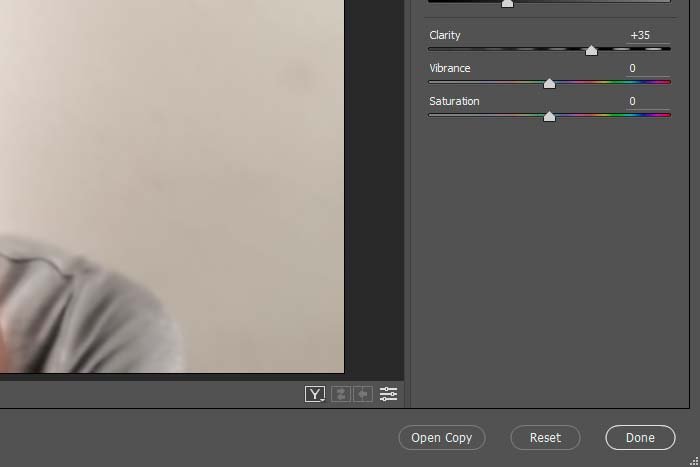
Clicking on this Reset button will have the same exact effect on the photo as the previous method had. It’s that easy.
——
I hope I’ve clearly explained how you can go about resetting an image being edited in Adobe Camera Raw to its original state. There are two methods for doing this. One uses a menu and the other uses a keyboard key. Both are equally simple to take advantage of. If you have any questions or concerns regarding this post, please leave them in the comment area below. Thanks for reading!
In today’s post, I’d like to make a few changes to a photo to see how I like them. After each change, I’ll purposefully decide that the edit just isn’t for me, which will call for me bringing the photo back to its original state. There are two methods for accomplishing this in Camera Raw. One uses a menu and the other uses a key on the keyboard. Both are equally straightforward.
Demo Image
This is the image I’ll be using for this post. The version you are looking at directly below has been edited to brighten it up a bit. For the examples below, I’ll be using the original, darker version. Again, I’ll be making two edits to the photo and then using one reset method for each edit. That way, you’ll get to see both in action. Here’s the photo.
Adding a Post Crop Vignette
For this first example, I’m going to apply a preset I made a long time ago. I apply this preset to 95% of the images I edit and then go from there. This preset will take the darker original image and brighten it up to the one you see above.How to Save Tool Presets in Adobe Camera Raw
This is the darker photo.

Now, I’ll head into the Presets tab and then I’ll click on the Normal Edits preset.

Again, doing this will apply all the slider edits I once made and saved into the preset. Here’s a look at those slider edits.

Okay, now that this part of the process is complete, I’ll move into the Effects panel and push the Post Crop Vignetting slider to the left until it reaches a value of -40.

Here is the resulting image.

I don’t know. I don’t think I like this at all. I’d like to undo everything I’ve done so far. I’ll cover the first method for accomplishing this in the next section. By the way, if you’d like to read about how to create a nice post crop vignette, check out this post.
How to Add & Adjust a Border Vignette in Adobe Camera Raw
Using a Menu to Reset Camera Raw Defaults
Since I’d like to reset every single adjustment I’ve made to this image, I’ll head up to the menu that will give me the option to do so. This menu is located in the same position, no matter what panel you’re currently editing in. It’s in the upper right corner of the panel area.
If I open the menu and then click on the bottom option that reads Reset Camera Raw Defaults, everything will go back to the way it was when the image wasn’t edited at all. This applies to any edits you previously made during another session. Everything will be reset. Everything.
Creating a Custom Vignette
Next, I’ll create a custom vignette, which is a much more versatile method for creating vignettes in Camera Raw.I’ll head back to the Presets menu and apply the Normal Edits preset once again, just to brighten the photo up, sharpen it and do a few other things. Then, I’ll activate the Radial Filter tool by clicking on it up in the top menu. I’ll draw the radial filter around the woman’s face in the photo and push some sliders around until I think things look presentable.

After that, I’ll send the photo over to Photoshop for some cropping and then I’ll save the file as a JPG and upload it here. Let’s have a look at the final result.

Wow, that looks a lot better. I think I really like this one. The only problem is, I’d like to show my friend how to go about this process, so I’ll need to undo everything I’ve done to bring the image back to its original state. The thing is, I’ve already transferred the file to Photoshop, which essentially closed out Camera Raw. I wonder if the next reset process will still work after I open the image back into Camera Raw. Let’s see.
Using a Keyboard Key to Reset Camera Raw Defaults
Because Camera Raw stores any edits made to a JPG file inside the photo’s meta information, I’m able to open the photo back up into Camera Raw, after it’s been closed out, to see those edits still in effect. Be warned though, if you decide to use certain tools, such as the Radial Filter, the information that needs to be stored is substantial, which can increase the file size of the photo and can create a sluggish environment when transferring an edited version of the image to Photoshop. I just experienced this. Transferring this image to Photoshop took about 20 seconds. This process usually takes about two seconds.To undo all the edits I’ve made to this image and to restore its original state, I’ll hold down the Alt key on my keyboard. Then, I’ll head down to the bottom right area of the application and click the Reset button. If you’ll notice, this Reset button was once the Cancel button, but since holding the Alt key down, it switches to Reset.

Clicking on this Reset button will have the same exact effect on the photo as the previous method had. It’s that easy.
——
I hope I’ve clearly explained how you can go about resetting an image being edited in Adobe Camera Raw to its original state. There are two methods for doing this. One uses a menu and the other uses a keyboard key. Both are equally simple to take advantage of. If you have any questions or concerns regarding this post, please leave them in the comment area below. Thanks for reading!
