Newman
Member
- Joined
- May 11, 2021
- Messages
- 106
- Reaction Score
- 0
- Points
- 23
- #1
Let’s face it, much of what we do on a daily basis in Adobe Camera Raw, Lightroom and Photoshop is repetitive. Oftentimes, what happens is, something that starts out as really exciting and fun, inevitably turns into, well, work. And being work, we try to be as efficient as possible when it comes to finishing it. After all, I don’t know many people who enjoy dragging out something that feels like work too much. That’s never fun.
In today’s post, I’m going to show you a few ideas I had over the weekend that can speed up your workflow in Camera Raw. The ideas revolve around the use of Presets. If you aren’t aware, presets in Camera Raw are a huge time saver and they are one tool I use just about every single time I open the application. If it weren’t for Presets, much of what I do would be monotonous. Thankfully, it isn’t.
Creating Presets in Adobe Camera Raw & Applying Them via Bridge
Applying & Deleting Presets in Adobe Camera Raw
Where to Find & How to Install Presets For Adobe Camera Raw
How to Save Tool Presets in Adobe Camera Raw
Presets are rather straightforward. Basically, all you need to do is to apply a few changes that you use more often than not, head over to the Preset panel in Camera Raw and create a new one. That preset will save everything you just did and will apply those same changes to anything you want in the future, with just one click. As I said, I love this things.
The thing is, even though presets are a simple concept, many editors out there aren’t aware that they can stack them. They can also build upon them and can even combine them to make completely new ones. There’s a bit of creativity that can be taken advantage of here, so I hope to share some of that with you below.
I’ll open a demo photo into Camera Raw now. Here is the photo I’ll be using.
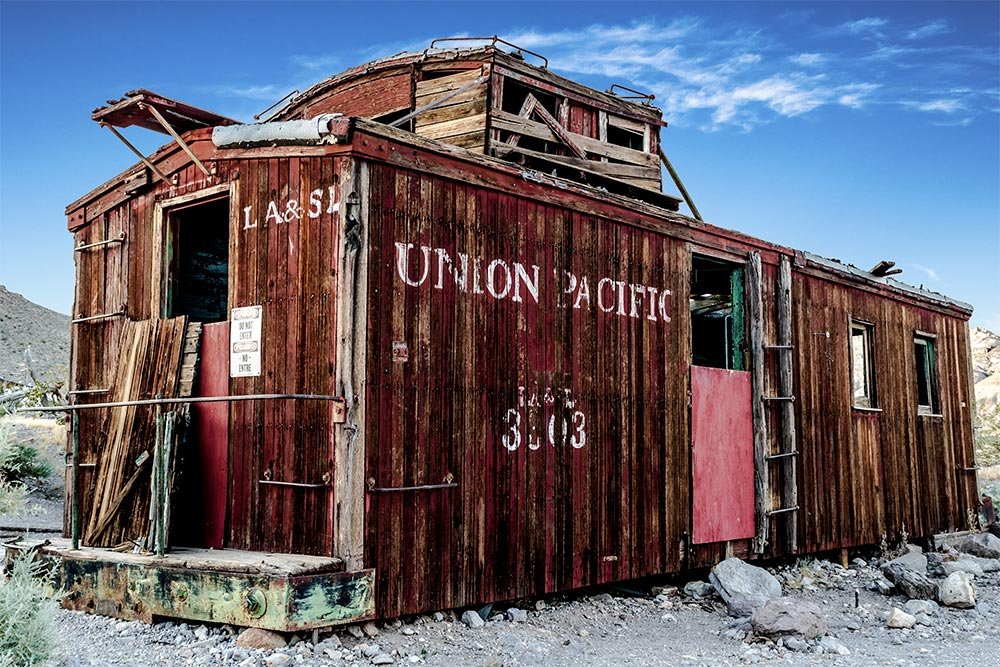
Obviously, it’s already heavily edited. Just ignore that.
After I open the photo, I’ll head into the Presets panel, where I have one that I made a long time ago just waiting to be used.
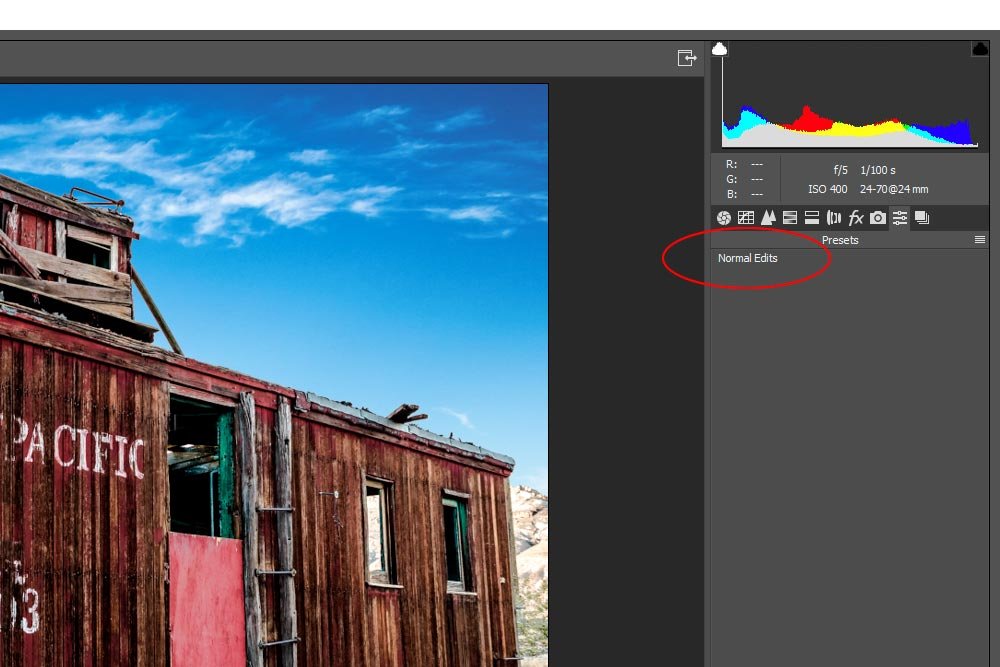
As you can see from the screenshot above, I called this preset Normal Edits. It applies all the changes I usually make to a photo in the Basic panel. Next, you can see the sliders that have been moved due to the application of my action.
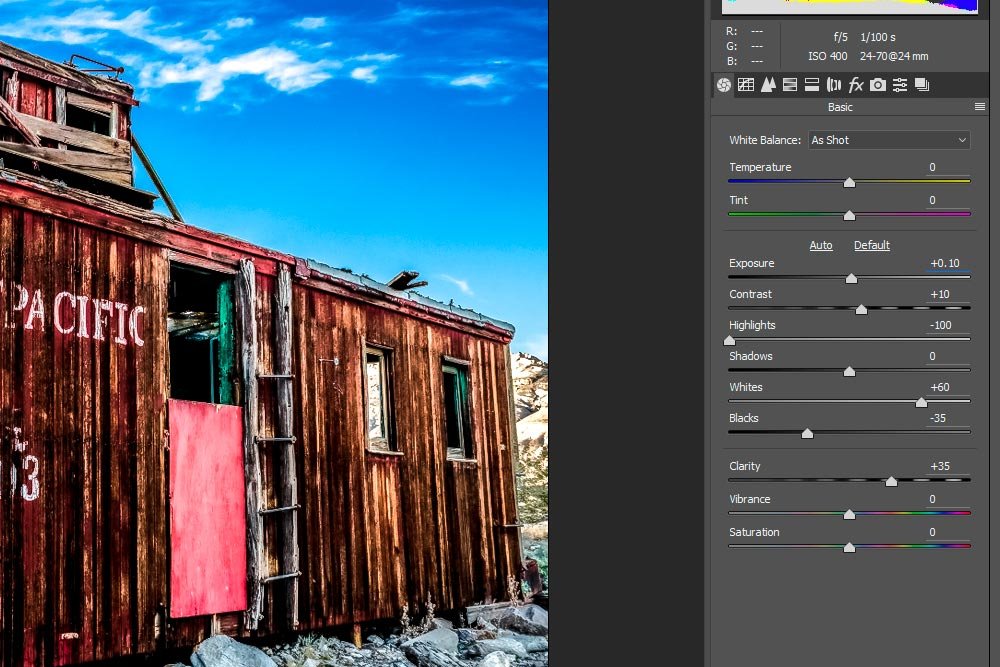
So far, I have only applied a preset to the photo in question. Most people would stop here. Since I generally head into the Lens Corrections panel to adjust a few settings as well, I’d like to include everything in a new preset. First, I’ll adjust the lens corrections that I’m interested in.
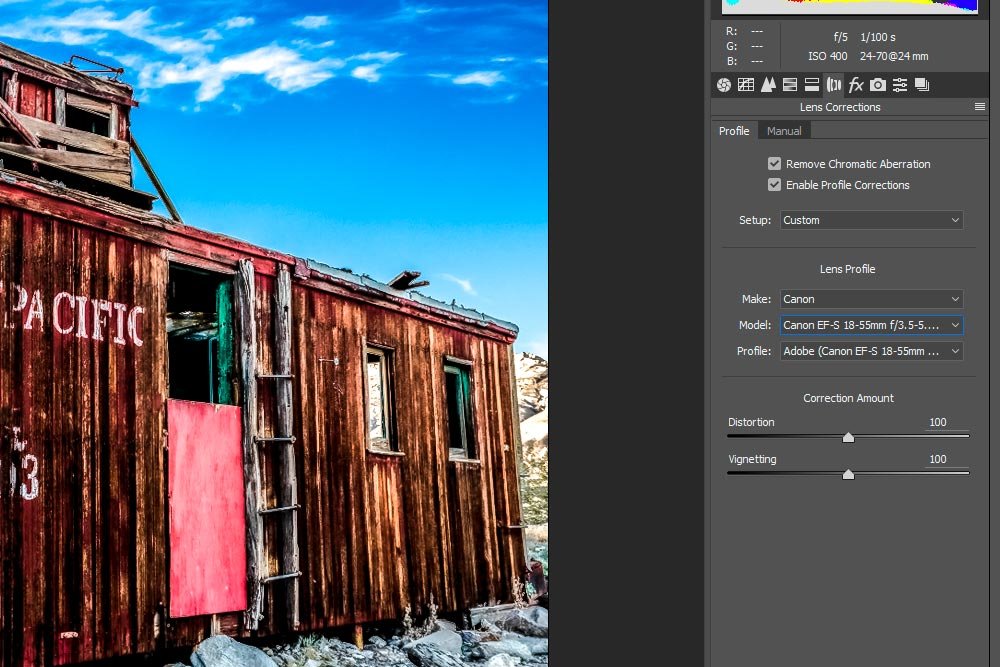
Just so you know, I checked the Remove Chromatic Abberation box as well as the Enable Profile Corrections box. Then, down below, I chose Custom from the Setup drop-down and then chose a demo lens that this photo might have been taken with. This is just a guess. In your case, you would put choose your actual lens.
Okay, now that I’ve made all the changes I’m interested in, I can create the new preset I’m after. I’ll head back to the Presets panel and click on the New Preset icon that sits down at the bottom.
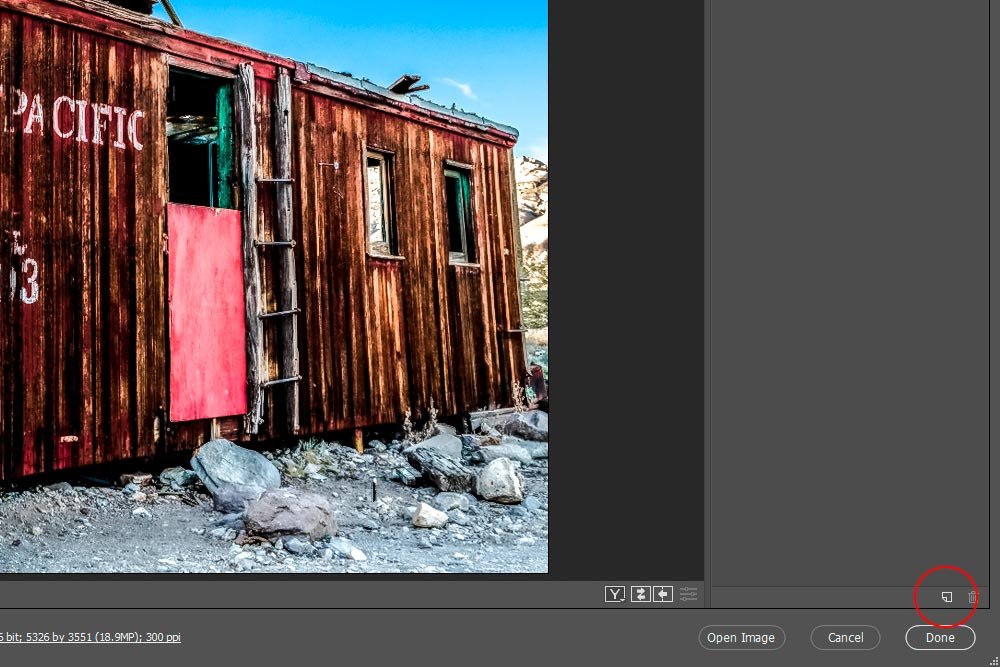
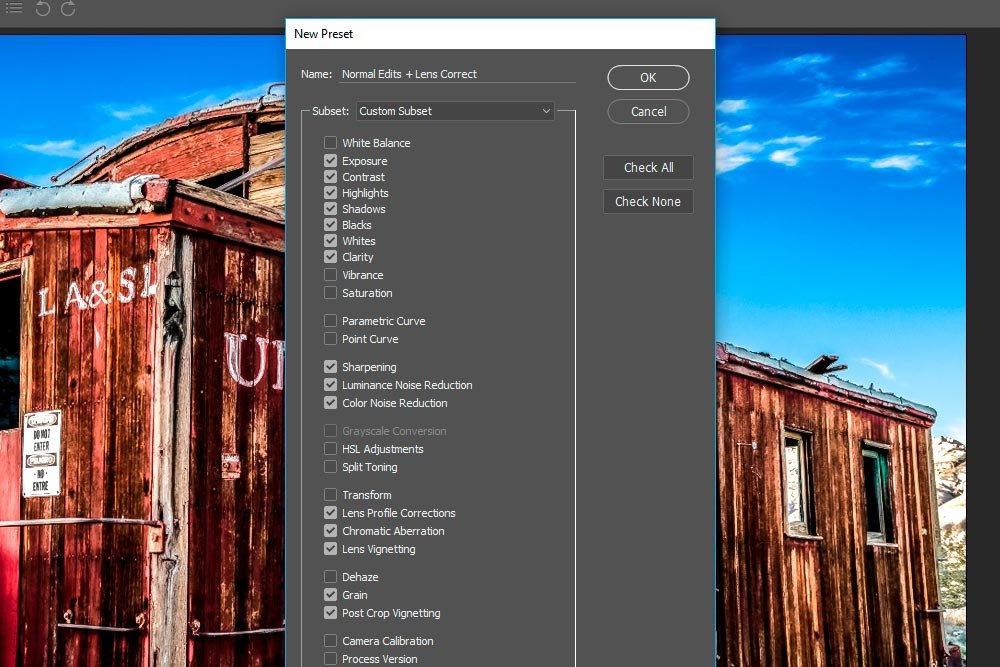
After I click that, I’ll notice the New Preset dialog box open up. I’ll be sure to uncheck any boxes that I haven’t touched. This is important and I’ll discuss why in later sections. I’ll name the new preset, which, in this case, will be Normal Edits + Lens Correction. When I’m done, I’ll click the OK button. I should see the new preset listed.
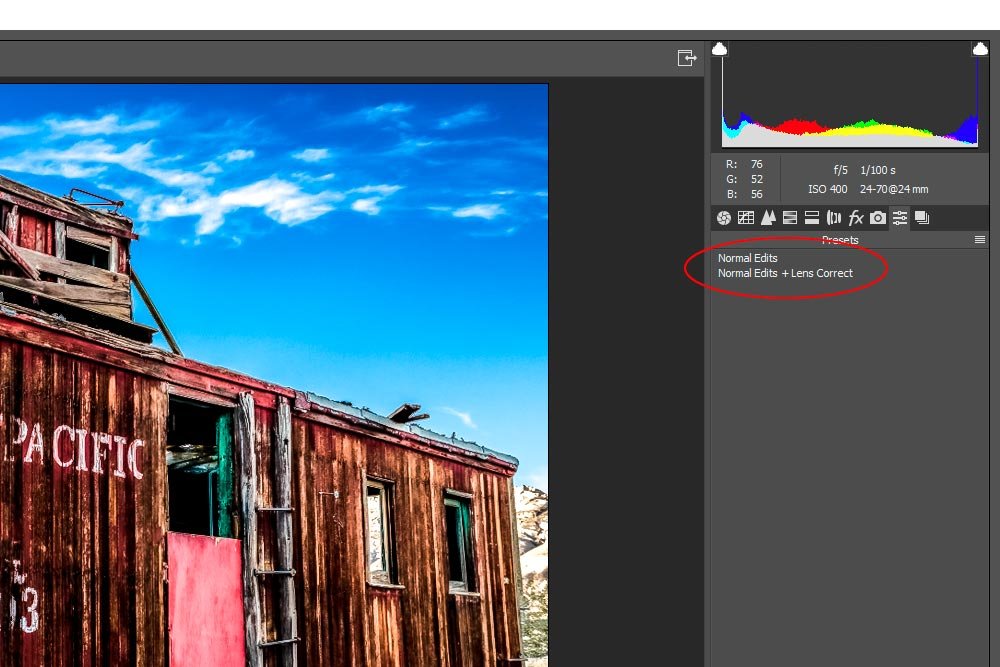
Now, when I open a photo, I can simply visit the Presets panel and click on the Normal Edits + Lens Corrections preset when I want everything taken care of in one fell swoop. That certainly makes life easier.
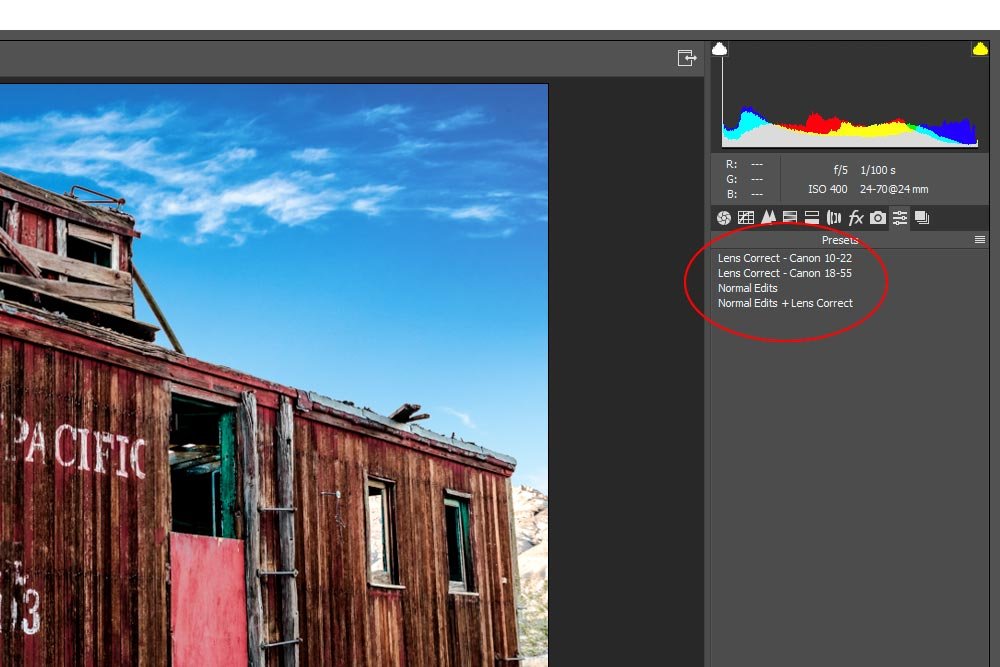
I created two new presets. They are called Lens Correct – Canon 18-55 and Lens Correct – Canon 10-22. Here’s the thing. When I created these two presets, I was sure to uncheck all the boxes in the New Preset dialog box and only re-check the boxes that had to do with any type of lens correction that I may have adjusted. The reason I did this was because I wanted to avoid any type of confusion when it comes to applying multiple presets. Let’s say that I applied my Normal Edits preset and then applied a new Lens Correction one right after that. What if, when I was creating the Lens Correction preset, I kept all the values of the Basic panel in their default positions. If I did that, there’s a chance that all those Normal Edits values might return to the default values after I made my changes. I know it’s sort of difficult to grasp. Just remember that if you’re going to create very specific presets to target one area only, be sure to only check the boxes in question, while leaving all others unchecked.
Now that I have some very specific presets created, after launching a photo into Camera Raw, all I would need to do is to visit the Presets panel and click each preset I’d like to apply. I can click one right after the other and watch all the changes that are included in each preset take place, right before my very eyes. This is very cool, if I don’t say so myself.
——
The point of this entire post was to show you that you are able to apply some creativity when using presets in Adobe Camera Raw and Lightroom. Since these two applications are so similar in many respects, much of what I write that’s targeted to one application can be superimposed on the other. Anyway, I hope I explained everything clearly in this post and if you have any questions or concerns regarding it, please let me know in the comment section down below. Thanks for reading!
In today’s post, I’m going to show you a few ideas I had over the weekend that can speed up your workflow in Camera Raw. The ideas revolve around the use of Presets. If you aren’t aware, presets in Camera Raw are a huge time saver and they are one tool I use just about every single time I open the application. If it weren’t for Presets, much of what I do would be monotonous. Thankfully, it isn’t.
Creating Presets in Adobe Camera Raw & Applying Them via Bridge
Applying & Deleting Presets in Adobe Camera Raw
Where to Find & How to Install Presets For Adobe Camera Raw
How to Save Tool Presets in Adobe Camera Raw
Presets are rather straightforward. Basically, all you need to do is to apply a few changes that you use more often than not, head over to the Preset panel in Camera Raw and create a new one. That preset will save everything you just did and will apply those same changes to anything you want in the future, with just one click. As I said, I love this things.
The thing is, even though presets are a simple concept, many editors out there aren’t aware that they can stack them. They can also build upon them and can even combine them to make completely new ones. There’s a bit of creativity that can be taken advantage of here, so I hope to share some of that with you below.
Execute One Preset, Add Changes, Create New Preset
The first tip I’d like to show you is something a lot of people don’t really think they can do. Basically, the scenario goes like this; I open a photo into Camera Raw and apply my usual, go to, preset. Then, I realize that after applying this preset, I usually head into another area to apply further changes. In this example, I’ll use the Lens Correction tool to demonstrate what I’m talking about. I get tired of applying a preset and then applying further changes and wonder if I could simply group everything into another, new, preset. The answer is yes, you can do this and it’s just as easy as creating a new preset by itself.I’ll open a demo photo into Camera Raw now. Here is the photo I’ll be using.

Obviously, it’s already heavily edited. Just ignore that.
After I open the photo, I’ll head into the Presets panel, where I have one that I made a long time ago just waiting to be used.

As you can see from the screenshot above, I called this preset Normal Edits. It applies all the changes I usually make to a photo in the Basic panel. Next, you can see the sliders that have been moved due to the application of my action.

So far, I have only applied a preset to the photo in question. Most people would stop here. Since I generally head into the Lens Corrections panel to adjust a few settings as well, I’d like to include everything in a new preset. First, I’ll adjust the lens corrections that I’m interested in.

Just so you know, I checked the Remove Chromatic Abberation box as well as the Enable Profile Corrections box. Then, down below, I chose Custom from the Setup drop-down and then chose a demo lens that this photo might have been taken with. This is just a guess. In your case, you would put choose your actual lens.
Okay, now that I’ve made all the changes I’m interested in, I can create the new preset I’m after. I’ll head back to the Presets panel and click on the New Preset icon that sits down at the bottom.

After I click that, I’ll notice the New Preset dialog box open up. I’ll be sure to uncheck any boxes that I haven’t touched. This is important and I’ll discuss why in later sections. I’ll name the new preset, which, in this case, will be Normal Edits + Lens Correction. When I’m done, I’ll click the OK button. I should see the new preset listed.


Now, when I open a photo, I can simply visit the Presets panel and click on the Normal Edits + Lens Corrections preset when I want everything taken care of in one fell swoop. That certainly makes life easier.
Create & Execute Multiple Presets
Oftentimes, there are small changes that I’d like to make to many different photos, depending on which lens I used or what the photo subject was. For instance, let’s say that I have a variety of different lenses and I like to apply a lens correction preset in addition to the Normal Edits preset. Well, in this case, I wouldn’t be able to use the preset I just made, because that used one special lens in particular. In this case, I would need to create a unique preset for every lens I use. I’ll do that now, behind the scenes.
I created two new presets. They are called Lens Correct – Canon 18-55 and Lens Correct – Canon 10-22. Here’s the thing. When I created these two presets, I was sure to uncheck all the boxes in the New Preset dialog box and only re-check the boxes that had to do with any type of lens correction that I may have adjusted. The reason I did this was because I wanted to avoid any type of confusion when it comes to applying multiple presets. Let’s say that I applied my Normal Edits preset and then applied a new Lens Correction one right after that. What if, when I was creating the Lens Correction preset, I kept all the values of the Basic panel in their default positions. If I did that, there’s a chance that all those Normal Edits values might return to the default values after I made my changes. I know it’s sort of difficult to grasp. Just remember that if you’re going to create very specific presets to target one area only, be sure to only check the boxes in question, while leaving all others unchecked.
Now that I have some very specific presets created, after launching a photo into Camera Raw, all I would need to do is to visit the Presets panel and click each preset I’d like to apply. I can click one right after the other and watch all the changes that are included in each preset take place, right before my very eyes. This is very cool, if I don’t say so myself.
Executing Multiple Presets & Creating a New Preset From the Result
This last tip is really easy. I don’t think I even need to include any screenshots for this one. Let’s use another example. I have only two lenses. Since I already have my trusted Normal Edits preset and two Lens Correction presets made and waiting to be used in the Presets panel, I could head in there to make some changes. I’ll click on the Normal Edits preset first and see the edits take place. Then, I’ll click on one of the Lens Corrections presets and watch that change take place. When I’m finished with that, I can head down to the New Preset icon, like I did earlier in this post, and create a brand new preset that combines the changes of both of the previous ones. I can name the new one something like Normal Edits + Canon 18-55. Then I can follow the same exact steps to create another preset and name this other one Normal Edits + Canon 10-22. Do you see what I’m doing here? Because I already have the assets I created earlier, I can take advantage of them to make something entirely new. Now that’s efficiency for you.——
The point of this entire post was to show you that you are able to apply some creativity when using presets in Adobe Camera Raw and Lightroom. Since these two applications are so similar in many respects, much of what I write that’s targeted to one application can be superimposed on the other. Anyway, I hope I explained everything clearly in this post and if you have any questions or concerns regarding it, please let me know in the comment section down below. Thanks for reading!
