LukeLewis
Member
- Joined
- May 7, 2021
- Messages
- 134
- Reaction Score
- 0
- Points
- 21
- #1
This is going to be one of those posts where you hit your forehead with your hand and say “Oof, I knew that!” It’s so easy, it’s often overlooked. Although, I will tell you that the proper conditions must exist. I played around with this little trick for quite a while this afternoon with many photographs and I have to tell you, not every one worked out so well. Some did and some didn’t. The best ones were where the object that needed to be moved was small and the area or pattern around it was great. I’ll explain more below.
In today’s post, I’m going to show you how you can use the Spot Removal brush in Adobe Camera Raw to actually move an object in a graphic or a photograph. Normally, I’d select the object and move it after I jump to Photoshop, but this method is just as good. Also, this way, things are non-destructive, which is always a good thing. This post should be brief because there aren’t many steps involved. I think you’ll like it though. Also, keep in mind that you can follow the same instructions if you plan on doing something similar in Lightroom. Both Camera Raw and Lightroom use the same engine, so many things you do in one application you can do in the other.
Once that’s done, I’ll go over to the right Spot Removal column and change a few settings.
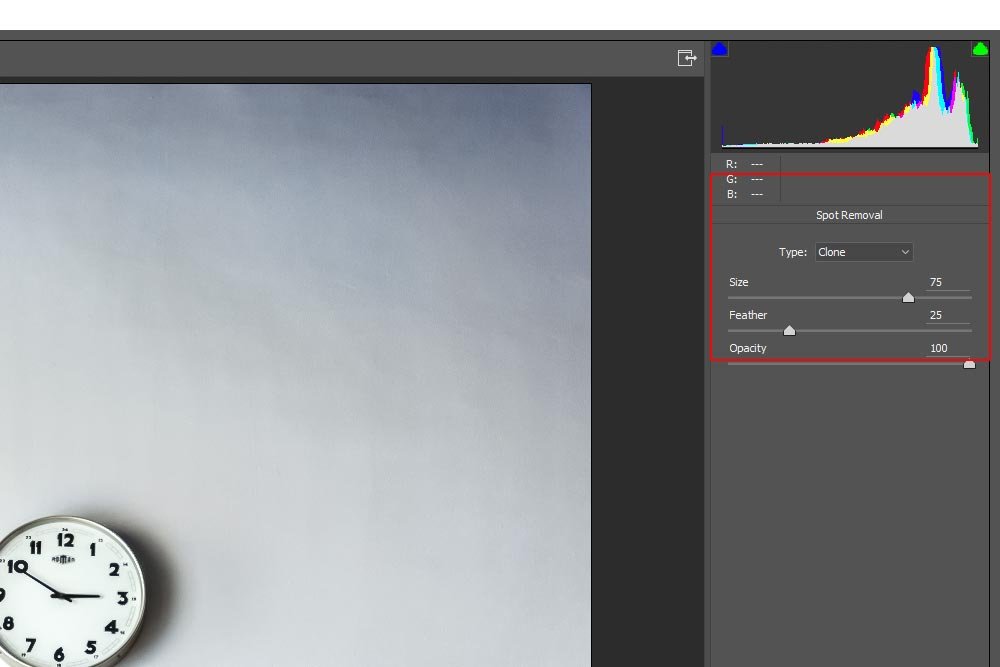
If you take a look at the screenshot above, you’ll notice that I set the brush fairly large. I did this because I want a nice broad curve when I begin painting. Also, I added a bit of feather and kept the opacity at 100%. The reason for this is because I’d like to make a duplicate copy of the clock to place somewhere else on the wall. This brings me to the most important setting, which is Clone. Since I want to make a copy, I wouldn’t select Heal from the drop-down above the other controls. I want a direct copy, which is what Clone will give me. If I need to adjust any of the sliders below as I work, I’ll do so.
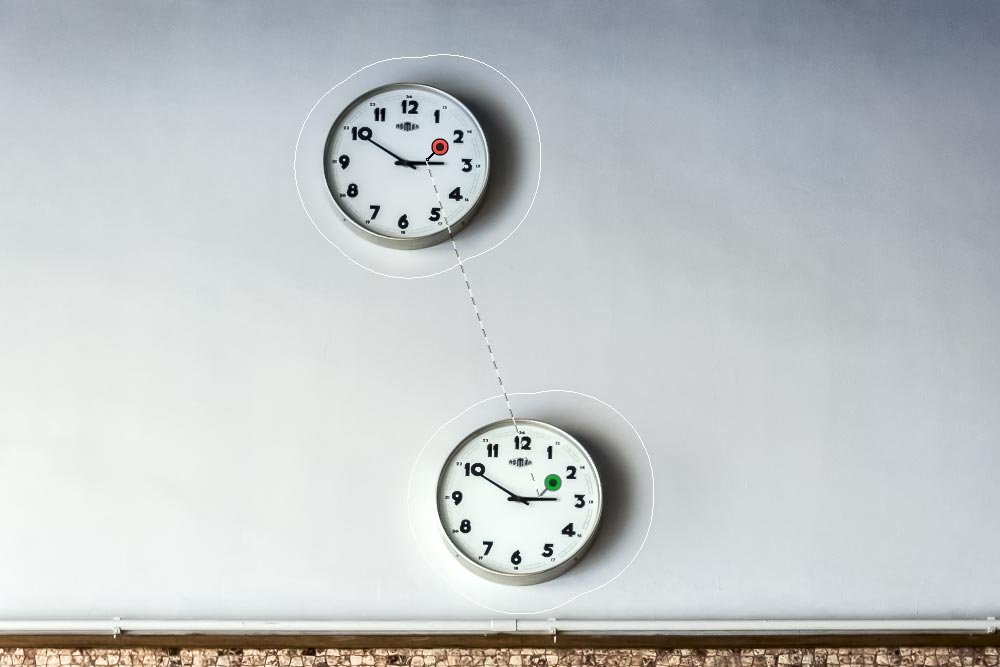
To help explain, I’ll first use the brush to paint over the clock and the immediate area surrounding it. The area I paint over will be referred to as the target and the area the replacement is coming from will be called the source.
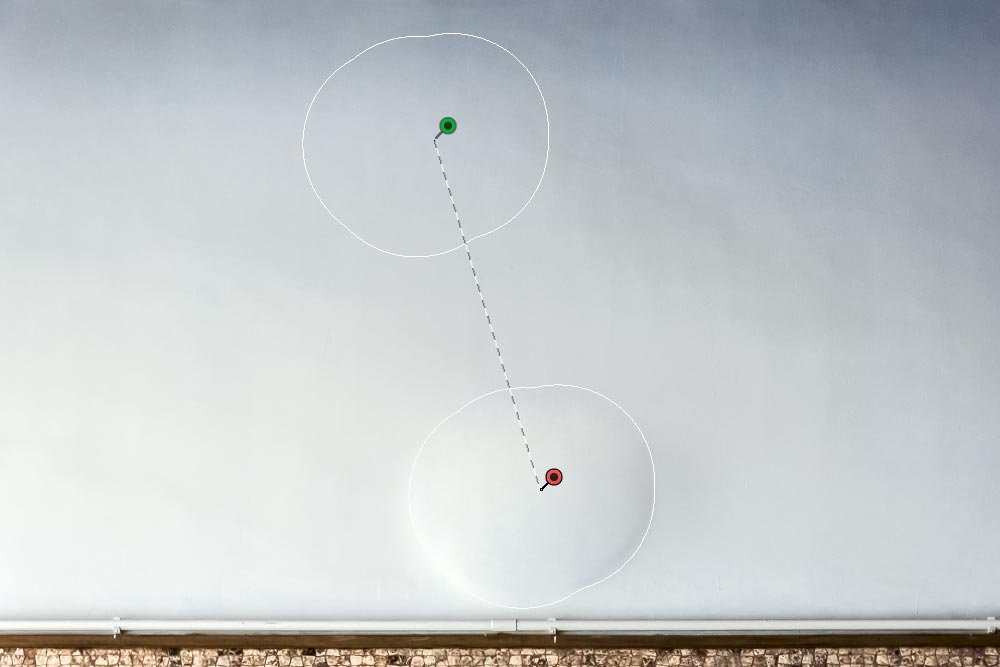
So in the above screenshot, the red pin is the target area that will be sourced with the content of the green pin. This is all very simple because I’m sure many folks have done this a zillion times. All I did so far was to paint something with the Spot Removal tool.
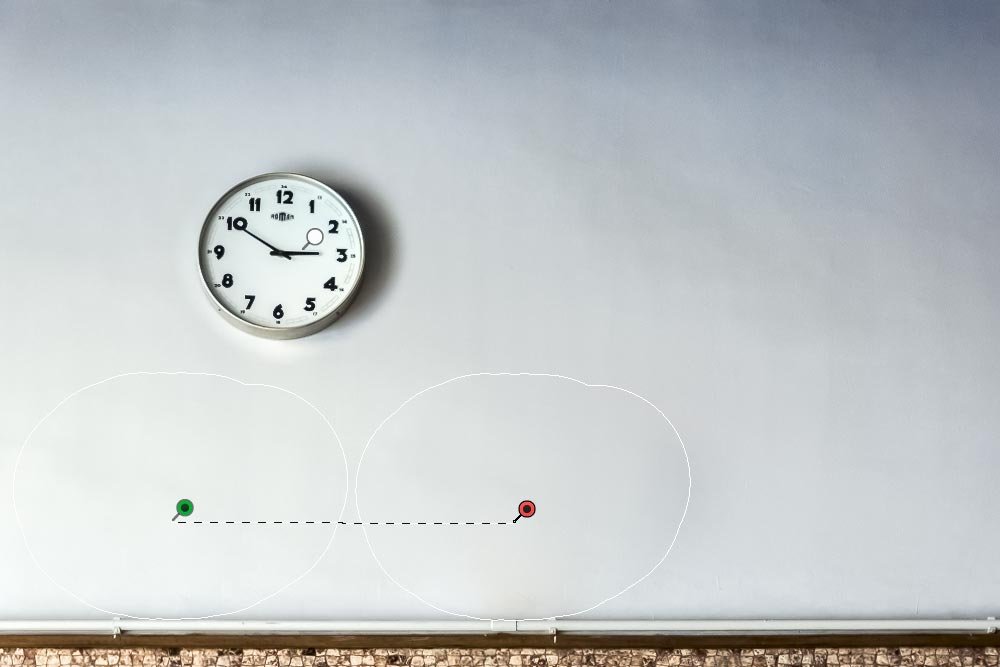
Here’s the neat part. What if I click inside each of these areas and reverse them? That’s right. I’ll click and drag each area so the target circle is sitting somewhere else on the wall and the wall circle is sitting over the clock. Let’s see what happens.
Basically, what’s happened is that the clock has now become the source content and the target is where ever I’d like to move the clock to. Pretty neat, huh?
Since there’s a gradient on the wall, I’ll have to either fuss with the Feather slider to soften up the edges, or I can simply move the new clock around until it blends in naturally. I think I’ll move it down slightly and then remove the check from the Show Overlay box that sits at the bottom of the Spot Removal panel.

By removing the check from the box, I hid the overlay graphics from both clocks. These consisted of the outlines that I painted inside of and both pins.
I’d say this looks very good. Of course, if I were a perfectionist, I could go back and modify whatever I wasn’t happy with, but really, I think I got the concept across. The best part is that any time I ever want to alter where the clock sits on the wall or what the sliders are set to, all I would need to do it to open this file inside of Camera Raw. It’s totally editable.
Again, I’ll uncheck the Show Overlay box to see what the wall looks like.

There does seem to be a small shadow showing towards the right of where the old clock sat, so I could just go over that area again with another instance of the Spot Removal brush. I could continue to do this until I was totally happy with the result.
Here is the final image:

I bet if you asked anyone what was done to this photo, not one person would be able to tell you. And the whole project only took me a few minutes. I’d say this is right on par with making a selection and moving something in Photoshop. I like it!
——
See? Wasn’t that easy? If you have any questions or concerns regarding this post, please let me know in the comment section below. Thanks for reading!
In today’s post, I’m going to show you how you can use the Spot Removal brush in Adobe Camera Raw to actually move an object in a graphic or a photograph. Normally, I’d select the object and move it after I jump to Photoshop, but this method is just as good. Also, this way, things are non-destructive, which is always a good thing. This post should be brief because there aren’t many steps involved. I think you’ll like it though. Also, keep in mind that you can follow the same instructions if you plan on doing something similar in Lightroom. Both Camera Raw and Lightroom use the same engine, so many things you do in one application you can do in the other.
Demo Photo
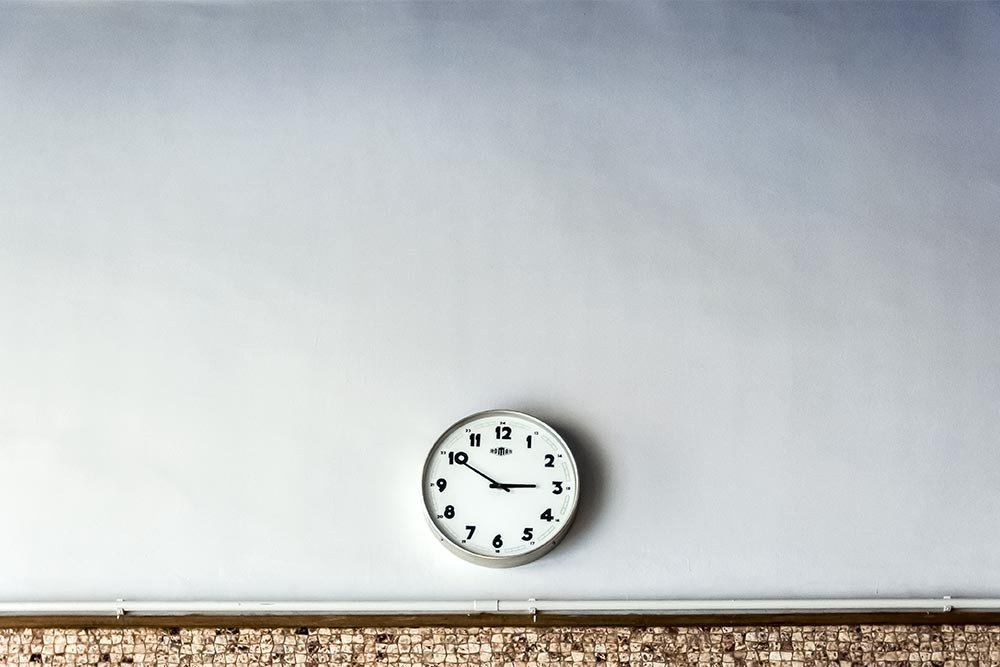
The only way the photo below could have been more perfect was to have a completely blank white wall with no sort of shading. Beyond that, it’s superb. I’m planning on moving the clock as my example and having all the room on the wall to move it to is great. Also, since the clock doesn’t take up much room, the process should be streamlined. Keep these things in mind if you plan on using the method I lay out below. Again, it’s only for certain situations.
Setting Up the Spot Removal Brush
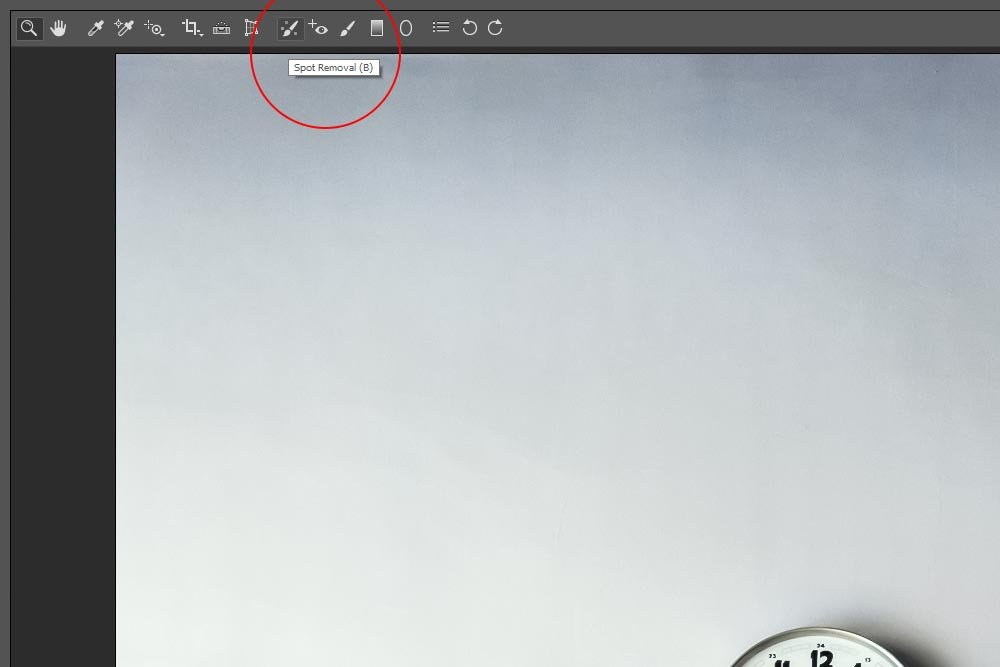
Since I’ve already got the image opened up in Camera Raw, I’ll get right to it. I’ll head up to the top horizontal toolbar and click on the Spot Removal brush icon.
Once that’s done, I’ll go over to the right Spot Removal column and change a few settings.

If you take a look at the screenshot above, you’ll notice that I set the brush fairly large. I did this because I want a nice broad curve when I begin painting. Also, I added a bit of feather and kept the opacity at 100%. The reason for this is because I’d like to make a duplicate copy of the clock to place somewhere else on the wall. This brings me to the most important setting, which is Clone. Since I want to make a copy, I wouldn’t select Heal from the drop-down above the other controls. I want a direct copy, which is what Clone will give me. If I need to adjust any of the sliders below as I work, I’ll do so.
Making the Copy
This is the part where you’ll hit your forehead. If you’ve ever used the Spot Removal brush before, you know that when you paint over something using the Clone setting, you get exactly what is inside the source area, somewhere else. Usually, you’ll paint over a blemish or something like that and replace it with an empty area. This time is different. Instead of painting over the clock to get rid of it, I’m going to paint over it and do something else.To help explain, I’ll first use the brush to paint over the clock and the immediate area surrounding it. The area I paint over will be referred to as the target and the area the replacement is coming from will be called the source.

So in the above screenshot, the red pin is the target area that will be sourced with the content of the green pin. This is all very simple because I’m sure many folks have done this a zillion times. All I did so far was to paint something with the Spot Removal tool.
Here’s the neat part. What if I click inside each of these areas and reverse them? That’s right. I’ll click and drag each area so the target circle is sitting somewhere else on the wall and the wall circle is sitting over the clock. Let’s see what happens.

Basically, what’s happened is that the clock has now become the source content and the target is where ever I’d like to move the clock to. Pretty neat, huh?
Since there’s a gradient on the wall, I’ll have to either fuss with the Feather slider to soften up the edges, or I can simply move the new clock around until it blends in naturally. I think I’ll move it down slightly and then remove the check from the Show Overlay box that sits at the bottom of the Spot Removal panel.

By removing the check from the box, I hid the overlay graphics from both clocks. These consisted of the outlines that I painted inside of and both pins.
I’d say this looks very good. Of course, if I were a perfectionist, I could go back and modify whatever I wasn’t happy with, but really, I think I got the concept across. The best part is that any time I ever want to alter where the clock sits on the wall or what the sliders are set to, all I would need to do it to open this file inside of Camera Raw. It’s totally editable.
Removing the Old Clock
There is one glaring issue, so I guess I shouldn’t celebrate just yet. I need to remove the original clock. To do this, I’ll click into another tool in the toolbar to set the Spot Removal tool up for a new instance and then I’ll click back into the Spot Removal tool. Then, I’ll change the drop-down to it’s set to Heal and I’ll paint a nice big area over the original clock. Camera Raw will decide where a good area is to replace it with.
Again, I’ll uncheck the Show Overlay box to see what the wall looks like.

There does seem to be a small shadow showing towards the right of where the old clock sat, so I could just go over that area again with another instance of the Spot Removal brush. I could continue to do this until I was totally happy with the result.
Here is the final image:

I bet if you asked anyone what was done to this photo, not one person would be able to tell you. And the whole project only took me a few minutes. I’d say this is right on par with making a selection and moving something in Photoshop. I like it!
——
See? Wasn’t that easy? If you have any questions or concerns regarding this post, please let me know in the comment section below. Thanks for reading!
