JodyBuchanan
Member
- Joined
- May 10, 2021
- Messages
- 138
- Reaction Score
- 0
- Points
- 21
- #1
In photography, details are oftentimes lost because of either too much light or too little light in the scene. If there’s too much light, parts of the photo can be washed out looking. If there’s too little light, parts of the photo can be hidden by shadows. If there is both too much and too little light in the same scene, things can get tricky. Oftentimes the details of whatever it is that’s being photographed are still available in the picture, it’s just that they need to be revealed by a talented editor. In general, it’s easier to pull the original scene out of RAW images as opposed to JPEG images because RAW images capture a lot more data than their lower quality counterparts.
Oftentimes, haze, fog, snow or other similar phenomenon has the potential to alter the look of an image. Adobe Camera Raw has done a very good job at combating this type of distraction with their Dehaze tool, but in reality, many other preexisting tools can do a very good job of clarifying what it is you originally took a photo of. And many times, applications like Camera Raw can make a photo looks a lot better than reality.
In today’s post, I’d like to focus on bringing back details to a photo. I have the perfect one in mind too. The image I’ll be working on is almost completely covered in snow, from the ground to the sky. I played around with the image before I began writing this post and I’m fairly happy with how much I was able to restore. For this post, I’ll be using only the Basic panel in Adobe Camera Raw to accomplish my goal. I think you’ll be impressed with the results.
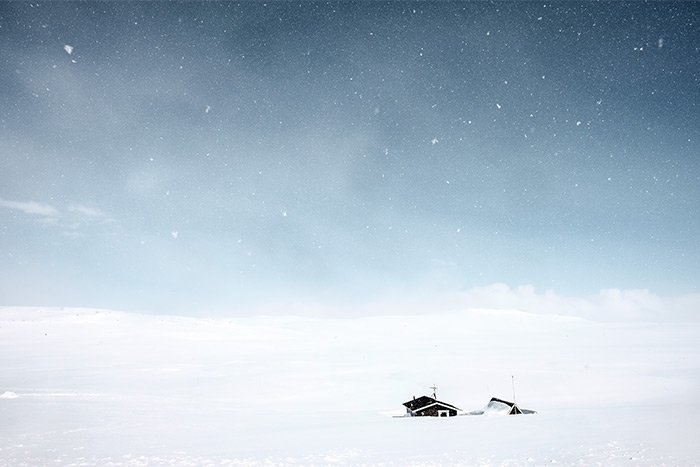
When attempting to determine the look you’re going for, think about this type of photo hanging on a wall somewhere. Would you purchase it? If not, why not? Personally, I’d like to see some more differentiation between the snow on the ground and the darkness of the sky. While I understand that there’s snow everywhere, I wouldn’t want to spend money on something where there’s not enough contrast.
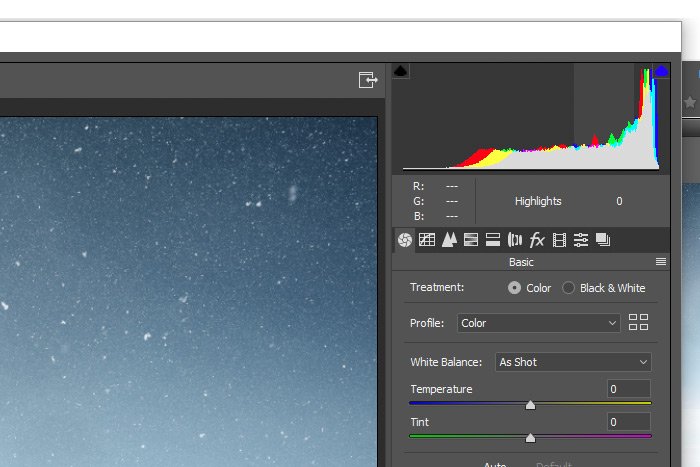
Take a look at the histogram in the screenshot above. If you look closely, you’ll see a very light vertical band going up and down it’s right side. In Camera Raw, there are five of these bands contained in the histogram and each one controls a different slider in the Basic panel (you can see the bands by simply rolling over the histogram with your mouse). If I were to click and drag this currently active band to the left or to the right with my mouse pointer, I’d be moving the Highlights slider down below. From left to right (darker to lighter), these bands control the Blacks, Shadows, Exposure, Highlights and Whites of the image. It’s important to take advantage of the histograms in cases such as the one I’m up against today because it can reveal glaring situations. As you can see, I have a highlights and whites issue. The entire histogram is slanted towards that side. Since this image is mostly dark sky, believe it or not, I’d like to see the histogram leaning much more the other way. Not all the way, but more than it is now. I need to darken that sky.
This is the resulting photo after this first change.
This first change, in my mind, was merely a correction. Now that this is completed, I think the photo looks much better, but can still use more in the way of making it actually look good. This is where I like to push the limits. By the way, by balancing out the histogram, the only sliders that moved more than slightly were the Exposure and the Blacks. Both moved to the left to lessen the brightness and to add black, respectively.
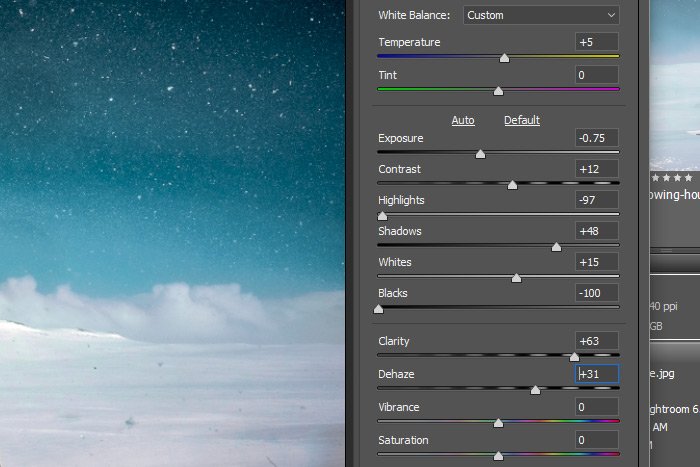
As it turns out, I ended up increasing the warmth a bit by pushing the Temperature slider slightly to the right for a value of +5. I also reduced the Exposure, increased the Contrast, reduced the Highlights, increased the Shadows, increased the Whites and decreased the Blacks. I also increase both the Clarity and Dehaze. And after all of that, I increased the Vibrance slightly as well. Here’s a quick view of the Basic panel sliders (I took this screenshot before I moved the Vibrance slider).
This is the final image.
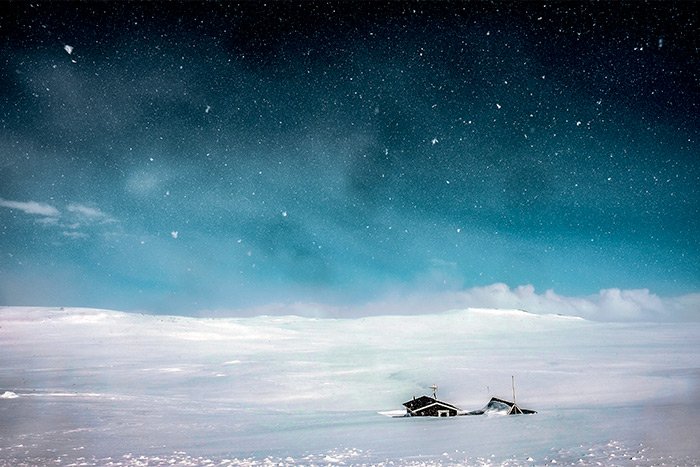
I think that looks a lot better. I like the way there’s distinction between the field and the sky now and I also like the way I can see the snow blowing around in the atmosphere. In my opinion, I’d much prefer this image hanging on my wall than the original.
——
I hope I clearly explained how to use Adobe Camera Raw to increase the clarity of an image while attempting to recover details. If you have any questions regarding this post, please let me know in the comment section down below. Thanks for reading!
Oftentimes, haze, fog, snow or other similar phenomenon has the potential to alter the look of an image. Adobe Camera Raw has done a very good job at combating this type of distraction with their Dehaze tool, but in reality, many other preexisting tools can do a very good job of clarifying what it is you originally took a photo of. And many times, applications like Camera Raw can make a photo looks a lot better than reality.
In today’s post, I’d like to focus on bringing back details to a photo. I have the perfect one in mind too. The image I’ll be working on is almost completely covered in snow, from the ground to the sky. I played around with the image before I began writing this post and I’m fairly happy with how much I was able to restore. For this post, I’ll be using only the Basic panel in Adobe Camera Raw to accomplish my goal. I think you’ll be impressed with the results.
Original Photo
This is the original photo I’ll be working on today. I’m sure you’ll agree that, while looking very interesting as it is, it can use some work in the “recovery of details” department.
When attempting to determine the look you’re going for, think about this type of photo hanging on a wall somewhere. Would you purchase it? If not, why not? Personally, I’d like to see some more differentiation between the snow on the ground and the darkness of the sky. While I understand that there’s snow everywhere, I wouldn’t want to spend money on something where there’s not enough contrast.
The Histogram
I’ve discussed histograms many times on this site before, so I don’t want to go too far into the topic. What I would like to tell you about is how you can alter the positions of some sliders in the Basic panel by simply clicking and dragging the histogram itself.
Take a look at the histogram in the screenshot above. If you look closely, you’ll see a very light vertical band going up and down it’s right side. In Camera Raw, there are five of these bands contained in the histogram and each one controls a different slider in the Basic panel (you can see the bands by simply rolling over the histogram with your mouse). If I were to click and drag this currently active band to the left or to the right with my mouse pointer, I’d be moving the Highlights slider down below. From left to right (darker to lighter), these bands control the Blacks, Shadows, Exposure, Highlights and Whites of the image. It’s important to take advantage of the histograms in cases such as the one I’m up against today because it can reveal glaring situations. As you can see, I have a highlights and whites issue. The entire histogram is slanted towards that side. Since this image is mostly dark sky, believe it or not, I’d like to see the histogram leaning much more the other way. Not all the way, but more than it is now. I need to darken that sky.
Balancing the Histogram
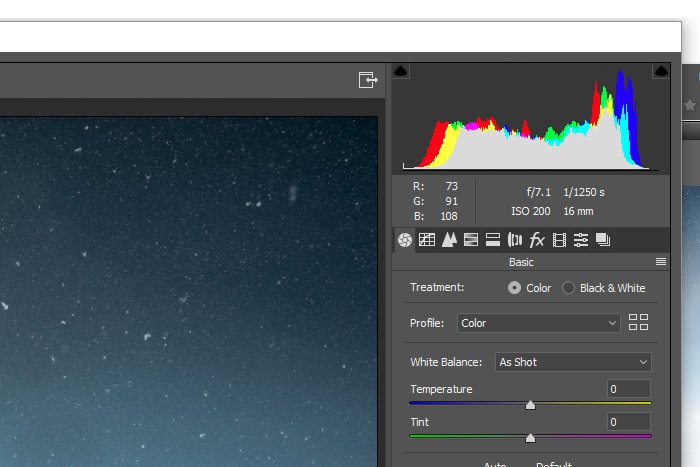
My first goal is to balance out the histogram, which shouldn’t be much of an issue. To accomplish this, I’ll click and drag each section of it until I see more of a uniform curve. Here’s the result of this effort.
This is the resulting photo after this first change.

This first change, in my mind, was merely a correction. Now that this is completed, I think the photo looks much better, but can still use more in the way of making it actually look good. This is where I like to push the limits. By the way, by balancing out the histogram, the only sliders that moved more than slightly were the Exposure and the Blacks. Both moved to the left to lessen the brightness and to add black, respectively.
Making Further Changes
As I go about pushing the sliders in the Basic panel, I have to keep in mind that as I push one, I may need to push another in the opposite direction. For example, I just mentioned that by clicking and dragging the histogram, the Exposure slider was nudged to the left to lessen the overall brightness of the image. Well, from experience, I know that moving the Highlights slider far to the left results in a gain of detail in brighter images. The thing is, when I push that Highlights slider, the overall picture becomes too harsh looking. It’s only when I increase the exposure that things look more normal. So the point is, there’s give and take with this process. Don’t become rigid during it and don’t think anything is ever set in stone.As it turns out, I ended up increasing the warmth a bit by pushing the Temperature slider slightly to the right for a value of +5. I also reduced the Exposure, increased the Contrast, reduced the Highlights, increased the Shadows, increased the Whites and decreased the Blacks. I also increase both the Clarity and Dehaze. And after all of that, I increased the Vibrance slightly as well. Here’s a quick view of the Basic panel sliders (I took this screenshot before I moved the Vibrance slider).

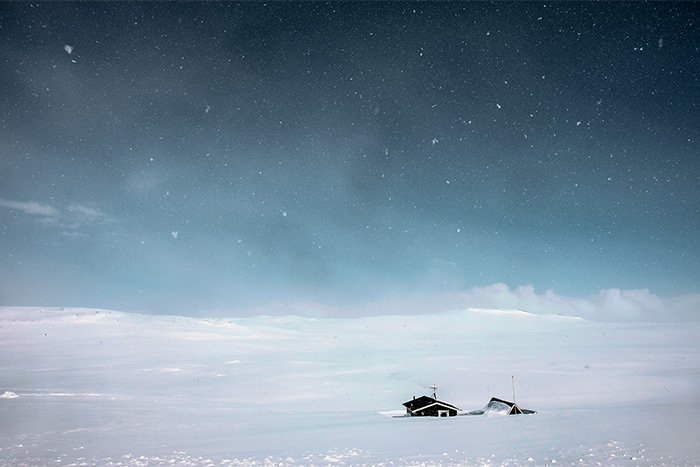
This is the final image.

I think that looks a lot better. I like the way there’s distinction between the field and the sky now and I also like the way I can see the snow blowing around in the atmosphere. In my opinion, I’d much prefer this image hanging on my wall than the original.
——
I hope I clearly explained how to use Adobe Camera Raw to increase the clarity of an image while attempting to recover details. If you have any questions regarding this post, please let me know in the comment section down below. Thanks for reading!
