Phoenix1
Member
- Joined
- May 7, 2021
- Messages
- 135
- Reaction Score
- 0
- Points
- 23
- #1
There are many methods for adjusting the color and tone of images inside of Adobe Photoshop, but I have to be honest here when I say that I much prefer using Camera Raw for my editing. While Photoshop does a good job of fixing up images and making them look much better than they did straight out of the camera, it has felt sort of clunky ever since I began using Camera Raw. Camera Raw has got it going on. There are tons of sliders and I do almost everything I need to, color and tone correcting-wise, inside of it. Of course, I use Photoshop when I need to go beyond simple corrections, but generally, simple corrections are all I need 99% of the time.
In today’s post, I’d like to work through a quick project using both Adobe Photoshop and Camera Raw. Sometimes I find myself working on a photo inside of Photoshop when I really need to edit part of that photo in Camera Raw. To help out in situations like this, I take advantage of the Camera Raw Filter to move the photo over to that application and then, when I return to Photoshop after making my edits, I take advantage of masks to limit those edits to specific areas of the image. This is an extremely handy workflow because of its versatility. When used, the editor (you and me) is able to jump back and forth between Photoshop and Camera Raw in a seamless manner. Having masks available to carve out specific areas of an edit is super handy as well.

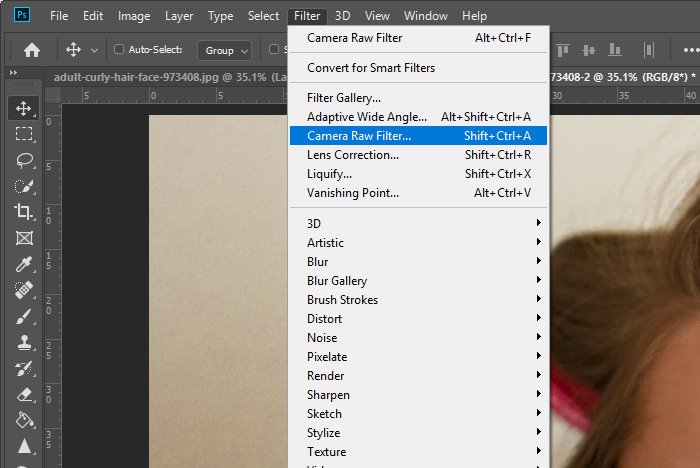
When I click that menu item, I’ll immediately jump to Camera Raw, where I can make my edits to the entire image. You should really read my previous post on how to make photos look fabulous in Camera Raw if you’re interested in that. When I’m finished in Camera Raw, I’ll click the OK button, which will bring me back to Photoshop.
If you aren’t aware, Camera Raw is actually a Photoshop plugin. I like to call it Adobe Camera Raw and refer to it as its own application, but that’s just because it acts like one. I’m not really being very accurate when I do that.
Let’s take a look at the image now that I color and tone corrected it in Camera Raw.

If you look closely at the image, you can see that I not only edited the woman and her magazine, I also inadvertently edited the wall behind her as well. Since I added some sharpening and brightness to the woman, I added the same thing to the wall as well, as is evidenced by the grain on the wall. I didn’t want that, so I’d like to revert the wall back to its original state. I’ll work on that next.
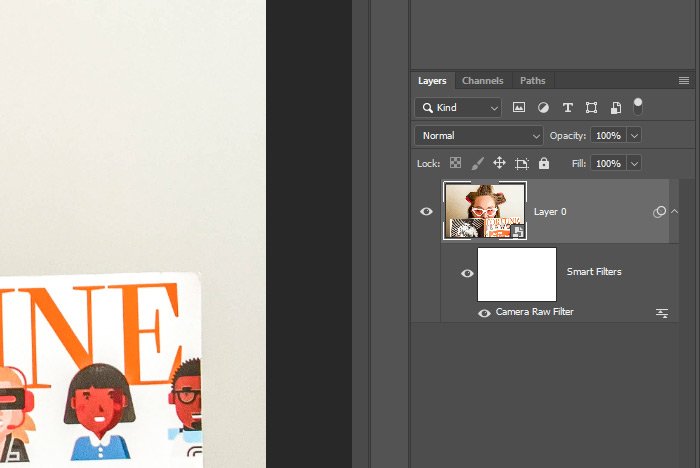
As you can see, I’ve got the top image layer that’s now a Smart Object. Below that, I’ve got the Smart Filter that is currently a Camera Raw Filter. The important thing here is the mask. Its thumbnail is white, which means that any and all of the edits I made in Camera Raw are showing. What I want to do is actually hide all of the changes and then reveal just what I want to show.
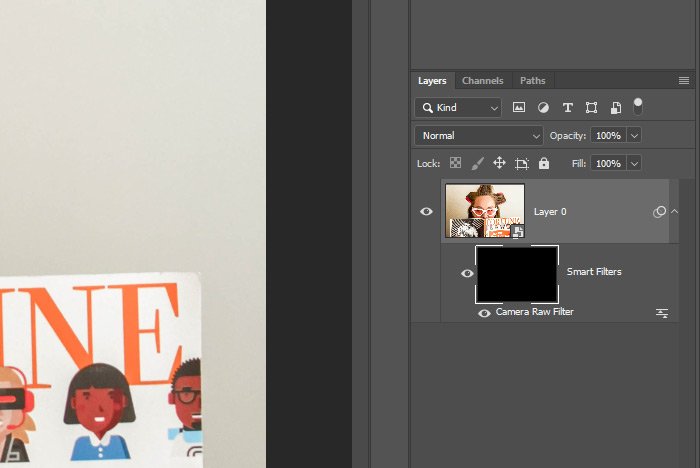
So, I’ll first need to invert the mask. I’ll click on the mask thumbnail to activate it and then I’ll use the keyboard shortcut of Ctrl+I (Command on Mac) to invert. After using the shortcut, the mask thumbnail should turn black and any changes I made in Camera Raw should be hidden. The changes are still there, but they’re just masked out at the moment.
At this point, I’d like to select the woman and her magazine. To do this, I’ll click on the image thumbnail in the Layers panel and then I’ll use the Quick Selection Tool to make the selection. If you’re interested in learning about how to make great selections in Photoshop, I encourage you to read my previous post on the topic.
Let’s see what the selection looks like. Mind you, this is very fast and rough, so don’t make fun.

Can you see the marching ants? They are surrounding the woman and the magazine.
The reason I had to click the image thumbnail in the Layers panel was to make the selection. Now, I’ll click on the black mask thumbnail in the Layers panel because I’d like to fill part of it with white. The selected area, to be exact.
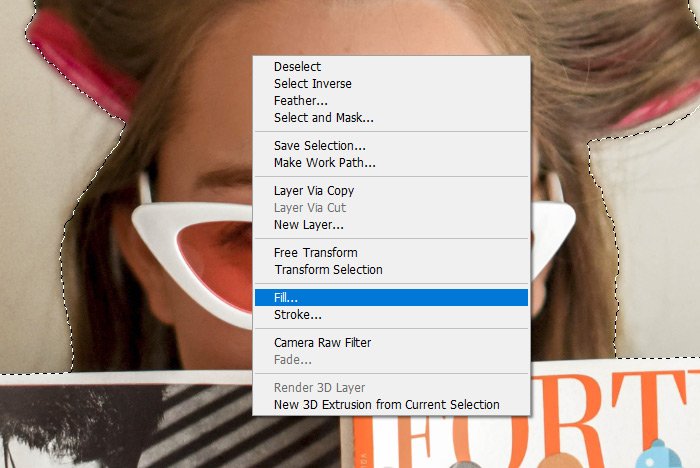
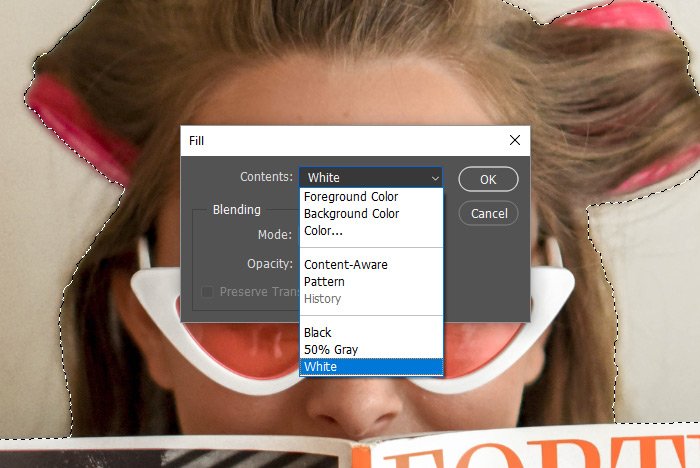
I’ll click the mask thumbnail and then I’ll right-click inside of the selection while the Quick Selection Tool is still active. When the menu appears, I’ll select the Fill option.
When the Fill dialog box appears, I’ll choose the White option from the Contents drop-down.
Finally, I’ll click the OK button and watch as the wall stays in its original state while the woman and her magazine revert to the edited version. Let’s take a look.

I’ll use the Select > Deselect menu item to deselect the active part of the image and take a look at the final result. It’s exactly as I wanted it to be. This is the final result. While the entire image was modified in Adobe Camera Raw, only part of that modification is showing because of a mask in Photoshop. I’m hoping this has inspired you to apply the same principles I used in this post for projects of your own. This technique is great for landscapes, portraits and all types of photography.

Just in case you’re interested, this is the active mask that’s revealing the woman and magazine while concealing the wall in back of her.
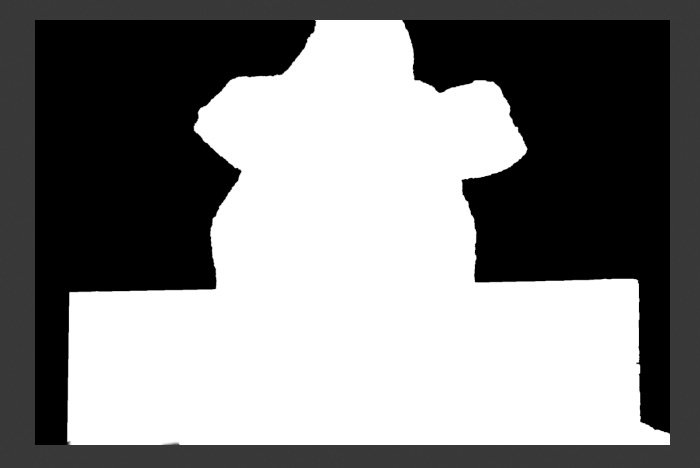
To superimpose the mask over the image in the workspace, I simply held down the Alt key on my keyboard and then clicked once on the mask thumbnail in the Layers panel.
I hope I clearly explained how to use the Camera Raw Filter inside of Adobe Photoshop and then how to use a selection to mask out part of the previous edit. If you have any questions regarding this technique or post, please let me know in the comment section below. You can also ask or add anything in the Photoshop forum as well. Thanks for reading!
In today’s post, I’d like to work through a quick project using both Adobe Photoshop and Camera Raw. Sometimes I find myself working on a photo inside of Photoshop when I really need to edit part of that photo in Camera Raw. To help out in situations like this, I take advantage of the Camera Raw Filter to move the photo over to that application and then, when I return to Photoshop after making my edits, I take advantage of masks to limit those edits to specific areas of the image. This is an extremely handy workflow because of its versatility. When used, the editor (you and me) is able to jump back and forth between Photoshop and Camera Raw in a seamless manner. Having masks available to carve out specific areas of an edit is super handy as well.
Today’s Demo Image
Here’s a nice photo of a woman holding a magazine in front of her face. The reason I chose this particular photo was two-fold. First, I like it and second, there’s a distinction between the woman and the wall behind her. I’ll be able to select either her and her magazine or just the wall when the time is right. So that’s why I chose this photo.
What’s My Goal?
My goal with this photo, or project rather, is to pretend that I’ve been working on it in Photoshop for some time, but just realized that it’s sort of dull looking. I’d like to enhance the colors of the woman and her magazine, but not of the wall behind her. I’d like to leave that as is.How to Use the Camera Raw Filter
The first step I’ll take is to right-click on the image layer in the Layers panel. When the menu appears, I’ll select Convert to Smart Object. After I do that, I’ll head up to the Filter > Camera Raw Filter menu item and click.
When I click that menu item, I’ll immediately jump to Camera Raw, where I can make my edits to the entire image. You should really read my previous post on how to make photos look fabulous in Camera Raw if you’re interested in that. When I’m finished in Camera Raw, I’ll click the OK button, which will bring me back to Photoshop.
If you aren’t aware, Camera Raw is actually a Photoshop plugin. I like to call it Adobe Camera Raw and refer to it as its own application, but that’s just because it acts like one. I’m not really being very accurate when I do that.
Let’s take a look at the image now that I color and tone corrected it in Camera Raw.

If you look closely at the image, you can see that I not only edited the woman and her magazine, I also inadvertently edited the wall behind her as well. Since I added some sharpening and brightness to the woman, I added the same thing to the wall as well, as is evidenced by the grain on the wall. I didn’t want that, so I’d like to revert the wall back to its original state. I’ll work on that next.
Inverting the Mask & Making a Selection
Before I go any further, let’s take a look at the Layers panel.
As you can see, I’ve got the top image layer that’s now a Smart Object. Below that, I’ve got the Smart Filter that is currently a Camera Raw Filter. The important thing here is the mask. Its thumbnail is white, which means that any and all of the edits I made in Camera Raw are showing. What I want to do is actually hide all of the changes and then reveal just what I want to show.
So, I’ll first need to invert the mask. I’ll click on the mask thumbnail to activate it and then I’ll use the keyboard shortcut of Ctrl+I (Command on Mac) to invert. After using the shortcut, the mask thumbnail should turn black and any changes I made in Camera Raw should be hidden. The changes are still there, but they’re just masked out at the moment.

At this point, I’d like to select the woman and her magazine. To do this, I’ll click on the image thumbnail in the Layers panel and then I’ll use the Quick Selection Tool to make the selection. If you’re interested in learning about how to make great selections in Photoshop, I encourage you to read my previous post on the topic.
Let’s see what the selection looks like. Mind you, this is very fast and rough, so don’t make fun.

Can you see the marching ants? They are surrounding the woman and the magazine.
The reason I had to click the image thumbnail in the Layers panel was to make the selection. Now, I’ll click on the black mask thumbnail in the Layers panel because I’d like to fill part of it with white. The selected area, to be exact.
I’ll click the mask thumbnail and then I’ll right-click inside of the selection while the Quick Selection Tool is still active. When the menu appears, I’ll select the Fill option.

When the Fill dialog box appears, I’ll choose the White option from the Contents drop-down.

Finally, I’ll click the OK button and watch as the wall stays in its original state while the woman and her magazine revert to the edited version. Let’s take a look.

I’ll use the Select > Deselect menu item to deselect the active part of the image and take a look at the final result. It’s exactly as I wanted it to be. This is the final result. While the entire image was modified in Adobe Camera Raw, only part of that modification is showing because of a mask in Photoshop. I’m hoping this has inspired you to apply the same principles I used in this post for projects of your own. This technique is great for landscapes, portraits and all types of photography.

Just in case you’re interested, this is the active mask that’s revealing the woman and magazine while concealing the wall in back of her.

To superimpose the mask over the image in the workspace, I simply held down the Alt key on my keyboard and then clicked once on the mask thumbnail in the Layers panel.
I hope I clearly explained how to use the Camera Raw Filter inside of Adobe Photoshop and then how to use a selection to mask out part of the previous edit. If you have any questions regarding this technique or post, please let me know in the comment section below. You can also ask or add anything in the Photoshop forum as well. Thanks for reading!
