KristinaW
Member
- Joined
- May 7, 2021
- Messages
- 127
- Reaction Score
- 0
- Points
- 18
- #1
I always think of Adobe Lightroom as having been created for photographers who capture series of photographs. While it’s great for the one-off pictures, the power of the application truly lies with enhancing and simplifying the speed and complexity of workflow. Because of this, Lightroom has many processes that amplify the execution of a task. It sort of acts like leverage does, but for editing images.
In today’s post, I’m going to cover three tips for copying edits across multiple photos. For example, let’s say that you recently took 50 photos of a wedding party. Every single photo in the shoot was of the same group of people and under the same conditions. Can you imagine editing every one of these photos independently? If I had to, I’d probable go nuts. Luckily, Lightroom makes editing the series as simple as editing one. Now that’s leverage.
To demonstrate how to accomplish what I’m going to cover, I’ll be using four photographs of a young model. She’s in very similar lighting and under virtually the same conditions. They’re perfect photos for this tutorial.
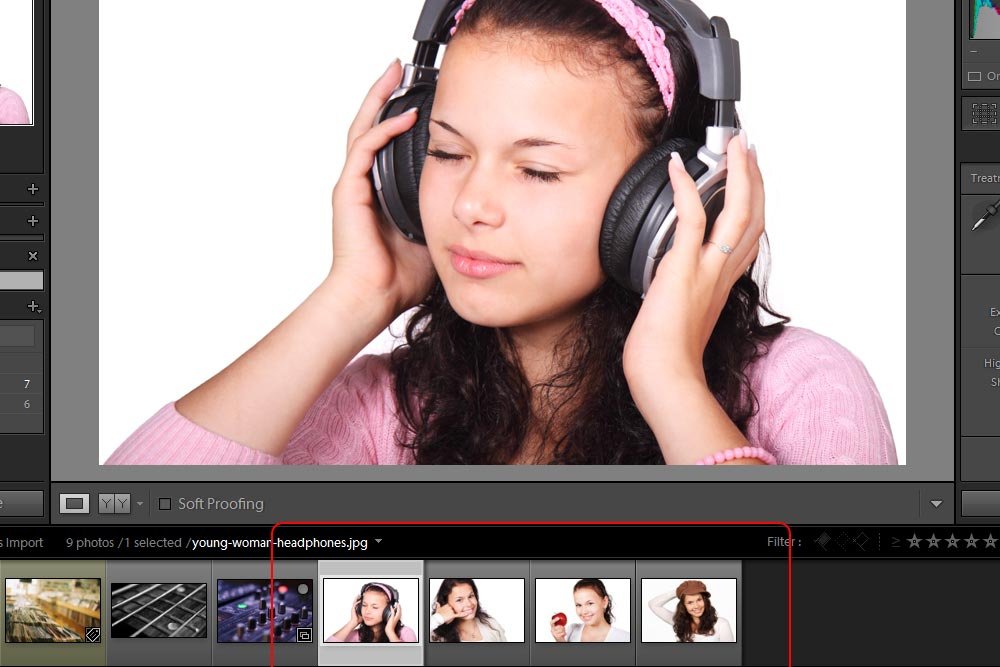
As you can see, I’ve already got the photos imported into Lightroom and they are available in the filmstrip view on the Develop module. My goal with each tip I show you is to basically batch process the photos. Again, I only want to do as little work as I have to. Duplicating my efforts is a waste of time.
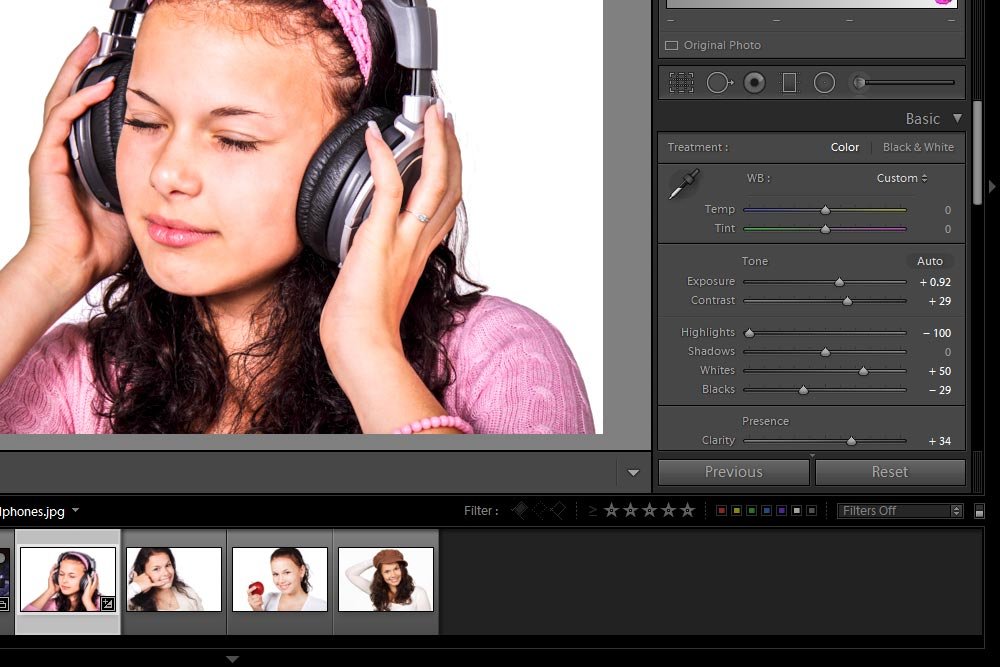
Nothing too drastic here. Now, I know that I want to make the same edits across the rest of the photos, but to be honest, I already forgot what I did. What I’m confident of is that the first photo looks good. I’m happy with it.
Tip #1
To copy an entire cluster of edits from one photo to the next, select the next photo you’re interested in applying the changes to and then click on the Previous button.
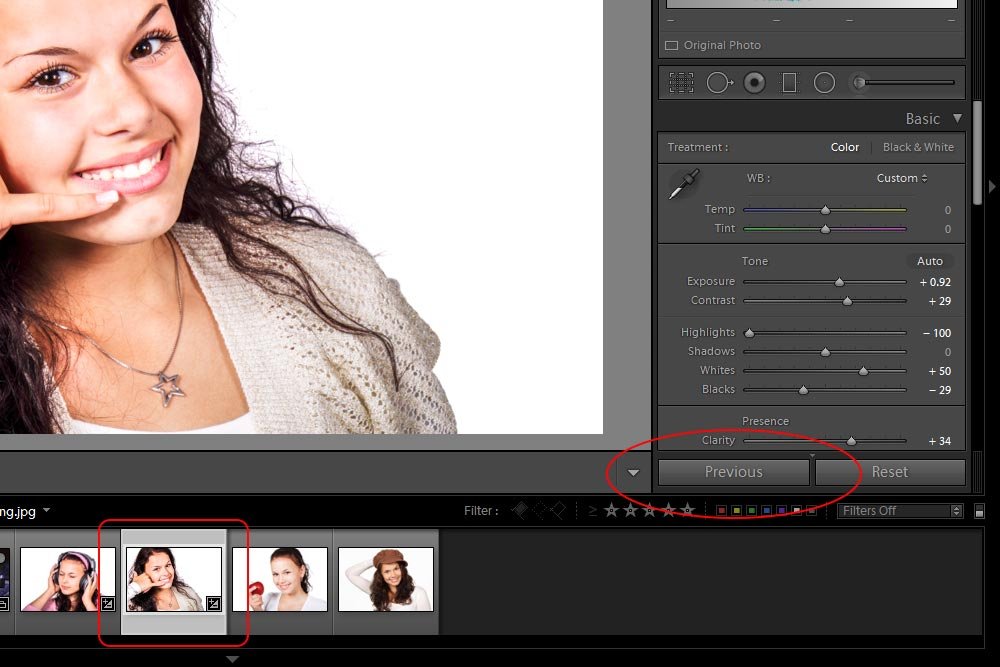
In my case, I selected the second photo in the series.
It’s that simple. The edits will immediately be applied to the new photo. And the best part is, you can go into the Basic panel again and modify any of the sliders. Nothing is set in stone. Also, the photos don’t need to be in any order. You can make some edits, jump to another photo anywhere, click the Previous button, make more changes, jump back to the original photo again and click the Previous button once more to apply those additional changes to the first photo. It’s really a flexible and intuitive method to use for copying changes from one image to the next.
Finally, you have the ability to go down the line of photos, if you wish. Consider the Previous button sort of a Copy button in that it merely copies the previous edits to another photo.
Tip #2
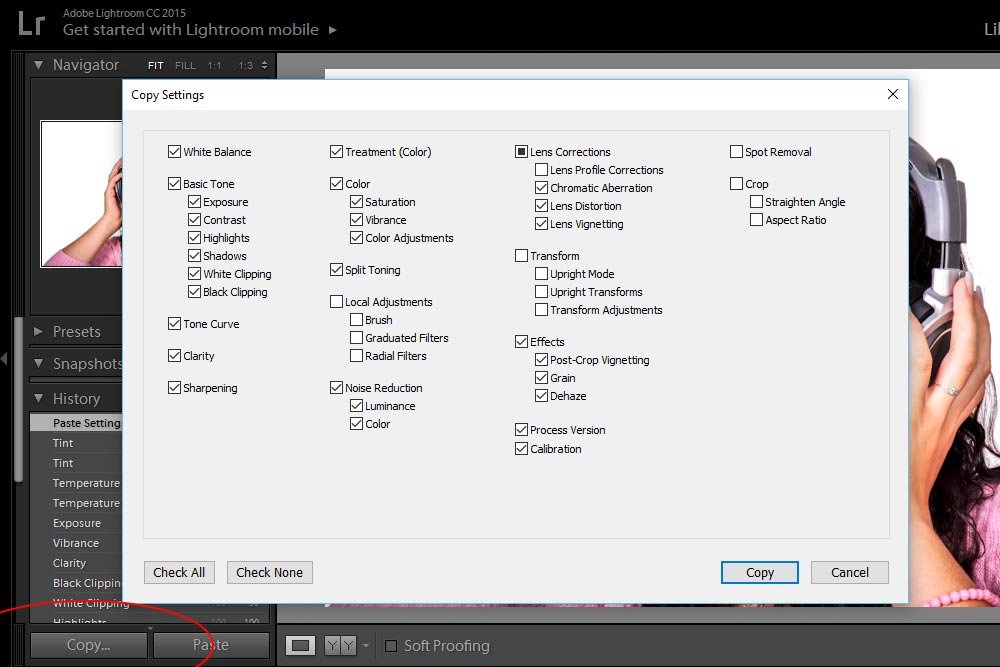
To copy either all edits or selected edits from one photo to another, select the first photo thumbnail and then click on the Copy button that’s located in the left column. When you do that, the Copy Settings dialog box will appear (above). Inside this dialog box, you’ll have the opportunity to finely select which edits from which panels you’d like to copy over to another image. When that decision has been made, press the Copy button in the dialog box, select the photo you’d like to paste to and then click the Paste button in the left column. Again, it’s that simple.
An important point to remember is that you only need to click the Copy button once. If you’re happy with the selected edits, you can click Paste after selecting any number of thumbnails. You don’t need to copy over and over again.
Tip #3
To copy the edits from one photo to many photos, select the first photo thumbnail just as we did above. Then, use the Ctrl (Windows) or the Command (Mac) key to selectively choose additional photos. Alternatively, you can select additional photos in a series by selecting the first thumbnail again and then holding down the Shift key on your keyboard and selecting the last thumbnail. This will highlight all images in the series.
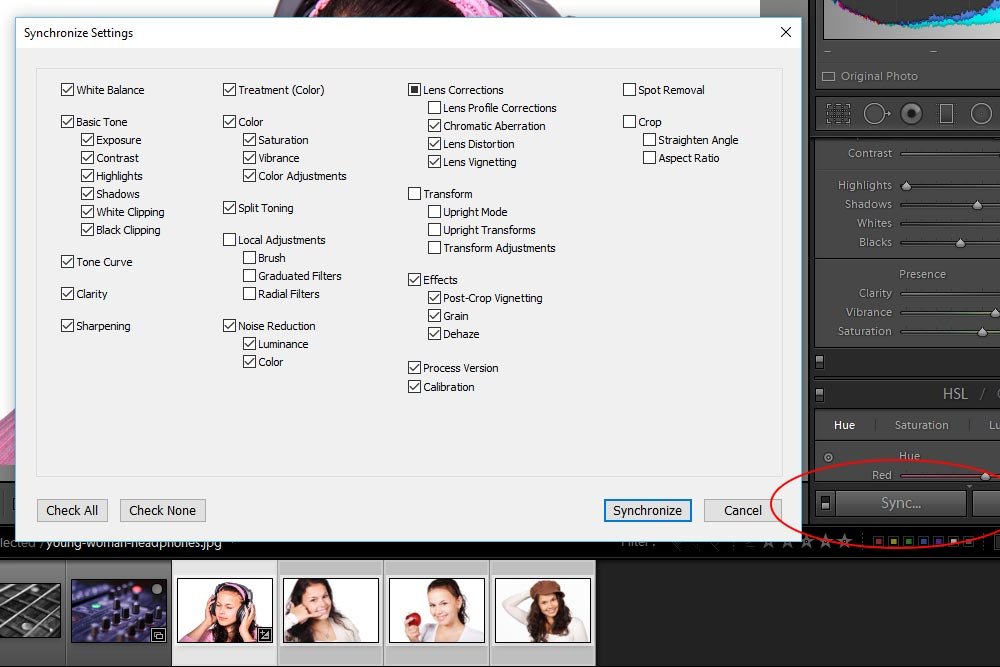
Once the thumbnails are highlighted, the Previous button in the right column will turn into the Sync button. Press this new button and the Synchronize Settings dialog box will appear. Just like in the previous section, choose the edits you’d like to apply to the additional photos and click the Synchronize button in the dialog box. The moment you do this, all edits will copy over to the selected images.
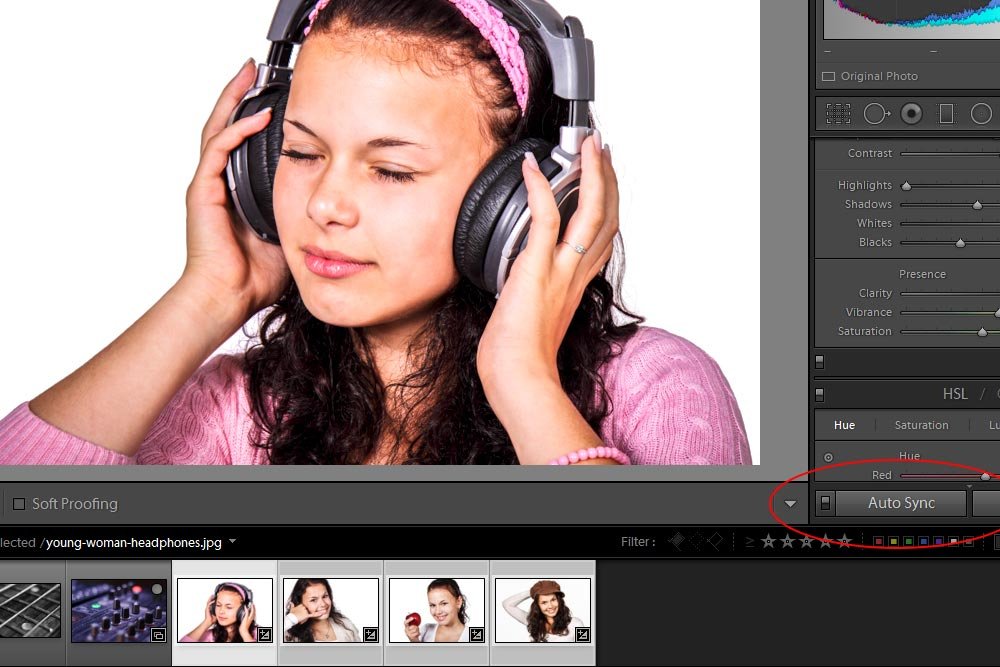
To edit in real time, I’ll select all the images I want to alter. This is just like I did above. Then, I’ll head back to the Sync button. I’ll click on the small switch that’s located just to the left of the button, which will change its title from Sync to Auto Sync. At this point, any alterations I make in any panel will be applied to all selected photos. I like this option the best. It’s the fastest. The others are good too, but for different purposes.
After I mess around in the Basic panel for a bit, I’ll export the perfectly edited photo.

If you’re a Lightroom power user and didn’t know about these workflow enhancing techniques, I hope I helped you out today. It’s tricks like this that makes these products so exciting. If you have any comments or questions, please leave them in the comment section below. Thanks!
In today’s post, I’m going to cover three tips for copying edits across multiple photos. For example, let’s say that you recently took 50 photos of a wedding party. Every single photo in the shoot was of the same group of people and under the same conditions. Can you imagine editing every one of these photos independently? If I had to, I’d probable go nuts. Luckily, Lightroom makes editing the series as simple as editing one. Now that’s leverage.
To demonstrate how to accomplish what I’m going to cover, I’ll be using four photographs of a young model. She’s in very similar lighting and under virtually the same conditions. They’re perfect photos for this tutorial.

As you can see, I’ve already got the photos imported into Lightroom and they are available in the filmstrip view on the Develop module. My goal with each tip I show you is to basically batch process the photos. Again, I only want to do as little work as I have to. Duplicating my efforts is a waste of time.
The Previous Button
In this first example, I’ll go ahead and make a few changes in the Basic panel. This is only for demonstration purposes, so it really doesn’t matter what changes I make.
Nothing too drastic here. Now, I know that I want to make the same edits across the rest of the photos, but to be honest, I already forgot what I did. What I’m confident of is that the first photo looks good. I’m happy with it.
Tip #1
To copy an entire cluster of edits from one photo to the next, select the next photo you’re interested in applying the changes to and then click on the Previous button.

In my case, I selected the second photo in the series.
It’s that simple. The edits will immediately be applied to the new photo. And the best part is, you can go into the Basic panel again and modify any of the sliders. Nothing is set in stone. Also, the photos don’t need to be in any order. You can make some edits, jump to another photo anywhere, click the Previous button, make more changes, jump back to the original photo again and click the Previous button once more to apply those additional changes to the first photo. It’s really a flexible and intuitive method to use for copying changes from one image to the next.
Finally, you have the ability to go down the line of photos, if you wish. Consider the Previous button sort of a Copy button in that it merely copies the previous edits to another photo.
Copying & Pasting the Edits
This next tip is a bit more flexible than the last. It has more options and allows you to slice and dice the edits you’d like to apply to different photos. Take a look.
Tip #2
To copy either all edits or selected edits from one photo to another, select the first photo thumbnail and then click on the Copy button that’s located in the left column. When you do that, the Copy Settings dialog box will appear (above). Inside this dialog box, you’ll have the opportunity to finely select which edits from which panels you’d like to copy over to another image. When that decision has been made, press the Copy button in the dialog box, select the photo you’d like to paste to and then click the Paste button in the left column. Again, it’s that simple.
An important point to remember is that you only need to click the Copy button once. If you’re happy with the selected edits, you can click Paste after selecting any number of thumbnails. You don’t need to copy over and over again.
Synchronizing Edits
So far, we copied edits to photos one by one. The real power of Lightroom reveals itself when we begin syncing edits across many photos.Tip #3
To copy the edits from one photo to many photos, select the first photo thumbnail just as we did above. Then, use the Ctrl (Windows) or the Command (Mac) key to selectively choose additional photos. Alternatively, you can select additional photos in a series by selecting the first thumbnail again and then holding down the Shift key on your keyboard and selecting the last thumbnail. This will highlight all images in the series.

Once the thumbnails are highlighted, the Previous button in the right column will turn into the Sync button. Press this new button and the Synchronize Settings dialog box will appear. Just like in the previous section, choose the edits you’d like to apply to the additional photos and click the Synchronize button in the dialog box. The moment you do this, all edits will copy over to the selected images.
Editing Many Photos in Real Time
While all the above methods are true time savers, I personally prefer to work in real time if I know my images are part of a similar group. I like to edit and see the changes among everything as I work. Good thing there’s a method for doing this.To edit in real time, I’ll select all the images I want to alter. This is just like I did above. Then, I’ll head back to the Sync button. I’ll click on the small switch that’s located just to the left of the button, which will change its title from Sync to Auto Sync. At this point, any alterations I make in any panel will be applied to all selected photos. I like this option the best. It’s the fastest. The others are good too, but for different purposes.

After I mess around in the Basic panel for a bit, I’ll export the perfectly edited photo.

If you’re a Lightroom power user and didn’t know about these workflow enhancing techniques, I hope I helped you out today. It’s tricks like this that makes these products so exciting. If you have any comments or questions, please leave them in the comment section below. Thanks!
