JodyBuchanan
Member
- Joined
- May 10, 2021
- Messages
- 138
- Reaction Score
- 0
- Points
- 21
- #1
Even though the History panel is quite visible in the left column of the Develop panel in Adobe Lightroom, not too many editors take full advantage of its capabilities. In all honesty, it’s one of the most useful tools in Lightroom. Its flexibility allows you to pinpoint exactly where you are in your workflow and take another route, if necessary. You can edit to your heart’s content and then head into the History panel to go back ten steps to either erase anything you did after your current location or start all over again. The History panel gives you control over the steps you’ve taken and, in my opinion, that’s a very handy tool to have available.
In today’s post, I’ll be using the example photo below to demonstrate how to use the History panel in Adobe Lightroom. It’s not the deepest tool out there, but as I said above, it can save your butt if you get into a jam.

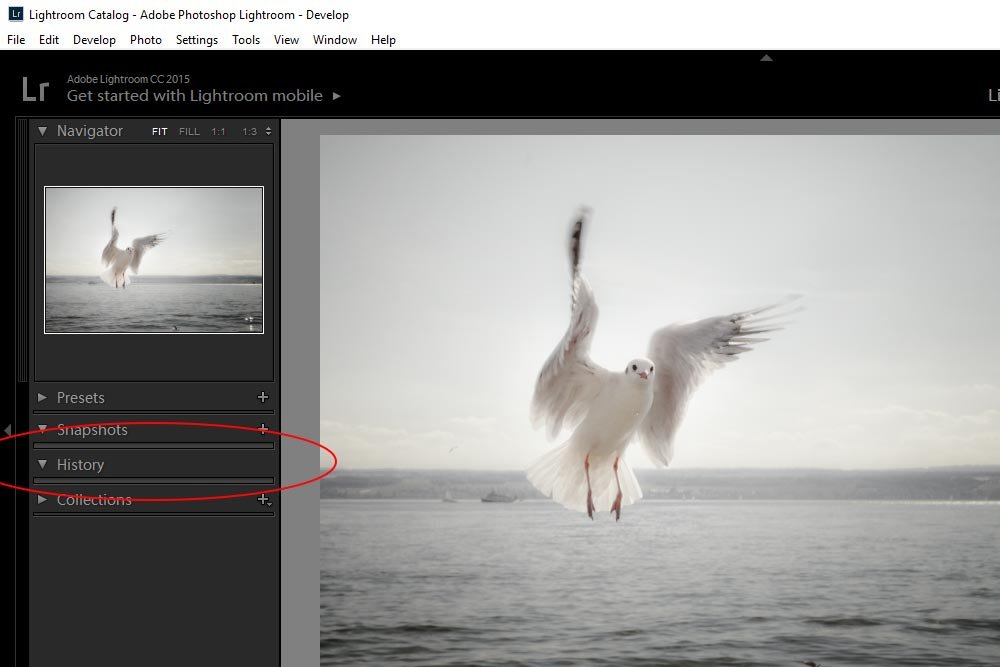
As you can see, even though the arrow in the drop-down is showing the the panel is open, there’s nothing in it. That’s because I haven’t begun my editing yet. In the next section, I’ll show you what the items look like in this panel once I make some changes.
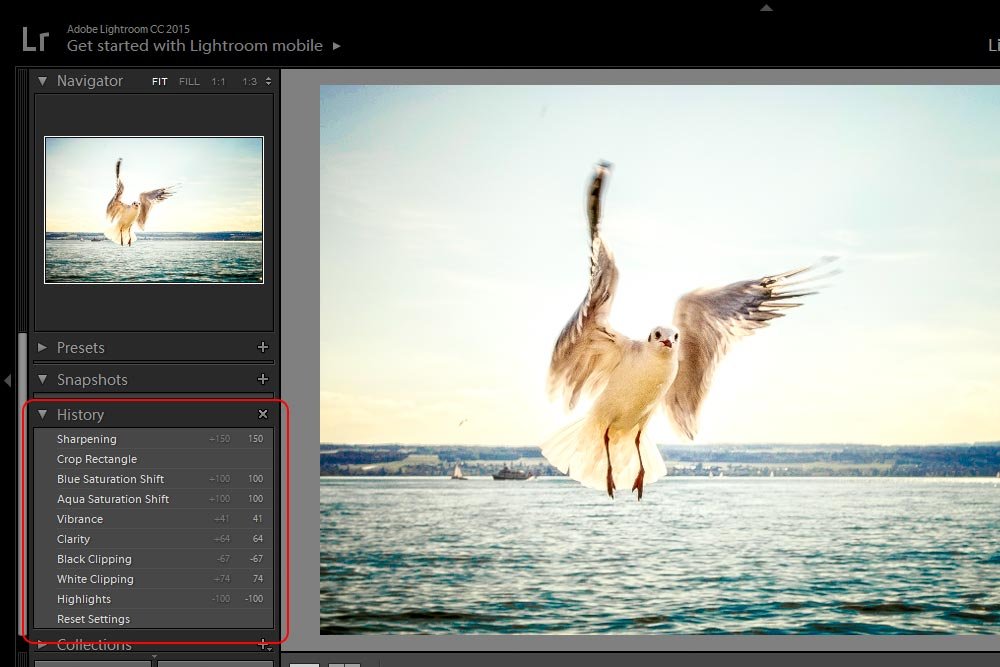
Take a close look at the steps inside this panel. On each line, you’ll see the details about each event that occurred. For example, the most recent change I made (the top in the list) to the demo photo was to add some sharpening. In this case, I pushed the Sharpening slider all the way to the right. In the History panel, the top item states that I increased the photo’s sharpening by 150 points and now the value of this attribute is 150. That’s important to know because you can see what each slider attribute is all in one place without looking inside all the other editing panels.
If I check out a few more steps, I can see that I increased both the blue and aqua saturation to 100. All this means is that I pushed the Blue Saturation and Aqua Saturation sliders all the way to the right in the HSL panel. So if I made dozens of edits to a photo, I’d be able to see exactly what I did, what their current values are and in what order I made the change all in one place. That’s huge.
If you can’t see what I’m talking about in the screenshot, take a look at the list below. I’ll copy the content of the panel so it’s more clear.
Sharpening +150 150
Crop Rectangle
Blue Saturation Shift +100 100
Aqua Saturation Shift +100 100
Vibrance +41 41
Clarity +64 64
Black Clipping -67 67
White Clipping +74 74
Highlights -100 100
Reset Settings
Each line of this list includes the attribute that was touched, the change in value that was made and then the current value.
So, if the most recent edit made is at the top of the list, I can start at the bottom to retrace my steps from the beginning. I began be resetting some practice changes I made earlier. That’s what the Reset Settings step is. After that, I pushed the Highlights, Whites, Blacks, Clarity and a few other sliders until I was happy with the look. If you follow what I’m writing here, you’d be stepping up each item in the above list.
Let’s say that I wish I didn’t crop this image. It’s not like I took a lot of material out of it or anything, I just think the original looked a lot better. To go back in time and revisit the step I made right before I cropped, I can click the step below Crop Rectangle, which happens to be Blue Saturation Shift.
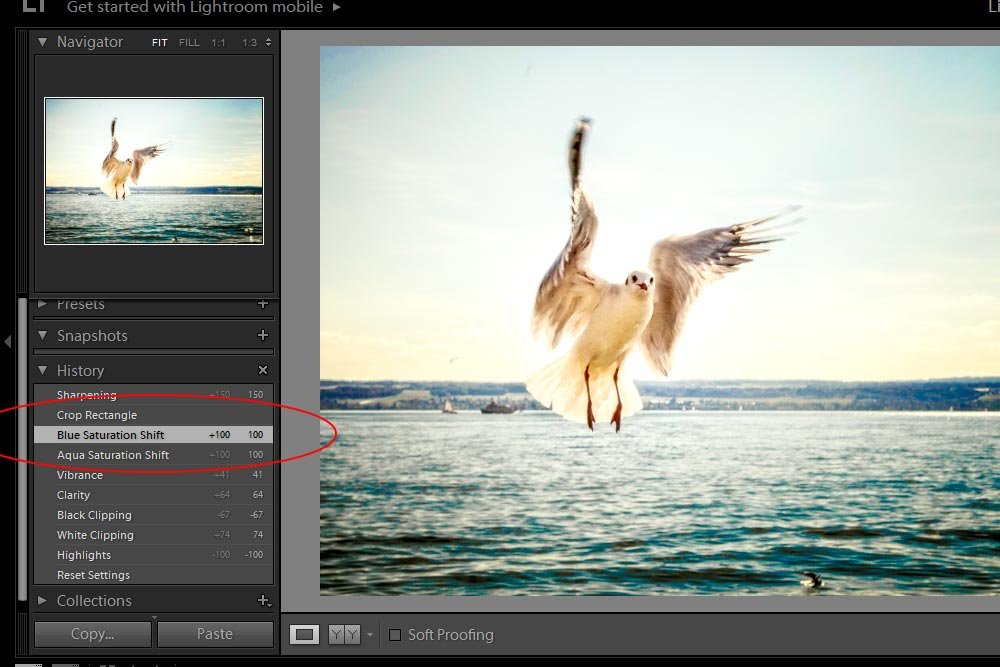
When I click on a step inside the History panel, any edit I made after that step will be temporarily disabled. Since I clicked on the Blue Saturation Shift step, both the Crop Rectangle and the Sharpening steps won’t be visible in the photo anymore. They’re still there but they just aren’t visible. I can jump around and click on any steps at this point and nothing will be removed.
Now, if I click on a step, like I have above, and make a new edit, things change quite a bit. Take a look at the next screenshot.
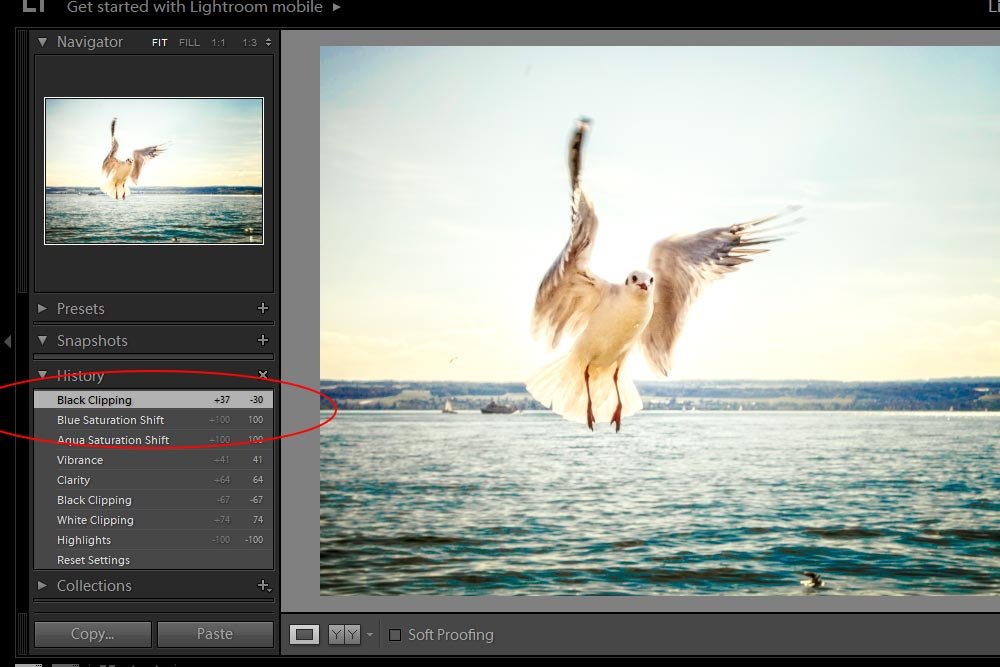
In this version, I can see that instead of stepping from Blue Saturation Shift to Crop Rectangle to Sharpening as we did previously, the workflow now steps from Blue Saturation Shift to Black Clipping. The reason the other two edits are no longer there is because right after I clicked on Blue Saturation Shift, I made a new edit, which deleted the others. This is what I was referring to when I mentioned that you can go back in time to follow a new route if you want to. This is an extremely powerful function.
I encourage you to experiment with this panel. Open up a photo in Lightroom, push some sliders around and then start clicking on the list of edits. You’ll quickly get the hang of what’s going on and I’m sure you’ll find ways you can fit this into your editing process.
I hope I gave you a good background of the History panel in Adobe Lightroom. If you have any questions or concerns, please leave me a note in the comment section below. I’m always here to help. Thanks for reading!
In today’s post, I’ll be using the example photo below to demonstrate how to use the History panel in Adobe Lightroom. It’s not the deepest tool out there, but as I said above, it can save your butt if you get into a jam.

Where is the History Panel?
I’ll be working on a photo that I already imported a while back. I’ll also be inside the Develop module. Inside this module, on the left side, there are a few drop-down panels. One of them is the History panel. Take a look at the screenshot below.
As you can see, even though the arrow in the drop-down is showing the the panel is open, there’s nothing in it. That’s because I haven’t begun my editing yet. In the next section, I’ll show you what the items look like in this panel once I make some changes.
Building a History
The best part about this tool is that you can edit a whole bunch and then step forward or backward depending on what you specifically want to look at. At this point, I’m going to stop writing for a few seconds to make a few edits. If you look at the screenshot below, you’ll see what they were.
Take a close look at the steps inside this panel. On each line, you’ll see the details about each event that occurred. For example, the most recent change I made (the top in the list) to the demo photo was to add some sharpening. In this case, I pushed the Sharpening slider all the way to the right. In the History panel, the top item states that I increased the photo’s sharpening by 150 points and now the value of this attribute is 150. That’s important to know because you can see what each slider attribute is all in one place without looking inside all the other editing panels.
If I check out a few more steps, I can see that I increased both the blue and aqua saturation to 100. All this means is that I pushed the Blue Saturation and Aqua Saturation sliders all the way to the right in the HSL panel. So if I made dozens of edits to a photo, I’d be able to see exactly what I did, what their current values are and in what order I made the change all in one place. That’s huge.
If you can’t see what I’m talking about in the screenshot, take a look at the list below. I’ll copy the content of the panel so it’s more clear.
Sharpening +150 150
Crop Rectangle
Blue Saturation Shift +100 100
Aqua Saturation Shift +100 100
Vibrance +41 41
Clarity +64 64
Black Clipping -67 67
White Clipping +74 74
Highlights -100 100
Reset Settings
Each line of this list includes the attribute that was touched, the change in value that was made and then the current value.
So, if the most recent edit made is at the top of the list, I can start at the bottom to retrace my steps from the beginning. I began be resetting some practice changes I made earlier. That’s what the Reset Settings step is. After that, I pushed the Highlights, Whites, Blacks, Clarity and a few other sliders until I was happy with the look. If you follow what I’m writing here, you’d be stepping up each item in the above list.
Going Back in Time
I’ll be writing a few posts in the days to come that talk about additional aspects of the History panel and some related topics, so I don’t want to get off track here. If you read something you don’t understand, you can either ask a question about it in the comment section below or sign up for my email list so you receive the future posts in your inbox.Let’s say that I wish I didn’t crop this image. It’s not like I took a lot of material out of it or anything, I just think the original looked a lot better. To go back in time and revisit the step I made right before I cropped, I can click the step below Crop Rectangle, which happens to be Blue Saturation Shift.

When I click on a step inside the History panel, any edit I made after that step will be temporarily disabled. Since I clicked on the Blue Saturation Shift step, both the Crop Rectangle and the Sharpening steps won’t be visible in the photo anymore. They’re still there but they just aren’t visible. I can jump around and click on any steps at this point and nothing will be removed.
Now, if I click on a step, like I have above, and make a new edit, things change quite a bit. Take a look at the next screenshot.

In this version, I can see that instead of stepping from Blue Saturation Shift to Crop Rectangle to Sharpening as we did previously, the workflow now steps from Blue Saturation Shift to Black Clipping. The reason the other two edits are no longer there is because right after I clicked on Blue Saturation Shift, I made a new edit, which deleted the others. This is what I was referring to when I mentioned that you can go back in time to follow a new route if you want to. This is an extremely powerful function.
The Purpose of the History Panel
The purpose of this panel is to give you control. It’s that plain and simple. If you made a change to a photo, you can find that change in a list and either learn about it or get rid of it. In my example above, I could have gone all the way back to the beginning if I wanted to. If I had done that, all the edits I made to the photo would disappear and new ones would be added (if I made new ones). This feature of Lightroom, in my opinion, is more of a technical housekeeping type than, say, those in the Basic panel. The sliders in the Basic panel actually have the ability to make a photograph more beautiful while the list of edits in the History panel can enlighten a user about their previous edits.I encourage you to experiment with this panel. Open up a photo in Lightroom, push some sliders around and then start clicking on the list of edits. You’ll quickly get the hang of what’s going on and I’m sure you’ll find ways you can fit this into your editing process.
I hope I gave you a good background of the History panel in Adobe Lightroom. If you have any questions or concerns, please leave me a note in the comment section below. I’m always here to help. Thanks for reading!
