CraigHardy
Member
- Joined
- May 11, 2021
- Messages
- 223
- Reaction Score
- 2
- Points
- 18
- #1
In my last post, I talked about how to look into and use the History panel in Adobe Lightroom. In this post, I’ll be discussing a tool that works hand in hand with that, which is called Snapshots.
In the past, I’ve said that Lightroom, in many respects, is very similar to Camera Raw. In all actuality, Lightroom uses the Camera Raw engine, so it only makes sense that both of these applications have many of the same features and tools. The Snapshots feature in Lightroom is virtually identical to the one in Camera Raw and just as luck would have it, I’ve already written a post about the latter. If you’re interested, you can view it here:
Using Snapshots to Save Versions in Adobe Camera Raw
Both tools in both applications even use the same name. And just so you know, if you’re a Lightroom user, it wouldn’t take any time to come to understand Camera Raw and vice-versa. They’re both very intuitive.
In today’s post, I’ll show you how you can work with the History panel in Adobe Lightroom to create and utilize snapshots in your workflow. I’ll also demonstrate how to go about creating snapshots without the use of the History panel as well.
The same goes for Snapshots. If I had created any of these for yesterday’s post, they still be there today as well.
So, what are snapshots anyway? Well, snapshots are basically a capture of the point of a certain edit. While the History panel holds each and every step you take while editing, the Snapshots panel records only the points of editing you’d like to save. It’s sort of like taking an actual photo of where ever it is you are in your post processing.
I’m sure you can see the advantages of creating snapshots during the editing process. Let’s say you would like to create many different versions of a photo and, for some reason, you don’t want to take advantage of Virtual Copies. You can sort of accomplish what you’re looking to do with Snapshots. I’ll go over exactly what I’m referring to below.
Using the History Panel in Adobe Lightroom
Since I’ve already made some edits to the demo photo, I’ll go ahead and use that for today’s post. If you look at the History panel in the screenshot below, you’ll see the edits.
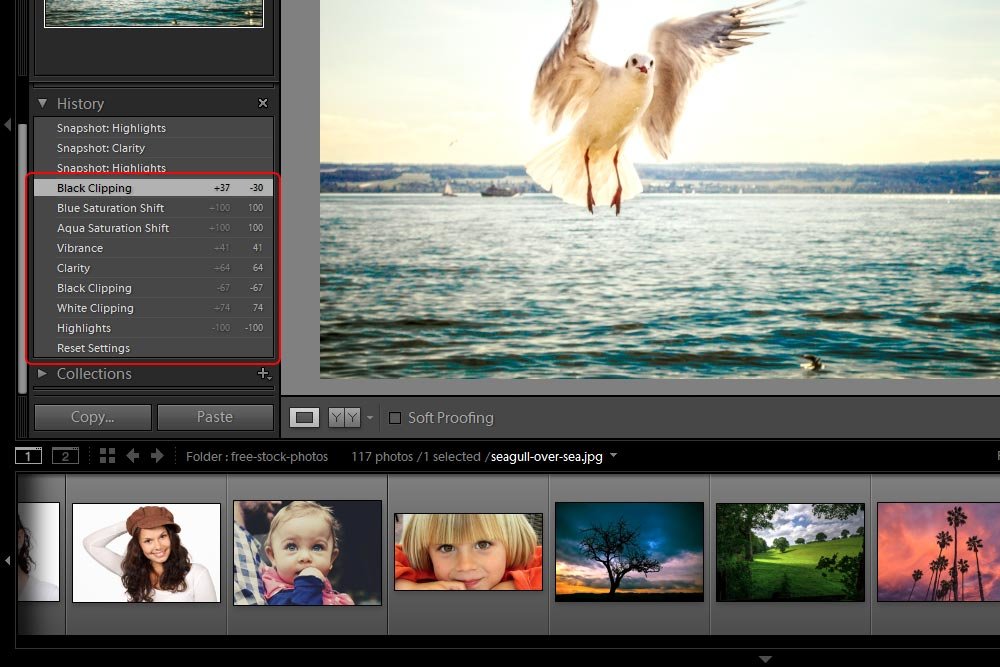
Please ignore the top three steps in the History panel above. I was playing around with creating some snapshots and apparently, the steps I took were recorded there. It seems like this panel is very effective. I outlined yesterday’s editing steps in red.
Now, let’s say that I’d like to save three different variations of the photo I worked on yesterday. First, I want to save a version where I only moved the Highlights slider. Sure, there isn’t much of a change to the photo by only moving one slider, but I still want to create a Snapshot for that version.
Next, I’d like to save a version of the photo for the point right after I pushed the Clarity slider. It was there that the photo began coming together lighting and contrast-wise, but without any of the colors being enhanced.
Finally, I’d like to create a Snapshot for the point where my editing was essentially finished. I pushed all the sliders I needed to push and I added some blue and aqua saturation. So, I would like to record the point at which I edited the Saturation Blue Shift. All this is easy enough to accomplish.
To create a Snapshot of a point along the editing process, all you need to do is right-click on a step in the History panel. So, the first point I’d like to grab, as I mentioned above, is Highlights. I’ll right-click on that step now.
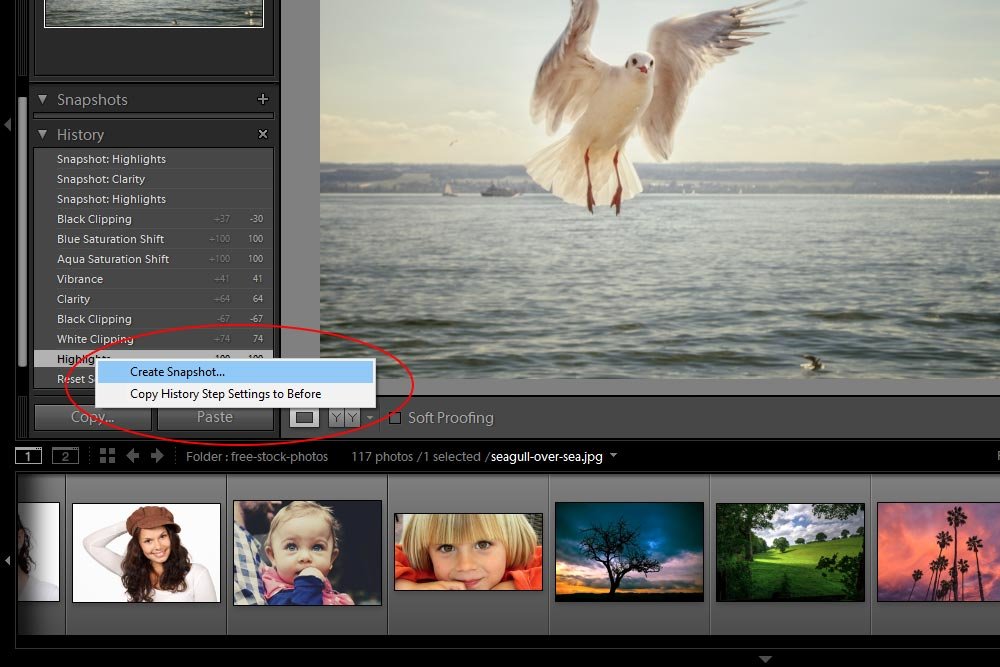
Once I do that, a small menu will appear. From there, I’ll click on Create Snapshot.
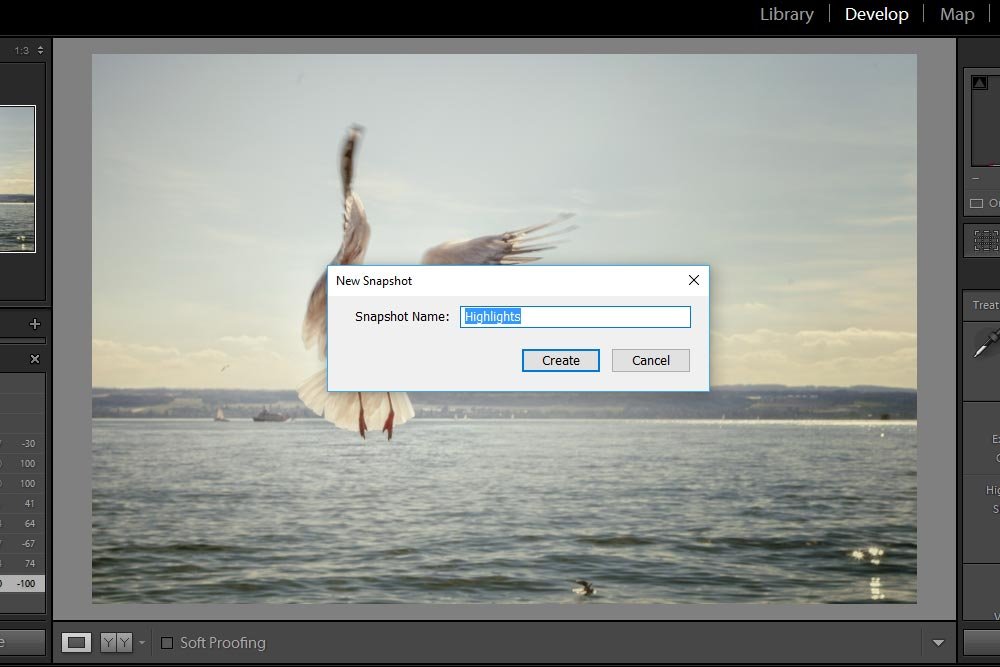
As you can see, the New Snapshot dialog box appeared towards the center of the screen. It’s here that I have the option of naming the Snapshot. Since I created this one from the History panel, it’s already been named by using the editing step I previously took. I think this is fine and I’ll leave the name as is. I’ll click Create and then head over to the Snapshots panel to see what happened.
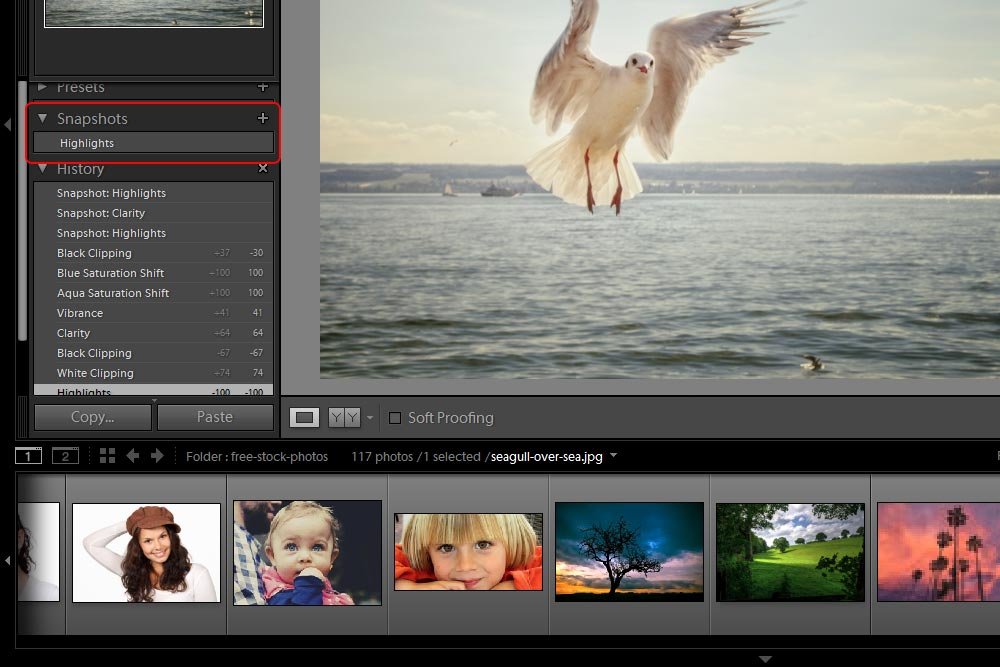
There it is. I created a new Snapshot, so now, any time I want to return to that point in my editing, I can easily click on that entry in the Snapshots panel. I’ll instantly return to that point in time.
I’ll go ahead and create the next two snapshots the same way.
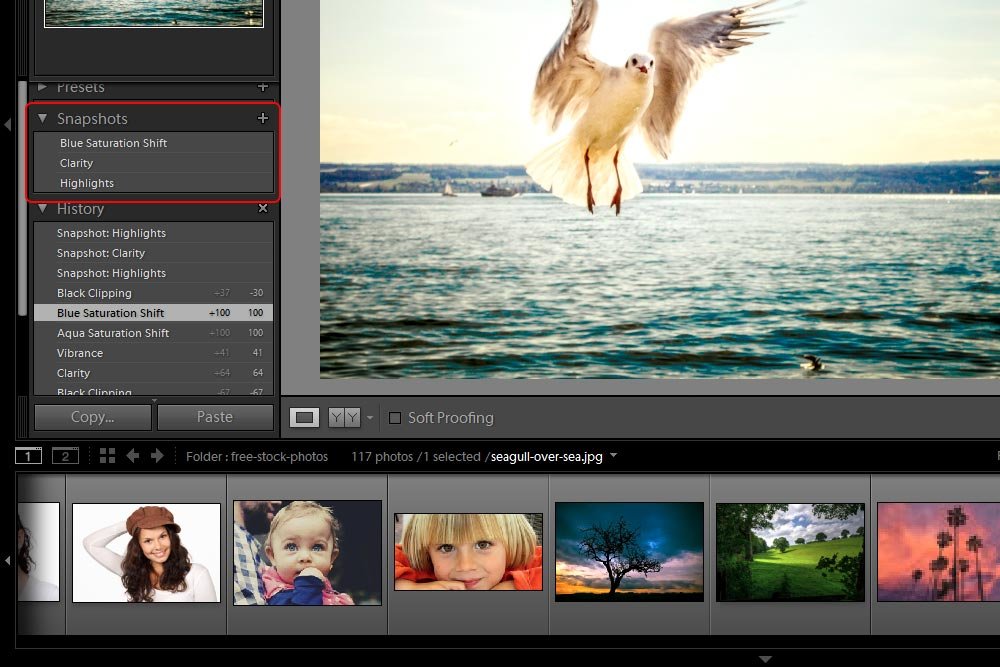
In the screenshot above, you can see all three Snapshots.
At this point, I want to explain something. Because I have relatively few edits, I get exactly the same results from clicking on a Snapshot or clicking on a line in the History panel. Because of this, you may be wondering why anyone would create a Snapshot at all. Think about this: you made 1000 edits. All you need to use are three points in that entire editing process. Do you really want to scroll up and down that entire list in the History panel to look for those points? No, or course not. That’s where Snapshots comes in handy.
Let’s say that I’m humming along, making a bunch of edits. Since I’m in the zone and have no interest in looking back at previous steps, I’d like to record Snapshots on the fly. I can do this with ease.
To create a Snapshot on the fly, simple make an edit. I’ll crop the image as an example.
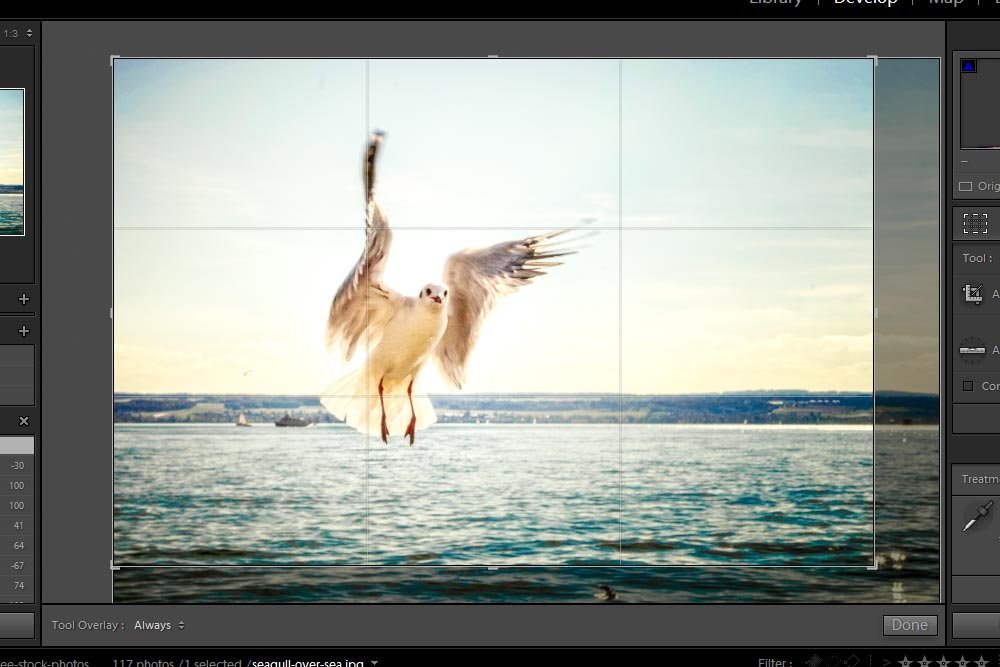
Once I’m happy with the crop, I’ll press the Enter key on my keyboard to apply it.
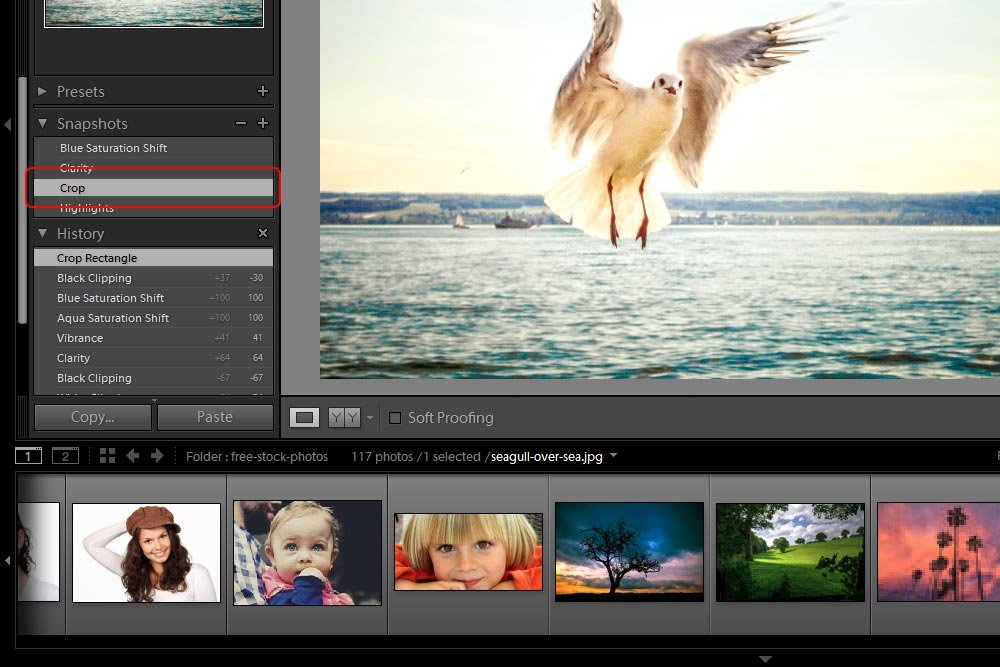
Next, to create the Snapshot, I’ll press the + button that’s located to the right of the Snapshots title on the associated panel. This will again pop up the New Snapshot dialog box.
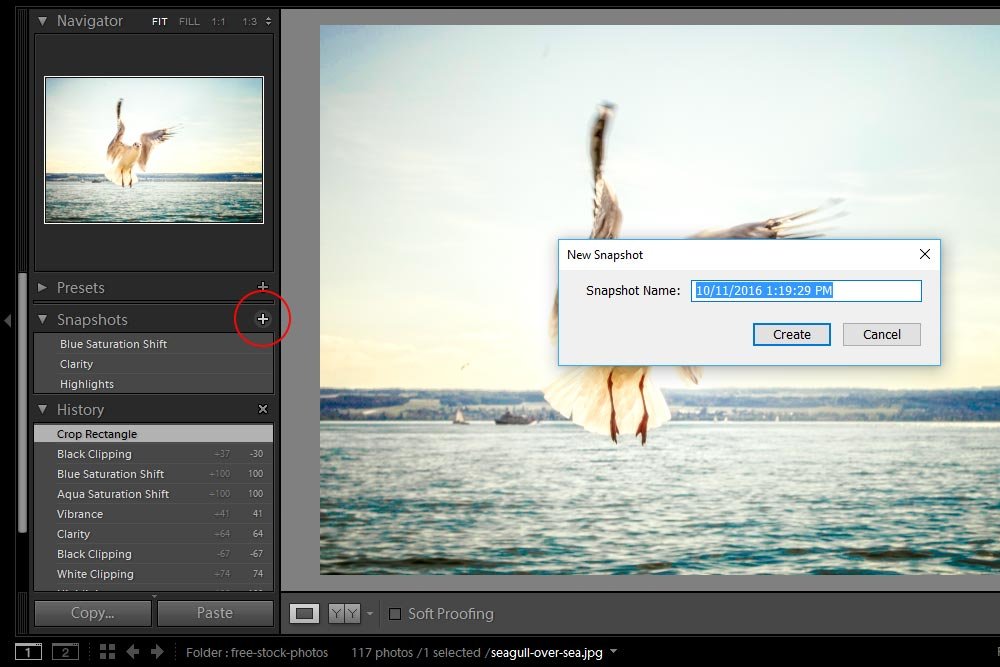
Since the current Lightroom generated name isn’t very descriptive, I’ll change it to Crop and then click Create.
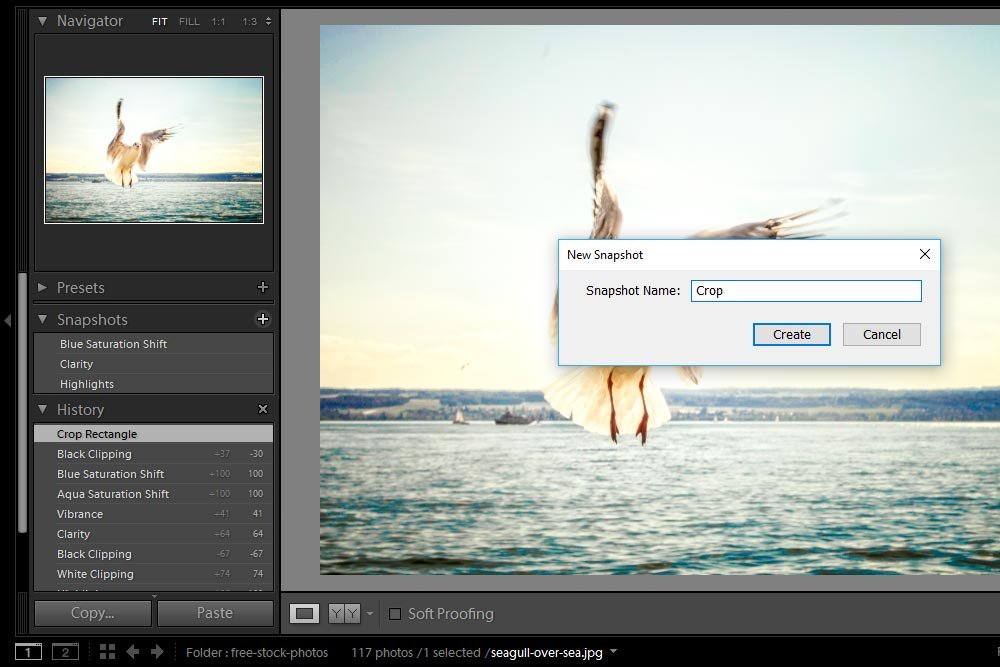
Finally, I’ll take a look inside the Snapshots panel to see if what I just did was created. It surely is.
Pretty cool, huh?
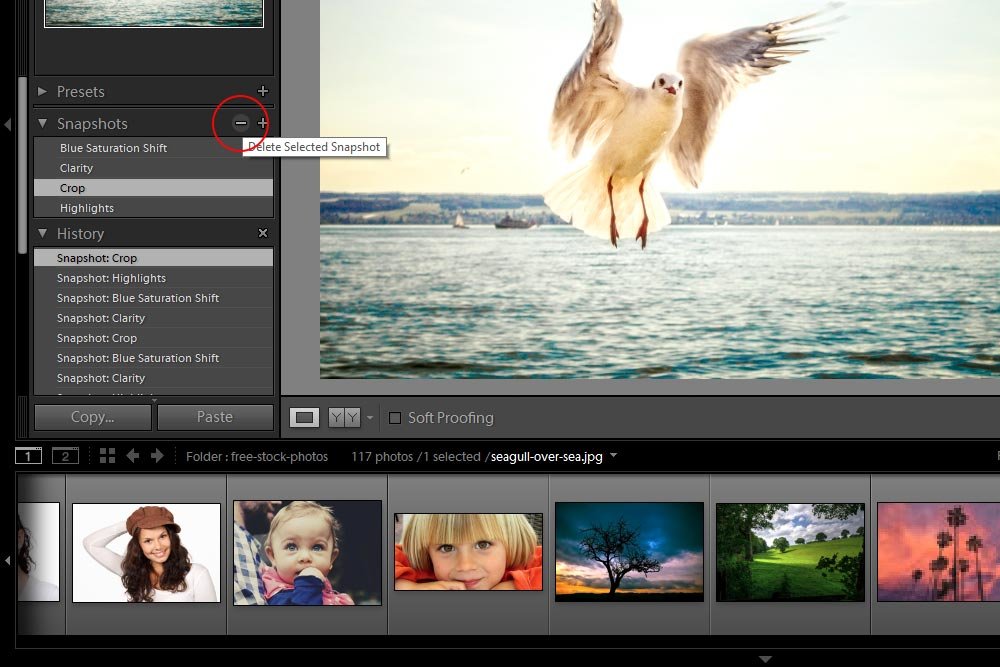
To delete a Snapshot, you’ll need to select the one you’re interested in getting rid of in the Snapshots panel. Then, you can click the – button that’s to the right of the panel title. If you hover your mouse over this button, you’ll see the words Delete Selected Snapshot appear.
An alternative to this method is to right-click on the Snapshot itself and click Delete from the menu that appears.
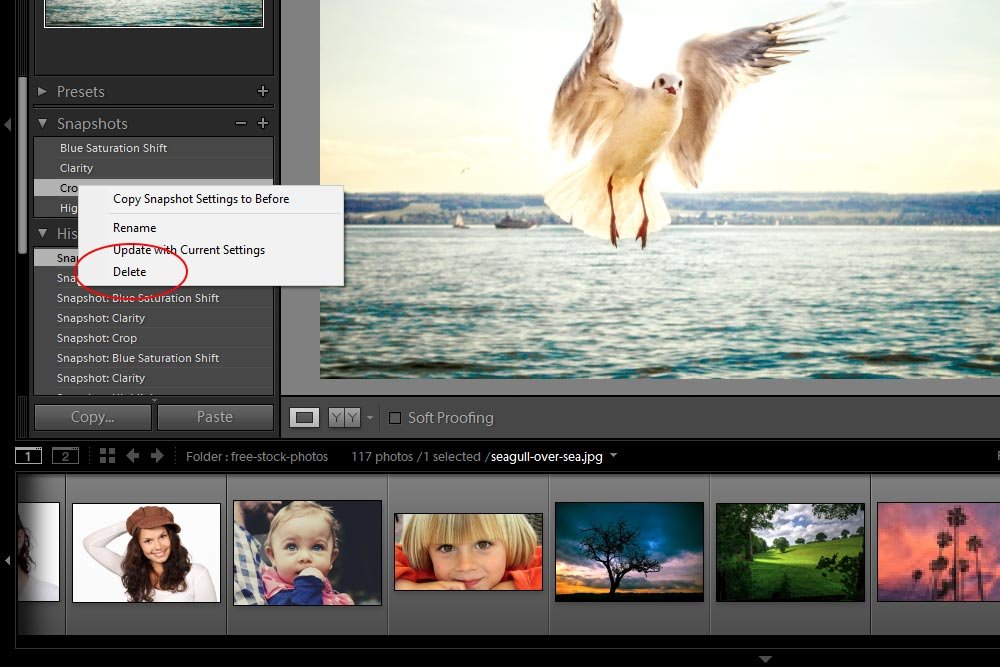
To rename a Snapshot, all you need to do is click Rename from the same menu that holds the Delete option. If you look at the screenshot above, you’ll see that option. It’s very simple.
Well, that’s about it for today. I hope I’ve given you a good background of how to use the Snapshots feature in Adobe Lightroom. If you have any questions or comments, please leave them below. Thanks for reading!
In the past, I’ve said that Lightroom, in many respects, is very similar to Camera Raw. In all actuality, Lightroom uses the Camera Raw engine, so it only makes sense that both of these applications have many of the same features and tools. The Snapshots feature in Lightroom is virtually identical to the one in Camera Raw and just as luck would have it, I’ve already written a post about the latter. If you’re interested, you can view it here:
Using Snapshots to Save Versions in Adobe Camera Raw
Both tools in both applications even use the same name. And just so you know, if you’re a Lightroom user, it wouldn’t take any time to come to understand Camera Raw and vice-versa. They’re both very intuitive.
In today’s post, I’ll show you how you can work with the History panel in Adobe Lightroom to create and utilize snapshots in your workflow. I’ll also demonstrate how to go about creating snapshots without the use of the History panel as well.
What are Snapshots?
Before I begin talking about what snapshots are when it comes to Lightroom, I want to point out one very important detail. After writing yesterday’s post, I closed Lightroom. When I opened it back up today, I found that all the steps I took yesterday, that were recorded in the History panel, were still there. This is a marked difference than what other applications offer. Take Photoshop for example. If you work on a photograph in Photoshop and then close it down, all the steps in the History panel disappear. They’re gone. Not so in Lightroom, which is a huge advantage.The same goes for Snapshots. If I had created any of these for yesterday’s post, they still be there today as well.
So, what are snapshots anyway? Well, snapshots are basically a capture of the point of a certain edit. While the History panel holds each and every step you take while editing, the Snapshots panel records only the points of editing you’d like to save. It’s sort of like taking an actual photo of where ever it is you are in your post processing.
I’m sure you can see the advantages of creating snapshots during the editing process. Let’s say you would like to create many different versions of a photo and, for some reason, you don’t want to take advantage of Virtual Copies. You can sort of accomplish what you’re looking to do with Snapshots. I’ll go over exactly what I’m referring to below.
Creating Snapshots Via the History Panel
If you haven’t read yesterday’s post yet, I encourage you to do so. In this section, I’ll be referring back to it and it’s important to have a good understanding of what’s going on. You can find it here:Using the History Panel in Adobe Lightroom
Since I’ve already made some edits to the demo photo, I’ll go ahead and use that for today’s post. If you look at the History panel in the screenshot below, you’ll see the edits.

Please ignore the top three steps in the History panel above. I was playing around with creating some snapshots and apparently, the steps I took were recorded there. It seems like this panel is very effective. I outlined yesterday’s editing steps in red.
Now, let’s say that I’d like to save three different variations of the photo I worked on yesterday. First, I want to save a version where I only moved the Highlights slider. Sure, there isn’t much of a change to the photo by only moving one slider, but I still want to create a Snapshot for that version.
Next, I’d like to save a version of the photo for the point right after I pushed the Clarity slider. It was there that the photo began coming together lighting and contrast-wise, but without any of the colors being enhanced.
Finally, I’d like to create a Snapshot for the point where my editing was essentially finished. I pushed all the sliders I needed to push and I added some blue and aqua saturation. So, I would like to record the point at which I edited the Saturation Blue Shift. All this is easy enough to accomplish.
To create a Snapshot of a point along the editing process, all you need to do is right-click on a step in the History panel. So, the first point I’d like to grab, as I mentioned above, is Highlights. I’ll right-click on that step now.

Once I do that, a small menu will appear. From there, I’ll click on Create Snapshot.

As you can see, the New Snapshot dialog box appeared towards the center of the screen. It’s here that I have the option of naming the Snapshot. Since I created this one from the History panel, it’s already been named by using the editing step I previously took. I think this is fine and I’ll leave the name as is. I’ll click Create and then head over to the Snapshots panel to see what happened.

There it is. I created a new Snapshot, so now, any time I want to return to that point in my editing, I can easily click on that entry in the Snapshots panel. I’ll instantly return to that point in time.
I’ll go ahead and create the next two snapshots the same way.

In the screenshot above, you can see all three Snapshots.
At this point, I want to explain something. Because I have relatively few edits, I get exactly the same results from clicking on a Snapshot or clicking on a line in the History panel. Because of this, you may be wondering why anyone would create a Snapshot at all. Think about this: you made 1000 edits. All you need to use are three points in that entire editing process. Do you really want to scroll up and down that entire list in the History panel to look for those points? No, or course not. That’s where Snapshots comes in handy.
Creating Snapshots on the Fly
In the previous example, I edited the photo first and then went back to look through the edits in the history panel. I chose a few I liked and created the Snapshots from there. This is a good method, but there’s another one available as well.Let’s say that I’m humming along, making a bunch of edits. Since I’m in the zone and have no interest in looking back at previous steps, I’d like to record Snapshots on the fly. I can do this with ease.
To create a Snapshot on the fly, simple make an edit. I’ll crop the image as an example.

Once I’m happy with the crop, I’ll press the Enter key on my keyboard to apply it.
Next, to create the Snapshot, I’ll press the + button that’s located to the right of the Snapshots title on the associated panel. This will again pop up the New Snapshot dialog box.

Since the current Lightroom generated name isn’t very descriptive, I’ll change it to Crop and then click Create.

Finally, I’ll take a look inside the Snapshots panel to see if what I just did was created. It surely is.

Pretty cool, huh?
Renaming & Deleting a Snapshot
Now that I’ve got a few snapshots created, I thought it would be helpful if I showed you how to rename and delete them. I won’t actually do this, but I’ll lead you to the area you need to look to accomplish something like this.To delete a Snapshot, you’ll need to select the one you’re interested in getting rid of in the Snapshots panel. Then, you can click the – button that’s to the right of the panel title. If you hover your mouse over this button, you’ll see the words Delete Selected Snapshot appear.

An alternative to this method is to right-click on the Snapshot itself and click Delete from the menu that appears.

To rename a Snapshot, all you need to do is click Rename from the same menu that holds the Delete option. If you look at the screenshot above, you’ll see that option. It’s very simple.
Well, that’s about it for today. I hope I’ve given you a good background of how to use the Snapshots feature in Adobe Lightroom. If you have any questions or comments, please leave them below. Thanks for reading!
