JodyBuchanan
Member
- Joined
- May 10, 2021
- Messages
- 138
- Reaction Score
- 0
- Points
- 21
- #1
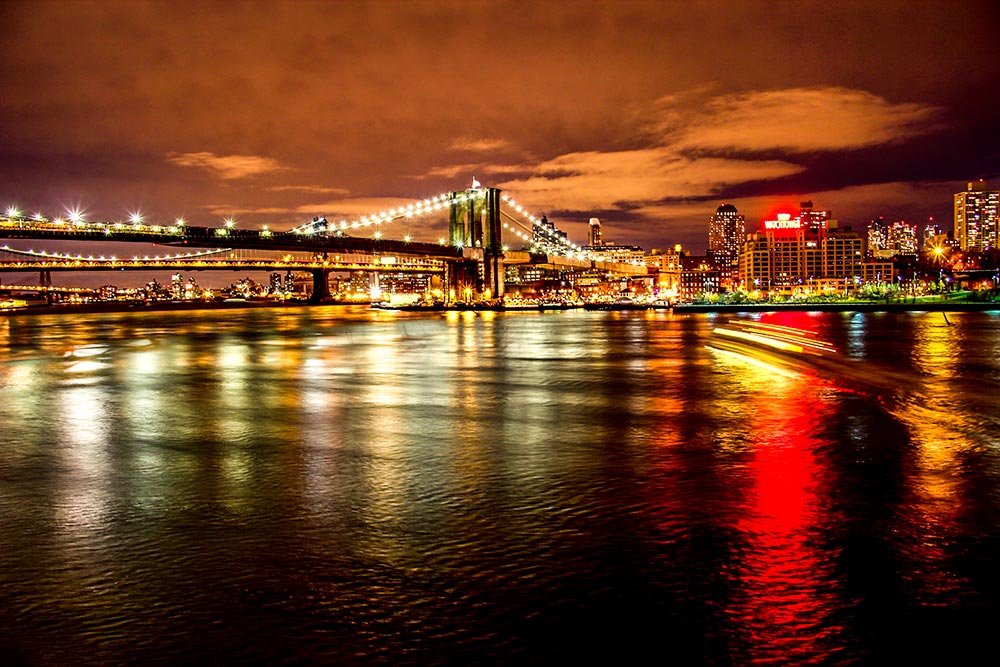
There are a few core pillars of what makes Adobe Photoshop great. Layer masks are one of those pillars. Using these types of masks allows for all sorts of creativity and like many other areas of Photoshop, their limit is completely up to the user. The problem many folks have, however, is that they oftentimes don’t fully understand what a layer mask is. I can remember back to my early years constantly hearing those words, but never really knowing what anyone was talking about. I would use the more readily understood tools, such as the eraser and opacity slider.
In this post, I’ll explain what a layer mask is inside of Adobe Photoshop. I’ll be brief as to keep things as simple as possible. Then, I’ll go through an example of what these masks can do. Within that example, I’ll talk about why masks are so much more valuable than the Eraser Tool and why you should consider never using the eraser again.
What is a Layer Mask?
First off, there are two different types of masks in Photoshop. The first is the Layer Mask and the second is the Clipping Mask. I’m going to limit this post to a discussion about the layer mask. I’ll leave the clipping mask for another time.In the most basic sense, a layer mask is a tool that allows a user to erase, to a varying degree, part of a layer. The value of using a mask is that it’s non-destructive. Let me give you an example (I’ll go through all this below too). Say you have a photo. Say that you apply a layer mask to the photo layer in Photoshop. You decide that you want to remove one particular area of the photo, so you click on the Brush Tool, change the color that will be applied through the brush to black and then paint the area of the photo that you want gone. This would be pretty much the same steps you would take with the Eraser Tool, if you chose to take that route.
A few moments later, you decide that you made a mistake. You now want all of the areas that you removed with the Brush Tool back again. Well, all you would need to do to recover the lost data is to change the color that you’d apply to white and brush back over the area that’s gone. Magically, it would reappear.
When you manipulate layer masks, you don’t actually change any data. You simply hide it. When you use a selection tool or a brush tool inside of a mask, you don’t remove the pixels you want hidden. You change their opacity. This is quite valuable because if you ever want those pixels back, you can recover them quickly.
Now, if you tried to recover data you removed via the Eraser Tool, you’d be out of luck. I suppose you could step back all the way to the point you erased those pixels, but that’s not very practical. It’s much better to use masks.
Applying a Layer Mask
In this section, I’m going to demonstrate how to apply a layer mask to a layer. Then, I’ll fool around a bit with some different shades of white through black to see just what happens.First, I’ll apply a mask. To do this, I’ll head down to the bottom of the Layers panel and click the Add a Mask icon. It’s the rectangle with the dark circle inside of it.
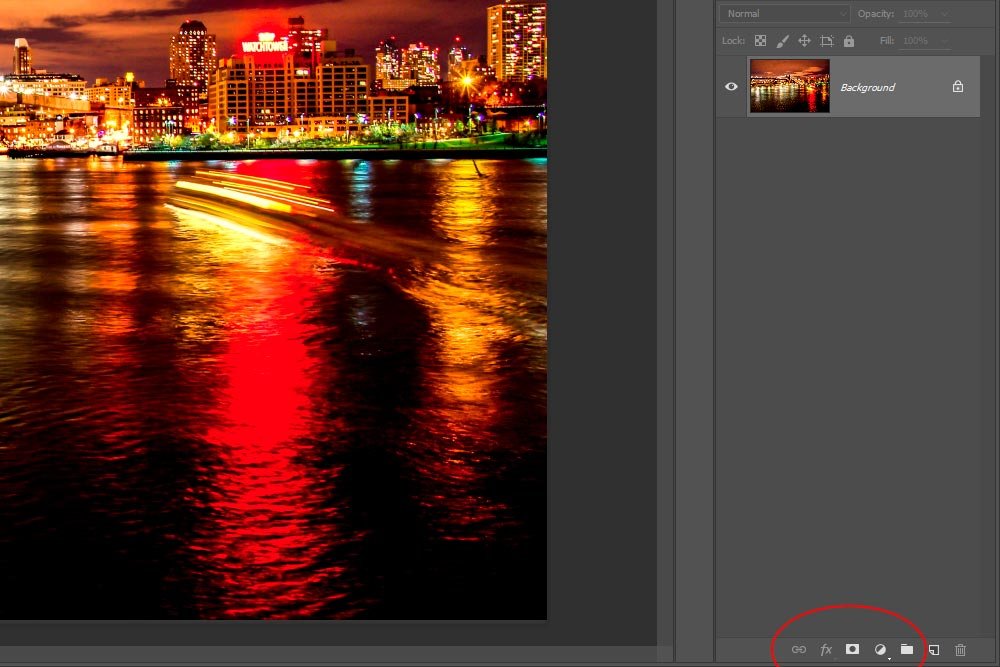
Once I do that, I’ll notice a mask box appear in the layer that I selected earlier (in this case, the only one).
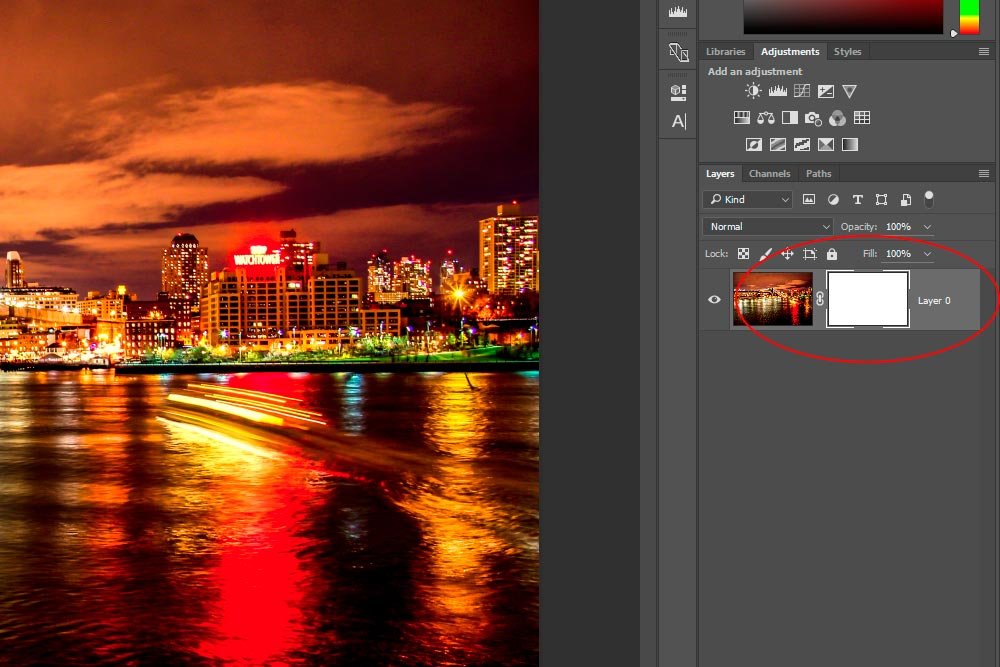
Changing Visibility Inside the Mask
Like I mentioned above, one of the goals of using a layer mask is to change visibility of a particular area. So with that in mind, I’d like to do some experimenting. Now that I have the mask applied to the layer, I’m going to select three distinct areas with the Rectangular Marquee Tool and I’ll fill those areas with three different shades. The first one will be only 20% white, the next will be 50% white and the last will be 80% white. Let’s see what they look like.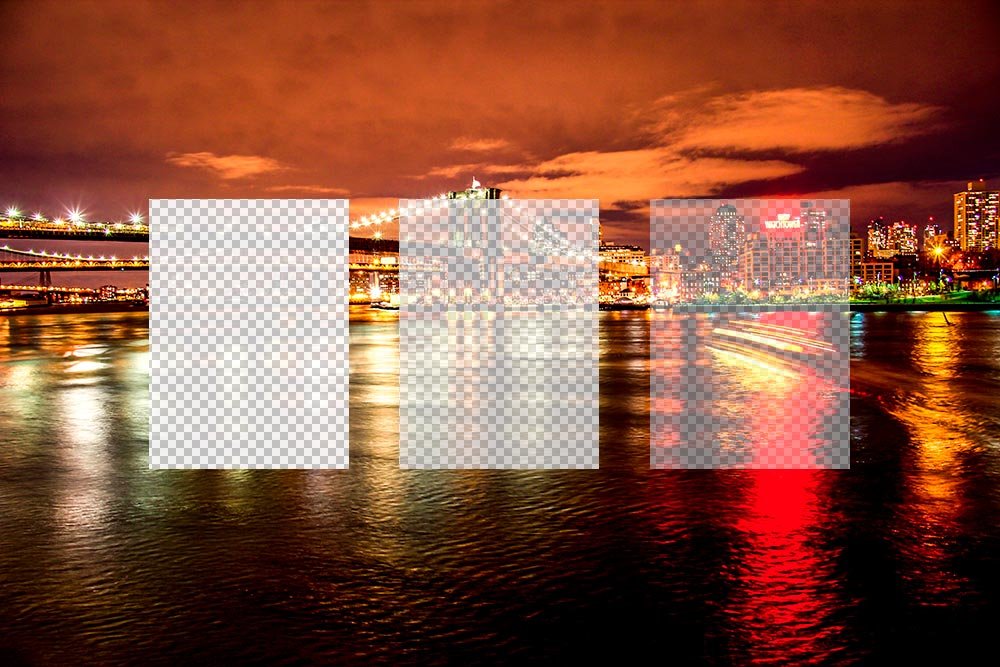
As you can see, we’ve got three different opacities. The first almost hid all of the area. I know you can’t see it very well, but there is a bit left. The second is more visible, with the mask hiding half of the visibility and the last area is the most visible. The mask only hid 20% of the layer. If I used 100% black in one of the areas, I would have completely hidden the area and if I used 100% white in one of the areas, there would be no change. It wouldn’t hide any of the layer. There’s an easy tip to remember which shade hides and which one reveals.
I can’t see in the dark. I can see in the light. It’s that simple. Black hides and white reveals.
Lastly, let’s take a look at the layer with the mask in it.
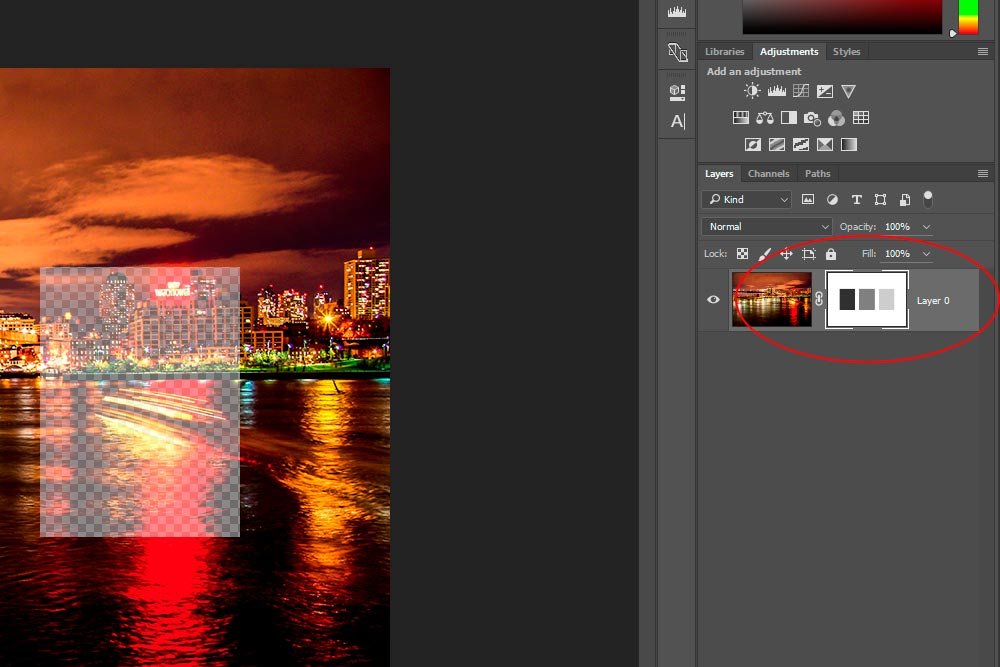
If you look closely, you can see the actual shades that are filling in each area. They’re right inside the mask area of the layer.
Hiding & Getting a Larger View of a Layer Mask
I’ve got a few cool tips for you when it comes to working with layer masks. The first one hides the mask. Let’s say that you applied a mask and hid some areas of a photo, but want to view the original, unmasked, photo again. What can you do? Well, if you select the layer in question over in the Layers panel and then hold down Shift on your keyboard and click the white mask box with your mouse, a big red X will appear in the layer. The mask will also be turned off.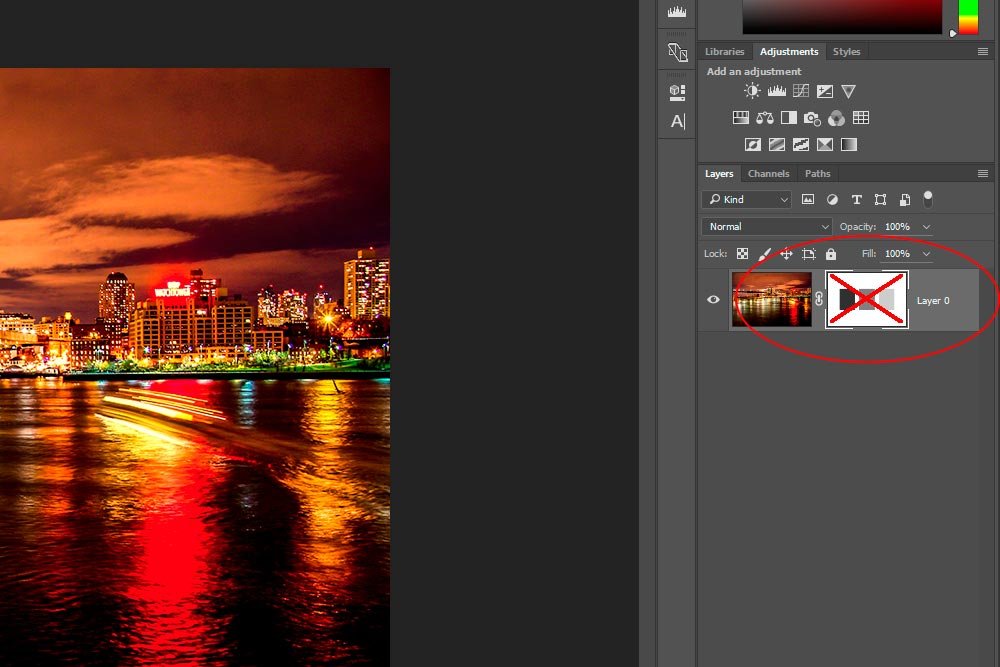
To activate the mask again, simply repeat the above steps.
Now, if you wanted to get a really big view of the masked area of the layer, you can do that too. All you need to do is hold down the Alt key on your keyboard and then click the mask. This time, the mask area itself will overlay the work area. You’ll get a nice large view.
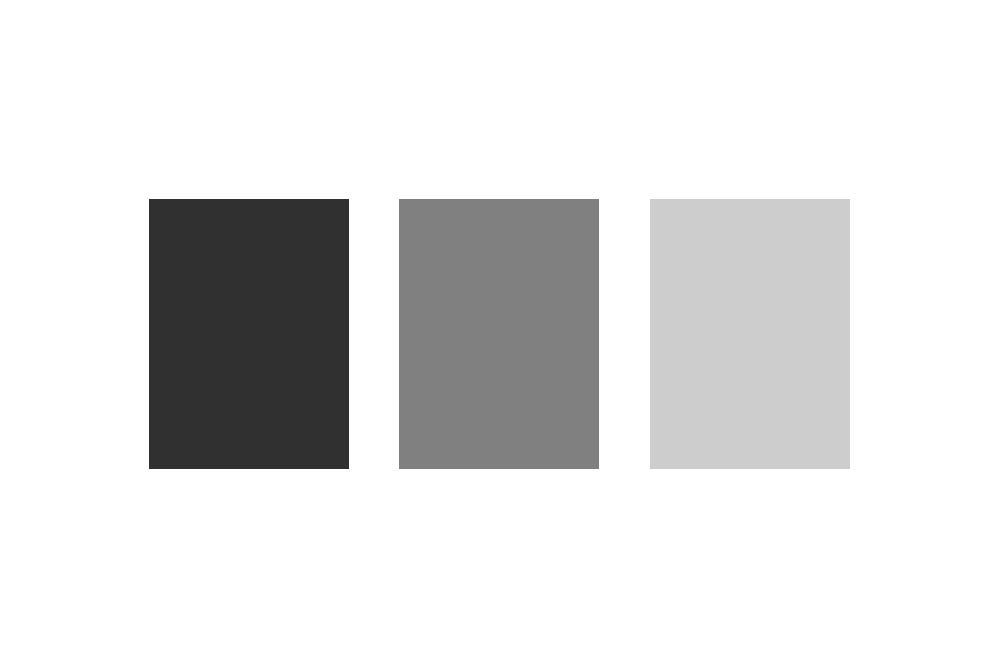
Again, to revert back to a normal view, simply repeat the above steps.
Masking with an Adjustment Layer
The first method I used (above) was to apply a mask directly to a layer using the mask icon in the Layers panel. There are other methods for applying masks as well. In this section, I’m going to apply one that has a lot of versatility. It’s via the Adjustments panel.The first thing I’m going to do is to select an area of the image with the Elliptical Marquee Tool. Since there’s only one layer, I don’t need to concern myself with selecting the layer. If there were multiple layers, I’d need to do that. I’ll set up some guides to assist me with keeping my selection centered.
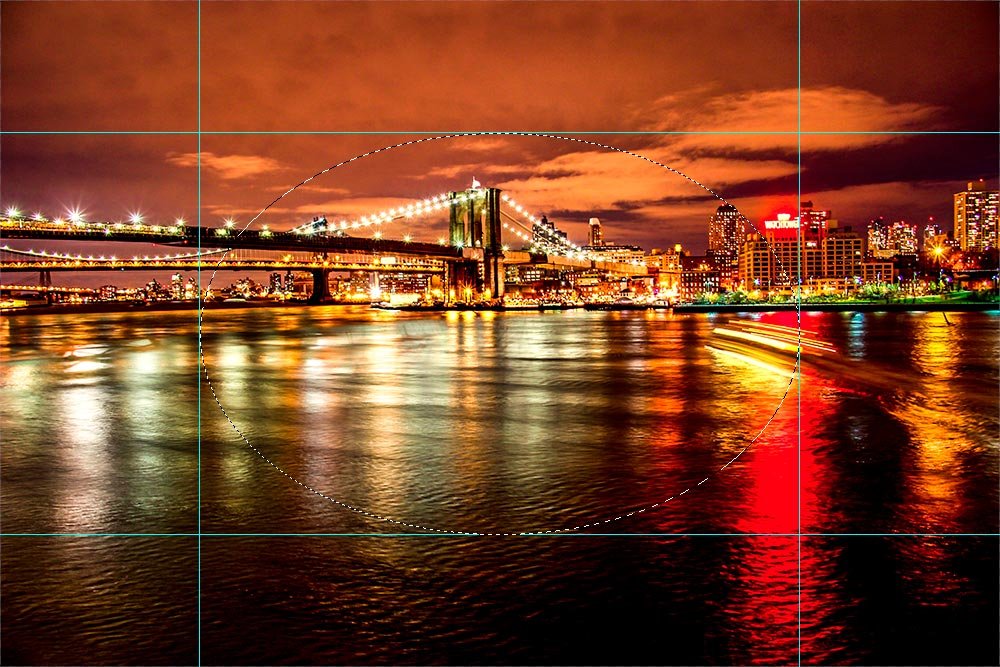
Now, I’ll head over to the Adjustments panel and click the Hue/Saturation icon. When I do this, a new adjustment layer appears in the Layers panel and the Properties panel for this adjustment pops open.
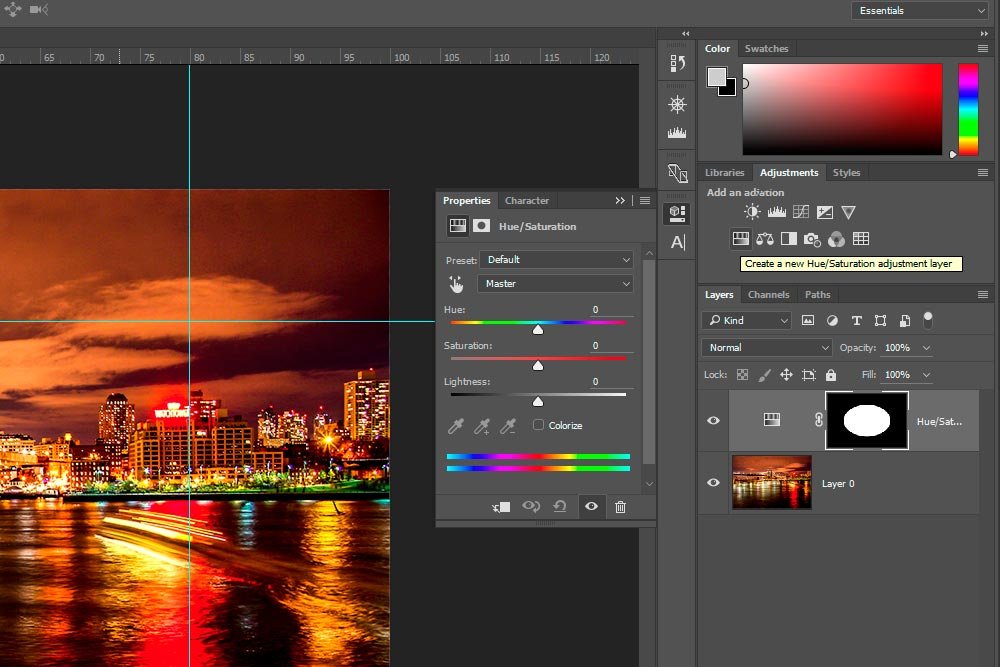
I want you to take notice of something very important here. If you look inside the adjustment layer in the Layers panel, you’ll see the mask box. Inside that box is a black background and a white oval. If you remember back to an earlier section of this post, I told you that black hides and white reveals. So, in this case, the black area is going to hide the changes I make inside the Hue/Saturation panel and the white area will reveal them. And if I get confused because the mask area inside the Layers panel is too small, I could always enlarge it.
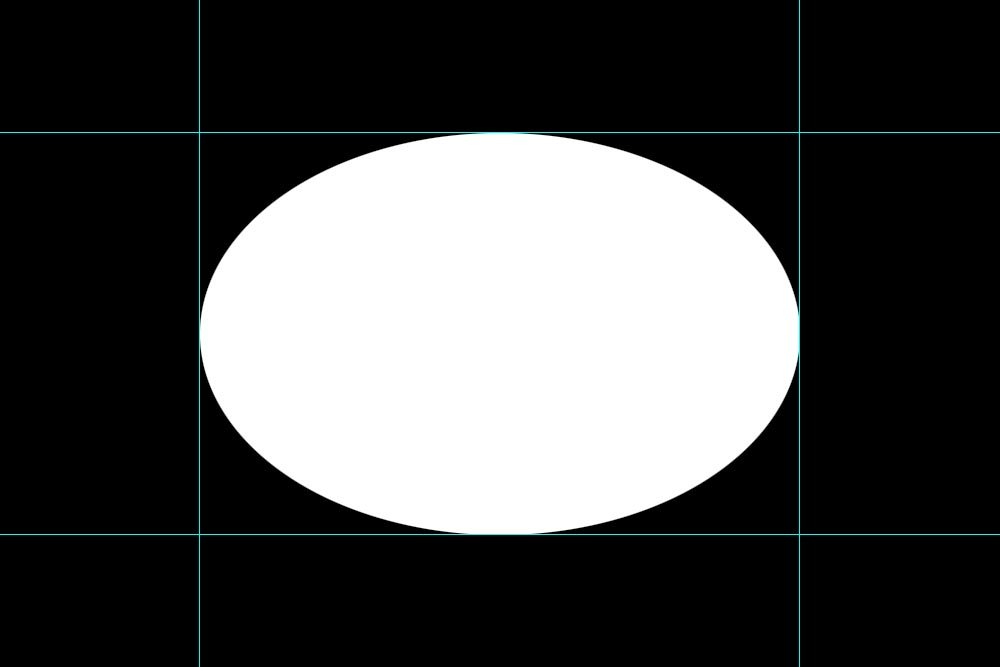
Remember that I gave the instructions for how to do this above?
Since my adjustment layer mask is now set up, I can make a change to the layer. I’m going to push the Saturation slider to the left so it reads -75%. Here’s what happens to the photo.
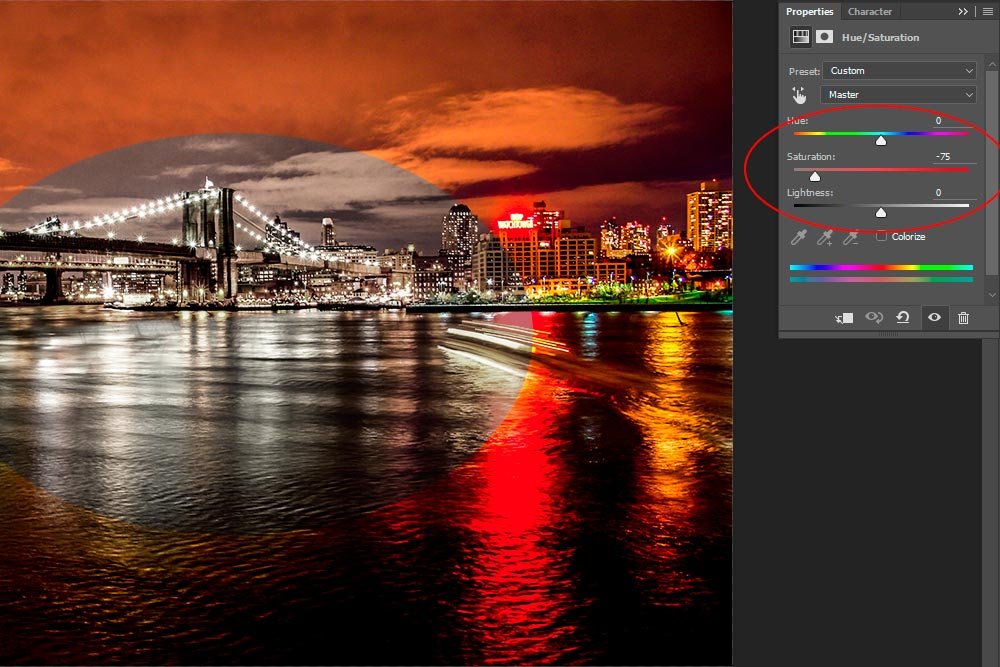
You can see that only the initially selected area is affected by the reduction of saturation. This is because of the mask I created by using the Elliptical Marquee Tool.
Inverting a Layer Mask
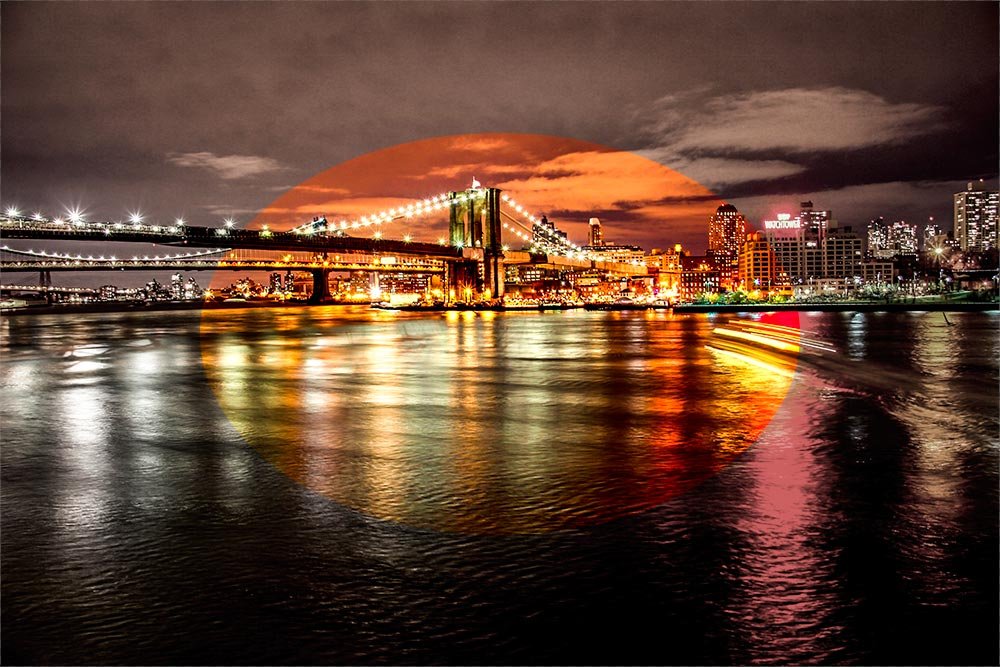
If I ever felt that I wanted or needed to reverse the effects of a mask, I could easily invert it. Do do this, I’ll double-click on the mask itself in the Layers panel and then, inside the Properties panel that appears, I’ll select Invert.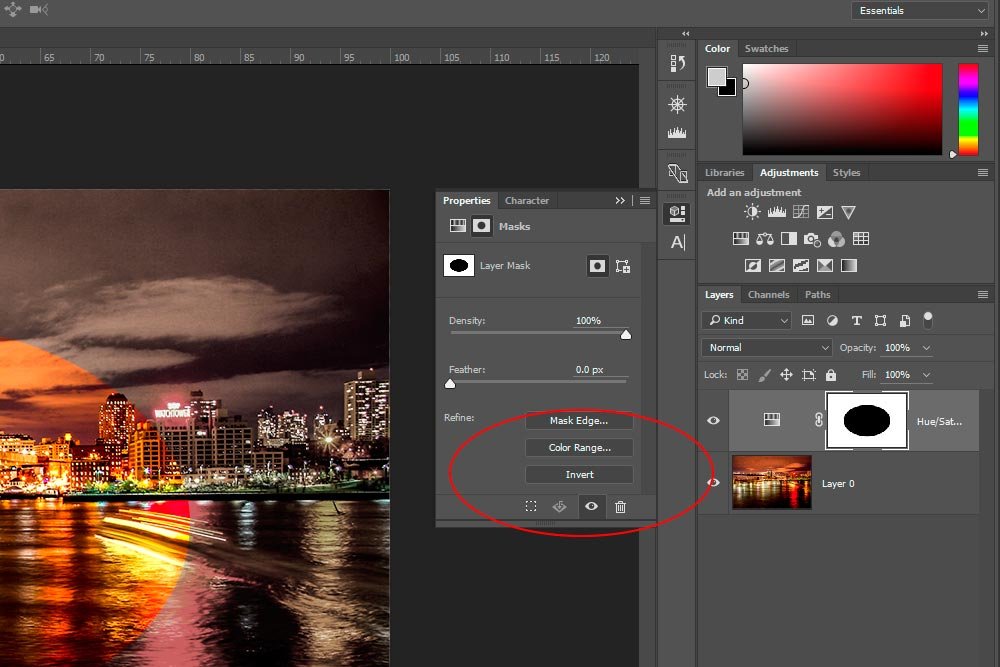
This is the result of inverting the mask. Now, the small mask box in the Layers panel is reversed, so the white (reveal) is on the outside and the black (hide) is on the inside.
Masking with the Brush Tool
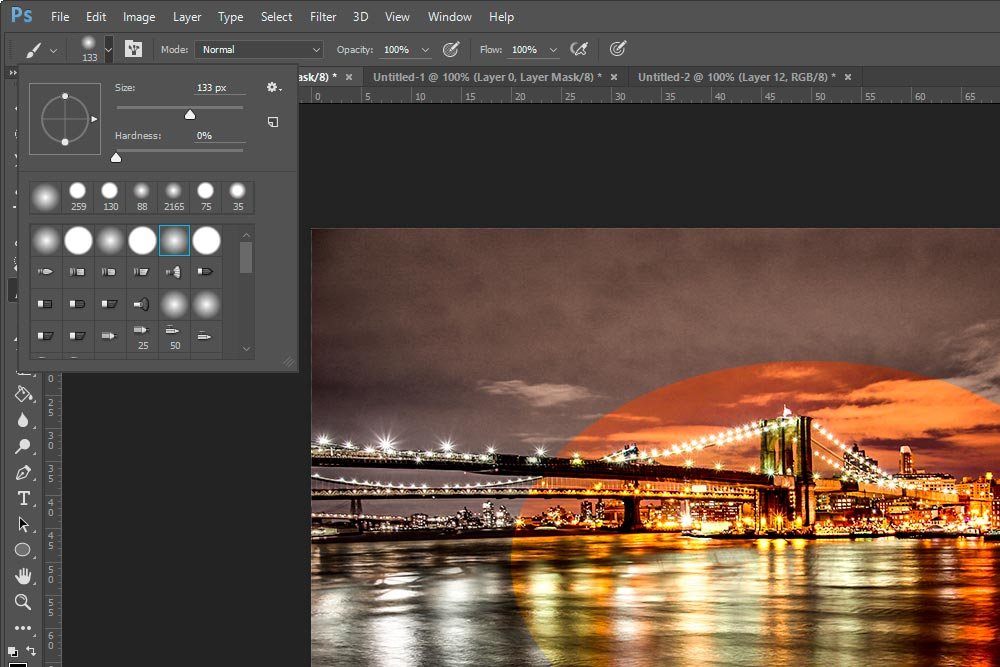
In this final section, I’d like to demonstrate how you can edit a mask with the Brush Tool. Since the edge of my original selection is hard, I’d like to soften it. I’d also like to enlarge the area a bit.I’ll head over to the Brush Tool and select it. Then, I’ll go up to the options bar Brush Preset Picker and adjust the brush Size and edge Hardness.
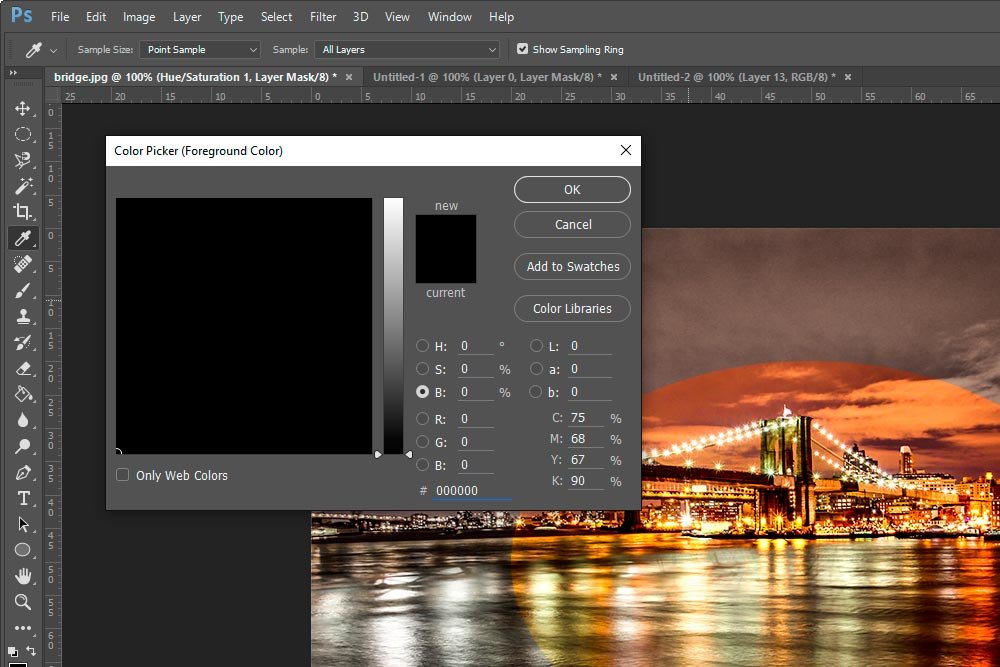
Next, I’ll open the Color Picker and change the shade to black. I want black because I would like to hide some of the desturated area.
Finally, I’ll trace the edge of the oval inside the photo with the brush. This will soften and enlarge, just as I wanted.
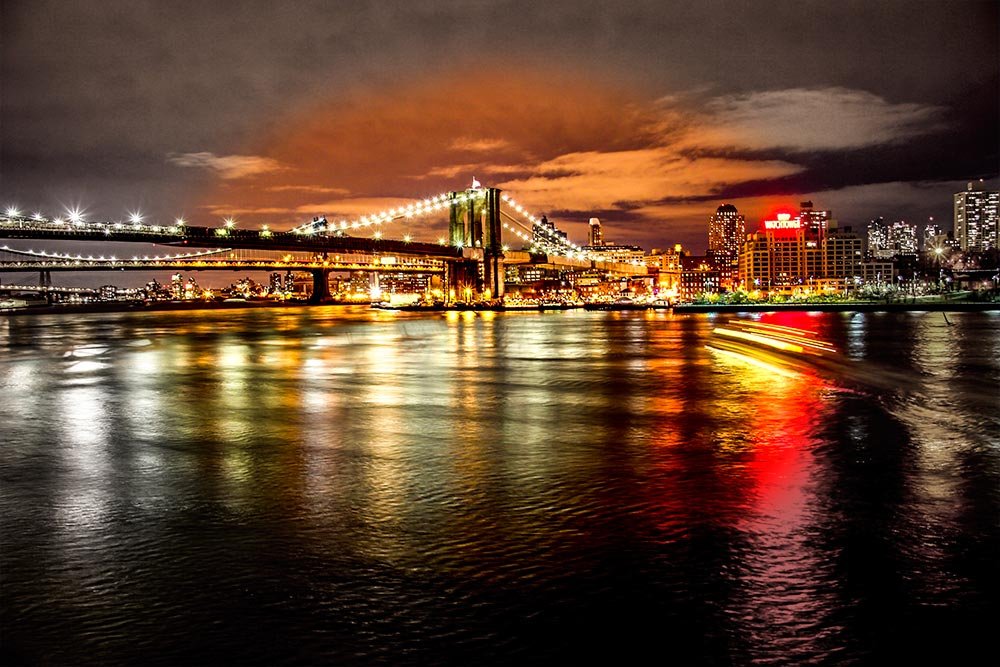
I’d say that’s pretty cool.
If you have any questions or comments, I’m all ears, so please leave them down below. I always reply, so please feel free to contribute.
