JGaulard
Administrator
Staff member
Site Supporter
Sr. Site Supporter
Power User
- Joined
- May 5, 2021
- Messages
- 319
- Reaction Score
- 2
- Points
- 18
- #1
This was a very exciting project for me. I’ve had a bathroom that I gutted about five years ago, sitting here doing a whole lot of nothing. It’s been waiting for me to get up off my bum to put things back together. If you don’t remember, years ago, we had an extremely cold winter that forced freezing air through the many gaps in the walls outside the room I speak of. I think the lows that night hit -18 degrees. It was crazy. The copper pipes in our house experienced a lot of damage via bursting and the next few days consisted of me running around town trying to pick up supplies to make repairs. As stressful as it was, it was a lot of fun. I know, weird. Things have changed slightly since then in that I decided to abandon the idea of using any fiberglass insulation at all in the exterior walls. Instead, I used four inches of rigid foam for a watertight seal. Our house has pine board and batten as it’s siding and to say air infiltration is an issue would be an understatement. So a word of advice for all you out there considering this type of siding, be sure to have air sealed the entire home before even thinking about adding something like this to the exterior. As for us, there’s the inside wall, some insulation and then the boards and batten. No air sealing or anything like that. I solved the bathroom issue by using rigid foam and expanding foam spray, but that doesn’t say much about the rest of the house. Perhaps one day I’ll fix that too.
------
This post is part of my "Symmons" shower valve series. Over the years, I've learned quite about this brand of shower valves; I've installed them from scratch and I've repaired them as well. Click through the links below to learn how to do these things yourself. And be sure to ask questions if you have them.
How to Fix a Symmons Shower Valve That Leaks
Replacing a Stem Cartridge Spindle For Symmons Temptrol Shower Valve
Installing a Symmons One Handle Shower Faucet
------
Anyway, over the past few weeks, I’ve been working on finishing up the insulation. As I just mentioned, I switched tracks a bit. I still have a few areas to complete, but that part of things is looking good. And since the wall that the bathtub was up against was finished, I decided that installing the tub again would be wonderful. The bathroom is small and that tub is right in the way of everything (being pulled away from the wall and all). Also, because the shower/tub valve was old and leaky in this bathroom, I decided to replace it, which brings me to the point of this fabulous post.
Okay, since I have experience with Symmons shower valves, I decided to go with that brand. In the past, I have rebuilt valves like this, so I was interested in taking things to the next level. I wanted to do a complete installation. So that’s what I did.
This is the bad boy I purchased. I got the entire kit from Amazon for $99, which included the valve and all the chrome accessories that one would need to perform an install from nothing. It even came with the tub spout and the shower head. All I needed was a tub, which I already had. Here’s the exact title of the kit I purchased, in case you’re interested: Symmons S-9602P-RP Origins 1-Handle Shower Faucet, Chrome.
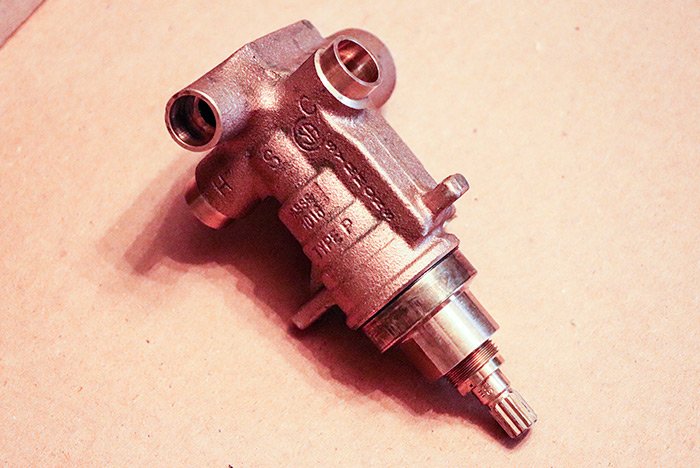
When it comes to projects like this, one of the most intimidating tasks is the soldering. Many folks shy away from it, when they really shouldn’t. Soldering copper pipes is a no-brainer, once you get used to it. It’s sort of like learning how to drive with a clutch. Once you get that one piece of information that you need, it makes all the difference. I’ll tell you the golden piece of information that has to do with this type of soldering below.
Let’s get going with the installation.
Before soldering any type of valve that has plastic or rubber parts in it, it’s a good idea to take the entire valve apart. Since I already purchased and still had on hand the special tool I would need to gut this thing, I used it and had no issues. Here’s a photo of the disassembled valve.
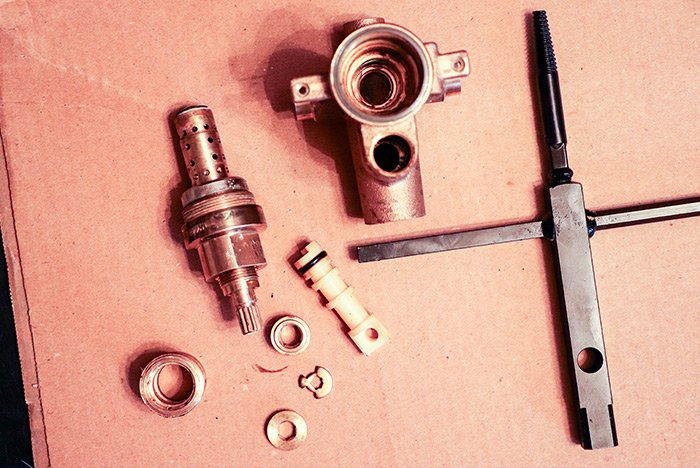
In the above photo, I included the tool that’s necessary to disassemble this type of valve. You can purchase this tool on Amazon as well.
Now, since I wanted to use Pex piping for this project as opposed to copper, I needed to solder some fittings onto this valve. The tube that leads to the tub uses a threaded fitting, so that would require some soldering and the hot and cold inputs and the shower output needed fitting soldered directly to the valve housing.
Since the valve housing for the hot, cold and shower lines were all female and my adapters were females as well, I needed to cut short pieces of copper pipe to act as males. I did that for the hot and cold lines.
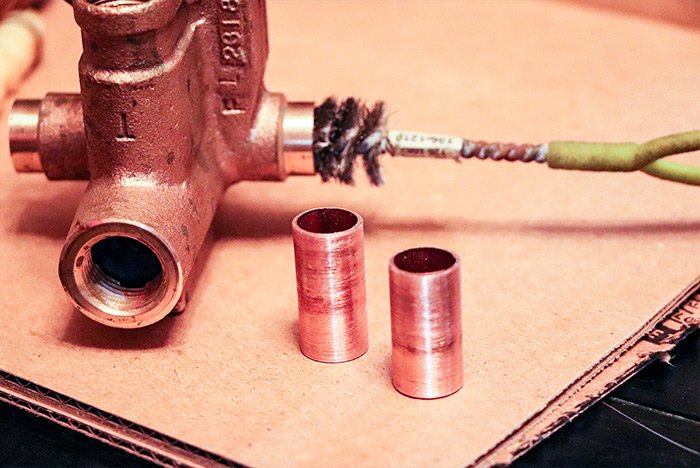
I then cleaned, fluxed and assembled the Pex adapters to the copper pipes to the Symmons shower valve housing. Check this out. I love how clean everything is.
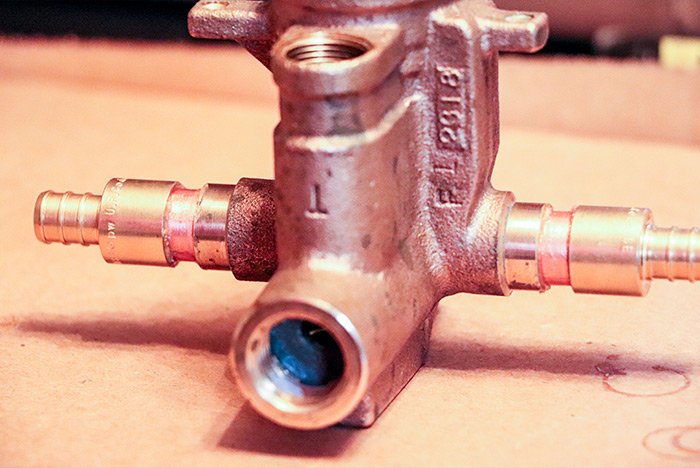
Once everything was assembled, I went ahead and did my soldering.
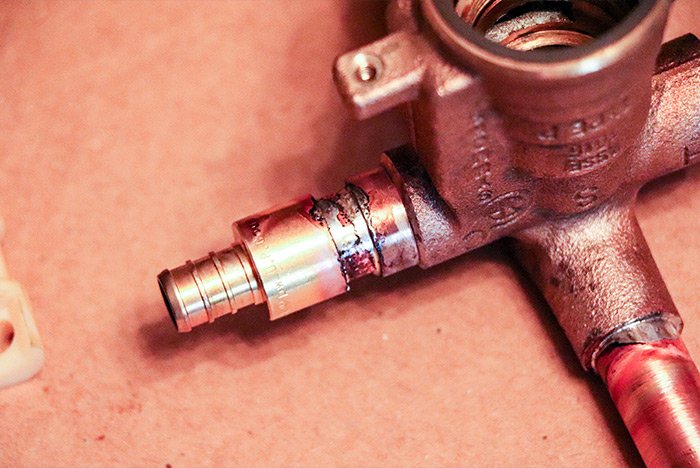
Okay, the trick to soldering in any direction is to heat the “joint” on the opposite side of where you’ll be touching the solder to the pipe. So let’s say you have a copper pipe with an adapter attached to it and that pipe is running horizontally. To heat the joint (the spot where the very end of the pipe touches the inside of the adapter), you’d point the torch flame directly at that point of the outside of the adapter. In this case, let’s say at the bottom. Then, you’d touch the tip of your solder to the opposite position on the top of the pipe. Take a look at this example soldering job. I had to attach the threaded fitting to the copper pipe.
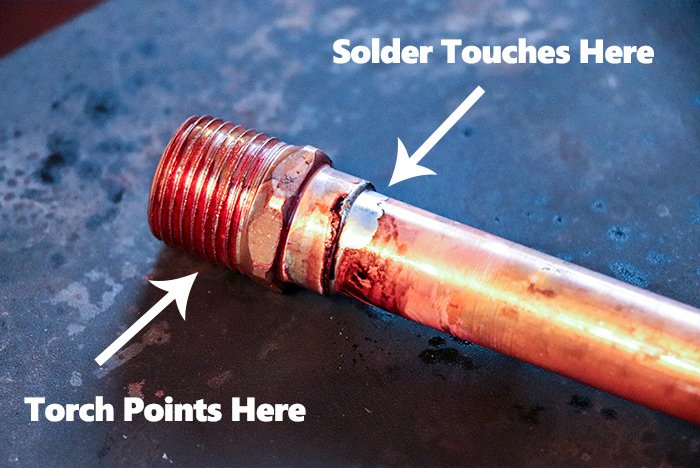
Since the end of the pipe is touching deep inside of the fitting, that’s considered the joint. That’s where you point the flame. Then, you’d touch the solder to the opposite side of the pipe. When the flame heats the joint enough and that heat makes its way to the area you’re touching the solder, the solder will quickly get sucked right into the joint.
One common mistake many folks make is to use too much solder, causing drips and a very ugly work product. All you need is a bit of solder. When you touch it to the pipe and it melts, trust me, it’ll get pulled right into everyplace it’s needed. Maybe a quarter inch of solder is all you need. Just make sure you clean your pipes and adapters thoroughly with fine grit sandpaper and a brush. And use flux. Oh yeah, and use MAPP gas in the yellow bottle as opposed to the regular propane in the blue bottle. MAPP gas is hotter and it will heat up the housing a lot faster when tackling a project like this.
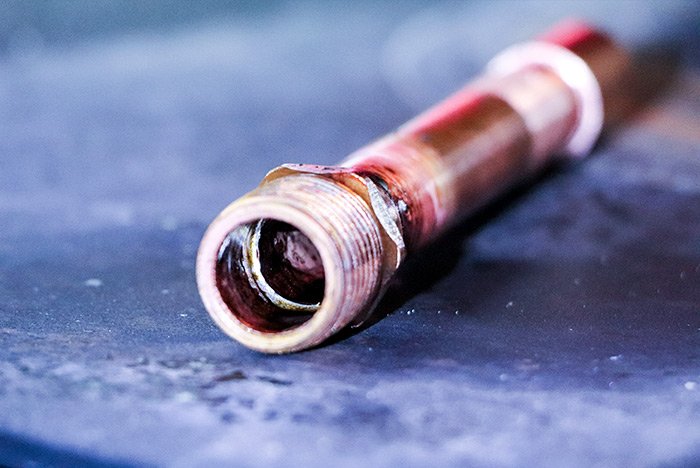
Here’s a photo to show you that the solder does, in fact, get pulled into the joint. Can you see the solder in the inside of this threaded adapter? Notice how it’s not pooling up because I added too much. It’s good to be cheap when it comes to plumbing. You won’t over use your supplies.
By the way, all of these adapters and piping were half inch.
This is the bottom of the soldering job.
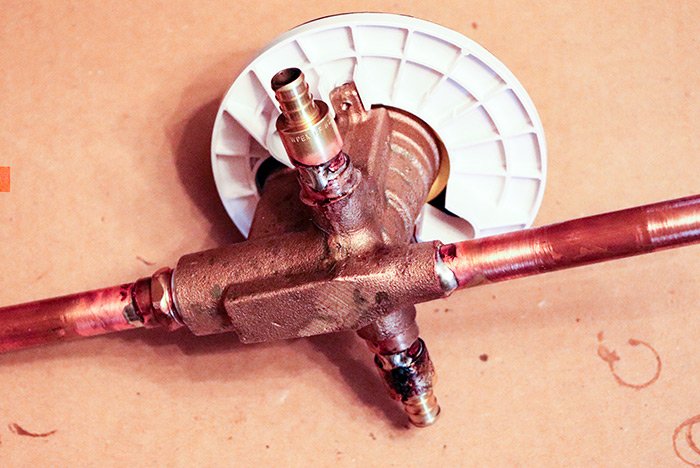
And this is a close-up of the copper threaded adapter screwed into the valve housing, with white tape and all. Be sure to use white plumbing tape with all screwed in attachments.
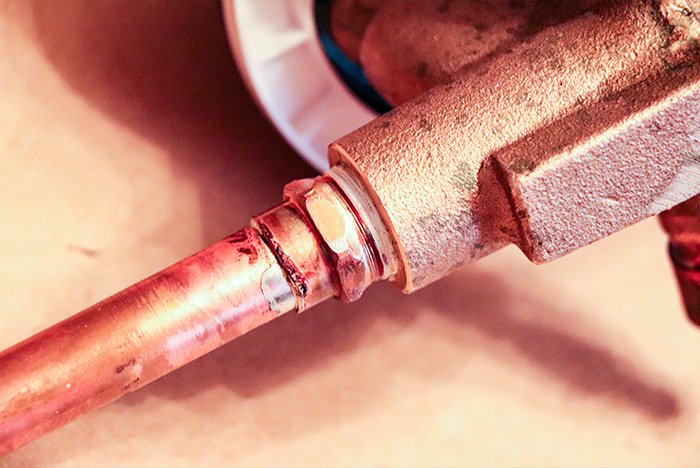
Let’s now move into the bathroom, where the tub is waiting.
In this next photo, I attached the shower valve to the back of the tub. As you can see, I’ve got some room to work, since the tub is out in the open. This Symmons Temptrol shower valve gets placed right up against the back of the tub with that white plate, which is included. Then, the chrome plate gets placed up against the valve on the inside of the tub and screwed in place. The front plate and the back plate squeeze the valve in place, which is very handy because it allows for this install to be completed when the tub isn’t fitted against the wall, such as in my case.
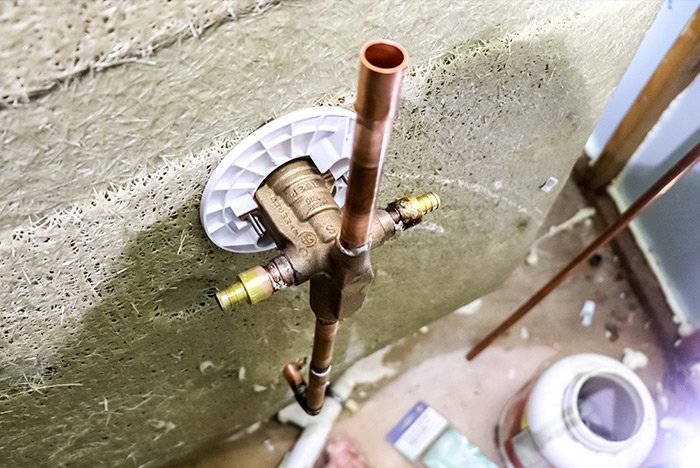
When it comes to installing the bathtub spout plumbing, there’s a trick you can use. Go ahead and solder an elbow and a longer pipe than necessary to stick through the tub spout hole that sits beneath the valve itself. Then, dry fit a threaded adapter on the end of the pipe. After that, lightly screw the tub spout onto the adapter.
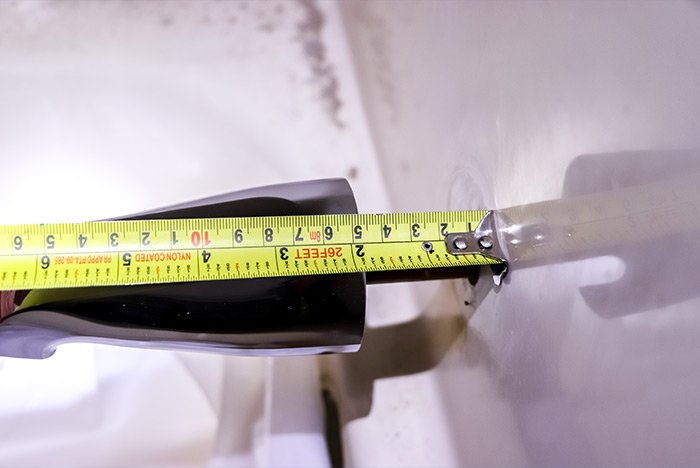
Since the pipe is too long (on purpose), you’ll need to measure the distance of the extra pipe. Record that distance and then remove the spout and the threaded adapter. Then, measure the same distance from the end of the pipe.
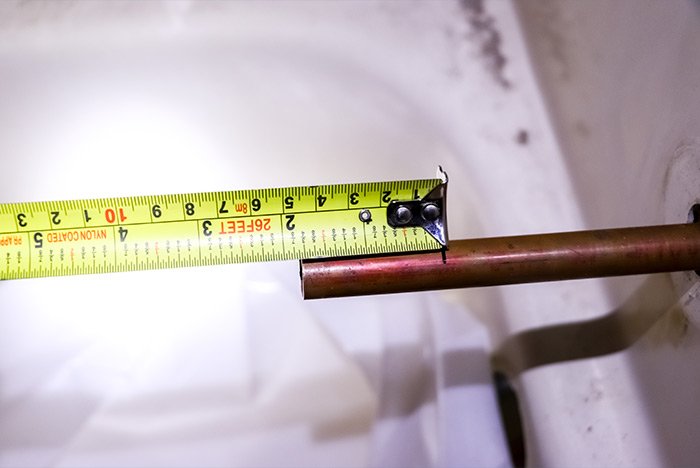
Mark the distance and cut the pipe at the mark. Finally, clean the pipe and threaded adapter, flux them up and solder your joint.
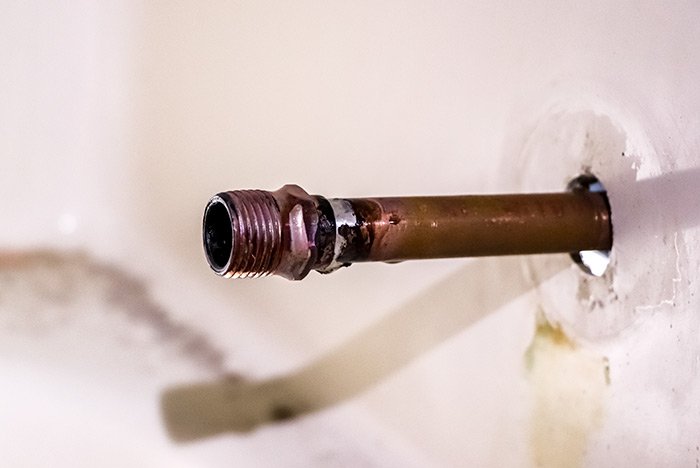
You should be left with the exact length you need for the tub spout. If you screw the spout back on, the back of it should perfectly touch the wall of the tub. This little trick certainly makes life a lot easier.
Okay, now let’s move onto the existing plumbing that’s contained inside the wall. As you can see in the photo below, there is some Pex tubing that’s attached to copper tubing that runs through the walls. Luckily, there are valves attached to that Pex tubing. Those valves made things much easier when it came to turning off the water. I didn’t need to shut the entire house down. All I did was turn those two valves to their off positions. Here’s another word of advice; use tons of valves in your plumbing. You’ll thank yourself one day.
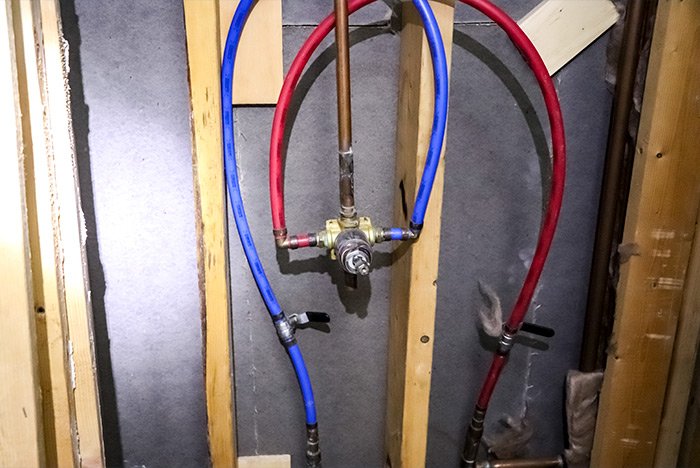
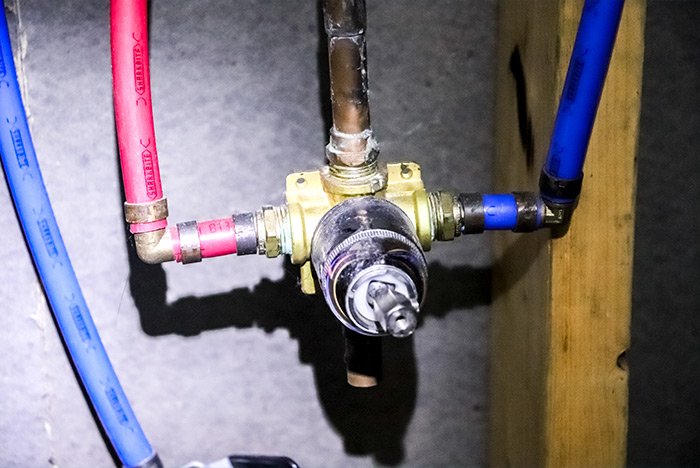
Here’s an up-close look at the old valve. I don’t even know where the rest of the parts are for this thing.
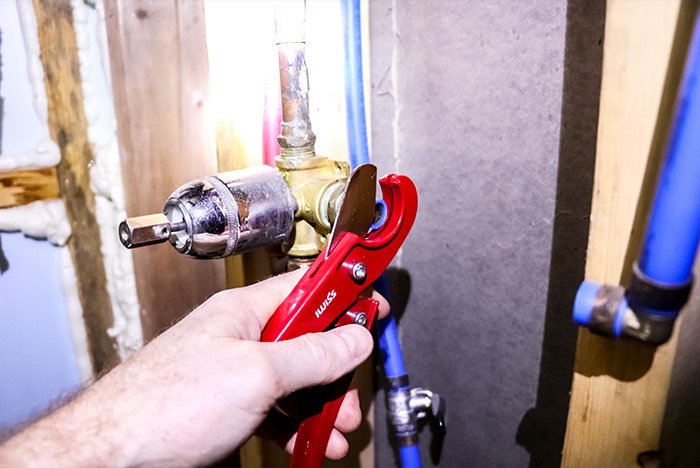
And here I am using my handy dandy (and very sharp) Pex tube cutting tool to cut the Pex tube away from the valve.
Here’s the valve that’s been cut away from the rest of the plumbing.
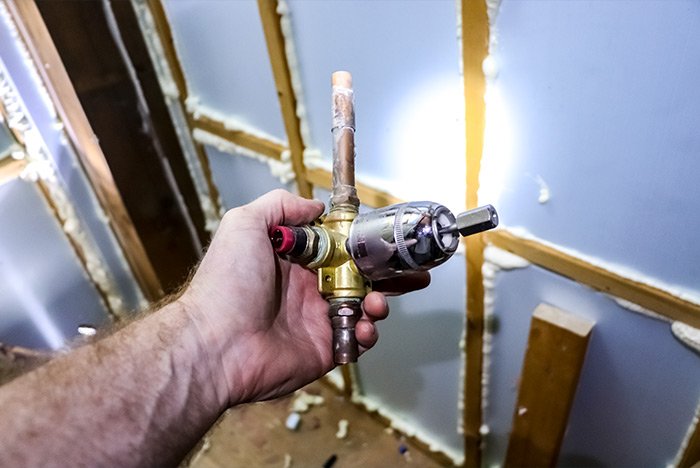
And finally, here we are with the wall plumbing that’s ready for installation.
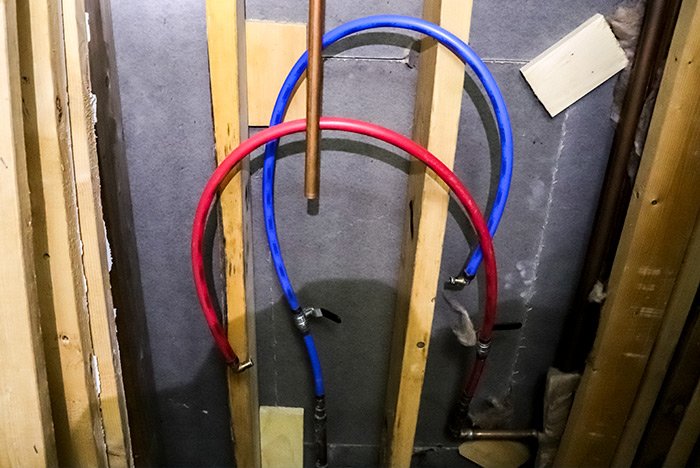
Since Pex adapters and attachments are so expensive, many manufacturers sell what they call “Pex tube removal tools.” These are tools that cut away the old crimps and tubing from existing plumbing. Since I purchased an IWISS Pex crimping tool as well as an IWISS Pex tubing crimp removal tool, I was able to make short work of the remainder of this project. I easily cut away the old crimps and tubes and attached my own.
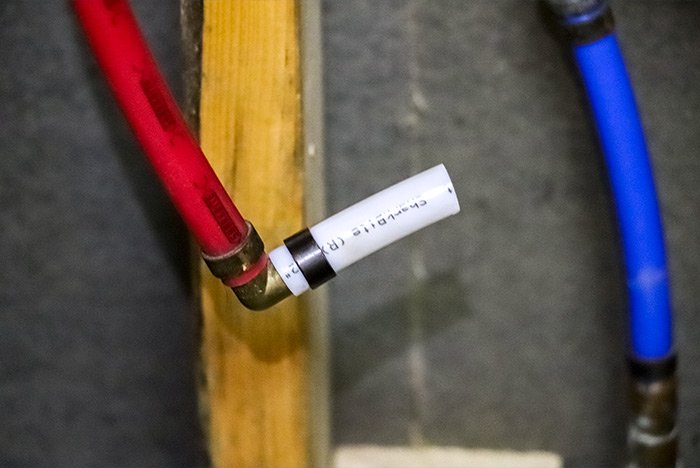
I also purchased a 100 foot role of half inch tubing, of which I obviously have lots left over. I only used about four inches of it.
After I had all my plumbing the way I wanted it, I moved the tub back into place against the wall. Then, I removed the wall on the other side (in the adjacent room) and hooked everything up. I made the necessary crimps and nothing leaked at all. Check this out.
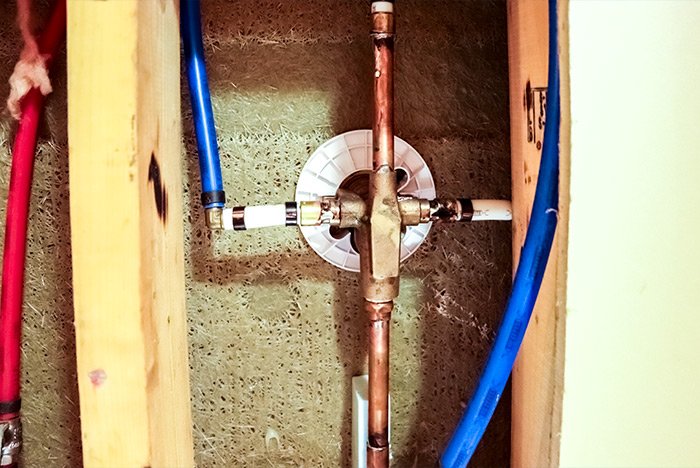
Using Pex tubing added a lot of flexibility. I was able to shift the tub around until it sat correctly in its final position. Here’s another view.
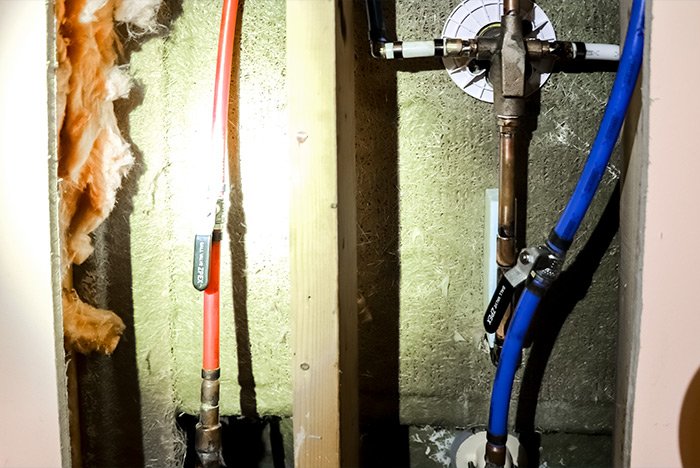
The next day, I even hooked up the drain pipes, which was an adventure unto itself. I’ll tell you about that another time.
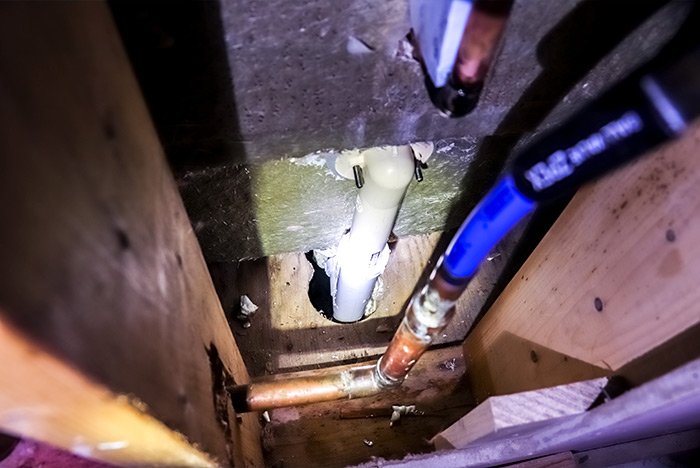
What’s best of all is that we now have a fully functional tub and shower, not that we can use it or anything. The rest of the bathroom still needs to be built out, but this is a step in the right direction.
Projects like this are quite simple to complete as long as they’re thought out, you have the necessary tools and you have access to the inside of your walls. When your ducks are in a row, everything else falls into place.
Do you have a similar bathroom project you’d like to complete? Do you have any questions? I love this kind of thing, so if so, please ask in the comment section below. I’ll do my best to answer. Thanks for reading!
------
This post is part of my "Symmons" shower valve series. Over the years, I've learned quite about this brand of shower valves; I've installed them from scratch and I've repaired them as well. Click through the links below to learn how to do these things yourself. And be sure to ask questions if you have them.
How to Fix a Symmons Shower Valve That Leaks
Replacing a Stem Cartridge Spindle For Symmons Temptrol Shower Valve
Installing a Symmons One Handle Shower Faucet
------
Anyway, over the past few weeks, I’ve been working on finishing up the insulation. As I just mentioned, I switched tracks a bit. I still have a few areas to complete, but that part of things is looking good. And since the wall that the bathtub was up against was finished, I decided that installing the tub again would be wonderful. The bathroom is small and that tub is right in the way of everything (being pulled away from the wall and all). Also, because the shower/tub valve was old and leaky in this bathroom, I decided to replace it, which brings me to the point of this fabulous post.
Okay, since I have experience with Symmons shower valves, I decided to go with that brand. In the past, I have rebuilt valves like this, so I was interested in taking things to the next level. I wanted to do a complete installation. So that’s what I did.
This is the bad boy I purchased. I got the entire kit from Amazon for $99, which included the valve and all the chrome accessories that one would need to perform an install from nothing. It even came with the tub spout and the shower head. All I needed was a tub, which I already had. Here’s the exact title of the kit I purchased, in case you’re interested: Symmons S-9602P-RP Origins 1-Handle Shower Faucet, Chrome.

When it comes to projects like this, one of the most intimidating tasks is the soldering. Many folks shy away from it, when they really shouldn’t. Soldering copper pipes is a no-brainer, once you get used to it. It’s sort of like learning how to drive with a clutch. Once you get that one piece of information that you need, it makes all the difference. I’ll tell you the golden piece of information that has to do with this type of soldering below.
Let’s get going with the installation.
Before soldering any type of valve that has plastic or rubber parts in it, it’s a good idea to take the entire valve apart. Since I already purchased and still had on hand the special tool I would need to gut this thing, I used it and had no issues. Here’s a photo of the disassembled valve.

In the above photo, I included the tool that’s necessary to disassemble this type of valve. You can purchase this tool on Amazon as well.
Now, since I wanted to use Pex piping for this project as opposed to copper, I needed to solder some fittings onto this valve. The tube that leads to the tub uses a threaded fitting, so that would require some soldering and the hot and cold inputs and the shower output needed fitting soldered directly to the valve housing.
Since the valve housing for the hot, cold and shower lines were all female and my adapters were females as well, I needed to cut short pieces of copper pipe to act as males. I did that for the hot and cold lines.

I then cleaned, fluxed and assembled the Pex adapters to the copper pipes to the Symmons shower valve housing. Check this out. I love how clean everything is.

Once everything was assembled, I went ahead and did my soldering.

Okay, the trick to soldering in any direction is to heat the “joint” on the opposite side of where you’ll be touching the solder to the pipe. So let’s say you have a copper pipe with an adapter attached to it and that pipe is running horizontally. To heat the joint (the spot where the very end of the pipe touches the inside of the adapter), you’d point the torch flame directly at that point of the outside of the adapter. In this case, let’s say at the bottom. Then, you’d touch the tip of your solder to the opposite position on the top of the pipe. Take a look at this example soldering job. I had to attach the threaded fitting to the copper pipe.

Since the end of the pipe is touching deep inside of the fitting, that’s considered the joint. That’s where you point the flame. Then, you’d touch the solder to the opposite side of the pipe. When the flame heats the joint enough and that heat makes its way to the area you’re touching the solder, the solder will quickly get sucked right into the joint.
One common mistake many folks make is to use too much solder, causing drips and a very ugly work product. All you need is a bit of solder. When you touch it to the pipe and it melts, trust me, it’ll get pulled right into everyplace it’s needed. Maybe a quarter inch of solder is all you need. Just make sure you clean your pipes and adapters thoroughly with fine grit sandpaper and a brush. And use flux. Oh yeah, and use MAPP gas in the yellow bottle as opposed to the regular propane in the blue bottle. MAPP gas is hotter and it will heat up the housing a lot faster when tackling a project like this.
Here’s a photo to show you that the solder does, in fact, get pulled into the joint. Can you see the solder in the inside of this threaded adapter? Notice how it’s not pooling up because I added too much. It’s good to be cheap when it comes to plumbing. You won’t over use your supplies.

By the way, all of these adapters and piping were half inch.
This is the bottom of the soldering job.

And this is a close-up of the copper threaded adapter screwed into the valve housing, with white tape and all. Be sure to use white plumbing tape with all screwed in attachments.

Let’s now move into the bathroom, where the tub is waiting.
In this next photo, I attached the shower valve to the back of the tub. As you can see, I’ve got some room to work, since the tub is out in the open. This Symmons Temptrol shower valve gets placed right up against the back of the tub with that white plate, which is included. Then, the chrome plate gets placed up against the valve on the inside of the tub and screwed in place. The front plate and the back plate squeeze the valve in place, which is very handy because it allows for this install to be completed when the tub isn’t fitted against the wall, such as in my case.

When it comes to installing the bathtub spout plumbing, there’s a trick you can use. Go ahead and solder an elbow and a longer pipe than necessary to stick through the tub spout hole that sits beneath the valve itself. Then, dry fit a threaded adapter on the end of the pipe. After that, lightly screw the tub spout onto the adapter.

Since the pipe is too long (on purpose), you’ll need to measure the distance of the extra pipe. Record that distance and then remove the spout and the threaded adapter. Then, measure the same distance from the end of the pipe.

Mark the distance and cut the pipe at the mark. Finally, clean the pipe and threaded adapter, flux them up and solder your joint.

You should be left with the exact length you need for the tub spout. If you screw the spout back on, the back of it should perfectly touch the wall of the tub. This little trick certainly makes life a lot easier.
Okay, now let’s move onto the existing plumbing that’s contained inside the wall. As you can see in the photo below, there is some Pex tubing that’s attached to copper tubing that runs through the walls. Luckily, there are valves attached to that Pex tubing. Those valves made things much easier when it came to turning off the water. I didn’t need to shut the entire house down. All I did was turn those two valves to their off positions. Here’s another word of advice; use tons of valves in your plumbing. You’ll thank yourself one day.

Here’s an up-close look at the old valve. I don’t even know where the rest of the parts are for this thing.

And here I am using my handy dandy (and very sharp) Pex tube cutting tool to cut the Pex tube away from the valve.

Here’s the valve that’s been cut away from the rest of the plumbing.

And finally, here we are with the wall plumbing that’s ready for installation.

Since Pex adapters and attachments are so expensive, many manufacturers sell what they call “Pex tube removal tools.” These are tools that cut away the old crimps and tubing from existing plumbing. Since I purchased an IWISS Pex crimping tool as well as an IWISS Pex tubing crimp removal tool, I was able to make short work of the remainder of this project. I easily cut away the old crimps and tubes and attached my own.

I also purchased a 100 foot role of half inch tubing, of which I obviously have lots left over. I only used about four inches of it.
After I had all my plumbing the way I wanted it, I moved the tub back into place against the wall. Then, I removed the wall on the other side (in the adjacent room) and hooked everything up. I made the necessary crimps and nothing leaked at all. Check this out.

Using Pex tubing added a lot of flexibility. I was able to shift the tub around until it sat correctly in its final position. Here’s another view.

The next day, I even hooked up the drain pipes, which was an adventure unto itself. I’ll tell you about that another time.

What’s best of all is that we now have a fully functional tub and shower, not that we can use it or anything. The rest of the bathroom still needs to be built out, but this is a step in the right direction.
Projects like this are quite simple to complete as long as they’re thought out, you have the necessary tools and you have access to the inside of your walls. When your ducks are in a row, everything else falls into place.
Do you have a similar bathroom project you’d like to complete? Do you have any questions? I love this kind of thing, so if so, please ask in the comment section below. I’ll do my best to answer. Thanks for reading!
