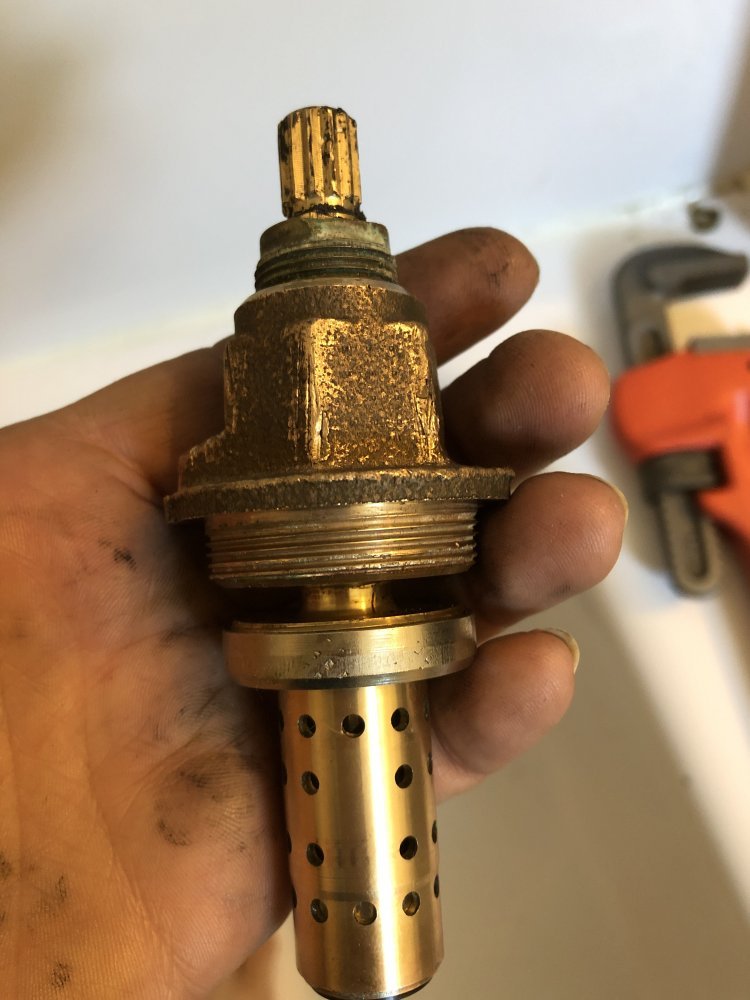
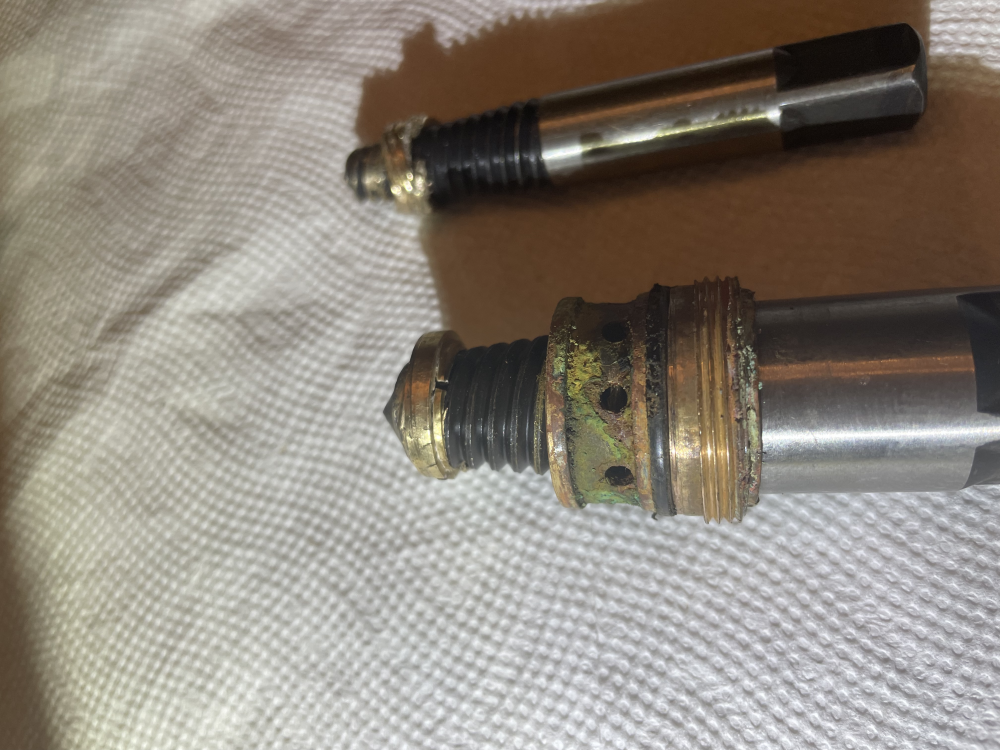
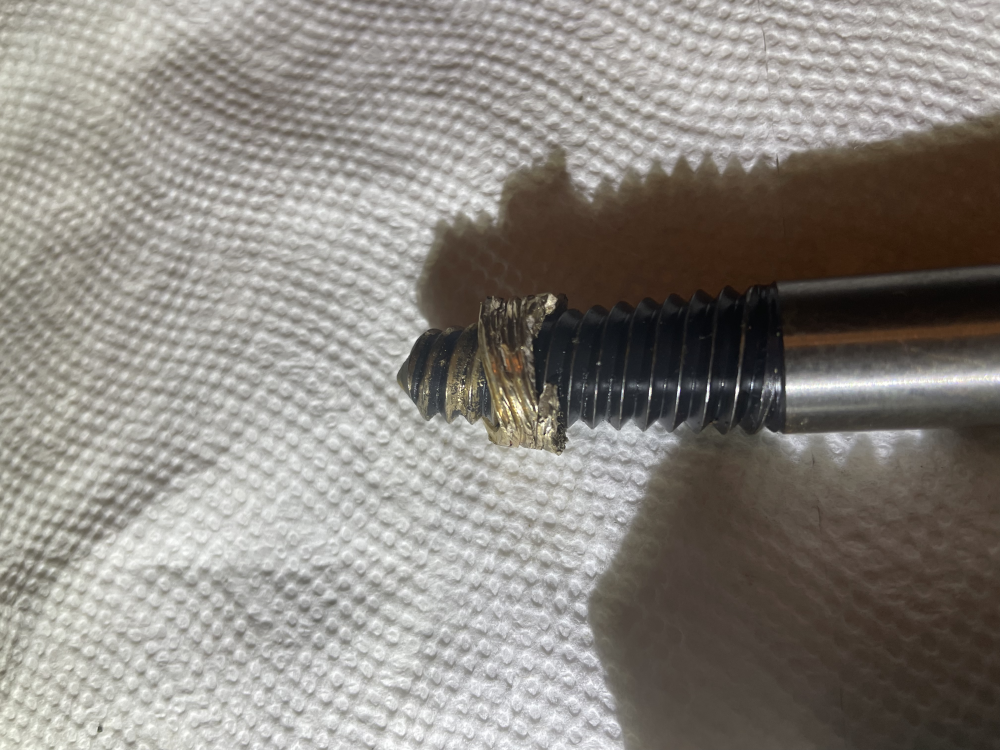
JGaulard
Administrator
Staff member
Site Supporter
Sr. Site Supporter
Power User
- Joined
- May 5, 2021
- Messages
- 319
- Reaction Score
- 2
- Points
- 18
- #1
What I’m about to share is for the greater good. I’ve done all the work and I’m willing to tell you all about it. If you have a shower valve that looks like the one below, and it leaks, you’re in good hands. I’m about to help your life immensely.
Here’s the scenario – every so often, you see a drip of water fall from the bathtub spout in your bathroom. You’ve seen it for years, but in your heart of hearts, you always felt that if you just tightened the shower handle a little tighter than you did the last time you took a shower, things would be all better. Then, of course, the next time you’re in the bathroom, you see that dam tub leaking again. You reach into the shower to tighten the handle once more, see that as you do it, the leak stops. Because of this, you internally blame whoever it is you live with for not turning off the shower properly. It’s their fault, not yours.
Really though, you know that your shower leaks and it needs fixing. You’re just procrastinating like the rest of us.
Be sure to bookmark this page for future use and please share on social media. That would help me out a lot!
------
This post is part of my "Symmons" shower valve series. Over the years, I've learned quite about this brand of shower valves; I've installed them from scratch and I've repaired them as well. Click through the links below to learn how to do these things yourself. And be sure to ask questions if you have them.
How to Fix a Symmons Shower Valve That Leaks
Replacing a Stem Cartridge Spindle For Symmons Temptrol Shower Valve
Installing a Symmons One Handle Shower Faucet
------
If you’re like me and you have a shallow “dug” well, you hear the well pump kick on and off every now and again throughout the day – when no one is using the water. In my case, I’ve heard it for years. I first replaced the leaky bathroom sink faucet and then the dripping kitchen sink faucet, which made a pretty big difference. Now, it’s time to rebuild the shower valve so the pump never kicks on again – when it isn’t supposed to.
To kick things off, let’s take a look at the valve I’m referring to. It’s a Symmons S-86-2-X Temptrol Tub/Shower Mixing Valve and it looks like this:
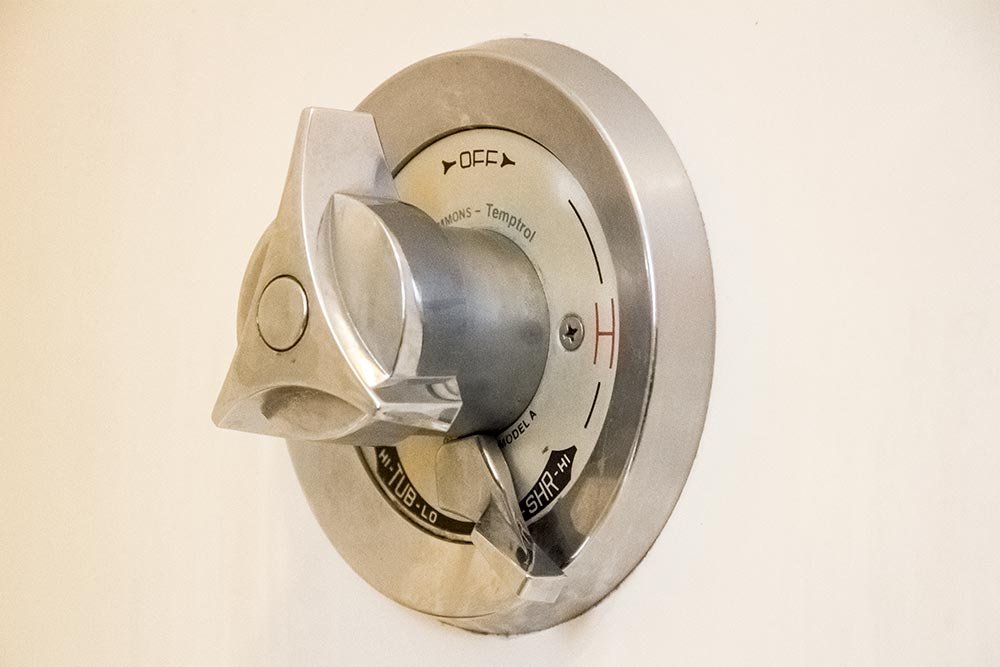
Yours is probably dirty too, so just ignore that.
Now, if you’re looking around Amazon, you may stumble across just the back end of this valve. Just the metal that’s tucked behind the wall that doesn’t come with all the shiny chrome pieces. If you are, that part would be called a Symmons S-4001-BODY Temptrol Shower Valve Sweat Connection. Even though that’s not important for this post, I thought I’d throw it in here.
Today, I’m going to partially rebuild this valve. I’ll guide you through the entire process. I’ll give you part numbers and let you know exactly what’s making your valve leak. I’m actually going to be writing a follow-up post to this one in a few days because I haven’t received one of the parts yet. With what I did though, I got my shower to stop leaking.
The real problem with a project like this is that one is never really sure which replacement parts to purchase. Also, one never really knows what the guts of their valve looks like. Every resource on the web does a terrible job of clearly depicting what it is we’re dealing with. Because of this, Laura and I spent some time together in the bathroom today. I took a few of the beginning shots and she handled the rest. I needed both hands when I hit the half way mark. Please pardon some of the blur below. I was working one handed.
Also, I found all the correct parts right on Amazon.com, so get your pencil out and start making notes. I’ll list them for you here to make life easier.
– Super Lube 21030 Synthetic Grease (NLGI 2), 3 oz Tube – $5.20
– Symmons Diverter Spindle Kit – TA-25A – $10.73
– Kissler TA-4 55-0004 Symmons Valve Seat Set – $14.40
– Symmons TA-9 Geniune Washer Repair Kit – $7.15
– Stem Cartridge Spindle For Symmons TA-10 Temptrol – $23.49
Total – $83.97
If you’re doing two of these repairs, you can subtract the cost of the tool and the lube from the second one, which will give you a total of $55.77.
When I got the cap off, the screw holding the handle was exposed.
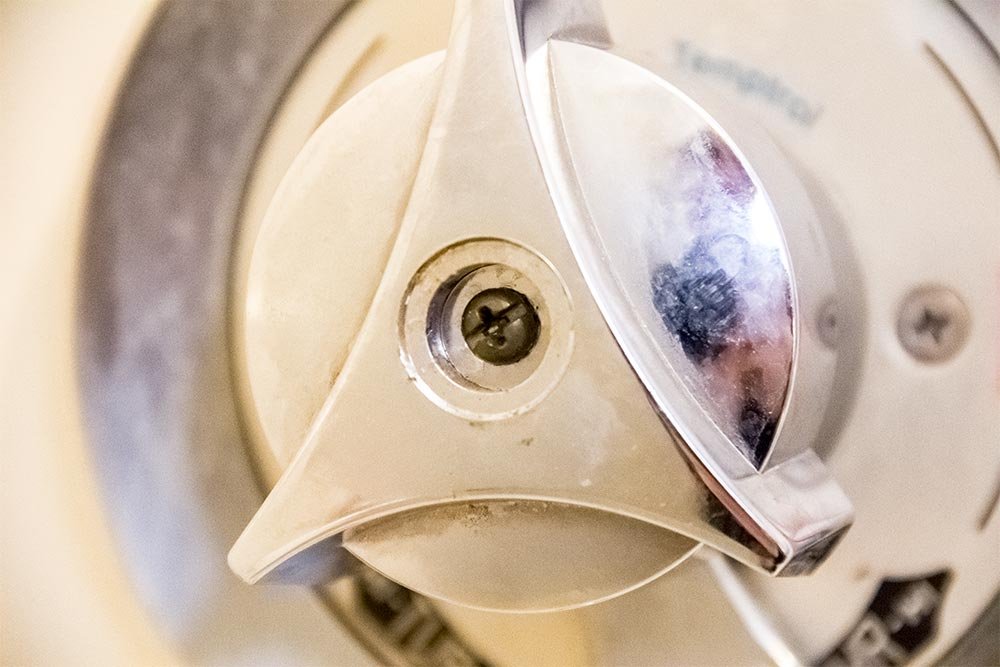
As you can see, you can use either a regular or a Phillips head screwdriver to remove the screw. I used the latter.
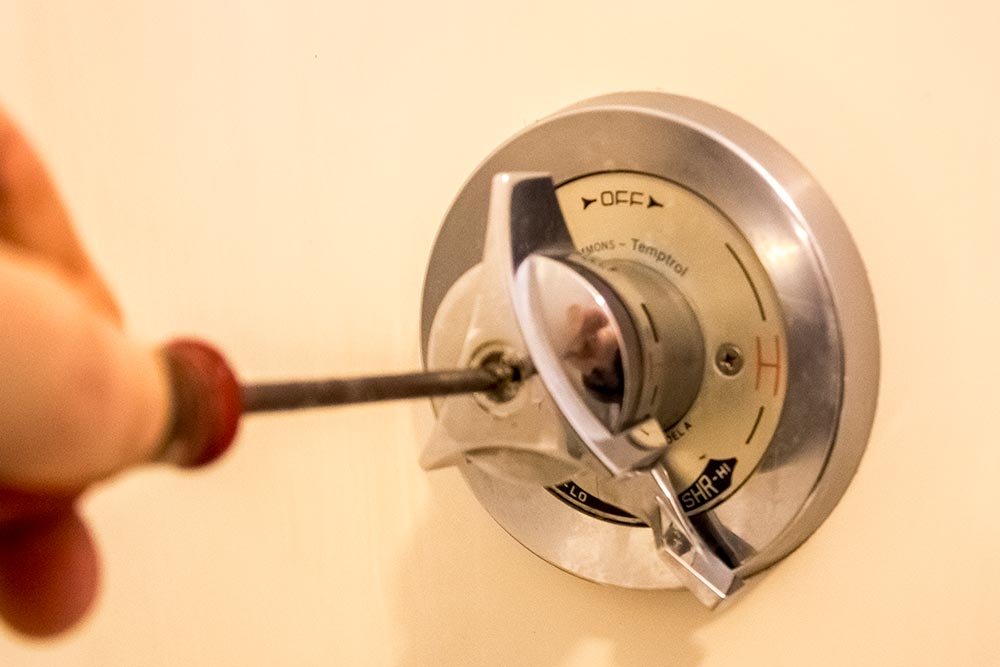
After the screw was removed, I pulled the handle straight back, which made it come off. If it didn’t come off, I could have used a pair of channellocks to grab the handle and wiggle it until it was removed. With the handle and the chrome collar taken off, I was left with this:
With a Phillips head screwdriver, I removed the two machine screws that held the cover on.
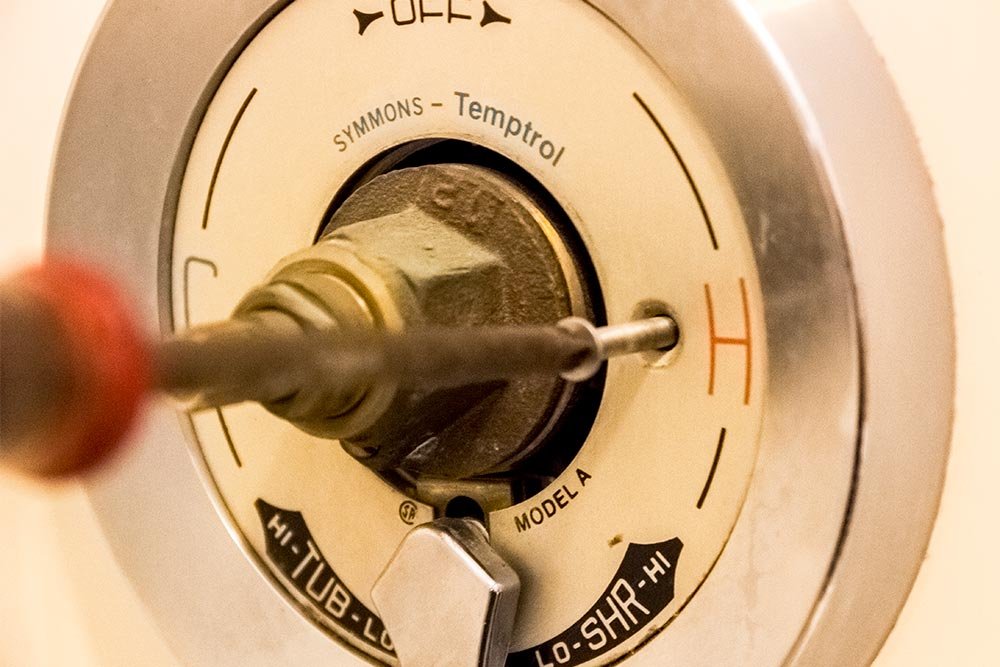
This is what it looks like without the cover:
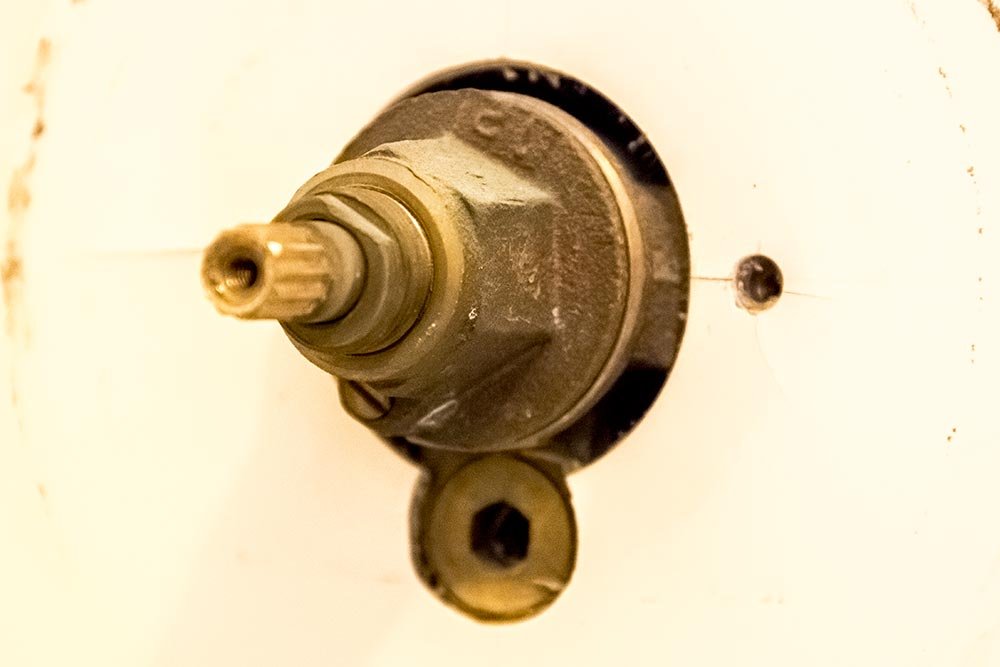
Now, I want to point out one thing. As you remove the cover, be careful that the clip holding the tub/shower valve doesn’t come off. It’s held on by a small clip. If it stays on, things will be easier when you’re putting things back together.
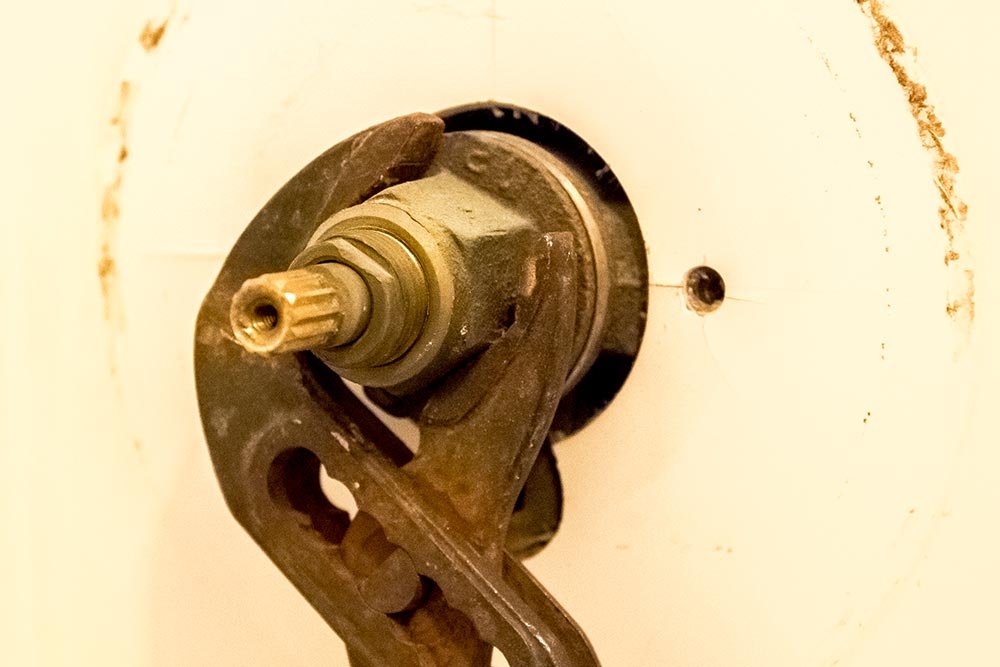
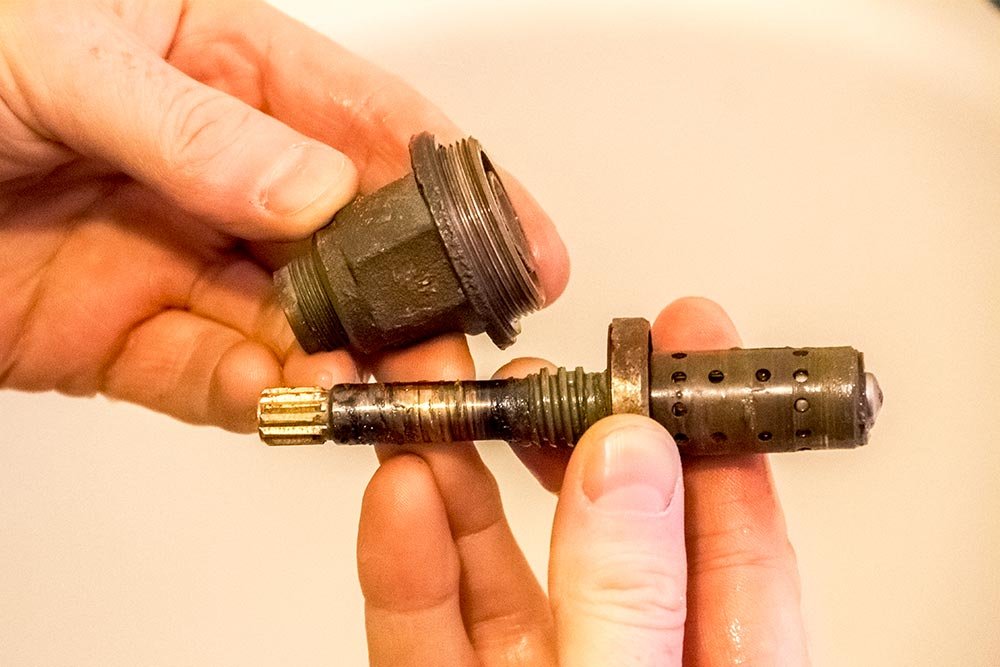
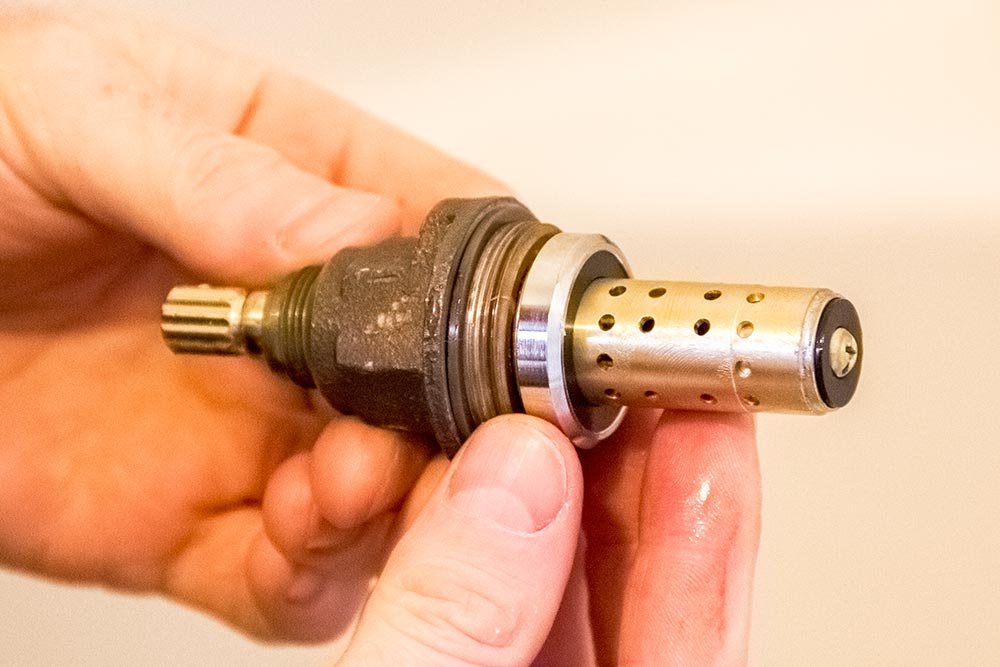
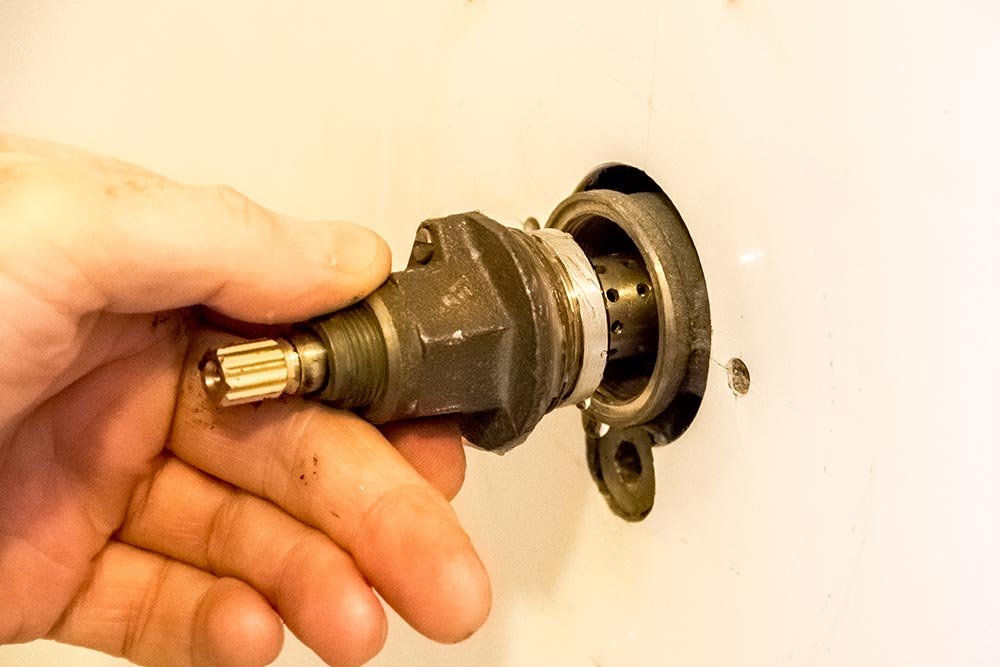
When it was totally loosened up, I pulled the entire contraption from the housing. This is what the butt end of it looks like. See that rubber washer? That’s supposed to be flat, not grooved like it is.
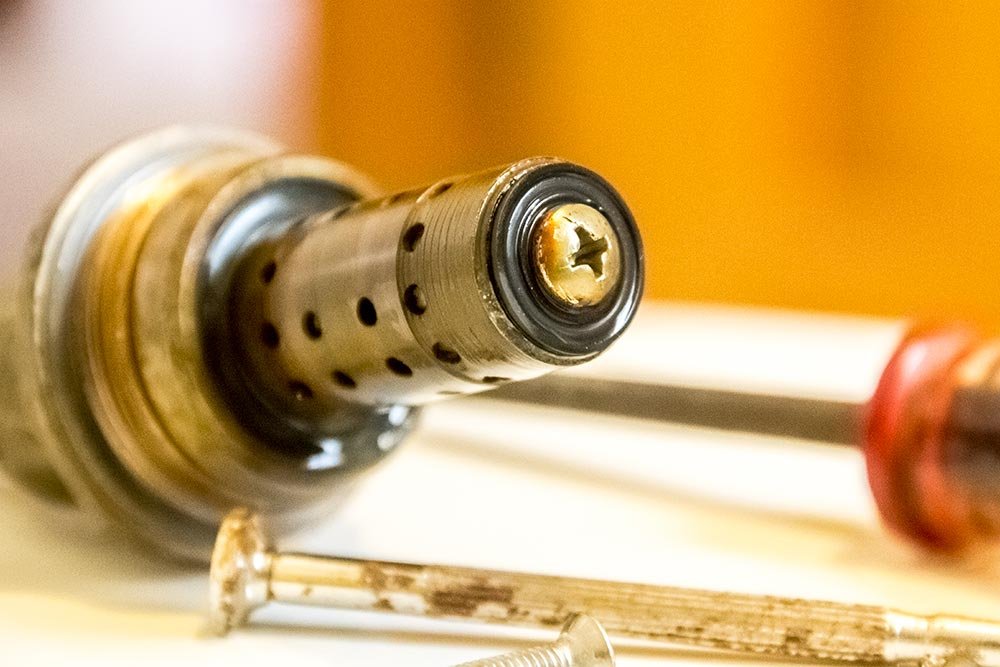
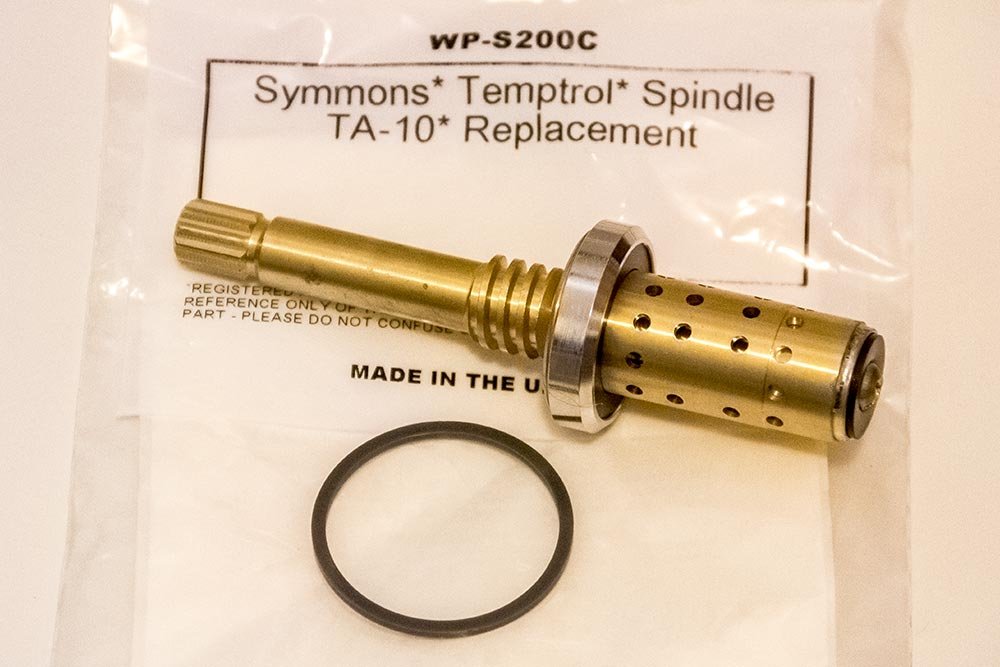
This is the stem cartridge spindle for a Symmons TA-10 Temptrol shower valve. You’ll need one of these, so I’ll add the part number to the list up above.
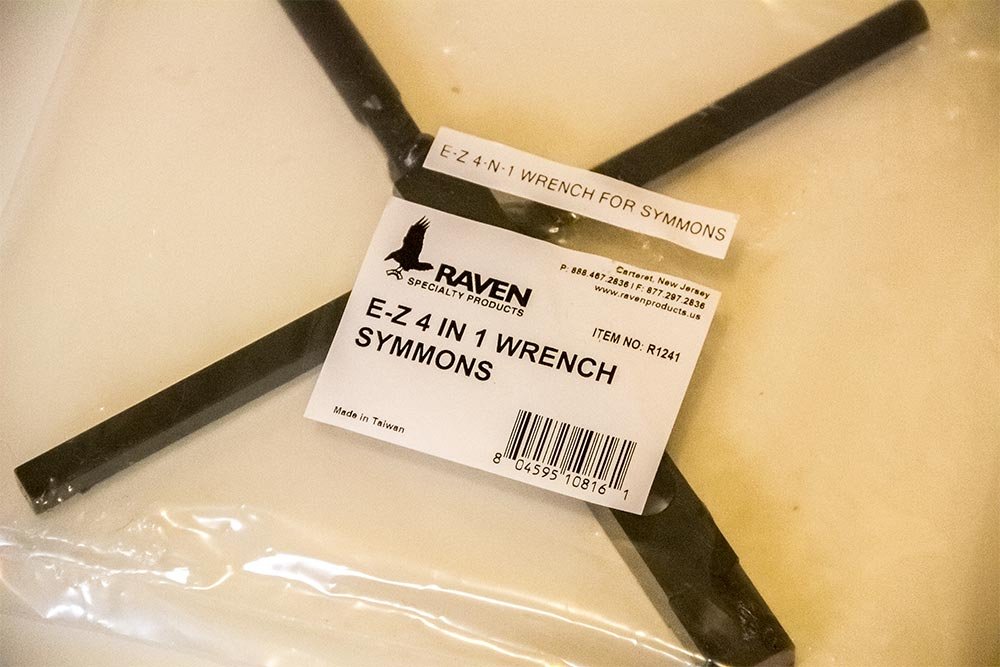
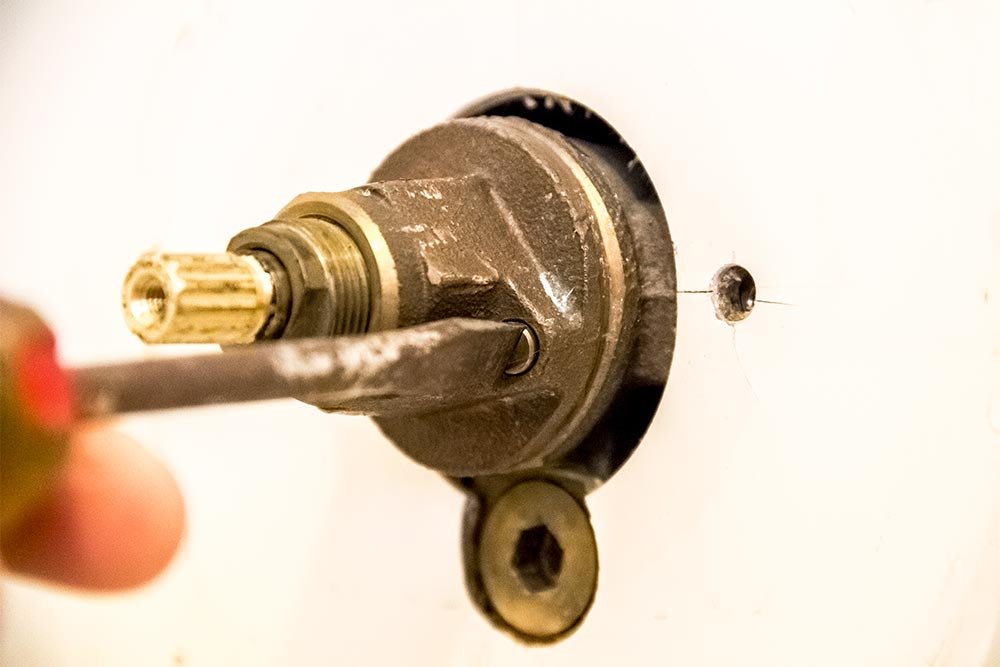
More precisely, it’s called the Raven E-Z 4 in 1 Wrench for Symmons and it’s item number R1241. Here I am using it for the first time. I needed the hex portion of the wrench to remove this small cover.
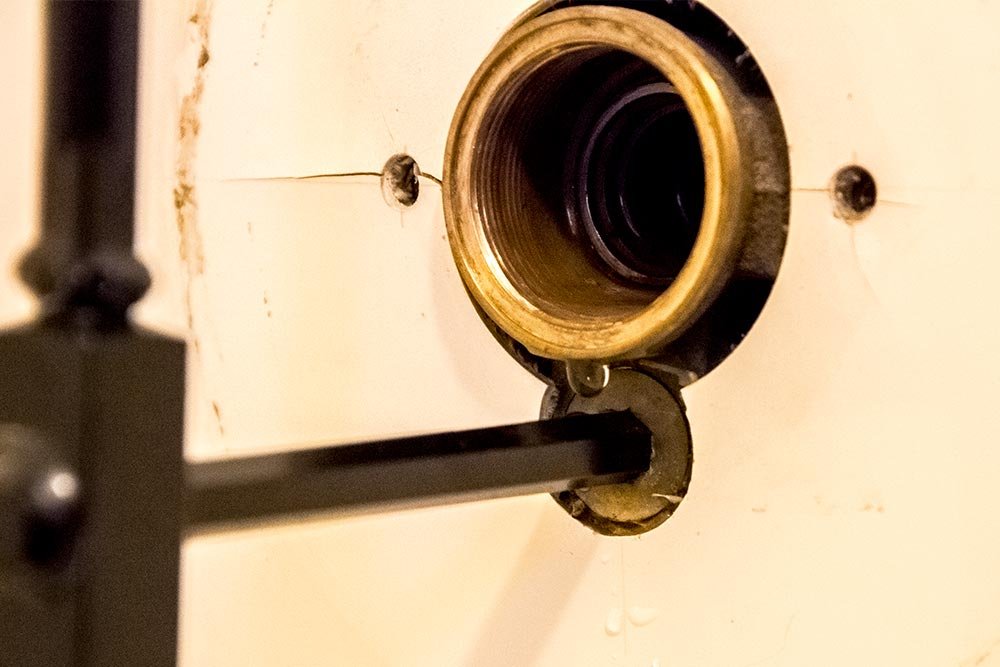
After I removed that hex screw, I saw this:
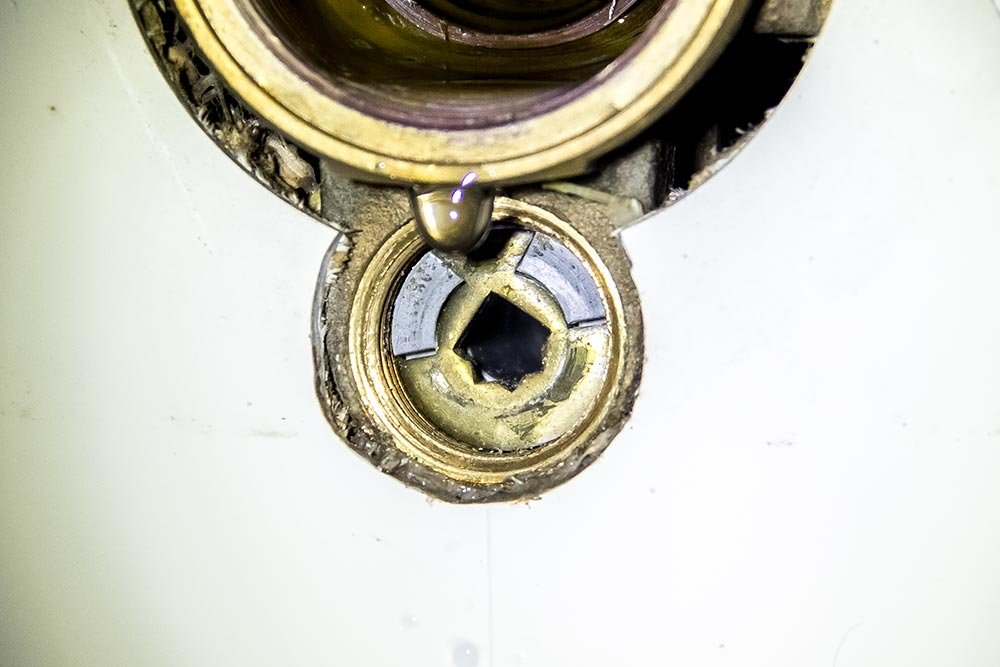
This is the metal Temptrol Diverter washer. I removed this washer easily with a regular screwdriver. It just pops right out.
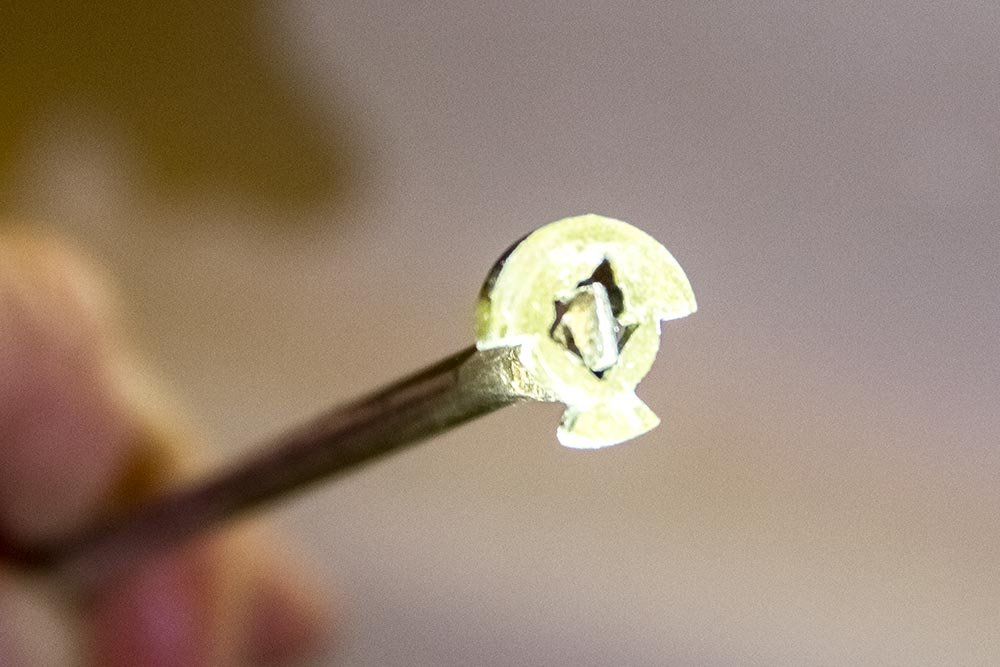
After the washer was out of the way, I used the screw end of the tool I just showed you above to pull the actual diverter out from its place. This step requires that you twist the tool counter-clockwise and pull out at the same time.
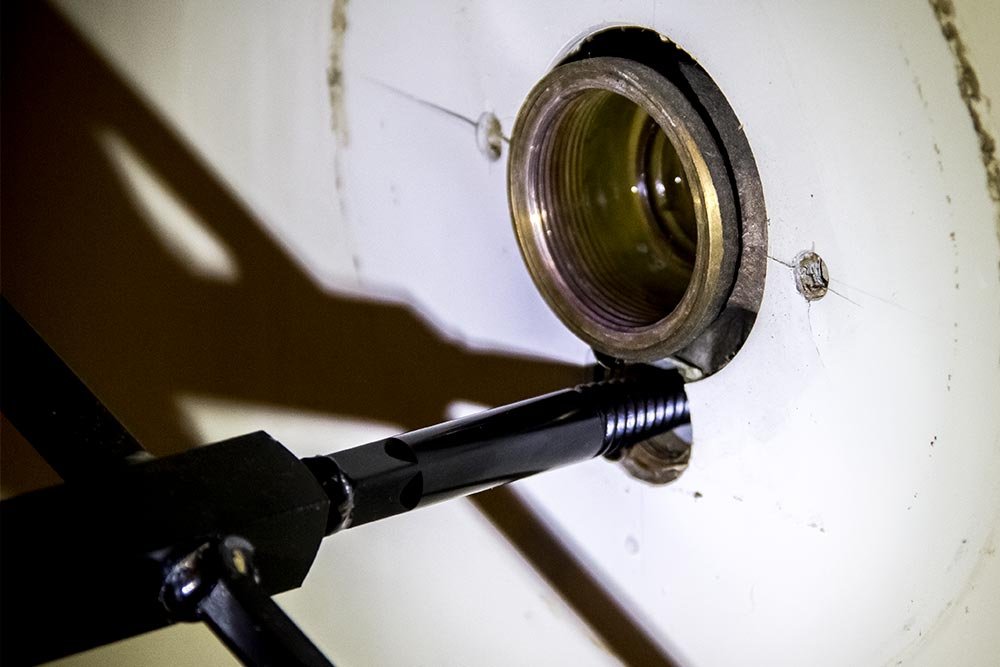
I pulled on the tool and the diverter pulled right out.
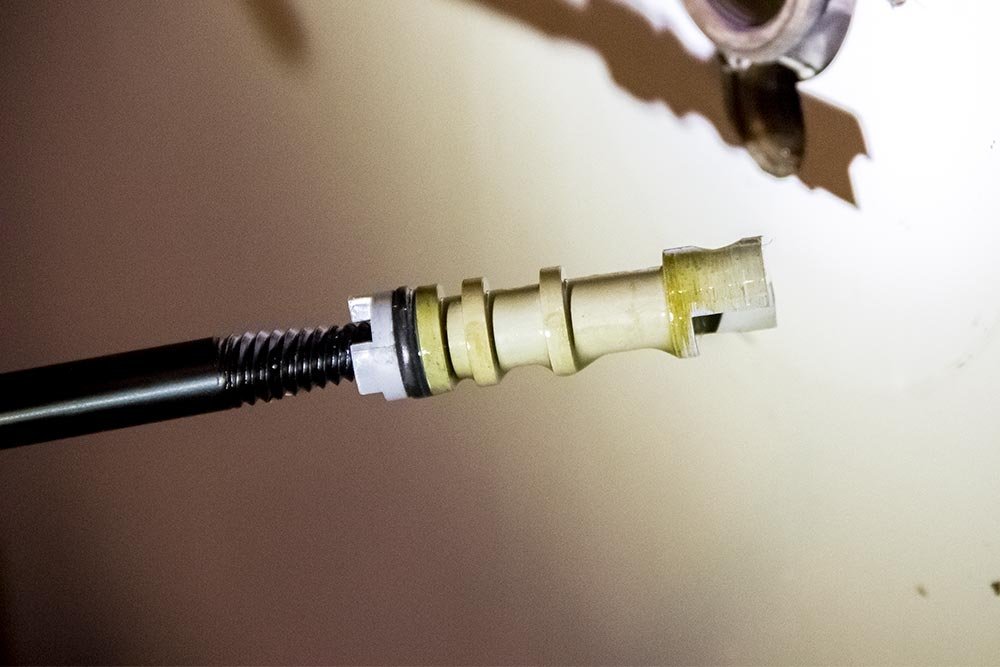
This is the second part you’re going to need. It’s called a Symmons Diverter Spindle Kit and I’ll list it above. It comes with a new washer.
You may be asking yourself why you need to replace this valve when it has nothing to do with the drip you’re experiencing. I’m here to tell you that when you rebuild something, you should do a nice job. Everything that you can replace, you should replace. Also, as time goes by, this valve and its associated o-ring wear out. When these parts wear, they allow water to flow where it shouldn’t. Do you turn the shower on and still see water coming out of the tub faucet? You probably always will, but replacing this valve will minimize that effect.
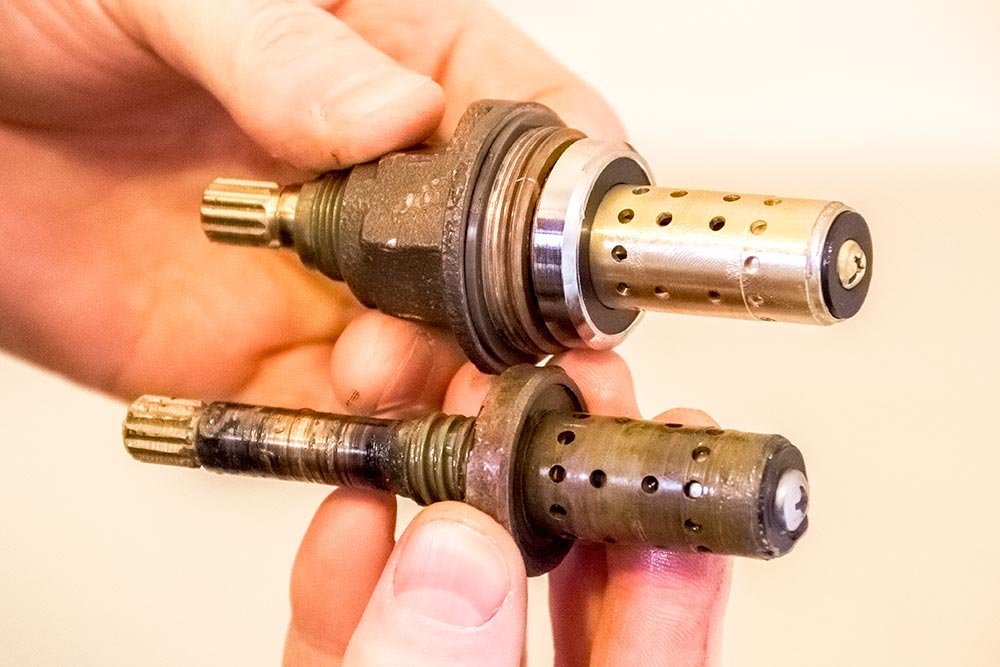
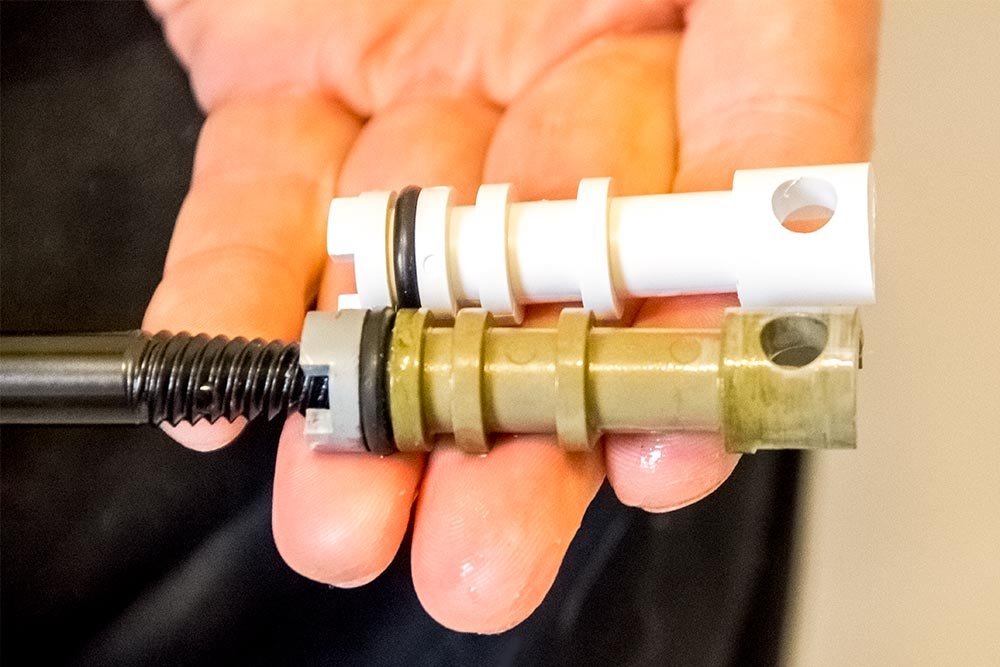
In this next photo, you can compare the old and new diverter spindles. Check out how flat the o-ring is on the old one.
To replace this spindle, you’ll need to get some plumbing grease. I used some Super Lube, which is good for this type of job.
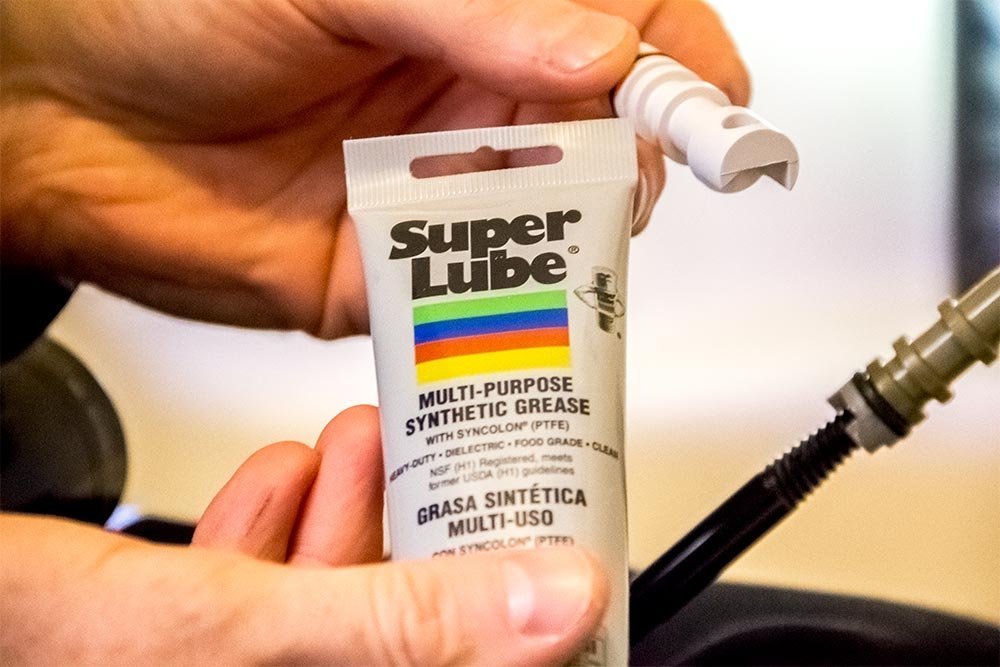
I opened the lube and smeared some of it on the areas of the spindle that would be touching the walls of the housing. I also added some grease to the o-ring. When that was finished, I pushed the diverter spindle back into its home.
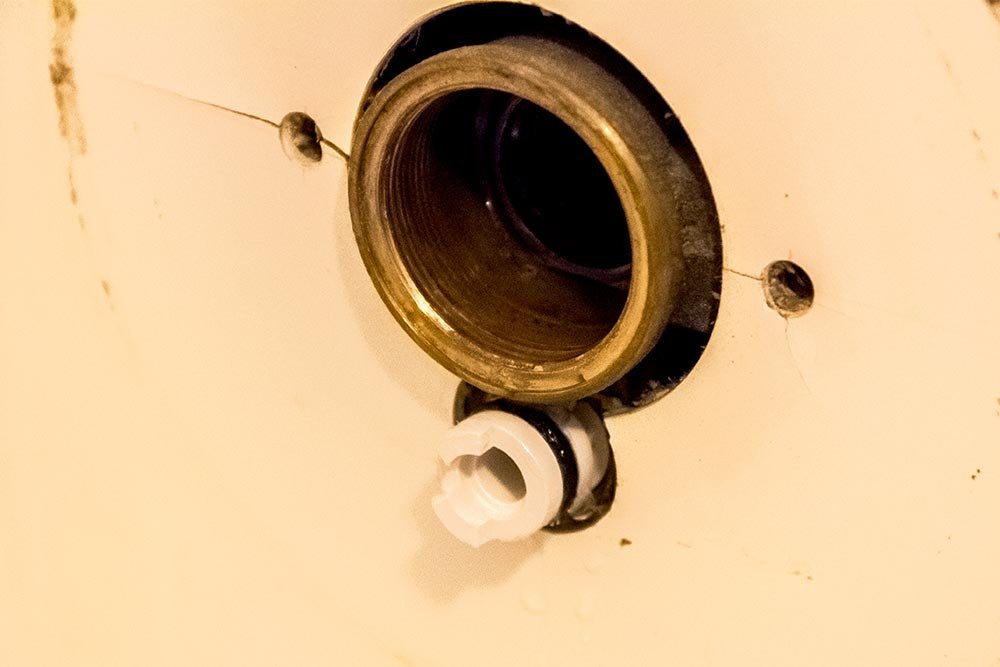
In the photo above, the spindle isn’t pushed in all the way. I wanted to quickly mention that you should face the small gap in the face of the spindle upward. This will make it easier for the corresponding handle to slide right into place if you center it. If you’re not sure what I’m referring to, take a look at the very first photo in this post. The handle I’m talking about is the bottom one – the one that changes the water from the shower to the tub. If you center this small spindle gap upward and then center that handle, things will match up.
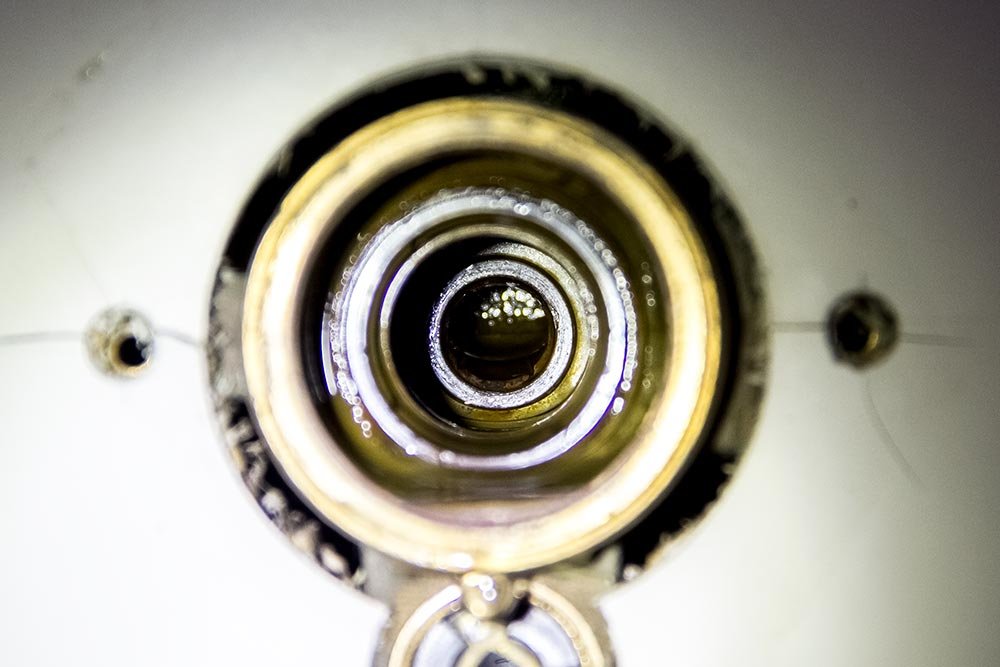
Inside this valve housing are two valve seats. These are sold in a kit and are called Kissler 55-0004 Symmons Valve Seat. Both the small one and the large one come together.
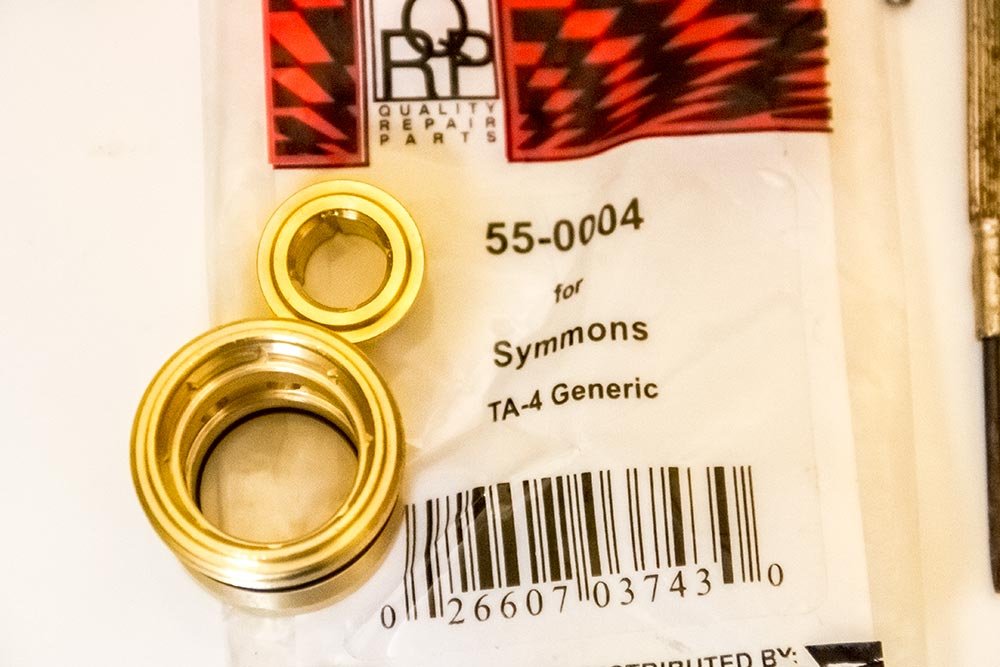
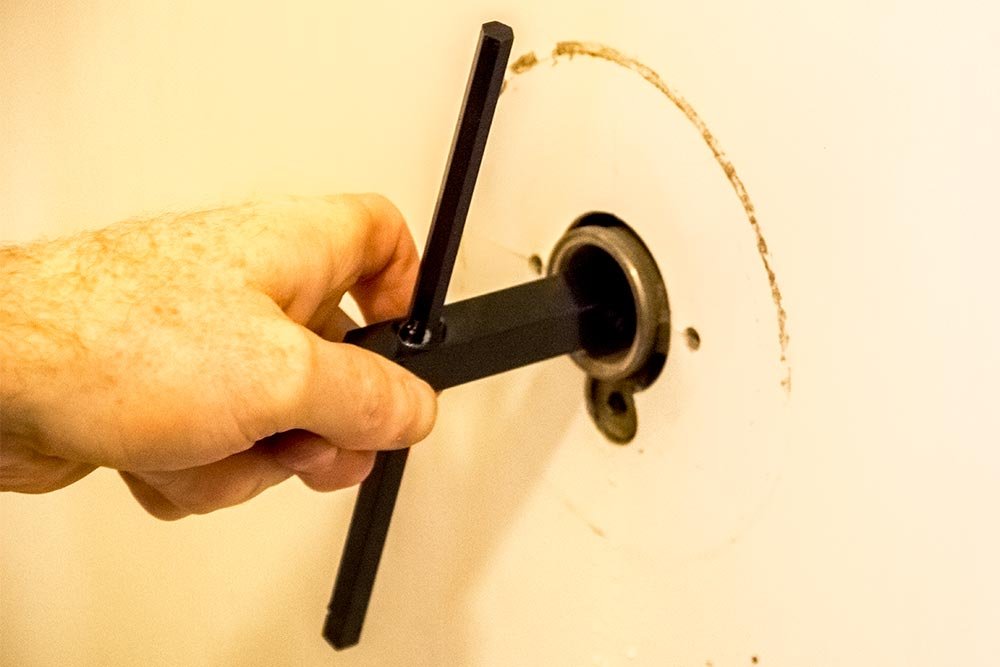
To replace these, I had to use the large square side of my new tool. I slid it into the housing until it wouldn’t go back anymore. Then, I turned counter-clockwise. After I felt the large valve seat loosen, I unscrewed it all the way and pulled it out.
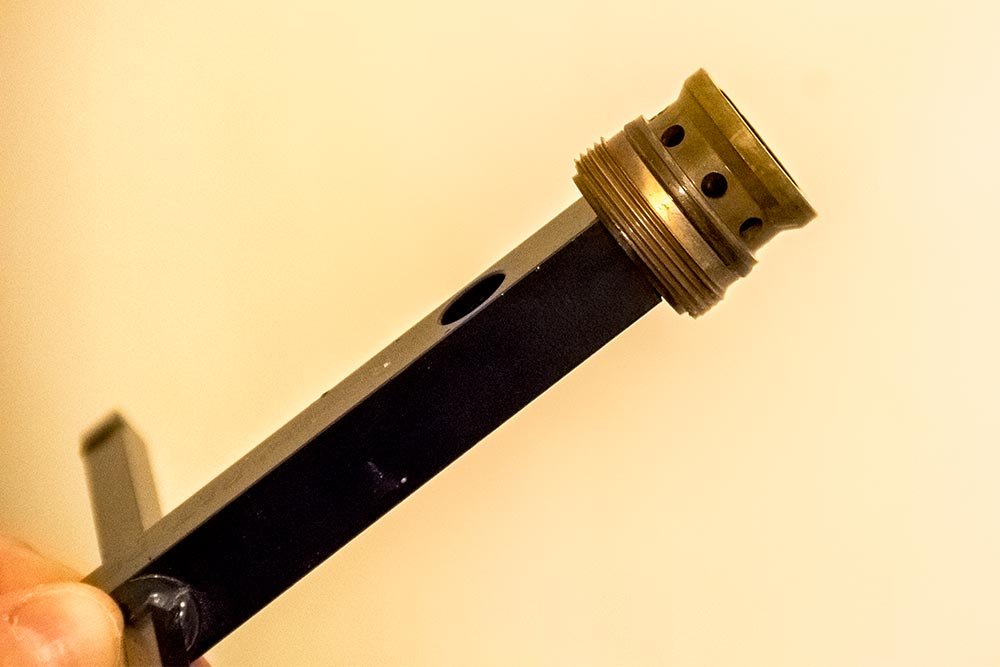
Then, I used the small square on the tool and did the same thing. I pulled the small seat out next. When I had both of them out, I compared parts, just to make sure everything was okay.
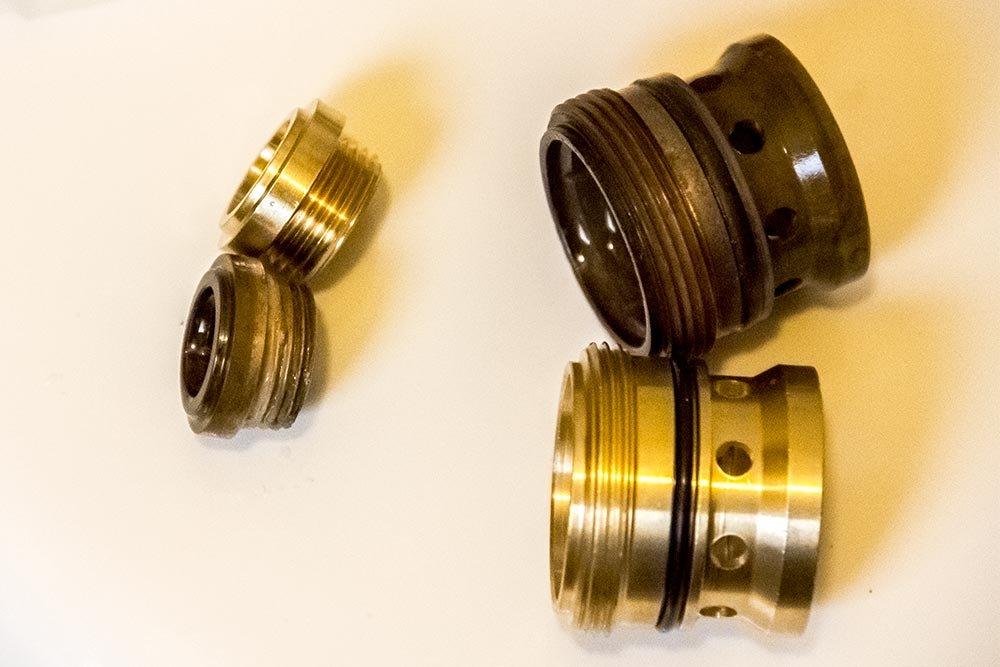
Since the new valve seats matched the old ones, I applied some grease to the inner and outer o-rings and threads and replaced the old with the new.
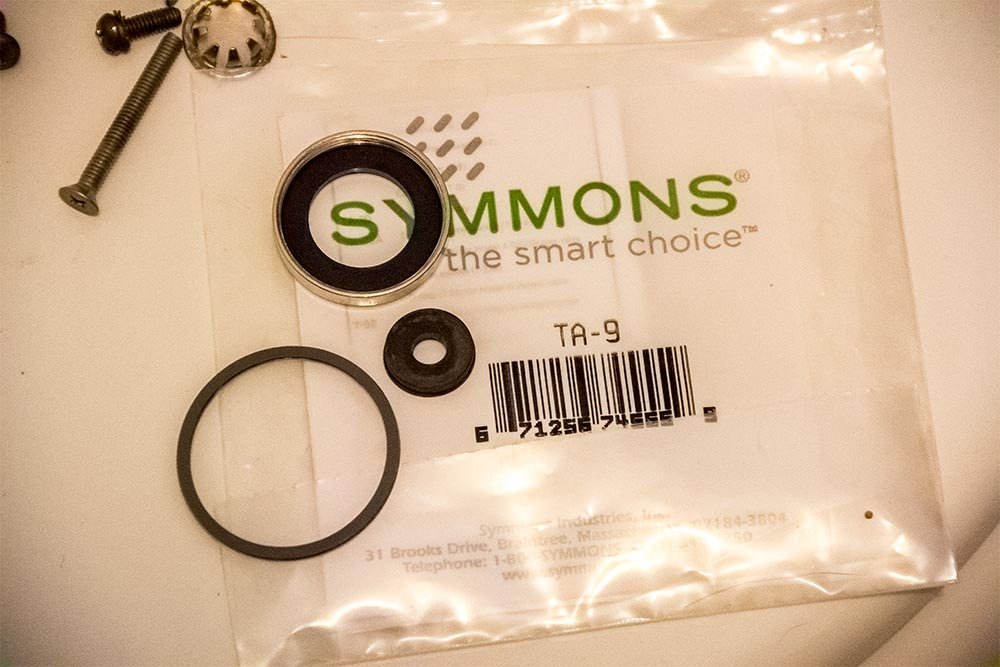
To replace this one washer, I merely unscrewed the screw at the back of the spindle, pulled off the old rubber washer, replaced it with the new one and screwed the new screw on. The reason I used the new screw is because it comes with some Loctite already applied to the threads. I didn’t have to use any of mine.
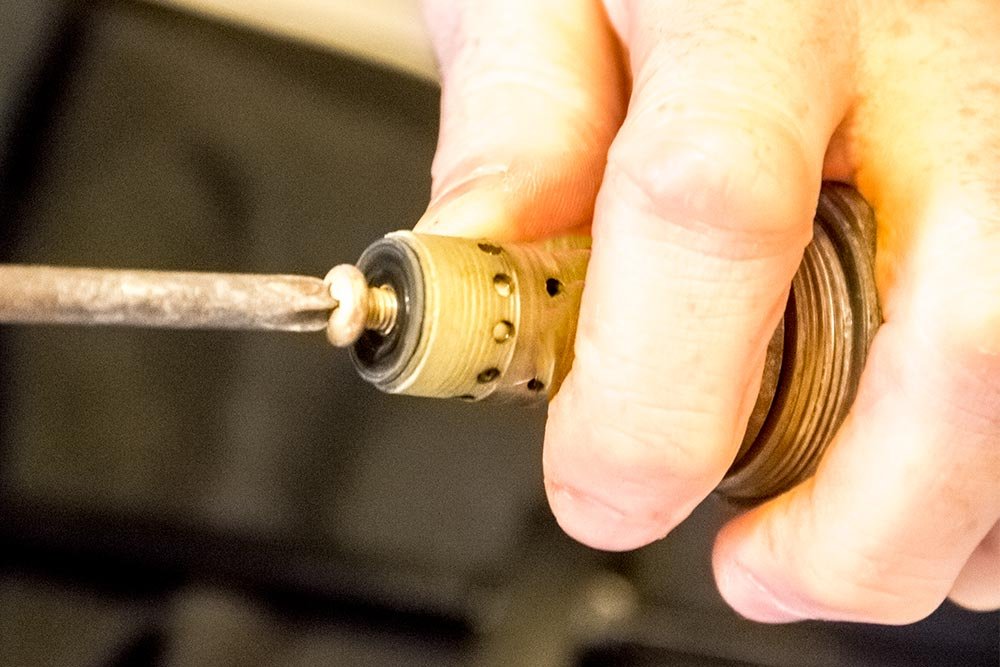
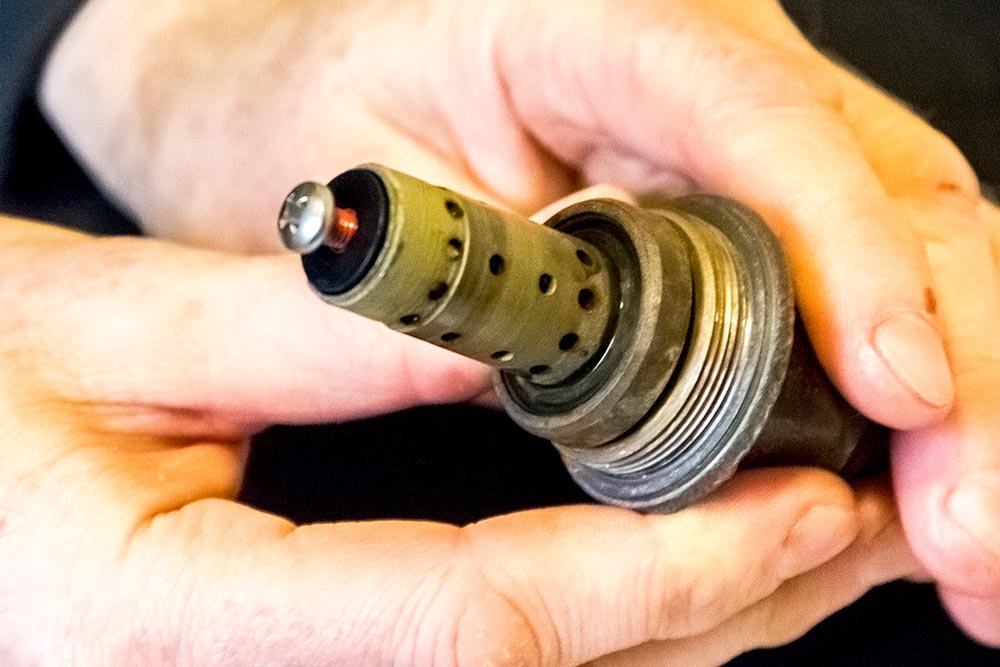
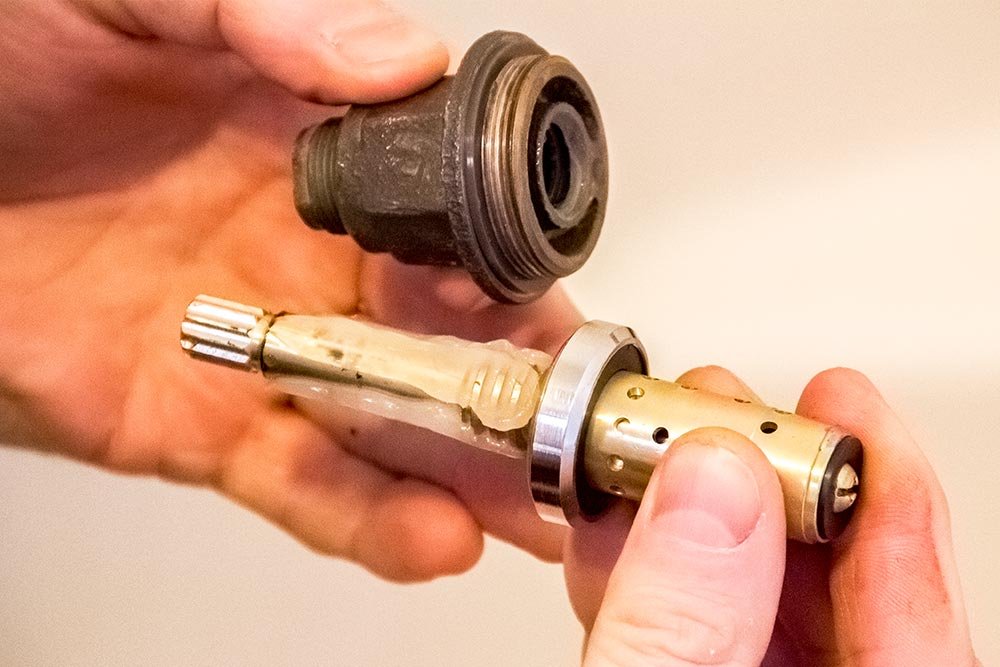
Again, you may be wondering something. You might not agree with replacing the entire spindle here. Well, I’ll tell you, there’s another rubber washer on this spindle that’s worn out. It’s actually probably the one that’s causing the majority of the drip. To replace that washer, you need to remove a thin metal ring from the spindle. This ring is almost impossible to remove without ruining the spindle itself. Folks have used a Dremel to do so and have had luck. I figured that since I’m already inside the shower valve, I really should replace as much as humanly possible. As I was trying to unscrew this ring with my channellocks, I felt the spindle metal compress, which, if I had gone any further, would have ruined it. In this case, it’s better to simply replace than repair. Again, I’ll give you the part number above.
After I was finished with everything, I reassembled the shower valve parts. When I get the new part, I’ll write the post and link to it right here. If you have any questions or concerns, please leave them in the comment section below. Thanks for reading!
COMMENT: I have a symmons temptrol shower/tub valve and when the shower valve is turned off and the diverter is in the tub position there is a small drip from the tub spout. I have the seat kit ta-4, the spindle t-10 and the washer kit ta-9 all replaced under warranty from symmons. Should I start by replacing just the new spindle?
COMMENT: Yes. The leak is most likely caused by one of the washers that has become worn or compressed on the spindle. I’ll tell you though, even after I replaced everything, I still need to “tightly” turn the valve to the off position. Just beware of that. I no longer have a leak though.
COMMENT: Thanks so much for this guide! My husband and I just purchased an older house (1965), somehow without knowing that there was a leak in the upstairs shower that made the kitchen ceiling drip drip drip. The shower has an old Symmons setup in it, and with the help of this page, we diagnosed the leak, got the parts we needed, and now we’re back to showering in style!
COMMENT: It warms my heart to read this comment. When I write these posts, I always hope that someone will get some sort of assistance from them. I’m so happy to hear you got just that. Good luck with your new house!
COMMENT: This was the BEST I have ever seen! Nice Job…am I’m a pro, so I appreciate what a great job you did!
COMMENT: I have one of these valves, except it’s for a straight shower. Instead of a tub diverter, there’s a pressure-control lever for the shower. Do you know if that uses the same diverter spindle? I can’t find a part for anything else. Thanks! UPDATE: Oh, looks like I might need a TA-25B spindle instead of the TA-25A.
COMMENT: Wish I had read your second post on replacing just the stem cartridge spindle before I tried the full rebuild! Your “How to Fix a Symmons Shower Valve That Leaks” post started off so convincing I went ahead and bought all the replacement parts prior to reading it all the way through. I had ordered a repair kit from Amazon and the tool they provided was not the same as the Raven E-Z 4 in 1 Wrench and it did not have the reverse screw for removing the Diverter Spindle. It took me almost 2 hours to get it out (in pieces) and I cannot get the new one to seat deep enough to get the screw cover to seat and hold in the Temptrol Diverter washer so I cannot divert the water from tub to shower. Any suggestions for getting the diverter spindle to seat? Thanks!
COMMENT: Always replace both rubber washers on spindle t-10 A & with water supply off open vale 1/4 turn so nothing will bind when removing valve cap with t-10 A in it , replace 55-0004 seats only as a last resort . Symmons valves only because most folks turn them off to hard !
not two hands & a shove, 2 fingers is all it needs . Two people & 2 childern growing up here & I changed the rubber washers once after 17 year’s & we are still using it today 10 years later.
COMMENT: Love this post – pics and descriptions I couldn’t find anywhere else. For me, all the gentle prying in the world wouldn’t get the handle off, though. The stem of the spindle assembly snapped, so I ended up having to get not only the spindle, but a new handle, too (T-31). I also really appreciate that these assemblies haven’t changed much, and are readily available online and at the HW store.
COMMENT: I’m glad the post helped! I understand what you’re saying about the photos. It’s tough to find good ones out there. I enjoyed taking all of them for the process.
COMMENT: Hi Jay - would it just be easier (and cheaper maybe) to just buy the entire valve body brand new – they’re about $60 on a popular site, and then the wrench? Current pricing at the box stores and online shopping have repair parts at $75 before the cost of wrench and grease. Just wondering if I’d be missing any parts getting the whole replacement body ( no trim included of course. ) thanks! -C
COMMENT: That’s certainly an option. The labor might dissuade many folks from taking on a project like that, but if you’re into soldering copper piping, go for it. I’m actually remodeling a bathroom right now that I may purchase a new valve body for. The walls are already opened up, so it may be easier than finding replacement parts. That said, rebuilding the current one is easy too. It’s up to you.
COMMENT: Hi Jay - sorry I wasn’t clear. I’m going to strip the new valve body and take all the parts out. Not replace/solder. Just strip and replace. And thanks for such a great tutorial! Best I’ve seen! Not sure about posting price etc here- feel free to delete- but if your looking at a new body as well, the S-46-2 is on sale at Amazon for $57.19 right now.
COMMENT: Thanks for the informative post. I copied and pasted your suggestion for replacements parts/valve kit and emailed Symmons. They shipped out the replacements parts (except the 4-1 wrench) for free no questions asked. I told them the shower (outdoor) has been slowly leaking when turned off and this year it was worse. Myself and a friend followed your step by step fix with no issues except we still have a small leak when shut off. We then tested having just hot on at once and cold on at once. It appears the hot water has no problem shutting off completely but the cold water still has a slow leak. We called Symmons and then recommended cleaning everything out with white vinegar. We did this and still had a small leak. Called again and they recommended tighting even more. That did not work. My friend (not a plumber by trade but handy) said the issue he was having was adjusting the seats so there would be no leaking but I guess we are having no luck. Any other thoughts or suggestions. Thanks again.
COMMENT: Unfortunately, I have zero experience with adjusting the seats for this valve. If you do learn what the issue is and fix it, please let me know.
COMMENT: You haven’t talked about a Symmons ” spindle” freezing in cold weather, when not being used. I have a summer house , that I shut down for the winter, and , the “spindle” froze. The internal moving part would not slide back and forth. I’ve heard that soaking in white vinegar will free it. Can you confirm, or , do you have any other suggestions?
COMMENT: I bought a complete new valve assembly. My plan was to swap out all of the pieces. I can’t get the larger seat valve off. I replaced the smaller one with no problem. So I tried putting it all back together. When I turned the water back on only a dribble comes out and it leaks when shut off. Any thoughts on how to get this working correctly and replacing the larger seat?
COMMENT: I’m wondering if you put the diverter spindle in wrong or something like that. Something has got to be off. Did you compare the old parts with the new? Are they exactly the same? Also, I’m not convinced the valve seats need to be replaced. I think it’s the rubber washers that are on the spindle that causes the leaking.
COMMENT: Thanks for this, Jay! I’ve ordered the parts and will be attempting to rebuild my daughter’s valve this coming weekend. One thing I noticed on Amazon — READ THE COMMENTS! Some of the items that come up when you do a search for the parts you listed have very negative comments, and some are way overpriced. I was able to find all the parts for the same prices you list, but just be aware that there appear to be some “less than reputable” sellers trying to get your bucks. “Prime” listings seem to be generally more reputable, but always check the ratings.
COMMENT: That’s good advice regarding the pricing on Amazon. I seem to remember running into some shady dealings when I was looking for my parts. Good advice is to always buy the name brand. I had to return one of my “off brand” spindles because it didn’t work properly. Thanks for the comment and good luck on the repair!
COMMENT: Thank you for the information, it was very helpful until I ran into the issue of the large valve seat being stripped and corroded so the Symmons tool wouldn’t work for me. I ended up using a #7 Century Drill & Tool Screw Extractor made for 7/8-1,1/8 size bolts and screws that I picked up at O’Reily Autoparts and that worked great to get it removed in case anyone else has a similar issue as I’ve seen on some other website postings. Also one last thing that I don’t think is very clear in the post, make sure the water temp valve is turned all the way on (after shutting off the water to the system) as that makes it much easy to get that large extortion valve off with the channellocks (or a regular monkey wrench worked just fine for me too).
COMMENT: Great help for a novice trying to stop a leak.. My problem is with the small screw that controls the amount of hot water that is mixed. The part is a small stem that when you tighten reduces the amount of hot water, probably anti scald measure. The part on the
parts list is T-34. Does this just screw in/out with a standard screwdriver. I can get the brass piece that includes this part at Home Depot. Seem simple. Anything else I need to know before I try to tackle this?
COMMENT: Hi Jay, you might know the answer to this.. my diverter spindle was leaking, i replaced it with a brand new one and it leaked MUCH more. went back to the old one and leaks a bit, not nearly as much as the new one. what could be the issue? not enough grease? o-ring the wrong size?. no idea. its baffling me. I do want to mention its the 76 model b version. meaning it uses the T-21A Brass Hold Down washer instead of the spindle screw cap. i even tried adding a gasket to the hold down washer. it helps a little but still has a drip (old one was a significant leak, new one was like a child's water gun that shot out, old with a make shift gasket is slightly less leaky than without the gasket).
COMMENT: Thanks for this… My diverter valve was leaking. The guide and parts list was just what I needed – ordered a new diverter spindle today.
COMMENT: Great post. Very informative as a step by step guide. One note is that some Symmons diverters use a cover that is held on with two Philips screws, one on each side of diverter. I would still recommend buying the Raven tool as it makes the removal of the spindle easier. Also make sure to clean out the bore well or new spindle will not want to fit. I used a wire brush for sweating copper pipes and cleaned residue with Q-Tips.
COMMENT: Hi Jay, I did all the steps but now I have a leak out the very front of the spindle. Any ideas?
COMMENT: Hmmm...a leak. I swear, I think this entire job can be completed by just changing that rubber washer at the end of the spindle. I suspect that's the source of your issue. A few questions: 1. You did change that washer, right? 2. How tightly are you turning the shower knob when you turn off the water? As I mentioned in this thread, for some strange reason, during the break-in period, you need to turn that knob more tightly than usual (don't kill it, just turn it more tightly). 3. How much of a leak do you have now? A drip, drip, drip? Or a steady stream?
Here’s the scenario – every so often, you see a drip of water fall from the bathtub spout in your bathroom. You’ve seen it for years, but in your heart of hearts, you always felt that if you just tightened the shower handle a little tighter than you did the last time you took a shower, things would be all better. Then, of course, the next time you’re in the bathroom, you see that dam tub leaking again. You reach into the shower to tighten the handle once more, see that as you do it, the leak stops. Because of this, you internally blame whoever it is you live with for not turning off the shower properly. It’s their fault, not yours.
Really though, you know that your shower leaks and it needs fixing. You’re just procrastinating like the rest of us.
Be sure to bookmark this page for future use and please share on social media. That would help me out a lot!
------
This post is part of my "Symmons" shower valve series. Over the years, I've learned quite about this brand of shower valves; I've installed them from scratch and I've repaired them as well. Click through the links below to learn how to do these things yourself. And be sure to ask questions if you have them.
How to Fix a Symmons Shower Valve That Leaks
Replacing a Stem Cartridge Spindle For Symmons Temptrol Shower Valve
Installing a Symmons One Handle Shower Faucet
------
If you’re like me and you have a shallow “dug” well, you hear the well pump kick on and off every now and again throughout the day – when no one is using the water. In my case, I’ve heard it for years. I first replaced the leaky bathroom sink faucet and then the dripping kitchen sink faucet, which made a pretty big difference. Now, it’s time to rebuild the shower valve so the pump never kicks on again – when it isn’t supposed to.
To kick things off, let’s take a look at the valve I’m referring to. It’s a Symmons S-86-2-X Temptrol Tub/Shower Mixing Valve and it looks like this:

Yours is probably dirty too, so just ignore that.
Now, if you’re looking around Amazon, you may stumble across just the back end of this valve. Just the metal that’s tucked behind the wall that doesn’t come with all the shiny chrome pieces. If you are, that part would be called a Symmons S-4001-BODY Temptrol Shower Valve Sweat Connection. Even though that’s not important for this post, I thought I’d throw it in here.
Today, I’m going to partially rebuild this valve. I’ll guide you through the entire process. I’ll give you part numbers and let you know exactly what’s making your valve leak. I’m actually going to be writing a follow-up post to this one in a few days because I haven’t received one of the parts yet. With what I did though, I got my shower to stop leaking.
The real problem with a project like this is that one is never really sure which replacement parts to purchase. Also, one never really knows what the guts of their valve looks like. Every resource on the web does a terrible job of clearly depicting what it is we’re dealing with. Because of this, Laura and I spent some time together in the bathroom today. I took a few of the beginning shots and she handled the rest. I needed both hands when I hit the half way mark. Please pardon some of the blur below. I was working one handed.
Also, I found all the correct parts right on Amazon.com, so get your pencil out and start making notes. I’ll list them for you here to make life easier.
Symmons Shower Valve Replacement Part List
– Raven E-Z R1241 Wrench For Symmons Tool, 1/4 Inch – 3/4 Inch – $23.00– Super Lube 21030 Synthetic Grease (NLGI 2), 3 oz Tube – $5.20
– Symmons Diverter Spindle Kit – TA-25A – $10.73
– Kissler TA-4 55-0004 Symmons Valve Seat Set – $14.40
– Symmons TA-9 Geniune Washer Repair Kit – $7.15
– Stem Cartridge Spindle For Symmons TA-10 Temptrol – $23.49
Total – $83.97
If you’re doing two of these repairs, you can subtract the cost of the tool and the lube from the second one, which will give you a total of $55.77.
Removing the Shower Handle & Cover
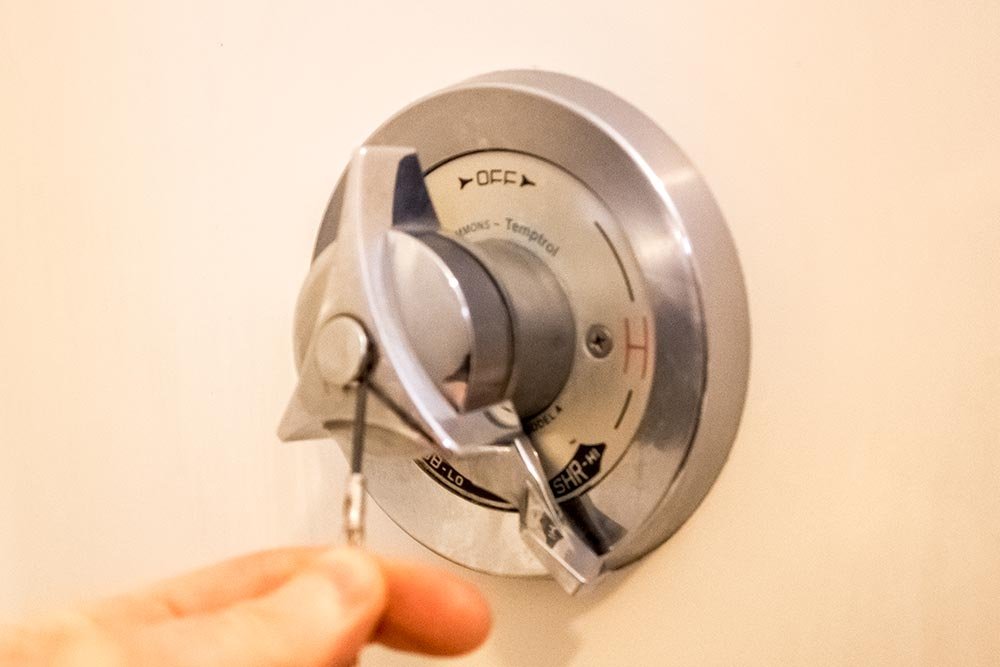
The first thing I did was to use a very small regular screwdriver to pop out the center cap of the handle.
When I got the cap off, the screw holding the handle was exposed.

As you can see, you can use either a regular or a Phillips head screwdriver to remove the screw. I used the latter.

After the screw was removed, I pulled the handle straight back, which made it come off. If it didn’t come off, I could have used a pair of channellocks to grab the handle and wiggle it until it was removed. With the handle and the chrome collar taken off, I was left with this:

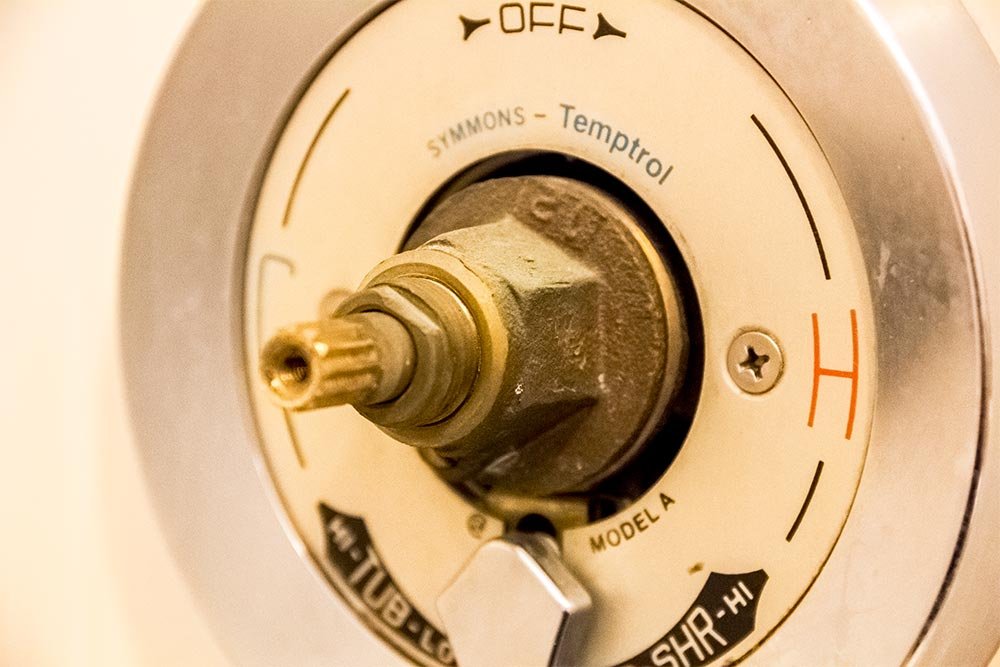
With a Phillips head screwdriver, I removed the two machine screws that held the cover on.

This is what it looks like without the cover:

Now, I want to point out one thing. As you remove the cover, be careful that the clip holding the tub/shower valve doesn’t come off. It’s held on by a small clip. If it stays on, things will be easier when you’re putting things back together.
Taking the Valve Apart
Next, I grabbed my channellocks and placed them on the large bolt looking thing and twisted counter-clockwise. It doesn’t take much force to loosen this spindle stem.
When it was totally loosened up, I pulled the entire contraption from the housing. This is what the butt end of it looks like. See that rubber washer? That’s supposed to be flat, not grooved like it is.

This is the stem cartridge spindle for a Symmons TA-10 Temptrol shower valve. You’ll need one of these, so I’ll add the part number to the list up above.
Removing & Replacing the Shower/Tub Diverter Spindle
Now, the first item I wanted to take care of was the valve that changes the water flow from the tub to the shower and vice-versa. To do that, I needed to unscrew the cover for this valve. To unscrew the cover, I needed a very special tool. I bought this tool as I was buying the other parts I needed. Don’t even think you can complete this project without this tool. You can’t. It’s called a Raven R1241 Wrench For Symmons Tool, 1/4 Inch – 3/4 Inch. I’ll list this up above too.
More precisely, it’s called the Raven E-Z 4 in 1 Wrench for Symmons and it’s item number R1241. Here I am using it for the first time. I needed the hex portion of the wrench to remove this small cover.

After I removed that hex screw, I saw this:

This is the metal Temptrol Diverter washer. I removed this washer easily with a regular screwdriver. It just pops right out.

After the washer was out of the way, I used the screw end of the tool I just showed you above to pull the actual diverter out from its place. This step requires that you twist the tool counter-clockwise and pull out at the same time.

I pulled on the tool and the diverter pulled right out.

This is the second part you’re going to need. It’s called a Symmons Diverter Spindle Kit and I’ll list it above. It comes with a new washer.
You may be asking yourself why you need to replace this valve when it has nothing to do with the drip you’re experiencing. I’m here to tell you that when you rebuild something, you should do a nice job. Everything that you can replace, you should replace. Also, as time goes by, this valve and its associated o-ring wear out. When these parts wear, they allow water to flow where it shouldn’t. Do you turn the shower on and still see water coming out of the tub faucet? You probably always will, but replacing this valve will minimize that effect.
In this next photo, you can compare the old and new diverter spindles. Check out how flat the o-ring is on the old one.

To replace this spindle, you’ll need to get some plumbing grease. I used some Super Lube, which is good for this type of job.

I opened the lube and smeared some of it on the areas of the spindle that would be touching the walls of the housing. I also added some grease to the o-ring. When that was finished, I pushed the diverter spindle back into its home.

In the photo above, the spindle isn’t pushed in all the way. I wanted to quickly mention that you should face the small gap in the face of the spindle upward. This will make it easier for the corresponding handle to slide right into place if you center it. If you’re not sure what I’m referring to, take a look at the very first photo in this post. The handle I’m talking about is the bottom one – the one that changes the water from the shower to the tub. If you center this small spindle gap upward and then center that handle, things will match up.
Removing & Replacing the Valve Seats
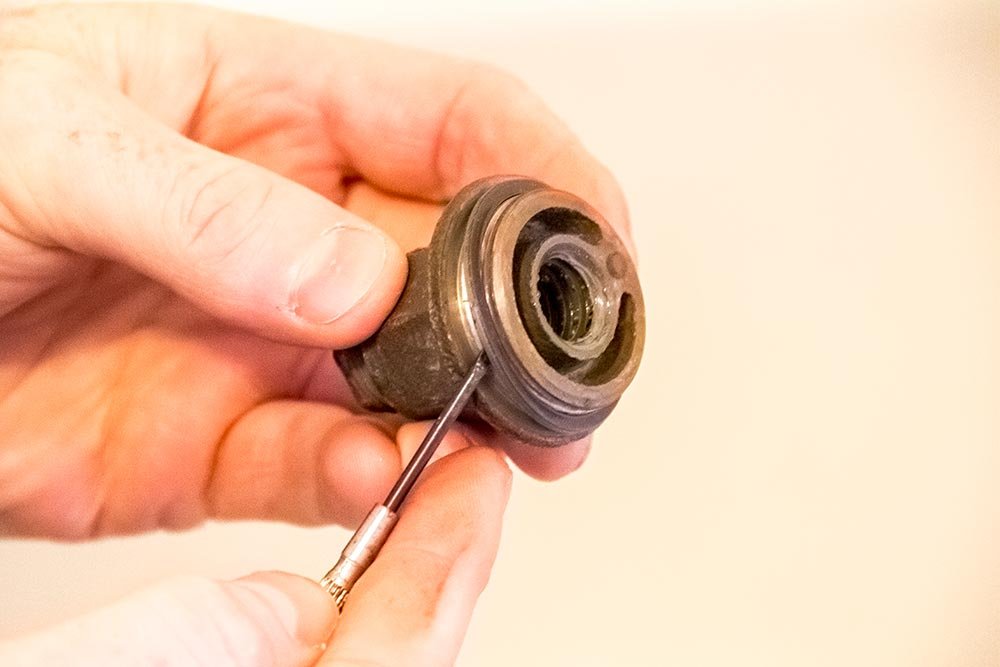
Next, let’s take a look inside the valve housing itself. This is one shot you’ll never see online. These are the ones I love to take because this is what I always look for. There’s got to be someone out there like me who appreciates this kind of stuff.
Inside this valve housing are two valve seats. These are sold in a kit and are called Kissler 55-0004 Symmons Valve Seat. Both the small one and the large one come together.

To replace these, I had to use the large square side of my new tool. I slid it into the housing until it wouldn’t go back anymore. Then, I turned counter-clockwise. After I felt the large valve seat loosen, I unscrewed it all the way and pulled it out.

Then, I used the small square on the tool and did the same thing. I pulled the small seat out next. When I had both of them out, I compared parts, just to make sure everything was okay.

Since the new valve seats matched the old ones, I applied some grease to the inner and outer o-rings and threads and replaced the old with the new.

Replacing the Rubber Washer on the Stem Cartridge Spindle
I haven’t received the stem cartridge spindle yet, so I can’t replace that. I did, however, replace the small rubber washer on the old spindle. I’m doing this temporarily until I receive the new part. When that happens, I’ll pull this spindle out quickly and switch out a few more parts. I’ll write about that in another post. For now, I’ll list both the washer set and the new spindle part numbers up above in the list. That should conclude all the parts you’ll need for a brand new functioning bathtub and shower.
To replace this one washer, I merely unscrewed the screw at the back of the spindle, pulled off the old rubber washer, replaced it with the new one and screwed the new screw on. The reason I used the new screw is because it comes with some Loctite already applied to the threads. I didn’t have to use any of mine.


Again, you may be wondering something. You might not agree with replacing the entire spindle here. Well, I’ll tell you, there’s another rubber washer on this spindle that’s worn out. It’s actually probably the one that’s causing the majority of the drip. To replace that washer, you need to remove a thin metal ring from the spindle. This ring is almost impossible to remove without ruining the spindle itself. Folks have used a Dremel to do so and have had luck. I figured that since I’m already inside the shower valve, I really should replace as much as humanly possible. As I was trying to unscrew this ring with my channellocks, I felt the spindle metal compress, which, if I had gone any further, would have ruined it. In this case, it’s better to simply replace than repair. Again, I’ll give you the part number above.
After I was finished with everything, I reassembled the shower valve parts. When I get the new part, I’ll write the post and link to it right here. If you have any questions or concerns, please leave them in the comment section below. Thanks for reading!
COMMENT: I have a symmons temptrol shower/tub valve and when the shower valve is turned off and the diverter is in the tub position there is a small drip from the tub spout. I have the seat kit ta-4, the spindle t-10 and the washer kit ta-9 all replaced under warranty from symmons. Should I start by replacing just the new spindle?
COMMENT: Yes. The leak is most likely caused by one of the washers that has become worn or compressed on the spindle. I’ll tell you though, even after I replaced everything, I still need to “tightly” turn the valve to the off position. Just beware of that. I no longer have a leak though.
COMMENT: Thanks so much for this guide! My husband and I just purchased an older house (1965), somehow without knowing that there was a leak in the upstairs shower that made the kitchen ceiling drip drip drip. The shower has an old Symmons setup in it, and with the help of this page, we diagnosed the leak, got the parts we needed, and now we’re back to showering in style!
COMMENT: It warms my heart to read this comment. When I write these posts, I always hope that someone will get some sort of assistance from them. I’m so happy to hear you got just that. Good luck with your new house!
COMMENT: This was the BEST I have ever seen! Nice Job…am I’m a pro, so I appreciate what a great job you did!
COMMENT: I have one of these valves, except it’s for a straight shower. Instead of a tub diverter, there’s a pressure-control lever for the shower. Do you know if that uses the same diverter spindle? I can’t find a part for anything else. Thanks! UPDATE: Oh, looks like I might need a TA-25B spindle instead of the TA-25A.
COMMENT: Wish I had read your second post on replacing just the stem cartridge spindle before I tried the full rebuild! Your “How to Fix a Symmons Shower Valve That Leaks” post started off so convincing I went ahead and bought all the replacement parts prior to reading it all the way through. I had ordered a repair kit from Amazon and the tool they provided was not the same as the Raven E-Z 4 in 1 Wrench and it did not have the reverse screw for removing the Diverter Spindle. It took me almost 2 hours to get it out (in pieces) and I cannot get the new one to seat deep enough to get the screw cover to seat and hold in the Temptrol Diverter washer so I cannot divert the water from tub to shower. Any suggestions for getting the diverter spindle to seat? Thanks!
COMMENT: Always replace both rubber washers on spindle t-10 A & with water supply off open vale 1/4 turn so nothing will bind when removing valve cap with t-10 A in it , replace 55-0004 seats only as a last resort . Symmons valves only because most folks turn them off to hard !
not two hands & a shove, 2 fingers is all it needs . Two people & 2 childern growing up here & I changed the rubber washers once after 17 year’s & we are still using it today 10 years later.
COMMENT: Love this post – pics and descriptions I couldn’t find anywhere else. For me, all the gentle prying in the world wouldn’t get the handle off, though. The stem of the spindle assembly snapped, so I ended up having to get not only the spindle, but a new handle, too (T-31). I also really appreciate that these assemblies haven’t changed much, and are readily available online and at the HW store.
COMMENT: I’m glad the post helped! I understand what you’re saying about the photos. It’s tough to find good ones out there. I enjoyed taking all of them for the process.
COMMENT: Hi Jay - would it just be easier (and cheaper maybe) to just buy the entire valve body brand new – they’re about $60 on a popular site, and then the wrench? Current pricing at the box stores and online shopping have repair parts at $75 before the cost of wrench and grease. Just wondering if I’d be missing any parts getting the whole replacement body ( no trim included of course. ) thanks! -C
COMMENT: That’s certainly an option. The labor might dissuade many folks from taking on a project like that, but if you’re into soldering copper piping, go for it. I’m actually remodeling a bathroom right now that I may purchase a new valve body for. The walls are already opened up, so it may be easier than finding replacement parts. That said, rebuilding the current one is easy too. It’s up to you.
COMMENT: Hi Jay - sorry I wasn’t clear. I’m going to strip the new valve body and take all the parts out. Not replace/solder. Just strip and replace. And thanks for such a great tutorial! Best I’ve seen! Not sure about posting price etc here- feel free to delete- but if your looking at a new body as well, the S-46-2 is on sale at Amazon for $57.19 right now.
COMMENT: Thanks for the informative post. I copied and pasted your suggestion for replacements parts/valve kit and emailed Symmons. They shipped out the replacements parts (except the 4-1 wrench) for free no questions asked. I told them the shower (outdoor) has been slowly leaking when turned off and this year it was worse. Myself and a friend followed your step by step fix with no issues except we still have a small leak when shut off. We then tested having just hot on at once and cold on at once. It appears the hot water has no problem shutting off completely but the cold water still has a slow leak. We called Symmons and then recommended cleaning everything out with white vinegar. We did this and still had a small leak. Called again and they recommended tighting even more. That did not work. My friend (not a plumber by trade but handy) said the issue he was having was adjusting the seats so there would be no leaking but I guess we are having no luck. Any other thoughts or suggestions. Thanks again.
COMMENT: Unfortunately, I have zero experience with adjusting the seats for this valve. If you do learn what the issue is and fix it, please let me know.
COMMENT: You haven’t talked about a Symmons ” spindle” freezing in cold weather, when not being used. I have a summer house , that I shut down for the winter, and , the “spindle” froze. The internal moving part would not slide back and forth. I’ve heard that soaking in white vinegar will free it. Can you confirm, or , do you have any other suggestions?
COMMENT: I bought a complete new valve assembly. My plan was to swap out all of the pieces. I can’t get the larger seat valve off. I replaced the smaller one with no problem. So I tried putting it all back together. When I turned the water back on only a dribble comes out and it leaks when shut off. Any thoughts on how to get this working correctly and replacing the larger seat?
COMMENT: I’m wondering if you put the diverter spindle in wrong or something like that. Something has got to be off. Did you compare the old parts with the new? Are they exactly the same? Also, I’m not convinced the valve seats need to be replaced. I think it’s the rubber washers that are on the spindle that causes the leaking.
COMMENT: Thanks for this, Jay! I’ve ordered the parts and will be attempting to rebuild my daughter’s valve this coming weekend. One thing I noticed on Amazon — READ THE COMMENTS! Some of the items that come up when you do a search for the parts you listed have very negative comments, and some are way overpriced. I was able to find all the parts for the same prices you list, but just be aware that there appear to be some “less than reputable” sellers trying to get your bucks. “Prime” listings seem to be generally more reputable, but always check the ratings.
COMMENT: That’s good advice regarding the pricing on Amazon. I seem to remember running into some shady dealings when I was looking for my parts. Good advice is to always buy the name brand. I had to return one of my “off brand” spindles because it didn’t work properly. Thanks for the comment and good luck on the repair!
COMMENT: Thank you for the information, it was very helpful until I ran into the issue of the large valve seat being stripped and corroded so the Symmons tool wouldn’t work for me. I ended up using a #7 Century Drill & Tool Screw Extractor made for 7/8-1,1/8 size bolts and screws that I picked up at O’Reily Autoparts and that worked great to get it removed in case anyone else has a similar issue as I’ve seen on some other website postings. Also one last thing that I don’t think is very clear in the post, make sure the water temp valve is turned all the way on (after shutting off the water to the system) as that makes it much easy to get that large extortion valve off with the channellocks (or a regular monkey wrench worked just fine for me too).
COMMENT: Great help for a novice trying to stop a leak.. My problem is with the small screw that controls the amount of hot water that is mixed. The part is a small stem that when you tighten reduces the amount of hot water, probably anti scald measure. The part on the
parts list is T-34. Does this just screw in/out with a standard screwdriver. I can get the brass piece that includes this part at Home Depot. Seem simple. Anything else I need to know before I try to tackle this?
COMMENT: Hi Jay, you might know the answer to this.. my diverter spindle was leaking, i replaced it with a brand new one and it leaked MUCH more. went back to the old one and leaks a bit, not nearly as much as the new one. what could be the issue? not enough grease? o-ring the wrong size?. no idea. its baffling me. I do want to mention its the 76 model b version. meaning it uses the T-21A Brass Hold Down washer instead of the spindle screw cap. i even tried adding a gasket to the hold down washer. it helps a little but still has a drip (old one was a significant leak, new one was like a child's water gun that shot out, old with a make shift gasket is slightly less leaky than without the gasket).
COMMENT: Thanks for this… My diverter valve was leaking. The guide and parts list was just what I needed – ordered a new diverter spindle today.
COMMENT: Great post. Very informative as a step by step guide. One note is that some Symmons diverters use a cover that is held on with two Philips screws, one on each side of diverter. I would still recommend buying the Raven tool as it makes the removal of the spindle easier. Also make sure to clean out the bore well or new spindle will not want to fit. I used a wire brush for sweating copper pipes and cleaned residue with Q-Tips.
COMMENT: Hi Jay, I did all the steps but now I have a leak out the very front of the spindle. Any ideas?
COMMENT: Hmmm...a leak. I swear, I think this entire job can be completed by just changing that rubber washer at the end of the spindle. I suspect that's the source of your issue. A few questions: 1. You did change that washer, right? 2. How tightly are you turning the shower knob when you turn off the water? As I mentioned in this thread, for some strange reason, during the break-in period, you need to turn that knob more tightly than usual (don't kill it, just turn it more tightly). 3. How much of a leak do you have now? A drip, drip, drip? Or a steady stream?

