CampFireJack
Member
- Joined
- May 9, 2021
- Messages
- 118
- Reaction Score
- 1
- Points
- 16
- #1
Please take a look at this front porch. It’s the one that came with our house. Tell me if you see anything wrong with it.
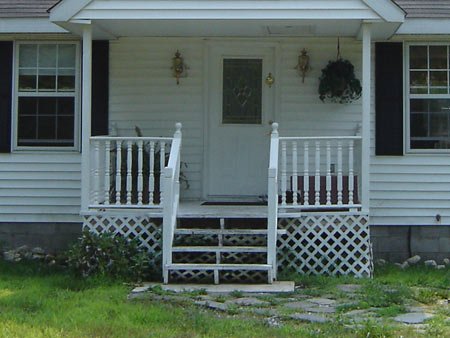
For months, I didn’t give it a second thought, but soon enough, in the mornings, as I pulled out of the driveway and started to drive down the road, I would look it at and get crazier and crazier every time I did. Forget the fact that the paint is chipping off of it and the fake, plastic lattice has green fungus all over it, doesn’t it look like it is bowed down (sagging) in the middle? Also, what's with the 3.5 foot wide stairs? You have all that room on both sides for wider stairs.
One day this spring I was working on another project, which you will hear all about in another post, and I just happened to glance at the porch. I said to myself, "That really looks horrible." I guess this is what a front porch looks like when it is built incorrectly and not taken care of. I walked over to it and began to wiggle and pull on one of the railings. Next thing I know, I looked at my watch and it was an hour later. I looked at the porch and the whole thing was torn down. Uh oh, what was my lady going to think when she got home? Oh well, she’ll LOVE it I told myself very proudly. What woman doesn't love a man who knows how to tear down a porch with absolutely no idea how to put it back up?
She got home and didn’t really care. She had faith. So that night and for many nights after that, I was on the internet gathering ideas and tips. I made many trips to Home Depot and brought back supplies strapped to my new Thule roof rack I had purchased just for this type of work. I started putting things back together, but this time I did them properly and the way I wanted to see them.
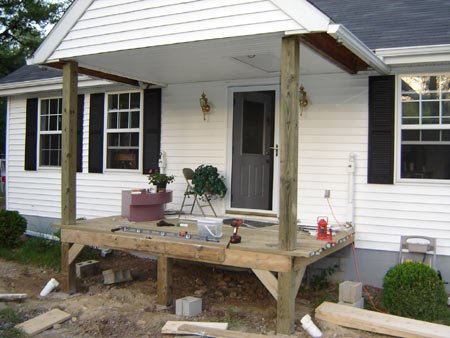
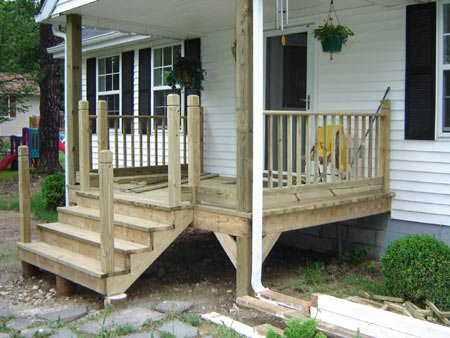
I put a center footing in, jacked up the center of the porch and put a nice 6″x6″ post there. The original problem was that there was no center support for an 11 foot span. Of course it was going to bow downward. I also put new 6"x6" corner posts in below the porch to the existing footings as well as above the porch to the overhang. I used the existing footings because they were the correct depth and width. I know this because I tried to dig one of them out and gave up after an hour. I really wanted a WHOLE new porch, but with something this secure already installed (and inspected by the building inspector), I'll take it. I used one inch high galvanized spacers in between the bottoms of the posts and the footings as to avoid wood rot (even though the new wood was pressure treated). I screwed a 2"x6" to the front of the porch as a lip for the top stair which would come later. I also put corner pieces in for nothing more than aesthetics. I found that idea on the internet.
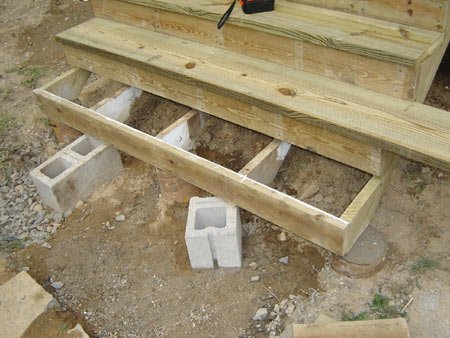
If you noticed on the first photo, the bottom of the stairs were resting on a cement slab. I hate cement slabs. I broke that one up with a sledge hammer and got rid of it. I dug three more holes and put in footers for the bottom of the stairs. I used 5 stringers (3 of which I reused from the old stairs - they were in great shape) for the stairs. The horizontal part of the steps were 6 foot 2"x12"s and for the vertical part I reused the 2"x6" pieces from the top of the porch. I reused a lot of lumber because it was in great shape and I didn't want to waste wood as well as throw money out the window.
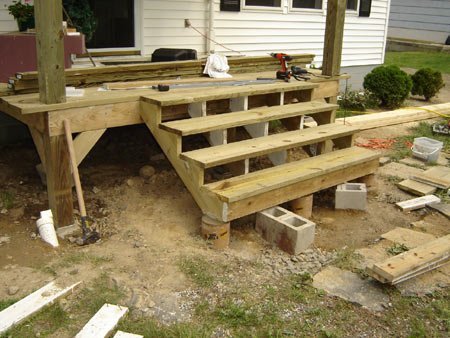
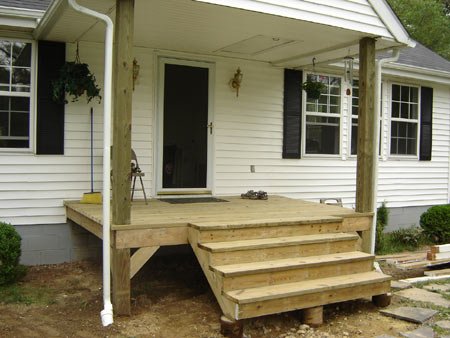
The stairs went up smoothly and I was ready to move on. I took my 40th trip to Home Depot and picked up all the supplies for the handrails. Before I started the handrails, I screwed an 8' 2"x6" to either side of the top of the deck. This gave me a perfectly straight running surface for my circular saw to cut off the uneven ends of wood. For the handrails, I used a pretty good system of sandwiching 1"x1" pieces in between two of what they call "lattice molding" 4 inches apart. Code calls for each 1"x1" to be no further than 4" apart. I placed the new completed "railing unit" on top of a vertical 2"x6" and tucked it under the actual handrail piece. This hides all the screw heads for the 1"x1"s. The reason I used the vertical 2"x6"s is because I didn't want to see any sagging of the rail after 2 months (like I am sure we have all seen). This was a lot of fun and gave me the feeling of really getting somewhere. I cut holes in the floor for the vertical posts and screwed and bolted them to the inside of the joists underneath. I did this because I didn’t want to see the outside of these posts just screwed to the side of the porch. I wanted them hidden. This takes longer, but looks much better.
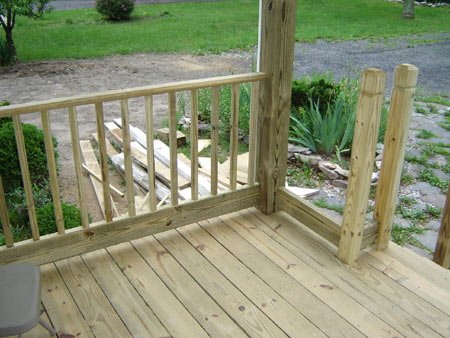
I finished up the stair portion of the railings by using a vertical 2″x4″ instead of the 2″x6″ because when the wood is cut on an angle, the 2″x6″ was just too high and didn’t meet the next piece correctly. Also, please note that I used “screws” for all of this construction. I never understood why people used nails when building things like this. How many times have you stubbed your tow or worse on a nail popping up from someone’s porch? Also, all the wood was pressure treated. These days, you always need to use pressure treated lumber when building anything outside.
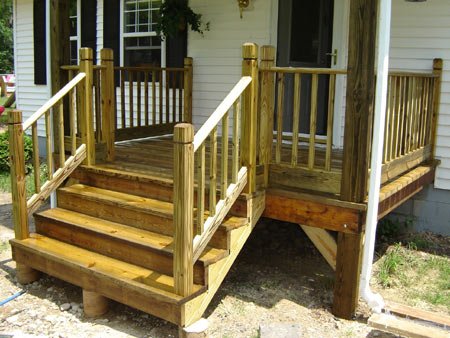
After a few weeks I picked up two gallons of Thompson’s Water Seal and gave it a nice coating with a brush. I used only 3/4 of a gallon, so I guess I have enough for next time. The back of the can said that it will last for two years before it needs to be reapplied. When it comes time to reapply, I will use a sprayer. Also, the can said to wait 30 days before applying any protectant, so if you have ever heard the myth about waiting a year before applying anything, that’s wrong. Your porch or deck will be gray by that point. I waited about 3 weeks and figured that the wood has probably been sitting for a while, so I was safe.
Now, when I pull out of the driveway in the morning, I see a nice straight and level porch!
COMMENT: What type of Thompson’s water sealer did you use? Clear?
COMMENT: There are two types of clear Thompson's Waterproofer. One is milky white until you put it on and it dries. This stuff is garbage. I never had any luck with it. The other "Plus" waterproofer is pretty good. It's thicker and has a UV protection. That's the one I always use now for any outdoor project where I want to keep the wood grain look.
COMMENT: I am trying to build a 16" by 6.5" ground level deck about a foot off the ground with a patio roof the same size. I've been trying to figure out how to attach the deck fraiming to the 4"x4" post that will be supporting roof too. Is that safe to do - just attach the deck frame to the outside of 4"x4" post like you did? I've been reading to do rabbet cut on the 4"x4" to sit the deck frame for more support, but then if I do this, how would I use this 4"x4" post to support the roof too? For the deck, I will be using ledger board attached to the house on the other side.
COMMENT: Those 6"x6"s on the corners aren't one piece. They don't go from the ground all the way up to the roof. For each corner, I used a short piece of 6"x6" that sits under the porch and then a longer one that sits on top of it. No rabbet cuts necessary.
COMMENT: Do you have a picture of your porch that is taken further away from the house? I want to build a porch similar to yours, but need to see how its connected to the roof, etc. Thanks in advance!! (if you have pics and for a reply!)
COMMENT: I don't think I have any at the moment. I'll try to take some. You can see the partial roof in the second picture above. I didn't work on any of that. The builders of the house did all that. That's above my skill level.
COMMENT: I was searching for something entirely different and somehow ended up here. This thread isn't about what I was looking for, but it was fun reading about your porch. BTW: Nice porch you have here. Take care!

For months, I didn’t give it a second thought, but soon enough, in the mornings, as I pulled out of the driveway and started to drive down the road, I would look it at and get crazier and crazier every time I did. Forget the fact that the paint is chipping off of it and the fake, plastic lattice has green fungus all over it, doesn’t it look like it is bowed down (sagging) in the middle? Also, what's with the 3.5 foot wide stairs? You have all that room on both sides for wider stairs.
One day this spring I was working on another project, which you will hear all about in another post, and I just happened to glance at the porch. I said to myself, "That really looks horrible." I guess this is what a front porch looks like when it is built incorrectly and not taken care of. I walked over to it and began to wiggle and pull on one of the railings. Next thing I know, I looked at my watch and it was an hour later. I looked at the porch and the whole thing was torn down. Uh oh, what was my lady going to think when she got home? Oh well, she’ll LOVE it I told myself very proudly. What woman doesn't love a man who knows how to tear down a porch with absolutely no idea how to put it back up?
She got home and didn’t really care. She had faith. So that night and for many nights after that, I was on the internet gathering ideas and tips. I made many trips to Home Depot and brought back supplies strapped to my new Thule roof rack I had purchased just for this type of work. I started putting things back together, but this time I did them properly and the way I wanted to see them.

I put a center footing in, jacked up the center of the porch and put a nice 6″x6″ post there. The original problem was that there was no center support for an 11 foot span. Of course it was going to bow downward. I also put new 6"x6" corner posts in below the porch to the existing footings as well as above the porch to the overhang. I used the existing footings because they were the correct depth and width. I know this because I tried to dig one of them out and gave up after an hour. I really wanted a WHOLE new porch, but with something this secure already installed (and inspected by the building inspector), I'll take it. I used one inch high galvanized spacers in between the bottoms of the posts and the footings as to avoid wood rot (even though the new wood was pressure treated). I screwed a 2"x6" to the front of the porch as a lip for the top stair which would come later. I also put corner pieces in for nothing more than aesthetics. I found that idea on the internet.

If you noticed on the first photo, the bottom of the stairs were resting on a cement slab. I hate cement slabs. I broke that one up with a sledge hammer and got rid of it. I dug three more holes and put in footers for the bottom of the stairs. I used 5 stringers (3 of which I reused from the old stairs - they were in great shape) for the stairs. The horizontal part of the steps were 6 foot 2"x12"s and for the vertical part I reused the 2"x6" pieces from the top of the porch. I reused a lot of lumber because it was in great shape and I didn't want to waste wood as well as throw money out the window.


The stairs went up smoothly and I was ready to move on. I took my 40th trip to Home Depot and picked up all the supplies for the handrails. Before I started the handrails, I screwed an 8' 2"x6" to either side of the top of the deck. This gave me a perfectly straight running surface for my circular saw to cut off the uneven ends of wood. For the handrails, I used a pretty good system of sandwiching 1"x1" pieces in between two of what they call "lattice molding" 4 inches apart. Code calls for each 1"x1" to be no further than 4" apart. I placed the new completed "railing unit" on top of a vertical 2"x6" and tucked it under the actual handrail piece. This hides all the screw heads for the 1"x1"s. The reason I used the vertical 2"x6"s is because I didn't want to see any sagging of the rail after 2 months (like I am sure we have all seen). This was a lot of fun and gave me the feeling of really getting somewhere. I cut holes in the floor for the vertical posts and screwed and bolted them to the inside of the joists underneath. I did this because I didn’t want to see the outside of these posts just screwed to the side of the porch. I wanted them hidden. This takes longer, but looks much better.


I finished up the stair portion of the railings by using a vertical 2″x4″ instead of the 2″x6″ because when the wood is cut on an angle, the 2″x6″ was just too high and didn’t meet the next piece correctly. Also, please note that I used “screws” for all of this construction. I never understood why people used nails when building things like this. How many times have you stubbed your tow or worse on a nail popping up from someone’s porch? Also, all the wood was pressure treated. These days, you always need to use pressure treated lumber when building anything outside.

After a few weeks I picked up two gallons of Thompson’s Water Seal and gave it a nice coating with a brush. I used only 3/4 of a gallon, so I guess I have enough for next time. The back of the can said that it will last for two years before it needs to be reapplied. When it comes time to reapply, I will use a sprayer. Also, the can said to wait 30 days before applying any protectant, so if you have ever heard the myth about waiting a year before applying anything, that’s wrong. Your porch or deck will be gray by that point. I waited about 3 weeks and figured that the wood has probably been sitting for a while, so I was safe.
Now, when I pull out of the driveway in the morning, I see a nice straight and level porch!
COMMENT: What type of Thompson’s water sealer did you use? Clear?
COMMENT: There are two types of clear Thompson's Waterproofer. One is milky white until you put it on and it dries. This stuff is garbage. I never had any luck with it. The other "Plus" waterproofer is pretty good. It's thicker and has a UV protection. That's the one I always use now for any outdoor project where I want to keep the wood grain look.
COMMENT: I am trying to build a 16" by 6.5" ground level deck about a foot off the ground with a patio roof the same size. I've been trying to figure out how to attach the deck fraiming to the 4"x4" post that will be supporting roof too. Is that safe to do - just attach the deck frame to the outside of 4"x4" post like you did? I've been reading to do rabbet cut on the 4"x4" to sit the deck frame for more support, but then if I do this, how would I use this 4"x4" post to support the roof too? For the deck, I will be using ledger board attached to the house on the other side.
COMMENT: Those 6"x6"s on the corners aren't one piece. They don't go from the ground all the way up to the roof. For each corner, I used a short piece of 6"x6" that sits under the porch and then a longer one that sits on top of it. No rabbet cuts necessary.
COMMENT: Do you have a picture of your porch that is taken further away from the house? I want to build a porch similar to yours, but need to see how its connected to the roof, etc. Thanks in advance!! (if you have pics and for a reply!)
COMMENT: I don't think I have any at the moment. I'll try to take some. You can see the partial roof in the second picture above. I didn't work on any of that. The builders of the house did all that. That's above my skill level.
COMMENT: I was searching for something entirely different and somehow ended up here. This thread isn't about what I was looking for, but it was fun reading about your porch. BTW: Nice porch you have here. Take care!

