Search

How to Use Content-Aware Scale in Adobe Photoshop

  • Thread starter LukeLewis
  • Start date
LukeLewis

LukeLewis

Member
Joined
May 7, 2021
Messages
134
Reaction Score
0
Points
21
  • #1
content-aware-scale-photoshop.jpg

Take a look at the above photo. Do you see anything strange about it? Anything wrong that jumps out at you? Don’t worry if you don’t. I don’t either. That’s the power of a pretty awesome feature in Adobe Photoshop that’s called Content-Aware Scale.

Content-Aware Scale is a tool that allows you to scale a photo within Photoshop without the harmful effects of distorting people, buildings, animals and more. It helps to preserve proportion when scaling smaller as well as filling in empty areas when scaling larger. When you use this feature, Photoshop focuses its efforts on pixels that don’t play a large role in the photo. Ask me how it does this and I’ll tell you it’s magic. I wish I knew the secrets that are hidden inside the Adobe lab.

To read more, please take a look at Adobe’s page: Content-Aware Scaling

How to Stretch an Image Using Content-Aware Scale in Adobe Photoshop​

In today’s post, I’m going to extend a photo that originally has a drink set off to one side. Here, take a look:

original-drink-photo.jpg

My goal for today is to center the drink in the photo without reducing its size at all.

I know that the first step most folks would take in a situation like this is to crop the photo smaller so the drink sits at the center. The thing is, what if we didn’t want to lose any sand or sky area? What if we didn’t want to cause the drink to appear larger? In cases like these, simple cropping wouldn’t work. That’s where Content-Aware Scale comes in.

Cropping Outward​

I want to give you a word of warning before I begin today’s tutorial. When using this feature in Photoshop, you need to be careful. The best results occur in photos that have larger open areas that are conducive to manipulation. I played around with another photo before I settled on this beach scene and didn’t have half as much luck. The was a road in the photo and when I attempted to enlarge it, it warped in an obvious way. If you have images of fields, skies, beaches or anything that can be enlarged gracefully, you should achieve very good results.

To begin working on the photo, I’ll open it in Photoshop and then select the Crop Tool from the left vertical toolbar. As of today, it’s the 5th tool from the top. You can either select it from the toolbar or simply click C on your keyboard.

I’ll then select the image with the tool so it looks like this.
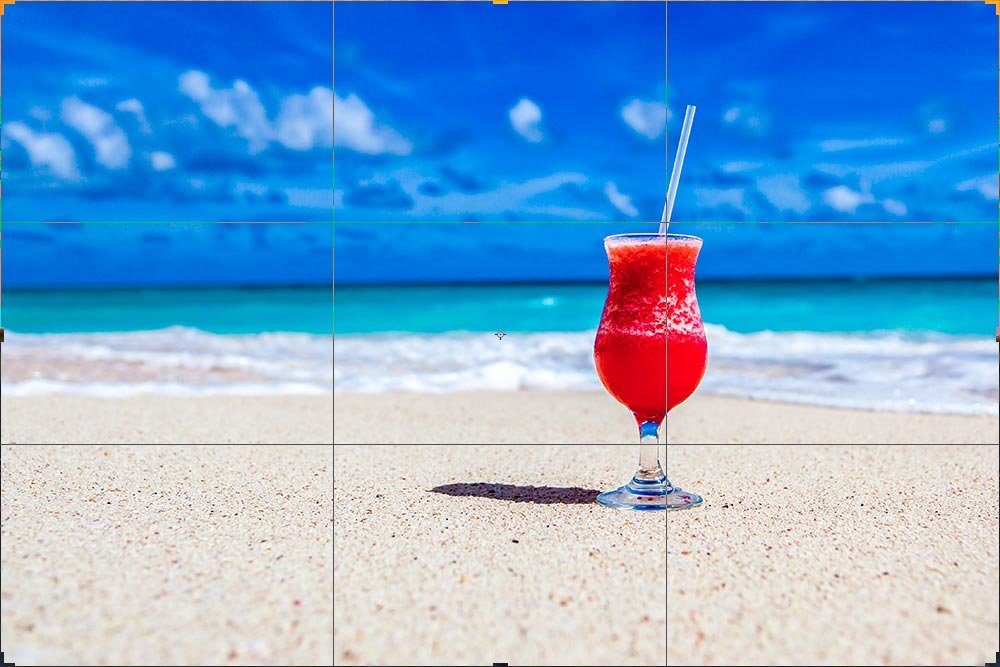
crop-tool.jpg

After that, I’ll take a look at the drop-down box in the Crop options bar that sits along the top of the workspace when the Crop Tool is activated. I’ll make sure I have the appropriate setting chosen. If you aren’t comfortable with cropping in Adobe Photoshop, please take a look at these posts. I wrote them a while back and they do a good job of covering most of what you need to know on the topic:

Using the Crop Tool in Adobe Photoshop

How to Crop a Photo to an Exact Size & Resolution in Adobe Photoshop

Next, I’ll click inside the image somewhere and drag it to the left until the drink is centered in the photo.
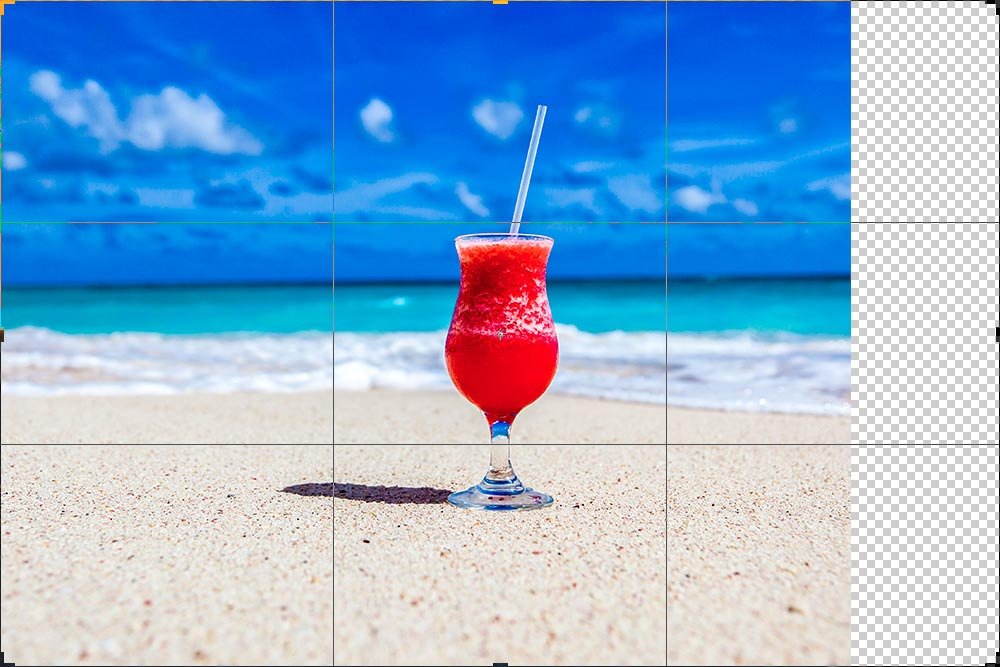
dragging-image.jpg

After that, I’ll either double-click or hit Enter on my keyboard to actually crop the image. What I have left is exactly what you’re looking at above, minus the Crop Tool outlines.

Selecting Part of the Image​

The next step is to try to select as much of the photo that’s similar to the area I’d like the empty part to look like. In other words, in the photo I’m currently working on, I would like the empty area to look like sky, water and sand. I don’t want any part of the drink in it. So, I’ll use the Rectangular Marquee Tool to select everything on the right side of the drink.
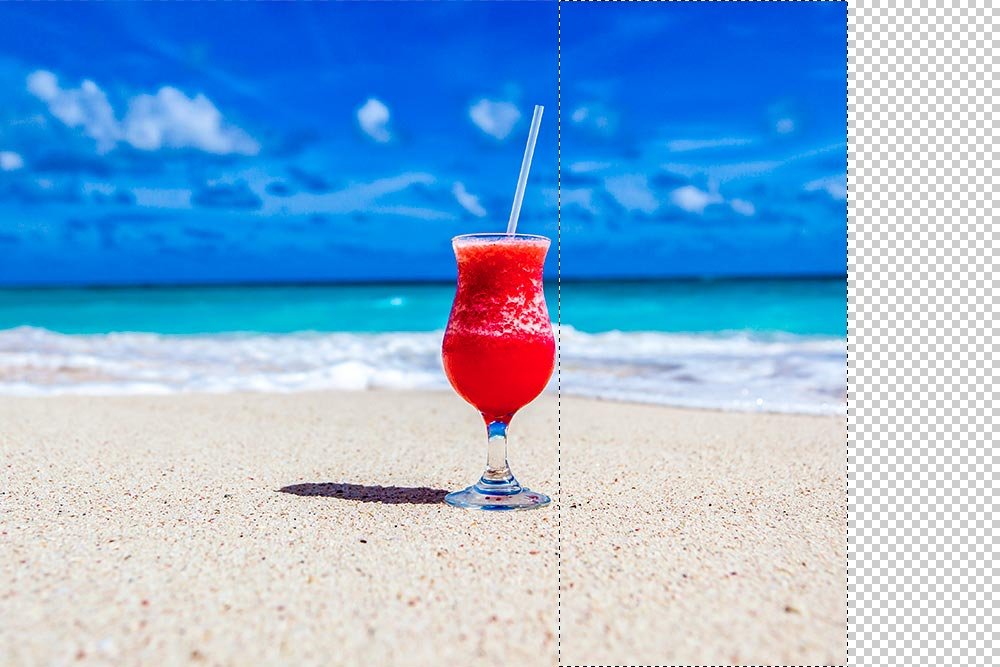
selection.jpg

Content-Aware Scale​

Here comes the best part. The magic, if you will. Now that I have the proper area selected, I can head up to the Edit > Content-Aware Scale menu item and click.
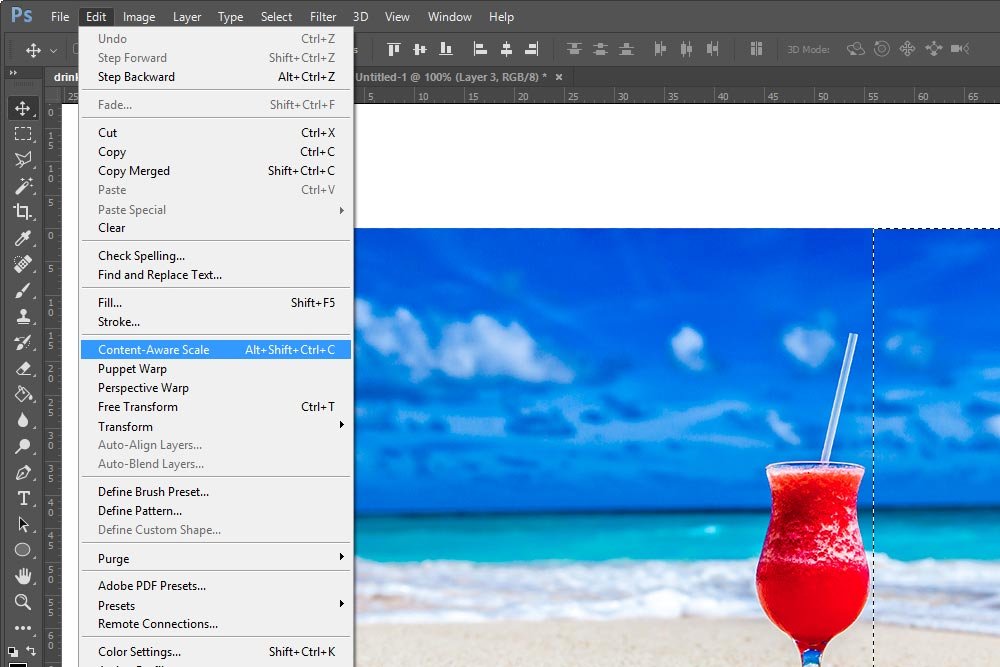
content-aware-scale-menu-item.jpg

Once I do that, I’ll notice that the selected area stays selected, but has some Free Transform handles applied to it. If I click the center-right handle and drag the transformation to the right so it matches up with the edge of the photo, things will start looking good.
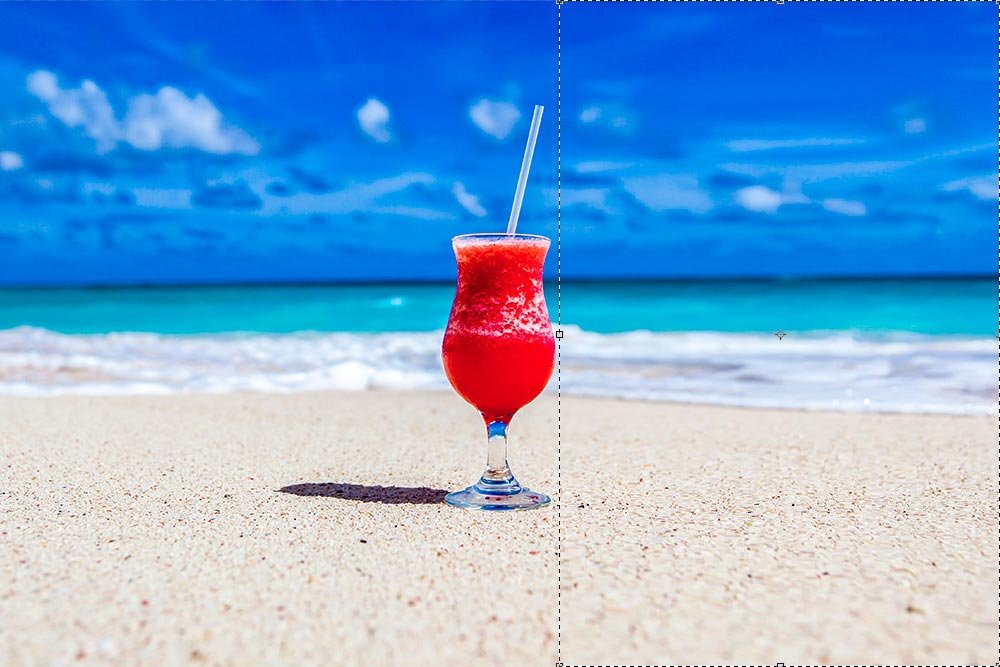
content-aware-scale-transform.jpg

From here, all I need to do it hit Enter on my keyboard to apply the transformation and then go up to the Select > Deselect menu item and click to remove the marching ants. And that’s it. I’m done.

content-aware-scale-photoshop.jpg

Looks pretty good, doesn’t it? I don’t think anyone would ever guess that this photo was edited.
 
LukeLewis

LukeLewis

Member
Joined
May 7, 2021
Messages
134
Reaction Score
0
Points
21
  • #2

Reshaping a Photograph with Content-Aware Scale in Adobe Photoshop​

I wrote a post a few days ago where I expressed my affection for square photographs. Since I made that post, I’ve looked around at even more examples of this type of post-processing and I’m so glad I wrote what I did. Square is where it’s at. I received a reply from a reader who praised photographer Michael Kenna and I was blown away after viewing his work. If you’ve never seen it, you should really check it out. So much is in black and white and so much is square. When visiting Michael’s site, click the photo on the homepage to enter and then click the Image Archive link. Or, you can simply click the link in the previous sentence. His stuff is so good. Now I’m jealous.

In today’s post, I’d like to offer you a few tips that may assist you in your own square journey. If you’re interested in “reshaping” an image that was previously captured using a landscape or portrait orientation, I may be able to help. Adobe Photoshop offers a tool that’s called Content-Aware Scale and this tool has the ability to not only stretch or elongate areas of an image, but to protect other areas that you don’t want touched. The results are truly remarkable, so I’m quite excited to share this with you.

Now, before I begin, I must warn you that working with this tool is only appropriate for certain types of photos. As I mentioned above, there is a bit of distortion that occurs, so you shouldn’t use the method I’ll share below with highly detailed edges or edges that are meant to portray reality accurately. If you’re unsure about what I’m referring to, just take a look at the demo image I’m using down below. This image is just perfect.

Demo Photograph​

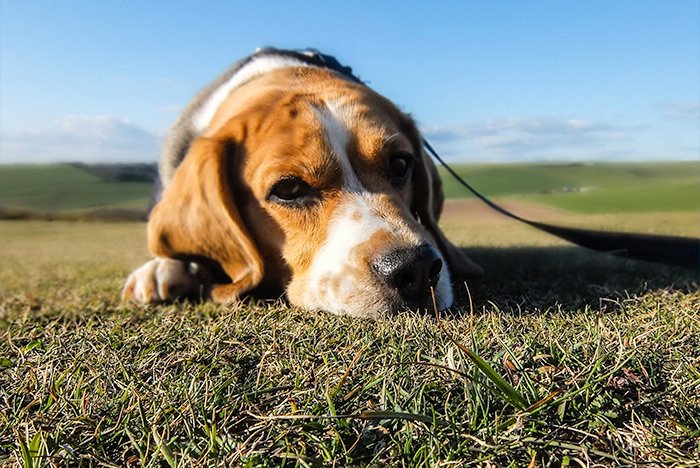
For today’s post, I’ll be using a photo of the cutest little puppy you ever will see. Please notice the sky above and the grass below. Both of these areas won’t be affected terribly as I work through the process of making this image square. Mind you, I won’t be cropping the sides; I’ll actually be adding to the top and the bottom.

cute-beagle-puppy.jpg

Resizing the Canvas​

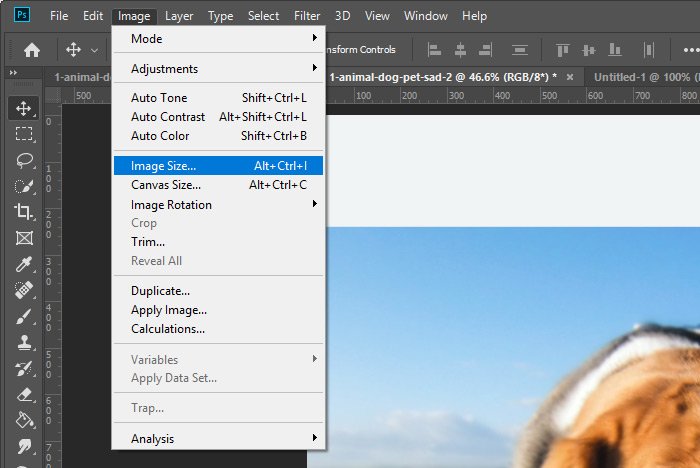
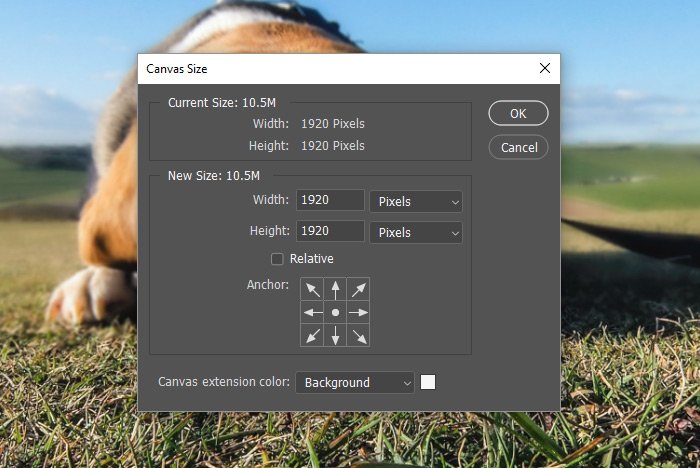
The first thing I’ll do to reshape this image is to resize the canvas. Since my goal is to make the photo square, I’ll head up to the Image > Canvas Size and change the Height value from 1440 pixels to 1920 pixels, so it matches the Width value. When I’m finished, I’ll click the OK button.

image-canvas-size.jpg canvas-size-dialog.jpg

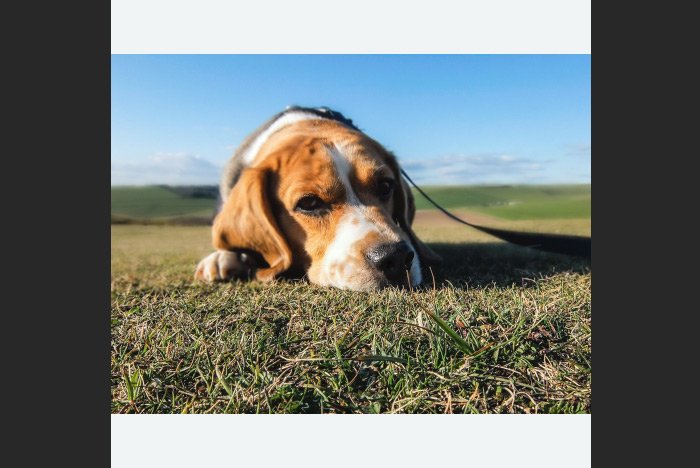
This is what the file looks like now. Do you see how I added space above and below the original image?

new-canvas-size.jpg

Protecting the Dog​

The process I’m showing you in today’s post actually stretches an image so it fits into a new shape. The problem with simply using the Free Transform tool for this is that the tool I just mentioned doesn’t do anything to protect objects and elements you don’t want distorted in your photo. There no intelligence, if you will. When using the Content-Aware Scale tool, you can actually take objects in the image into account and those objects won’t be distorted at all.

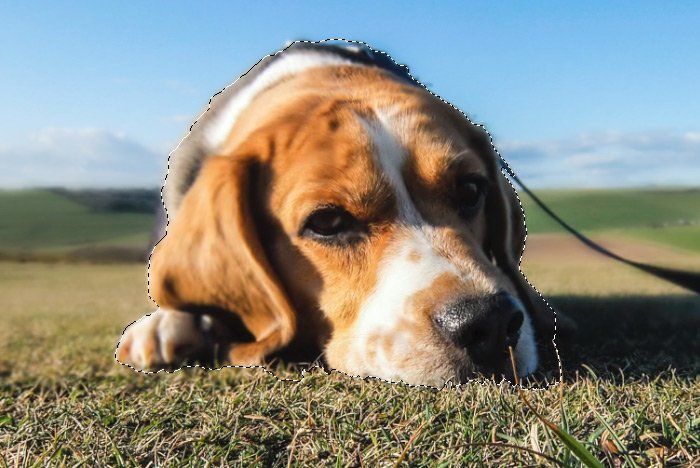
To protect the dog in the image I’m working with, all I need to do is select him. To do this, I’ll use the Quick Selection Tool. I don’t need to be perfect with the selection either. All I need to do is make the rough selection so the dog is ignored in the following steps down below.

dog-selection.jpg

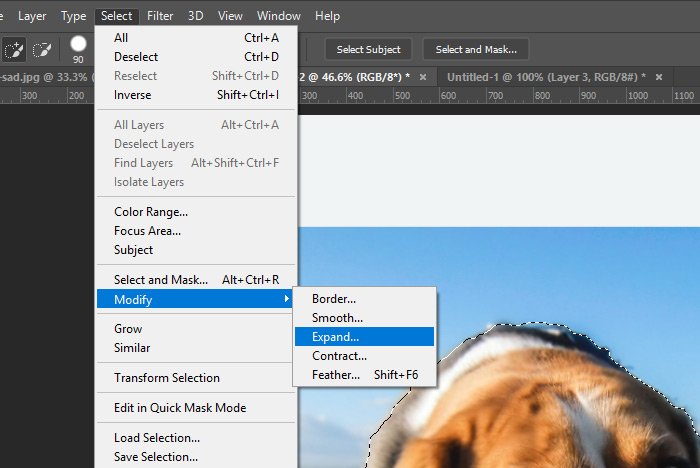
Just to be sure I selected the entire dog, I’ll expand the selection by ten pixels using the Select > Modify > Expand menu item.

select-modify-expand.jpg

Saving the Selection​

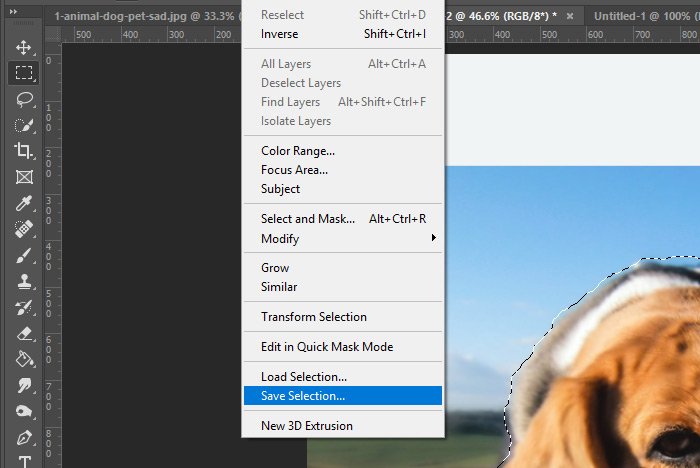
Now that I have my selection, I’ll need to save it. To do this, I’ll head up to the Select > Save Selection menu item and click.

select-save-selection.jpg

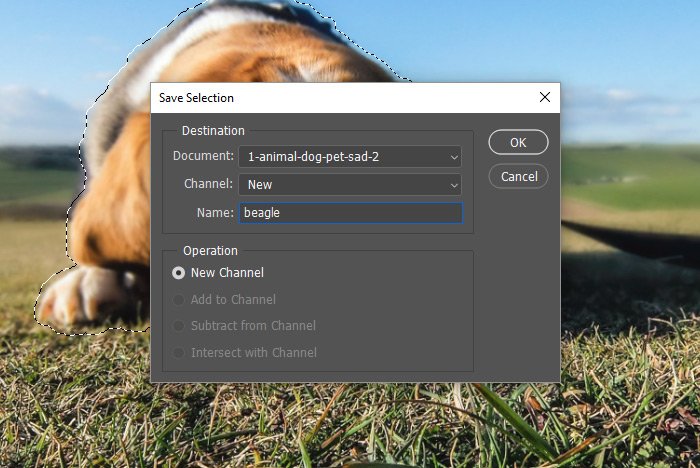
When the Save Selection dialog opens, I’ll name the selection Beagle and then click the OK button to save the selection into the Channels panel. It’s not important that you know where the selection is saved, but I thought I’d mention that.

save-selection.jpg

Changing the Scale of the Photo​

The next step I’ll need to take is to go about the actual scale adjustment. I have the dog selected and that selection saved, so I’ll now need to deselect my selection. I’ll use the Select > Deselect menu item for that.

After that, I’ll use the Rectangular Marquee Tool to select just the photo area of the canvas. Then, I’ll go to the Edit > Content-Aware Scale menu item and click. Doing this will activate a transform bounding box. I’ll drag the top center handle to the top of the canvas and the bottom center handle to the bottom of the canvas. Since I’m using the latest version of Photoshop, I’ll need to hold down the Shift key on my keyboard so the proportions aren’t locked. Adobe seems to have reversed that little feature.

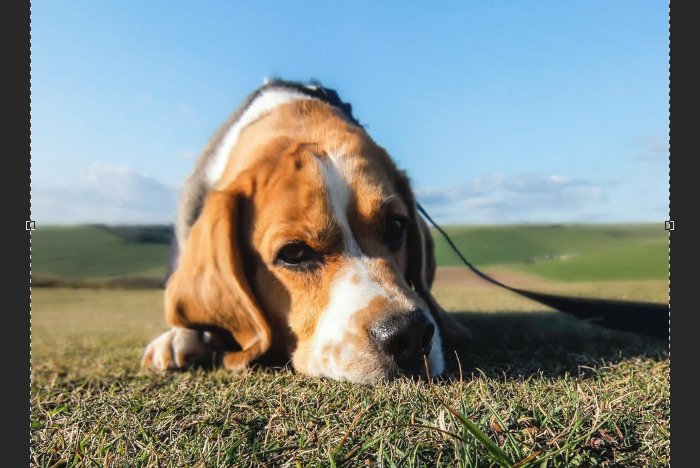
As I stretch the image, I’m noticing something. The dog is being stretched too, even though I thought I protected him. Take a look. See how long he’s looking?

distorted-transform.jpg

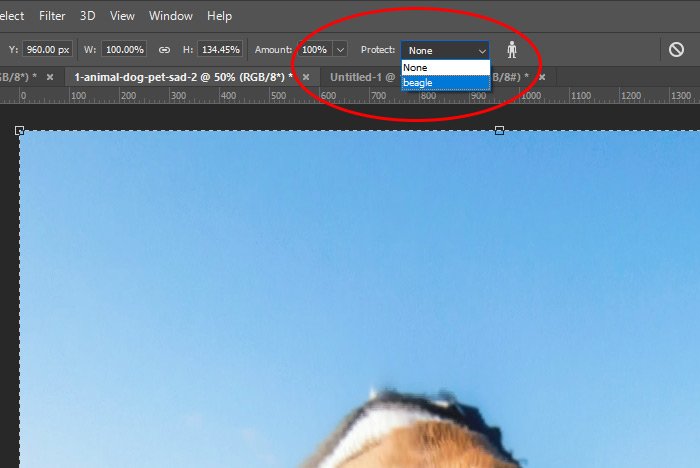
The reason for this distortion is because even though I selected the dog and saved that selection, I haven’t yet protected it. To do this, I’ll need to go up to the options bar and click on the Protect drop-down box and then, when I see my saved selection named beagle, I’ll click on that.

protect-drop-down.jpg

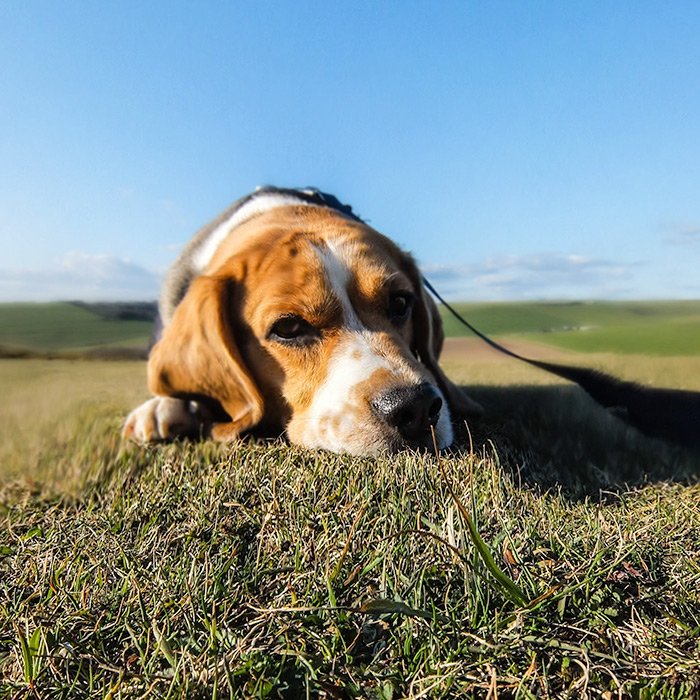
Doing this will immediately snap the dog back to its original state and everything will look great. I’ll press the Enter key on my keyboard to accept the changes and then I’ll deselect the layer. Take a look at the final image.

content-aware-scale-example.jpg

I’d say that looks pretty darn good!

I hope I clearly explained how to use the Content-Aware Scale tool in Adobe Photoshop. If you have any questions regarding this post or topic, please let me know in the comment section down below or in the Photoshop forum. Thanks for reading!
 
LukeLewis

LukeLewis

Member
Joined
May 7, 2021
Messages
134
Reaction Score
0
Points
21
  • #3

How Can I Use the Content-Aware Scale Tool to Create Square Photographs?​

Question: I’m interested in producing, printing and framing more square photographs as opposed to the normal portrait or landscape ones we usually see and was wondering what the best way to approach this would be. I know the Content-Aware Scale tool in Photoshop handles this sort of thing and can alter the shape of a photo, but I’m not sure if it would be good in my situation. I capture primarily landscape and nature shots, so there’s detail from edge to edge in many of my shots, but I also take landscape shots that don’t have a lot of detail at the edges. Can this tool do a good job with my style of photography?

Answer: Using the Content-Aware Scale tool really depends on which type of photos you want to change the dimensions of. For the images with details along the edges that you don’t want stretched, I wouldn’t suggest using it. If you have skylines and that sort of thing though, those are what this tool was created for. It does a very good job at allowing you to avoid cropping your images and simply adding to them. I do this all the time.

I suggest you read though this post on using the Content-Aware Scale tool for a full explanation on all of this.

If you do decide to use this tool to reorient your photographs, these are the steps you should take to complete the process.

– Open your image in Adobe Photoshop and resize the canvas so it’s perfectly square. So if the canvas is currently 1000px wide by 800px tall, make it so it’s 1000px by 1000px square. After you do this, you’ll see some empty areas above and below the image. These can be either checker marked or white. It doesn’t matter what they look like. Their appearance will depend on your Photoshop settings.

– The Content-Aware Scale tool actually distorts part of the image to change its dimensions. If you have any areas that you don’t want distorted, you’ll need to protect them. The way to protect them is to first select the areas and then save the selection. Use the Quick Selection Tool or another like it to make your selection and then use the Select > Save Selection menu item to save your selection. When the Save Selection dialog appears, name your selection in the Name field and then click on the OK button to save it.

– Next, you’ll need to do the actually resizing. Use the Rectangular Marquee Tool to select the area of the original image and then go to the Edit > Content-Aware Scale menu item and click. What you’ll get next is something that looks just like the Free Transform tool gives you. You’ll see a box with handles on it. Click on one of the handles and drag the top of the box so it’s flush with the top of the canvas and then do the same thing with the bottom. After you do this, you’ll see your entire photo distort. This is fine.

– Now you’ll need to correct your protected areas. While the transform box is still live (meaning, you haven’t clicked Enter to make the change permanent yet), go to the options bar and click on the Protect drop-down box. Inside this drop-down, you should see the protected area you named earlier. Click that name and the result will be that the area you selected earlier will snap back to its original form.

– The final step is to press the Enter key on your keyboard to accept your changes. And you’re done.

Essentially, the Content-Aware Scale tool is a glorified Free Transform tool. Both tools do the same exact thing, but the Content-Aware version allows for the protection of some areas, while the Free Transform one doesn’t. This is what makes it “Content Aware.”

If you have any questions, please ask. I love this stuff.
 
Top