15Katey
Member
- Joined
- May 10, 2021
- Messages
- 130
- Reaction Score
- 0
- Points
- 23
- #1
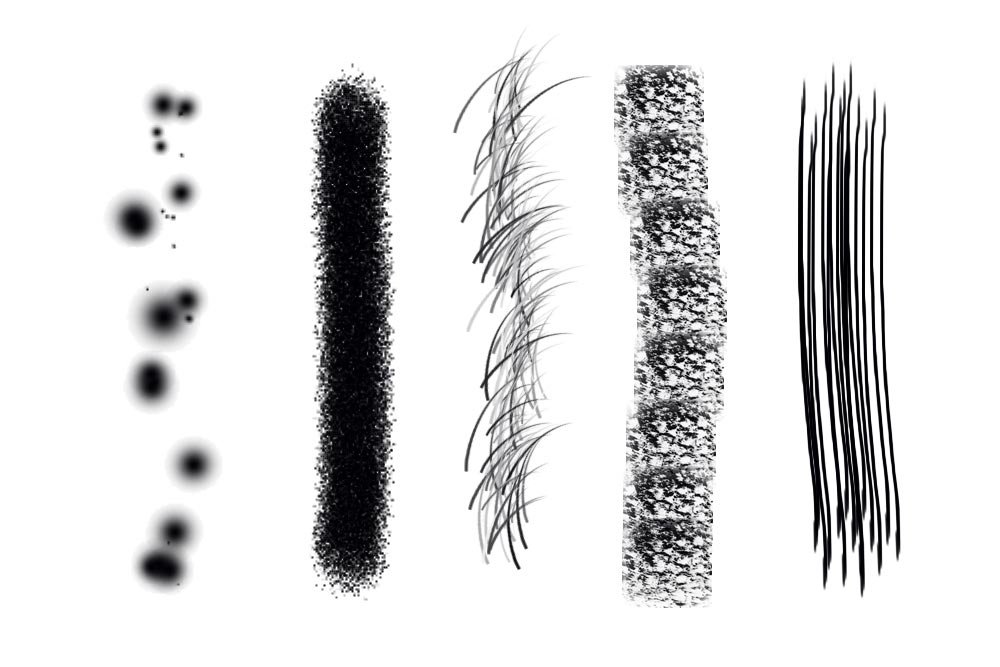
If you’re anything like me, you probably didn’t even know you could make custom brushes in Adobe Photoshop. Unless you’re an artist or graphic designer, brushes most likely haven’t played a large role in your use of the application. Every now and then, though, we all need to reach for that Brush Tool. Whether it be to work with masks or to color something in, we generally choose one of Photoshop’s presets.
Here’s a scenario: what if we needed a specific type of brush for a project we’re working on and it wasn’t available as a preset? What would we do? We certainly couldn’t just whip one up out of thin air – or could we?
In today’s post, I’m going to talk about how we can create custom brushes in Photoshop. In all honesty, you can probably put a very simple one together in about three steps. It’s when you have to meet certain specifications that things become more complex. Not crazy complex, but a familiarity of certain panels is definitely in order.
Creating a Custom Brush – The Simple Method
There really are only a few steps necessary to create a custom brush. In this section, I’ll cover the fastest method.Create a New Document
The very first thing I need to do is to create a new white document. To accomplish this, I’ll head up to the File > New menu item and click. From there, I’ll set the document to 1000 pixels wide by 667 pixels high. Also, I’ll set the dpi to 72 because this is for web, not print (that would be 300 dpi or higher). Now, I want you to know that these settings aren’t important. I merely chose them because this is the size I usually work with while making screenshots for this blog. It’s also the same ratio of a normal photograph. Please feel free to choose any settings you’d like, as long as the document is large enough to work inside of.
Change the Workspace
Next, I’m going to change my workspace to one that’s more conducive to working with brushes. Luckily, Photoshop has such a workspace already preset into the application. To change it, all I need to do is head to the upper-right corner and click the drop-down box. From there, I’ll select Painting.
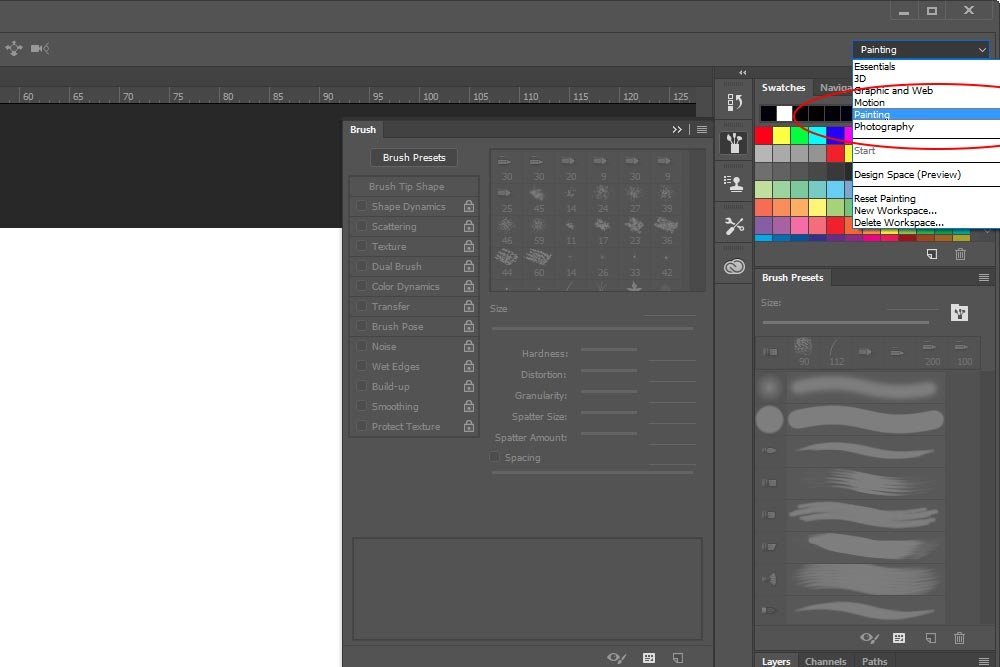
This workspace places the Brush Presets panel on the right side and in clear view, above the Layers panel. It also makes the Brush panel easily clickable in the vertical toolbar that sits just to the left of that.
Create a New Layer
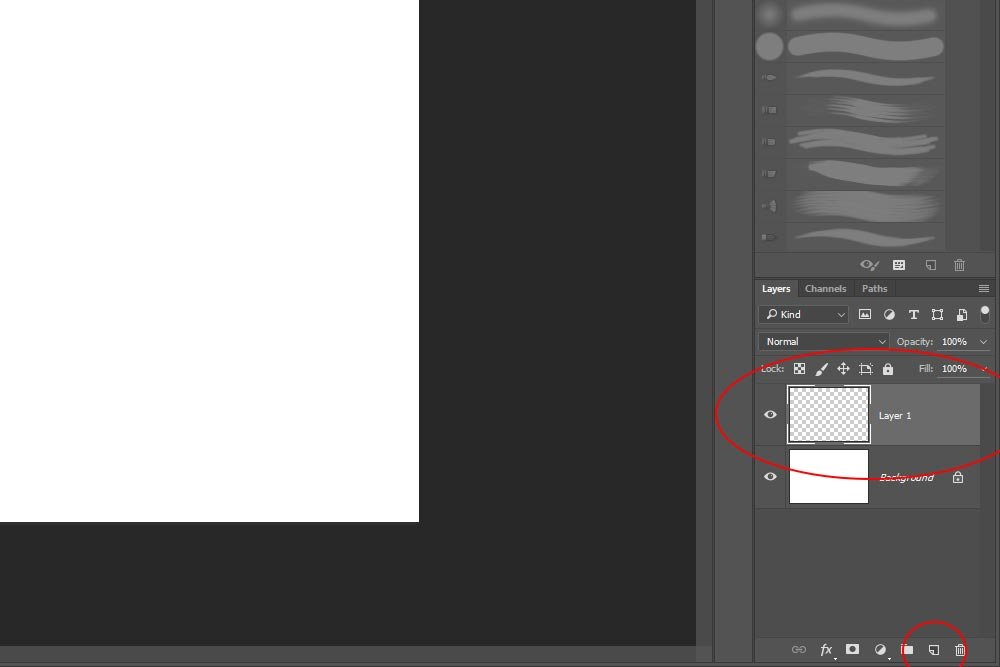
This step is easy. I’ll move to the Layers panel and click the New Layer icon that sits at the bottom. This will create a new empty layer.
Draw a Brush
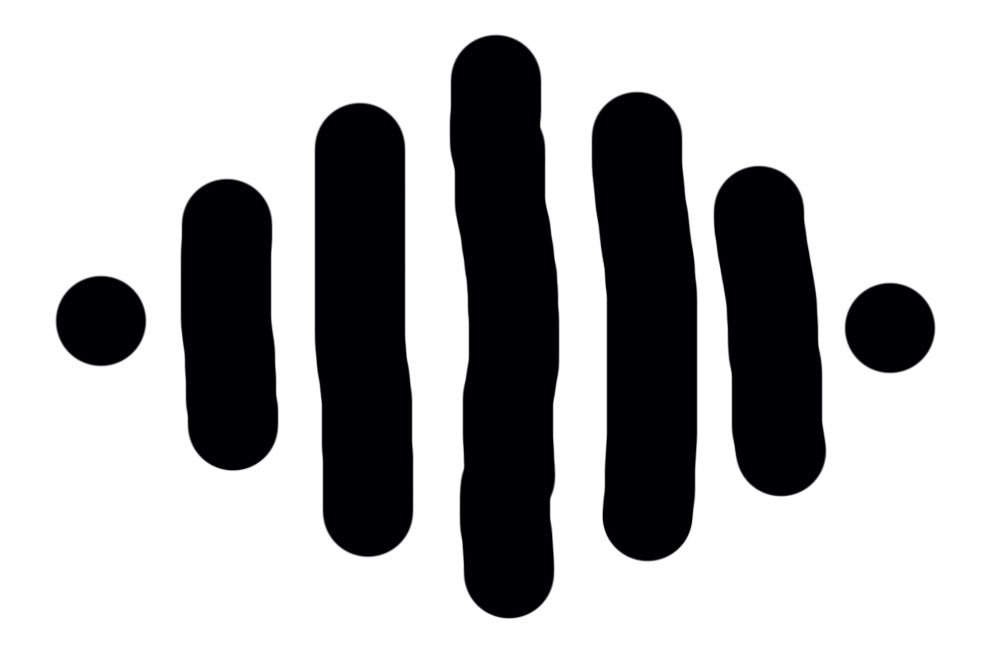
This is where we begin to get into the meat of this project. If you think about it, brushes are just drawings. If I draw a happy face, I can save that as a brush and stamp happy faces everywhere. I can do the same thing with a simple circle or a few straight lines. To keep things as basic as possible in this section, I’ll draw some lines with one of the Brush Presets Photoshop offers. I’ll do this in the new empty layer. Also, I’ll make sure I’m drawing in black.
Save the Brush as a Preset
Now that I’ve got my brush drawn, I can save it to the Brush Preset panel. To accomplish this, all I need to do is to head up to the Edit > Define Brush Preset menu item and click.
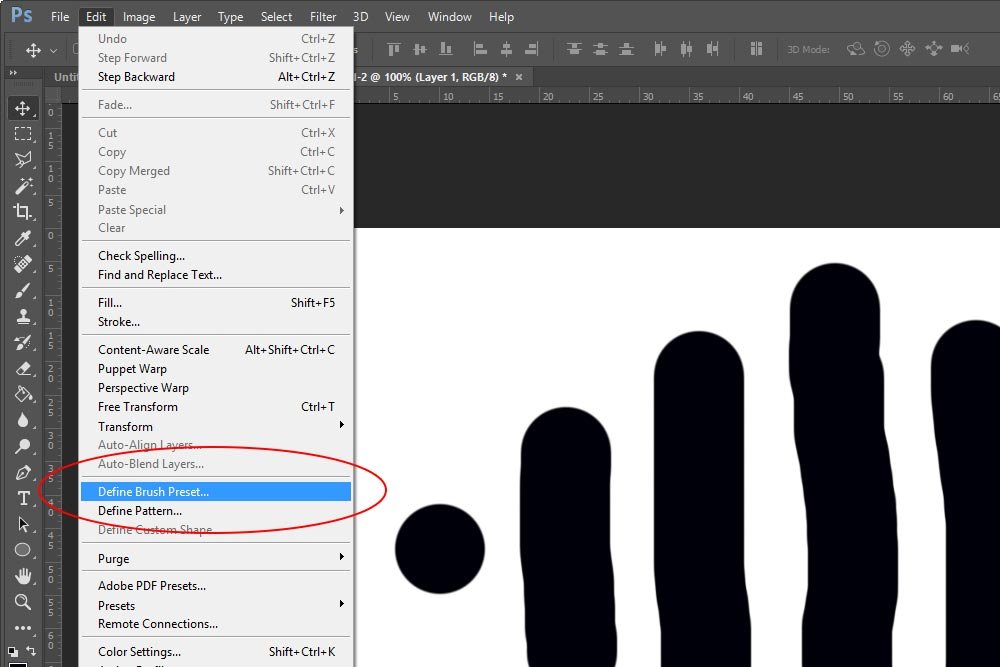
Once I click that menu item, I’ll be presented with a Brush Name dialog box that asks me to name the brush. In this case, I’ll name it Jay’s Sample Brush and then I’ll click OK.
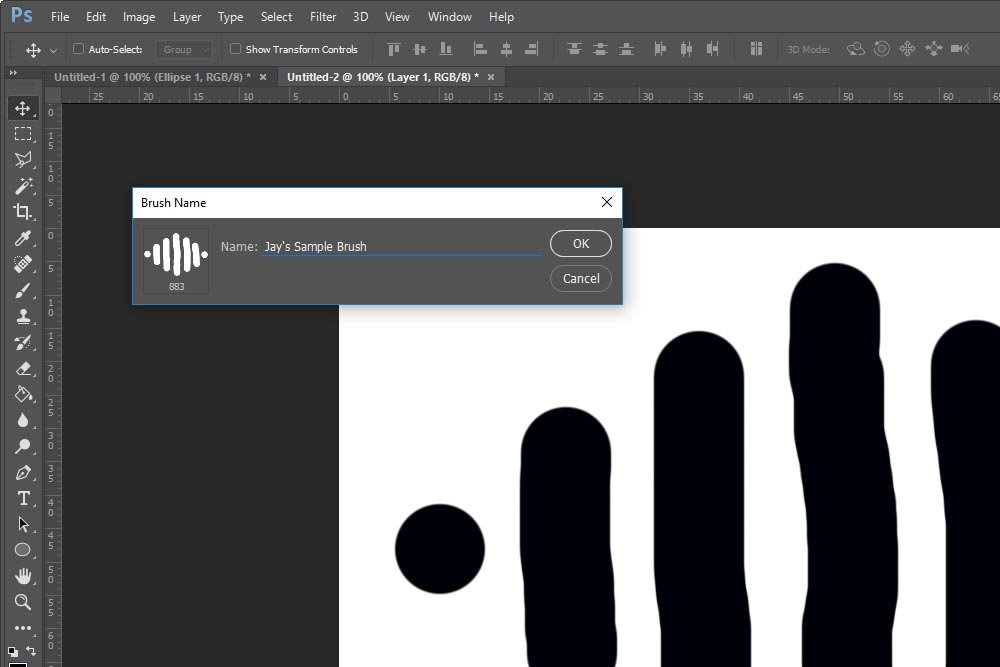
Finding the Custom Brush Preset
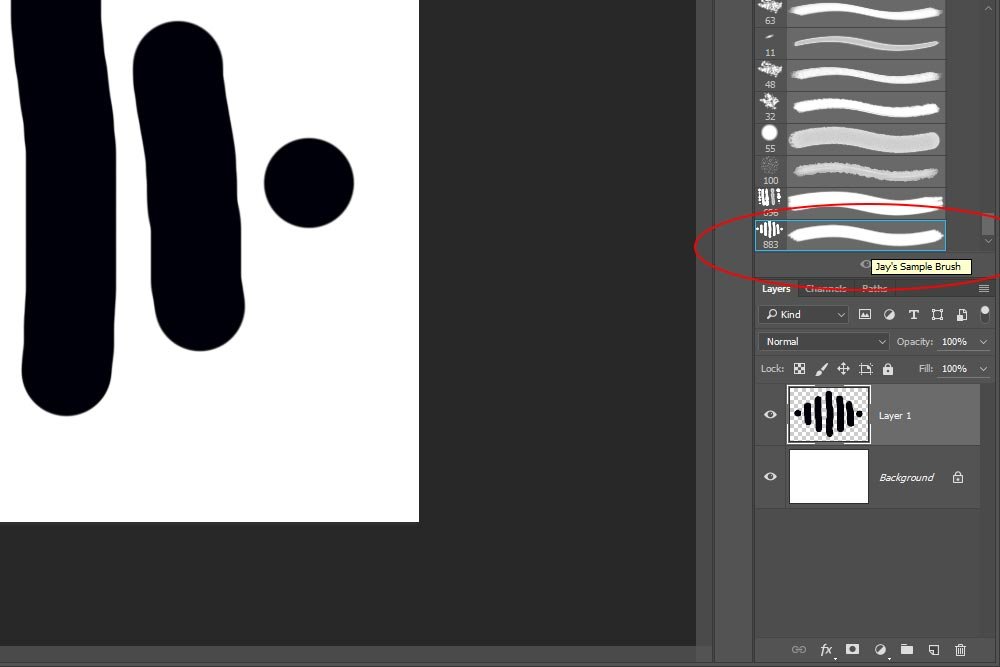
Basically, I’ve created the custom brush. To use it, all I need to do is take a look around the Brush Preset panel and find it. In this case, since I just created it, it’s still sitting at the bottom of the list of presets.
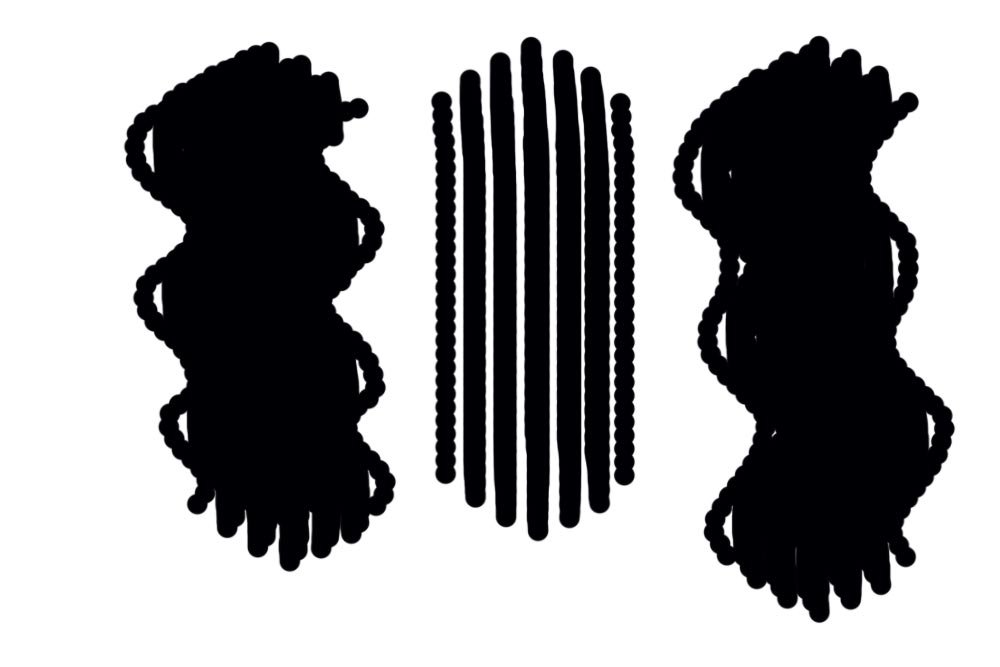
I can create a new document, change the size of the brush and start drawing with it as I please.
Deleting or Renaming a Brush Preset
As you may have noticed, the brush I made has a few issues. Perhaps it would be good for some use, but honestly, it’s not very effective for anything I can think of. Due to this, I’d like to delete it.
To delete or rename of brush preset, all I need to do is to right-click on it in the Brush Presets panel. Once I do this, a popup box will appear with two instructions. Rename Brush and Delete Brush.
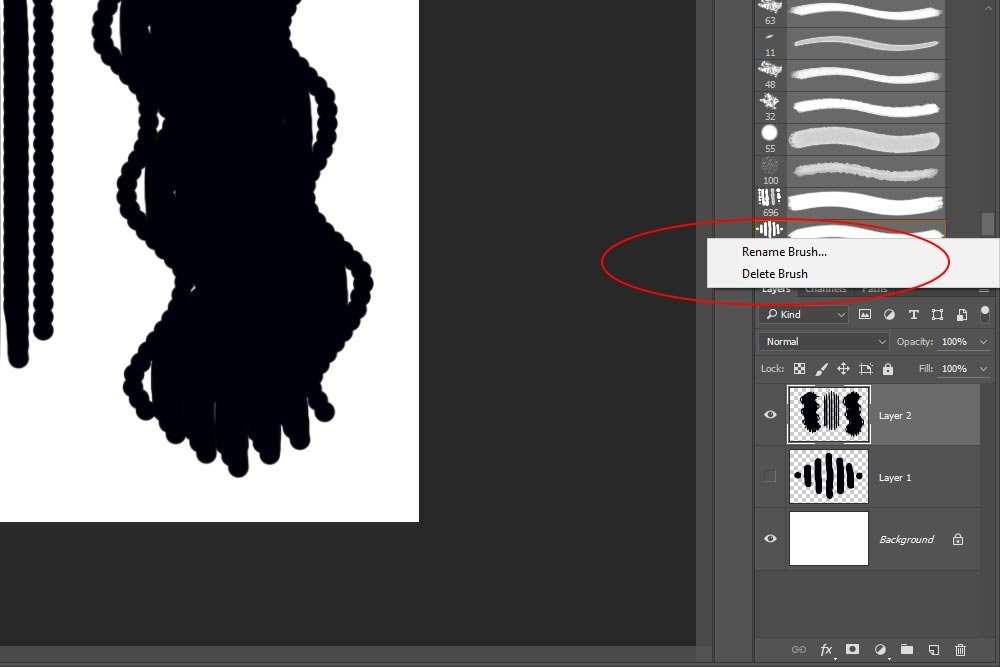
If you look closely at the above screenshot, you’ll see that the Rename Brush… option has three dots after it. That means that there will be some sort of dialog box that opens after you select it. In this case, it’ll be a Rename dialog. The Delete Brush option doesn’t have this. If I click that option, the brush will disappear (after I click OK).
Creating a Custom Brush – The Complex Method
You have to admit, creating a new brush preset is pretty easy. All you need to do is draw something and then save it. The issue with this is that there certainly isn’t a lot of thought that goes into this type of thing. As I mentioned above, there will usually be some sort of requirements that come along with making a new brush. In this section, we’ll explore the Brush panel to see how we can add some extra flavor to a new brush preset.Adding Spacing & Jitter
My goal with this section is to make a brush that’s actually interesting. And one that might work well for a specific project. While this is merely an example, this is how you would go about doing something like this in real life.
The first thing I’m going to do is open the Brush panel. If you remember back, the shortcut for this is in the vertical tool bar that’s next to the right column.
Next, I’m going to select a random round brush preset. This is my starting point. I’ll size it so it’s easily workable and then head down to the Spacing slider and set it to 50%.
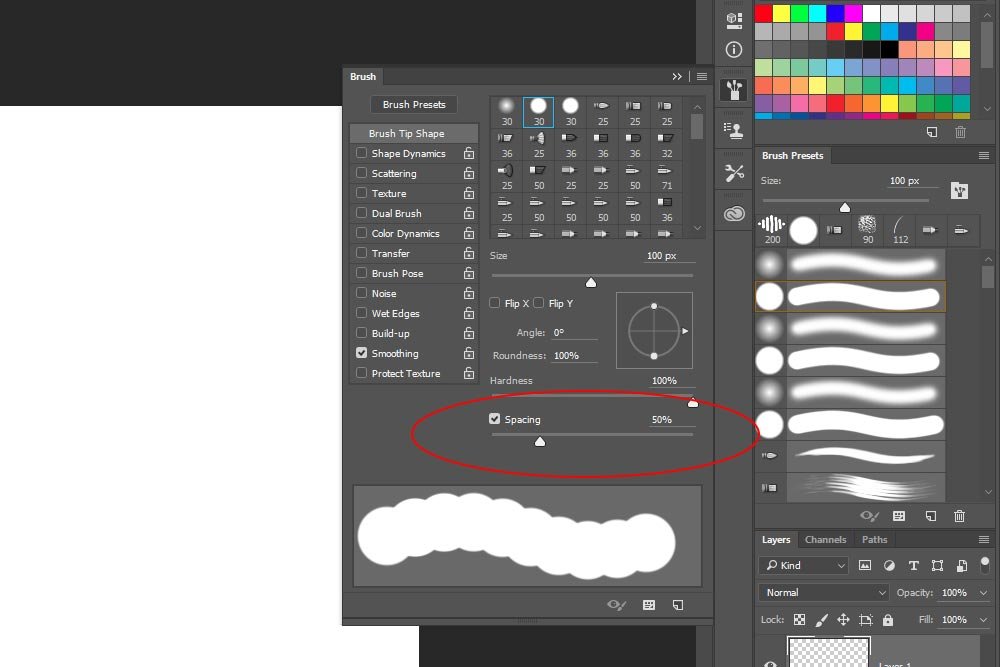
I’ll draw a sample line with the brush set like this in the document. I’ll show that sample in a bit.
Next, I’ll click the Shape Dynamics checkbox in the left column of the Brush panel. This will offer many more options to choose from and alter. Right now, what I’m concerned with is Size Jitter. I’ll bring that all the way up to 100%. I’ll draw a sample line with the brush set like this as well.
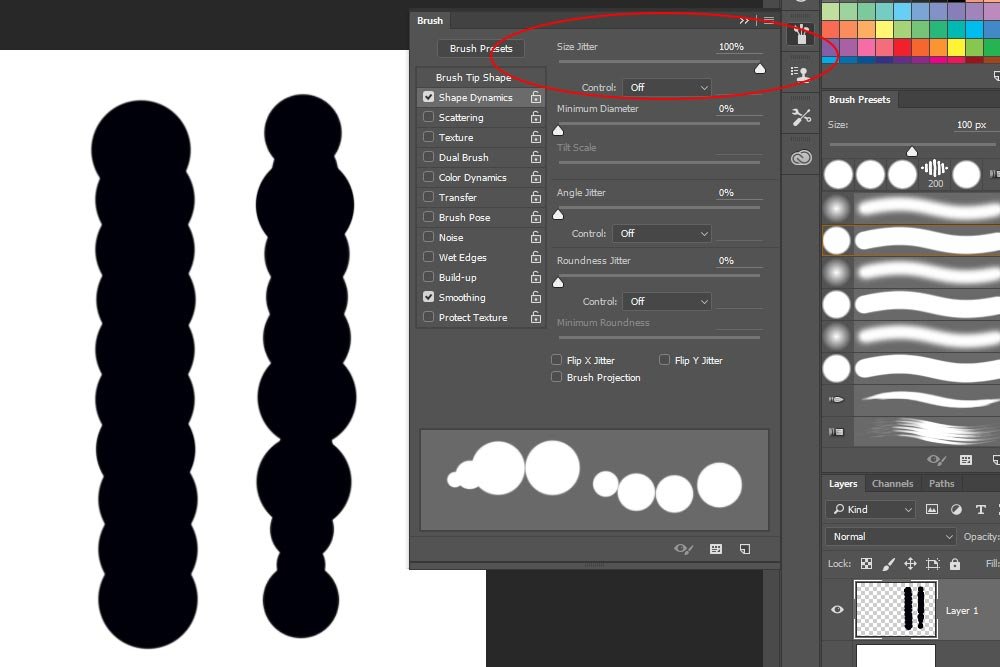
If you take a look at the above screenshot, you’ll see that the left sample line has uniformly sized dots while the one on the right has varying sized dots. This is what the Size Jitter setting changes – the sizing and randomness of the paint dabs.
Changing Opacity
Now that I’ve got some good spacing and jitter in the brush which makes it much more interesting than regular lines, I can move onto another dimension – opacity. To shake up and randomize the opacity of each brush stroke or paint dab, I’ll click on the Transfer check box in the left column of the Brush panel. After that, I’ll click in the top drop-down box and choose Pen Pressure. When I do this, a small warning triangle appears telling me that I need to use a pressure sensitive drawing pad to experience different opacity while drawing, but I’m going to ignore that. Even without that piece of equipment, I’ll get some different opacities in my lines.
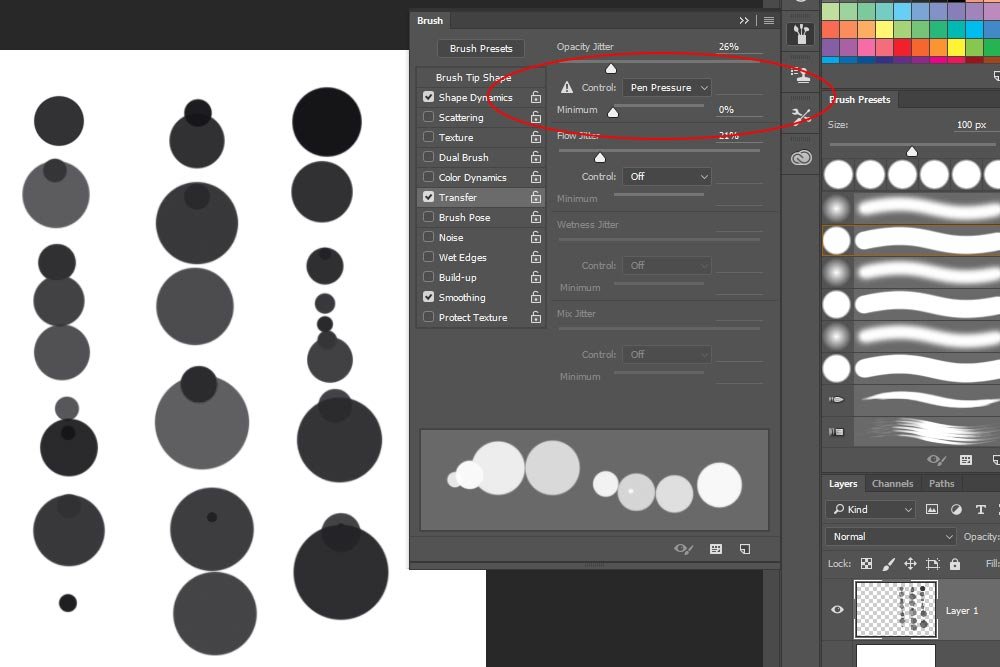
Now, just to let you know, what I’ve got here is a fairly interesting brush that’s well worthy of saving like we already did above. I don’t want to do that just yet though because I’ve got bigger plans.
The next thing I’m going to do is to draw something like I did in my first example above. I want individual lines that will act as strokes. To do this, I’ll draw another picture, but this time, I’ll use this new brush that I’ve set up. I’ll also use random sizing as I draw. Here’s what it looks like.
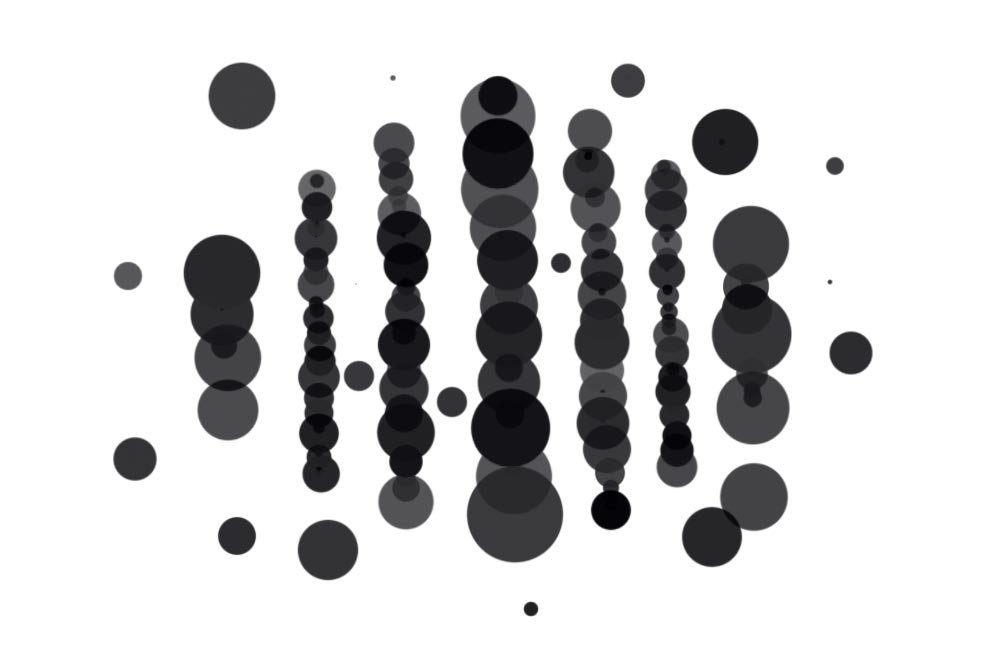
Next, I’ll save this as a brush preset like I did above and this time, I’ll call it Jay’s Random Brush.
Let’s see what this brush looks like if I paint with it.
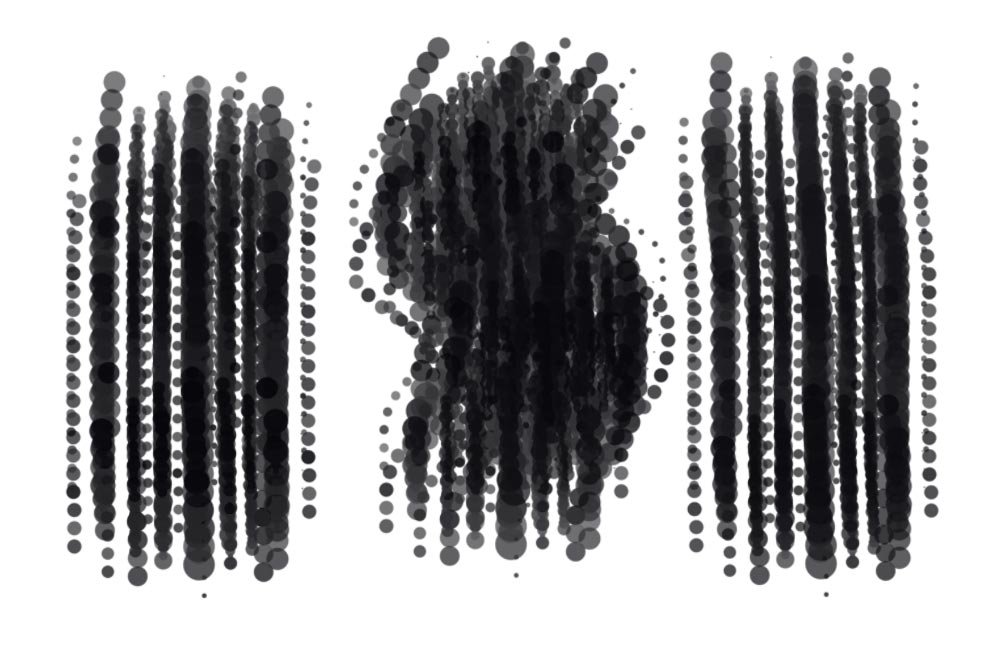
This looks pretty good. It’s interesting, to say the least. There are a few more things I’d like to experiment with though.
Changing Direction
Let’s pretend that I wanted to use this brush so it showed horizontal strokes instead of vertical ones. How would I do that? Well, if I go back into the Brush panel and click on Brush Tip Shape in the left column, I’ll see where I can change the direction of the brush itself. If I click inside the Angle area, I can change degrees to 90 degrees and my brush will turn sideways.
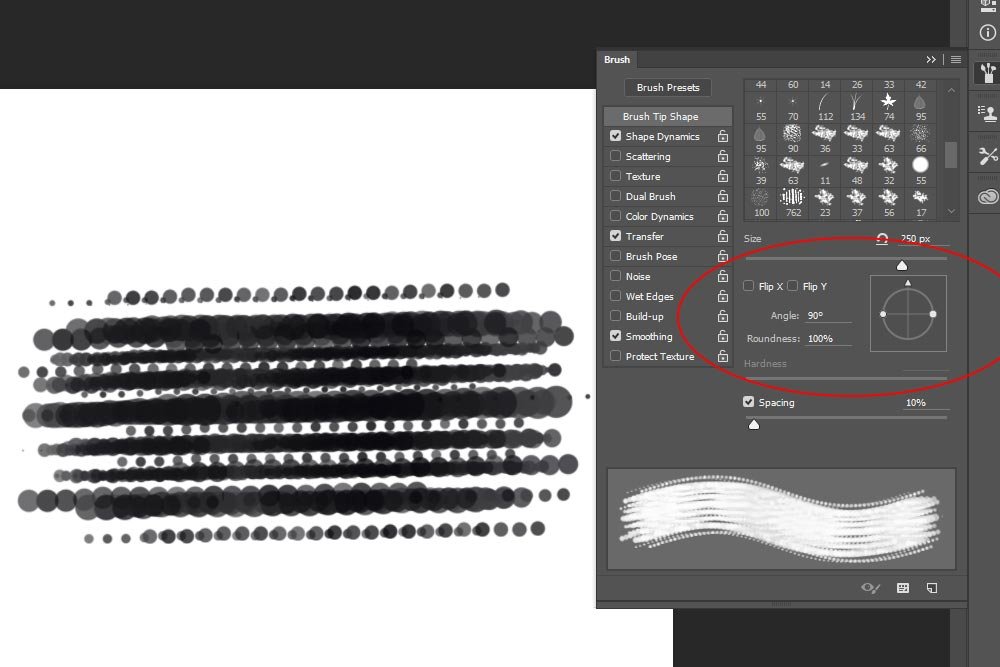
Following the Direction
If I wanted to go one step further and have my new brush follow the direction in which I’m painting, I can do that too. This would make things much more realistic. To accomplish this, I’ll click on Shape Dynamic in the left column again and then click on the drop-down box that’s right below the Angle Jitter slider. Inside that box, I’ll select Direction.
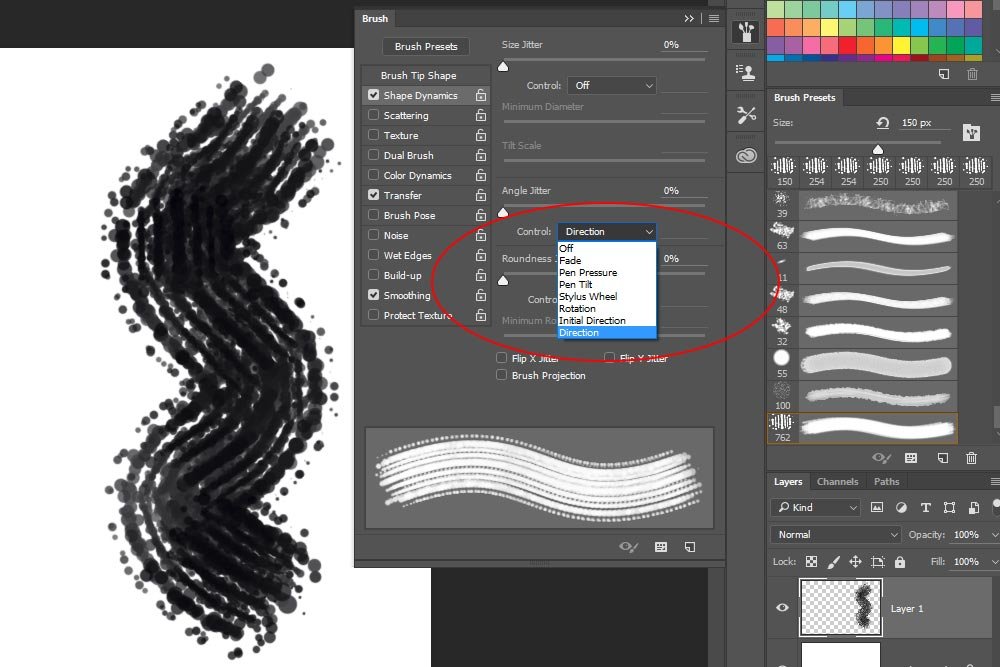
As you can see, the brush now acts much more like a real live one.
At this point, I can save the brush again and name it as something else. I’ve changed many settings to add to what I originally saved, so it’s definitely worth it to retain all that work.
I’m going to stop here. I think I’ve demonstrated how simple or complex it can be to create a custom brush in Photoshop. I’ll be writing many more posts on this topic, so stay tuned. Thanks!
