EmeraldHike
Member
- Joined
- May 10, 2021
- Messages
- 133
- Reaction Score
- 0
- Points
- 21
- #1
This post sort of reminds me of how some TV shows applied “Technicolor” to old black and white films. You may recognize some of them – The Wizard of Oz, Down Argentine Way, The Adventures of Robin Hood and Gone with the Wind. If you’re old enough, you may have seen a few of these when they were actually colorless, but if you were born in the 70s like I was, your first viewing was probably in color. Bright, saturated, vivid color.
Let’s say you have an image that’s grayscale and you’d like to add color to some objects in it. At first glance, you might think this endeavor is impossible. I mean, how in the world do you add color to something that has none? How do you add it so it accurately represents what the original color was? What if you don’t want to bring the color back to its original state, but would rather add some creativity instead? If you’re interested in any of these questions, I think you’ll enjoy what I share below.
Before I begin, I want to tell you that I’m no artist. The final result of this image will be, well, just okay. I did a few practice runs and discovered that the apples in the demo photo I picked out aren’t all that forgiving when it comes to adding color. What I can tell you, though, is that I can lead you down the path you need to be lead down when it come to this type of project. I can show you the proper tools that need to be utilized.
Colorizing Objects in a Photo with Adobe Camera Raw
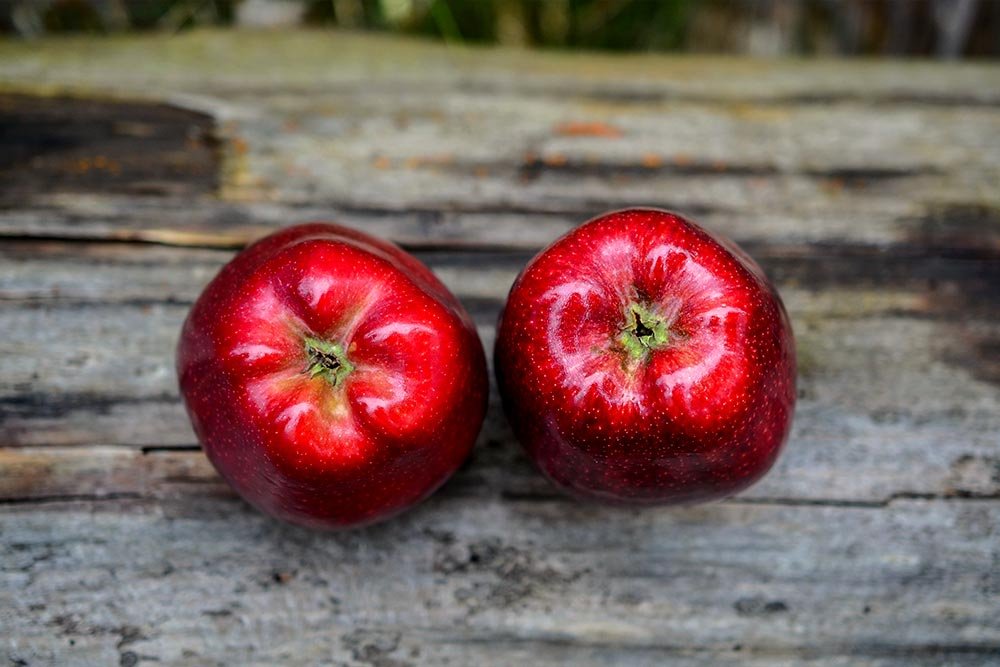
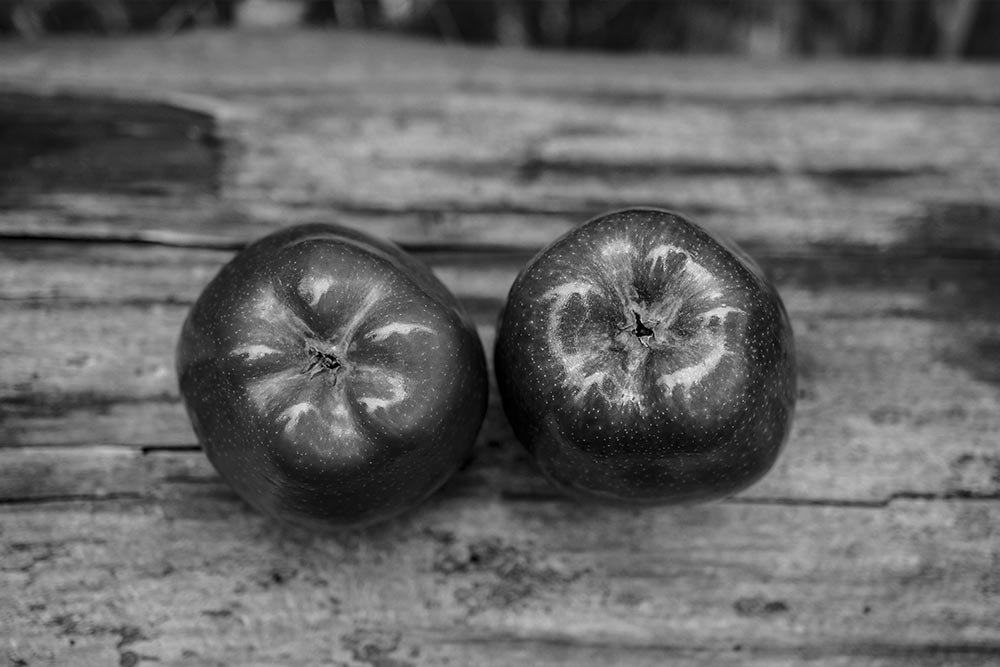
Once that was finished, I moved the picture from Camera Raw to Photoshop. So, just to reiterate – I began with a color photo that I changed to black and white. That image is sitting in Photoshop ready to be worked on. Here are both the color and the grayscale images:
While nothing will appear visibly altered, this change will set us up for the future when we add some color back to the apples.
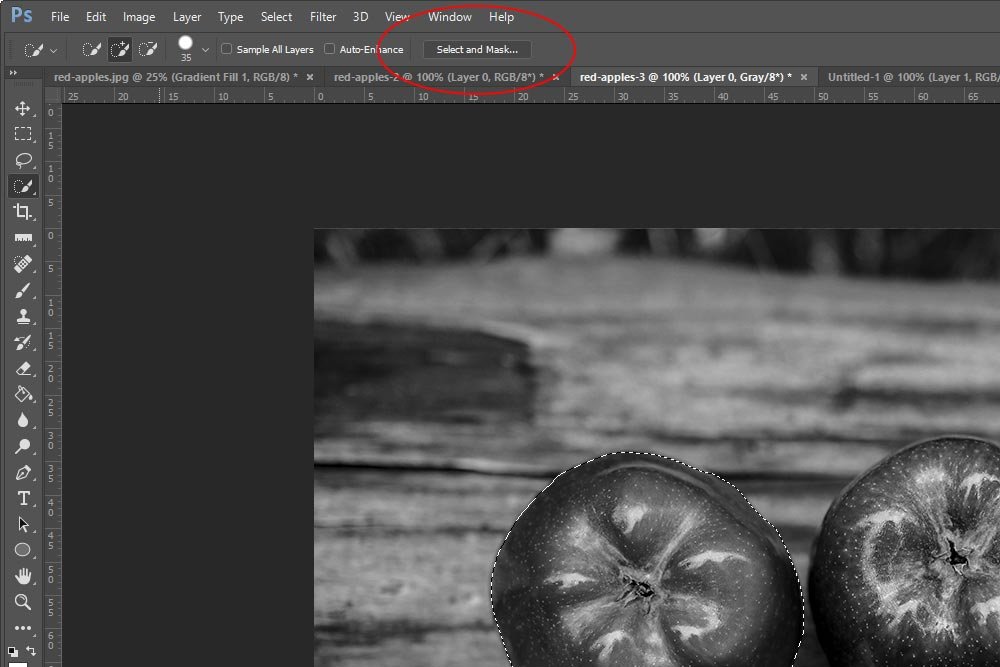
Even though I did a good job, I still want to refine what I did. To accomplish this, I’ll click on the Select and Mask button up in the options bar. This new button replaces the old Refine Edges one.
Even though the Select and Mask button opens a newly styled Properties panel, many of the same functions exist. With that in mind, I’ll push the Smooth and Contrast sliders to 50 and 50% respectively.
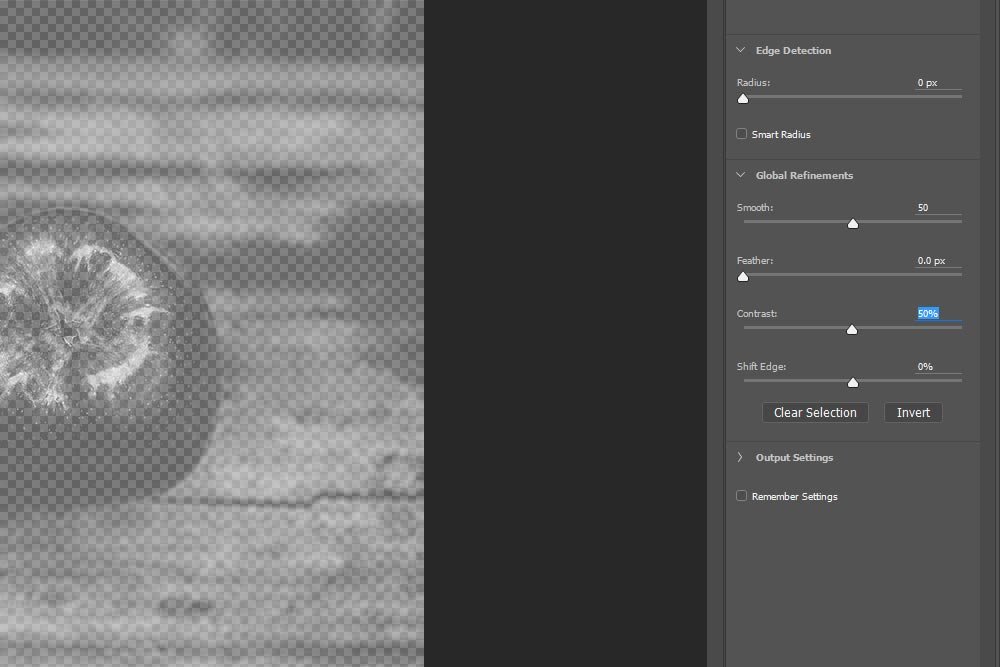
This does a good job of smoothing out and defining any rough areas. When finished, I’ll click OK and will return to the image. If you’d like to learn more about making selections and refining edges in Photoshop, please take a look at my post on the topic:
Selecting Objects & Refining Edges in Adobe Photoshop
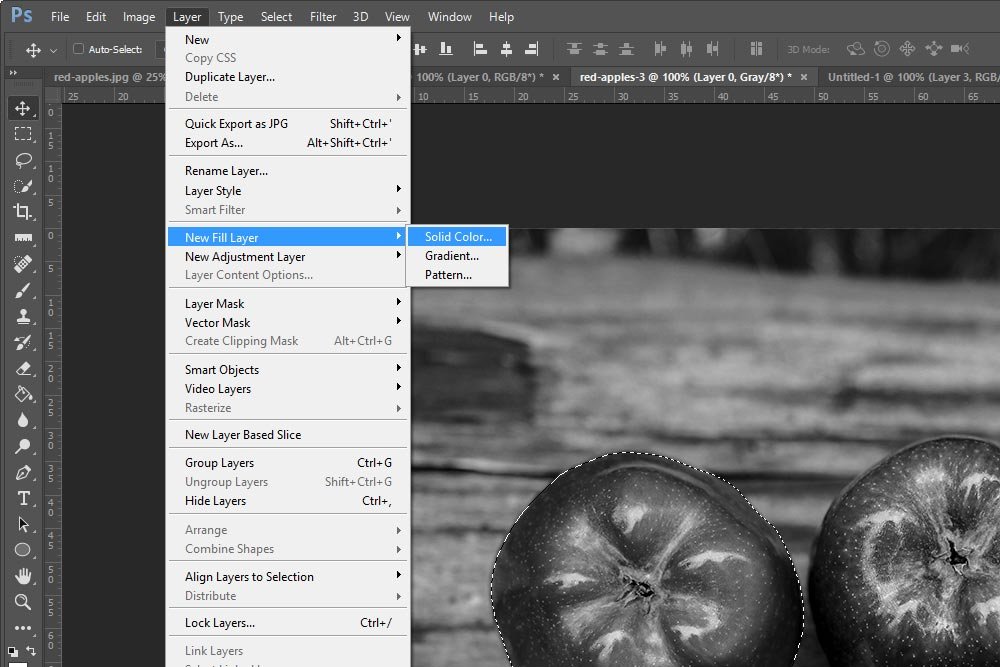
I’ll head up to the Layer > New Fill Layer menu item and select Solid Color.
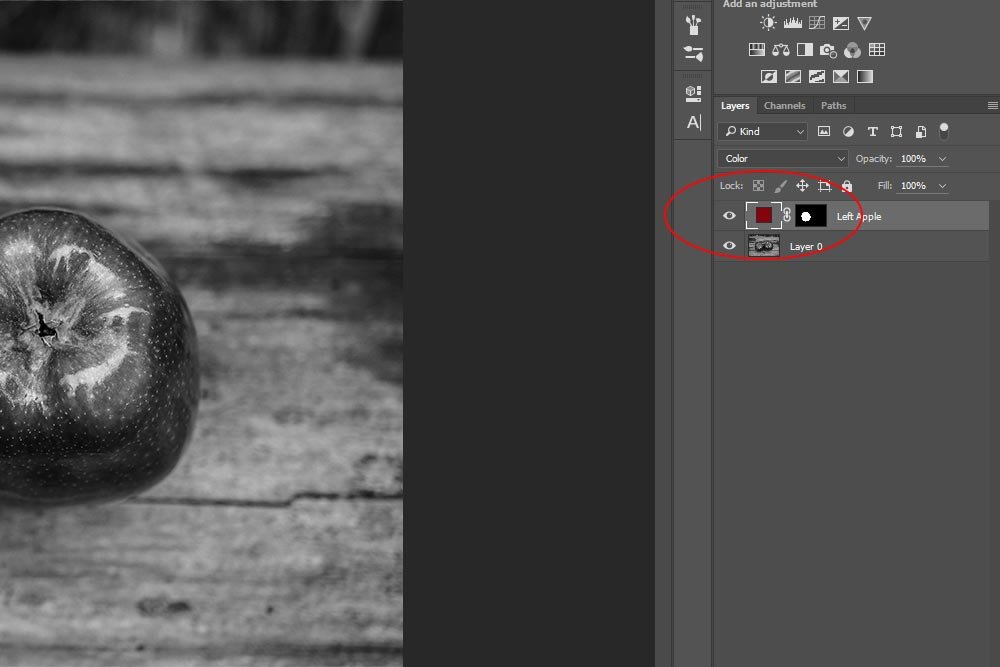
When I make that selection, a small New Layer dialog box will appear. In the box, I’ll name the new layer Left Apple and will choose Color from the blend Mode drop-down.
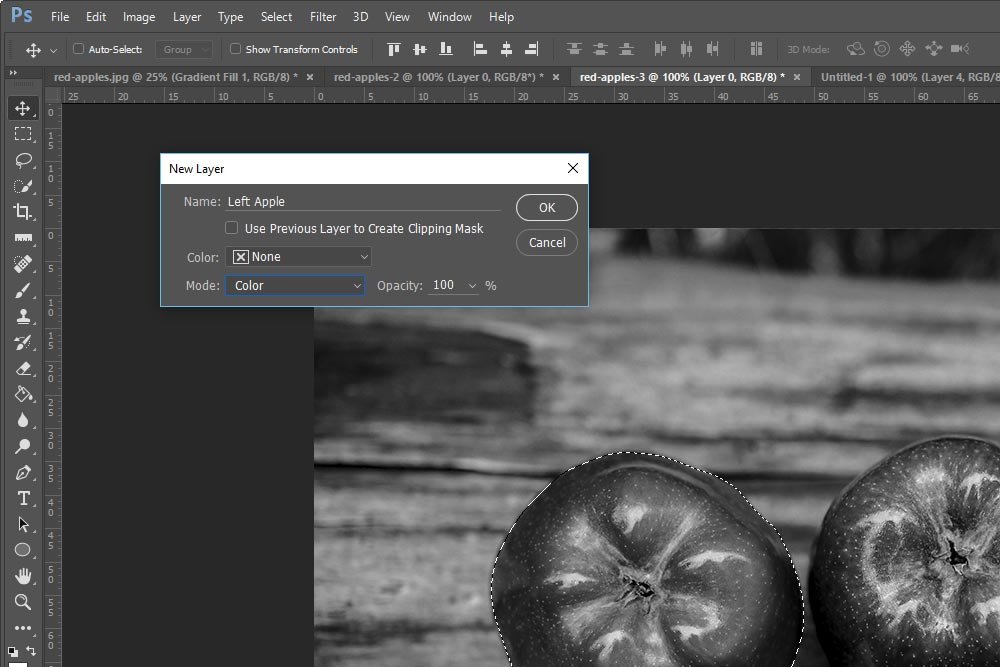
All this means is that I’ll be creating a new fill layer, along with a mask, that will host some new, blended color within the selection area.
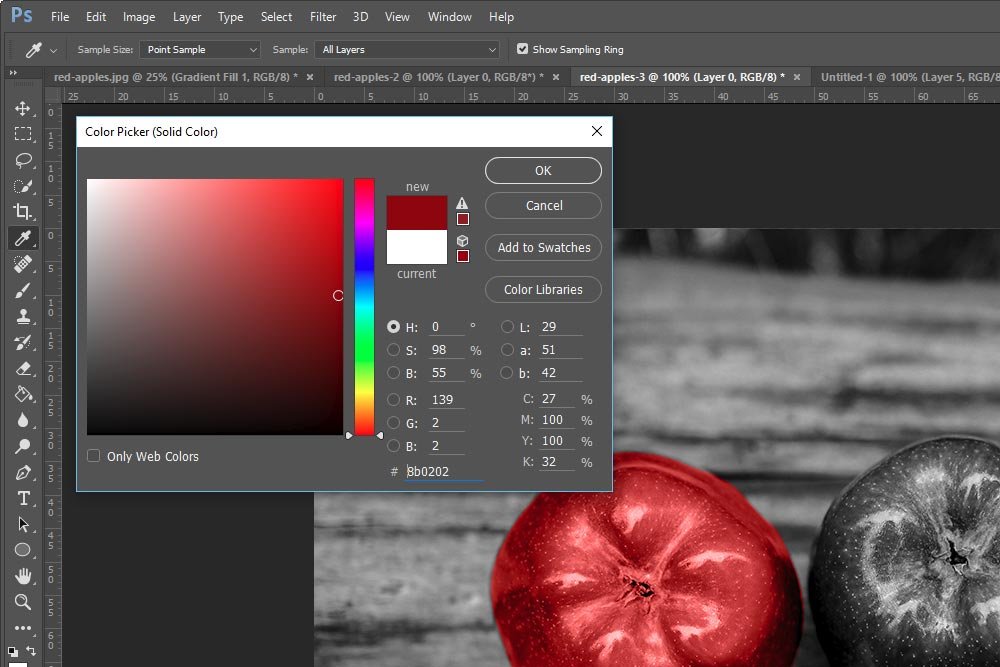
When I’m finished with this, I’ll press OK. As soon as I do this, the Color Picker opens up, where I can choose whatever color it is that I’d like to fill the apple in with. In this case, it’ll be a shade of red.
From there, I can choose a new color and click OK.
To soften the edges of the mask, I can push the Feather slider to the right. In this case, since I want to soften them by only a hair, I’ll just go to 1 pixel. Also, I want to remind you that since this is a mask, you can easily fix any edge anomalies by painting over parts of the photo with black or white with your paint brush. If you need a refresher on masks, please check out my previous post:
What are Layer Masks in Adobe Photoshop?
First, I’d like to darken the color of the apple so the outer ring matches the original better. I’ll double-click the color in the layer and change things in the Color Picker.
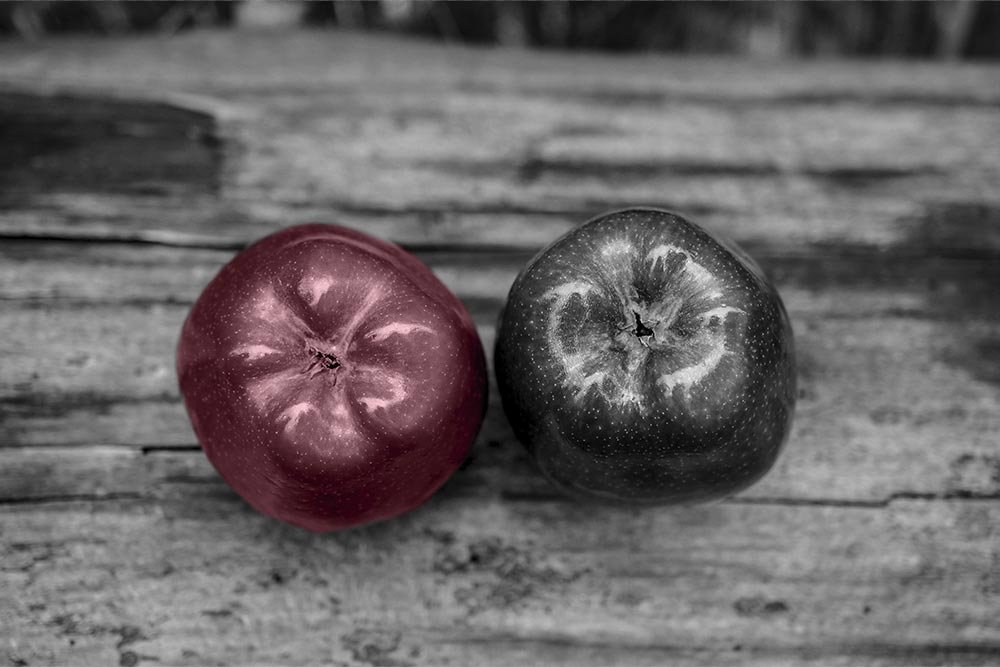
Now, I’ll duplicate the masked fill layer in the Layers panel by using the keyboard shortcut of Ctrl+J (Windows) or Command+J (Mac).
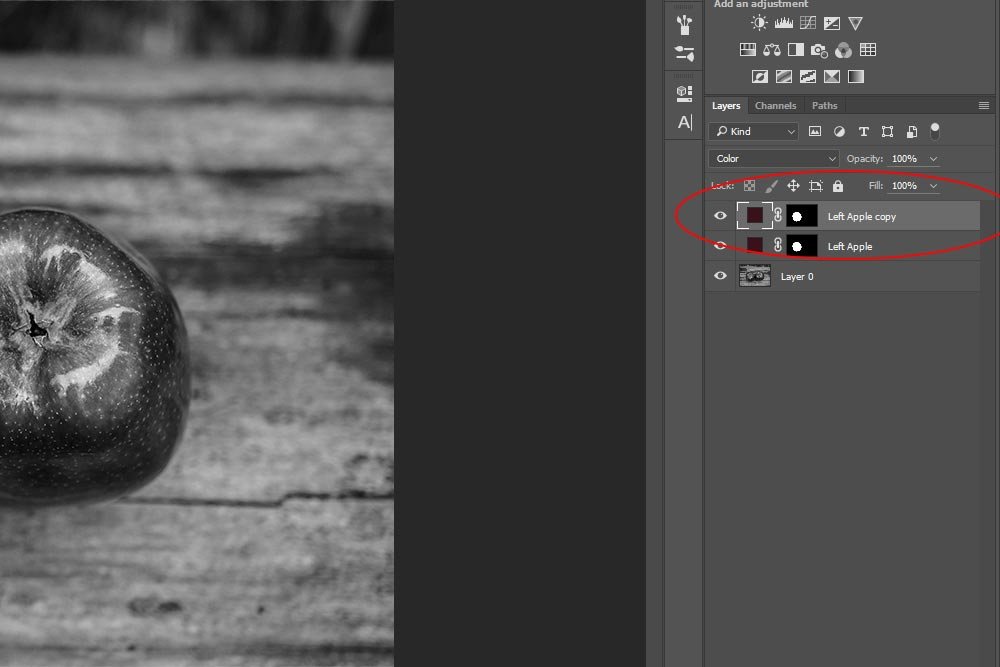
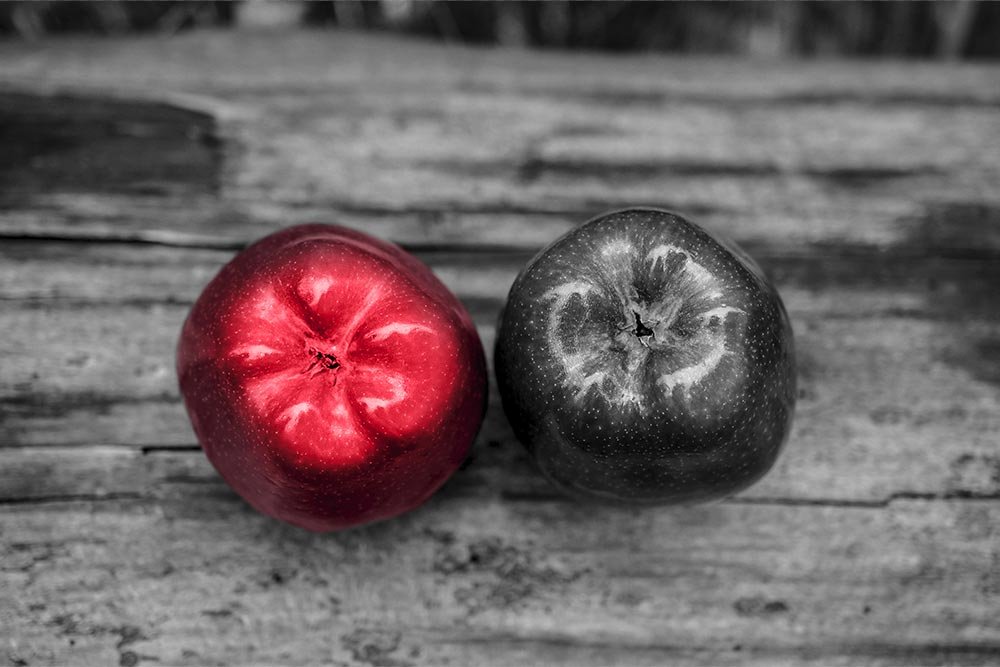
After that, I’ll change the color of the new layer so it’s lighter and a bit more yellow and orange, so it matches the interior area of the original apple. Then, since this new layer will be covering the entire layer beneath it, I’ll paint some of the top layer away with my black Brush Tool with a very soft edge. Basically, I’d like to reveal the darker outer edge of the apple with the lighter and more colorful interior.
If I wanted to go even further, I can duplicate the layer mask once again and change the color of this new layer to green. I can then paint everything black, except the core of the apple, which would leave me with this:
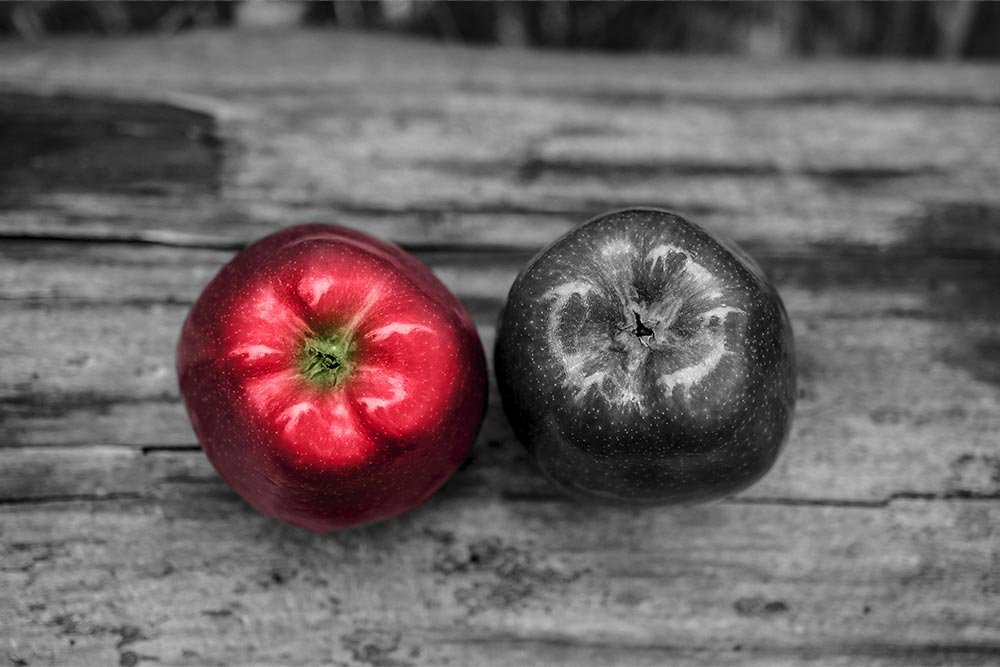
Even though it’s not perfect, I think you can see where I’m heading here. If I added a few adjustment layers that would increase the contrast and saturation, I’d have an almost perfectly colored apple. Not bad.
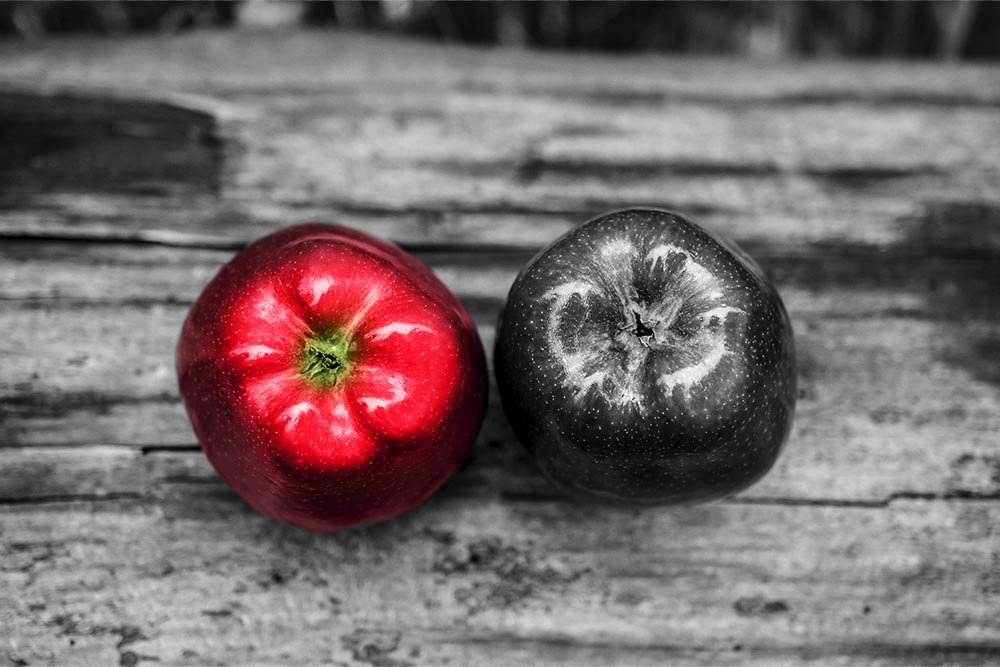
There’s a lot of creativity that can come from using the tools I described above. Not only can you fill the layer with solid color, but you can also use gradients and patterns. That’s when the fun really begins.
If you have any comments or questions about this post or anything else, please leave them in the comment section below. Thanks!
Let’s say you have an image that’s grayscale and you’d like to add color to some objects in it. At first glance, you might think this endeavor is impossible. I mean, how in the world do you add color to something that has none? How do you add it so it accurately represents what the original color was? What if you don’t want to bring the color back to its original state, but would rather add some creativity instead? If you’re interested in any of these questions, I think you’ll enjoy what I share below.
Before I begin, I want to tell you that I’m no artist. The final result of this image will be, well, just okay. I did a few practice runs and discovered that the apples in the demo photo I picked out aren’t all that forgiving when it comes to adding color. What I can tell you, though, is that I can lead you down the path you need to be lead down when it come to this type of project. I can show you the proper tools that need to be utilized.
The Original & Grayscale Photos
In order to get an image that was colorless, I had to remove any existing color. I did this by launching the photo into Adobe Camera Raw from Bridge. Once in Camera Raw, I “Converted to Grayscale.” If you need to know how to do this, please check out my previous post on the topic:Colorizing Objects in a Photo with Adobe Camera Raw
Once that was finished, I moved the picture from Camera Raw to Photoshop. So, just to reiterate – I began with a color photo that I changed to black and white. That image is sitting in Photoshop ready to be worked on. Here are both the color and the grayscale images:


Changing the Color Mode
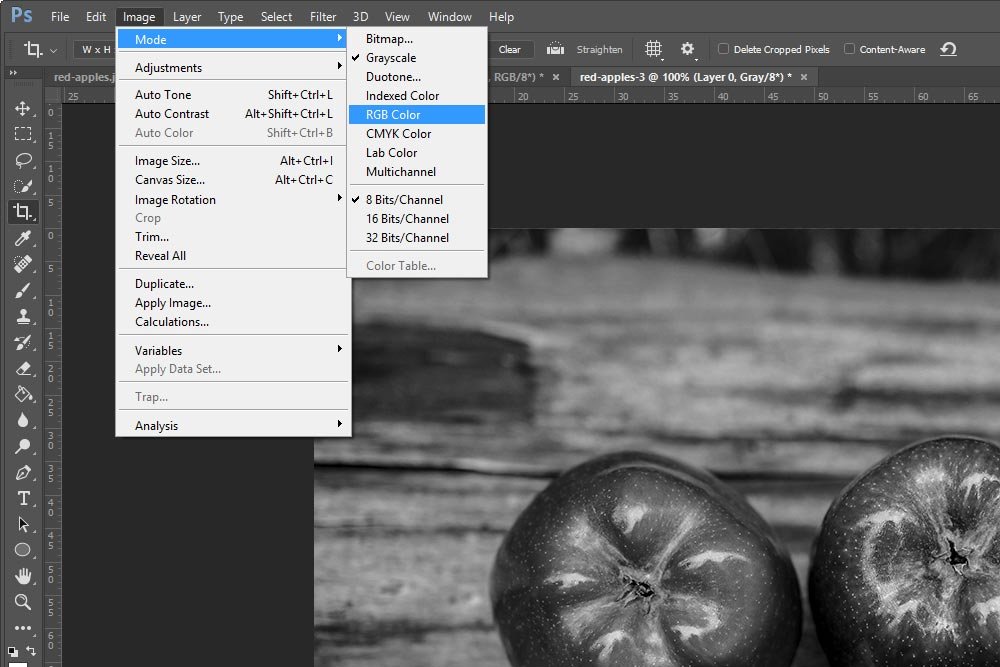
At this point, there’s a small adjustment we need to make before moving forward. When you convert an image to grayscale in Camera Raw and then launch that image into Photoshop, the color mode in Photoshop is set to Grayscale. Since this is going to be problematic for us in just a few short steps, we’ll need to change the mode from Grayscale to RGB Color. This is simple enough to accomplish. Simply access the Image > Mode menu item and select RGB Color.
While nothing will appear visibly altered, this change will set us up for the future when we add some color back to the apples.
Making a Selection
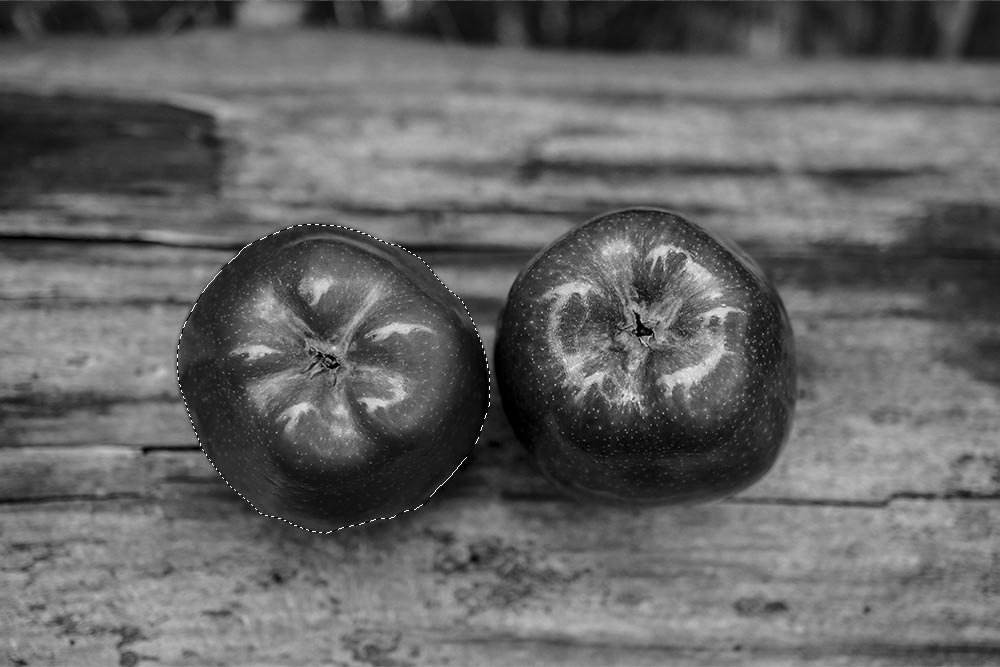
Now that we have everything in order, I can begin selecting the first apple. For this, I’ll use the Quick Selection Tool (W). I’ve got some decent edges, so I don’t think this will offer much of a challenge.
Even though I did a good job, I still want to refine what I did. To accomplish this, I’ll click on the Select and Mask button up in the options bar. This new button replaces the old Refine Edges one.

Even though the Select and Mask button opens a newly styled Properties panel, many of the same functions exist. With that in mind, I’ll push the Smooth and Contrast sliders to 50 and 50% respectively.

This does a good job of smoothing out and defining any rough areas. When finished, I’ll click OK and will return to the image. If you’d like to learn more about making selections and refining edges in Photoshop, please take a look at my post on the topic:
Selecting Objects & Refining Edges in Adobe Photoshop
Filling the Layer
Now that my selection is made, I can fill the area with color. The thing is, I don’t want to simply pour a solid color right over the apple. I want it to blend in with the lines and gradients of what the apple has to offer. Because of this, I’ll follow some specific steps.I’ll head up to the Layer > New Fill Layer menu item and select Solid Color.

When I make that selection, a small New Layer dialog box will appear. In the box, I’ll name the new layer Left Apple and will choose Color from the blend Mode drop-down.

All this means is that I’ll be creating a new fill layer, along with a mask, that will host some new, blended color within the selection area.
When I’m finished with this, I’ll press OK. As soon as I do this, the Color Picker opens up, where I can choose whatever color it is that I’d like to fill the apple in with. In this case, it’ll be a shade of red.

Changing Color
The benefit of creating a new fill layer like I did above is that it gives me flexibility. If I ever wanted to change the color of the apple, all I need to do is double-click on the color in the layer itself and the color picker will appear again.
From there, I can choose a new color and click OK.
Softening the Edges
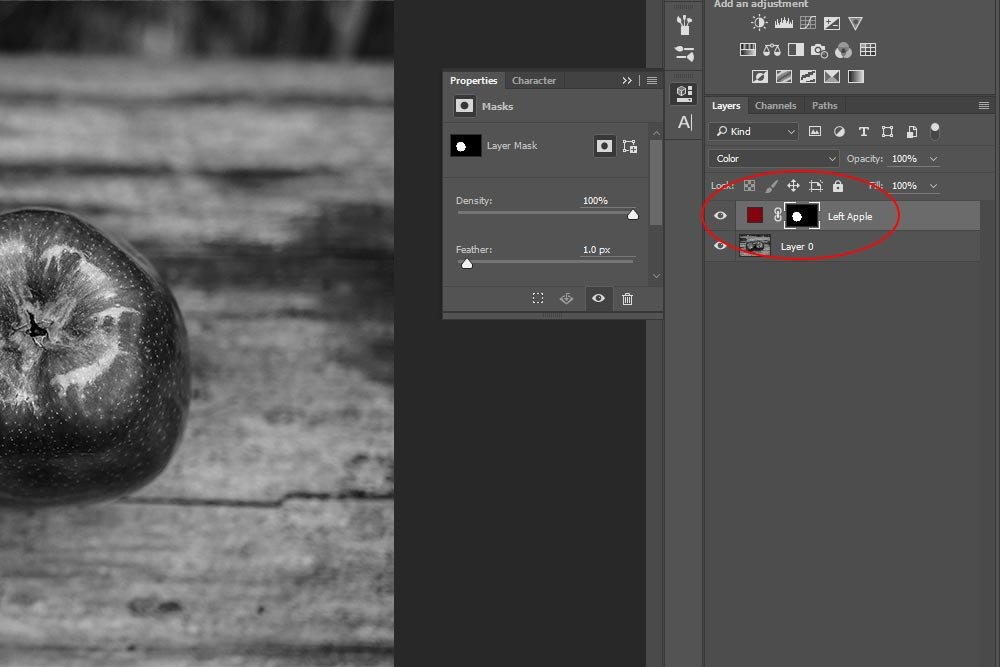
Earlier on, I smoothed and defined the edges of my selection. Since I filled the area with a blended color, I can see that the edges are a bit hard. I’d like to soften them up some. To do this, I’ll double-click on the mask in the layer, which will open the related Properties panel.
To soften the edges of the mask, I can push the Feather slider to the right. In this case, since I want to soften them by only a hair, I’ll just go to 1 pixel. Also, I want to remind you that since this is a mask, you can easily fix any edge anomalies by painting over parts of the photo with black or white with your paint brush. If you need a refresher on masks, please check out my previous post:
What are Layer Masks in Adobe Photoshop?
Adding a Gradient
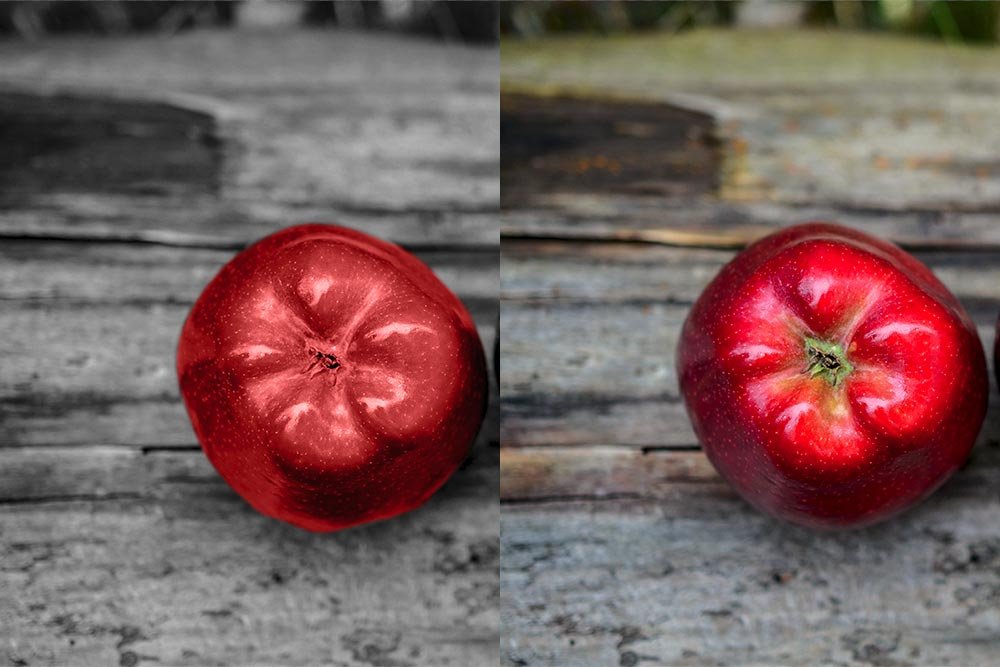
If you compare the original colored image with the desaturated and recolored image, you’ll see that the new “colorized” apple looks a bit weird. For starters, the lightness and darkness is off. Things also look very flat. I need to do a few things to correct this.
First, I’d like to darken the color of the apple so the outer ring matches the original better. I’ll double-click the color in the layer and change things in the Color Picker.

Now, I’ll duplicate the masked fill layer in the Layers panel by using the keyboard shortcut of Ctrl+J (Windows) or Command+J (Mac).

After that, I’ll change the color of the new layer so it’s lighter and a bit more yellow and orange, so it matches the interior area of the original apple. Then, since this new layer will be covering the entire layer beneath it, I’ll paint some of the top layer away with my black Brush Tool with a very soft edge. Basically, I’d like to reveal the darker outer edge of the apple with the lighter and more colorful interior.

If I wanted to go even further, I can duplicate the layer mask once again and change the color of this new layer to green. I can then paint everything black, except the core of the apple, which would leave me with this:

Even though it’s not perfect, I think you can see where I’m heading here. If I added a few adjustment layers that would increase the contrast and saturation, I’d have an almost perfectly colored apple. Not bad.

There’s a lot of creativity that can come from using the tools I described above. Not only can you fill the layer with solid color, but you can also use gradients and patterns. That’s when the fun really begins.
If you have any comments or questions about this post or anything else, please leave them in the comment section below. Thanks!
